1
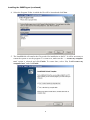
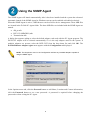
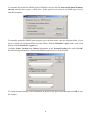
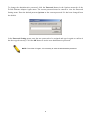
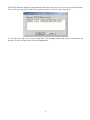
DGE-530T 32-bit Gigabit Network Adapter
SNMP Agent Manual
Use this guide to install and use the SNMP Agent on a PC equipped with the DGE-530T adapter.
Installing the SNMP Agent
Follow these steps to install the SNMP Agent on the PC on which the DGE-530T adapter and driver
had already been installed that is running Microsoft Windows 2000, Windows Server 2003, Windows
Server 2003 x64 Edition, Windows XP or XP 64bit operating system. The SNMP Agent includes MIB
files used for device management using a MIB browser.
1. Insert the CD-ROM included with the DGE-530T. The DGE-530T installer menu appears on
the desktop. Click Install SNMP Agent to launch the InstallShield® Wizard setup program.
1
Installing the SNMP Agent (continued)
2. Click Next to continue with the installation.
3. Select the location for the agent. The default location is in the Program File folder. To select a
different location, click Browse and find the preferred location or type a complete file name
and path in the Browse menu. To continue click Next.
2
Installing the SNMP Agent (continued)
4. Select the Program Folder in which the file will be located and click Next.
5. The InstallShield will transfer the files needed for installation to the PC. It will be necessary to
restart the system to use the program. To restart now, make sure the “… restart my computer
now” option is selected and click Finish. To restart later, select “No, I will restart my
computer later” and click Finish.
3
Using the SNMP Agent
The SNMP Agent will launch automatically after it has been installed and the system has rebooted.
Automatic launch of the SNMP Agent for Windows start up can be enabled or disabled as desired.
When the SNMP Agent is active, a MIB browser can be used for device management. These MIB files
are located in the D-Link PC Agent folder. The three MIB files are included with the SNMP Agent are
named:
• dlk_pc.mib
• RFC1213-MIB(DLK).mib
• Transmission.mib
A dialog box appears asking to select the default adapter card used with the PC Agent program. The
DGE-530T adapter will be selected automatically if it is the only adapter used for the system. If
multiple adapters are present, select the DGE-530T from the drop down list and click OK. The
D-Link Ethernet Adapter Agent menu appears with the Configuration tab displayed.
NOTE: The drop-down menu in the Configuration tab lists any installed adapters capable of
using the SNMP Agent.
In the Options menu tab, click the Personal button to add Name, Location and Contact information;
click the Password button to set a new password. A password is required before changing the
password or when exiting the PC Agent.
4
To automatically launch the SNMP Agent at Windows start up click the Auto launch when Windows
start up selection box to place a check there. If this option is not selected, the SNMP Agent can be
launched manually.
To manually launch the SNMP Agent program, go to the Start menu, open the Programs folder (if you
chose to install it in a different folder open that folder), find the D-Link PC Agent folder, open it and
double-click the D-Link PC Agent icon.
Configure Name, Location and Contact information in the Personal Setting menu and click OK.
Personal Setting information is shared with SNMP capable devices on the network.
To change Personal Setting, enter information as desired in the spaces provided and click OK to save
the changes.
5
To change the administrative password, click the Password button in the Options menu tab of the
D-Link Ethernet Adapter Agent menu. The current password must be entered to view the Password
Setting menu. Enter the default password private or the current password if it has been changed from
the default.
In the Password Setting menu, enter the new password to be assigned and type in again to confirm it
has been typed correctly. Click the OK button to set the new administrative password.
NOTE: To exit the PC Agent, it is necessary to enter the administrative password.
6
The D-Link Ethernet Adapter Agent maintains and allows the user to view an error log for the adapter.
To view the error log click on the Error Log tab to select it. The error log is displayed:
To save the error log to the system’s hard disk, click the Save button and choose a location at the
prompt. To delete all log entries click the Clear button.
7