1
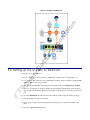
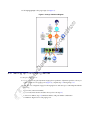
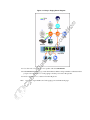
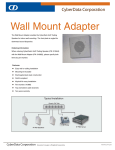
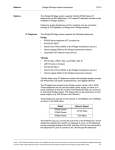
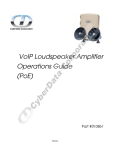
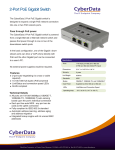
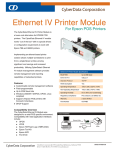
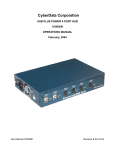
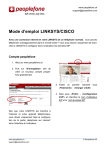
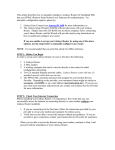
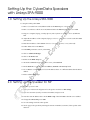
Setting Up the CyberData Speakers
with Linksys SPA-9000
1.0 Setting Up the Linksys SPA-9000
To set up the Linksys SPA-9000:
1.1 Run a Cat 5 cable from a POE/Ethernet hub to the Internet port on the SPA-9000.
1.2 Run a second Cat 5 cable from a PoE/Ethernet hub to the Ethernet port on the SPA-9000.
1.3 Plug in a computer/laptop, a Linksys phone, and a CyberData speaker to the PoE/Ethernet
hub.
1.4 Adjust the IP address of the computer/laptop so that it is on the same network as the SPA-9000
(192.168.0.X).
1.5 Enter the IP address of SPA-9000 in a browser (192.168.0.1/admin/voice/advanced).
1.6 Under Voice click on the SIP tab.
1.7 In the PBX parameters section, select WAN.
1.8 Click on submit all changes.
1.9 Click on the Router tab.
1.10 Click on the WAN Setup tab.
1.11 From the Connection Type drop-down menu, select Static IP.
1.12 In the Static IP section, fill out the IP address, Netmask and Gateway fields.
1.13 Go to Router => LAN Setup and set an IP address that is on a different subnet than the WAN
address.
1.14 Select submit all changes.
2.0 Setting up the Speaker for SIP
To set up the speaker for SIP:
2.1 Pull up the web-based configuration for the speaker and click on SIP settings.
2.2 Enter the username (usually an extension number) and password.
2.3 Enter the static IP address that is in the WAN setup of the SPA-9000 as the SIP server address.
2.4 Change the remote SIP port to 6060.
2.5 Save the settings and reboot the speaker.
2.6 Send a page to the speaker by entering the extension number (username) of the speaker at the
dial-tone.
Figure 1. Linksys—SIP Diagram
3.0 Setting up the Speaker for Multicast
To set up the speaker for Multicast:
3.1 If you are using CyberData speakers as MGROUPS, complete step 1.1 through step 1.13.
3.2 Go to Voice => SIP and make a note of the multicast address and port number for page groups
(default is 224.168.168.168, port 34567).
3.3 Go to the Speaker Setup on the webpage for the speaker and select MGROUPS and DHCP.
3.4 After the speaker reboots, get the IP address by activating the DTMF switch on the speaker to
announce the new IP address. Enter this new address in the browser to access the speaker's web
page.
3.5 Select the MGROUPS tab and enter the same multicast address and port number in step 3.1.
3.6 Save the settings and reboot the speaker.
3.7 Send a page to the speaker by dialing *96 on the Linksys phone and then selecting the dir
menu.
3.8 Select the corporate directory menu.
3.9 Select page groups as the page target (see Figure 2).
Figure 2. Linksys—Multicast Diagram
4.0 Setting up the Paging Server
To set up the paging server:
4.1 If you are connecting the CyberData Paging Server product to CyberData speakers so that you
can have more than one paging zone (Figure 3), complete step 1.1 through step 1.13.
4.2 Go to the web configuration page for the Paging Server and set it up as a SIP endpoint with the
following:
●
Username (extension number)
●
Password (make sure this matches what you have in step 2.2)
●
SIP server address (step 1.5).Multicast address and port number combination
●
DTMF two digit tone for each paging zone
Figure 3. Linksys—Paging Server Diagram
4.3 Go to the web configuration for the speaker and select MGROUPS.
4.4 In the MGROUPS Setup page, match the multicast address and port number combination that
you put in the Paging Server for the paging zone that you want for the speaker.
4.5 Dial the Paging Server's extension from the SIP phone.
Note
Enter a two-digit DTMF tone for the paging zone and initiate the page.