1
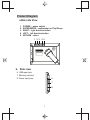
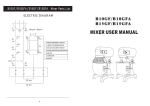
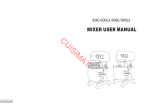
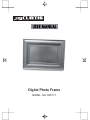
Digital Photo Frame
MODEL NO: DPF771
Contents
Safefy Precaution............................................. 1
Introduction....................................................... 2
Features........................................................... 2
Packaging Check List....................................... 2
Specifications.................................................... 2
Product Diagram............................................... 3
Using Your Frame............................................ 4
Technical Notes................................................ 5
Troubleshooting................................................ 5
AVANT TOUTE UTILISATION DE CE PRODUIT, VEUILLEZ LIRE,
COMPRENDRE ET SUIV RE CES INSTRUCTIONS. CONSERVEZ CE
MANUEL POUR TOUTE REFERENCE FUTURE. / BEFORE US ING
THIS PRODUCT, PLEASE READ, AND FOLLOW THESE
INSTRUCTIONS. SAVE THIS BOOKLET FOR FUTURE
REFERENCE. / LEA ESTAS INSTRUCCIONES Y SíGALAS ANTES DE
UTILIZAR ESTE RECEPTOR. GUARDE ESTE
LIBRITO PARA POSTERIORES CONSULTAS.
Warning Please turn off the power when inserting or removing
a memory card to avoid damaging the unit or the card.
Safety precaution
Warning: To reduce the risk of fire or electric shock, do not expose this
apparatus to rain or moisture.
(1) Use only the supplied 5V DC power adapter.is apparatus to rain
or moisture.
(2) Please read the instruction manual carefully and follow all
the requirements of safe operation to operate the device.
(3) Do not use this unit near water. Do not plac e over the unit any cont
(4) Do not install near any heat sources such as radiators, heat registers,
stoves, or other apparatus (Including amplifiers) that produce heat.
(5) Unplug this unit during lightning, storms or when not use for long.
(6) About Cleaning: Unplug the sy stem; use only wet cloth to clean.
Do not use liquid detergent or aerosol.
(7) Only use accessories specified by the manufacturer.
(8) Refer all servicing to qualified service per sonnel, servicing isrequired
when the unit has been damaged in any way, such as power supply
cord or plug is damaged, liquid has been spilled or objects have fallen
into the unit, exposed to moisture, does have fallen into the unit,
exposed to moisture, does not operate normally. Don't try to repair the
machine by yourself because of the danger of high voltage and
electric shock
1
Introduction
•
•
•
•
•
•
Your new digital picture frame lets you view digital pictures from
memory cards easily and quickly.
No computer or printer is needed.
Includes convenient slide show mode, which starts automatically
when the frame is turned on.
Supports many popular memory card types. os with family and
friends anywhere.
Easy to take with you to share phot
A step beyond the traditional photo frame. View tens or even
hundreds of digital photos without the need to pay for printing.
1. Features:
• 7 inch TFT LCD screen
• Supports Secure Digital (SD), Multimedia Card (MMC),
Memory Stick MS
• View the pictures from memory cards directly
• Resolution: 480x234 pixels
• Automatic start of slide show
• Wood Frame
• Supports USB
2. Packaging Check List
• Digital Picture Frame x1
• User Manual x1
• Power Adapter x1
• Warranty card x1
3. Specifications
Panel Size
Resolution
Brightness
Contrast
Viewing Angle
Response Time
Screen Size Mode
Picture Rotation
File Format Type
Max. Photo Size
Power Requirement
Power Consumption
Operating Temperature
Storage Temperature
7 inches
480 x 234
250 cd/m2
300
60/60/50/40 (CR=10)
20~30ms
16 :9
270 degrees
JPEG
10 megapixels
5V DC
5W
-20~65 degrees centigrade
30~75 degrees centigrade
2
Product Diagram
a.Bck side View
1ˊPOWER : power switch
2ˊENTER/MODE: confirmation or Play/Pause
3ˊRIGHT: right direction button
4ˊLEFT: left direction button
5ˊRETURN : return
1 2 3
4 5
b. Side view
6. USB input jack
7. Memory card slot
8. Power input jack
6
7
8
3
Using Your Digital Picture Frame
Install the stand for tabletop display, or mount to a wall. Connect the
AC adapter. Insert a memory card in the digital picture frame (with the
card’s electrical contacts toward the back of the unit).
the card’s electrical contac ts toward the back of the
This machine is close status after connecting to power, press “ POWER”
button to turn on the machine
PLS NOTE: Don’t leave photo frame in stand by status for too long time,
please unplug the frame.
This machine will play photo automatically after insert cards into card slot
When playing , press ENTER/MODE button long 3 seconds, the machine
will switch at three mode:
STANDARD MODE, DRAWING FULL SCREEN SIZE., ZOOM FULL
SCREEN SIZE .
Press ENTER/MODE to pause the photo playing ,
press LEFT/RIGHT button to select and browse photos,
press ENTER/MODE again to return to play status
Press RETURN button to return photo browse status,
press LEFT/RIGHT button to select photo,
press ENTER/MODE button to enter pause broswing status,
press ENTER/MODE again to enter auto-play mode
4
Technical Notes:
1. Your digital picture frame is a sophisticated electronic device.
Do not drop or subject the unit to jarring orstrong vibrations.
2. Avoid placing the digital photo frame in areas of high
humidity or where it might be subjected to splashing.
4. The LCD panel is made of plastic and can be easily damaged.
Avoid sharp objects.
5. Use only a soft dry cloth to clean the screen
Questions / Troubleshooting Guide
1.Question:What kind of photos does this device support?
Answer: The frame will display digital photos that are stored
in the JPEG format, which is the standard format for nearly
all digital cameras. Some cameras allow images to be stored
as TIFF or RAW files as well as JPEG. Only the JPEG format
is compatible with the frame. Photos of up to million pixels can
be displayed.
2.Question:What should I do if the system does not respond
when the power is turned on?
Answer: Please make sure the unit is properly connected to
a power source. Then turn it off, re-connect the power and
turn it on again.
3.Question:Why is the memory card not recognized?
Answer: The memory card might be inserted backwards or is
not pushed far enough. After inserting the memory card in the
right direction, if the still cannot be read, please turn off the unit
and then power it on again.
5