1
GAs
USE,
BARBECUE
CAR_A_N
i NSTALLATION
UAL
With Grill Lighting
I
_
D'U_ATION
ET
A veC- lnstructions
GAS
CuI
PARRi
D
el
Readal!
ido de
J
_
E
these
instructi°ns
.....
Laissez
andii_eeP!the'_.i_!_safe
ces
instructions
place
_i'utilisateur,
CONSOMMATEURIUTILISATEUR
Lisez
U & C 09/99
routes
ces
instructions
et conservez_le$
for ft_tu!_
_
-
- -- .... -:-_-,:_-. _
: :
dansun
lieu
sEJr pour
11/00 1142-0161BX
WARN|NG!
WARNING!
iF YOU
SMELL
FOR YOUR
GAS:
t. DO NOT Store or use gasoline
or
other flammable
vapors and liquids
in the vicinity of this or any other
appliance.
2. An LP. cylinder
not connected
for
use shall NOT be stored in the
vicinity of this or any other appliance:
3. NEVER use Liquid Propane (L.P.)
Gas in a unit designed
for Natural
Gas.
1. Shut off gas to the appliance.
2. Extinguish
any open flame.
3. Open Lid.
4. If odor continues,
immediately
call
your gas supplier or your fire
department.
5. NEVER use Natural
Gas in a unit
designed
for Liquid
Propane
SAFETY:
(L.P.) Gas.
_ WARNING:
I Combustion by-products produced whenusing this product containschemicals known to the State of California to cause
i
cancer, birth defects, or other reproductive harm:
..........................................................
...............
------ .....................
,--_ .... --
___AVERTISSEMENT
SI
vous
SENTEZ
UNE
A AVERTISSEMENT
!
ODEUR
DE GAZ
POUR
".
F
1, Fermez
r
I'appareil,
2. Eteignez
route flamme
nue.
3, Ouvrez le couvercle,
4. Si rodeur
persiste,
appelez
imm_diatement
la compagnie
du gaz
ou les sapeurs-pompiers.
5. NE JAMAIS
utiliser
du Gaz Naturel
darts un appareil
deStin_
a recevoir
du
Propane
(GPL).
:
a
n
a
i
S
le gaz au niveau
de
VOTRE
S_CURITE
!
"
1. NE PAS ranger
ou utiliser
d'essence
ou d,autre
produit
inflammable
a proximit_
de cet
appareil
ou de tout autre
appareil.
2.
Une bouteille
de GPL non reli_e
I'appareil
NE DOiT PAS _tre rang_e
&
&
prpximit_
de cet appareil
ou de tout
autre appareiL
3,
NE JAMAIS
utiliser
de Propan9
(GPL) dans un appareil
destin_
recevoir
du Gaz NatureL
"/iX-- AVERTISSEMENT:
"
Les sous.produitsde combustionobtenusdurantI'utilisatton_de ce produit contiennent des substanceschimiquesreconnues par i'E:tatde la
Californie commepouvant causer le cancer,des malformations cong_nitales, ou presenter d'autres dangers pour la reproduction.
/_ ADVERTENCIA
ADVERTENCIA
SI
E
USTED
HUELE
PAPA
GAS:
1. Cierre
el gas del aparato.
2. Apague
cualquier
llama expuesta
aire libre.
al
3. Abrir la tapa.
4. Si el olor continua,
Ilame
inmediatamente
al proveedor
del gas
o a los bomberos.
5. NO USAR nunca Gas Natural
en una
unidad
dise_ada
para Gas de Propano
Licuado.
SU SEGURIDAD:
1. No almacenar
ni usar gasolina
m
otros vapores
o liquidos
inflamables
cercano
a _ste o a cualquier
otro
aparato,
2. Un tanque
de Gas Propano
Licuado
no conectada
NO SE DEBE
almacenar
cerca de dste o de
cualquier
otro aparato,
3, NO USAR nunca
Gas de PropanoLicuado
en una unidad
dise_ada.para
Gas Natural.
.
/_ ADVERTENCIA:
Losderivados
delacombusti6n
generados
alusarestepr0duct0contienen
sustanclas
quimicas
c0nocidas
porel EstadodeCaliforniacom0
causantes
de cdncer,
defectos
enelnacimiento
u otrosdafiosal sistema
reproductor.
,_
pg. 2
U & C 1142-0161BX
TABLE
E
n
g
I
i
s
h
F
r
a
n
a
i
Safety Rules .............................................................................. 4
General Installation .................................................................. 6
Optional Electrical Attachments .............................................. 7
Fuel Connections other than Portable L.R Cylinders .......... 8
Portable L.R Gas Barbecue Cylinders .................................. 9
L.R Gas Supply Cylinder. ...................................................... 10
Hose and Regulator. .............................................................. 12
Transporting the Cylinder. ..................................................... 13
Filling and Purging Type 1 LR Gas Cylinders ................... .14
Purging & Evacuation Devices for Cylinders
with Type 1 Cylinder Valves .................................................. 15
Connecting Type 1 L.P. Gas Cylinders ................................ 16
Leak Testing ............................................................................ 17
Fixing a Fuel Leak .................................................................. 18
Start-Lip Check List ......................................... :....................... 19
Lighting Instructions ............................................................... 21
R#gles de s6curit_ ..................
:..................................
Installation G#n6rale ...................................................
Accessoires
Electriques Optionnels
..........................
Raccord de Combustible
autre que
Bouteilles de GPL portables ........................................
Bouteilles de GPL portables .......................................
Bouteilles de GPL .... :................................................
Tuyau et R#gulateur. ................................................
Transport de la bouteille de gaz ...............................
Remplissage
et Purge de Bouteilles
de GPL de Type 1........... :.........................................
Disposififs de Purge et d'Evacuation
pour les bouteilles avec valves de Type 1 ................
Connections
des bouteilles
4
6
7
8
9
10
12
13
14
15
s de GPL de Type 1.................................................
.... 16
Test d'Etanch#it# .......................................................
17
Comment rem6dier _ une Fuite ........................
........ 18
Liste de V6rifications ................................................
19
Instructions d'Allumage
.... ;.......................................
21
E
s
P
a
o
I
Reglas de Seguridad
........ ........ ;.... ., ......... i.. ............. 5
Instalaci6n General ................ ........ .............................
6
Accesorios
EI6ctricos Opcionales
..............................
7
Conexiones a Combustible
diferentes de las
Tanques de Gas de Propano Licuado Port_.tiles ........ 8
Tanquesde
Gas de Propano Licuado
para Parrilas Port_.til ............. . ....................................
9
Tanque de Suministro de Gas de Propano Licuado .... 10
Manguera y Regulador
..... ::;.:!. ................................
12
Transporte de la Botella ......... :................................
13
Relleno y Purga de los Tanques de Gas
de Propano Licuado del Tipo 1 .. .......... .................... 14
Dispositivosde
Purga y Evacuaci6n
con V_Jvulas de Botella del Tipo 1 ..........................
15
Conexi6n de Tanques de Gas Propano
Licuado T!po 1 ......._ ..................................................
16
Prueba para Comprobar
la Presencia de Fugas ..,.17
Reparaci6n de una Fuga de Combustible ................ 18
Lista de Comprobaci6n
Inicial .i ....................... _,..,...19
Instrucciones
de Encendido
................ :................... 21
U & C 1142-0161BX
Lighting Instructions for 300- 700 Series Grills ................. 22
Match Lighting ....................................................................... 23
Side Burner Lighting (selected models only) ....................... 24
Shutting off the Grill ................................................................. 25
General Use and Correct Bumer Flames ............................ 26
Grilling Tips and Hints ............................................................. 28
In Case of Grease Fire ........................................................... 30
Cooking Methods .................................................................... 31
Cleaning the Venturi ................................. ............. :................. 32
Cleaning and Maintenance .................. .................................. 34
Moving and Storage.., ............................................................. 36
Grill Igniter System .................................................................. 37
Trouble Shooting ..................................................................... 38
For Your Additional Safety. .............................................. . ......40
Instructions
d'allumage pour
les grils S6ries 300 - 700 ..........................................
22
Allumage Manuel .....................................................
:23
Allumage du bruleur lat6ral ......................................
24
(sur certains modules uniquement)
Eteindre le gril. ...........................................................
25
Utilisation g6n6rale et flammes
de bruleur correctes ..................................................
27
Petits trucs et conseils pour griller ............................
29
Si la graisse s'enflamme
..., ................... ................... 30
Modes de cuisson .....................................
: ................ 31
Nettoyage du venturi ................................................
33
Nettoyage et entretien ...... .............................
.r...... ....35
D#placement
et rangement
.................. .................... 36
Syst#me d'allumage
du gril ......................................
37
D_pannage ..... ..............................................
_...;. ....... 38
Pour votre s_curit_ ........ . ............... ............................
40
Instrucciones
de encendido para las Series
de parrillas 300 : 700..:;.:...:!:,..,L:..I
........ :...:.. ........... 22
Encendido por medio de cerillos .; ................ :i ........ 23
Encendido
por medio del quemador
(solo en modelos selectos)
......... ....... ........... ..... . ..... 24
Apagado de la parrilla ...................................
........... 25
Uso general y flamas de quemador ade.cuadas. ..... 27
Consejos y sugerencias
para cocinar a la parrilla,...29
En caso de que haya un fuego
Ocasionado
por la grasa .............................
. ............ 30
Metodos de coccion ......................................
. ........... 31
Limpieza del venturi ..................... .............................
33
Limpieza y mantenimiento
.........................................
35
Traslado y almacenamiento
......................................
36
Sistema de encendido de la parrilla ........... ............. 37
Soluci6n de problemas.
...........................................
39
Para su mayor seguridad ..............................
............ 40
pg. 3
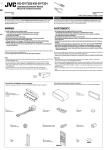
WARNING
Z_
=Riskof injury
=Riskof fire
_
=Riskof explosion
=Keepaway
, NEVERplace morethan 15pounds on a sidetable, a side
burneror a front table. DO NOTlean on shelyes. (Fig. 5)
• NEVERusecharcoalbriquettesor lighterfluidin a gasgrill. (Fig.6)
, Grill is hot when in use; to avoid burns, DONOT touchany hot
grill surface. Keepchildrenand pets away from hot grill. (Fig. 7)
• NEVER leavethe grill unattendedwhile it is in use. (Fig. 8)
• It is your responsibilityto assemble,install,operateand care
for your gas grill properly.
E
n
A, DANGER
g
• FOR OUTDOORUSEONLY. NEVERoperategrill in enclosed
areas,as this couldlead to gas accumulatingfrom a leak, causing
an explosionor a carbonmonoxidebuildupwhichcouldresult in
injuryor death.DO NOTuse in garages,breezeways,shedsor any
enclosedarea. (Fig. 1)
, NOT FORUSEBY CHILDREN.(Fig. 2)
• If these instructionsare ignored,a hazardousfire or explosion
could resultin physicalinjury,deathor propertydamage!
I
i
S
h
•" DO NOT movegrill whileit is lit. (Fig.3)
• Keep outdoorcookinggas appliancearea clearand freefrom
combustiblematerials,gasolineand
WARNING
otherflammablevapors and
liquids. (Fig. 4)
REGLES
DE
SECURITE
, DO NOT vent propane vaporfrom the cylinderbeforetaking it
to be refilled.
--J
AVERTISSEMENT
]
• NE JAMAISplacer plus de 15livres (6,8Kg) sur une desserte,
un brFJleur
lateralou une petite table. NEPASs'appuyersur les
z_
=Risquede blessure
Z_
=Risqued'incendie
_
=Risqued'explosion
_
=Ne pas mettre_ proximit6
DANGER•
•
6tag#res.(Fig.5)
5--
A UTILISERUNIQUEMENTAL'EXTERIEURNE JAMAISfaire
fonctionnerle gril dans des-lieuxferm#s,carceci pourraitentrainer
une accurnulationde monoxydede carbonepouvantprovoquant'des
blessuresgravesou mcfrtelles.NE PAS utiliserle barbecuedans un
garage,une remise,un abride jardin, ou tout lieu ferm6. (Fig. 1)
o C.ETAPPAREILNE DOlT PASETRE UTILISEPARDES
ENFANTS.
(Fig.2)
• Si vousignorezces instructions,un incendieou une explosion
entra_nantdesblessuresgraves,mortellesOUdes dommages
mat6rielspeuvent _treprovoquer..
AVERTISSEMENT
• NE PASd#placerlegrillorsqu'il estallum6. (Fig. 3)
• Nepas conserverde combustible,d'essenceou de produits
inflammablesdansla zoneczbest utilis6 le gril _ gaz. (Fig. 4)
pg. 4
• DO NOTusegasgrill indoorsor store anypropanecylinder(s)
indoors,includingin the garage,breezeways,shedsor enclosedareas.
, Undersome circumstances,propane may losethe distinctive
odor that was added. Keep theservice valveclosed and plugged
or capped(as recommendedby the manufacturer)when the
cylinderis not connectedto theappliance,including"empty"
cylinders.Otherstrong odors mayhide or maskthe odor of
propane. Colds,allergies,sinus congestion,and the useof
tobacco,alcoholor drugs may impairyour abilityto detectthe
odor of propane.
• NEJAMAISutiliserde briquettesde charbonni de liquidd'allumage
dansungril # gaz. (Fig.6)
, Eviter toute brCJlure;
NE PAS toucheraux surfaceschaudesdu
_ril. Tenirles enfantset les animauxdomestiquesloin du gril
Iorsqu'ilest chaud. (Fig. 7)
• NE JAMAIS laisser le gril sans surveillance Iorsqu'il est
allum#. (Fig. 8)
• Vous_tes responsabledu montage,de I'installation,de
I'utilisationet de rentretiencorrects de votregril _ gaz.
• NE PASd#chargerd'6manationsde propanede la bouteillede
gaz avant de la faire remplir.
• NEPASutiliserle gril _ gaz ni rangerde bouteillesde propane_ ....
I'intMeur,y comprisdansungarage.
• Danscertainescirconstances,
il se peutquele propaneperde
I'odeurdistinctivequi lui a 6t6 ajout#e.Maintenezla valved'entretien
fe_6e etcapuchonn_e(suivantlesrecommandations
du fabricant)-_"
Iorsquela bouteillen'estpasreli6e_ I'appareil,y comprispourles _ :
• bouteillesM'des; II sepeutque rOdeurdupropanesoit dissimul_e
_
d'autresodeursfortes. Unrhume,une allergie,unesinusiteou
_
I'_'lisationd'alcqo.
I, de tabacou de m6dicaments
peuvent_a!ement
diminuervotrecapacit6_ d#tecterI'odeurdepropane....
U & C 1142-0161
[
REGLAS
DE
SEGUR!DAD
]
_=
Riesgode heridas
_
= Riesgode incendio
_=
Riesgode explosi6n
_
= iantener apartado
PELIGRO
. SOLOPARASU USOENEXTERIORES
NOusarNUNCAla parrillaen zonas_rradas, ya queesto podrfa
provocarque el gasde una fugaseacumularacausandounaexplosi6no
concentradones
de mon6xidode carbonoIoque podrfaprovocarheridas
e inclusola muerte.NOusarencochera,pasillosde ventilad6n,
cobertizoso en cualquierzonacerrada.(Fig.1).
• NODEJARNUNCAQUESEA USADOPORNINOS.(Fig.2)
• Si se ignoran estas instrucciones,un fuegopeligrosoo una
explosi6npodr[anprovocarlesiones,la muerteo dafios a la
propiedad.
/!k ADVERTENCIA
• NO mover la parrilla mientrasest_ encendida.(Fig. 3)
, Mantenerla zona a[ aire libre en donde se utilice el aparato de
cocci6na gas libre de materialescombustibles,gasolinau otros
vaporeso Ifquidosinflamables.(Fig. 4)
iik ADVERTENCIA
, NocolocarNUNCAm_s de 15 libras(6,8Kg)en unamesalateral,un
quemadorlateralo una mesafrontal.NO inclinarse
sobreestanten'as..
(Fig5).
• NOutilizarnuncapastillasar{ificiales
de carl:_no liquidode
encendedores
de cigarrillosen una parrillade gas. (Rg.6)
• La parfillasecalientadurantesuuso;paraevita"quemaduras,
NOtocar
ningunasuperficiede la parfillaqueest_caliente.Mantenera losnifiosy a
losanimalesdom6sticos
apartadosde la parrillacaliente.
(Rg.7)
, NUNCAdejedesatendida
la parfillamientz_as
la est_usando.(F_.8)
, Essu responsabilidad
montar,instalar,
operary cuidarsuparfillade gas
de unamaneraad_uada.
• NOdejarescaparel vaporde propanode el tanqueantesde Ilevarloa
cargarde nuevo.
, NO usarla parrillade gasen interioresni almacenar
ninguntanquede
propanoeninteriores,incluyendolacochera,pasillosdeventilad6n,
cobertizoso en cualquierzonacerrada.
• Bajoalgunascircunstancias
el propanopuedeperderel olorpeculiar
quese le ha afiadido.Mantenerlav_lvulade servidocerraday tapadao
consucubiertaen posid6n(deacuerdoconlasrecomendaciones
del
fabricante)cuandoel tanqueno est6conectadaal aparato,incluyendo
tanques"vacfas".Otrosoloresfuertespuedenocultar8 enmascarar
el
olordel propano.Loscatarros,alergias,lascongestiones
causadaspor
sinositisy el usode tabaco,alcoholo drogaspuedenafectar
negativamente
sucapacidadde detectarel olordelpropano.
i
()
U & C 1142-0161
pg. 5
GENERAL
UNSTALLATIO J
_
......
_
Clear
D_gager
Despejado
• Installationmustconformwith localcodesor,in theabsenceof localcodes,.
witheithertheNationalFuelGasCode,ANSIZ223.1(USA),CAN/CGA-B149.1,
NaturalGasInstallationCodeor CAN/CGA-B149.2,
PropaneInstallation
Code(Canada).
Tochecklocalcodes,seeyourlocalLP. gasdealeror naturalgascompanylisted
in theYellowPagesfor recommended
installationproceduresand regulations.
24"
(60cm)
A WARNING
REPRESENTATIVE
24"
Thisapplianceisnotto be installedin or on a recreational
vehicleand/orboat.
Follow these safety rules before each use:
1. Alwaysmaintaina minimumclearanceof 24 inchesor 60 cm fromall
sidesofgrillto anycombustibleconstruction.(Fig.9)
2. Neverlocategrillunderan unprotected
combustiblematerialor overhang
whichisconnectedtoa building.(Fig.9a)
3. Do notobstructtheflowof combustionandventilationair.
4. Keeptheventilationopening(s)
of theCylinderenclosurefreeandclear
fromdebris.
5. Grillshouldbe leveland notfaringdirectlyintowind.
ILLUSTRATION
ILLUSTRATION REPRESENTATIVE
ILUSTRACION REPRESENTATIVA
(60cm)
A
WARN I NG Keepany electricalsupplycord away
from any heatedsurface. Duringassemblyof grill and when
attachingor replacingthe L.P. gas cylinder,insure thatthe gas
supplyhoseis free of kinksand is at least3" away from hot
surfacessuch as the grill casting.
.....................................................
t
INSTALLAWON
•. ..... _--. .....
GENERALE
r
a
n
AVERTISSEMENT
Cetappareilne doitpas _treinstall_ dansun camping-caret/ou sur
un bateau.
• Suivez ces regles de securit_
avant chaque
utilisation:
1. Toujoursmaintenirun espacede 24 pouces(60 cm) de chaque
......................
E
S
P
o
I
L.__ .................................
-__- __...............................
c&t_du gril,entrecelui-ciet touteconstruction
combustible.(Fig.9)
2. Nejamais placer le gril sous un plafondcombustiblenon _
prot#g6. (Fig. 9a)
3. Nepas obstruerla circulationde/'air de combustionet de
ventilation.
_.
4. Assurez-vousque les ouverturesde ventilationde rabri de la
bouteillede gaz ne sont pas bouch#esni obstru6espar des d#bris.
5. Le gril dolt #tre _ niveauet ne doi!pas fairedirecteme#tface
au vent....
.
A VERTI S SEMEN
T
Maintenirtout cordon
d'alimentation
#lectrique#loign#des surfaceschaudes.Durantle
montagedu gill, et Iorsquevousbranchezou remplacezunebouteille
de gaz,assurez-vous
que le tuyaud_rriv_ede gazn'estpas entoftill#
et se ITouve
_ plus de 3 pouces(7,5cm)dessurfaces_haudestelles
que lespi_es de fondefiedugill.
L_"..............................
L .................
destinadaal combustible. (Fig. 9) ......,
2. Nocolocar nuncala parrilla bajo un materialcombustiblesin
• La instalaci6n
debecumplirconlasreglamentadones
localeso en ausencia protecci6no el cobertizode un edificio.(Fig. 9a)
3. No obstruirel flujo de combustibleni el aire de ventilaci6n. ;
de dichasreglamentaciones
locales,
deber_,cumplirconya seala "National
4. Mantenerla aperturao aperturasde ventilaci6ndel recintoi::le
FuelGasCode,ANSIZ223.1(USA),CAN/CGA-B149.1,
NaturalGas
"
Installation
Codeo la CAN/CGA-B149.2,
PropaneInstallation
Code(Canada.)". el tanquelibres y limpios'deescombros.
5.
La
parri!ladebe
estar
niveladay
no
debe
encarardirectamente
Parade comprobarlasreglamentaciones
Iocal_es,
consultea sudistribuidorde
al viento.
Gasde PropanoUcuadolocalo a la oompaS[ade gasnaturalque aparecen
enlas P_.g=
hasAmarillas,en estoslugaresoodr&averiguarcualessonlos
.. _..
procedimientos
y lasreglamentaciones
de instalaci6n
recomendadas.
/'iX ADVERTENCIA
Mantenercu_quiercablede
[ INSTALACIO
n
)
• L'installation
dolt#treconformeauxr6glementations
locales
ou,enleur
absence,au "NationalFuelGasCode,ANSI7_223.1
(USA),CAN/CGAB149.1",au "NaturalGasInstallationCodeou au CAN!CGA-B149.2,
PropaneInstallationCode(Canada)':
Pourv6rifierquellessontlesr_lementationslocales,etpour obtenirdes
recommandations
concemantI_ procures etr6glementations
relatives
I'installatbn,consultezvotrerevendebr
de GPLlocalou la compagniedugaz
list#(e)danslespagesiaun_.
F
a
|
.......
N GENERAL
]
ADVERTENCIA
Este aparaton_ se debe instalaren un vehiculoo embarcaci6nde
car&cterrecreativo.
• Respetar estos reglamentos
de seguridad
antes de carla uso:
1. MantenersiempreunaseparaciGnminimade 24 pulgadaso de
60 cm de todos los lados de la parrilla concualquierconstrucci6n
pg. 6
conexi6nel_trica apartadodecualquiersuperficiec_iente.Duranteel
montajede la paifillay cuandose _necte o se_nbie el tanquede
Gasde PropanoLicuado,asegSr..ese
de que la manguera
de
alimentad6nde gasno est,.torciday queseencuentraal menosa
3 pulgadas(7,5cm)de lassupenldescatientescomoesel casode la
piezade hierrocoladoquefotmala parrilla.
. '.
U & C 1142-0161
TIONAL
ELeCTRiCAL
ATTAC#4 ,_q - NTS
When usingan electricattachmentwith grill, followspecification
statementsaccompanyingthe accessory.
IMPORTANT: If usingan externalelectricalsource,the installed
E appliancemustbe electricallygroundedaccordingto localcodes or,
rl in the absenceof localcodes,with the NationalElectricalCode,
ANSI/NFPA70 or the CanadianElectricalCode CSAC22.1.
g
I
i
r
!
s
h
i
!
WARNING
ElectricalGroundinginstructions: An applianceequippedwith a
three-prong(grounding)
plugfor your protectionagainst shock
hazard and MUSTbe pluggeddirectly into a properlygrounded
three-prongreceptacle.DO NOT remove groundingprong from
athree-prong plug.
ACCESSOIRES
F
r
a
/1
ELECTRIQUES
Lors de I'utilisationd'un accessoire#lectriqueavec le gril, suivez
les instructionsfoumiesavec I'accessoire.
IMPORTANT:Si vous utilisezune source d'alimentation#lectrique
exteme,rappareil install#dolt #tre tell# _ la terreconform#mentaux
r#glementationslocalesou, en leur absence,au "NationalElectrical
Code,ANSI/NFPA70 ou au CanadianElectricalCode CSAC22.1".
Instructionsde Mise _ la Terre: Pour votreprotection,et afin
d'#vitertout choc #lectrique,utilisezuniquementun appareil
#quip# d'uneprise de terr'e(fiche _ trois lames). Celle-ci DOlT
#tre branch#edirectementdansune prise correctementreli#e _ .
la terre. NE PAS retirerla lamede terred'une fiche _ trois lames.
[ CONEXiONES ELECTRICAS
ADVERTENClA
Instruccionesde C0nexi6na lierra: El aparatoest,. equipado
con un enchufeo conectorde tres dientes (conexi6na tierra)
para su protecci6nen contra de electrocuciones,dste SE
DEBEconectardirectamenteen un recept_.culode tres dientes
conectadoa tierrade una maneraadecuada. No extraer el
dientede conexi6na tierradel enchufede tres terminales.
}
Les cordonsd'alimentationlongset d#tachables,ou les rallonges,
doivent#treutilis#(e)savecprudence. La valeurnominaledu cordon
#lectriqueou de la rallongedolt #treau moins#gale_ Cellestipul#esur
I'appareil. Si celui-cido##trereli# # la terre,utilisezuniquementun
cordon_ trois ills. Utilisezdes rallongesd'extMeurdontla surfaceest
marqu#edessuffixes"W-A"et muniesd'une#tiquetteindiquant"Peut
#tre utilis#en extMeur". Maintenirles raccordements
d'unerallonge
loin de reau et du sol Arrangezle cordonde maniere_ ce qu'il ne
pendepas du plan de travail,que des enfantsne puissentpas tirer
dessusetqu'il n'yaitaucun risquede tr#bucherdessus....
Nejamais nettoyerd'appareil#lectriqueavec de I'eauou des produits
liquidesnettoyants. Rangertout appareil#lectrique_ I'intMeur et hors
de port#edes enfantsIorsqu'iln'est pasutilis#. PRENDREGARDE
ce que le cordonne soit en contactavec aucunesurfacechaude;
I'isolantrisqueraitde fondre.
oPCiONALES
CuandouseunaConexi6nel_ctricaconla parrilla,respetar las
especificacionesque se incluyencon el accesorio.
E IMPORTANTE: Si se usa una fuente de'electricidadexterna,el
s aparatoinstaladodebe estar conectadoa tierra de acuerdocon las
P reglamentacioneslocaleso en ausenciade _stas, conel "National
ElectricalCode,ANSI/NFPA70 o el CanadianElectricalCode CSA
a C22.1":
.......
-.......
U&Cl142-0161
Longerdetachablepower-supplycords or extensioncords mustbe
usedwith care. The markedelectricalratingof thecord set orextension
cord mustbe at least as greatasthe electricalratingofthe appliance. If
the applianceisofthe groundedtype,theextensioncordshouldbe a
grounding-type3 wire cord. Useoutdoorextensioncordswith a surface
markedwith suffix letters"W-A"andwith a tag stating"Suitablefor Use
with OutdoorAppliances".Keep theconnectionto an extensioncord
away fromwater and offtheground. Arrangethecordso that itwill not
drape overthe countertopor tabletop whereit canbe Pulledon by
childrenor trippedoverunintentionally.
Neverclean anyelectricalproductwith water or cleaningfluids. Store
electricalproductsindoorsand outof reachof childrenwhennot in use.
DONOT allowcordto touchany hotsurfaceswhichcouldmelt
insulation.
OPTUONNELS
AVERTISSEMENT
s
}
]
Loscablesde alimentaci6nel_ctricao lasextensionesrodslargosse '
debenusarcon cuidado. El r_gimennominalel_ctricomarcadodel
juego del cable de alimentaci6no de la extensiondebeser al menostan
alto comoel r_gimennom[nal.el_ctrico
del aparato..Si el aparatoesdel
tipo de conexi6na tierra,el cablede extensi6ndebeser del tipode
conexi6na tierra conun cabletrifilar. El usode cablesde extensi6ncon
una superficiemarcadaconlas letras"W-A"con unaetiquetaque
indique"Adecuadopara AparatosEl_ctricospara el Exterior". Mantener
la conexiTncon un cablede extensi6napartadadel agua y lejos del
suelo. Disponerel cablede alimentaci6ndemaneraque no caigapor
encimade la partesuperiordel mostradoro la partesuperiorde la
mesa,en donde puedeser tiradopor nidoso en dondepuedeser causa
de tropiezosaccidentales.
No limpiarnuncaningSnProductoel_ctricocon aguao liquidsde
limpieza.AlmacenarproductoselTctricosen el interiory fueradel
alcancede niSoscuandono se utilicen. NOpermitirque el cable de
alimentaciTntoqueningunasuperficiecalienteque puedafundirel
aislamiento.
)
pg. 7
CONNECT{O_S
OTHER
THAN
PORTABLE
L,P.
CYLINDER-_
/_ WARNING
•
This noticeappliesto L.P.Gas (Propane)Grillsand only
where propanegasis to be pipedto the grill.
Naturalgas can.o.Bl.ybe used with grillswhichcome
fromthe factory alreadyequippedfor usewith naturalgas.
E
n
,
g
s madeby a qualifiedinstalleror a licensedplumber. The gas supply
line mustnot be installedby the consumer.
h The maximuminletsupplypressureis 13.0"w.c. for propanegas
and 10.5"w.c.for naturalgas.
The specifiedsupplypressureis 11.0"w.c. for propanegasand
7.0"w.c. for naturalgas.
be
THE PIPINGSYSTEMMUSTBE INSTALLEDIN ACCORDANCEWITHNATIONAL
1. The applianceand it's indMdua shut-offvalvemustbe
disconnectedfrom thegas supplypiping systemduring anypressure'
testingof that systemat test pressuresin excessof 1/2psi (3.5 kPa).
2. Theappliancemust be isolatedfrom the gassupplypiping system
by closing it's individualmanualshut-offvalve duringany pressure •
testingof the gas supply pipingsystemat test pressuresequalto or less
than 1/2 psi (3.5kPa).
DE GPL PORTABLES
COMBUSTIBLE
AUTRE
/_ ATTENTION
F
Grillsdesignedto use L.P.Gas (Propane)_
convenedto use naturalgas.
FUEL GAS CODE INTHE USA, INCLUDING:
I
If the applianceis for connectiontootherthanan LP. cylinder
i (consulttheAssemblyInstructions)the gasconnectionsmustbe
BOUTE]LLES
RACCORD
DE
,
QUE
'!
/_ MISE
Cette
consignene s'applique
qu'auxbarbecues_ gal.propane
qui
serontpacc_
_ unetuy.autede
cralirnentation
engazpropane.
=3 • Seuls les barbecues sp_cialemerit fabriqu_s pour
fonctionner au gaznaturel peuvent _tre ailment,s au
n
_=._aznaturel.
.
r
EN GARDE
. Les barbecues conguspour fonctionner augaz propane
ne peuvent
_tre convertispour _tre alimentds au
_az natureL
LE SYSTEME
DE TUYAUTERIE DOlT _"TRE INSTALLS:CONFORME:MENT AU
NATIONALFUEL GAS CODE AUX USA, Y COMPRIS:
Si vousne souhaitezpas relier I'appareil_ une bouteillede GPL (voir
les Instructionsde Montage),les raccordementsde gaz doivent&tre
1. L'appareil
et son robinetd'arr_tdoivent_treddconnect6sdu
i effectu_spar un installateurqualifi_ou par un plombieragr_6.La
syst_mede tuyauteried'alimentationen gaz durantles testsde
S conduited'arrivdede gaz ne doltpas _treinstall6epar I'utilisateur.:
pressiondu syst_me_ despressionsd'essaisup6rieures_ 1/2psi (3,5
La pressiond'alimentationmaximaleest de 13poucesde colonne
kPa).
-. ......
. -d'eaupour le propane etde 10,5pouces de colonned'eaupour le gaz
2. L'appareildolt _tre bold du syst_mede tuyauieried'alimentation
natureL
en gaz gracea la fermeturede son robinetd'arr_tmanueldurantles
Lapressiond'alimentation
sp_e est de 11poucesde colonned'eau
tests depress_ondu syst_me_ des pressionsd'essaiinferieuresou.
pourlepropaneet de 7 poucesde colonned'eaupourle gaznaturel.
•dgales_ 1/2psi (3,5 kPa).
a
.........................
- ......................
CONEXIONES
A COMBUSTIBLE
TANQUES
DE PROPANO
-"- . =._.................................................
DIFERENTESA
LAS
LICUADO
PORTATILES
/_ PRECAUCION
•
E
S
P
Estaadvertenciaaplicaa las Parrillasde Gas Propano
Licuadoy solo pordondeel gas propanova a ser
• conducidoa la parrilla.
. El gasnaturalpuedeser=sglame,.o._ usadocon pard,as
quevienenequipadasdefabricaparael usocon gasnatural.
L.....
DE LOS
!
/_ ADVERTENClA
}
•
.
Las parrillas disefiadas Para el uso con Gas Propano
Licuado.no. pueden ser adaptadas para el uso con gas|
natural....
I
a
ELSlSTEMA
DETUBERIAS
SEDEBE
DEINSTALAR
DEACUERDO
CON
LOEXPUESTO
F_.N
EL"NATIONAL
FUELGASCODE"_NTHEE.U.A.,INCLUYENDO:-; -..
-.
Si el aparatoes para realizaruna conexiSndiferentea la de un
tanquede Gas de PropanoLicuado(consultarlas Instruccionesde
O Montaje)lasconexionesde gas debenser realizadaspor un instalador
I capacitadoo un plomerocon la licenciaadecuada.
El consumidorno debe instalarla linea de suministrode gas.
La presi6nde suministrode entradam_ima esde 13 pulgadas,w.c
para el gas propanoy de 10,5pulgadasw.cpara el gas natural.
La presi6nde suministroespecificadaes 11pulgadasw.c. para Gas
propanoy 7 pulgadasw.c. para GasNatural.
1. El aparatoy su v,_lvulade pasoindividualse debendesconectardel
sistemade tuberiasde la alimentaci6nde gas durantecualquierpnJeba
de presi6nde ese sistema,bajo presionesde pruebasiJperioresa 1/2psi
(Ipc)(3,5 kPa)..
_, ' ::
2. El aparatoel_ctricodebe estaraisladodel sistemade tuberias del
suministrode gas, por mediode cerrar su v_lvulamanualindividualde
pasodurantecualquierpruebade presi6ndel sistemade tuberias del
suministrode gas a presionesigualeso inferioresa 1/2psi (Ipc) (3,5kPa).
fi
pg. 8
U & C 1142-0161A
Liquefied Petroleum gas, (abbreviatedL.P.gas or propane)is highly
flammable. It becomesliquidwhenstored underhigh pressureinsidea
cylinderand vaporizeswhen released. L.P.gas is heavierthanair and
tendsto collectin low areas. It is importantthat thereare no leaking
connectionson your gas grill that couldcausea fire or explosion. (See
"LEAKTESTING",Pg. 17)
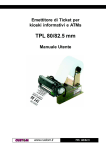
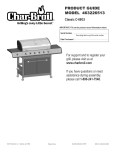
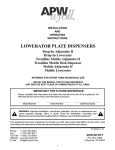
A
PortableLP gas grills requirea fueldeliverysystemwhich is
comprisedof a valve [A], a hose[B], a regulator[C]with vent hole [G],
an L.P.gas supplycylinder[D], a Type 1 couplingnut [E] and a Type 1
cylindervalve [F]. (Fig. 10)
C
AWARNING
Your new barbecue grillis equippedwith a Type 1 coupling
nut [E]. DO NOTattemptto connectto any otherL.P.
cylindernot equippedwitha matingType 1 cylindervalve
[F]. This grill is not to be usedwith any othercylinder
connectiondevice.
BGUTEILLES
DE GPL
PORTABLES
G
]
Le gaz de petrole Iiqu_fi6, (ou encoreGPL,ou Propane)est un gaz
AVERTISSEMENT
F tr_s inflammable. 11se liqu6fieIorsqu'ilest conserv_sous haute
r! pressionclansune bouteille,et se vaporiseIorsqu'ilest fib_r6. Le GPL
a est plus Iourdque I'airet tend_ s'accumulerjusteau-dessusdu sol. I!
I1' est in_portantque les raccordementsde votregril _ gaz soient exempts
de toute fuite,car ceci [_ourrait
provoquerun incendieou une explosion.
g (Voir "TESTD'ETANCHEITE",Pg. 17)
a
Lesgrils _ gaz au GPLportablen_cessitentun syst_me
i
d'approvisionnement
en combustibleconstitu_d'une valve[A], d'un
s
tuyaq[B], d'un r_gulateur[C] avec un troud'a6ration[G], unebouteille
de GPL[D], un 6crou de raccordde Type 1[E] et une valve
d'accouplementde Type1 [F]. (Fig. 10)
[TANQUES
E
DE GAS DE PROPANe
LICUADO
El Gas de Petrbleo Licuado es altamenteinflamable. Se convierte
Sen liquidocuandose almacenabajo alta presi6ndentrode un tanquey
se vaporizacuandose libera. El Gas PropaneLicuadoes m&spesado
P que el aire y tiendea acumularseen las zonas bajas. Es importante
a que no hayaconexionesconfugas en su parrillade gas, ya que podrian
I_ provocaruna explosi6n. (Consultar"PRUEBAPARACOMPROBARLA
O PRESENCIADE FUGAS",p_.gina17)
I
Votrenouveau barbecue est _quip_ d'un_crou de raccord
de Type 1 [E]. NE PAStenter de la raccorder_ une autre
bouteille de GPL non _quip_e d'une valve d'accouplement
de Type 1 [I7. Cegall ne doit pas _tre utilfs_ ave€un aufre
dispositif de raccordement.
PARA PARRILAS
PORTAT|LESJ
ADVERTENCIA
Su nuevaparrillade parrilaestAequipadacon una tuerca de
acoplamientodel Tipo 1 [_, NO intenterealizaruna
conexi6na cualquierotrotanquede Gasde Propano
Licuadoque no est_ equipada con unav_lvulade tanquede
Tipo 1 que haga juegocon la conexi6n[F]. Esta parrilla no
se debe utilizarcon ning_notro dispositivode conexi6nde
tanque.
Las Pariillasde Gas de PropaneLicuadonecesitanun sistemade
alimentaci6nde combustible,que est,. compuestoper una v_.lvula[A],
una manguera[B], regulador[C] con un orificiode ventilaci6n[G], un
tanquede alimentaci6nde Gas PropaneLicuado[D], tuerca de
acoplamientoTipo 1 [E] y unav._lvulade tanqueTipo 1 [F]. (Fig. 10)
U & C 1142-0161
;pg. 9
P.
suP L o" iNDERJ
A DANGER
, DONOT insert any foreignobjectsintothe valve outlet. You
maydamagethe back-check.A damagedback-checkcan
causea leak, which couldresultin explosion,fire, severe
personalinjuryor death.
WARNING
• Cylindersmust be storedoutdoorsout of the reachof children
and mustnot be storedin a building,garageor any other
enclosedarea. (Fig. 11)
CYLINDERSPECIFICATIONS
• Any L.P.gas supplycylinderusedwith this grill mustbe
approximately12 inchesdiameterand 18 incheshigh. Themaximum
fuel capacityis 80% and is approximately20 poundsof propane.
, The maximumweight of a properlyfilled cylinderwill be
approximately38 pounds(47.7Ibs.nominalwater capacity).
--• The L.P.cylindermust havea shut-offvalveterminatingin a Type
1 L.P.gas cylindervalve outlet. (Seeitem [F], Fig. 10,pg. 9).
BOUTEILLES
DE
L
DANGER
• NE PASins6rerd'objet_trangerdansI'ofificede sortie de la
valve.Vousrisquefiezd'endommagerle dispositifde nonretour.Un dispositifde non-retourendommag6peut provoquer
une fuite,qui pOurraitavoircommeconsequence
s une
explosion,un incendie,ou des blessuresgraves ou mortelles.
A AVERTISSEMENT
• Les bouteillesde gaz doivent_treconserv_es_ I'ext6rieur
et
horsde port_edes enfants.Ellesne doiventpas _tre rang_es
dans un garage,ni tout autreb_timentou lieu clos.(Fig. 11)
SPECIFICATIONSDE !_4 BOUTEILLE DE GAZ
• Lesbouteillesde GPL utilis_esavecce gril doiventfaire environ
12pouces (30 cm) de diam_treet 18pouces(45 cm) de haut. La
capacit6maximalede combustibleest de 80%et environ20 livres
(9 Kg) de propane.
• Le poids maximald'une bouteillecorrectementrempliesera
d'environ38 livres (17,2Kg) (47,71bsde capacit6d'eau nominale).
• La bouteillede GPL doitposs_derun robinetd'arr_ttermin6par
une sortiede valve de Type !. (Voir article[F], Fig.10, pg. 9) ,
[T,.OOE
OO
S,,,,,,.,ST,O
O,,S
OO
P,OP..O
,.,CU.OO
!
I
P
a
fi
0
I
"
•
i
E
S
.
PELIGRO
, NO inserte.ningSn
objetoextrafioen la salidade la v_lvula.
Puededa_arel dispositivode protecci6nde posiblesretrocesos.
Undispositivode protecci6nde retrocesosen malestadopuede
provocarfugas,io que puedeprovocaruna explosi6n,fuego,
lesionespersonalesgraveso inclusola muerte.
ADVERTENCIA
, Lostanquesse deben almacenaren el exteriorfueradel
alcancede los niSos,y no se debenalmacenaren un edificio,
cocherao cualquierotra zonacerrada.(Fig. 11)
pg. 10
ESPECIFICACIONES
TECNICASDELTANQUE
• Cualquiertanquede suministro
de Gasde PropanoLicuadoque seuse.
conestaparrilladebetenerun di_etro aproximado
de 12 pulgadas
(30cm)y unaalturade 18pulgadas(45cm).Lacapacidadm_ma de
combustibleesde180%y esde aproximadamente
20libras(9 Kg)de
propano.
• El pesom_imo de un tanqueque se hayaIlenado
adecuadamenteser_ de aproximadamente38 libras(17,2Kg)
(capacidadde agua nominalde 47,7 libros).
• El tanquede Gas de PropanoLicuadodebeposeeruna v&lvulade
pasoque termineen una salidade v&lvulade tanquede Gas de
PropanoLicuado(C0nsultarel articulo[F], Fig. 10,p_.gina9).
U & C 1142-0161
• A Type 1 compatiblecylinderwith a Type 1 cylindervalve hasa
back-checkvalve which doesnot permitgas flow,untila positiveseal
has beenobtained.
E • The cylindermustbe arrangedfor vapor withdrawal. It mustalso
includea collar to protectthe cylindervalve. A safety reliefdevice
11
havingdirectcommunicationwith the vapor spaceof cylindermustbe
g provided. This will expel high pressuregas if the cylinderis over
I filledor overheatedwhich couldresultin fire or explosion.
i • All L.P.gascylindersusedwith this applianceshallbe constructed
and markedin accordancewith the specificationsfor L.E gas
S cylindersof the U. S. Departmentof Transportation(DOT)or the
h NationalStandardof Canada,CAN/CSA-B33£,Cylinders,Spheres
and Tubesfor Transportationof DangerousGoods;and Commission,
F
r
a
o
a
i
$
• Unebouteillecompatiblede Type1 avec un robinetde Type1 est
dot6ed'une valvede dispositifde non-retourne permettantpas
I'_coulementdu gaz avant qu'une6tanch#it#positiveait _t6r#alis_e.
, La bouteilledolt #tre arrang#ede mani#re_ permettrer6vacuation
des vapeurs.Elle dolt 6galementposs#derun collierservant
prot#gerla valve.Undispositifde d6chargede sOret#communiquant
directementavec I'espacede vapeurde la bouteilledolt _galernent
_trepresent.Celui-cipermettrad'expulserle gaz_ hautepressionsi
la bouteilleest tropremplieou surchauff#e(cequi risqueraitde
provoquerune explosionou un incendie).
, Touteslesbouteillesde GPL utilis6esavec cet appareildoivent
#tre fabriqu#eset marqu6esconform6mentauxsp6cifications
relativesaux bouteillesde GPLpubli#espar le "U.S. Departmentof
Transportation(DQT) ou le NationalStandardof Canada,CAN/CSAB339,Cylinders,Spheresand Tubesfor Transportationof Dangerous
Goods;et Commission".,
le cas #ch#ant; et seramuni d'undispositif
de pr6ventionde surremplissager#pertori6.
• Un tanquecompatibledel lqpo 1 con Unav._lvulade tanquedel.
Tipo 1 poseeuna V_.lvulade protecci6nde posiblesretrocesosque
no permiteel fluj0 de gas, hasta obtenerun cierrepositivo.
• El tanquedebe de estar ajustadapara la retiradadel vapor.
E Tambi_ndebeincluirun collarinpara protegerla v_.lvuladel tanque.
S Es necesarioincluirun dispositivode escape de seguridadque
poseacomunicaci6ndirecta con el espaciode vapordel tanque.Esto
P expulsar_,el gas del tanqueque seencuentrabajo alta presi6nsi el
a tanqueest_ demasiadoIlenao sobrecalentada,Ioque podria
provocarun fuegoo Unaexplosi6n.
:......
, Todoslostanquesde Gas de PropanoEicuMoque se Usencon
o
este aparato,se debende construiry marcarde acuerdoconlas "
I especificacionespara los tanquesde Gas de PropanoUcuadodel
"U. S. Departmentof Transportation(DOT} 0 de Nationalstandardof
Canada,CAN/CSA-B339,Tanques,Esferasy Tubospara el
Transportede MercandasPeligrosas;y Comisi6n_,segt_nsea
aplicable;y debe incluirun dispositivopara la prevenci6nde Ilenado
excesivoenumerado.
U & C 1142-0161
.',.
as applicable;and shall be providedwith a listed overfilling.i
prevention.device.
, Readlabelson the L.R Gas SupplyCylinder.
• New cylindersare alwaysshippedemptyfor safety.
, Allowonly qualifiedL.P.gas dealersto fill or repairyour LP. gas
supplycylinder.
, Informthe gasdealer if it is a newor usedcylinderto be filled.
• Cautionthe gasdealer not to overfillcylinder.
• After filling, havethe gasdealercheckfor leaksand to seethat the
reliefvalve remainsfreeto function.
' Z_ CAUTION: Have the gasdealer weighcylinderafter finingto
'ensure that the cylinderis not overfi!!ed.
• Toujourslire les #tiquettesdes bouteillesde GPL.
• Lesnouvellesbouteillessont toujoursexpedites vides,pourplus
de s#curit6.
, Pourle remplissageou la r#parationdesbouteillesde GPL, ne
s'adresserqu'_un revendeurde GPL agr6&
• Pr6cisezau revendeur
si la bouteille& remplirestneuveouusag#e.
• Veillez_ ce que le revendeurne remplissepas tropla bouteillede
gaz. Rappelez-luiles dangersdu surremplissage.
• Apr#s qu'ila remplila bouteille,demandezau revendeurde v#rifier
qu'aucunefuite n'estpr6senteet que la valve de d#chargefOnctionne
tou]ourscorrectement.
'
" z_ ATTENTION:Oemandezau revendeurde peser.ldbout_lTle
de gaz apr#sI'avoirremplie,afinde s'assurerqu'ellen'a pas #i4(rop
remplie.
_" '
, Leer las etiquetasen el Tanquede Sumir_istro
de Gas de Propano
Licuado.
• Losnuevostanquessiemprese envfan vacfaspara mayor
seguridad...................
• Permitirtan soloque distribuidoreso concesionariosde Gas de
PropanoLicuadoIleneno reparensu tanquede alimentaci6dde Gas
de PropanoLicuado.
. - ,..
, Informaral concesionarioo distribuidorde gassi hayque ilenar un
tanquenuevao usada.
• Advertiral concesionarioo distribuidorde gaspara que.nollene e!
tanqueexcesivamente.
• Despu_sdel Ilenado,hacerqueel concesionario
o distril_i_de(cle
gas
compruebela posiblepresenciadefugas,paraasicomprobarsilav_lvula
de seguridadpermanecelibreparafuncionasincontralJemp0s.
" Z_ CUIDADO: .Hacerque el concesionarioo distribuidorde gas
peseel tanquede gas despu_sdel Ilenadoparaasegurarque el,.
tanqueno est,.demasiadoIlena.
p_. 11
HOSE
AND
REGULATOR
!
The pressureregulatorand hbseassemblywith theType 1 fitting
suppliedwith the appliancemustbe used. Do notuse anotherhose
and regulatorassemblyotherthanthe one suppliedwith the grill or a
manufacturer'sreplacementpressureregulatorassembly.The
pressureregulatorand hoseassemblyprovidedis factoryset at an
outlet pressureof 11incheswater column(.4 lb. per sq. inch.)
, Keepthe smallvent holein the regulatorcleanof dirt and debris.
(Seeitem [G], Fig.10, pg. 9).
, Consultyour L.P.gas dealerif you thinkthe regulatoris not working
properly.
TheType 1 connectionsystemhas the followingfeatures:
1.The systemwill not allow gas to flow until a positiveconnectionhas
been made.
NOTE:The cylindercontrol valve mustbe turnedoff beforeany
connectionis
madeor removed.
1
2.The system has a thermalelementthat will shut off the flow of gasin
] the event of a fire.
I 3. The systemhas a flow limitingdevicewhich,whenactivated,will
i limit the flow of gas to 10 cubicfeet per hour.
'3 4. NEVERuse grill without leak testing this connection.
I
h
A WARNING:
Duringassemblyof grilland
whenattachingor replacingthe L.P.gascylinder,insurethat
the gassupplyhoseis free of kinksand/ordamageand is at
least3" awayfrom hot surfacessuchas thegrill casting.
/i", WARNING
. DO NOT attemptto adjustthe regulatoras this could create
a situation causing personalinjuryor propertydamage.
Lesyst#mede raccordde Type1poss#delescaract6fistiques
suivantes:
1.Le systbmene permetpas au gaz de s'_couleravantqu'une
F connexionpositiven'ait #t6 effectu#e.
REMARQUE: La valve de r6gulationde la bouteilledolt #treferm_e
r avantqu'une connexionsoit effectu6eou supprim6e.
a 2. Le syst#meest dot6 d'un616mentthermiquearr#tantr#coulementdu
rl gaz en cas d'incendie.
Vousdevezutiliserle r6gulateurde pressionet le tuyauavec raccord
de Type1 foumisavec I'appareit.N'utilisez
pas de r6gulateur5u
tuyauautresque ceuxfivr#savecle grit, ou autresque lespi#ces de
rechangefourniespar le fabricant.Le r6gulateurde pressionet le
tuyaufoumissont r6gl#sen usinesur unepresslonde sortie de
11poucesde colonned'eau (0,4lb. par poucecart6).
• Veillez_ ce que le petit troud'a6rationdu r#gulateursoit propree!
3. Le syst#meest dot#d'undispositifde limitationde I'_oulementqui,Iorsqu'il exemptde salet#. (Voirarticle[G], Fig. 10,pg. 9)
est activ6,limiter_oulementdu gaz_ 10piedscubepar heure(28crdl.
• Consultezvotrerevendeurde GPL si vouspensezque votre "
4. NE JAMAIS utiliser le gril sans test#e ses raccordements contre
r_gulateurne fonctionnepas correctement.
d'_ventuelles fuites d'#tanch#it6s.
a
i
S
AVERTISSEMENT
AVERTiSSEMENT
• NE PAS tenter d'ajusterle r_gulateur,car ceci pourrait
entrafnerdes blessuresgraves ou des dommagesmatdriels.
[MANGUERA
Y REGULADOR
]
El sistemade conexi6ndel Tipo 1 poseelas siguientescaractedsticas:
1. El sistemano permiteel flujo del gas hasta conseguiruna conexi6n
positiva.
NOTA:La v_lvula de controlde el tanquese debecerrar antesde
realizaro extraercualquierconex=6n.
2. El sistema poseeun elementot_rmicoque cerrar_,el flujo de gasen
caso deincendio.
:
3. El sistemaposee un dispositivolimitadorde flujo que,cuand0est_
activado,limitar_,el flujode gas a 10 pies cebic6spor hora (28 cm3).
4. No usar NUNCA la parrilla sin antesverificar posibles fugas en
la conexi6n.
E
S
p
a
I_
O
I
ADVERTENCIA
|
|
NO intente ajustar el regulador ya que estop0dria crear
una situaci6n susceptible de provocar lesiones personales o
L_ dal_°s en la Pr0piedad'
pg. 12
__
-.
]
I
]
[
: D-_rantle montage
[
du gall,et Iorsque vous brancheZ ou remplacezune bouteille: I
de gaz, assurez-vousque ietuyau d_arriv.#e
de gaz n'est pas : |
entortill# et se trouve _ plus de 3 pouces (7,5cm) des
" -I
surfaces chaudes telles que les pi#ces de fonderie du
Esnecesado
utilizarel montajedel regulador
de presi6ny dela manguera
conel accesorio
de_po l que seincluyeconel aparato.Noutiliza"Ufi':_
montaje'
de manguera
y de reguadordiferentealqueseinclu_e'_nla_ _
parrillao un montajede regulado_'
de presi6nde rePuest0
delfabricante._
_
El montajedel regulador
de presi6ny de manguera
queseinduye_!_.,:_,i
ajustad0enfAbricaa una_esi6ndesalidade 11pulgadas
de co!Qmna
de
agua(0,4librasporpulgadacuadrada).
'
• _o -..
• Mantenerel pequer_oorificiode ventilaci6nquese encuentr_en e
reguladorlibrede suciedad_/dedesperdicios.
_,-5'
(Consultarartfculo[G], Fig. 10, pAgina9)
• Consulteconsudistrib_idor
deGasde PropanoUcuadoen-_ de:_i-=
quesospeche
queel regdladornoest,.fundonande
correctarnente_"_}_
'I .:."
ADVERTEN
CIA:
Duranteel rfi6ntaje€leia
parrillay cuandose conecteo se cambieel tanque:deGas
Propano Licuado, asegeiese de que la manguerade_uminisiro
de gasno est_ torcida y que se encuentraal menosa 5-i _
3 pulgadas(7,5cm) de las superficies Calientes,comoia pieza de hierrocoladoque forma la parrilla,
U & C 1142-0161
A 8,PORTI {G
,
•
E
n
g
I
i
S
h
CYLIh' DER
]
Transportonly one cylinderat a time.
Transportcylinderin an uprightandsecure mannerwith control
valve turnedoff and the POLplug or capin place.
• DONOT transportcylinderin passengercompartment,unless
you havean openwindowventilation.
• DONOT leavecylinderin directsunlightor in a high heatarea
such as a closed car trunk. Highheat areascouldcausetherelief
valveto ventgas.
, Use a cylindercap on Cylindervalve outletduring transportand
whenthe cylinderis notconnectedto grill.
• Keepcylindervalve closedwhennotin use.
• Takethecylinder(s)directlyhomeafterthey havebeenfilled.
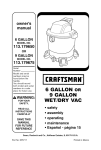
,_ DANGER
• NEVERstorea spareL.P,gas supplycylinderunderthegrill
bodyor insidegrill enclosureor in the vicinityof anyheat
producingappliance. (Fig. 12)
• NEVERfill the cylinderbeyond 80% full.
Failure to follow this information exactly couldresult in an
explosion and/or fire causingdeath or serious injury may occur.
_\ WARNING
A
A
REPRESENTATIVE
ILLUSTRATION
ILLUSTRATION
REPRESENTATIVE
ILUSTRACION
REPRESENTATIVA
Handlea full cylinderwith care. Gas is underHighpressure.
[_rRa. ¢SPORTDE La BOUTE,LLEDE GAZ ]
F
r
a
n
a
i
S
, Ne transporterqu'uneseulebouteille_ la fois.
•
Transporterla bouteilleen positionverticaleet stable,et vei!ler
ce que la valvede r6gulationsoit terrn#eet le capuchonou le
bouchonPOLen place.
,
NE PAStransporterde bouteilledansun compartiment
passagers,a morns qu'une(enOtrene soit ouvertepour la ventilation.
"
NEPASlaisserunebouteilleenpleinsoleil,ni dansunlieutr_schaud
telquele coffred'unevoiture.Detr_ hauteschaleurspourraient
entratner
1'6chappement
degaz_ travelsla soupapede sOret6.
•
Placerun capuchonsur rorificede sortie de la valvedurantle
transportet lorsquela bouteillen'estpas reli#eau gril.
•
Maintenirla valveferm#eIorsquela bouteillen'est pasutilis#e.
•
Ramenez
la (les)bouteille(s)
directement
chezvousunefoisremp/ie(s).
....
DANGER
• Afind'evitertoutrisqued'explosion,
NE JAMAISranger_.ne
bouteilledeGPLderechangesousle corpsdugril,_ rinte'rieur
deI'abddu gdl,oua proximit_de toutappareil.(Fig.12)
• NEJAMAISremplirla bouteilledegaz a plus de 80%
Si vousne suivezpas exactementsesinformations,une
explosionou/etun feupourraientsurveniretprovoquer la mort
ou de s6deusesblessures.
AVERTIsSEMENT.
ManierUnebouteillepleine avecprudence.
L_
soushauteFession...........
L , .sPo.ToT..ouo
]
E
S
p
a
I_
o
I
• Transportelos tanquesde una en una.
• Transporteel tanqueen posici6nverticaly de una manerasegura,
con la v&lvulade controlcerraday el tap6no tapaPOL en posici6n.
• NOtransporteel tanqueen un compartimiento
de pasajeros,a no
ser que tengauna ventanaat:)ierta.
, NOdejar el tanquebajo luzsolardirectao en una zonaconinucho
calor,comouna camionetacerrada.Las zonasde altatemperatura
puedenhacerque la v_.lvulade escapeventilegas.
• Usaruna tapa de tanquede gas sobrela salidade la v_.lvulade el
tanquedurantee!transp0rtey cuandoel tanqueno estOconectadoa
la parrilla.
• Mantenerla v&lvulade el tanquecerradacuandono seest_
usando,
• Llevarel tanque(s)directamenteal hogardespuOsdel relleno.
U'& C 1142-0161
,/_ PELIGRO
, No almacenarNUNCAun tanquede suministrode Gas
PropanoLicuadobajoel chasisde la parrilla o en el interior
del recintode la parrillao cercade cualquieraparato que
produzcacalor. (Fig.12)
• NOIleneNUNCAel tanquea mdsde 80%: i ]
El no seguiresta infermaci_con exactitud
puedeprovOcaruna
explosi6ny/o una lesionseriao la muertea causadel fuego.
/_ ADVERTENCIA
•Manejarun tanqueIlenacon(_uidado.
El gasest_ bajo Alta Presi6n.
,
,,
pg. 13
FILLING
AND
PURGING
TYPE
1 L.P, GAS CYLINDERS
TAKE THESE INSTRUCTIONSTO THE L.P. GAS DEALER,
E
/_ DANGER
n
Purgingand fillingof L.P.Gascylindersmustbe performedby
personnelwho have beenthoroughlytrainedin acceptedL.P.
Gasindustryprocedures. Failureto follow this instructionmay
result in explosion,fire, severepersonalinjury,or death.
?
i
J
, New cylindersmust be purgedbeforefilling. Tellyour LP. Gas
dealer if your cylinderis new and has notbeenpreviouslyfilled.
The L.P.Gascylinder hasa Type1 cylindervalvewith a back-check
modulein itsoutlet whichwill not permitgas to flow untilan
evacuationdevice is installed. Topurgethe L.P.Gas cylinder,the
back-checkmodulemustbe openedwith an evacuationdevice..,
CGA-510
POL
s
h
, Whenusingcylinderexchange:If your grill is equippedwith a Type
1 cylinder,be sure the exchangedcylinderis a Type 1 cylinder,as a
510 POL cylinderwill not fit Type 1 regulator.
• This tank is easily filled with a standard CGA 510 POL filling
connection.(Fig. 13)
F
r
8
APPORTE_LCES iNSTRUCTIONSAU REVENDEURDE
GPL.
n
€
a
i
s
/i_ DANGER
....
Le remplissageet Ia purge desbouteillesde GPL doivent _tre
r_alis6spar un personnelqualifi6et exp_riment_quant aux
proc6duresde I'industriedu GPL.Ne passe conformer_ ces
instructionspourrait entra_nerune explosion,un incendieou des
blessuresgraves ou mortelles. :
.......................
_.... . ...........
RELLENO
Y PURGA
DE PROPANO
dispos!t[td'#vacuation: i
__..::.5. ...........
LLEVARESTASINSTRUCCIONES
AL CONCESIONARIO
0
DISTRIBUIDOR
DEGASDEPROPANOLICUADO,
P
a
o
I
Y
/fk PEL|GRO
La purgay el relleno de tanquesde Gasde PropanoLicuadosot
acdonesque deben realizarpersonaldebidamenteformado en
procedimientosindustrialesdel Gas de PropanoLicuado.El no
respetarestasinstruccionespuede causaruna explosi6n,fuego,
lesionespersonalesgraveso incluso la muerte..
pg. 14
i'
:...,...,:. ...... .:............
: _" __
' _' "
,--:--i::'---'--: .......
DE LOS TANQUES
DE GAS
LICUADO
DEL. TIPO I
E
S
• Lors d'un changementde bouteille: Si votregril est _quip#d'une
bouteillede Type 1,veillez_ ce que la nouvellebouteillesoit aussiune
bouteillede Type 1,car une bouteille510POLne s'adapterapas surun
r_gulateurde Type1.
_,
• Ce r_servoir est facilernent rempli avec un raccordde
•J
remplissage CGA510 POLstandard. (Fig. 13)
° Les bouteillesneuvesdoivent _trepurg6esavantd'etreremplies.Si
votre bguteil!ede GPL est neuveet qu'ellen'ajamais6t6 remplie, i
informez-envotre revendeurde GPL.
La bouteillede GPL est dot_e d'unevalvede Typei avec modulede
non-retourdans son orificede sortie,qui emp#cherale gaz de s'#couler
jusqu'&ce qu'undispositifd'6vacuationait #t# install#.'pourpurgerla
bouteillede GPL,le modulede non-retourdolt #treb'U_,drt
avec un
• Cuandouse los serviciosde intercambiodetanques:si su parrilla
est,. equipadacon un tanquedel Tipo I, asegL_rese
de que el tanque
irtercambiadaes un tanquedel 13po1, ya que un tanque510 P0L no
se podr&ajustaren un reguladordelTipo 1.
"
, Este dep6sitose Ilena f_cilmente con uiia conexi6nde relleno
CGA'510POLnormal. (Fig."i3) ....
, Los nuevostanquessedebenpurgarantesde rellenarlIndiquea su
concesionarioodistribuidordeGasde PropanoLicuadosi su tanquees
nuevoy no se ha ilenadoanteriormente.El tanquede Gasde Propano
Licuadoposeeuna v_Jvulade tanquedel Tipo1 conun m_ulo de
retenci6nen su salida,queno permitir&quefluyael gas hastaque se
instaleun dispositivode evacuaci6n.Parapurgarel tanquede propano
licuado,el m_ulo de retenci6nsedebeabrirconundispositivode
evacuaci6n.
- ,
U & c 1142-'0161
CAUTION
i
After purging or filling an L.P.Gascylinder,DONOT inserta
POL plug into the valve outlet. Insertionof theplug will prevent
the back-checkfrom closing.Use ONLYthe providedcapand
strap attachedto the outlet. Closethe cylindervalveknob
beforereturningthe cylinderto the customer.
For properpurging proceduresreferto:
In the US: Safety BulletinNPGA#133,"PurgingL.P.Gas
Cylinders",and Safety BulletinNPGA#130,"Recommended
Proceduresfor FillingCylinders".
A,
B.
Purgingusinga Type 1 connection(Fig. 14):
¢. L.E Gas cylinderevacuationcan be accomplishedduringeach
purgingby usinga Type 1 connection. The Type1 valveoutlet
hasan external1 5/16"ACME right handthreadwhichwill
acceptthis connection.
t
i
i
f
Hose end valve with a bleedport (Fig. 13):
Purgingcan be accomplishedusinga hoseend valve containing
a bleed port which also allowsfor evacuationwithoutthe use of
an adapter.
Hose end valve without a bleedport:.
When a hose end valve doesnot havea bleed port, a separate
device must be used for evacuation.
DtSPOSITiFS
DE PURGE
ET D'EVACUATION
PQUR I. FS ROUTE{LLES
ATTENTION
Apr_savoirpurg_ou rempliunebouteillede GPL,NE PASinsurerde
bouchonPOLdansI'orilfcede sorUede la valve.L'insertion
du bouchon
emp_hera le dispos_fde non-retourde sefermer.Utiliser
UNIQUEMENT
lecapuchon
etlasangleattaches_ I'orificede sortie.
Fermerla poign#ede la valvede la bouteilleavantde la redonner
I'uUlisateur.
-.
Pour de plus amples renseignementsconcemantles procedures
correctesde purge, consulter:
Aux USA : SafetyBulletinNPGA# 133,"PurgingL.R Gas
Cylinders",et Safety BulletinNPGA#130, "Recommended
Proceduresfor Filling Cylinders".
•
"
PROPANO
LlCUADO
CON VALVULAS
CUIDADO
Despu_sde purgar o Ilenarun tanquede propanolicuado,NO
insertarun tap6n POEdentro de la salidade la v&lvula.La
inserci6ndel tap6r_impedir_el cierrede la reienci6n.Usar SOLO
la tapay la corre&c0nectadaa la salida.Cerrarel bot6nde la
v_.lvuladel tanque antes de devolve[el tanqueal cliente.
Para obtenerprocedimientosde purga adecuados,consultar:
En el US: Safety BulletinNPGA#133,"Purgade Tanquesde Gas
de PropanoLicuado",y SafetyBulletinNPGA#130,
"ProcedimientosRecomendadospara el Llenadode Tanques°.
U & C 1142-0161
AVEC
VALVES DE TYPE
f:
]
A. Valved'extr#mit6de tuyauavec port de purge (Fig. 13) i
La purgepeut &trer_alis#e_ I'aided'unevalved'extr#mit#de ; "
tuyaucontenantun port de purge permettantla d#chargesans
I'utilisationd'un adaptateur.
B. Valved'extr#mit#de tuyau sansport de purge :
Lorsquela valve d'extr6mit_de tuyaufie poss_e pas #e port de
purge,un dispositifs#par6dolt #treutilis6pour la d#charge.
C. Purgeavec raccordde Type 1 (Fig. 14)"
La d#chargedesbouteillesde GPLpeut #trer#alis#edurant
chaquepurge _ I'aided'un raccordde Type1. L'orificede sortie
de valvede Type 1poss#de un pas _ dreiteexterneAcm#de _1
5/16",qui acceptece raccord.
DE TANQUE
DEL TIPO
I
"
A. V&lvuladel final de la mangueracon unasalidade escape
(Fig. 13):
La purgase puederealizarusandouna v_lvuladel final de la
mangueraque contengauna salidade escape,que tambi_n
permitela evacuaci6nsin el usode un adaptador.
B. V_lvuladel finalde la mangUerasinuna salidade escape:
Cuandouna v_.lvulade final de manguerano poseeuna salida
de escape,se debe utilizar un dispositivoseparadopara la
evacuaci6n.
C. Purgausandouna conexi6ndel Tipo 1 (Fig.14):
La evacuaci6ndel tanquede propanolicuadose puederealizar
durantecadapurga por mediode usaruna conexi6ndel lipo 1.
La salidade vAIvuladel Tipo 1 poseeun roscadohacia la
derecha1 5/16"ACME.que aceptar&estaconexi6n.
, pg. 15
I L,P, GAS
CYLI
SeeFig, 15:
Connectthe L.P.cylinder,with cylindervalve closed,to the grill outdoorsWARNING
only. Readand fellowdirectionson thecylinderand fuel hose
safetytags.
,3
i
i
CAUTION
[
In theconnectionprocess,the grill sideof}
slight resistance.The connectionrequiresaboutone-halfto threequartersadditional
urn to
connection.Todisconnect,
he connectionwill tseal
oncompletethe
theback-checkin
the valve,resultingin a [|
turn counterclockwise.Tightenby hand only. DO NOTuse tools.
1. Checkthat the cylindervalveis closedby turningthe cylinder
knobclockwiseto a full stop.
2. Checkthat all thegrill burnerknobsare in theoff position.
3. Removethe protectivecaps fromthe cylindervalveand coupling nut. NOTE:Thecouplingnut connectsto the largeoutside
threadson the valveoutlet.
4. Holdthe regulatorin one handand insertthe nippleinto the
valve outlet. Be surethe nippleis centeredin thevalveoutlet.
Handtightenthe couplingnut,takingcare notto cross-threadthe
connection.
5. Turnthe couplingnut clockwise,tightento a full stop.
If youcannotcompletethe finalconnection,disconnectthe regulatorand repeatsteps4 through6. If you are still unableto completethe connection,DONOTuse this valveand regulator!
6. Checkthat thehosehas no kinksor sharpbendsand clears
areasthat will becomehotduringuse. Neverput strainon the
hosewhereit joinsa fitiing..
7. BEFORElightinggrill, checkall connectionsfor leaksusing
the procedureas shownin Fig. 16 on pg. 17.
i
3. Retirezlescapuchons
protecteursdela valvedela bouteifleet de
I'#crouderaccord.
R
EMARQUE
: L'#croude raccordseplacesurle gros
Ne relierla bouteilleavec la valve ferm_eau gril que Iorsquecelui-ci
filetage,_ I'ext#rieur
de I'orificedesortiede la valve.
se trouve_ I'ext_rieur.Lisezet suivezles instructior)squi se trouvent
4. Tenezle r6_lateur dans unema!net ins#rezremboutdansrorisur les _tiquettesde la bouteilleet du tuyau de Combustible.
..-.,.--..J...___
rice de sortjede la valve,en veillant_ ce qu'ifsoit bien centr6. .
Serrez1'6c_ de raccord_la main,en faisantattentionde ne pas
ATTeNTiON
Durantla connexion,le 05t6gril de
croiserla connexion.
la connexion_tabliraune_tanchdt6avecle dispositifde non-retour
5. ToumezI'_croude raccorddansle sens desaiguillesd'u_imon(dansla valve),cequi aurapourcons_uenceune certalner_sistance.
tre, et vissezjusqu'aubout. $i vousne parvenezpas _ terminerla
La conn.exion
n6cessiteenviron½ _ _ de toursuppl_mentaire
po.ur _tre
connexionfinale,d#connectezle r#gulateuret r#p#tezles #tapes4
complete.Pourd&;onnecter,toumerdansle sensinversedesalguilles
6. Si vous n'yparveneztoujourspas, N'UTILISEZPAScettevalveet
d'unemontre.Serreruniquement_ la main.NEPASutiliserdbutil.
ce r_gu!ateur!
.
6..V#rifiez que le tuyaun'estpas entortill#ni recourb#,et d_gagez _:
Voir Fig. 15 "
les zones qui serontchaudesdurantI'utilisation.hiejamais appliquer
I. V_rifiezque la valve de la bouteillesoit ferm_een toumantla
,
#oign_e de la bouteilledans le sens des aiguillesd'une montre,jusquau de pressionsur le tuyau_ un endroitob il est reli#_ un raccord.
7.AVANTd'allumerlegril,examineztouslesraccordspourv#fifierqu'il
bout, afin de la fermercompl_tement.
2. V_rifiezque tousles boutonsde r6glage desbrOleursdu gril sont en n'ya aucunefuite,ensuivantlaproc_ure illustr#een Fig. 16,page 17. r.. positionferm_e...
....................................
- ........................................
_........
_. .. __L_
AVERTISSEMENT
F
r
3
n
a
i
S
CONF.XION
DE LO
ADVERTENCiA
E
S
P
TANQUES
PROPANO
--
Conectarel tanquede GasPropanoUcuado,conla v_.lvula
de controlcerrada,solamenteen la parrillaque seeficuentreen el exterior.Leery respetar
Jasinstrucciones
que seencuentranen Inseliquetasde seguridadde el
uey de la manguerade combustible.
z_ CU I DADO
Enel procesode conexi6n,el ladode la par.
nllade laconexi6ncenar_,hermeticamente
la retend6ndela v_.lvula,
Io
quetienecomoresultadounaligeraresistencia.
La conexi6nnecesita
aproximadamente
de unamitada tres cuatrosderotaci6nadicionalpara
finalizarla conexi(Jn.
Paradesconectar,
girarhaciala izquierda.Apretartan
soloa mano.NOusarherramientas.
Vet Fi,qura15:
.......
1 Ven_carquela v_vu_aee controleel tanqueest_cerrada,girandola perilla del tanquehaciala derechahastaque sedetengaparacerrarcompletamente.
2 Revisarque todos los botones del quemadorde la parrillaest_.nen
la posiciSn"OFF".
pg. 16
LICUADO
DEL TIPO
I ........
,
3. Extraer!astapasprotectoras
de lav_vuladeel tanquey tuercade 1
acoplamiento.
NOTA:Latuercade acoplamiento
seconectaconlos , :
roscados
exteriores
grandesenla salidade lav_.lvula.
" .
4. Sostenerel reguladoren unamanoe insertarla boquilladen_'de la
salidade lav_ilvula.
Asegdrese
de quela Ix)quillaest,_centradaenla
salidade lav_vula.Apretar
a manola tuercade acoplamiento,
a_
gur&ndose
de quenosecruzeel roscadode laconexi6n. _::_..
5. Girarla tuercadeacoplamiento
hacialaderecha,apretarhastaque
sedetengacompletamente.
Si nopuedeterminarla conexi6nfinall.
desconectar
el regulador
y repetirlospasosdel4 hastael 6. Si a_nas[
nopuedefinalizarla conexi6n,
NOusarestev_lvulaniel regulador.
6. Comprobarque la manguerano estAtercidani demasiado
dobladay que se apartade las zonasque secalentar&nduranteel
uso.Nuncahacertensi6nsobrela mangueraen el area en donde
se une conun accesoriode conexi6n.
7. ANTESdeencenderla parfillarevisartodasInsconexiones
para
verificarquenohayafugasusandoelprocedimiento
dela Fig.16enla
p_gina17.
U & C 1142-0161
DANGER
E
I1
g
I
i
S
h
To PREVENTFIRE OR EXPLOSIONHAZARD:
. NOSMOKING.DO NOT useor permitsourcesof ignitionin
the area while doing a leak test.
° Performleak tests outdoorsonly.
EVEoR perform a leak test withfire or flame.
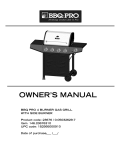
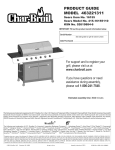
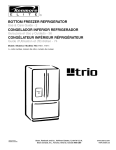
How TOCHECKFORLEAKS
1. Createa soapy solutionof equal parts mildliquid dishwashing
detergentand water.
2. Turnoff all burner controlknobs.
3. Turnon fuel supply. Turn cylindervalve knobcounterclockwise
(rightto left) one rotation.
4. Apply soapsolutionto connectionsindicatedwith arrowsin Fig.
16 & Fig. 17, If bubblesappearat these areas, a leakis indicated.
z£
@A
F
(_..
TEST
D'ET_
COMMENT VERIFIER S'IL YA DES FUITES
r
a
n
a
i
s
REPRESENTATIVE
ILLUSTRATION
ILLUSTRATION
REPRESENTATIVE
ILUSTRACION
REPRESENTATIVA
1. cr#ez une solutionsavonneuse
DANGER
POURPR_VEN/R TOUTRISOUE D'INCEND/EET D'EXPLOS/ON:
• NE PASFUMER.NE PASUT/L/SERde sourced'a//umage
aux alentoursdu gril Iorsd'un testd'_tanch6it6.
• Effectuerles testsd'#tanch#it#uniquementh I'ext6rieur.
• NE JAMAISeffectuerun testd'_tanch#it6avec du feuou une
flamme,
PRUEBA
PARA
DETECTAR
LA PRESENCIADE
/_ PELIGRO
PARA PREVENIRINCENDIOS0 EL RIESGO DEEXPLOSI6N:
. NO FUMAR.NOUSARni perrnitir
fuentesde ignid6nen la zona
mien_asse realizaunapruebaparadetectarlapresendade fugas.
. Realizarlas pruebaspara comprobarla presenciade fugas
tan solo en exteriores.
• NUNCArealice una pruebapara detectarla presenciade
fugascon fuego o con llamas.
U & C 1142-O161
(parts #galesde liquide vaisselleet d'eau).
2. Fermeztousles boutonsde r6glagedesbrOleurs.
3. Ouvrezralimentationen combustible.Toumezla poign#ede la valve
de la bouteillede gazdansle sens inversedesaiguillesd'unemontre (de
gauche_ droite),d'un seultour.
4, Appliquezde la solutionsavonneusesur les raccordsindiqu6spar
des fl#chesdansles Fig. 16et 17,Si des bullesapparaissenth ces
endroits,celasignifiequ'ily a une fuite.
FUGAS
]
COMODETECTAR
LA PRESENCIA
DE FUGAS
1. Prepararuna soluci6njabonosautilizandoparte_igualesde
detergentelavaplatoslfquido suavey agua.
2. CerrartodoslosIx)tonesde controldelquemador- colocaren "OFF".
3. Abrirel suministrode combustible-colocaren "ON".Girarel bot6ndela
v_.lvula
cleltanquehada la izquierda(dederechaa izquierda)
una rotaci6n.
4. Aplicarsoluci6njabonosaalas conexionesque aparecenindicadas
con flechasen las Figuras16 y 17.Si aparecenburbujasen estas
zonas,estoindicar_,la presenciade unafuga.
, /
pg. 17
FIXJ G
A FUEL
LEA {
J
. IF YOUDETECT A LEAK;
!. Turnoff the fuel supply. Pushin and turn on control knobsto
releasepressurein hose,then turnthe control knobsback to off.
.- 2. Washoff soapy solutionswith coldwater and toweldry.
3. Stop a leakby tighteningthe loosejoint, or by replacingthe faulty
1 part with a replacementpartrecommendedby the manufacturer.DO
] NOTattemptto repair the cylindervalve if it shouldbecome
i damaged; the cylinder MUSTbe replaced.
i 4. If you are unableto stop a leak, shut off the gassupply at the
cylindervalve. Removethe cylinderfrom the grill. Call a gas
applianceservicemanor LP. gasdealer. DONOT use appliance
1 untilthe leakis corrected.
° WHEN TO TEST FOR LEAKS;
Performa leak test eachtime the gas supplycylinderis
connectedto the regulator. Leak testanytimea partof the gas
I
OOMtM, ENT RJSMEGfER
A UNE F tTE
1
r
a
• Sl VOUS DETECTEZ UNE FUITE :
1. FermezI'arriv6ede gaz.Appuyezsur lesboutons de r#glageet
tournez-lesafin de lib6rer la pressiondu tuyau,puis remettez-lesen
positionArr#t.
2. Rincezla solution savonneuse_ I'eaufroide,puisessuyez _ I'aide
I1
d'un chiffon.
=
a
i
S
3. Pourrem6dier_ la fuite,serrezlejointou remplacez
la pi&;e
d6fectueuse
par unepi&_ede rechangerecommand6e
par le fabricant.
NEPAStenterde r_&_rerla valvede la bouteilledegazsi elleest
endommag#e
; dansoe cas,la bouteilleDOlT#treremplac6e.
4. Si vousneparvenezpas_ arr#terla fuite,fermezrarriv#edegazau
niveaude la valvede la bouteille.D6branchez
la bouteilledugril.Appelez
un techniciende mdntenanceou votrerevendeur
de GPL.
NE PASub'liserI'appareilavantquela fuiten'ait#t#corrig#e.
systemis replaced.
Performa leaktest at least onceeachyearwhetherthe L.R gas
supplycylinderhasbeendisconnectedor not.
Havea dealercheckthecylinderfor deteriorationafter 12years,
accordingto DOTregulations. Immediatelyreplacecylinderif any
deteriorationis found.
CAUTION
Inspectthe gassupply hosebeforeeachuse. If thereare cuts,
damage,excessiveabrasionor wear,replacethehoseprior to
operatingthe appliance.Duringassemblyof grilland when
attachingor replacingthe L. R gas cylinder,insurethat the gas
supplyhoseis free of kinksand/ordamageand is at least3" away
from hotsurfacessuchas the grill casting. Useonlythe hose
replacementspecifiedin the partslist foryour barbecuegrill.
• QUAND TESTERL'ETANCHEITE ;
Effectuezun testd'#tanch6it#_ chaquefob quela bouteillede gaz
est branch6eau r#gulateur,et _ chaquefois qu'unepiece du circuitde
gaz est remplac6e.
'
Effectuezun testd'#tanch#it6au moinsune foispar an,que la
bouteillede gazait #t# d#branch6eou non.
FaitesvMfier la bouteillede gazpar un revendeurau bout de
12 ans,conform#mentaux r#glementationsdu DOT.Remplacez
imm_iatementla bouteillede gaz si elle est endommag6e.
ATTENTION
Inspectezle tuyaud'alimentationen gazavantchaqueutilis_tion.
S'il est coup6,endommag#ou s'ily a des marquesd'usurespar
frottement,remplacezle tuyauavant de fairefonctionnerle gril.
Durantle montagedu gril, et Iorsquevousbranchezou remplacez
une bouteillede gaz, assurez-vousque le tuyaud'arriv#ede gaz
n'estpas entortill6etse trouve_ plus de 3 pouces(7,5cm) des
surfaceschaudestellesque lespi#ces de fonderiedu gill. Utilisez
uniquementle tuyau de remplacementsp#cifi#dansla fiste de
_de
votrebarbecue..
suministro
de gasseconecteal regulador.
Realizarlaspruebasen busca
de fugassiempreque secambie parledel sistemade gas.
Realizarunapruebaen buscade fugasuna vezal aSo,sin importarsi
REPARACION
DE UNA FUGA ]
el tanquede suministrode Gasde PropaneLicuadose ha desconectado
o no seha desconectado.
, Sl DETECTA UNA FUGA:
Hacerque el concesionarioo distribuidorreviseel tanqueen busca
1. Cerrarla alimentaci6ndecombustible-colocaren "OFF".Empujar
de sedalesde detedorodespu6sde 12 aSos,de acuerdocon las .......
haciadentroy colocar en "ON"losbotonesdecontrolparaliberarla
DOT.Cambiarel tanqueinmediatamentesi se
presi6nexistenteen la manguera,despu6svolvera colocarlosbotones reglamentaciones
encuentra
algunasepalde
deterioro.....
de controlen "OFF".
DEcoMBus'r,BL,= !
E
S
P
a
o
!
2. Lavarlas solucionesjabonosasconaguafria y secarconuna toalla.
3. Detengauna fuga apretandola atadurasuelta,o por mediode
cambiarla piezadefectuosapor una piezade repuestorecomendada
por el fabricante.NO intente repararla v_.lvuladel tanquesi resulta
daSada;el tanque SE DEBEcambiar.
4. En casede quesea incapazde detenerunafuga,cerrarel suministro
degasen lav_lvuladel tanque.Extraerel tanquede la parrilla.Llamara un
t_,nicode gaso a un concesionario
de Gasde PropanoLicuado.NOusar
el aparatohastaque se corrijala fuga.
° CUANDO SE DEBEN REALIZARLAS PRUEBASEN BUSCA
DE FUGAS:
Realizaruna pruebaen buscadefugacadavezqueel tanquede
pg. 18
CUll)ADO
- -;
Inspeccionar
la manguerade suministrode gasantesde cadause,
si aparecencortes,daSos,o una abrasi6nexcesivao desgaste,
cambiarla mangueraantesde operarel aparato.Duranteel mentaje
de la parrillay cuandose conectao secambiaeltanquede Gasde
PropaneLicuado,aseg_Jrese
de que la manguerade suministrode
gasno est_torciday/oda5aday quese encUentre
al menosa
3 pulgadas(7,5cm)de las superficiescalientes,comela parrillade
fundici6n.Usarsolamentela manguerade reemplazoque se
especificaen la listade piezasde suparrilladeparrila.
!
U & C 1142-0161
[] STAR3"-UP
CHECI_
LUS,T
WARNING
Failuretofollowthesesafetystepsbeforeusinggrill eachtime
could resultina firethatcouldbe hazardousto you,your
applianceor property. It is especiallyimportantto observethese
stepsafter the grill has beenstored,movedor cleaned.
,=,.
[]
1. Regularlycheckburnerventuritubesfor blockagefrom an
insectnest. Read"CleaningtheVenturi"on pg. 32 and
"Troubleshooting"
on pg. 38.
[]
2. Checkthat all burnerventuri[H]areset overthe valveoutlets
[J] correctly.Thevalveorifice[K] mustbe insidetheventuri. (Fig.18)
[]
3. Inspectthegas supplyhosebeforeeachuse. Hosescan
be burnedor chafed if they are routedimproperly,See thatthe hose
has no kinks,sharpbendsor tensionon the hose.Insurethat the
hoseis at least 3 inchesawayfromany hotsurface.
[]
4. Arrangelavarocksor evenlyspaceceramicbriquettesin a
singlelayeron rock grate.
[_CAUTION:
J
,=.
K
H
REPRESENTATIVE
I LLUSTRATION
ILLUSTRATION
REPRESENTATIVE
ILUSTRACION
REPRESENTATIVA
-
DONOT
addcharcoal
orlighting
fluid, ]
Checklist continuednext page.
1
LfSTE
DE
VERfFICAWONS
|
F
AVERTISSEMENT
r'
Nepas suivreces mesuresde s6curit6avantchaqueutilisationdu
gill pourrai(entrainerun incendieayantpour cons#quencesdes
blessurescorporellesou desdommagesmat6riels.II est
notammentessentielde respecterces consignesapr#sque le gril
a 6t6 rang#,d#plac6ou nettoy&
B
3
9
a
i
1. V6rifiezr#guli#rementque les venturisdu brOleurne sont
s pas bouch#spar un nid d'insectes.Lisezla section"Nettoyagedes
Venturis"page 33 et "D6pannage"page38.
2. V6rifiezque tousles venturisde brOleurs[H]sont bien
places sur lessortiesde valve[J]. L'orificede la valve[K] dolt#tre
3. Inspectezle tuyaud'alimentafionen gaz avant chaque
utilisation.S'ilssont incorrectementachemin6s,les tuyauxpeuvent
br#ler ou s'userpar frottement.V#rifiezque le tuyaun'estpas
entortill6ni recourb#,et qu'aucunetensionn'est appliqu#edess_s.
Assurez-vousque le tuyause trouve_ au moins 3 pouces (7,5 cm)
de toute surfacechaude.
4. R#partiruniform6mentlespierresvolcaniquesou les
briquettesde c_ramiqueen une seule couchesur la grille _ roches.
z_ ATTENTION
[] LISTA
DE VERIFICACION
NE PASajouterde Charbonde
bois ni de liquided'allumage!
Suitede la liste de v6rificafionsen page suivante._ . .... io,..
I'int6rieurdu ven!ufi.(Fig. 18)
t
..
INICIAL
..
J
/_ ADVERTENCIA
El no respetarestospasosde seguridadcadavezqueseusela
parrillapodn'aprovocar
un incendioque,o{x:ln'a
serpeligrosopara
usted,suaparatoy supropiedad.Esespecialmente
importante
respetarestospasosdespu_sde quela parrillasehayaatmacenado,
transportad_
o o limpiado.
o
1 []
1. Revisarde maneraregularlostubosventuridelquemadoren
buscade seSalesde blcqueoprovocado
porun nidode insectoslLeer
"Umpiezadel Venturi"en la pAgina33y "BOsqueda
y Reparaci6n
de
Avefias"en la I&_gina
39.
[] 2. Revisarquetodoslostubosventuridelquemador
[H]est_.n
colocadossobrelassalidasdev_lvula[J]correctamente.
El orifidode la v,_lvula[K]debeestaren elinteriordelventuri.(Fig.18)
U & C 1142-0161
[]
3. tnspeccionarla manguerade suministrode gas antes de cada
uso. Lasmangueraspuedenresultarquemadaso trituradassi se an
dirigido incorrectamente.Comprobarque la manguerano est_ :.:
dobladade maneraexagerada,no est_ retorcidani est&demasiado
tensada.Aseg_resede queia manguerase encuentreal menos a
3 pulgadas(7,5cm) de cualquiersuperficiecaliente.
[]
4. Arreglede manerauniforme laspiedrasde lava o los bloques
de cer_.micaen una capasimple sobrela parillade piedras:
CUIDADO-"
i NO aSadircarb6nvegetalni liquidos
inflamablesparael encendido!
I
La lista de verificaci6ncontinuaen la pr6ximap_.gina.
pg. 19
[]
[]
E
START=UP
CHECK
LAST
= CONT_D.
]
,,,
5. use only the gas specifiedin assemblyinstructions.
_
6. Keep the barbecueon alevel surface.
7. Keep an empty metalcontainer,such as a soup can, in the wire
or plasticgreasecan holder belowthe grill bottomto catchdraining
n
greaseduring use. (Fig. 19, Fig. 20)
i
s
z_ CAUTION
h
The greasecan, greasepan and grill bottombecomeextremelyhot
during use. To avoid burn injury,emptygreaseholder onlywhen
the grill is cool.
For 800- 900
Series Grill
Pour les Grils
S_ries800 - 900
Para las Parriilas de
la Series 800 - 900
LISTE
DE VERIFICATIONS
.
r
-
_ .
.
:,.
;:_._. . _ z ._ .
":$UITE
.
_
.
a
n
a
i
S
J
.
6d 5. Utilisezuniquementle gaz sp6cifi#dansles instructions
de montage.
l£1 6 Veillez& ce que le barbecuesoitplac# sur une surfaceplane.
_r 7. Afin de recueillirla graissedurant I'utilisation,placez un
r#cipienten m#tal (une bo_tede conservepar exemple)dansle support
en plastiqueou en m6talqui se trouvesous le gill. (Fig.19,Fig. 20)
L"
---
[] LISTA
"
.
_
."
/_ ATTENTION
La bo_te_ graisse,le plateau_ gra_sseet le dessusdu gril
deviennenttr#s chaudsdurantle fonctionnementdu gill. Pour
#vitertoutrisque de brOlure,ne videzle r#cipient_ graisseque
Iorsquele gril a refroidi.
•
DE VERIFiCACION
INICIAL.,
CONTINUACION
J
s
P
a
I1
o
I
[]
5.Usarsoloel gasqueseespe£ificaen lasinstrucciones
de montaje.
[]
6. Mantenerla parrilaen una superficienivelada
[] • 7. Mantenerun envasede metal vacio, como una lata de sopa,
en la sujeci6nde lata para la grasade alambreo de pl_.sticoque se
encuentradebajo del fondode la parr!lla,que tiene como fin retenerla
grasaque se escurra duranteel uso. (Fig. 19, Fig. 20)
pg. 20
/_ ADVERENCIA
El depositode grasa,el sart_n paragrasa,y el fondodel asador
se calientanextremadamenteduranteel uso. Para evitarlesiones
por quemaduras,vacie el contenedorde la grasa solocuandola
parillaeste fria.
U & C 1142-0161
Ii WARNING
THE FOLLOWING
FOLLOWED
RULES MUST ALWAYS BE
IN THIS ORDER (Fig. 21):
1. OPENGRILL LID! Any attemptto lightthe grill with the
lid downcould cause an explosion.
2. Checkthat the burner controlknobs are turnedto "OFF".
3. Turnon fuel supply. For an L.P.gas cylinder,turn the top
cylindervalve knobcounter-clockwiseone rotationto open.
4. DO NOT standwith head or armsover grill.
,,4',WARNING
i
[
In order to prevent a flash fire, IT IS IMPORTANTto check
the lightinginstructionsfor the grill you will be lighting.
Variousdesignsrequire lightinga specific sideof burner first.
Refer to the following 2 pages to locate your grill with
it's correct lighting instructions. (Pg's. 22,23)
o
_. o
#"S°ERUCTiONS
-A RTi
D'ALLUMAGE
]
SSEMENT
LES REGLES SUIVANTES
TOUJOURS
ETRE SUIVIES
DOIVENT
DANS GET
AVERTISSEMENT
ORDRE (F_q. 2"! ) :
" _
.
1; OUVREZLE COUVERCLEDU GRIL! Toutetentative
d allumagedugril alors que le couVercleest ferm#risque de
!
Afind'#vitertoutrisqued'incendieinstantan6,ILESTTRES
IMPORTANT
de v#tifierlesinstructionsd'allumagedu gdl que
vousallezallumer.Selonle type degril, certainsc6t#,sdu bnJleur
doivent_treallum_senpremier.Consultezles 2p,vges oi"!"
suivantes afin de trouver votre gril et lesinstructions
d'allumages'y rapportant. (Pages22, 23)
provoquerune explosion.
2. V6rifiezque les boutonsde r6glagede brOleurssont en
positionArr_t.
•
....
3. Ouvrezlalimentationen combustible.Pourles bouteilles
de GPL, toumezle bouton de la valvede la bouteilledun
tour clansle sens inverse des aiguillesd'unemontre.
4.
au-dessusdu
' NE PASplacerla t#teou les mainsjuste,au-dessus
du gril.
gri_
{ |NSTRUccIONESDE
ENCEND|DO
]
ADVERTENCIA
LAS SIGUIENTES
DEBEN
SEGUIR
REGLAS
EN ESTE
SIEMPRE
ORDEN
SE
'(Fi._q21):
1, i ABRIRLA TAPADE LA PARRILLA! Cualquierinten{0de
encenderla parrillaconla tapaabajopuedeprovocaruna
explosi6n.
2. Revisarque los botonesde controldel quemadorest_.nen
"OFF".
ADVERTENCIA
:
ParaimpedirUnfogonazoo combustiSn,
repentina
peligrosa,ES
IMPORTANTE
revisarlasinstrucciones
de encendido
de la panilla
quesepretendeencender.AlgunosdiseSosexigenencenderen
primerlugarun ladoespecificodelquemador.Consultelas2
p_ginassiguientesparaencontrara su parrillacon sus
instruccionesde encendidocorrectas.(P_.ginas
22,23)
3, Abrir el suministrode combustible. Para un tanquede Gas
de PropanoLicuadogirar el bot6nsuperiorde la v_.lvuladel
tanqL_ehaciala izquierdauna rotaci6npara poderabrir.
4, NOpermanecerde pie conla cabezao brazossobrela parrilla.
n,.
U & C 1142-0161
, :t
pg. 21
LiGHTiNG
INSTRUCTIONS
FOR 300 - 700 SERIES
GRILLS
For assistance,
call 1-800-200-2300.
Please reference model number on back of grill.
IMPORTANT
INSTRUCTIONS
Read instructions before lighting.
Open lid before lighting.
1,
2,
3.
TO ENSURE
PROPER
LIGHTING
AND
GAS FLOW,
YOU MUST FOLLOWTHESESTEPSIN ORDER:
IGNITERLIGHTING
1. Turnon eithergas control knob.
2. Engagethe igniterswitch severaltimes (4 to 5) untilthe flame
ignites.
3. If the burnerdoes not light after trying again,turn offknoband try
matchlightingthe grill.
Make sure cylinder valve and
burner valve knobs are OFF.
Turn cylinder valve on FIRST.
Turn burner valve knob on NEXT.
1
IMPORTANT
INFORMATION
FOR
ELECTRONIC
IGNITERS:
If you havean electrdnicigniter,checkthat yourbatteryis fresh and
properlyinstalled.
Beforelightinggrill, verifyelectronicigniter]ssparkingat electrode(s)/-
Turn off cylinder
Veuillez
citer
i
E'LECTRONIQUES:
:
Si votre barbecueest muni d'un allumeur_lectronique,v_rifier
que votrebatterie est encorebonne et qu'elle est bien install_e.
Avant d'allumerle barbecue,s'assurerque I'allumeur
61ectroniqueproduit une _tincelle&(aux)_lectrode(s).
Lire attentivement
Ouvrir le couvercle avant d'allumer
_
C.
leE boutons
sont fee's
S'assurer
COMMENCER
B.
_._
du barbecue,
avant d'allumer le barbecue.
le barbecue.
de r_glage
des
bl'_leu_'
1
/
"
[OFF).
que ie robinet de la bouteille et
par ouvrir le robirmt de la bouteille.
NSUITE, du enfoncer
r_glage
br_leur.
et tourner
le bouton
de
si le barbecue ne s'ailume pas imm_diatement, FERMER le bouton
de r_glage du br_leur, attendre 5 minutes et r_p_ter I'op_ration.
O
Fermerlefinide
robinetde
la bouteille
quandvousavez
vousservirdu
barbecue,
Si nece_ita ayuda, Ilame al 1-800-200-2300,
Por favor, use como referencia el n_mero de modelo que se encuentra en _aparte trasera del
INSTRUCClONES
IMPORTANTES
1 • Lea las Instrucciones antes de encender el asador.
2, Abra la tapa antes de encender el asedor.
PAPA ASEGURAR
APROPIADO,
E ENCENDIDOPORMEDIODEIGNICIONESLECTRICA
S 1. Enciendacualquierade las perillasde control de gas.
2. Accionee! interruptorde encendidovariasveces (4 a 5) haste que la
P flama se encienda.
a 3. Si el quemadorno se enciendedespu_sde haber tratadode nuevo,
apague la perillay trate de encenderlocon cerillos.
EL ENCENDIDO
leE instructions
tous
;
3,
PARA'
h rarribre
POUR ASSURER UN D-i_BITDE GAZ ADI_QUAT, VOUS DEVEZ
SUIVRE LEE E't'APES SUIVANTES DANS L'ORDRE.--:-----
A.
INSTRUCCIONES
DE
ENCENDIDO
PARA
LAS PARRILLAS
SERIES 3GO - 700
iMPORTANTE
inscrlt
IMPORTANTES
2.
4.
RENSEIGNEMENTS
IMPORTANTS
SURLESALLUMEURS
|NFORMACION
du module
1,
3,
a
I
le num_ro
INSTRUCTIONS
ALLUMEUR
F 1. OuvrezI'undes boulons de r_glagede g_z. "
r 2. Appuyezplusieurs lois (4 ou 5 lois) sur I'allumeurjusqu'&ce
=3 que la flammeapparaisse.
n 3. Si le brOleurne s'allumetoujourspas, fermezle boutonet
essayezd'allumerle gn?avec une allumette.
o
after use.
Pour tout renseignement, composez le _1:8G0:200_2300.
iNSTRUCTIONS
D'ALLUMAGE
POUR
LES GRILS SERIES
300700
s
If ignition does not immediately take place,
turn the burner valve knob to OFF,wait 5
minutes and repeat lighting procedure above.
EI._ECTR6NICO:
Si ustedtieneencendidoelectrSnic0,
verifiqueque la bateria est_ en
buen estadoe instaladacorrectamente.
A.
J_
_-_ _.
_
_
B. /
C.
_,
DEBEP_
UN ENCENDIDO
I
I
Asegdrese
de que la v=qvula del tanque
la perilla de la v_lvula del quemader estdn
en "OFF" (APAGADO).
. _
PRIME.RO
f.,_
Y FLUJO DE GAS
SEGUIR ESTOS PASOS EN EL PEDIDO:
encienda
LUEGO encienda
quemader ........
la v_'lvula del tartclUe.
la perilla
de la vdlvuta
del
Sl no ocurre una ignici6n immediatamente, gire la v_lvula de!
quemador hasta que est_ en "OFF", espere 5 minutos y repita
el proceso de encendido mencionado
anteriormente.
Apague el tanque despues de usarse.
L.J
Antesde encenderla parilla,verifiqueque e!(los)electrodo(s)del
encendidoelectr6nic0haga(n)chispa.
pg. 22
U & C 1142-0161BX
...,=
[
1. Strike and placethe burningmatchthroughthe lightinghole(s)
as shown. (Fig. 22 & 23)
2. Turnon RIGHTgas controlknob.
3. Extendtheflame untilit is abovethe end of thelightertube. This
shouldcausethe burner to light.
mmi_mmmmmmmmmJlnBmmmm
ALLUMAGE
,,
MANUEL
F
j
i
?
7
AT -- TeNT ON
1
L_-_._--_,_.._'
Utilisezune LONGUE
..... allumette_en
bois.
1. Frottezi'allumetteei placez-laprosde I'orifice(s)d'allumage.
(Fig.22,23)
!
2. Tournezle boutonde r6glagedegaz de DROITE.
3. Augmentezla flammejusqu'&ce qu'ellese trouve au-dessusde
I'extr#mit_du tube de I'allumeur.CeladevraitprovoquerI'allumage
du brQleur.
1. Encienday coloqueel cerilloa tray,s del orificio(s)de encendido.
(Fig. 22.23)
2. Enciendala perilia de controlde gas de la DERECHA.
3. Subala flamaI_astaqueest_perendmadel extremodel tubodel
encendedor.
Estodebehacerqueel quemadorse endenda.
U & C 1142-0161BX
pg. 23
I
IGNITERLIGHTING
1. Turn on the side burner gas controlknob. (Fig.24)
2. Engagethe igniterswitchseveraltimes(4 to 5) untilthe
flameignites•
3, If the flame doesn'timmediatelylight, turn off control knob
and wait for five minutesfor gas to clear,
4. Repeat steps 1 through3.
5. If the burner does not light after trying again,turnoff knob
and try matchlightingthe burner. HINT: If the igniterfails to
light the side burner,adjust electrodetipwith needle-nose
E
n
g
I
i
,
WARNING
t
.
•
•
Grill mustbe levelbeforeusingsideburner.
NEVERmovegrill with a pot or pan on the side burner.
Make sure potor pan is centeredon sideburner. (Fig.24a)
To avoida possibilityof tippingthe grill over,NEVERplaceover 15 poundson
the sideburner. A filled6 quart aluminumpot is approximately15 pounds.
i
OfflFenT_er/Apagada
--_I__,NOORRECTI
o
:
_
!
_
INCORRECTO
pliers. A spark mustjump near a gas openingin the burner
when igniteris activated. Use care notto damagethe
ceramicinsulatoron electrode.
S
h
MATCH LIGHTING
High/ Niveau /AR(
1. Strike and placethe burningmatchnear the burnergas
port holes.
2. Turn on side burnergas control knob. This shouldcause
the burnerto light.
_ LowlBas !Bajo
i
,,r
ALLUMEUR
ALLUMAGEMANUEL
CORRECT
CORRECT0
i
"
-
' :
en boisi "
1. Appuyezplusieurs
Tournezle boutonder6g/age
gazsur
duI'allumeur
br_leurlat6raL
(Fig.24)
__lumette
2.
lois (4 ou5de
lois)
jusqu'_
ce
que la flammeapparaisse.
1. Frottezune allumettepros du nez du brOleur.
_ . 5. _:'
3. Si la flammen'apparaftpas imm6diatement,fermezle bouton 2. Toumezle boutonde r_glagedegaz du brOleurlateral.Celadevrait
_
de r6glagede gaz et attendezcinq minutesque le gaz s'6vacue. provoquerI'allumage
du brOleur.
_" ._;_-,i "-.:"_
4. R#p6tezles 6tapes 1 _ 3.
F
r
a
rl
5. Si le brOleurne s'allumetoujourspas, fermezle bouton et
essayezd'allumerle gril avec une altumette.
CONSEIL: Si I'allumeurne parvfentpas _ allumerle brDleur
lat6ral, ajustezI'emboutde I'#lectrode_ I'aided'une pince_ becs
fins. Une#tincelle doltse produirepros de I'arriv_ede gaz du
brOleurIorsqueI'allumeurest activ& Faitesattentionde ne pas '
endommagerI'isolateuren c_ramiquede .l'_lectrode.
a
i
S
A VERTI SS EMEN T
.....
Le gnl dolt etremls de nweauavant d utl#serle bruleurlateral .... o,._.,_...
NEJAMAISd#placer
ungnlavecunemarmiteouunplatsurle brOleur
!ate_.:.!
S'assurer
quelamarmiteouleplatestbienaucentredubr_leurlat#ral.
(F'_g,
24a).)i,.,
Pour#viterquelegrilserenverse,
NEJAMAIS
placerplusde 15livres ' ':i_;.
(6,8kg)surleb_leurlat#ral.Unemarmite
enaluminium
de5,6litres,
pleine,
p_ envf_.
15IMes(6,8kg).s
::'_'-
f
[
E
S
P
a
O
I
EHCENDIDO
DEL QUENIADOR
LATERAL
ENCENDIDO
PORMEDICDEIGNIClONELECTRICA
1. Encienda
la peri!lade controlde gasdelquemador,
lateral.(Fig.24)
2. Accioneel interruptor
de encendidovarias veces (4 a 5) hasta
que la llama se encienda.
3. Si la flama no se enciendeinmediatamente,apaguela
pssssserillade control y espere5 minutospara que el gas se
despeje.
4. Repita los pasos del 1 al 3.
5. Si el quemadorno se enciendedespu_sde haber tratadode
nuevo, apaguela perillay trate de encenderlecon cerillos.
SUGERENCIA:Si el quemadorlateral no Iograencendersepor
medic de ignici6n el6ctrica,ajuste la puntade electrodocon unas
pinzas de puntade aguja.Cuandose activela ignici6nel6ctrica,
debe saltar una chispa cerca de un orificio de gas en el quemador.
Tengacuidadode no dadar el aisladorde cer_.micao el electrodo.
pq. 24
(SOle
en modelos
se ectos) ;'i|
ENCENDIDO
PORMEDICDECERILLOS
CAUCION
:_:_ii_.i__
Useun cerilloLARGOd_
1. Encienday coloqueel cerilloen los orificiesdel quemador.
: '-_2, Enciendala perillade controlde gas del quemador.Estodebe hacerqu'_':i'_
el quemadorse encienda.
"
-....
Z_ ADVERTENCIA
....
._;
Laparrilladebeestarniveladaantesde usa"el quemador
lateral.
- _.
NUNCAmuevala parrillacuandotengaunao a o sart_nsobreel quernador
lateral
......
. AsegQrese
quelaollao sart6nest_enel centrodelquemador
lateral.(F_j24a) ,
, Paraevitarla posibilidad
de ladearla parrilla,NUNCAcoloqueun pesoarribai:
de 6,8kilossobreel quemadorlateral.Unaollade aluminio
de 5,6litrosIlena,
pesaaproximadamente
6,8kilos.-
SHUTTING
GFF
T_IE
!tl
GRELLq
L._ CAUTION
DONOTtouch hot grill partswith bare hands!
1
= You MU,,ST
use protectivegloves. (Fig. 25)
]
\
1.Turnall burnercontrolknob(s)to off.
2. After burnerflamegoes out, turnoff fuelsupply. Foran L.P.cylinder,
turn the L.P.Cylinderknob in a clockwisedirectionuntilit stops.
1
1
' A CAUTION
the
Be certainthe
grill is not in
gasis
use.shut off at theL.P.cylindervalveanytime
ETEINDRE.
LE GRIL
}
r
7
i
s
m___
.
/_ ATTENTION
NE PAStoucherles surfaceschaudesdu gril _ mains nues!
VousDEVEZporterdes gants deprotection. (Fig.25)
Assurez-vousque le gaz est ferm_ au niveaude la valvede la
bouteil!ede GPL_ chaquefoisque le gril n'estpas utilis&
1. Metteztous les boutonsde r_lage de brOleurssur la positionarr#t.
2. Unelois la flammedu br#leur#teinte,fermezI'arriv&ede gaz. Si
vousutilisezune bouteillede GPL,toumezle boutonde la bouteillede
GPLdans lesens desaiguilles d'unemontre'jusqu'aubout.
'
APAGADO
S
P
a
o
I
•
/_ ATTENTION
DE LA PARRILLA
A PRECAUCION
}
..
iNO toque las partescalientesde la parrillasin protegerselas
manos!TIENEque usarguantesde protecci6n.(Fig. 25)
/'7',,PRECAUCION
Asegc_irese
que la W.lvulade gas del tanquede Gas Propano
Uquidoest_ cerradacuandola parrilla no est6 en uso.
1. Apaguetodaslasperillas de controlde los quemadores.
2. Despu_sde quela flamadel quemador
se extinga,apagueel suministro
decombustible.
Paraun tanquede GasPropanoUquido,girela perilladel
tanquedegasen sentidode lasmanecillas
delrelojhastaquesepare.
U & C 1142-0161
pg. 25
WARNING
I
E
n
i
o
Keep applianceareaclean andfreefromcombustiblematerials,gasolineand otherflammablevaporsand liquidsand spareLP. cy!indem.
DO NOT Obstructtheflow of combustionand ventilationair.
Keep the ventilationopening(s)of the L.P.cylinderenclosure(if so equipped)free and clearof debris.
::
A barbecuegrill becomeshot duringuse. It is necessaryto useprotectivegloveswhenoperatingcontrolknobs,LP. cylindershut-offknobor
lid handle. DO NOTtouch castings,glassand grids.
DO NOT disposeof unusedpropanegasby openingthe LP. cylindervalve and ventingvaporintothe atmosphere. Instead,takethe cylinder
to yourpropanegassupplier.
Be sureto tightenup all hardware(screws,nuts, bolts,etc.)at least oncea year or eachgrillingseason.
S
h
CONDITIONTHE GRILL
' Vegetableoil can be usedto coat and preservethe internalgrids,burnerand metal partswhile in storage.
, Beforeusingthe grill for the first time or afterstorage,operategrill with lid closedon highsettingfor 15 minutesto burnaway oil.
• Once the oil hasburntaway,checkthe burnerflame pernext step.
THE BURNERFLAME
, Keepthe grill lid closedand the cookingsurfacesin place.
, Observethe burner'sflame from belowthe grill bottomor by lookingthroughthe matchlightinghole. (Fig. 26)
, Flamesshouldappearsimilarto the goodflame shownin Fig.26a and as follows:
[]
[]
[]
[]
[]
[]
A good flameshouldbe bluewith someyellowtip comingfrom the burnerholes.
Someyellowtips on flamesup to 1"in lengthare acceptableas longas no carbonor soot depositsappear.
If flamesare excessivelyyellowand irregular,the oil residuemay not be completelyburnedoff or the venturimay be cloggedor may
notbe properlypositionedoverthe orifices. Allowgrillto coolbeforere-positmningventud overvalve and Orifices.
Grillsthat havebeenin usefora whilesometimesbeginto havemoreyellowflame.A bu d-upof fooddeposits,fatsor cookingseasonings
can
causeyellowingof flames. Cleanthe burnerto removeresidueandcheckfor cloggedburnerholesor blockedventuri.
Regularuseof your grill will actuallyhelp keepit Operatingmoresmoothly. .
_':i
Eachgrill may heatdifferently.Someunitswill heatsomewhatmoreto the centerand back of grill. Flavor of grilledfoodwill imprq_e
with useand as youbecomefamiliarwith the grill.
-_:.,
"Jaune
Amarilla
GOOD
BON
BUENA
BAD
M,4UVAIS
MALA
q
•
Yellow
Jaune
Am_
Blue ......
Bleue
Azul
E_
Holes in BurnerJ
Orificesdu br#leur
Orificiosdel quemador
E;SZ_
VISUAL FLAME CHECK
VERIFICATIONVlSUELLEDE LA FLAMME
VERIFICACIONDE LA FLAMA
pg. 26
U & C 1142-0161
UT LISATtOH
GEHERALE
ET
FLAMMES
DE
BRULEUR
CORRECTE '
AVERTISSEMENT
Nepes conserver
de combusUble,
d'essenceou de produitsinflammables,
ni debouteillesde GPLde rechangedansla zoneo_ le gill est utilis#,.
NE PASobstruerla circulationde I'airde combustionet de ventilation.
Assurez-vousque les ouverturesde ventilationde rabri de la bouteillede gaz (s'ilyen a) ne sont pas bouch#esni obstru#espar des d#bris.
Ungril-barbecue
devienttr_schaudpendantsonfonctionnement.
II est imp#ratifd°utiliser
desgantsdeprotectionIorsquevousactionnezlesboutonsde
r@lage,le boutonde ferrneture
de la bouteillede GPLou la poign_edu couvercle.NEPAStoucherauxpbces de fonderie,auxvitreset auxgrilles.
, NEPASlib6rerle propaneinutilis#en ouvrantla valve de la bouteillede GPLet en laissant_chapperle gaz dansI'atmosph#re.Rapportez
!plut6tla bouteillechez votrerevendeurde propane.
I', Assurez-vousdd bien serrerroutesles pi_ces (vis,6crous,boulons,etc.) au moinsune loispar an ou _ chaquesaisonde barbecue.
PREPARATION
DU GRIL
" DeI'huilev_j6taiepeut#treutilis6epourrecouvfiretpr6serverlesgrillesint6rieures,
le brOleuretlespartiesm6talliques
Iorsquele gill est rang6.
, Avantd'utiliserle gillpour la premierefob ouapr#sunedur6ede non-utilisation
prolong6e,faitesfonctionner
le gill avecle couvercleferm#surfeu fort
pendant15minutespour#liminerrhuileenla brOlant.
, - Unefob rhuile 61imh_6e,
v6rifiezla flammedu brOleurtel que d#crit clansla prochabe 6tape.
LA FLAMMEDU BRULEUR
" Laissezle couvercleferm_et les surfacesde cuissonen place.
• Observezla flammedu brOleurdepuisle dessousdu gril en regardant_ traversI'orificed'allumagemanuel.(Fig. 26)
• Lesflammesdoivent#tre commecellesillustr#essur la Fig. 26a et commesu#:
[] Uneflammecorrectedolt#tre bleueavec quelquespetits traitsjaunes 6manantdes orificesdu brOleur.
[] Quelques
petitstraitsjaunessurlesflammesjusqu'#2,5cm de hauteursont acceptables
tantqu'ilny a pasde d#p6tde _rbone nide suie.
[] Si lesflammessontexcessivement
jaunesetirr@uli#res,fl sepeutque lesr#sidusd'huilenesoientpascompl#tement
#limin_sou le ventufipeut#tre
obstru6ou ne pas#trepositionn#correctement
surles _vents.Laissezrefroidirle gill avantde remettreenplacele venturisurla valveet les#vents.
[] Lesgrils qui sont utilis#sdepuisun certaintempspeuventcommencer_ avoirdavantagede flammesjaunes. Uneaccumulationde d#p6ts
d'aliments,de graisseou d'assaisonnements
peut provoquerdes flammesjaunes. Nettoyezle br#leurpour _liminerlesr6siduset v#rifiezque les
orificesdu br_leur ne so.ntpas obstru#set le venturibloqu&
'
'
[] Uneutilisationr#guli#rede votregril va en fafflui permettre de fonctionnerbeaucoupmieux.
[] Chaquegril peut chaufferde mani#rediff#rente.Certainsappareilsvontplut6t chaufferdavantageau centreet _ I'arri#redu gril. Le goOtdes
_a_lim.e_nts
.grill_.sva_s'_a.m#_li.orer._,
mesur.e,
quevous utili_sere_z
et vous familjari.serez
avec_vot_re
_gr_iL
.....................................
USO GENERAL
!
Y FLAMAS
IBE QuEr AoOR
ADECUADAS
]
/_ ADVERTENCIA
, Mantengalimpia'el _.readel aparatoy libre de materialescombustibles,gasolinay otros vaporesy liquidosinflamablesy de repuestosde
Ianquesde gaspropanoI[quido.
.NOobs_ruyael flujo de mirede combusti6ny ventilaci6n.
Mantengaelllosorificio(s)de ventilaci6nineluido(s)en tanquede gas propanolicuado(si estAequipado)limpio(s)y libre(s)de cochambre.
La parrillase calientadurantesu uso. Es necesarioque use guantesde protecci6ncuandoopere las perillasde control,la perillade apagado
tel tanquede gas propanoo a agarraderade la tapa. NO toqLte.laspiezas met_.licas,el vidrioy las parrillas.
, NOse deshagadel gas p_'opanoI[quidoabriendola vAIvula.de.ta.nque
y dejandoloescapara la atm6sfera.Mejor, Ileveel tanquea su
distribuidorde gas propano:
......... " : ....
" ..... ..
.
..
,. AseglJrese
de api'etar!odoslosherrajesde ensamblaje(tomillos;t_i_rcas,pemos,etc.}al menosunavezaJafio o cadatemporadaqueuse lapanilla.
ACONDICIONE
LA PARRILLA
. ''-'- _" "
'
• Puedeusar aceite_,e_]etal
para cubriry preservarlas parrillasinternas,queinadoiesy partesmetalcas mientrasestAguardada
o Antesde usar la_drrilla por primeravez o despu_sde haber estado guardada;operela parrillaconla tapaencimayen ajustealto durante
15 minutospara quemarel aceite. "
" "
, Cuandoel acei!eSe"hayaquemadoverifique la flama del quemadorparael siguientepaso.
LA FLAMADELQUEMADOR
•"
:
, Mantengala tapa'dela parrillacerraday las superficiesde cocinadoen su lugar.
• Observela flar_adel quemadorpor debajode la parte inferiorde la parrilla vi_ndolaa.trav_sdel orificio de encendido.(Fig26)
, Lasllamasdeberi:_,erse
similara la llama que se muestraen la figura 26a y comose indicaenseguida:
[] Unabuenaflama tieile que ser azulconuna puntaamarillosaque sale de los orificiosdel quemador.
[] Algunaspuntasamarillosasen las flamasde hasta 2,5 cmde largo son aceptablesmientrasque no aparezcandep6sitosde carton u hollin.
[] Si lasllamas est_.nexcesivamenteamarillase irregulares,el residuode aceitepuede que no se haya quemadopor completo o el venturi "
puedeestartapadoo puedeno estarco ocadocorrectamentesobre los orificios.Permitaque la parilla se enfrfe antesde volvera colocarel
venturisobrela vAlvulay los orificios.
.
•
[] Lasparrillasque hartsido0sadasdurantealgbn rato algunasveces empiezana tener una llama mAsamari!la. Unaacumulaci6nde
dep6sitosde comida,grasaso sazonadorde comidaspuede causarque las flamasse ponganamarillas.Limpieel quemadorpara quitarel
residuoy verifiqueque los orificiosdel quemadoro el venturi no est_n bloqueados.
[] El uso regularde la parrillaayudarAa que siga funcionandoadecuadamente
....
[] Cadaparrillapuede que calientediferentemente.Algunas unidadescalentarAnm_.sal centro yen la parte traserade la parrilla. El saborde
la comidaasadaen la parrilla mejorarAcon el uso y conformese familiaricecon la parrilla.
,_
U & C 1142-0161
pg. 27
BURNER
CONTROL
SETTING
TIPS
. Thehighflamesetting
istoohotfordirect
cooking,
Thehighflame
setting
isgoodforquick
searing
ofmeat,
thenfinish
cooking
onmedium
or,!
lowflame
settings.
. Usehighflamesetting
withlid closed to preheatthe grill for 5 minutesbeforecookingandwith lid closedfor a maximumof 5 minutesafter _
cookingto burn off greasedrippings.
, Use mediumflame settingfor direct cookingof steaks,pork chops,chickenand hamburgers.
• Use low flame settingfor roastsand rotisseriefoods.
, Thick steaks will finish with a bettertextureand morejuice if firstsearedon high flamesettingand thencookedon lowflamesetting.
SAFEGRILL OPERATION
• NEVERleave cooking foodunattended. Continuallyobservingthe foodwill help in maintainingan eventemperature,conservefuel,improve
thefood's flavor and lessenflare ups.
• To open grill lid, stand to side of grill and lift handleslowlyto avoidburningin caseof a greasefireflare up.
• DO NOT expose any partof your bodydirectlyabove the cookingarea.
FOOl:)PREPARATION
HINTS
Yourgrill can cook a variety of foods. For best results,follow thefollowinginstructions:
•Trim excessfat from meat and poultry.Slash any remainingfat to stopcurling,but take carenot to cut the meat.
•Frozen meat and poultryshouldbe thawedprior to cooking.
, Frozenfish and vegetableswill cookwithoutthawing.
,Placingfrozen food on very hotporcelaincookinggridscan causetemperatureshockandcrackthe finish.
,Salt food after cookingto help preventdryingout the food.
,Brush naturally lea_nmeatswith cooking oil or margarine.
,Cook small piecesof tenderfoods in foilor on specialdelicatefood cookinggrids. (seebelow)
. ,Apply barbe.cue,tomatoor sugarbasedsaucesno soonerthan the last 10 minutesof cooking.
,Turn foodwith tongs or sDatula;piercingtends to dry out meat.
°
"
ELICATE
GRILLE
•
' ALIMEN
CONTROL
pg. 28
U & C 1142-016! :
i PETITSTRUCSPOURLEREGLAGE
DU BRULEUR•
i Le r#glagede !lamme"foil" est tropchaudpour une cuissondirecte.Le r6glagede flamme"fort"convienttout _ fait pour salsir rapidementla
• viande; terminezensuitela cuissonen r&glantla flammesur la position "moyen"ou "doux".
'
Utilisezle r_glagede flamme"fort"
avec le couverclefefm_pour pr_chaufferle _Jrilpendant5 minutesavantde fairecuire et avec le couverde
ferm6 pendant5 minutesmaximuma r_s la cu!ssonpour brOlerles d_p6tsde gralsse.
Utilisezle r_glage_de"
flamme"moyen"pour la cuissondirectede steaks,de c6tesde porc, de poulet et de hamburgers.
Utilisezle r#.glage de flamme"doux"
pour la cuissondesr6tis et des alimentsau tournebroche
.....
Les steaks#Paisaurontune meilleuretextureetSerontplusjuteux s'ils sont d'abordsaisissur feu."forPpu!scults sur leu "doux".
FONCTIONNEMENT
DUGRILENTOUTESECURITE
Ne JAMAISlaisser les alimentscuiresans surveillance.Unesurveillanceconstantedes alimentsaidera _ maintenirune temp6raturer#guli#re,
preserverle gaz, _ am#liorerla saveurdes alimentset _ diminuerles feux de foyer.
Pourouvilrle couverdedugill,mettez-vous
surle c_t#dugill etsoulevezdoucement
lapoign#epour#viterde vousbr_lersi la graisses'enflamme.
NE PAS exposerdirectementdepartiede votrecorps au.dessusde la zonede cuisson.
CONSEILSDE PREPARAtiON
DESALIMENTS
Votregill peut cuire unegrandevari6t#d'aliments.Pour obtenirde meilleursr#sultats,veuillezsuivreles instructionssuivantes•
Eliminezrexc6dentde graissedesviandeset volailles.Entaillezle gras restantpour 6viterqu'il ne se recroqueville mais faitesattention
ne pas couperla viande.
La viandeet les volaillescongel_esdoivent_tred_congel#esavant la cuisson.
"
'
Le poissonet les I_gumescongel_sserontcultssans d_cong61ation.
.........................
Mettredesalimentscongel6ssurune grille de cuissonen c6ramiquetr#s chaudepeut provoquerun choc de temperatureet craquelerle
rev#tement.
Salezles alimentsapr#sla cuissonpour #viterqu'ils ne se dess_chent,
Badigeonnezles viandesnaturellementmaigresavec de rhuile de cuissonou de la margarine,
Faitescuireles petitsmorceauxd'alimentsfragilesdansdu papier aluminiumousur des grillessp#cialesadapt#es_ la cuissondes
alimentsd#licats.(Voirpage28)
N'ajoutezpas les sauces_ basede barbecue,de tomatesou de sucre avant les 10 derni_resminutesde cuisson....
Retoumezles aliments_ /'aidede pincesou de spatules;percer la viandea tendance_ la dess_cher.
..
CONSEJOSPARACONTROLAR
LOSQUEMADORES
Iia posici6nde fuegoalto es demasiadocalientepara cocinardirectamente.Es adecuadapara chamuscarla came r&pidarnentea fuego muyalto
y despu_sterminarla cocci6na fuegomedianoo lento.
Usela posici6nde fuegoalto conla.tapa cerradapara precalentarla parrillaper 5 minutosantes de cocinar y con la ta.pacerradapor un m_imo
de 5 minutosdespu_sde cocinarpara quemarla grasa que hayagoteado.
Use la posici6nde fuegomedianopara codnar directamentefiletes,costillasde puerco,polioy hamburguesas.
Use la posici6nde fuegolentoparacocinarasadoy rostizaralimentos,
La came de corte gruesotendr_,unatexturamejory quedarAm_.sjugosa si primeiose chamuscanr_pidamentea fuego muy altoy despu6sse
cocinaa fuegolento.
FUNCIONAMIENTO
SEGURODELA PARRILLA
NUNCAdeje desatendidala comidamientrasse cocina.El observarcontinuam-ente
los alimentosle agud_,a mantenerunatemperaturauniforme,
a conservarcombustible,a mejorarel saborde la comiday a reducirlas Ilamaradas.
Paralevantarla tapade la parrilla,pAresea un ladode la parrillay levantela tapa lentamenteparaevitar quemadurasen casode que se
enciendauna flama a causade la grasa.
NOcoloqueningunapartedel cuerpodirectamentesobreel _,reade cocd6n.
CONSEJOS
PARALA PREPARACION
DEAUMENTOS
Puedecocinar una variedadde alimentosen la parrilla.Paramejeresresuliados,siga las siguientesinstrucciones:
Corteel excesode grasade la camey las aves.Hagacortesen la grasaque quedeen la came para que _sta Qltimase mantengaplana,pero
tengacuidadode no hacercortesen la came.
La came y las ayes congeladasdebendescongelarseantesde cocinarse.
El pescadoy las verdurascongeladosse cocinansin descongelarse.
Cotocaralimentoscongeladossobrelas parrillasde cocci6nde porcelanacuando_stas est_.nmuy calientespodria ocasionarun choquede
temperaturay resquebrajarel acabado.
ASadala sal despu_sde cocinarlos alimentosparaque no se sequen.
Use un cepilloparaaplicaraceitede cocinaro margarinaa las carnesmagras.
Cocinelas porcionespequeSasde alimentosdelicadosen papel de aluminioo en parrillasde cocci6nespecialespara alimentosdelicados.(Vea
la p&gina28)
Apliquela salsade "barbecue",de tomateo las de base de az_caren los 51timos10 minutosde cocci6n.
Volteelosalimentoscon tenazaso esp__tula,
ya que el agujerearla came tiendea resecarla.
U & C 1142-0161
pg. 29
E
n
g
I
i
s
h
FOLLOWTHESESTEPS:
1. Shut off gas at the burnervalve(s)and stayaway!
2. Allow the fire to burn itselfout.
3. Oncethe fire is outand the appliancehas cooled,shut off the L.P.cylindervalve.
4. Cleanall parts and inspectfor damage. Partsto checkfor damageare the LP. cylinder,cylindervalve,regulator,gas supplyhose,burner
valve(s)and burner.
5. I f any of the abovementionedcomponentsare damaged,seek replacementfrom a factory authorizedservicecenter beforeoperatingthe;
applianceagain. Locateyournearestservicecenter by calling1-800-356-3612.
NOTE:
•
•
•
•
Someflare up addsa smokyflavorand searsfood. Excessive0reasefirescancausea potentiallyhazardoussituationand damagethe gn
Avoidexcessiveflare ups by pre-heatingthegrill with the lid closedfor 5 minuteson high settingto burn off greasefrom previouscooking.
Cookwith lid downand continually
monitorcookingfood to avoid greasefires and flare ups.
Trimmingexcessfat from meat will reducegreasefires andflare ups. Cookfatty meat in smalleramountsoverindirectheaton lowsetting.
VEUILLEZSUIVRECESINDICATIONS
:
F
r
a
n
8
i
$
1. Fermezle gaz au niveau de la valve du br_leur et 61oignez-vous
!
2. Laissezle feu s'6teindre.
.
3. Unefois le feu 6teint et rappareilrefroidi,fermezla valvede la bouteillede GPL.
4. Nettoyeztous les 61#mentset v#rifiezles dommages.Les 616ments
_ v6rifiersont la bouteillede GPL,la valvede la bouteille,le r#gulateur,le
tuyaud'alimentationdu gaz, la valvedu brOleuret le br#leur.
5. Si Fundes 61#mentsmentionn#sci-dessusest endommag#,faites-leremplaceravant de vousservir _ nouveaude I'apparei!en vousadressant
un centre de serviceapr#s-venteagr#6. Vouspouvez connaftrele centrede serviceapr#s-ventele plus procheen appelantle 1-800-356-36'i2.
REMARQUE:
• Certainsfeux apportentune odeurde fum_e et dess_chentles aliments.Lesfeux de graisseexcessifspeuventengendrerdes risqueset
endommagerle gril.
....
:
• Evitezlesfeuxexcessifsenpr#chauffant
le gill avecle couvercleferm#pendant5 minutessurfeu"fort"pourbrOlerla graissedescuissonspr_:dentes.'_
• Cuisinezavec le couverclebaiss#et surveillezconstammentla cuissondesalimentspour #viter les feux et que la graisse ne s'enflamme._• EliminerI'exc#sde grasdela viander_dqirale risquede feuxet quelagraissene s'enflamme.F_es cuireIaviandegrasseparpetitesquantit#ssurfeu._
indirectetdoux.
[ EN CASO
DE QUiP HAYA
UN FUI::GO
OCAS!ONADO
POR Li ,
SA']
SIGA LOSPASOSSIGUIENTES:
E
S
P
a
rl
0
I
1. Cierrela o lasvdlvulasdel gasy ial_jese!
2. Dejeque el fuegose extingasolo.
3. Unavez que el fuegose hayaextinguidoy la parrillase hayaenfriado,cierrela v_.lvuladel cilindrode gas.
4. Limpietodas las piezase inspecci6nelaspara determinarsi est_n daSadas.Laspiezas que debeninspeccionarseson.eIcilindrode gas, la
v_lvula del cilindro, el regulador,la manguerade suministrode gas, la o las v_lvulasdel quemadory el quemador.....
5. Si cualquierade los componentesantes mencionadosestuvieradaSado,obtengapiezas de iepuesto en un centrode servicioautorizado'de
f_.bricaantes de volvera usarla parrilla.En EstadosUnidos,Ilameal 1-800-356-3612para encontrarel centrode serviciom_.scercano.
,
NOTA: "
-
• LasIlamaradasalmaden
un saborahumadoy chamuscanla comida,
• Paraevitar Ilamaradasexcesivas,precalientela parrillacon [a tapacerradapor 5 minutosen la posici6nde fuegoalto paraquemar a grasa
que hayaquedado de otras ocasiones.
• Cooinecon la tapacerraday Vigilecontinuamente
los alimentospara evitarlos [uegos ocasionados
por grasay las Ilamaradas. , :, '
':
• El retirarla grasa excesivade la came reducir_,losfuegosocasionadospor la grasay las Ilamaradas,Cocinela carnegrasosaen p0rciones
:
mAspequedassobrefuegoindirectoo lento.
ioa. 30
,. J-."
_.
Ii P,,n 114p-0161
I
OOKING
METE ODS
)
DIRECTMETHOD:
•. The heat sourceis directlybelowthe food.
, Use for browningmeat or cookinghot dogsand hamburgers,but checkfoodfrequently.
• Use for skilletand stir-frycooking,butlimit the amountof oil and heatto be used.
• Cook roasts,turkey or duck on low heat. Place meatwith water in foil pan with corrugatedbottom. Replenishwater as needed.
•INDIRECTMETHOD:
, Lightonly one side of the burnerand placefood onoppositeside for cooking.
, Allowsfood to cook at lowertemperatureswhich increasestendernessand reducesgreaseflare ups.
, Good methodof cookingfoods that burn easily (vegetables,fish, etc.).
, Cook casserolesin oven-wareor foil pans much likecooking in a conventionaloven.
, Also try placinga pan of water abovethe lit burnerside to help meat retainit's juices. Replenishwateras needed.
DUAL TEMPERATURE:
, Cook 2 foods at onceby settingcontrolsknobs at differenttemperatu[es.
SMOKEFLAVORING:
• Try garliccloves, bay leaves,hickory,fruit woodsor mesquitechips. Soakthe desiredflavorin waterfor 30 minutesand placeit in an accessory
metal smokerbox. Placethebox belowthe cookinggrid prior to cookingfood.
[
MODES
DE
CUtSSOH
]
MODEDE CUISSONDIRECT"
, La source de chaleurse trouvedireatementsous les aliments.
, A utiliserpour faire rissolerla viandeou pour cuire deshot dogs et des hamburgersmais en v6rifiantfr_quemmentla cuisson.
• A utiliserpour les cuissons_ la po_le et saut6es,mais il faut limiter la quantit_d'huileetla chaleur.
• Cuisinezlesr6tis,la dindeet le canardsurfeudoux.Disposezla viandedansunplatenaluminiumavecle fondondul_,a]outezde I'eau.R_loutezde reau
si besoin.
MODE DE CUISSON
INDIRECT:
" Allumezseulementun c6t6 du brOleuret mettez les aliments_ cuiresur le cSt_oppose.
• Celapermet aux alimentsde cuire _ des temp6raturesplus basses,ce qui favorisela tendret_et r#duitles feux de graisse.
° C'estune bonne m#thodepour cuire les alimentsqui brOlentfacilement(l_gumes,poisson,etc.).
• Pr6parezdes cuissonsen cocottedens de la porcelaineculinaireou des plats en aluminiumun peu commedans un four traditionneL
• Essayez6galementde mettreun platremplid'eausurle cSt#de bn31eur
allum__ur aiderla viande_ conserverson]us. Rajoutezde I'eausibesdn.
DOUBLETEMPERATURE
:
....
, Cuisinez2 alimentsen m_metempsen r_glantles boutonssur des temperaturesdiff6rentes.
AROMEDE FUMEE:
• Essayezles goussesd'ail,les feuillesde laurier,le noyer,les cerisiersou le mesquite.Faites tremperles aromatesd_sir_sdensI'eaupendant
30 minuteset mettez-lesdans une botte _ fumage m#tallique.Placezla boTtesous la grillede cuissonavantde fairecuire les aliments.
M,='rooos
j
METODODIRECTO:
, La fuentede calor estAdirectamentedebajo de los alimentos.
• Use para dorarcarneo cocinarhot dogsy hamburguesas,pero es necesariorevisarlos alimentosfrecuentemente.
• Use para sofreir en un sart_n,pero limite la cantidadde aceite y calor que vaya a usar.
• Cocine asados,pavo o pard a !uegolento. Coloquela came con agua en un recipientede papel de aluminiocon fondocorrugado.Repongael
agua segt_nsea necesario.
'.
METODOINDIRECTO:
• Enciendaun lado del quemadorsolamentey coloquela comida en el ladeopuestopara cocinarla.
, Permiteque los alimentosse cocinena temperaturasm_s bajas, Iocual aumentala suavidadde la came y reducelas llamaradasocasionadas
por la grasa.
- :
• Buen m6todopara cocinaralimentosque se quemanf_cilmente(verduras,pescado,etc.).
, Cocinaguisos en vajillarefractariaoen recipientesde papelde aluminiode formamuy parecidaa la del homo convencional.
• Tambi_npfuebe€o!ocandoun sart6ncon agua sobre el lado del quemadorencendidopara ayudara que la came retengasus jugos. ASada
agua segSnsea necesario.
Dos TEMPERATURAS:
' Cocine 2 alimentossimultAneamentecon s61ocolocarlas perillasde control a distintastemperaturas.
PARA DARSABORMEDIANTE
EL AHUMADO:
• Usedientesdeajo,hojasdelaurel,leSade nogalamericano,
astillas
de maderasde _:_olesfrutaleso mesquite.Remojeel sabordeseado
en agua
durante30 minutosy col_uelo en el accesodode cajade ahumarmet_lica.Antesde _::odnar
losalimentos,
coloque
la cajadebajodela rejilladecodnar,,_
U & C 1142-0161
pg. 31
IN G THE
A,WARNING
"
atL.P.
cylinder
valve----]
Spiders
nestsor wasp'smud insidetheventurimay
causefire at valve. If a fire occurs,immediatelyturn off gassupply
_____1
_See representativeillustrationin Fig,27)
E
NOTE:
Spiders
andsmall
insects
canspin
websandbuild
nestsinside
theventun
tubes.
Thisespecially
occurs
inlate
summerandfall
before
frost
when
rl spiders
aremostactive.
Thesenests
canobstruct
gasflowandcausea fire
inandaroundtheburner
valves.
Sucha fire
cancauseoperator
g
injury
andserious
damagetothegrill.
I Tohelpprevent
a blockage
andensure
full
heatoutput,
clean
andinspect
ventud
tubes
often
(once
ortwice
a month),
NOTE: Waterorair
i pressure
will
notnormally
clear
a spider
web.
S
h
STEPS FOB CLEANINGVENTURI:
I,Removeburner
fromgrill
bottom.
2,Lookinside
lower
endofventuri
tubesfornests,
websormud,
3. Toremovetheaboveobstructions,
usean accessory
flexible
ventud
brush
orbenda small
hookon oneendofa20 inch
long
flexible
wire
suchastheoneshowninFig.
28andtherepresentative
illustration
inFig.
29,
4. Inspectand clean the burnerif needed.
5. Replacethe burnerassemblyintothe grill,
6. Make surethe valve orificesare insidetheventuri tubes.
7. Secureburnerback into grill bottom.
I
f
pg. 32
U & C 1142-0161
,
,....
,,,, i
,
DU
i
VRF
.f,IETTOYAGE
tTURJ
]
......
-----3
Les toilesd araign6eset les bouesde gu#pes_ l int6rieurdu venturipeuventprovoquerun feu. Si un feu est provoqu6,fermez
imm_
.
[
boutei_ de GPL au niveau de Ia valve.(VoirI'illustrationsurla Fig. 27)
REMARQUE:
Les araign#eset lespetits insectespeuventtisser destoiles et construireleurs nidsdans les venturis.Celaarriveparticuli#rement_ la fin de 1'6t#
et & I'automneavant les gel6es,Iorsqueles araign#essont les plus actives.Ces nidspeuventg#ner la circulationdu gazet provoquerun feu _
I'int6rieuret autourdes valvesdu brOleur.Un tel feu peutprovoquerdesblessures_ I'utilisateuret s#rieusementendommagerle gril.
Pour 6viter un blocageet assurerune bonne circulationde la chaleur,nettoyezet v6rifiezr6guli#rementles venturis(une _ deuxfois par tools).
REMARQUE" De reau ou de rair pressuris6(e)61iminetr#s bien les toiles d'araign6e.
INSTRUCTIONS
POURLENETTOYAGE
DU VENTURI"
1. Sortezle brCJleur
du fond du gill.
..
2. V#rifiezI'extr6mit#inf#rieuredes venturispour voirs'il y a des nids, des toilesou des boues.
"
3. Pour #liminerles obstaclesmentionn#sci-dessus,utilisezune brosse#-venturiflexibleou faitesun petit crochet_ I'extr6mit6d'un c,;2ble
flexiblede 50,8cm de long commeindiqu6sur la Fig. 28 et Surrillustrationde la Fig. 29.
- "
4. V4rifiezet nettoyezsi besoinle bffHeur.
5. Remettezle dispositifdu brOleurdansle gril.
..
6. Assurez-vousque les 6ventsde la valvesont bien dans les venturis.
7. Fixezle brgleurdansle fonddu gdl.
ADVERTENcIA
"
Siel Venturituvieranidosde ar_as o fangode avispasensu interior,estopodrfaocasionarfuegoen la vfilvula. Si ocurreunfuego,de_
apagarinmediatamente
la vfilvulade alimentacidn
degasdel tanquedeGas PropanoUcuado:(Veael dibujorepresentativo
enla Ilustraddn27)
NOTA:
LasaraSasy lospeque6osinsectospodriantejertelarar_asy €on.struirnidos adentrode los tubosdel Venturi.Esto podifasuceder
particularmentea fines del veranoyen el otoSoantesde que hielel pues es cuandolas ara6asest_.nm&sactivai Estosnidospueden obstruirel
flujo de gas y ocasionarUamaradasdentrode lasv_.lvulasdel quemadory alrededorde elias. Estefuegop.uedeoc'asionarlesionesal oPerarioy,
da_osgraves a la parrilla...
.
-..
- . • i
-.
Para ayudara prevenirbloqueosy aseguiarque salgaadecuadamentetodo e! calor,limpiee inspeccionea menudolostubosdel Venturi
(una o dosveces al rues).NOTA:Aplicaragua o aire a presi6nnormalmenten._o.o
despejatelarar_as.
PASOSPARALIMPIAREL VENTURI:
. '
1. Retireel quemadorde la partede abajo de la parrilla.
2. Mireen el interiordel extremom_.sbajo de !os tuboSdel Venturiparavei"si haynictos,telarasaso fango.
3, Para retira[ las obstrucci0nes,use el accesoriode cepiUoflexiblepara el Venturio doble un extremode un alambreflexiblede 20 pulgadas
(50,8cm) de largopara formar un peque5ogancho,como el que Semuestraen la Ilustraci6n28 yen el dibujo representativode la Ilustraci6n29.
4. Inspeccioneel quemadory I[mpielode ser necesario.
5. Vuelvaa colocarla unidadde quernadoresenia parfilla.
6. Aseg_resede que !oso[ifici0s de la v_.lvulaquedendentrode los tubos del Venturi.
7. Fijela parteposteri0i"del quemadoren la parte inferiorde la parrilla.
! & C 1142-0161
pg. 33
CAUTION
All cleaningand maintenanceshouldonly be donewhengrill is cooland with thefuel supplyturnedoff at the L.P.cylinder. DONOT clean
any barbecuepart in a self-cleaningoven. The extremeheatwilldamagethe finish.
E
n
g
I
i
S
h
1
Correctcareand maintenancewill keepyourgrill operatingsmoothly.Cleaninternalpartsof grill regularlyas determinedby the amountof '
use and thetype of foodscooked. NOTE: Cleantheentiregrill eachyear and tightenall hardwareon a regularbasis(1 - 2 tir_esa year or
moredependingon usage). Cleaningshouldbe donewheredetergentswon't harmpatio,lawn or the like.
SUGGESTED
CLEANINGMATERIALS:
Milddishwashingliquiddetergent , Hot water
• Wirebrush
• Paperclip
• Nyloncleaningpad , Soft brassbristledbrush
• Puttyknife • Scraper
COMPONENT
CLEANING:
• BURNER:Wire brushloosecorrosionfrom burnerexterior.Cleancloggedgas port holeswith an openedpaperclip. Replacecorrodedor
damagedburnersthat wouldemit excessgas.
• ALUMINUMCASTINGS:Cleancastingexteriorwith mildliquiddishwashingdetergentand hotwater. Aluminumis resistantto rust but
extremetemperaturesand weatheringmay causeoxidationto formwhite spots. To refinishedcastings;cleanthe extedorand lightlysand
with mediumemery paperor fine sandpaper. Cleanoff residuewith vinegarwaterand rinsewith clean water. Oncedry, paint with a high
temperaturepaint. After painthasthoroughlydried,bakeit on by operatinggrill for 15 minuteson mediumheat.
• STAINLESSSTEEL: Cleanwith anymultipurpose(lowabrasive,no phosphorous)metalpolishor stainlesssteel polishanda softclothto
preventmardngor scratchingof the surface.NEVERUSEOVENCLEANER!
• ORIFICES: Unscrewodficesfrom rearof valves. (Fig.30) Washodficesin solventand blowair throughthe small end holes. Carefully
replacethe odficesin valvewhenthey are dry. Makecertainthat theorificesaretightly reassembled.
NEVERattemptto operateyourgdll withoutorificesin the valves_re
hazardwouldresult.
I
• COOKINGGRIDS AND ROCKGRATES:Cleancookinggridswith mildsoapand hot water. Removestubbornresiduewith a mild r
cleanseror scrub brush. Use a brassbristleon porcelaincoatedgrids. DONOTuse a commercialovencleaner. Brushtherock grates with
a wire bn.Jshto removescale.
: .
• PORCELAINCOATEDHEATTENTS: Wipeoff greaseresidueusinga cleaningpad and a brass bristlebrushto knockoff residue, use
care not to damageporcelainfinish. Replaceheattentsto their correctposition.
Orifices
Events
Valves
Valves
V&lvulas
REPRESENTATIVE
ILLUSTRATION
ILLUSTRATION
REPRESENTATIVE
ILUSTRACION
REPRESENTATIVA
pg. 34
U & C 1142-0161
_u
! Touteop#rationde nettoyageou d'entretienno doit _tre effectuTequeIorsquele gill est frondel que I'arriv#ede gaz est ferm#e au niveau de la[
l. bouteflle deGPL._..j.
NE PASnettoyer_les_!_mentf dubarbecuedans un fouraut..,
o-netto=yant.
L extr#mechaleurendommageraitle rev_tement, i
Unentretienetun nettoyagecorrectsprTserveront
le bonfonctionnement
de votregril.Nettoyezr@uli#rement
Ins 61#ments
int#rieursde votregill selonla
fr#quenced'utilisation
etle typed'aliments
cuisinTs.REMARQUE: Nettoyezenti_rement
le grilune loispar an et resserreztousIns 61#ments
r#guli#rement.
_R_ 2 loispar anou davantageselonrusage).Effectuezle nettoyageclansun endroitqui n'abfmerapanla terrasse,lapelouseouautre.
ODUITSDENETTOYAGE
CONSEILLES
:
, Produita valsselledoux • Eau chaude
, BrossemTtallique
, Trombone
, Tamponen nylon • Pinoeaudouxen laiton
• Couteau_ mastiquer
, Raclette
NETTOYAGE
DESELEMENTS
:
• BRULEUR' La brossemTtallique61iminela corrosionde la surfacedu brOleur.NettoyezIns orificesd'arriv#edu gazobstru#s_ I'alded'un
tromboned#pli& RemplacezIns br:Aeursrouill#sou endommag#squipourralentdiffusertrop de gaz.
, PIECESDEFONDERIEENALUMINIUM' NettoyezI'ext#rieurdes pi#ces de fonderieavec un produit_ vaisselledoux et de reau ohaude.
L 'aluminiumr#siste_ la rouillemaindes temp#raturesextremeset Ins intemp#riespourraientprovoque:une oxydationet former despoints blancs.
Pour restaurerIns pi_cesde fonderie,nettoyezrext#rieuret poncez16g#rementavec du papier 6meris#moyen ou du papier de verre fin. Eliminez
Ins rTsidusavec de I'eauvinaigr#eet rincez_ I'eauclaire. Unefois sec,peignez avec une peinturer#sistanteaux fortestemp#ratures.Lorsquela
peintureest compl#tements#che,faites-lacuire en mettant le gril en marchependant 15 minutessur feu moyen.
, ACIERINOXYDABLE:Nettoyezavecduproduit_ polirInsm#tauxmulti-usages
(peuabrasffetnonphosphoreux)ou du produit_ polirlacierinoxydable
et unchiffondouxpour #viterle maculageou Insrayuressurle rev_tement.
NEJAMAISUTILISERDEPROOUlTSA NET-I-OYER
LESFOURS!
• EVENTS" D#vissezIns #ventssitu#s_ I'arri#redes valves,(Fig. 30). Lavez Ins #ventsdans un solvant et soufflezdedanspar Inspetits trous
I'extr#mit&RemettezdoucementIns #ventsdansla valveIorsqu'ilssont secs, V_rifiezqu'ils soient viss#ssoigneusement.
i_, N'essayez
JAMAISde fairefonctionner
votregrilsansIns
#.
_jests clansIns valves.Celaprovoqueraitun risquede feu__
, GRILLESDE CUISSONET GRILLESDE FOYER: NettoyezIns grillesde cuissonavec du savon doux et de I'eauchaude. EliminezIns r#sidus
tenaces& I'aided'un d#tergentdoux ou d'une brosse# r#curer.Utilisezun pinceauen laiton pour les grilles recouvertesde c#ramique.
."
NE PASutiliserde produit_ nettoyerles fours du commerce.Brossezlesgrilles de foyeravec une brosse m#talliquepour #liminerle tartre.
, TENTESDECHALEURRECOUVERTES
DE CERAMIQUE: Essuyezles r6sidusde graisse _ I'aided'un tamponnettoyantet d'un pinceauen
laitonpour d6collerles r#sidus.Veillez_ ne pas endommagerle rev#tementen c#ramique.Remettezbien les tentes de chauffage_ leur place.
ADVERTENCIA
'
]
La limpieza_/el mantenimientos61odeben hacersecuandola parrillaest_ frfa y cuandoel suministrode combustibleest_ cortadodesde el
|
L cilindrode gas. NO limpienin._
gunapieza para asaren un hornoautol!mpiable.El calorextremodafiar_,el acabado.
Cuidary darmantenimiento
adecuadamente
a su parrillala mantendr_,
fundonandosinproblemas.
Umpielaspiezasintemasde la parrillaperi&:licarnente,
segSnel usoquele d_ y eltipode alimentos
que cocineen ella.NOTA:Umpietodala parrillacadaafioy aprietetodoslostomillos,lasconexiones
y los
accesoriosperi_icamente(1 - 2 vecesal aSoo m._sfrecuentemente,
segLinel uso).La limpiezadebehacerseL_nicamente
dondelos detergentes
no daSen
tios,c_spedu otrascosassimilares.
TERIALES
DE LIMPIEZASUGERIDOS"
' Detergentesuave liquidopara trastes
Agua caliente
, Cepillode alambre
, Clip
, Estropajode nil6n
_ Cepillode cerdassuavesde bronce
; Esp_.tula
, Raspador
LIMPIEZADELOSCOMPONENTES.'
• QUEMADOR:
Retireconun cepillodealambrela corrosi6nsueltadel exteriorde losquemadores.
Useun Clipde papelabiertoparalimpiarlosorificiosdel
quemadorqueest_ntapados.
Cambielosquemadorescorroidoso dafiadosque pudieradejarsalirgasen exceso.
• PIEZASFUNDIDASDEALUMINIO:Umpieel exteriorde Inspiezasde aluminiocondetergentesuaveIfquidoparatrastesy aguacaliente.El aluminioes
resistenteal 6xido,peroInstemperaturas
extremasy la exposici6n
a loselementospodn'anocasionarquela oxidad6nformaramanchasblancas.Para
retocarel acabadoa piezasmet__licas:
limpieel exteriory lijeligeramente
conpapelde esmerilde gradofin& Limpieel residuoconaguade vinagrey
enju_guelas
conagualimpia.Unavezquese sequen,apliqueunapinturade altatemperatura.
Despu_sde quela pinturasesequecompletamente,
enciendala parrillaa fuegomedianopor15minutosparaque la pinturasehomee.
.
•: ACEROINOXIDABLE:
Umpieconcualquierpulimentomultiusosparametales(depocaabrasi6n,que no seafosforoso)o conpulimentoparaacero
noxidabley un patiosuaveparaevitarquela superficiese estropeeo seraye.iNUNCAUSELIMPIADORES
PAPAHORNO!
ORIFICIOS:
Desatomille
laspiezasde ori_os de la parteposteriorde lasv_Jvulas
(llustraci6n
30).Lavarlosorifidosen disolventey soplarairea trav_sde
lospequedosagujerosdelextremo.Cuandose sequenvuelvaa colocarlosen lasv_.lvulas.
Asegurarsequelosorifidosest_nreensamblados
flrmemente.
!
i
PELIGRO
NUNCAtratede usarla parrillasin que los orificiosest_nen Ins v_.lvulas,ya que est__o
garve e inmediato. [
, REJILLAPARACOCINARY PARRILLAPARACARBON/ROCAS:LimpieIns rejillaspara cocinar coil jab6n suave y agua caliente.Retire el
residuodif[dl con un limpiadorsuaveo cepillo de fregar.Use cerdas de broncepara limpiarIns parrillasrecubiertasde porcelana.NO use un
mpiadorde homocomercial.Cepillela parrilla para rocas con un cepillode alambrepara retirar la oxidaci6n.
PIEZASDE CALORRECUBIERTAS
DE PORCELANA:Use un estropajopara retirarel residuode grasay un cepillode cerdas de broncepara
despegarel residuo.Tengacuidadode no dafiar el acabadode la porcelana.Vuelvaa colocar Ins piezasde caloren su posiciTncorrecta; . :
U & C 1142-0161
pg, 35
[
STORAOE
)
El
ION
[A collisionwiththe grill,as withanymetalobjectcouldcauseinjury.Usecarewhenmovinga portablegas
---q
MOVINGTHEGRILL:
E
n
g
I
i
S
h
. To movethe grill, lift end of grill oppositethe wheels. (Fig. 31)
• Move grill slowly. DONOT run with or pull thegrill behindyou; it couldhit youfrom behindcausing
injury. (Fig. 31)
• DO NOT move the grill whileit is lit or hot, or with objectson thecookingsurface(s)or side table(s).
AFTERMOVINGTHEGRILL:
' Checkall gas connectionsfor leaksthat couldoccurfrom the movement.
• Checkthe venturi tubes to be sure they are still overthe orifices.
STEPSTO FOLLOWBEFORESTORINGGRILL:
mm
DEPLACEMENT
a
n
a
i
s
ET RANGEMEHT
Unecollisionaveclegill, commeavectoutobjetm6tallique,
peutprovoquer
desblessures.Faitesattention
Iorsquevousd#placezungril_gazporta_
DEPLACEMENT
DU GRIL:
• Pour d_placerle gril, soulevezI'extr6mit#
du gril oppos#eaux roues.
(Fig. 31)
• D#placezlentementle gril. NEPAS couriravec ou tirerle gril derriere
vous,fl pourrait vouspercuterpar I'arri#reet vousblesser.(Fig.31)
• NE PASd#placerle gril tant qu'il est allum#,chaudou _ desobjetssur la
plac#s sur la surface_ cuisinerou sur les cSt#s.
APRESAVOIROEPLACE
LE GRIL:
• V#rifieztoutesles connexionsde gaz pourpr#venirles fuitesqui
pourraientprovenirdu d#placement.
• V#rifiezles venturispour vousassurerqu'ilssont biensur les #vents.
Y ALMACENAMIENTO
m
m
m
mm
mm
J
laissezla bouteilledegas_ I'ext#rieu
r. Si vousle laissezdehors,fermez ,
I'arfiv#ede gazauniveaude la bouteillede GPLet recouvrezlegill
.
pourleprot&2erdesinternp#fies.
Vouspouvezacheterdes housse4._,
pourgillsaupr#sd'unvendeurde grilsou d'unfabric,
ant.
ATTENTION
Si legril n'estpas utilis6_le gazDOlT #treferm# au niveau,del,
.,
I'arriv#ede gaz de la bouteille.
: _,.
]
Unchoqueconla parrilla,al igualqueconcualquierotroobjeto,podfia
ocasionarleSiones.Tengacuidadoal moverunaparrillade gaspo_til de un
lu£1ar
a otro.
P AL MOVERDELUGAR_ PARRILLA:
a
I1
m
• Nettoyezle gril.
• Recouvrezl6g#rementlebrOleurd'huiledecuisinepourpr#venirla,
rouille.
o Grild'ext#rieur
seulement.
Si le gill estrang#_ I'int#rieur,
d#tachezei
PRECAUCION
S
_
INSTRUCTIONS
A SUIVREAVANTDE RANGER
LE GRIL:
ATTENTION
, TRASLADO
E
mm m
' Cleanthe gril!.
• Coat the.burner lightlyw th cookng oil to retardrusting.
.._
• For outdooruse only. If grill is stored indoors,detachand leavethe cylinderoutdoors. If left outdoors,
turn off the fuel supplyto the L.P.cylinderand coverthe grill for protectionfrom theweather. Grill covers
may be purchasedfrorfi a grill dealeror manufacturer.
WARNING
Ifthe grill is not inuse, the gas MUSTbe turnedoff at the fuelsupplycylinder.
'F
r
m
• Para mover la parrillade un lugara otro, levanteel extremoque no tiene
ruedas.(Fig. 31)
• Mueva la parnllalentamente.NOcorra ni jale la parrilladetr_,sde usted,
0 ya que podna pegarlepor detr_.sy lesionarle.(Fig. 31)
I • NOmoverla parfillamlentrasest6calienteo ence,ndida,
o conobjetosenla(s)
superficie(s)
de cocci6no en la(s)mesa(s)lateral(es).
DESPUESDEMOVERLA PARRILLA:
° Revisetodas las conexionesde gas paraasegurarseque el movimiento
no ocasion6fuqas.
. Reviselos tuSosdel Venturiparaasegurarseque todavfase encuentren
sobrelos orificios.
pg. 36
PASOSA SEGUIRANTESDE GUARDAR
LAPARRILLA:
. Limpiela parrilla.
.-. ,.,_
• Cubrael quemadorcon una capadelgadade aceitede cocinar::_ "
pararetardarlaOxidaci6n,
" ....
. Parasuusoen exteriores
solamente.
Si guardala.pardllaadentro,
separeel tanquedela parrillay d#jeloafuera.Si dejasu parri!laa la.
intemperie,
corte el suministrode combustible
delcilindrode gasy cubra
la parrillaparaprotegerla
de loselementos.LOSdistribuidore
sy
fabricantes
de parrillas
vendencubiertasparapardllas.
PRECAUCION
i
Si la parrillano estd"en uso, el gas DEBEestarcortado desde |
el Cilindrode suministrodecombus_
U & C 1142-0161
]
THE IGNITERSYSTEMconsistsof a gascollector,electrode,wire and igniter(sideburners
includea secondelectrodewith wire). Gas accumulatingin thegas collectoris ignitedby an
electricspark generatedwhenthe igniterunitis activated. The sparkgap is automaticallyset
whenthe electrodeis installed. Theigniterwireshouldbe kept a minimumof 3" belowthe grill
bottomso that the heatwon'tdamagethe wire.
1
REPRESENTATIVE ILLUSTRATION
ILLUSTRATION REPRESENTATIVE
ILUSTRACION REPRESENTATIVA
TESTINGTHE IGNITERSYSTEM:
BE SURE CONTROL KNOB VALVE(S) ARE OFF AND PROCEED AS FOLOWS:
t
I
mm
ml
mm
mm
mm
m
mm
n
mm
m
mm
mm
a
mm
mm
m
Usinga handmirror,watchthe electrodetip insidethe gas collectorwhile activatingthe igniter.
Toavoida possibleshock, DO NOTtouch the burneror metalparts on ignitorsystemwhile
performingignitertest. A visible sparkshouldjump from the electrode. See the representative
illustrationin Fig. 32. If thereisn'ta spark,checkthe wire connectionsand see that the electrode
isn't broken. It is normalfor the wireto fit looselyinsidethe porcelain.Dirt and ruston the
burneror ignitercan preventthe igniterspark. Cleanthemwith a de-greaseror warm soapy
waterand dry. Removerustfrom electrodetip and metal surfacesby lightlysandingwith an
emerycloth or finegrain sandpaper.
1
SYSTEME
D'ALLUMAGE
DU
GRIL
]
LE SYSTEME
D'ALLUMAG
E se composed'uncollecteur,
de gaz,d'une61ectrode,
d'unfilet d'unallumeur(lesbr_leurslat_rauxposs_dentunedeuxi_me
r_ • _lec!r_e avecill).Legaz accumul_dansle collecteurde gazest enflamm_par une_Uncelle
61ectfique
quiseproduit!orsquele dispositifdeI'allumeurest
ac_6. L'_;artementdes_lectrodesestautomatiquement
r_l_ Iorsqueles61ectrodes
sontinstall_es.Le fil d'a!lumage
dolt_trepla_ _ 6,62cm au moins
!
dufonddu gril de fagon_ ce quela chaleurne rendommage
pas.
1
TESTDUSYSTEME
D'ALLUMAGE
"
VERIFIEZQUELA (OULES) VALVE(S)
DESBOUTONSDEREGLAGESOITFERMEEPUISSUIVEZLESINSTRUCTIONS
SUIVANTES"
A
I'aided'unmiroirdepoche,v_fifiez
rembout
d
e
r_lectrode
_
fint6rieur
du
collecteur
d
egazpendant
q
ue
vousactivez
I'allumeur.
Pour_viterun _ventuel
t
choc_lectrique,
NE touchezPASle bi_leuroules _16ments
m_talliquesdusyst_med'allumagependantquevousr6alisezcetest.Une_b'ncellevisible
devraltjaillirdeI'_lectrode.VoirI'illustration
de la Fig.32.S'ilny a pas d_tincelle,v_rifiezlesconnexions
du fil et regardezsi r61ectrode
n'estpas cass_e.
II esttout_ faitnormalquele filsoit I&chedansla c_ramique.
La salet_et la rouillesurle br_leurou I'allumeurpeuventemp_herr6tincelle.Nettoyezqes
*
*
•
t
aV ecunproduitd6gralssant
ou de leauchaudesavonneuse
ets_chez-les.Eliminezla rouillede I'emboutde 1'61ectrode
et dessurfacesm_talliquesen
pon£.an!
I@_rementavecunetoile_efis_e ou unpapierde verre_ grainfin.
"
:
!
[
SISTEMA
DiE ENCENDIDO
DE
LA
pARRILLA
]
,
.
EL SlSTEMADEENCENDIDO
consistede un colectorde gas, electrodo,alambrey dispositivode encendido(losquemadoreslateralesincluyen
un segundoelectrodocon alambre).El gas acumuladoen el colectorde gas se enciendemedianteuna chispa el_ctricaque se generacuandola
unidaddel dispositivode encendidose activa. La separaci6nde la chispa se estableceautom_.ticamente
al instalarel electrodo.El alambredel
dispositivode encendidodebe rnantenersea un minimode 3 pulgadas(6,62cm) de la parteinferiorde la parrillapara que el calorno Io dafie.
t
COMOPROBARELSISTEMADEENCENDIDO:
'
i
ASEGURESEQUELA PERILLADECONTROLDE LA(S) VALVULA(S)ESTE(N)APAGADA(S)Y SIGA EL SIGUIENTEPROCEDIMIENTO:
Useun espejode manopara ver la puntadel electrodoubicadodentrodel colectorde gas al mismotiempoque activael dispositivode
encendido.Paraevitar descargasel_ctficas,mientrashagaesta prueba NOtoquelas piezasde metal ni del quemadordel sistemade
encendido.Unachispavisibledeberiasaltar del eiectrodo.Veael dibujo representativoen la Ilustraci6n32. Si no se produjerauna chispa, debe
revisarlas conexionesde alambrepara asegurarseque el electrodono est6 roto.Es normalque el alambrequede flojodentrode la porcelana.
La mugrey el 6xidoen el quemadoro dispositiv0de encendidopuedenevitarque e! dispositivode encendidoproduzcala chispa.Limpieloscon
un desengrasadoro agua calientejabonosay s_quelos.Lije ligeramentela puntadel electrodoy las Superficiesmet_,licascon papel de lijade
gradofino para retirarel 6xido.
PROBLEM: BURNER WILL NOT LIGHTOR HAS INCOMPLETEBURNERFLAME.
POSSIBLECAUSES AND SOLUTIONS;
1. Checkfor spiderwebsor insectnestin venturiand cleanventuri. 2. Lack of fuel. Checkto see cylindervalve is open and cylinderhas fuel.
3. Misalignmentof venturion orifices. Positionventuriover orifices. 4. Burnerports,orifices,valves or hosehaveblockage. Cleanthe
components. 5. If burnerlightswith matchbut not igniter,checkceramicelectrodepositionin gas collectorand conditionof ignitorwire afid'ii's
connections.Performignitertestand replaceanydamagedpads. 6. Crimpedfuelsupply hoseneedsstraightened.• 7. Regulatorfailu(e"0r
damagedhoseneedto be replacedbyan authorizedservicedealer. 8. Quickconnectis not engagedand needsproperlyassembled(pg.'!_6),
PROBLEM: YELLOWFLAME, POSSIBLECAUSESAND SOLUTIONS:
" "
" :i;' ":
1. Checkforspiderwebsorinsectnestin venturiand cleanventud. 2.New burnermay haveresidualoil whichwill burnoff. 3. Clearfoff"
any food residue,greaseor seasonsaltson burner. 4. Air may be in cylinderif cylinderwas not properlypurged. Use up remaininggas; the
yellow flamemay disappearwith use. 5. Venturimay be misalignedand needlined up overorifices..
E PROBLEM: FLAME BLOWSOUT ON LOWSETTINGOR HAS UNEVENHEAT DISTRIBUTION,
n
g
I
PROBLEM: GRILL TOO HOT,
i
S
h
POSSIBLECAUSES ANDSOLUTIONS:.
" •_
1. Checkfor spiderwebsor insectnestin venturiand clean venturi. 2. Coldgrill needsto be preheatedfor 5 minuteson high setting. :_
3. Venturimaybe misalignedand needlined up overorifices. 4. Coldand windy weatherwill requireyou to movegrill away from thewind:,::"5. Lackof fuel. Checkto seecylindervalveisopenand cylinderhasfuel.
-/it.:
POSSIBLECAUSESAND SOLU'ii()NS:
_:"_;_
1. Excessive
flareupswhichrequirethemaintenance
describein thisbookunder"INCASEOF GREASEFIRES". 2. A damagedodficeOr _i,'
regulatorwhichrequiresreplacementwithfactoryauthorized
parts. 3. Buildupofgreaseinsidegrillwill requirecleaningandemptygre'as_4_)
or tray. 4, Choosea lowercookingtemperature
if usingexcessivelyhigh settings.
_
PROBLEM: FIRE AT ANYCONNECTION. POSSIBLE
CAUSES
ANDSOLUTIONS"
.....
IMMEDIATELYshut off cylinder valveand allow grillto cool. 1. Gas is leakingfrom a faultyconnection. "lightenconnectionswith an
adjustablewrenchand replacedamagedpads. Performa leaktest onall connectionsbeforecookingon grill again.
PROBLEM: FLAME BEHINDCONTROLPANELOR CONTROLKNOBAREA.
POSSIBLE
CAUSES
ANDSOLUTIONS:
IMMEDIATELYshut off cylinder valve and allow grill to cool. 1. Checkfor spiderwebsor insect nestin venturi and cleanventuri. 2. Gas
is leakingfrom a faultyconnection.Tightenconnectionswith an adjustablewrenchand replacedamagedpads. Performa leaktest on all
connectionsbeforecookingon grill again. 3. Venturimay be misalignedand need linedup overorifices.
_ ;-:,:
A
DANGER
'
If a fire occursat the cylindervalve, DONOTattemptto move the cy!inder. IMMEDIATELYcall the fire departmentand clear thearea. _;o_i#_l
safely spray waterwith a gardenhosefrom a distanceof at least !5feet away fromcylinderuntil firemenarrive.
PROBLEME "LE BRULEURNE S'ALLUMEPAS OU SA FLAMMEN'ESTPAS COMPLETE.
F
r
a
n
__ =
_
._ _i!J
RAIsoNsPOSS/eLES
E'rSOLUnONS
"
• ""
'"i1n'y apas de toflesd
"
'aralgneesou
" "
'
"
' nettoyezle ventun.
" 2. II ny
' a plus de gaz. Vdnf,
" "1ez que Is.
_._;
1. V#nfiezs
de nldsdtnsectesdansle
ventunet
valvede la bouteilleest bien ouverteet qu'ily a du gaz clansla bouteille. 3. Le venturin'estpas correctementalign6sur les #vents. Placezle _::"_
venturisur/es #vents. 4. Les orificesde combustion,les #vents,les valvesou les tuyauxsent obstru#s. Nettoyezles #l#ments. 5. Si le ... ., ,br_leurs'allumeavec une allumetteet pasavec I'allumeur,v#rifiezla positionde I'#lectrodeen Cdramiquedans le collecteurde gaz et r#tat du fi! !_'
d'allumageet de ses connexions. TestezI'aflumeuret remplacezles #l#mentsendommag#s. & Le tuyau d'arriv#egaz sertia besoind'#tre %
redress#. 7. II y a une d#faflla#cedu r#gulateurou le tuyauendommag#doit #treremplac#,par un r#parateuragr#& 8. Le raccordinstantan#n'estpas enclench#et n#cess)'ted'#treassembl#correctement(page 16).....
_::;:.
PROBLEME.: FLAMMEJAUNE,
RAISONSPOSSIBLESET SOLUTIONS:
- ,#_
1.Vdrifiezs'il n'y a pas de reliesd'araign#esou de nids d'insectesclansle venturiet nettoyezle venturi. 2. Le bnJleurneuf poutprdsenterdes '.i,'
a rdsidusd'huilequi brCHerent,3. Eliminezdu brOleurles rdsidusd'aliments,de graisseou de sels d'assaisonnement. 4, fl peut y avoir de I'air ;_::,
i dans la bouteillesi e!len'a pas dt6purgdecorrectement.Utilisezle gaz restant,la flammejaune pourraitdispara_tre_ mesurede I'utilisation. 5.
•
S Le venturin'estpas correctementaligndet dolt #trepositionndsur les _vents.
PROBLEME "LA FLAMMES'ETEINTSUR FEU DOUX OU LA DISTRIBUTIONDE CHALEUREST IRREGULIERE.
•R4lsot¢s
POSS_LES
"
ETSOLUtiONS:
1. V#rifiezs'il n'yapas de toilesd'araigndesou de nidsd'insectesclansle veniuriet nettoyezle venturi_ 2. Le gril froid dolt #trepr&chauff#
pendant5 minutessur feu fort. 3. Le venturin'estpas correctementaligndet dolt#tre positionn6sur les dvents. 4. Le tempsest froid et il y a
du vent; vousdevezd#placerle gril _ rabri du vent. 5. II n'y a plus de gaz. Vdrifiezque la valve de la bouteilleest bien ouverteet qu'il y a du
gaz clansla bouteille,
'
pg. 38
U •& C 1142-0161
i-"_iO_LE,_;E" LE GRfL EST ;_0? CF;,_UD. RAISONS
POSSIBLES
ETSOLUTIONS
;
1. Ily a tropde feuxquin#cessitent
I'entreb'e
n d#ciltdansce livretsousla rubrique"SILAGRAISSES'ENFLAMME".2. Un6ventou unr#gulateur
endommag6
n&;essiteunremplacement
par un r_parateur
agree. 3. Ily a uneaccumulation
de graisse_ I'int_rieurdugill, il estn_e,ssairede nettoyeret
de viderle r_dpientouplateaur&:up6rateur
degraisse. 4. Choisissez
une temp#rature
de cuissonplusbassesi vousutilisezboplesfeuxforts.
t-_F;O_LEME
: IL Y A !.E FEU ALIKi;_."EAllD'UIqECONNEXION,
RAISONS
POSSIBLES
ETSOLUTIONS"
FermezIMMEDIATEMENT
la valve de la bouteille et laissez refroidir le gill.
1. II y.a une fuite de gaz au niveau d'uneconnexiond6faillante.
Resserrezles connexions_ raide d'un toumevisr_glableet remplacezles _l_mentsendommag6s.Faitesun test d'_tanch_it_au niveaude toutbS
les connexionsavant de cuisiner_ nouveausur le gill.
PROBLEME : IL Y A DES FLAM_,']EsDERRIERELE TABLEAUDE CONTROLEOU AU IVlVEAUDES BOUTONSDE REGLAGE. BAISONS
POSSIBLES
el SOLUTIONS
:
FermezIMMEDIATEMENT
la valvede la bouteilleet laissezrefroidirle gril. 1. V#ilfiezs'ilny a pas de toilesd'araign_esou denidsdTnsectes
dansle
ventufietnettoyezle ventufi. 2. Ily a unefuitedegazau niveaud'uneconnexiondbfaillante.
Resserrezlesconnexions
_ I_'ded'untoumevisr#glableet
remplacezles616ments
endommag#.s.
Faitesun testd'6tanch#it#
au niveaude touteslesconnexions
avantde cuisiner_ nouveausurlegill. 3. Le venturi
n'estpascorrectement
align_et dolt_b'epositlbnn_surles_vents.
Si un feuse d_clareau niveaude la va!vede la bouteille,N ESSAYEZPASde d#pla_r la boute'l_TEMENT
les pompierset i
61oignez-vous
de la zone. Vouspouvezavec pr6cautionarroserd'eauavec un tuyaud arrosage_
_ une d_nce de 4,57 m au rnoinsde i
la bouteillejusqu'_ce que lespompiersarrivent.
.
I
L.
_ .....
=,,==.==,.=J.
PROBLEMA:EL QUEMADOR
NOSEENCIENDE
O LA FL_.MANO CUBRETODOEL QUEMADOR.
POSlBLES
CAUSAS
Y SOLUClONES:
1, Reviseel Venturipara asegurarsede que no tengatelaraSasni nidosde insectosy limpielo. 2. Le falta combus!ible.Revisela v&lvula(Jel
cilindropara asegurarseque est_ abiertay reviseel cilindropara asegurarseque tengacombustible.
3. El Venturiest_ mal alineadocon losorificios.Coloqueel Venturisobrelos orificios.. 4. Haybloqueosen losorificiosdel quemador,los
,orificios,lasv_.lvulaso la manguera.Limpielos componentes. 5. Si el quemadorfuncionaal encendersecon un cerillopero no con el
dispositivode encendido,revisela posici6ndel electrodode cer_.micaubicadoen el colectorde gas y acondicioneel alambredel encendidoy sus
conexiones.Hagala pruebadel dispositivode encendidoy cambie las piezasdar_adas. 6.. La manguerade suministrode combustibleest_i
dobladay necesitaenderezarse. 7. El reguladorha falladoo la mangueraest,. daSaday es necesarioque un distribuidorde servicioautorizado
los cambie. 8. La conexi6nr_.pidano est_ activaday necesitaensamblarsecorrectamente(p. 16).
PROBLEMA:LA FLAMAESTAAMARILLA.
PosleLES
CAUSAS
Y SOLUClONES"
1. Reviseel Venturiy asegdresede que no tengatelaraSasni nidosde insectos.Limpielo. 2. Podriahaber aceite residualen el quemador
nuevoy estarquem__ndose.3. Limpieel quemadorpara retirartodo residuode alirnentos,grasay salesde sazonar. 4. Si el cilindrono Se
purg6adecuadamente,podriatener aim.Use el gas sobrante;Ioamarillode la flama podria desaparecercon el uso. 5. El Venturipodr[aestar
malalineado.Alin_elosobrelos orificios.
aROBLEMA:LA FLAMASE APAGAENLA POSICION
DE FUEGOLENTOO NODISTRIBUYE
BIENEL CALOR, POSIBLES
CAUSAS
Y SOLUClONES"
1. Reviseel Venturiy aseg6resede que no tengatelaraSasni nidosde insectos.Lfmpielo. 2. Cuandola parrilla,est,. fria necesitaprecalentarse
5 minutosen la posici6nde fuegoalto. 3. El Venturipodria estar malalineado.Alindelosobre losorificios. 4. En clima frio y Conviento ser_
necesarioque aleje parri!lade dondeno le d_ el viento. 5. Le falta combustible.Revisela v__lvula
del cilindropara asegurarseque est_ abiertay
reviseel cilindro
asegurarseque tengacombustible.
ara
PROBLEMA:LAPPARRILLA
ESTADEMASI/_OCALIENTE, POSIBLES
CAUSAS
Y SOLUClONES;
1. Uamaradasexcesivasquerequierenelmantenimiento
descrito
en estemanualbajo"ENCASODEQUEHAYAUNFUEGOOCASIONADO
PORLA
GRASA". 2. Unor_ficio
o reguladorda_adorequiemsucambioconpiezasautorizadas
de{_brica, 3. La grasaacumuladaadentrode la panillarequiem
limpiezay quesevaciela tasao bandejade grasa. 4. Si usatemperaturasexcesivamente
altas useuna temperatura
m&sbaja.
PROBLEMA:FUEGOENCUALQUIERA
DE LASCONEXIONES, POSlBLES
CAUSAS
YSOLUClONES:
Cierre la v_lvula del cilindroINMEDIATAMENTE
y deje que la parrilla se enfrie. 1. Hay una fuga de gas en una conexi6navefiada.Apfiete
las conexionescot1una Ilaveajustabley cambie las piezasdaSadas.Antesde volvera cocinaren la parrilla,pruebetodas lasconexionespara
detecta,
r fugas.
,
'
PROBLEMA:HAY FUEGODETRASDELPANELDECONTROLO DELAREADELAS PERILLASDECONTROL, .POSlBLES
CAUSAS
't SOLUClONES:
Cierre la vzilvuladel ciUndroINMEDIATAMENTE
y deje que la parrilla se enfrle. 1. Reviseque no haya telaraSasni nidosde insectosen el
Venturi.Limpielo. 2. Hayuna fugade gas en una conexi6naveriada.Aprietelasconexionescon una Ilave ajustabley cambielas piezas
darmdas.Antesde volvera cocinaren la 3arrilla,pruebetodaslas conexionespara detectarfugas. 3. El Venturipodr{aestar malalineado.
Alin_elosobre losorificios.
]
z PELiGRO
"
,.,
..
,
.
"
Si hubierafuegoen la v_.lvuladel cilindro NO trate de mover el cilindrolLlameINMEDIATAMENTEa los bomberosy despejeel firea. Puede
_mojarel cilindroconuna manguerade jardin a una distanciade por io menos 15 pies (4,57m) del cilindio hasta que los bombei'osIleguen. ' ;
LJ P,, _
II,_9./31_I
FOR
VOUR
ADDITIONAL
SAFETY
-
POUR
VOTRE
SECURITE
- PARA
SU MAYOR
SEGURIDAD
3
The L.P. gas cylinderprovided with this grill (on selected models only)is fitted with an Overfill ProtectionDevice(O.P.D.)I
To insure that you retain this safety device equipped cylinder, take it to an L.P. gas service station for filling, or
when exchanging your cylinder at a cylinder exchangestation, request that your replacementcylinder be fitted withthe O.P.D. feature.
La bouteillede GPLfournie avec ce gril (pour certains modeles uniquement) est dot_e d'undispositifde protection anti.d_bordemenL
Pour _tre sOr de conserver ce dispositif de s6curit_ sur votre bouteille, rapportez.la dans une station service _quip_ GPL pour ia
remplir, ou Iorsque vous _changez votre bouteille demandez_ ce qu'elle soit _.quip6edu dispositif de protection anti-d_bordement.
El cilindrode gas incluidocon esta parrilla (s61oalgunosmodelos) est_ equipadoconun dispositivode protecci6ncontra
sobrelienado.Paraasequrarque este cilindrocontineeequipadocon el dispositivodeseguridad,II_veloa unaestaci6nde
serviciode gas (L.P.)paraque Io Ileneno bien,si Io cambiaen una estaci6nde cambiode cilindros,soliciteque coloquen
el dispositivode protecci6ncontrasobrellenadoal cilindrode reemplazo.
YOUR NEW GAS GRILL IS EQUIPPED WITH A TYPE 1 CONNECTION DEVICE WHICH HAS 3 SAFETY FEATURES:
(SEE TYPE 1 CONNECTION ILLUSTRATION)
1. Proof of gas seal between the connector and the cylinder before gas flow takes place.
2. A flow limiting device designedto limit the flow of gas in the event of a regulator or hose failure.
3. The connection has a thermal shut-off which willstop the flow of gas if the connection reaches a certain temperature.
YOUR NEW GAS GRILL IS ALSO EQUIPPED(on selected models only) WITH AN
OVERFILL PROTECTION DEVICE (O.P.D.) IN THE GAS CYLINDER WHICH GREATLY
REDUCES THE CHANCE OF ACCIDENTALLY OVERFILLINGTHE CYLINDER.
E
n
g
I
i
S
h
SPECIAL NOTE CONCERNING L.P. GAS CYLINDERS:
It is important to insure that your new gas cylinder is properly purged before it is filled. Please inform Your
propane gas dealer that this is a new cylinder and needs to be properly purged before being filled.
SPECIAL NOTE CONCERNING TYPE 1 cONNECTION DEVICES:
.... _:.
If you notice very small flames on the burner(s), you may have accidentally activated the flow limiting device in
the type 1 connection device. Besides a rupture in the gas hose, the flow limiting devicemay activate for_0nlelofl
the two following reasons:
1. Openingthe burnervalvesbeforeopeningthe Cylindervalve. SOLUTION:Shut the burnervalvesandthe L.P.cylindervalveoff
and openin the propei"order:
'
a). OpentheL.P.cylindervalvefirst, then
b). Openthe burnervalvesandignitethe burneraccordingto the instructionsin this manualfor yourgrill.
IF YOU STILL HAVE A PROBLEM, THEN THERE MAY BE AIR IN THE CYLINDER DUE TO IMPROPER PURGING.
2. The L.P. cylinder was not properly purged before it was filled. SOLUTION: See your L.P. gas supplier.
Nipple with Excess Flow
Embout avec limitation d'6coulement
Thermal Sensitive Handwheel
Boquilla con flujo de exceso _
Volant thermique
Rueda de mano termosensiblef_,_
Regulator
R_gulateur f
Regulador
•
_
Valve
Valve
_,
_V_lvula
__
,_
_
_
1-5/16" Acme Connection
Raccord Acm_ de 1-5/16"
Conecci6n Acme de 1-5/16"
TYPE 1 CONNECTIONILLUSTRATION
ILLUSTRATIONDU RACCORDDE TYPE 1
ILLUSTRAClON DE CONEXIONDE TIPO 1
pg. 40
_
VOTRE NOUVEAU GRIL A GAZ EST EQUIPE D'UN SYSTEME DE RACCORO DE TYPE 1 QUI COMPORTE
3 DISPOSITIFS DE SECURITE" (VOIR L'ILLUSTRATION DU RACCORD DE TYPE 1)
1. Contr61ed'_tanch6it_ entre le raccord et la bouteille avant que I'#coulement du gaz ne commence.
2. Un dispositif de limitation de r6coulement qui permet de limiter I'#coulement du gaz en cas d'#chec du tuyau ou du r#gulateur.
3. Le raccord dispose d'un arr#t thermique qui stoppera l'#coulement du gaz si le raccord atteint une certaine temp6rature.
VOTRE NOUVEAU GRILL A GAZ EST EGALEMENT EQUIPE (SUR CERTAINS MODELES UNIQUEMENT)
D'UN DISPOSITIF DE PROTECTION ANTI-DEBORDEMENT SUR LA BOUTEILLE DE GAZ QU! REDUIT
ENORMEMENT LES RISQUES DE TROP-PLEIN LORS DU REMPLISSAGE DE LA BOUTEILLE.
REMARQUE SPECIALE CONCERNANT LES BOUTEILLES BE GPL :
II est imp#ratif de s'assurer que votre nouvelle bouteille de gaz a #t6 correctement purg#e avant d'etre
remplie. Veuillez informer votre revendeur de propane qu'il s'agit d'une bouteille neuve qui dolt #tre
correctement purgee avant d'etre remplie.
REMARQUE SPEClALE CONCERNANT LES SYSTEMES DE RACCORO DE TYPE 1 :
Si vous remarquez de tres petites flammes sur le(s) brgleur(s), il se peut que vous ayez activ6 accidentellement
le dispositif de limitation de I'_coulement clans le syst_me de raccord de type 1. En plus d'une rupture du tuyau
d'a/imentation de gaz, /e dispositif de limitation de/'#cou/ement peut #tre activ# pour/es deux raisons suivantes :
1. Ouverture des valves du brOleur avant I'ouverture des valves de la bouteille. SOLUTION : Fermez les valves du brOleur et de la
bouteille et ouvrez dans le bon ordre :
a). Ouvrez d'abord la valve de la bouteille, pui.s
b). Ouvrez les valves du brOleur et allumez le brOleur selon les instructions donn#es clans ce fivret.
$1LE PROBLEME PERSISTE, IL SE PEUT QU'IL Y AIT DE L 'AIR DANS LA BOUTEILLE A CAUSE D'UNE MAUVAISE PURGE.
2, La bouteille de GPL n'a pas #t6 purg6e correctement avant d'#tre remplie. SOLUTION : Voir avec votre revendeur de GPL.
T ..........................................................................................................
"
SU NUEVA PARRILLA DE GAS ESTA EQUIPADA CON UN DISPOSITIVO DE CONEXION TIPO 1
QUE CUENTA CON 3 CARACTERISTICAS DE SEGURIDAD: (YEA LA ILUSTRACION DE LA CONEXlON TIPO 1)
1. Prueba de sello del gas entre el conector y el cilindro antes de que el gas empiece a fluirJ
2. Un dispositivo limitador de flujo disedado para limitar el flujo de gas en caso de una falla en el regulador o en la manguera de gas,
3. La conexi6n tiene un apagado t6rmico que detiene el flujo de gas si la conexi6n Ilega a cierta temperatura.
SU NUEVA PARRILLA DE GAS TAMBIEN ESTA EQUIPADA (s61o ciertos modelos) CON UN DISPOSITIVO
DE PROTECCION CONTRA SOBRELLENADO EN EL CILINDRO DE GAS, MISMO QUE REDUCE EN GRAN
MEDIDA LAS PROBABILIDADES DE SOBRELLENAR ACCIDENTALMENTE EL CILINDRO.
NOTA ESPECIAL ACERCA DE LOS CILINDROS DE GAS L,P.:
Es
importanteasegurarse de que su nuevo cilindro de gas est6 adecuadamente purgadoantes de Ilenarlo.
• Por favor informe a su proveedordegas propano que este es un cilindro nuevo y es necesario
purgarloadecuadamente antes de Ilenarlo.
NOTA ESPECIAL ACERCA DE LOS DISPOSITIVOS DE CONEXlON TIPO 1:
Si las llamas en el o los quemadores son muy pequefias, podria haber activado accidentalmente el
dispositivo limitador de flujo del dispositivo de conexi6n tipo 1. Aparte de una ruptura en la manguera
del gas, el dispositivo limitador de flujo puede activarse por una de las dos siguientes razones:
1. Abrir las vMvulas del qu,emador antes de abrir la v_lvula del cilindro. SOLUCION: Cierre las v&lvulas del quemador y la v_lvula
del cilindro de gas L.P. y abralas en el orden correcto:
a). Abra la vAIvula del cilindro _
y despu6s
b). Abra las vAIvulas del quemador y encienda el quemador siguiendo las instrucciones que aparecen en este manual para
;u parrilla.
SI CONTINUA TENIENDO PROBLEMAS, PODRIA DEBERSE A QUE HAY AIRE EN EL ClLINDRO
DEBIDO A QUE SE PURGO INCORRECTAMENTE.
__.El cilindro de gas no se purg6 adecuadamente antes de Ilenarse. SOLUCION: Consulte a su proveedor de gas L.P.
& C 1142-0161
/
"
"
-
r._,