1
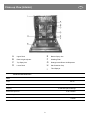
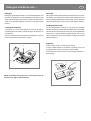
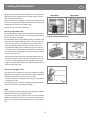
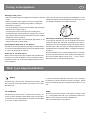
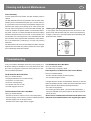
Integrated
Dishwasher
CW493 BL/WH/SS
Users Operating Instructions
Before operating this appliance,
please read these instructions carefully
Guarantee
CDA appliance carry a five-year parts and one-year labour guarantee.
CDA will repair or replace any defect or part attributable to faulty material or workmanship. Within the first year this will be
free of both labour and parts charges. After the first year and within five years, the parts will be supplied free of charge
provided that the repair is carried out by an agent authorised by CDA and the labour will be charged at the commercial rate
applicable at the time of repair.
The appliance must have been installed by a suitably qualified person and in accordance with the manufacturers instructions and current legislation. The guarantee does not cover faults caused by the incorrect fitting of the appliance.
Limit of Cover
•
•
•
•
•
•
•
•
•
The guarantee does not cover cosmetic damages e.g. discolouration or oxidisation.
Proof of purchase or installation date must be produced before a service call will be booked.
The appliance must be used for domestic purposes only. Appliances used for commercial or professional purposes are
not covered by this guarantee.
The appliance must not be modified or tampered with or repair attempted by any unauthorised person.
The guarantee does not cover damage caused by transit or by misuse, accident, abuse or neglect.
The guarantee does not cover routine maintenance.
Use of parts not supplied or recommended by CDA will invalidate the warranty.
Rubber seals, filters, removable glass parts, control knobs and buttons, fuses and light bulbs which need replacing
periodically are not covered by the guarantee.
Second hand or reconditioned appliances are not covered by the guarantee.
The conditions under which this guarantee is offered are in addition to the statutory rights of the domestic purchaser and
these rights are not affected by this guarantee.
CDA reserve the right to change specification without prior notice.
The symbol
on the product or on its packaging indicates that this product may not be treated as
household waste. Instead it shall be handed over to the applicable collection point for the recycling of electrical and electronic equipment. By ensuring this product is disposed of correctly, you will help prevent potential
negative consequences for the environment and human health, which could otherwise be caused by inappropriate waste handling of this product.
For more detailed information about recycling of this product, please contact your local city office, your
household waste disposal service or the shop where you purchased the product.
Safety Is Very Important
GB
IMPORTANT
Carefully read the instructions contained in this manual, as it pro-
* If the appliance is not operating properly or, requires
maintenance, disconnect the appliance from the power supply.
vides information that is essential to safe and proper installation,
use and maintenance of this appliance.
- Keep detergents out of the reach of children. Also keep children
away from the dishwasher when it is open to reduce the risk of
injury.
- This appliance cannot be installed outdoors, not even if the
This appliance complies with following EEC
area in which it is installed is covered by a roof. It is also very
dangerous to leave it exposed to the rain and elements.
directives:
-73/23/EEC of 19/02/73 (Low Voltage) and subsequent
modifications;
- 89/336/EEC of 03/05/89 (Electromagnetic
Compatibility) and subsequent modifications.
- Do not touch the heating element during or after a wash cycle.
- Do not lean or sit on the door when it is open, as this could
overturn the dishwasher.
- If the appliance malfunctions, turn off water supply to the appliance and disconnect the plug from the wall socket. Then, consult the section entitled, "Troubleshooting." If you cannot re-
- Carefully dispose of the packing material.
- After removing the packing, check to make sure that the appli-
solve the problem, contact a service centre.
- Only specialised personnel are authorised to make repairs.
ance is not damaged. If in doubt, contact a qualified professional.
- The dishwasher must only be used by adults for the washing of
- Appliances which are being discarded must be made
inoperable by cutting the power supply cord and removing the
household dishes and cooking utensils.
- Fundamental rules to follow when using the appliance:
door lock.
- The appliance must be positioned so that the plug is accessible.
* Never touch the dishwasher with wet hands;
* We discourage the use of extension cords and multiple sockets;
- If installing this dishwasher on a carpeted floor, ensure the car
pet does not obstruct the opening.
* During installation, the power supply cord must not be excessively or dangerously bent or flattened;
- If the supply cord is damaged, it must be replaced by the manufacturer or an authorised service agent.
Close-up View (Control Panel)
A BC D
I H G
A
B
C
D
E
F
E
F
G
H
I
ON-OFF Light
ON-OFF Button
Low Salt Indicator Light
Low Rinse Aid Indicator Light
Knob For Selecting Cycle
.1.
Handle For Opening Door
"Eco" Button
"HALF LOAD" Button
"RAPID" Button
Close-up View (Interior)
A
B
C
D
GB
E
F
G
H
I
Upper Rack
Rack Height Adjustor
Top Spray Arm
Lower Rack
Bottom Spray Arm
Washing Filter
Detergent and Rinse Aid Dispenser
Salt Container Cap
Third Sprayer
Technical Characteristics
Width
60 cm
Depth
58 cm
Height
82 cm
12 standard place settings
Capacity
Mains water pressure
0.03-0.6 MPa
Power voltage
220-240V~ 50Hz
Total absorber power
2150W
.2.
Salt......
GB
Salt
The hardness of the water varies from place to place. If hard
water is used in the dishwasher, deposits will form on the dishes
Adjusting Salt Consumption
The dishwasher is designed to allow for adjusting the amount of
salt consumed based on the hardness of the water used. This is
and utensils.
The appliance is equipped with a special softener that uses a salt
specifically designed to eliminate lime and minerals from the water.
intended to optimise and customise the level of salt consumption
so that it remains at a minimum.
Loading the Salt into the Softener
To adjust salt consumption, proceed as follows:
Always use salt intended for use with dishwashers.
The salt container is located beneath the lower rack and should
be filled as follows:
- Remove the lower rack and then unscrew and remove the cap
from the salt container;
- If you are filling the container for the first time, fill it with water;
- Place the end of the funnel (supplied) into the hole and introduce about 2 kg of salt. It is normal for a small amount of water
to come out of the salt container.
- Carefully screw the cap back on.
- Unscrew the cap from the salt container;
- There is a ring on the container with an arrow on it (see figure to
the side).
- If necessary, rotate the ring in the anticlockwise direction from
the "-" setting towards the "+" sign, based on the hardness of
the water being used.
It is recommended that adjustments be made in accordance with
the following scheme:
The salt container must be filled when the "low salt" indicator light
Water Hardness
appears on the control panel.
To prevent the formation of rust, load the salt just before beginning a wash cycle.
Level
Clarke
degrees
ºdH
mmol/l
MNIT
1
014
MNT
2
NQPS
3
PSTN
4
[TN
.3.
Salt
Selector c o n s u m p t i o n Autonomy
(cycles/2kg)
position (Grams/cycle)
L
M
L
NUQQ NIUQIQ
=?J?
OM
SM
QRUV QIRUIV
jba
QM
QM
?H?
SM
OR
[UV
[UIV
Detergent and Rinse Aid......
GB
Detergent
Rinse Aid
Detergent specifically intended for use with dishwashers must
be used. The dispenser must be refilled before the start of each
This product makes dishes sparkle and helps them to dry without spotting. The dispenser is located on the inside panel of the
wash cycle following the instructions provided in the "Wash Cycle
Table." The detergent dispenser is located on the inside panel
door and should be filled after every 80 wash cycle (or when the
rinse aid indicator light comes on for models with this feature).
the door.
Loading the Rinse Aid
Loading the detergent
To open the dispenser, turn the "C" cap in an anti-clockwise
To open the "A" cover on the dispenser, press the "B" button.
The detergent for the wash cycle should be poured into the "C"
direction and then pour in the rinse aid, making sure not to overfill.
The amount of rinse aid used for each cycle can be regulated by
compartment.
After the detergent has been placed in the dispenser, close the
turning the "F" dosage adjuster, located beneath the "C" cap,
with a screwdriver. There are 6 different settings; the normal
cover and press down until it clicks in place.
dosage setting is 3.
Important
C
Proper dosage of the rinse aid improves drying.
If drops of water remain on the dishes or spotting occurs, the
dosage adjuster should be turned to a higher setting.
A
If the dishes have white streaks, turn the dosage adjuster to a
lower setting.
B
C
F
C
NOTE: To facilitate closing the cover, remove any excess detergent on the edges of the dispenser.
.4.
Loading the Dishwasher
GB
Before placing the dishes in the dishwasher, remove larger food
Lower Rack
particles to prevent the filter from becoming clogged, which results in reduced performance.
Upper Rack
If the pots and pans have baked-on food that is extremely hard to
remove, we recommend that they are soaked before washed. This
will eliminate the need for extra wash cycles.
Pull out the rack to load the dishwasher.
How to use the lower rack
We recommend that you place the most difficult to clean items on
the bottom rack: pots, pans, lids, serving dishes and bowls, as
shown in the figure to the right.
Load for 12 Standard Settings
It is preferable to place serving dishes and lids on the sides of the
racks in order to avoid blocking the rotation of the top spray arm.
- Pots, serving bowls, etc. must always be placed face down.
- Deep pots should be slanted to allow the water to flow out.
1
- The silverware basket can be doubled (see fig.A) so that only
one section may be used when the silverware load is light. This
2
also makes space for additional pots and pans and it can also be
placed in the upper rack.
3
4
- Silverware should be placed in the silverware basket with the
handles at the bottom; if the rack has side baskets, the spoons
fig.A
should be located individually into the appropriate slots. Especially long utensils should be placed in the horizontal position at
the front of the upper rack.
How to use the upper rack
The upper rack is designed to hold more delicate and lighter
dishware, such as glasses, cups and saucers, plates, small bowls
and shallow pans (as long as they are not too dirty).
- Position the dishes and cookware so that they do not get moved
by the spray of water.
The upper rack can be adjusted for height by using the knobs lo-
fig.C
cated on the sides of the rack itself (see fig.B).
Shelf
Lean tall glasses and those with long stems against the shelf-not
against other items to be washed (see fig.C).
Long items, serving cutlery, salad, servers or knives should be
placed on the shelf so that they do not obstruct the rotation of the
spray arms. The shelf can be folded back when not required for
use.
.5.
fig.B
Turning on the Appliance
GB
Starting a wash cycle
- Make sure that the plug for the appliance is inserted into the wall
socket.
Wait a few minutes before unloading the dishwasher to avoid
handling the dishes and utensils while they are still hot and more
- Make sure that the water supply is turned on to full pressure.
- Load the dishwasher (see the section entitled, "Loading the
susceptible to breakage. They will also dry better.
Dishwasher" on page 5).
- Pour in the detergent (see the section entitled, "Salt, Detergent
and Rinse Aid" on page 3 and 4).
- Turn the knob located on the right of the control panel in
clockwise direction until the number or symbol for the cycle setting is aligned with the reference mark (see the section entitled,
"Wash Cycle Table" on page 8).
Cancelling or modifying a wash cycle setting
- Press the ON-OFF button, and the ON-OFF light will turn on. At
A cycle that is underway can only be modified if it has been
this point, the wash cycle will begin.
running for a short time. Otherwise, the detergent may have al
If you forget to load some of the dishes
ready been used, and the appliance may have already drained
The wash cycle can be interrupted by pressing the ON-OFF button. the wash water. If this is the case, the detergent dispenser must
You can then load additional dishes and turn the appliance back
on. The cycle will start where it left off.
be refilled (see the paragraph entitled, "Loading the Detergent"
on page 4).
Press the ON-OFF button, and the ON light will turn off. Rotate
At the end of the wash cycle
the knob in clockwise direction to the desired cycle setting (see
the section entitled: Starting a wash cycle?F. Then, turn the
When the knob stops turning and is aligned with a STOP mark
(see figure), the cycle has finished. Turn off the appliance using
the ON-OFF button, turn off the water supply and open the door
of the dishwasher.
dishwasher back on using the ON-OFF button.
Wash Cycle Adjustment Buttons
Button
This button (see "close-up View - Control Panel" on page 1, letter
"G" ) is used for normal dirty dishes, pots and pans. It is a standard daily cycle.
It can be used before setting any of the wash cycles, except for
the intensive cycles (if included in the wash cycle table ). Please
keep in mind that the amount of detergent should also be cut in
half.
1/2 load Button
Rapid
This button (see "close-up View - Control Panel" on page 1, letter "H" ) makes it possible to wash dishes using only the upper
This button (see "close-up View - Control Panel" on page 1, letter
"I" ) , when pressed with wash cycle 4 (glassware) make it pos-
rack if there are not enough dishes for a full load. This will allow
you to save on water and electricity.
sible to run the wash cycle at a lower temperature
(50) and eliminates the drying phase.
.6.
Energy Saving Tips
- It is important to try and run the dishwasher when it is fully
loaded to save on energy. In order to prevent odors from forming and food from caking onto the dishes, you can run the soak
GB
- Use the right amount of detergent: if you use too much detergent,
the result will not be cleaner dishes, but, rather, a greater negative impact on the environment.
cycle.
- Choose the right wash cycle: the choice of cycle depends on
the type of dishware, cookware and utensils being washed and
how dirty they are.
How to Keep Your Dishwasher in Shape
After Every Wash
Moving the Appliance
After every wash, turn off the water supply to the appliance and
If the appliance must be moved, try to keep it in the vertical position.
leave the door slightly ajar so that moisture and odors are not
trapped inside.
If absolutely necessary, it can be positioned on its back.
Remove the Plug
Seals
Before cleaning or performing maintenance, always remove the
One of the factors that cause odors to form in the dishwasher is
plug from the socket.
food that remains trapped in the seals. Periodic cleaning with a
sponge will prevent this from occurring.
No Solvents or Abrasive Cleaning Products
When You Go on Holiday
To clean the exterior and rubber parts of the dishwasher, do not
use solvents or abrasive cleaning products. Use only a cloth and
When you go on holiday, it is recommended that you run a wash
cycle with the dishwasher empty and then remove the plug from
warm soapy water.
To remove spots or stains from the surface of the interior, use a
the socket, turn off the water supply and leave the door of the
appliance slightly ajar. This will help the seals last longer and pre-
cloth dampened with water and a little white vinegar, or a cleaning product made specifically for dishwasher.
vent odors from forming within the appliance.
.7.
Wash Cycle Table
Cycle
Eco
Button
Rapid
Button
GB
Cycle Selection
Information
Description of
Cycle
Deter- Rinse
gent
Aid
Pre-wash with hot water.
Very dirty dishes, pots and
Rinse with cold water.
Intensive
pans (not to be used with
Extended wash at 60K
Wash
delicate items).
Intensive
Very dirty dishes, pots and
pans. (not to be used with
delicate items)
and pans. Standard daily
Normal
cycle.
Wash
and pans. Standard daily
Normal Wash
cycle.
(IEC-EN50242)
25g
25g
rinsed and dried only.
For dishes that need to be
rinsed and dried only.
Glassware
Rinse with cold water.
Extended wash at 60K
Rinse with hot water at 70K
Rinse with cold water.
Extended wash at 50K
Rinse with hot water at 60K
Drying.
For dishes that need to be
Rinse
Pre-wash with hot water.
Rinse with cold water.
Extended wash at 50K
Rinse with hot water at 60K
Drying.
Drying.
Normally dirty dishes, pots
Extended wash at 50K
Rinse with hot water at 70K
Drying.
Extended wash at 50K
Rinse with hot water at 60K
Drying.
Economic, fast cycle to be
.
Wash at 50
used for items which are
K
Hot Rinse at 55
sensitive. Run immediately
Drying.
15g
after dishes are used.
Economic, fast cycle to be
Wash at 50K
used for items which are
Rinse with cold water.
sensitive. Run immediately
after dishes are used.
Soak
30g
Rinse with hot water at 70K
Normally dirty dishes, pots
Glassware
Drying.
Wash
Rinse
30g
Pre-wash of dishes, pots and
Short cold wash to prevent
pans while waiting for the
food residue from drying on
load to be completed after
the dishes K
the subsequent meal.
.8.
15g
Cleaning and Special Maintenance
GB
Filter Assembly
For best performance and results, the filter assembly must be
cleaned.
The filter efficiently removes food particles from the wash water,
allowing it to be recirculated during the cycle. For this reason, it
is a good idea to remove the larger food particles trapped in the
filter after each wash cycle by rinsing the "A" semi-circular filter
and cup under running water. To remove the filter assembly, pull
Cleaning the Spray Arms
on the cup handle in an upward direction. The entire filter assembly (made up of the "A" semicircular filter and the "B" fine filter)
It may happen that food particles become encrusted on the
sprayer arms and block the hole (see "Close up view [interior]"
on page 1, letters C-F ). Check the sprayer arms periodically and
should be cleaned at least once a month. To clean the filter and
the fine filter, use a cleaning brush. Then, reassemble the filter
clean them when needed.
parts as shown in the figures below and inset the entire assembly in the dishwasher, positioning in its seat and pressing
downward.
The dishwasher must never be used without the filters. Improper
A
replacement of the filters may reduce performance of the appliance and damage dishes and utensils.
B
Troubleshooting
It may occur that the dishwasher does not function properly or at
all. Before calling for assistance, Iet us see what can be done
The Dishwasher Does Not Drain
first: Have you forgotten to press one of the buttons or to perform an essential operation?
- the drain hose is crimped or bend.
Lime Deposits or a White Film Form on the Dishes
The Dishwasher Does Not Start
Have you checked whether:
- the lid to the salt container is closed properly;
Have you checked whether:
- the rinse aid dosage is correct.
Have you checked whether:
- the plug is pushed into the socket correctly;
- the power is on in the house;
If, despite all these checks, the dishwasher still does not function
and/or the problem persists, contact the nearest authorised service
- the door is closed properly;
- the ON-OFF switch is on "ON";
agent and provide them with the following information:
- the nature of the problem;
- the water supply is turned on.
- the model type number (Mod...) and the serial number (S/N...),
which are indicated on the plate located on the side of the inner
The Dishwasher Does Not Load Water
part of the door.
Have you checked whether:
- the water is turned on and the hose is connected properly;
- the water supply to the houses on and has sufficient pressure;
- the water supply hose is crimped or bend;
- the filter for the water supply hose is clogged.
.9.
Never call on unauthorised technicians and refuse to allow parts to be installed that are not original spare parts.
Installation
GB
Positioning the Appliance
Hot Water Connection
Position the appliance in the desired location. The back should
The water supply to the appliance can also be connected to the
rest against the wall behind it, and the sides, along the adjacent
cabinets or wall. The dishwasher is equipped with water supply
house's hot water line (centralised system, heating system), as
long as it does not exceed a temperature of 60.
and drain hoses that can be positioned to the right or the left to
ensure correct installation.
In this case, the wash cycle time will be shortened by about 15
minutes and the wash efficiency slightly reduced.
Levelling the Appliance
Once the appliance is positioned, adjust the feet (screwing them
in or out) to adjust the dishwasher, making it level. The appliance
should not be inclined more than 2. If the appliance is level, it
will help ensure proper performance.
The connection must be made to the hot water line following the
same procedures as those for the connection to the cold water
line.
Cold Water Connection
Connect the cold water supply hose to a threaded 3/4 (gas) connector and make sure that it is fastened tightly in place (see fig.1).
If the water pipes are new or have not been used for an extended
period of time, let the water run to make sure that the water is
clear and free of impurities. If this precaution is not taken, there
is a risk that the water inlet can get blocked and damage the
appliance.
fig.1
Installation
Drain Hose Connection
Attention:
Insert the drain hose into a drain pipe with a minimum diameter
of 4cm, or let it run into the sink, making sure to avoid bending
The special plastic hose support must be solidly fastened to the
wall to prevent the drain hose from moving and allowing water to
or crimping it. Use the special plastic support that comes with
the appliance (see fig.2). The free end of the hose must be at a
spill outside the drain.
height between 40 and 100 cm and must not be immersed in
water.
After making sure that the voltage and frequency values for the
current in the home correspond to those on the rating plate
Electrical Connection
(located on the stainless steel inner door of the appliance) and
that the electrical system is sized for the maximum voltage on
the rating plate, insert the plug into an electrical socket which
is earthed properly (the earthing of the appliance is a safety
requirement mandated by law).
If the electrical socket to which the appliance must be connected
is not appropriate for the plug, replace the plug, rather than
using adaptors or the like as they could cause overheating and
burns.
fig.2
.10.
Assembly Instructions for Integrated Dishwasher
GB
Fastening the Bracket to the Wooden Panel(Fig.4 integrated with control panel)
Technical Information for Installation
The control panel can be easily aligned with the kitchen drawers,
using the spacers supplied with the appliance (see Fig.1 and
At the point marked, drill holes 2 mm in diameter . If the panel is
made of chip board , only drill through the veneer. If the panel is
Fig.2).The height of the control panel is 115 mm, while the three
spacers each add 7.5 mm in height.
made of solid wood, the holes can be made deeper. Position the
two brackets so that they are lined up with the holes made in the
bottom part of the panel. The holes furthest to the outside should
be used to fasten the brackets. The small fins should be turned
Adjusting the Height of the Control Panel
downward. The hooks in the totally built-in version should be
screwed into the two holes at the top.
If the kitchen decor requires that the height of the panel be
modified, it can be increased by adding spacers at the bottom
of the control panel itself (see Fig.1 and Fig.2). Each spacer
adds 7.5 mm in height.
Mounting the Wooden Panel onto the Door and Sliding the Dishwasher into the Cabinet
Mounting the Wood Door Panel onto the Dishwasher
During the preparatory stages for installing the dishwasher into
Place the wood panel onto the door of the dishwasher. Then
the kitchen cabinet, holes must not be drilled in the sides, or
door, in order to avoid compromising the performance or opera-
perform the installation steps described below, based on whether
the panel is for a totally built-in model or integrated with the con-
tion of the appliance. Before working on any internal components,
the unit must be disconnected from the power supply .The maximum dimensions for the wood panel that can be installed on the
trol panel.
door are: Height - 610mm; Width - 598mm; Thickness:20mm.
The height dimension of 610 mm must be reduced if the height
Panel Integrated with the Control Panel
of the control panel is increased through the use of the spacers.
In addition, the base must be trimmed if it interferes with the
Insert the metal fins into the slots located on the dishwasher
door, hooking the panel into place by sliding it to the right (see
opening of the door.
Fig.5).
Using the Drilling Template (Fig.3 - integrated with
control panel )
Align the top edge of the template (identified with the “A” arrow
) with the top edge of the panel. On both sides of the template
(top and bottom ) are written the various dimensions that correspond to the different possible widths for the panel. Align the
template with the side of the panel (left or right), making sure
that the panel coincides with the appropriate dimensions. Mark
the positions for the holes for the screws, using the tip of a drill
or a pencil. The three holes closest to the side should be used
(B). Repeat this step on the other side of the panel ,using the
corresponding side of the template.
.11.
Assembly Instructions for Integrated Dishwasher
GB
Adjustment of Back Feet (Fig.6A)
How to use water-proof plastic
Insert the appliance in the cutout and then adjust the height of
Firstly take off the water-proof plastic from the sticker with the
the machine using the screws located at the bottom front .Use a
screwdriver to turn the screws in a clockwise direction to raise
appliance (seeI=Fig.9). Secondly stick it on the bottom of the
kitchen board (seeI=Fig.9). All of this can avoid humidity in the
the dishwasher and in an anticlockwise direction lower it.
kitchen.
Positioning the Unit within the Cutout (Fig.10)
Push the dishwasher into the cutout opening and turn the feet to
make it level and to adjust for height so that the crosspiece (A)
Adjusting the Door Springs (Fig.6B)
The door must be perfectly balanced. In the factory , the tension
for fastening it in place located on the top part of the machine
(Fig.10) comes into contact with the counter .Align the door panel
of the springs is regulated to ensure that the door is perfectly
balanced when light wood door panels are mounted on the door.
mounted on the dishwasher with the doors on the adjacent cabinet (2).
If heavier, solid wood door panels are used, the door can be
balanced by simply turning the two screws (both screws must
be turned the same amount) located on the top part of the
machine.
Important:
The dishwasher must absolutely be fastened to the counter top
to prevent the machine from tipping when the loaded dish racks
are pulled out.
Installation of Continuous Base Moulding
Position the washing machine in the cut-out in the kitchen cabinet:
1Install the continuous base moulding , following the
manufacturer’s instructions .
Notice:
If power screwdrivers are used to make the adjustment, make
2Slowly open the door of the dishwasher to check to see if
the door strikes or rubs against the base moulding.
the final adjustment manually with a normal screwdriver.
3If so, rest the bottom edge of the panel on the base
moulding and mark the part to be cut. Leave at least 3mm
of the play between the panel and the base moulding
to allow for the door to rotate freely (Fig.7).
4Remove the base moulding and trim it as needed,protecting
the surface that has been cut with a paint or similar
wood finish (Fig.7)
5Install the base moulding again (Fig.8).
.12.
Assembly Instructions for Integrated Dishwasher
NNR
NPTKR
GB
Fig.4
Fig.1
2-7Kg
Fig.5
_
Fig.2
mm
115
122.5
130
137.5
145
152.5
_
m
m 115 2.5
12
^
0
13 7.5
13 5
14 2.5
15
58
432mm
436mm
440mm
444mm
LARGH.=448mm
m
m 115 2.5
12
m
m
6m m
m
58 0m m
59 4m 8m
59 .=59
H
RG
LA
2m
m
8m
59
H.= mm
RG 594 0mm m
LA
59 6m m
58 2m
58
0
13 7.5
13 5
14 2.5
15
58
^
m
m
6m m
m
58 0m m
59 4m 8m
59 .=59
H
RG
LA
2m
2Kg
m
8m
59
H.= mm
RG 594 0mm m
LA
59 6m m
58 2m
58
7Kg
LARGH.=448mm
444mm
440mm
436mm
432mm
Fig.6
Fig.3
.13.
Assembly Instructions for Integrated Dishwasher
Fig.7
GB
Fig.8
^
UM
M
SMM
UOM
SMMJTM
RUM
Fig.9
Fig.10
.14.
Installation
GB
Diagram
WR
3(1)
1(3)
IG
LS
IS
1
L
N
4(2)
220-240V~ 50Hz
1
LSB
2
3
2(4)
LSS
B1
B5
F
CL
CL
8
TS.50
n.a.
7
A5
A4
Filter
B2
B3
B3
B4
A3
TS.58
n.a.
5
ISB
EV2
1
L
R
1
3
ICR
3
S
ECO
C
ISS
A
M
EV1
D-Ed
3(2)
I1/2
B6
B7
a b
CL
B10
B9
4
CL 3
B8
B8
C
1(1)
EV1/2
A10
A9
A6
CL
CL 1
A7
A8
2
A8
3
2
IAQS
1
toW=táêáåÖ=Äçñ=====fdW=mçïÉê=ëïáíÅÜ=====fpW=aççê=ëïáíÅÜ======mNW=t~íÉê=äÉîÉä=ëïáíÅÜ=====ipW=mçïÉê=áåÇáÅ~íçê
ippW=p~äí=ãáëëáåÖ=ëïáíÅÜ================ip_W=oáåëáåÖ=~ÖÉåí=ãáëëáåÖ=áåÇáÅ~íçê===================fppW=pçÑíÉåÉê=ëïáíÅÜ
fp_W=aáëéÉåëÉê=ëïáíÅÜ===mpW=aê~áå=éìãé===bsNW=fåäÉí=î~äîÉ===aJbaW=aáëéÉåëÉê====f`oW=o~éáÇ=ï~ëÜ=ëïáíÅÜ
b`lW=bÅçåçãáÅ=ï~ëÜ=ëïáíÅÜ===========fNLOW=e~äÑ=ï~ëÜ=ëïáíÅÜ=================qpKRUW=RU=íÉãéÉê~íìêÉ=ÅçåíêçääÉê
qpKRMW=RM=íÉãéÉê~íìêÉ=ÅçåíêçääÉê=========oW=eÉ~íÉê=========bîOW=pçÑíÉåÉê=î~äîÉ========bsNLOW=e~äÑ=ï~ëÜ=î~äîÉ
jiW=t~ëÜáåÖ=ãçíçê===================================jqW=qáãÉê=ãçíçê========================================f^npW=lîÉêÑäçï=ëïáíÅÜ
.15.
Appliance servicing
CDA provide a quality and effective after-sales service to cover all your servicing needs.
Please attach your receipt to this page for safekeeping.
Please help us to help you by having the following information available when booking a service call.
1. Model type, make and model – see the front of this manual
2. Evidence of installation/purchase date
3. Retailer where the appliance was purchased
4. Clear and concise details of the fault
5. Full address including postcode and any contact phone numbers
Contact telephone numbers
CDA Customer Care Department
Harby Road
Langar
Nottingham
NG13 9HY
Telephone: 01949 862000
Email:[email protected]
0120504603
CW493 BL/WH/SS Dishwasher