1
OPERATION CHART:MODULE QW-1210
GENERAL GUIDE
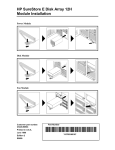
+ Press © to change from mode to mode. Each mode is explained in detail on the following
pages.
* After you perform an operation in any mode, pressing O returns to the Timekeeping Mode.
Timekeeping Mode
Sunrise/Sunset Mode Temperature Data Recall Mode
The operational procedures
for Modules 974 and 1210
are identical. All of the illus-
@
(Timekeeping Display) (Temperature Display) ha
[Module No. 974]
[Module No. 1210]
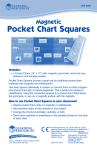
TIMEKEEPING FUNCTIONS
Setting the time and date are available in the Timekeeping
Mode, which you can enter using ©.
Month * While in the Timekeeping Mode, press ® to illuminate
and Date the display.
Day of the week
Temperature
graph
* Graphically shows the amount of daylight per day,
based on the sunrise time and sunset time.
Current time
Daylight
graph*
Daylight time
r
Minutes
AM indicator Seconds
Sunset time
Sunrise time
To set the time and date
1. Press D to display the Timekeeping Display (with the month and date).
2. Press ® and the seconds digits flash on the display because they are selected.
3. Press © to change the selection in the following sequence.
4. While the seconds digits are selected (flashing), press © to reset the seconds to “00”. If you
press © while the seconds count is in the range of 30 to 59, it is reset to “00” and 1 is added
to the minutes. If the seconds count is in the range of 00 to 29, the minutes count is
unchanged.
. While any other digits (besides seconds), are selected (flashing), press © to increase the
number. While the day of the week is selected, pressing @ advances to the next day. Holding
down © changes the current selection at high speed.
While the seconds, hour, or minutes are selected, press ® to switch between the 12-hour and
24-hour formats.
. After you set the time and date, press @ twice to return to the Timekeeping Display.
The date can be set within the range of January 1, 1980 to December 31, 2029.
* It you do not operate any button for a few minutes while a selection is flashing, the flashing
stops and the watch goes back to the Timekeeping Display automatically.
с
o
Important
« After you change a setting in the above procedure, the watch needs a bit of time to calculate
certain information. During this calculation, the patterns in the graphic displays move at high
speed. Wait until these display stop moving before you try to input any further data.
* If you set the current time forward one hour for daylight saving time (summer time), be sure to
also increase the setting for your difference from Greenwich Mean Time (see “To set location
data”). Ot course, you should remember to adjust the other way (by decreasing the difference)
when you go back to standard time.
SUNRISE/SUNSET FUNCTIONS
These functions tell you the time of sunrises and sunsets for specific dates. It also displays a
Daylight Graph based on sunrise and sunset data. Note that you must correctly set the required
data in the following procedures for the Sunrise/Sunset Functions to operate correctly. Use the
Time Zone Chart to find the applicable data for your location.
To set the location data
Difference from GMT
Latitude
Use © to enter the Timekeeping Mode.
Press © to display the Timekeeping Display.
Press ® and the seconds digits flash on the display.
. Press ® again to display the location data. The difference from
GMT data is flashing because it is selected.
5. Press © to change the selection in the following sequence.
Difference from
GMT
SON
Longitude Latitude
trations in this manual
show Module 974.
6. While any of the selections is selected (flashing), press © to increase the value or ® to
decrease it. Holding down either button changes the current selection at high speed.
< Longitude > < Latitude >
Press O Press O
180% OE 179°W 65°N ON 65°S
Г” — —] — —
Press ® Press ®
7. After you set the location data, press @® to return to the Timekeeping Display.
Important
After you change a setting in the above procedure, the watch needs a bit of time to calculate
certain information. During this calculation, the patterns in the graphic display move at high
speed. Wait until these display stop moving before you try to input any further data.
To display the sunrise and sunset times for a specific date
1. Use © to enter the Sunrise/Sunset Mode.
* When you enter the Sunrise/Sunset Mode from another
mode, the display shows the sunrise/sunset data for
today's date (as set in the Timekeeping Mode).
2. Press © to advance the date or ® to set it back.
Holding down either button changes the date at high
speed.
. When the date you want is displayed, you will have to
wait for about 15 seconds as the watch performs its
internal calculation before displaying the sunrise/sunset
time for the date.
Sunrise time Sunset time
o
Notes
* If you think that the watch is not showing the correct information, check the settings of the
watch in the following order: year, difference from GMT, longitude, latitude, east/west,
north/south.
Sunrise and sunset times are for sea level locations. Actual times may differ slightly
depending on your elevation.
Sunrise and sunset times are correct within a range of 5 minutes at latitudes less than 50, and
10 minutes at latitudes greater than 50.
You can set the difference form GMT in units of one hour. In areas where the actual
difference from GMT is closer to the half hour, the actual sunrise and sunset will be 30
minutes later.
Example: In an area where the actual difference from GMT is +9.5, set the GMT difference as
+9. In this case, the actual sunrise and sunset will occur 30 minutes later than the
times calculated by this watch. If the watch shows a sunrise of 6:35 am, the actual
sunrise will be at 7:05. If the watch shows a sunset of 6:05 pm, the actual sunset
will be at 6:35.
THERMOMETER FUNCTIONS
A built-in temperature sensor measures temperature and shows the measured value on the
display. The readout from the temperature sensor can also be switched between Celsius ("C)
and Fahrenheit ('F). The thermometer can be calibrated to correct for errors.
.
important
Temperature measurements are affected by your body temperature (while you are wearing the
watch), direct sunlight, and moisture. To achieve a more accurate temperature measurement,
remove the watch from your wrist, place it in a well ventilated location out of direct sunlight, and
wipe off all moisture from the case. It takes approximately 20 to 30 minutes for the case of the
watch to reach the actual surrounding temperature.
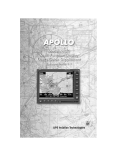
Accurate temperature measurements cannot be achieved while you are wearing the watch. The
following graph illustrated affects of body temperature on actual temperature.
40°C
30°C
Temperature 20°C
Approximate
10°C PP
Differences caused by
individual body
0°C |
temperture or clothing
10°C 20°C 30°C 40°C
Temperature measured when watch is worn on wrist
About Temperature Measurement
Temperature measurements are usually taken automatically every two minutes, regardless of
what mode the watch is in. You can see the measured values in the Timekeeping Mode's
Temperature Display.
Understanding the temperature display
1. Use © to enter the Timekeeping Mode.
2. Press © to display the Temperature Display.
* Whenever you switch to the Temperature Display, the current
temperature is measured and displayed.
Current temperture *2
* 1 The temperature graph uses the current temperature (the
far right element of the graph) as zero, and shows the
changes in temperature for the past five hours.
* 2 The display shows “ — . —'C (or 'F)” if a measured value
falls outside the range of -20'C to 60°C (- 4°F to 140°F).
The normal display will return as soon as the temperature
returns within the allowable range.
Temperature graph *1
Switching between Celsius and Fahrenheit
1. While in the Timekeeping Mode, press © to display the
Temperature Display.
2. Press ® and the current temperature digits flash.
3. Press © to select either Celsius “C” or Fahrenheit “F”.
4. After you select the Celsius or Fahrenheit, press @ to return
to the Temperature Display.
About temperature memory...
In addition to the normal temperature measurements taken every two minutes, you can also set
the watch to automatically measure temperature at reguiar intervals (10 minutes, 1 hour,
3 hours, 24 hours) and store the measurements into memory. The memory hold up to 30 sets of
measurement data each set consisting of the date and time of the measurement, along with
temperature. Once memory is full, the data is updated by recording the newest measurement
and deleting the oldest one. You cannot manually delete data.
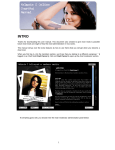
Note
The following graph shows when temperature measurements would start for each available
interval when you change the intervai setting.
Example: When you change the interval setting at 8:48 am.
Interval Set First Measurement Measurement Measurement
10 mi y y y
, -— nutes ----- ====== 10 minutes ----- —-— —
10-mi nute = T= 10 minutes 1 10 minutes >
interval AMB:40 AMB:48 AMB:50 AM 9 : 00 AM9: 10
----- 1 hour ------ um |1hour => ------ 1 ROU .-----
1-hour Г } | | и
interval AMB:00 AMS:48 AMO: 00 AM 10:00 АМ 11 : 00
…---- 3 hours ------ »< ———————- 3 hours -------- e =----- 3 hours .-----
3-hour Ш + T T M
interval AMB:00 AMB:48 AM11:00 PM 2: 00 PM 5 : 00
— 24 hours ja nee 24 hours ----—--
24-hour = | | MM
interval AM8:00 AM8:48 AMB:00 AM 8 : 00
* For the 10-minute interval in the above example, the watch starts the first interval from 8:40,
and the first measurement is taken at 8:50.
* For the 1-hour, 3-hour, and 24-hour intervals in the above exampie, the watch starts the first
interval from 8:00, and the first measurement is taken respectively 1 hour, 3 hours, or 24
hours after this start point.
To select the temperature measurement interval
1. Use © to enter the Temperature Data Recall Mode.
® 2. Press O and the temperature measurement interval starts to flash
on the display.
3. Press @ to change the interval in the following sequence.
Every 10 minutes Every 1 hour Every 3 hours Every 24hours
4. When the interval you want is flashing on the display, press ® to return to the Temperature
Data Recall Mode.
To recall temperature data
Time Temperature 1. Use © to enter the Temperature Data Recall Mode.
* The first data to appear.
® 2 Press © to scroll forward through the stored data
items or ® to scroll backward.
* Holding down either button scrolls through the data
items at high speed.
& OD * The temperature Graph compares the currently
displayed temperature (indicated as O on the far right
of the graph) with the five previous measurements.
Each segment on the graph represents 2°C (4°F).
Data number
Recalied temperature
+20 +10
or “0
-20 -10
°F -5 —# 3 2 —_1 0 °C
Temperatures of previous interval
Calibrating the Temperature Measurement
The temperature sensor of this watch is calibrated at the factory before shipment and further
adjustment is normally not required. If noticeable error is found in the temperature readings
produced by the watch, you can adjust it to correct the error.
important
Incorrectly calibrating the temperature measurement of this watch can result in incorrect
readings. Carefully read the following before doing anything.
Compare the readings produced by the watch with those of another reliable, accurate
thermometer.
If calibration is required, remove the watch from your wrist and wait for 20 or 30 minutes to
give the temperature of the watch time to stabilize.
+ Perform the temperature calibration before procedure as quickly as possible to avoid the
temperature of the watch being affected by your body temperature.
* You can also preform temperature calibration underwater, if the water temperature is stable.
To calibrate the temperature
—
. Use © to enter the Timekeeping Mode and press © to
display the Temperature Display.
Press ® and the current temperature digits flash.
. Each press of © increase the displayed temperature by
0.1°C, and pressing the ® decrease it by 0.1°C.
If you have selected Fahrenheit as your unit of measurement,
the above operations change the reading by 0.2°F.
You can calibrate the temperature within a range of — 9.9°C
to + 9.9°C (- 18.0°F to + 18.0°F).
Press ® and D at the same time to rest the temperature
calibration to the factory setting.
. After calibrating the temperature, press O) to return to the
Temperature Display.
ALARM FUNCTIONS
When the Daily Alarm is switched on, the alarm sounds for 20
seconds at the preset time each day. Press any button to stop
the alarm after it starts to sound.
When the Hourly Time Signal is switched on, the watch beeps
every hour on the hour.
+ со
+
>
Mode indicator
To set the alarm time
1. Use © to enter the Alarm Mode.
2. Press ® and the hour digits flash on the display because
they are selected. At this time the Daily Alarm is switched on
automatically.
Minutes 3. Press © to change the selection in the following sequence.
indicator
Hourly time signal on
indicator
Press @ to increase the selected digits. Holding down ® changes the selection at high speed.
The format (12-hour and 24-hour) of the alarm time matches the format you select for normal
timekeeping.
When setting the alarm time you using the 12-hour format, take care of set the time correctly
as moming (A) or afternoon (P).
. After you set the alarm time, press ® to return to the Alarm Mode.
>
an
To switch the daily alarm and hourly time signal on and off
Press © while in the Alarm Mode to change the status of the daily alarm and hourly time signal
in the following sequence.
Alarm on indicator / hourly time signal on indicator
@ DC Dm DCD
Both ON Both OFF Daily Aiarm only Hourly Time Signal only
STOPWATCH FUNCTIONS
The Stopwatch Functions let you record elapsed time, split times, and two finishes. The range of
the stopwatch is 23 hours, 59 minutes, 59.99 seconds. Stopwatch functions are available in the
Stopwatch Mode, which you can enter using ©.
@ Elapsed time measurement
— > — —> ©
Mode indicator 1/100 O—»®
second Start Stop Re-start Stop Clear
> Split time measurement
—— 6 — — > —_— B-—— В
Start Split Split release Stop Clear
© Split time and 1st-2nd place times
Start Split Stop Split release Clear
First runner Second runner Record time
Minutes finishes. finishes, of second
Record time of runner.
first runner,
TIME ZONE CHART
North America
NO. CITY Te OMT POR LONGITUDE LATITUDE | INO. CITY FROM GMT POR LONGITUDE LATITUDE
STANDARD TIME STANDARD TIME
1. PAGO PAGO —11 171°W 14N 15. DALLAS -6 97°W 33°N
2. HONOLULU -10 158°W 21°N 16. NEW ORLEANS —6 90°W 30°N
3. ANCHORAGE -9 150°W 61°N 17. WINNIPEG -6 97W 50°N
4. NOME -9 165°W 65°N 18. MEXICO CITY -6 99°W 19°N
5. LOS ANGELES —8 118°W 34°N 19. NEW YORK -5 74W 41°N
6. SAN FRANCISCO —8 122°W 38°N 20. MONTREAL -5 74W 45°N
7. LAS VEGAS -8 115°W 36°N 21. DETROIT -5 83W 42°N
8. VANCOUVER -8 123°W 49°N 22. MIAMI -5 80°W 26°N
9. SEATTLE -8 122W 48°N 23. BOSTON —5 71°W 42°N
10. DENVER -7 105°W 40°N
11. ES PASO -7 106°W 32°N
12. EDMONTON -7 114°W 54°N
13. CHICAGO -6 88°W 42°N
14. HOUSTON -6 95°W 30°N Add 1 hour to the difference time if DST
(Daylight Saving Time) is used. (EX. if difference
of standard time is +2, that of DST is +3.)
Europe
THE DIRRERENCE THE DIRRERENCE
NO. CITY FROMGMTFOR LONGITUDE LATITUDE | {NO. CITY FROMGMTFOR LONGITUDE LATITUDE
STANDARD TIME STANDARD TIME
1. AZORES -1 25°W 38°N 15. ATHENS +2 24% 38°N
2. LONDON +0 CE 51°N 16. HELSINKI +2 25°E 60°N
3. DUBLIN +0 EW 53°N 17. ISTANBUL +2 29°E 41°N
4. CASABLANCA +0 8°W 34°N
5. LISBON +1 9°W 39°N
6. PARIS +1 2°E 49°N
7. MILAN +1 9% 45°N
8. ROME +1 12% 42°N
9. MADRID +1 4W 40°N
10. AMSTERDAM +1 5% 52°N
11. HAMBURG +1 10% 54°N
12. FRANKFURT +1 39% 50°N
13. VIENNA +1 16€ 48°N Add 1 hour to the difference time 1 DST
14. STOCKHOLM +1 18° SN (Daylight Saving Time) is used. (EX, if difference |
of standard time is +2, that of DST is +3.)
Asia and South pacific
NO. CITY FROM GMT POR LONGITUDE LATITUDE | INO. CITY NON QM FOR LONGITUDE LATITUDE
STANDARD TINE STANDARD TIME
1. DHAKA +6 90% 24°N 16. SEOUL +9 127E 38N
2. BANGKOK +7 100°E 14N 17. PYONGYANG +9 126°E 39N
3. JAKARTA +7 107°E 6%$6 18. SYDNEY +10 151% 34°S
4. PHNOM-PENH +7 105% 12°N 19. MELBOURNE +10 145°E 38%
5. HANOI +7 106°E 21°N 20. GUAM +10 145°E 13°N
6. VIENTIANE +7 103% 18N 21. NOUMEA +11 166°E 22°S
7. HONG KONG +8 114°E 22N 22. PORT VILA +11 168% 18°S
8. SINGAPORE +8 104°E 1N 23. WELLINGTON +12 175€ 41%
9. KUALA LUMPUR +8 102% 3°N 24. CHRISTCHURCH +12 173°E 43%S
10. BEIJING +8 116°E 40N 25. SUVA +12 178E 18%
11. TAIPEI +8 122€ 25°N 26. NAURU ISLAND +12 166€ 1"S
12. MANILA +8 121€ 15°N 27. PAPEETE -10 150%W 18%
13. PERTH +8 116€ 32N
IE UANBATOR OTE 48% | | ion Sauna iv soo ЧЕХ у itrnce
15. TOKYO +9 140€ 36°N of standard time is +2, that of DST is +3.)
Central and South America
THE DIRRERENCE THE DIRRERENCE
NO. CITY FROMOMTPFOR LONGITUDE LATITUDE | iNO. CITY —FROMGMTPOR LONGITUDE LATITUDE
STANDARD TIME STANDARD TIME
1. PANAMA CITY —5 80°W 9°N
2. LIMA -5 7PW 12°S
3. BOGOTA -5 74W 5°N
4. CARACAS -4 67°W 10°N
5. LA PAZ -4 68°W 17°S
6. SANTIAGO -4 T71°W 33°S
7. PORT OF SPAIN —4 61°W 11°N
8. RIO DE JANEIRO —3 43°W 23°S
9. SAO PAULO -3 47°W 24°S
10. BRASILIA -3 48°W 16°S
11. BUENOS AIRES -3 58°W 35°S
12. MONTEVIDEO -3 58°W 35°S
e difference bme |
(Daylight Saving Time) is used. (EX. if difference
of standard time is +2, that of DST is +3.)
Africa and Middle East
NO. CITY TEROM GMT POR LONGITUDE LATITUDE [ [NO. CITY "ROM OUT PF POR LONGITUDE LATITUDE
STANDARD TIME STANDARD TIME
1. BEIRUT +2 35°E 34°N 15. DAKAR +0 17°W 15°N
2. DAMASCUS +2 36°E 33°N 16. ABIDJAN +0 4°W 5°N
3. CAPE TOWN +2 18% 34°S
4. KUWAIT +3 48% 29°N
5. RIYADH +3 47°E 25°N
6. JEDDAH +3 39°t 21°N
7. ADEN +3 45%€ 13°N
8. ADDIS ABABA +3 39% 9°N
9. NAIROBI +3 37% 1°S
10. DUBAI +4 56% 25°N
11. ABUDHABI +4 54% 24°N
12. MUSCAT +4 58°E 23°N
13. KARACHI +5 67% 25°N
14. PRAIA -1 23°W 15°N [Sore Same Ter em (EX
(Daylight Saving Time} is used. (EX. if difference
of standard time is +2, that of DST is +3.)