1
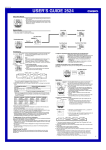
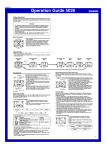
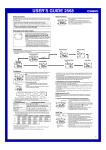
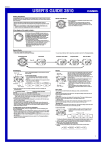
MO1110-EA
Operation Guide 3227
About This Manual
Contents
• Depending on the model of your watch, display text
(Light) appears either as dark figures on a light background or
light figures on a dark background. All sample displays
in this manual are shown using dark figures on a light
background.
• Button operations are indicated using the letters shown
in the illustration.
• Each section of this manual provides you with the
information you need to perform operations in each
mode. Further details and technical information can be
found in the “Reference” section.
General Guide ......................................................................................................... E-4
Timekeeping ............................................................................................................ E-6
Data Bank .............................................................................................................. E-12
Alarms .................................................................................................................... E-18
Stopwatch .............................................................................................................. E-25
Countdown Timer .................................................................................................. E-27
Dual Time ............................................................................................................... E-29
Reference .............................................................................................................. E-31
Specifications ....................................................................................................... E-34
E
E-1
Procedure Lookup
To test the alarm ................................................................................................... E-22
The following is a handy reference list of all the operational procedures contained in
this manual.
To turn Alarms 2 through 5 and the Hourly Time Signal on and off ............... E-23
To set the time, date and language ....................................................................... E-6
To select the operation of Alarm1 ...................................................................... E-24
To toggle between 12-hour and 24-hour timekeeping ......................................... E-9
To measure times with the stopwatch ................................................................ E-26
To toggle the Timekeeping Mode time between DST and Standard Time ........ E-10
To set the countdown start time .......................................................................... E-27
To display the Dual Time screen and Data Bank screen in the Timekeeping Mode ... E-11
To use the countdown timer ................................................................................ E-28
To create a new Data Bank record ...................................................................... E-13
To set the Dual Time ............................................................................................. E-29
To recall Data Bank records ................................................................................. E-16
To toggle Dual Time Mode time between DST and Standard Time ................... E-30
To edit a Data Bank record ................................................................................... E-16
To display the Timekeeping screen and Data Bank screen in the Dual Time Mode ... E-30
To delete a Data Bank record ............................................................................... E-17
To set an alarm time ............................................................................................. E-20
E-2
E-3
General Guide
Alarm Mode
• Press B to change from mode to mode.
• In any mode, press L to illuminate the display.
Stopwatch Mode
▲
▲
B
Data Bank Mode
B
B
▲
B
▲
Timekeeping Mode
Countdown Timer Mode
▲
▲
Dual Time Mode
B
B
E-4
E-5
C
Timekeeping
Day of week Use the Timekeeping Mode to set the time, date and
language. You can also view the Dual Time Mode screen
Hour : Minutes Seconds
or Data Bank Mode screen from the Timekeeping Mode.
Note
This watch is capable of displaying text for the day of the
week in any one of 13 different languages (English,
Portuguese, Spanish, French, Dutch, Danish, German,
Italian, Swedish, Polish, Romanian, Turkish, and
Year Month–Day Russian).
PM indicator
lllll
lll
lll
Language indicator
To set the time, date and language
1. In the Timekeeping Mode, hold down A until the
seconds start to flash, which indicates the setting
screen.
2. Use C and B to move the flashing in the sequence
shown below to select other settings.
lll lll
E-6
Indicator
ENx
POR
ESP
FRA
Press D. NED
Language
English
Portuguese
Spanish
French
Dutch
Indicator
DAN
DEU
ITA
SVE
POL
Language
Danish
German
Italian
Swedish
Polish
Indicator
RO
T)R
PUC
Language
Romanian
Turkish
Russian
4. Press A to exit the setting screen.
• The day of the week is automatically displayed in accordance with the date (year,
month, and day) settings.
• See the “Day of the Week List” at the back of this manual for information on
abbreviations used.
E-8
C
C
Year
B
B
C
Month
B
B
Minutes
B
Hour
C
Day
B
B
C
Language
C
• The currently selected language indicator flashes on the display while the
Language (setting) is selected in the above sequence.
3. When the setting you want to change is flashing, use E and D to change it as
described below.
To Do This:
Reset the seconds to 00
Change the year, month, day,
hour or minutes
Change the language
Do This:
Press E.
Use E (+) and D (–).
Use E and D.
E-7
• While the language indicator is flashing on the display, use E and D to cycle
through the language indicators as shown below, until the one for the language
you want to select is displayed.
Press E.
Seconds
• In addition to the day of the week display, the language setting also affects the type
of characters you can input for the name in the Data Bank Mode.
• Pressing A in the Timekeeping Mode displays the indicator for the currently
selected language. Keeping A depressed for one or two seconds changes to the
Timekeeping Mode setting screen (indicated by the flashing seconds digits). If you
accidentally display the setting screen, press A again to exit.
To toggle between 12-hour and 24-hour timekeeping
In the Timekeeping Mode, press C to toggle between 12-hour timekeeping (indicated
by A or P on the display), or 24-hour timekeeping.
• With the 12-hour format, the P (PM) indicator appears on the display for times in the
range of noon to 11:59 p.m. and the A (AM) indicator appears for times in the range
of midnight to 11:59 a.m.
• With the 24-hour format, times are displayed in the range of 0:00 to 23:59, without
any indicator.
• The 12-hour/24-hour timekeeping format you select in the Timekeeping Mode is
applied in all modes.
E-9
Operation Guide 3227
Daylight Saving Time (DST)
Daylight Saving Time (summer time) advances the time setting by one hour from
Standard Time. Remember that not all countries or even local areas use Daylight
Saving Time.
To toggle the Timekeeping Mode time between DST and Standard Time
Holding down C for about two seconds in the
DST indicator
Timekeeping Mode toggles between Daylight Saving Time
(DST displayed) and Standard Time (DST not displayed).
• Note that pressing C in the Timekeeping Mode also
toggles between 12-hour timekeeping and 24-hour
timekeeping.
• The DST indicator appears on the display to indicate
that Daylight Saving Time is turned on.
To display the Dual Time screen and Data Bank screen in the Timekeeping Mode
Holding down D in the Timekeeping Mode displays the Dual Time screen. Holding
down E displays the record you were viewing when you last used the Data Bank
Mode.
Dual Time Screen
Data Bank Screen
Hold down D.
Hold down E.
E-10
E-11
To create a new Data Bank record
1. In the Data Bank Mode, press C to display the new
Name area
record screen.
Number area
• The new record screen is the one that is blank
(contains no name and telephone number).
• If the new record screen does not appear when you
press C, it means that memory is full. To store
another record, you will first have to delete some of
the records stored in memory.
New Record Screen
ll
lllll
ll
The Data Bank Mode lets you store up to 30 records,
Remaining number of records each containing name and telephone number data.
Records are automatically sorted based on the characters
of the name. You can recall records by scrolling through
them on the display.
Name • The characters you can input for the name depend on
the language you select in the Timekeeping Mode. See
“To set the time, date and language” (page E-6) for more
information. Changing the language setting does not
affect names that are already stored.
• All of the operations in this section are performed in the
Data Bank Mode, which you enter by pressing B (page
E-4).
lllll
Data Bank
2. Hold down A until the flashing cursor (_) appears in
the name area of the display. This is the record input
screen.
3. In the name area, use E and D to cycle through
characters at the cursor position. The characters cycle
in the sequence shown below.
Telephone number
E-12
E-13
Press E.
(space)
A to Z
(alphabet)
@ to (symbol)
7. In the number area, use E and D to cycle through numbers and symbols
(hyphen, brackets, space) at the cursor position. The characters cycle in the
sequence shown below.
0 to 9
(number)
Press D.
Press E.
• The above character sequence is for English input. See “Character List” at the
back of this manual for the character sequences of other languages.
4. When the character you want is at the cursor position, press C to move the cursor
to the right.
5. Repeat steps 3 and 4 until the name is complete.
• You can input up to eight characters for the name.
6. After you input the name, press C as many times as necessary to move the cursor
to the number area.
• When the cursor is located at the eighth space of the name area, moving the
cursor to the right causes it to jump to the first digit of the number. When the
cursor is at the 15th digit of the number, moving it to the right (by pressing C)
causes it to jump to the first character in the name.
• Pressing C moves the cursor the right, while B moves it to the left.
x
0 to 9
[
]
(space)
Press D.
8. When the character you want is at the cursor position, press C to move the cursor
to the right.
9. Repeat steps 7 and 8 until you complete number input.
• The number area initially contains all hyphens. You can leave the hyphens or
replace them with numbers or other symbols (brackets, space).
• You can input up to 15 digits for the number.
10. Press A to store your data and exit the Data Bank record input screen.
• When you press A to store data, the name and number you input flash for about
one second as Data Bank records are sorted. After the sort operation is complete,
the Data Bank record screen appears.
E-14
E-15
• The name can show only three characters at a time, so longer text scrolls
continuously from right to left. The last character is indicated by the symbol
after it.
To recall Data Bank records
In the Data Bank Mode, use E (+) and D (–) to scroll through Data Bank records on
the display.
• See “Sort Table” at the back of this manual for details on how the watch sorts
records.
• Pressing E while the last Data Bank record is on the display or D while the first
record is on the display displays the new data screen.
To edit a Data Bank record
1. In the Data Bank Mode, use E (+) and D (–) to scroll through the records and
display the one you want to edit.
2. Hold down A until the flashing cursor appears on the display. This is the record
input screen.
3. Use C (right) and B (left) to move the flashing to the character you want to
change.
4. Use E (forward) and D (back) to change the character.
5. After making the changes that you want, press A to store them and exit the Data
Bank record input screen.
To delete a Data Bank record
1. In the Data Bank Mode, use E (+) and D (–) to scroll through the records and
display the one you want to delete.
2. Hold down A until the flashing cursor appears on the display. This is the record
input screen.
3. Press B and C at the same time to delete the record.
• CLR appears to indicate that the record is being deleted. After the record is
deleted, the cursor appears on the display, ready for input.
4. Input data or press A to return to the Data Bank record screen.
E-16
Alarm Types
Alarms
Alarm number
You can set up to five independent multi-function alarms
Alarm time
with hour, minutes, month, and day. When an alarm is
(Hour : Minutes)
turned on, the alarm tone sounds when the alarm time is
reached. One of the alarms can be configured as a
snooze alarm or a one-time alarm, while the other four are
one-time alarms.
You can also turn on an Hourly Time Signal, which will
causes the watch to beep twice every hour on the hour.
• There are five alarm screens numbered1 through 5.
Timekeeping Alarm date
The Hourly Time Signal screen is indicated by :00.
Mode time
(Month–Day)
• All of the operations in this section are performed in the
Alarm Screen
Alarm Mode, which you enter by pressing B (page
E-5).
Hourly Time Signal Screen
E-18
E-17
The alarm type is determined by the settings you make, as described below.
• Daily alarm
Set the hour and minutes for the alarm time. This type of setting causes the alarm to
sound everyday at the time you set.
• Date alarm
Set the month, day, hour and minutes for the alarm time. This type of setting causes
the alarm to sound at the specific time, on the specific date you set.
• 1-Month alarm
Set the month, hour and minutes for the alarm time. This type of setting causes the
alarm to sound everyday at the time you set, only during the month you set.
• Monthly alarm
Set the day, hour and minutes for the alarm time. This type of setting causes the alarm
to sound every month at the time you set, on the day you set.
Note
The 12-hour/24-hour format of the alarm time matches the format you select in the
Timekeeping Mode.
E-19
Operation Guide 3227
To set an alarm time
Alarm number
1. In the Alarm Mode, use E and D to scroll through the
alarm screens until the one whose time you want to set
is displayed.
Press E.
AM Indicator
Alarm 2 on indicator
Hour : Minutes
Month–Day
E-20
Press D.
Alarm1
Alarm 2
Alarm 3
Hourly Time
Signal
Alarm 5
Alarm 4
3. Use C and B to move the flashing in the sequence shown below to select other
settings.
Press C.
Hour
Minutes
Month
Day
Press B.
• You can configure Alarm1 as a snooze alarm or a
one-time-alarm. Alarms 2 through 5 can be used as
one-time alarms only.
• The snooze alarm repeats every five minutes.
2. After you select an alarm, hold down A until the hour
setting of the alarm time starts to flash, which indicates
the setting screen.
• This operation automatically turns on the alarm.
Alarm Operation
The alarm tone sounds at the preset time for 10 seconds, regardless of the mode the
watch is in. In the case of the snooze alarm, the alarm tone operation is performed a
total of seven times, every five minutes, until you turn the alarm off or change it to a
one-time alarm (page E-24).
• Pressing any button stops the alarm tone operation.
• Performing any one of the following operations during a 5-minute interval between
snooze alarms cancels the current snooze alarm operation.
Displaying the Timekeeping Mode setting screen (page E-6)
Displaying the alarm1 setting screen (page E-20)
To test the alarm
In the Alarm Mode, hold down C to sound the alarm.
• Pressing C also toggles the currently display alarm or the Hourly Time Signal on
and off.
4. While a setting is flashing, use E (+) and D (–) to change it.
• To set an alarm that does not include a month (Daily alarm, Monthly alarm), set x
and ) while
for the month. Use E and D until the x mark appears (between
month setting is flashing.
• To set an alarm that does not include a day (Daily alarm, 1-Month alarm), set xx
for the day. Use E and D until the xx mark appears (between the end of the
month and ) while the day setting is flashing.
• When setting the alarm time using the 12-hour format, take care to set the time
correctly as a.m. (A indicator) or p.m. (P indicator).
5. Press A to exit the setting screen.
E-21
To turn Alarms 2 through 5 and the Hourly Time Signal on and off
1. In the Alarm Mode, use E and D to select a one-time
Alarm on indicators
alarm (alarm 2 through 5) or the Hourly Time Signal.
2. Press C to toggle it on and off.
• The current on/off status of Alarms 2 through 5 is
shown by indicators (AL-2 through AL-5). The SIG
indicator shows the on (SIG displayed)/off (SIG not
displayed) status of the Hourly Time Signal.
• The alarm on indicators and Hourly Time Signal on
indicator are displayed in all modes.
• While an alarm is sounding, the applicable alarm on
Hourly Time Signal
indicator flashes on the display.
on indicator
E-22
E-23
To select the operation of Alarm1
1. In the Alarm Mode, use E and D to select Alarm1.
2. Press C to cycle through the available settings in the sequence shown below.
Stopwatch
Hours
Minutes
Seconds
SNZ indicator and Alarm1 on indicator
C
C
One-time alarm on Snooze alarm on
Alarm off
C
• The SNZ indicator and Alarm1 on indicator (AL-1) are displayed in all modes.
• The SNZ indicator flashes during the 5-minute intervals between alarms.
• The alarm indicator (AL-1 and/or SNZ) flashes while the alarm is sounding.
Timekeeping
Mode time
1/100 second
The stopwatch lets you measure elapsed time, split times,
and two finishes.
• The display range of the stopwatch is 23 hours, 59
minutes, 59.99 seconds.
• The stopwatch continues to run, restarting from zero
after it reaches its limit, until you stop it.
• The elapsed time measurement operation continues
even if you exit the Stopwatch Mode.
• Exiting the Stopwatch Mode while a split time is frozen
on the display clears the split time and returns to
elapsed time measurement.
• All of the operations in this section are performed in the
Stopwatch Mode, which you enter by pressing B (page
E-5).
E-24
E-25
To measure times with the stopwatch
Countdown Timer
Elapsed Time
C
Start
➤C
Stop
➤C
Re-start
➤C
Stop
➤A
Clear
➤A
Split
➤A
Split release
➤C
Stop
➤A
Clear
➤C
Stop
➤A
Split release
➤A
Clear
Hours
Minutes
Seconds
Split Time
C
Start
(SPL displayed)
Timekeeping Mode time
Two Finishes
C
Start
➤A
Split
First runner
finishes.
Display time of
first runner.
Second runner
finishes.
Display time of
second runner.
The countdown timer can be set within a range of 1
minute to 24 hours. An alarm sounds when the countdown
reaches zero.
• All of the operations in this section are performed in the
Countdown Timer Mode, which you enter by pressing
B (page E-5).
To set the countdown start time
1. In the Countdown Timer Mode, hold down A until the
hour setting of the countdown start time starts to flash,
which indicates the setting screen.
2. Press B or C to move the flashing between the hour
and minute settings.
3. While a setting is flashing, use E (+) and D (–) to change it.
• To set the starting value of the countdown time to 24 hours, set 0:00.
4. Press A to exit the setting screen.
E-26
To use the countdown timer
Press C while in the Countdown Timer Mode to start the countdown timer.
• When the end of the countdown is reached, the alarm sounds for 10 seconds or until
you press any button to stop it. The countdown time is automatically reset to its
starting value after the alarm stops.
• The countdown timer operation continues even if you exit the Countdown Timer
Mode.
• Press C while a countdown operation is in progress to pause it. Press C again to
resume the countdown.
• To stop a countdown operation completely, first pause it (by pressing C), and then
press A. This returns the countdown time to its starting value.
E-27
Dual Time
Dual time
(Hour : Minutes Seconds)
Timekeeping Mode time
E-28
The Dual Time Mode lets you keep track of time in a
different time zone. You can select Standard Time or
Daylight Saving Time for the Dual Time Mode time, and a
simple operation lets you view the Timekeeping Mode
screen or Data Bank Mode screen.
• The seconds count of the Dual Time is synchronized
with the seconds count of the Timekeeping Mode.
• All of the operations in this section are performed in the
Dual Time Mode, which you enter by pressing B (page
E-5).
To set the Dual Time
1. In the Dual Time Mode, hold down A until the hour setting start to flash, which
indicates the setting screen.
2. Press B or C to move the flashing between the hour and minute settings.
3. While a setting is flashing, use E (+) and D (–) to change it.
4. Press A to exit the setting screen.
E-29
Operation Guide 3227
To toggle Dual Time Mode time between DST and Standard Time
Holding down C for about two seconds in the Dual Time Mode toggles between
Daylight Saving Time (DST displayed) and Standard Time (DST not displayed).
• The DST indicator on the display indicates that Daylight Saving Time is turned on.
To display the Timekeeping screen and Data Bank screen in the Dual Time Mode
Holding down D in the Dual Time Mode displays the Timekeeping screen. Holding
down E displays the record you were viewing when you last used the Data Bank
Mode.
Timekeeping Screen
Data Bank Screen
Hold down D.
Hold down E.
Reference
This section contains more detailed and technical information about watch operation.
It also contains important precautions and notes about the various features and
functions of this watch.
Auto Return Features
• After you perform any button operation (except for L) in any mode, pressing B
returns directly to the Timekeeping Mode.
• The watch automatically returns to the Timekeeping Mode if you do not perform any
operation for two or three minutes in the Data Bank Mode.
• If you do not perform any operation for two or three minutes while a setting screen
(one with flashing digits or a cursor) is displayed, the watch automatically saves any
settings you have made up to that point and exits the setting screen.
E-30
E-31
Scrolling
The B, C, D, and E buttons are used in various modes and setting screens to
scroll through data on the display. In most cases, holding down these buttons during a
scroll operation scrolls through the data at high speed.
Initial Screens
When you enter the Data Bank or Alarm Mode, the data you were viewing when you
last exited the mode appears first.
Backlight Precautions
The backlight uses an LED (light-emitting diode) and a light guide panel that causes
the entire display to glow for easy reading in the dark. In any mode, press L to
illuminate the display for about one second.
• The backlight may be hard to see when viewed under direct sunlight.
• The backlight automatically turns off whenever an alarm sounds.
• Frequent use of the backlight shortens the battery life.
Timekeeping
• Resetting the seconds to 00 while the current count is in the range of 30 to 59
causes the minutes to be increased by 1. In the range of 00 to 29, the seconds are
reset to 00 without changing the minutes.
• The year can be set in the range of 2000 to 2039.
• The watch’s built-in full automatic calendar makes allowances for different month
lengths and leap years. Once you set the date, there should be no reason to change
it except after you have the watch’s battery replaced.
E-32
E-33
Specifications
Accuracy at normal temperature: ± 30 seconds a month
Timekeeping: Hour, minutes, seconds, a.m. (A)/p.m. (P), year, month, day, day of the
week (English, Portuguese, Spanish, French, Dutch, Danish, German,
Italian, Swedish, Polish, Romanian, Turkish, Russian)
Time system: Switchable between 12-hour and 24-hour formats
Calendar system: Full Auto-calendar pre-programmed from the year 2000 to
2039
Other: Daylight Saving Time (summer time)/Standard Time; Dual Time screen
and Data Bank screen display
Data Bank:
Memory capacity: Up to 30 records, each including a name (8 characters) and
telephone number (15 digits)
Other: Remaining number of records screen; Auto sort; Support of characters of
13 languages
Alarms: 5 multi-function* alarms (4 one-time alarms; 1 snooze/one-time alarm);
Hourly Time Signal
* Alarm type: Daily alarm, date alarm, 1-month alarm, monthly alarm
Stopwatch:
Measuring unit: 1/100 second
Measuring capacity: 23:59' 59.99''
Measuring modes: Elapsed time, split time, two finishes
Countdown Timer:
Measuring unit: 1 second
Input range: 1 minute to 24 hours
Dual Time: Hour, minutes, seconds, a.m. (A)/p.m. (P)
Other: Daylight Saving Time (summer time)/Standard Time; Timekeeping screen
and Data Bank screen display
Other: Backlight (light emitting diode); Auto Display function
Battery: One lithium battery (Type: CR1616)
Approximately 3 years on type CR1616 (assuming alarm operation 10 sec./day,
and one backlight operation 1.5 sec./day)
• Frequent use of the backlight shortens the battery life.
E-34
E-35
Day of the Week List
Character List
Sort Table
L-1
Day of the Week List
ENx
POR
ESP
FRA
NED
DAN
DEU
ITA
SVE
POL
ROo
TgR
RUS
L-2
Sunday
SUN
DOo
DOo
DIo
ZON
SvN
SON
DOo
SiN
NIE
DUo
PAZ
CS
Character List
Monday Tuesday Wednesday Thursday
oON
TUE
WED
THU
SEx
TER
QUA
QUI
LUN
oAR
oIb
JUE
LUN
oAR
oER
JEU
oAA
DIN
WOE
DON
oAN
TIR
ONS
TOR
oON
DIE
oIT
DON
LUN
oAR
oER
xIO
owN
TIS
ONS
TOR
PON
WTO
qRO
CZW
LUN
oAR
oIE
JOI
PZT
SAL
mAR
PER
QO
BT
SR
YT
Friday
FRI
SEX
VIE
VEN
VRI
FRE
FRE
VEN
FRE
PIl
VIN
CUo
QT
Saturday
SAT
SaB
SaB
SAo
ZAT
LvR
SAo
SAB
LiR
SOB
Sjo
CTS
SB
ENx: (space) A B C D E F x H I J n L o N O P Q R S T U V W X Y Z @
]?'.:/+-0123p56q89
POR: (espaço) A ; ( , h B C ^ D E = [ F x H I > J n L o N O ? ] i P
QRSTU@VWXYZ@]?'.:/+-0123p56q89
ESP: (espacio) A ; B C D E = F x H I > J n L o N ` O ? P Q R S T U
@)VWXYZ@]?'.:/+-0123p56q89
FRA: (espace) A ( , B C ^ D E = a [ c F x H I e d J n L o N O ] g P Q
RSTUbf)VWXYZ@]?'.:/+-0123p56q89
NED: (Spatie) A B C D E F x H I J n L o N O P Q R S T U V W X Y Z @
]?'.:/+-0123p56q89
DAN: (Mellemsrum) A B C D E F x H I J n L o N O P Q R S T U V W X
YZuvw@]?'.:/+-0123p56q89
L-3
Operation Guide 3227
DEU: (Leerzeichen) A h B C D E F x H I J n L o N O i P Q R S T U )
VWXYZ@]?'.:/+-0123p56q89
ITA: (spazio) A ( B C D E = a F x H I j e J n L o N O ? k P Q R S T
UbVWXYZ@]?'.:/+-0123p56q89
SVE: (Mellanslag) A B C D E F x H I J n L o N O P Q R S T U V W X Y
Zwhi@]?'.:/+-0123p56q89
POL: (epacja) A l B C m D E n F x H I J n L o o N p O ? P Q R S q
TUVWXYZrs@]?'.:/+-0123p56q89
ROM: (spa iu) A r , B C D E F x H I e J n L o N O P Q R S s T t U V
WXYZ@]?'.:/+-0123p56q89
T)R: (bo luk) A B C ^ D E F x y H I t J n L o N O i P Q R S s T U
)VWXYZ@]?'.:/+-0123p56q89
PUC: (npo en) A B C D E F G * I J K L M o O P Q R S T U V W X Y
abciefh@]?'.:/+-0123p56q89
Sort Table
1 (space) 13
2
A
14
15
3
a
16
4
f
17
5
r
6
j
18
7
h
19
8
h
20
21
9
l
10
B
22
23
11
C
12
m
24
m
D
E
b
a
[
c
n
F
x
y
H
25
26
27
28
29
30
31
32
33
34
35
36
I
>
j
e
d
t
J
n
L
o
o
N
37
38
39
40
41
42
43
44
45
46
47
48
p
`
O
?
k
l
i
+
g
P
Q
R
49
50
51
52
53
54
55
56
57
58
59
60
S
q
s
T
t
U
@
b
f
)
V
W
61
62
63
64
65
66
67
68
69
70
71
72
X
Y
Z
r
s
u
v
w
h
i
B
C
73
74
75
76
77
78
79
80
81
82
83
84
D
E
F
c
*
I
J
K
L
M
o
O
L-4
85
86
87
88
89
90
L-5
P
Q
R
S
T
U
91
92
93
94
95
96
V
W
X
Y
a
97
98
99
100
101
102
b
c
i
e
f
h
103
104
105
106
107
108
@
]
?
'
.
:
109
110
111
112
113
114
/
+
0
1
2
115
116
117
118
119
120
3
p
5
6
q
8
121
9
• O caractere 7 (h) é para o alemão, e o caractere 69 (h) é para o sueco.
• O caractere 43 (i) é para o alemão e turco, e o caractere 70 (i) é para o sueco.
• Os caracteres de 71 a 102 são para o russo.
• Character 7 ( h) is for German, character 69 ( h) is for Swedish.
• Character 43 ( i) is for German and Turkish, character 70 ( i) is for Swedish.
• Characters 71 through 102 are for Russian.
• El carácter 7 (h) es para el idioma alemán, el carácter 69 (h) es para el idioma
sueco.
• El carácter 43 (i) es para los idiomas alemán y turco, el carácter 70 (i) es para el
idioma sueco.
• Los caracteres 71 al 102 son para el idioma ruso.
L-6
L-7