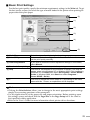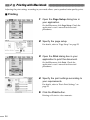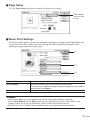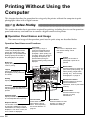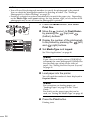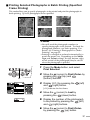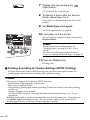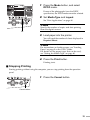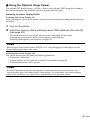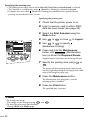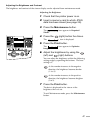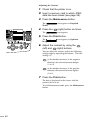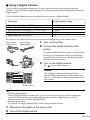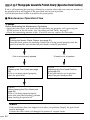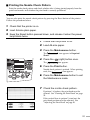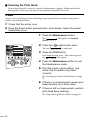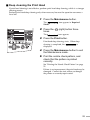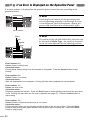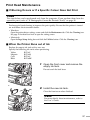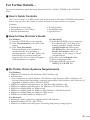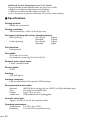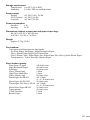
1
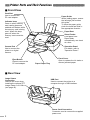
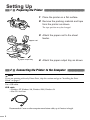
BUBBLE JET PRINTER
Quick Start Guide
Table of Contents
Preface
1
Shipping Materials
1
Introduction
1
Printer Parts and Their Functions
Setting Up
Preparing the Printer
2
4
4
Connecting the Printer to the Computer
4
Installing the Print Head
6
Loading Paper
9
Installing the Printer Driver
10
Aligning the Print Head
16
Basic Operations
22
Printing with Windows
22
Printing with Macintosh
24
Printing Without Using the Computer
26
Before Printing
26
Printing Photographs
31
Print Applications
40
If Photographs Cannot Be Printed Clearly
(Operation Panel Section)
50
If an Error Is Displayed on the Operation Panel
54
Print Head Maintenance
57
Notes on Handling the USB Interface (for Windows Users)
58
For Further Details...
59
BE
QA7-2102-V01
Exif Print
This printer supports Exif 2.2 (also called “Exif Print”).
Exif Print is a standard for enhancing the communication between digital cameras and printers. By
connecting to an Exif Print-compliant digital camera, the camera’s image data at the time of shooting
is used and optimized, yielding extremely high quality prints.
Canadian Radio Interference Regulations
This digital apparatus does not exceed the Class B limits for radio noise emissions from a digital
apparatus as set out in the interference-causing equipment standard entitled “Digital Apparatus”,
ICES-003 of the Industry Canada.
Cet appareil numérique respecte les limites de bruits radioélectriques applicables aux appareils
numériques de Classe B prescrites dans la norme sur la matériel brouilleur: “Appareils Numériques”,
NMB-003 édicatée par l’Industrie Canada.
International ENERGY STAR® Program
As an ENERGY STAR Partner, Canon Inc. has determined that this product meets the ENERGY
STAR guidelines for efficiency.
The International ENERGY STAR Office Equipment Program is a global program
that promotes energy saving through the use of computer and other office equipment. The program backs the development and dissemination of products with
functions that effectively reduce energy consumption. It is an open system in
which business can participate voluntarily. The targeted products are office equipment such as computers, monitors, printers, faxes and copiers.
Their standards and logos are uniform among participating nations.
Power Requirements
Never use a power supply voltage other than that supplied in the country of purchase. Using the
incorrect voltage could cause a fire or electric shock. The correct power supply voltages and frequencies are as follows:
Europe
USA/Canada
Australia
AC 230V±10%, 50Hz
AC 120V, 60Hz
AC 240V, 50Hz
Printer Model: K10216 (S530D)
Preface
■■ Shipping Materials ■■■■■■■■■■■■■■■■■■■■■■■■■■■■■■■■
Thank you for purchasing a Canon Bubble Jet Printer.
Check that all the following items are in the box. If anything is missing or is damaged, contact
your Canon Authorised Dealer or Sales Representative.
❏ Printer
❏ Setup Software & User’s Guide CD-ROM
❏ Quick Start Guide
❏ Print Head
❏ 4 Ink Tanks
❏ PCMCIA Card Adapter
❏ Bubble Jet Printer - digital camera connection cables (Direct Interface cable DIF-B100/DIFB250)
* USB cables should be purchased separately according to your computer. For details on cable
types and specifications, refer to page 4.
■■ Introduction ■■■■■■■■■■■■■■■■■■■■■■■■■■■■■■■■■■■■■■
This Quick Start Guide uses the following symbols to indicate important information. Always
observe the instructions indicated by these symbols.
Instructions that, if ignored, could result in death or serious personal injury caused by
incorrect operation of the equipment. These must be observed for safe operation.
Instructions that, if ignored, could result in personal injury or material damage caused by
incorrect operation of the equipment. These must be observed for safe operation.
Also read the Safety Precautions in the User’s Guide. Observe the warnings and cautions to
avoid personal injury or damage to the printer.
Trademark Notices
• Canon® is a registered trademark of Canon Inc.
• BJ™ is a trademark of Canon Inc.
• Microsoft® and Windows® are registered trademarks of Microsoft Corporation in the U.S.
and other countries.
• Apple, Mac and Macintosh are trademarks of Apple Computer, Inc., registered in the U.S.
and other countries.
• CompactFlash is a trademark of SanDisk Corporation.
• MEMORY STICK is a trademark of Sony Corporation.
• SmartMedia™ is a trademark of Toshiba Corporation.
• All other trademarks and registered trademarks appearing in this Quick Start Guide are
the property of their respective owners.
Copyright ©2002 CANON INC.
All rights reserved. No part of this publication may be transmitted or copied in any form
whatsoever without the express written permission.
1
■■ Printer Parts and Their Functions ■■■■■■■■■■■■■■■■■■■■■
■ Front View
Card Slot
Use to connect the
PC card adapter.
Paper Guide
When loading paper, ensure
the left edge just touches
this guide.
To move the paper guide,
pinch the knob and slide in
the appropriate direction.
Indicator lamp
Goes on when memory
card reading becomes
enabled and flashes while
the memory card is being
read. When this lamp
goes off, when the
memory card cannot be
read.
Paper Rest
Sheet Feeder
Load paper here.
Paper feeds
automatically, one sheet
at a time.
Operation Panel
For details, refer to
"Operation Panel."
Camera Port
Use to connect the
printer to a digital
camera.
Eject Button
Press to remove the
PC card adapter.
Paper Output Tray
Front Cover
Open to replace the ink tanks or
remove jammed paper.
■ Rear View
Image Viewer
Connection
Remove the cover when
installing the optional TFT
Image Viewer <<IV-100>>
(see page 45).
USB Port
Used to connect the printer to a
computer through a USB interface.
Power Cord Connection
Connector used to connect the supplied
power cord.
2
■ Inside the Printer
Paper Thickness Lever
Adjusts the gap between the print head and the surface of the printing paper.
Print Head Holder
Install the print head here.
Print Head Lock Lever
Locks the print head into the holder.
Once the print head is installed, do not touch this lever.
■ Operation Panel
POWER Button
Press to turn the printer
on or off.
Reset Button
Press to resume printing once
an error has been cleared. The
printer will then initialise ready
for printing.
Also, to cancel printing in
progress when connecting to
the computer, press this button.
POWER Lamp
Off: the printer is turned off.
Green: the printer is ready to print.
Flashing green: the printer is preparing to print, or is currently printing.
Flashing orange: an error has occurred and the printer is not ready to print.
Flashing orange and green alternately: an error has occurred that may require a service call.
For details on names and functions on the Operation Panel, refer to ”Operation Panel Names
and Usage” on page 26.
3
Setting Up
■■ 1 ■ Preparing the Printer ■■■■■■■■■■■■■■■■■■■■■■■■■■■
1 Place the printer on a flat surface.
2 Remove the packing material and tape
from the printer as shown.
The tape position may be changed.
3 Attach the paper rest to the sheet
feeder.
paper rest
paper output tray
4 Attach the paper output tray as shown.
■■ 2 ■ Connecting the Printer to the Computer ■■■■■■■■■■■
➥Note
If you are printing with only Direct Print, skip this section and go to “Installing the Print
Head” on page 6.
Use a USB cable.
USB cable
• Windows XP, Windows Me, Windows 2000, Windows 98
• Mac OS 8.6 or later
Recommended: Canon or other computer manufacturer cable, up to 2 meters in length.
4
➥Notes
• If your computer has an earth connection, ensure that this is attached.
• If you do not intend to use the printer for a long period of time, unplug the power cord
from the power outlet after turning off the printer.
Follow the steps below to install the printer
driver correctly.
1 Ensure the printer and the computer
are switched off.
2 Connect the cable.
➥Note
If the Add New Hardware Wizard or Found New Hardware
Wizard screen appears when carrying out the following
operations, click Cancel and turn off the computer.
5
■■ 3 ■ Installing the Print Head ■■■■■■■■■■■■■■■■■■■■■■■■
• Never attempt to plug the power cord into the power outlet or unplug the power cord
when your hands are wet.
• Never damage, modify, stretch, or excessively bend or twist the power cord. Do not place
heavy objects on the power cord.
• Never use any power supply other than the standard power supply available in the
country of purchase. Using the incorrect voltage and frequency could cause a fire or
electric shock.
• Always push the plug all the way into the power outlet.
■ Installing the Print Head
1 Plug the printer in.
2 Turn on the printer. Do NOT turn on
the computer yet.
The POWER lamp flashes and the printer begins
to operate. Wait until the POWER lamp remains
fully lit.
3 Open the front cover.
➥Note
If the front cover is opened more than ten
minutes, the print head holder moves to the
right side. If this occurs, close the front cover,
and open it again.
4 Remove the tape.
5 Raise the print head lock lever.
Do not touch internal parts other than the lock
lever.
6
6 Remove the protective cap from the
print head.
➥Notes
• Do not touch the
print head nozzles or
electrical contacts.
• Do not attempt to
reattach the
protective cap once it
has been removed.
electrical contacts
print head
nozzles
print head
7 Place the print head in the holder.
print head
holder
8 Lock the print head into place by
lowering the lever.
Do not touch the lock lever once the print head
has been installed.
■ Installing the Ink Tanks
• For safety reasons, store ink tanks out of the reach of small children.
• Do not drop or shake ink tanks.
1 Take out the yellow ink tank.
2 Pull the orange tape in the direction of
the arrow and remove the clear film.
7
3 Hold the ink tank as shown in the
diagram and remove the protective
cap.
➥Notes
• Do not squeeze the sides
of the ink tanks as this
may cause the ink to leak
out and stain your clothes
and hands.
• Do not touch the ink port.
• Do not attempt to reattach
the protective cap once it
has been removed.
ink port
4 Insert the yellow ink tank into the righthand slot. Press the top until it clicks
into place.
5 Use the same procedure to install the
other ink tanks in their appropriate
slots.
Check the labels to ensure that each tank is in the
correct position.
➥Notes
• Only install the ink tanks in the positions
specified by the labels.
• If ink tanks are not installed in the right
position, colours will not be printed
correctly. Immediately reinstall the tank in
the correct position and carry out print head
cleaning. For details, refer to the User’s
Guide.
Black
Cyan
Magenta
Yellow
6 Close the front cover.
Wait until the POWER lamp remains fully lit.
8
■■ 4 ■ Loading Paper ■■■■■■■■■■■■■■■■■■■■■■■■■■■■■■■■■
■ Loading A4 (Letter) Size Plain Paper
paper thickness lever
1 Open the front cover.
2 Move the paper thickness lever at the
top of the print head holder to the left
position. Close the front cover.
➥Note
Set the paper thickness lever to the left when
using plain paper, to the right when using
thick paper. Refer to the User’s Guide for
information on loading envelopes and other
media.
print side
3 Load the paper, aligning it with the
right side of the sheet feeder.
You can load up to 100 sheets of plain paper. Do
not exceed this limit. After printing, do not stack
more than 50 sheets in the paper output tray.
4 Press the paper guide and slide it
against the left side of the stack of
paper.
You now need to install the printer driver:
Windows:
Go to page 10
Macintosh:
Go to page 12
(If you are printing with only Direct Print,
you do not need to install the printer
driver. Go to “Aligning the Print Head” on
page 16.)
9
■■ 5 ■ Installing the Printer Driver ■■■■■■■■■■■■■■■■■■■■■■
➥Note
If you are printing with only Direct Print, skip this chapter and go to “Aligning the Print
Head” on page 16.
■ Installing the Printer Driver - Windows
➥Notes
• Do not disconnect the cable or remove the CD-ROM during the installation. The driver
cannot be correctly installed.
• The screens below refer to Windows Me installation. Screen may differ depending on
the environment you are using.
• When installing the printer driver in Windows XP or Windows 2000, log on to the
system as a member of the Administrators group.
If the following screen appears automatically, click Cancel and follow steps 1 to 7 to install
the printer driver.
Special Notes for Windows 98 USB Users
Click Cancel to quit the screen and turn off the printer. Next, remove and replace the USB
cable connected to your computer.
1 Ensure the printer and computer are
switched off.
2 Turn on the computer and start
Windows. If any applications
automatically run, quit them.
Disable any virus detection programs.
Do NOT turn the printer on at this stage.
10
3 Place the Setup Software & User’s
Guide CD-ROM in the CD-ROM drive.
➥Notes
• If the CD-ROM does not run automatically,
double-click My Computer in the Windows
screen, for Windows XP, click Start and
select My Computer, and then double-click
the CD-ROM icon.
• If the language selection screen appears,
select a language, then click the Next button.
4 Follow the instructions displayed on
the screen. When the screen shown on
the left is displayed, click Install.
5 When the screen shown on the left
appears, turn the printer on.
If the printer is recognised, the printer driver will
be automatically installed.
➥Note
If the connection is not recognised, refer to the
section “Notes on Handling the USB Interface
(for Windows Users)” on page 58.
11
6 Click OK.
Before you can use the printer, you must carry out
print head alignment on page 16.
7 Click Install to install the memory card
utility.
8 Click OK after having completed the
installation.
9 When the screen shown on the left
appears, click Exit.
➥Notes
• To view the User's Guide, please refer to
page 59.
• If a message prompting you to restart the
computer appears, click Yes.
■ Installing the Printer Driver - Macintosh
➥Notes
• Do not remove or insert the USB cable during installation, as this may result in the
computer or printer not operating correctly.
• Before installing the driver, disable all virus detection programs and automatically
loading programs or remove them from your system folder.
12
1 Turn on the Mac.
2 Place the Setup Software & User’s
Guide CD-ROM in the CD-ROM drive.
3 Double-click the Printer Driver folder,
then select a language.
4 Double-click Installer.
5 Read the Licence Agreement and click
Accept to continue.
6 Click Install.
Wait for the installation to finish.
➥Note
If the above message appears, check that there
are no unsaved documents, then click the
Continue button. If a document needs to be
saved, click Cancel then save the document.
After saving the document, begin again from
Step 4.
7 Click Restart.
The computer restarts.
13
8 Double click Memory Card Utility of
the CANON BJ folder.
9 Double click the BJ Installer.
10 Click
.
11 Read the Software License Agreement
and if you agree, click Agree and then
click
.
12 Click Install.
Installation is started, and when completed, a
message for successful installation will be
displayed.
Click Restart now.
14
13 Select Chooser in the Apple Menu.
14 Click the icon for the printer you are
using and close Chooser.
Before you use the printer, you must carry out
print head alignment on page 18.
➥Note
Refer to the User’s Guide when using this
printer as a network printer.
15
■■ 6 ■ Aligning the Print Head ■■■■■■■■■■■■■■■■■■■■■■■■■
This operation must be carried out when using the printer for the first time. Aligning the
print head positions allows you to print without shifts in the colour registration.
■ Aligning the Print Head - Windows
1 Click Start and select Printers in
Settings.
➥Note
For Windows XP, click Start and select
Control Panel - Printers and Other Hardware
- Printers and Faxes.
2 Click the icon for your printer.
3 Open the File menu and select:
• Windows Me/Windows 98→ [Properties]
• Windows XP/Windows 2000→ [Printing
Preferences...]
to open the setting screen.
4 Click OK.
5 Click the Maintenance tab, and click
the Print Head Alignment icon.
6 Check that paper is loaded in the
printer and click OK. If a message
warning you not to perform other
operations appears, click OK.
16
7 After the pattern is printed, click Yes.
If the pattern is not printed successfully, open the
front cover and ensure that the ink tanks are
correctly installed.
8 Look at the print-out. From the patterns
in Column A, select the most even,
least irregular pattern and enter the
number.
9 In the same way, one by one, select
the most even patterns printed with the
least irregularities from each of
Columns B to F, enter their numbers,
and click OK.
If it is difficult to pick the best pattern on Column
F, pick the setting that produces the least
noticeable vertical white stripes.
Less noticeable
white stripes
More noticeable
white stripes
10 Click OK.
This completes the printer setup. The printer is
now ready to use.
➥Note
Before turning off the power
If you are using Windows XP or Windows
2000, the computer recognizes the printer as a
removable disk that is connected with a USB.
Therefore, to turn off the printer while you are
using the computer, you must perform the
hardware removal operation on the computer.
See the Windows user’s guide for the removal
operation.
17
■ Aligning the Print Head - Macintosh
1 Select Page Setup in the File menu.
2 Click Utilities.
3 Select Test Print from the menu and
click the Print Head Alignment icon.
4 Check that paper is loaded in the
printer and click OK.
If the pattern is not printed successfully, open the
front cover and ensure that the ink tanks are
correctly installed.
5 Look at the print-out. From the patterns
in Column A, select the most even,
least irregular pattern and enter the
number.
18
6 In the same way, one by one, select
the most even patterns printed with the
least irregularities from each of
Columns B to F, enter their numbers
and click Send.
If it is difficult to pick the best pattern on Column
F, pick the setting that produces the least
noticeable vertical white stripes.
Less noticeable
white stripes
More noticeable
white stripes
7 Click Close.
8 Click OK.
This completes the printer setup. The printer is
now ready to use.
19
■ Adjusting the Print Head - Operation Panel
To print photographs more beautifully, be sure to adjust the position of the print head before
you begin printing on your purchased printer for the first time.
You should also adjust the print head position if lines or smudges appear when you print
photographs.
1 Press the Maintenance button.
The
Sheets.
2 Press the
The
icon is displayed in Required
(right) button four times.
icon is displayed.
3 Check that A4-sized paper is set, and
press the Print button.
Patterns are printed. When printing ends, the
icon is displayed.
4 Examine the printed page, place a
check mark on the pattern in which the
vertical lines that stand out the least.
Pattern in
which
vertical lines
stand out
✔
Pattern in
which
vertical lines
do not stand
out
✔
✔
pattern number
✔
✔
5 Press the
(left) or
(right) button
to display the pattern number (+7 to 3) of column A where the check mark
was placed in step 4.
When you press the
(right) button, the
number increases; when you press the
(left)
button, the number decreases.
6 Press the Print button.
20
The
icon is displayed.
➥Note
To interrupt the operation and start over,
press the Cancel button, and start over from
step 1.
7 Repeat steps 5 and 6, and set the
pattern numbers for columns B to F.
When you finish pattern number settings for up
to column F, the
icon appears.
8 Press the Maintenance button.
This completes the preparations for the printer.
21
Basic Operations
• If you detect smoke, unusual smells or strange noises around the printer, immediately
switch the printer off and always unplug the printer. Contact your local Canon service
representative.
• To avoid injury, never put your hand or fingers inside the printer while it is printing.
■■ 1 ■ Printing with Windows ■■■■■■■■■■■■■■■■■■■■■■■■■■
Adjusting the print settings according to your needs allows you to produce better quality prints.
In this section, we will use WordPad for the purpose of explanation. The procedures you use
and the screens that appear on your computer may differ according to the application that you
use.
■ Printing
1 Print the document from the
application.
On the File menu, click Print.
Check the application’s user’s manual for the
actual procedures.
2 Ensure your printer is selected, then
click Properties.
3 Specify the required settings and click
OK.
➥Note
If you use anything other than plain paper,
please refer to “Basic Print Settings” on
page 23.
4 To start printing, click OK.
Printing will start in a few moments.
22
■ Basic Print Settings
For the best print quality, specify the minimum requirement settings in the Main tab. To get
the best results, ensure you select the type of media loaded in the printer when printing on
paper other than plain paper.
(6)
(1)
(2)
(3)
(4)
(5)
(1) Media Type
Select the type of media loaded in the printer.
(2) Print Quality
Select one option from High, Standard and Draft. Select Custom to
set the print quality manually.
(3) Colour Adjustment
If you wish to control the colour adjustment settings in more detail,
select Manual.
(4) Preview before printing
Select this to check the layout before printing.
(5) Help
Click this for more details on the functions in the tab. (This may not
appear when using Windows XP or Windows 2000. If this happens in
Windows XP, click Start then select All Programs - Canon S530D Guide. In Windows 2000, click Start then select Programs Canon S530D - Guide).
(6) ?
Click this to change the cursor shape to ?. By clicking on the item’s
name with this ? cursor, an explanation will be displayed.
➥Notes
• Clicking the Print Advisor allows you to change to the most appropriate print settings
simply by answering questions when prompted.
• Use the application to set the paper size and paper orientation. Before printing, open
the settings screen and check that the Page Size in the Page Setup tab is the same as
that specified within application.
• Refer to the User’s Guide for more information about printer driver functions.
23
■■ 2 ■ Printing with Macintosh ■■■■■■■■■■■■■■■■■■■■■■■■
Adjusting the print settings according to your needs allows you to produce better quality prints.
■ Printing
1 Open the Page Setup dialog box in
your application.
On the File menu, click Page Setup. Check the
application’s user’s manual for the actual
procedures.
2 Specify the page setup.
For details, refer to “Page Setup” on page 25.
3 Open the Print dialog box in your
application to print the document.
On the File menu, click Print. Check the
application’s user’s manual for the actual
procedures.
4 Specify the print settings according to
your requirements.
For details, refer to “Basic Print Settings” on
page 25.
5 Click the Print button.
Printing will start in a few moments.
24
■ Page Setup
Use the Page Setup dialog box to specify the paper size settings.
Select paper
size you wish
to use.
■ Basic Print Settings
For the best print quality, specify the minimum requirement settings in the Print dialog box.
To get the best results, ensure you select the type of media loaded in the printer when
printing on paper other than plain paper.
(3)
(1)
(2)
(1) Media Type
Select the type of media loaded in the printer.
(2) Print Mode
Select the closest type of document you want to print.
To specify more detailed settings for the print quality or colour, select
Manual and click Details....
(3) Print
Click this to start printing.
➥Notes
• See Balloon Help for more information about other printer driver functions.
Select Show Balloons in the Help menu for an explanation of each of the items in the
setting screen. To see the explanation, point to the item with the mouse.
• Refer to the User’s Guide for more information about printer driver function.
25
Printing Without Using the
Computer
This chapter describes the procedure for using only the printer without the computer to print
photographs taken with a digital camera.
■■ 1 ■ Before Printing ■■■■■■■■■■■■■■■■■■■■■■■■■■■■■■■
This section describes basic operations required for printing, including how to use the operation
panel and memory card and how to connect a digital camera to the printer.
■ Operation Panel Names and Usage
The names and usage of the operation panel used in print setup are described below.
Operation Panel Names and Functions
Last
When printing a range of
continuous photograph frames,
specify the number of the last
photograph. For specified frame
printing, specify the number of
the photograph to be printed.
Media Type
Specify the type of media to be
used for printing.
First/-OrderWhen printing a range of
continuous photograph frames,
specify the number of the first
photograph. (When printing only
one frame, specify the number of
photograph to be printed.) For
specified frame printing, the
specified number (printing order) is
displayed.
Quality
Specify the print quality.
Maintenance button
Press this button to perform
printer maintenance
operations, such as print head
cleaning.
Print Date
Specify whether the date when
the photograph was taken is to be
printed.
Required Sheets
The number of sheets required
for printing is displayed. During
maintenance, the step number is
displayed. If an error occurs, the
error number is displayed.
26
Copies
Specify the number of
photograph copies to be
printed.
Mode button
Press this button to switch the
print mode (index printing, all
frame printing, single frame
printing, etc.). See "Printing
Photographs" on page 31.
Layout
Specify the number of
photographs to be printed on
one sheet.
Optimize Image
Specify whether the photograph
is to be adjusted before printing.
Cursor
The cursor is displayed at the
item whose setting can be
changed.
Cancel button
Press this button to stop
printing or to stop
maintenance.
Cursor button
Press these buttons
when setting various
items. See "Operating
the Cursor Buttons" on
page 27.
Print button
Press this button to start
printing or to apply the
maintenance setting.
Operating the Cursor Buttons
Moving between Items
To move the
(cursor), press the
(down) buttons.
(up) and
Changing a Setting
To change the photograph number or a setting,
press the
(left) and
(right) buttons.
The
(right) button increases the photograph
number; the
(left) button decreases the
photograph number.
27
■ Using a Memory Card
This section explains how to set and remove a memory card.
Memory Card and PC Adapter
You can use the following memory cards. Set the memory card in the PC card adapter to
use the card.
• Compact flash (Use the PC card adapter that comes with this printer.)
• Smart media
• Memory stick
• SD memory card
• Multimedia card
• Micro drive
• Flash ATA card PCMCIA Type (II)
(The PC card adapter is not
necessary.)
When using a memory card, note the following points:
• Some digital cameras do not support 64MB or 128MB memory cards. Photographs
stored in memory cards that are not supported by the camera cannot be read or may
be destroyed.
• Format the memory card with the digital camera. This printer does not support the
computer's unique format.
• Photographs that have been edited with the computer may not print properly.
• Use a PC card adapter that is recommended by the memory card you use.
➥Note
For information on memory cards and PC card adapters that are supported by a digital
camera, ask the digital camera manufacturer.
28
Setting the Memory Card
➥Note
The operation procedure is different if you are using a memory card when the printer is
connected to the computer. See the "User's Guide."
1 Turn on the printer.
2 Set the memory card into the PC card
adapter.
3 Set the PC card adapter into the card
slot.
The indicator lamp will go on.
The mark and ‘AT’* are displayed on the
operation panel.
* Setup for ‘AT’ *: Images are automatically
corrected when data in formats
supporting Exif2.2 (ExifPrint) is
printed.
For image correction, please refer to ‘Correcting
Photographs (Image Correction)’ on page 43.
Memorycard mark
➥Notes
• When changing/modifying the content of
the memory card of the computer, ensure to
print from the computer. When printing
from the operation panel, printing may not
be done correctly.
When printing from the operation panel,
eject the memory card and print again after
having reset it.
• Ensure to insert the PC card adapter deeply.
29
Ejecting the Memory Card
➥Note
The operation procedure is different if you are using a memory card when the printer is
connected to the computer. See the "User's Guide."
1 Check that the indicator lamp is not
blinking.
➥Note
If you remove the memory card or switch off
the power to the printer while the indicator
lamp is blinking, the data of the memory card
may be destroyed.
2 Press the printer power button to turn
off the computer.
Indicator lamp
Eject button.
3 Check that the indicator lamp is off,
and press the Eject button.
4 Pull out the PC card adapter.
➥Note
Do not remove only the memory card with the
PC card adapter still set in the card slot.
➥Notes
30
Saving the ink (to users who will be using
the printer without connecting to a
computer)
• Except when the printer will not be used for
a long period of time (one month or longer),
always leave the printer plugged in. (Use
the Power button on the printer to turn the
printer on/off.)
If the printer is not connected to a computer,
print head cleaning begins automatically
when the power plug is unplugged and
then reinserted. This action maintains the
optimal print head condition but also
consumes ink.
• This product should be connected directly to
the power outlet.
If this product is switched on/off from a
tabletop that has a power switch, cleaning
begins automatically because the same
condition exists as when the power plug is
unplugged and reinserted, and ink will run
out faster.
■ 2 ■ Printing Photographs ■■■■■■■■■■■■■■■■■■■■■■■■■■■■
This section explains how to print photographs without using a computer.
■ Print Flow
Print photographs according to the following procedure. The printing method can be
selected from five modes: Index, All Frames, Single Frame, Specified Frame, and DPOF.
1 Setting the memory card
Set the memory card (see page 29).
2 Selecting a print method
Select a print method from the five selections.
Index Printing (see page 33)
Prints a list of the photographs.
All Frames Printing (see page 35)
Prints all photographs individually.
Single Frame Printing (see page 35)
Prints the selected one photograph.
Specified Frame Printing (see page 37)
Prints the specified photographs
individually.
DPOF Printing (see page 38)
Prints according to the camera settings.
31
❷
❸
❹
❺
❻
❼
❶
3 Setting print details
❶ Setting the Number of Print Copies (see page 40)
❷ Setting the Media Type (see page 40)
❸ Setting the Print Layout (see page 41)
❹ Setting the Print Quality (see page 42)
❺ Printing the Date (see page 42)
❻ Correcting Photographs (see page 43)
❼ Operating the Cursor Buttons (see page 27)
4 Printing
Load paper into the printer, and press the Print
button.
Loading the paper: Regular Paper (see page 9)
Other Paper (see page 61)
32
■ Printing a Photograph List (Index Printing)
This mode allows you to print a list of the photographs and photograph numbers stored on
the memory card.
Photograph
Number
➥Notes
• You will need the photograph numbers to specify the photographs to be printed. Note that
these numbers are different from the ID numbers that the digital camera assigns.
• Printing is enlarged or reduced automatically to match the paper size. Depending on the
Media Type setting, the top, bottom, right, or left section of the photograph may be cut off
when the photograph is printed.
1 Press the Mode button, and select
Print Index.
2 Set Media Type and Quality.
See "Print Applications" on page 40.
You can also print a partial photograph index by
specifying a range. See "Specifying the range and
print the photographs" on page 34.
3 Load paper in the printer.
On
You will need the number of sheets indicated in
Required Sheets.
➥Note
For instructions on loading the paper, see
"Loading Paper" on page 9 or the "User's
Guide."
For details on the paper types that can be
used, see "Setting the Media Type" on page 40.
33
4 Press the Print button.
Printing starts.
➥Note
Specifying the range and print the photographs
You can print only the specified range of the photographs in the memory card using
either Index printing or All Frames printing function. Set the Print Index or Print All
mode by using the Mode button, and then specify the range according to the procedure
below.
You will need the photograph numbers to specify the range of photographs to be printed.
To check the photograph numbers, use index printing. For details, see "Printing a
Photograph List (Index Printing)."
1 Move the
(cursor) to First/-Orderby pressing the
(top) and
(bottom) buttons.
2 Display the number of the photograph
to be printed first by pressing the
(left) and
(right) buttons.
3 Move the
pressing the
(cursor) to Last by
(down) button.
4 Display the number of the photograph
to be printed last by pressing the
(left) and
(right) buttons.
If you specify a photograph number that is
smaller than the First number, the photographs
will be printed in reverse order starting from the
photograph with the largest photograph number.
34
■ Printing a Sequential Range of Photographs (All Frames
Printing)
This mode allows you to print all photographs found on the memory card. You can also
specify a range to print only some of the photographs.
➥Note
Printing is enlarged or reduced automatically to match the paper size. Depending on the
Media Type and Layout settings, the top, bottom, right, or left section of the photograph
may be cut off when the photograph is printed.
1 Press the Mode button, and select
Print All.
2 Set Media Type and Layout.
See "Print Applications" on page 40.
You can specify a range to print only some of the
photographs. See "Specifying a Print Range" on
page 34.
3 Load paper into the printer.
On
You will need the number of sheets displayed in
Required Sheets.
➥Note
For instructions on loading paper, see
"Loading Paper" on page 9 or the "User's
Guide."
For details on the paper types that can be
used, see "Setting the Media Type" on page 40.
4 Press the Print button.
Printing starts.
■ Printing Photographs One at a Time (Single Frame Printing)
This mode allows you to select and print a single photograph found on the memory card.
35
➥Notes
• You will need the photograph numbers to specify the photograph to be printed.
You can check the photograph numbers by printing an index. See "Printing a
Photograph List (Index Printing)" on page 33.
• Printing is enlarged or reduced automatically to match the paper size. Depending
on the Media Type and Layout settings, the top, bottom, right, or left section of the
photograph may be cut off when the photograph is printed.
1 Press the Mode button, and select
Print One.
2 Move the
On
(cursor) to First/-Orderby pressing the
(top) and
(bottom) buttons.
3 Display the number of the photograph
to be printed by pressing the
and
(right) buttons.
(left)
4 Set Media Type and Layout.
See "Print Applications" on page 40.
➥Note
If you select a multiple pattern ([2][4][8][16])
in Layout, the same photograph is printed for
the specified copy count on one sheet of
paper. See "Setting the Print Layout (Layout)"
on page 41.
5 Load paper into the printer.
You will need the number of sheets displayed in
Required Sheets.
➥Note
For instructions on loading paper, see
"Loading Paper" on page 9 or the "User's
Guide."
For details on the paper types that can be
used, see "Setting the Media Type" on page 40.
6 Press the Print button.
Printing starts.
36
■ Printing Selected Photographs in Batch Printing (Specified
Frame Printing)
This mode allows you to specify photographs to be printed and print the photographs in
batch printing. Up to 99 photographs can be specified.
➥Notes
• You will need the photograph numbers to
specify photographs to be printed. To check the
photograph numbers, use index printing. For
details, see "Printing a Photograph List (Index
Printing)" on page 33.
• Printing is enlarged or reduced automatically to
match the paper size. Depending on the Media
Type and Layout settings, the top, bottom, right,
or left section of the photograph may be cut off
when the photograph is printed.
1 Press the Mode button, and select
Print Selected.
2 Move the
On
(cursor) to First/-Order- by
pressing the
(top) and
(bottom) buttons.
3 Display [-01-] by pressing the
and
(left)
(right) button.
[-01-] indicates the first frame.
4 Move the
(cursor) to Last by
pressing the
(down) button.
5 Display the number of the photograph
to be printed by pressing the
and
(right) buttons.
(left)
6 Move the
(cursor) to First/-Orderby pressing the
(up) button.
37
7 Display [-02-] by pressing the
(right) button.
[-02-] indicates the second frame.
8 To specify a frame after the second
frame, repeat step 2 to 5.
If you select ---- for Last, that frame will not be
printed.
9 Set Media Type and Layout.
See "Print Applications" on page 40.
10 Load paper into the printer.
You will need the number of sheets displayed in
Required Sheets.
➥Note
For instructions on loading paper, see
"Loading Paper" on page 9 or the "User's
Guide."
For details on the paper types that can be
used, see "Setting the Media Type" on page 40.
11 Press the Print button.
Printing starts.
■ Printing According to Camera Settings (DPOF Printing)
If Digital Print Order Format (DPOF) settings are specified in the digital camera, the
printing begins automatically according to the specified settings.
➥Notes
• This printer supports the following DPOF functions.
- Specification of photographs to be printed
- Print style (standard, index)
- Date printing/photograph number printing (If both are selected, only date printing
will be set.)
- Number of copies to be printed
All other DPOF functions (shooting information, trimming function, etc.) are not
supported.
• Printing is enlarged or reduced automatically to match the paper size. Depending on
the Media Type and Layout settings, the top, bottom, right, or left section of the
photograph may be cut off when the photograph is printed.
38
1 Press the Mode button, and select
DPOF mode.
If none of the photographs have the DPOF
specification, the DPOF mode cannot be selected.
2 Set Media Type and Layout.
See "Print Applications" on page 40.
➥Note
Specify the number of copies and date printing
from the digital camera.
On
3 Load paper into the printer.
You will need the number of sheets displayed in
Required Sheets.
➥Note
For instructions on loading paper, see "Loading
Paper" on page 9 or the User's Guide.
For details on the paper types that can be used,
see "Setting the Media Type" on page 40.
4 Press the Print button.
Printing starts.
■ Stopping Printing
Starting printing without using the computer, you can stop printing from the operation
panel.
1 Press the Cancel button.
Cancel button
39
■■ 3 ■ Print Applications ■■■■■■■■■■■■■■■■■■■■■■■■■■■■■
You can set the type of paper and layout to be used in printing, the number of print copies,
photograph correction, quality, and dated printing. Set these settings after you set the print
mode (Index, All Frames, Single Frame, Specified Frame, and DPOF).
■ Setting the Number of Print Copies (Copies)
Copies allows you to set the number of copies in Single Frame mode.
➥Notes
• Copies cannot be set in Index, All Frames, or Specified Frame mode.
• For DPOF mode, set Copies from the digital camera.
• Copies allows you to specify the number of copies for one photograph. The number of
required sheets differs depending on the setting in Layout. For example, if eight copies
in Copies and four patterns in one sheet in Layout are specified, two sheets are needed
to print.
1 Set Single Frame mode.
See "Printing Photographs One at a Time (Single
Frame Printing)" on page 35.
2 Move the
press the
buttons.
(cursor) to Copies by
(top) and
(bottom)
Up to 99 copies can be set.
3 Set the number of copies by press the
(left) and
(right) buttons.
■ Setting the Media Type (Media Type)
You can select the paper for printing from the following seven types:
<PR-101>
40
<PC-101S>
Operation panel display
Media name and size
[A]
Photo Paper Pro for Borderless printing (PR-101)
[B]
Photo Paper Plus Glossy (4" × 6") (PP-101)
[C]
Photo Paper Pro (PC-101S)
[D]
Photo Paper Pro Letter size (PR-101)
[E]
Photo Paper Pro A4 size (PR-101)
[F]
Plain Paper Letter
[G]
Plain Paper A4
1 Set the print mode.
See "Printing Photographs" on page 31.
2 Move the
(cursor) to Media Type by
pressing the
(top) and
(bottom) buttons.
3 Select the media type by pressing the
(left) and
(right) buttons.
You can check the media name that corresponds
to each letter on the right side of the operation
panel.
■ Setting the Print Layout (Layout)
You can set the number of photographs (layout) to be printed on one sheet of paper.
➥Notes
• In Index mode, Layout cannot be set.
• In Single Frame mode, the same photograph is lined up in the specified layout and
printed.
• In All Frames, Specified Frame, and DPOF mode, the sections that have no photograph
to print are left blank.
1 Set the print mode.
See "Printing Photographs" on page 31.
41
2 Move the
(cursor) to Layout by
pressing the
(top) and
(bottom) buttons.
3 Select the layout by pressing the
(left) and
(right) buttons.
Select
to print a borderless photograph.
Select
to print a bordered photograph.
■ Setting the Print Quality (Quality)
You can set the print quality.
➥Note
The print quality that can be set differs according to the media type and the print mode.
1 Set the print mode.
See "Printing Photographs" on page 31.
2 Move the
(cursor) to Quality by
pressing the
(top) and
(bottom) buttons.
3 Select the quality by pressing the
(left) and
(right) buttons.
When the number of
is high, the photographs
can be printed finely. When the number of
is
low, the photographs can be printed quickly.
■ Printing the Date When the Photograph Was Taken (Date
Printing)
The date when the photograph was taken, as recorded in the digital camera, is printed.
Date
Date
Index printing
42
Printing of full screen without frame
➥Note
In DPOF mode, set Print Date from the digital
camera.
1 Set the print mode.
See "Printing Photographs" on page 31.
2 Move the
(cursor) to Print Date by
pressing the
(top) and
(bottom) buttons.
3 Select OFF (disable)/ON (enable) for
date printing by pressing the
or
(right) button.
(left)
■ Correcting Photographs (Image Correction)
This function automatically corrects photographs before printing them. This function is
effective when printing photographs that fogged because of fluorescent lighting effects or
photographs that do not have proper exposure.
➥Notes
• When image correction is performed, printing may take a long time.
• The actual image and colouring may differ from the printed ones depending on the
photograph.
1 Set the print mode.
See "Printing Photographs" on page 31.
2 Move the
(cursor) to Optimize
Image by pressing the
(top) and
(bottom) buttons.
3 Select OFF (disable)/ON (enable) for
image correction by pressing the
(left) of
(right) buttons.
43
➥Note
To set more detailed photograph correction, two correction functions, a correction for
colour fogginess and exposure (Photo Optimizer PRO function) and a correction for
reproducing vivid colours (Vivid Photo function), are performed. To set only one
correction function, follow the procedure below.
1 Select ON (enable) for Optimize
Image by pressing the
(right) button.
(left) or
To use only the correction function for colour
fogginess and exposure (Photo Optimizer PRO
function)
2 Press the
(right) button once.
The display changes to [POP[ON]], and only
the Photo Optimizer PRO function becomes
enabled.
To use only the correction function for
reproducing vivid colours (VIVID Photo
function)
2 Press the
(right) button twice.
The display changes to [VP[ON]], and only the
VIVID Photo function becomes enabled.
44
■ Using the Optional Image Viewer
The optional TFT Image Viewer <<IV-100>> allows you to display JPEG image data stored on
the inserted memory card and check the print layout of the first page.
Switching the Viewer Display On/Off
Switching the Viewer Display On
After attaching the viewer to the printer, turn on the viewer display according to the following
procedure:
1 Turn on the printer.
2 Insert the memory card containing saved JPEG data into the card slot
(see page 29).
The first data that was saved to the memory card is displayed on the viewer.
The brightness and contrast of the viewer display can be adjusted.
Adjusting the Brightness and Contrast (see page 47)
➥Note
When Digital Print Order Format (DPOF) is set, the photographs are displayed in the
chronological order they were shot.
Switching the Viewer Display Off
The viewer display goes off under the following conditions:
• The printer is turned off.
• A digital camera that can print data directly is connected (see page 49).
• The inserted memory card is ejected.
➥Note
If no key operation on the operation panel is performed for about five minutes, the
viewer display goes off automatically (sleep mode). In sleep mode, the viewer display
comes back on when a key operation is performed on the operation panel.
45
Specifying the printing area
• The printing area can be chosen while Print All, Print One or Print Selected is selected.
• This function is available only when
(Borderless Printing) is selected for Layout.
• Examples for cases when (Borderless Printing) are selected for the specified frame
printing are introduced in this section.
Specifying the printing area
1 Check that the printer power is on.
2 Insert a memory card to which JPEG
data has been saved (see page 29).
3 Select the Print Selected using the
Mode button.
4 Use
or
to move
to Layout.
5 Use
or
to specify
(Borderless Printing).
6 Press and hold the Maintenance
button until
(Maintenance
icon) is shown for Required Sheets.
A green frame is displayed on the Image Viewer.
7 Specify the printing area using
or
.
The frame will be moved upwards/downwards
and left/right depending on the length and width
ratio of the image or paper type.
8 Press the Maintenance button.
The Maintenance icon disappears, and the
printing option is enabled.
9 Press the Print button.
The specified area is printed.
➥Notes
• To change the image
The image can be changed using
• To reset the print area specifications
Change Mode and Media type.
46
and
.
Adjusting the Brightness and Contrast
The brightness and contrast of the viewer display can be adjusted from maintenance mode.
Adjusting the Brightness
1 Check that the printer power is on.
2 Insert a memory card to which JPEG
data has been saved (see page 29).
3 Press the Maintenance button.
The
Sheets.
4 Press the
The
icon appears in Required
(right) button five times.
icon is displayed.
5 Press the Print button.
The
Image.
icon appears in Optimize
6 Adjust the brightness by using the
(left) and
(right) buttons.
You can adjust the brightness within the following
setting range by operating the buttons. The base
setting is 0.
: As the number increases in the negative
direction, the brightness becomes darker
(-1 to -9).
: As the number increases in the positive
direction, the brightness becomes brighter
(1 to 9).
7 Press the Print button.
The data is displayed in the viewer at the
brightness that was set.
To exit Maintenance mode, press the Maintenance
button.
47
Adjusting the Contrast
1 Check that the printer is on.
2 Insert a memory card to which JPEG
data has been saved (see page 29).
3 Press the Maintenance button.
The
Sheets.
4 Press the
The
icon appears in Required
(right) button six times.
icon appears.
5 Press the Print button.
The
Image.
icon appears in Optimize
6 Adjust the contrast by using the
(left) and
(right) buttons.
You can adjust the contrast within the following
setting range by operating the buttons. The base
setting is 0.
: As the number increases in the negative
direction, the contrast becomes deeper
(-1 to -9).
: As the number increases in the positive
direction, the contrast becomes lighter
(1 to 9).
7 Press the Print button.
The data is displayed in the viewer with the
contrast that was set.
To exit Maintenance mode, press the Maintenance
button.
48
■ Using a Digital Camera
You can print photographs connecting a Canon digital camera which has direct printing
function. If you connect the digital camera to the printer, perform the print operations from the
digital camera.
You can use the following types of media when you connect a digital camera.
Paper type
Digital camera setting
Photo Paper Pro (4" × 6") (PR-101)
Photo Paper Plus Glossy (4" × 6") (PP-101)
Photo Paper Pro Perforated (4" × 6") (PC-101S)
Photo Paper Pro Letter (PR-101)
Photo Paper Pro A4 (PR-101)
Card #1
Card #2
Card #3
LTR
A4
Descriptions may differ from those in the above table depending on the camera used.
Direct Interface
Cable DIF-B100
Direct Interface
Cable DIF-B250
1 Turn on the printer.
2 Connect the digital camera to the
printer.
Use either of the cables that come with the printer.
For the type of connection cables that match up
correctly with your camera, read the instructions
that come with the camera.
3 Turn on the digital camera.
The
(camera) mark appears.
➥Note
The setting for communicating with this
printer differs depending on the camera that
you use. Read the instructions that come with
the camera.
Camera mark
➥Notes
• Printing photographs
When a digital camera is connected, you will not be able to print from the operation
panel. For instructions on printing photographs from the digital camera, see the
manual that comes with the digital camera.
• Removing the cable
To remove the digital camera cable, follow the procedure below.
1 Disconnect the cable on the printer side.
2 Turn off the digital camera.
49
■■ 4 ■ If Photographs Cannot Be Printed Clearly (Operation Panel Section)
If ink is still remaining but printing is blurred or a certain colour does not come out, nozzles in
the print head may be clogged or the print head may be out of position.
Use the Maintenance function to maintain the print quality.
■ Maintenance Operation Flow
➥Notes
Before Performing the Maintenance Operation
• Open the front cover, and check that the ink tanks are properly set by pressing the
PUSH section of the ink tanks. See "Installing the Ink Tanks" on page 7.
• Check the remaining amount of ink. If ink has run out, replace the ink tanks.
STEP1
Printing the Nozzle Check Pattern (see page 51)
Print the check pattern for checking whether ink is being ejected properly from the
print head nozzles and whether the print head is correctly positioned.
If ink is not properly ejected
STEP2
Cleaning the Print Head (see page
52)
If ink is not being ejected properly,
clean the print head.
If head is out of position
STEP2
Adjusting the Print Head Position
(see page 20)
If the print head is out of position,
adjust the print head position.
STEP3
Deep cleaning the Print Head (see
page 53)
If ink is not being ejected properly
even after print head cleaning, perform
deep cleaning the print head.
➥Note
If the conditions does not improve even after you perform [Step3], the print head
may be damaged.
Contact the store where you bought the printer or a repair center.
50
■ Printing the Nozzle Check Pattern
Print the nozzle check pattern and check whether inks is being ejected properly from the
print head nozzles and whether the print head is correctly positioned.
➥Note
You can also print the nozzle check pattern by pressing the Reset button of the printer.
Follow the procedure below.
1 Check that the printer is on.
2 Load A4-size plain paper.
3 Keep the Reset button pressed down, and release it when the power
lamp blinks twice.
1 Check that the printer is on.
2 Load A4-size paper.
3 Press the Maintenance button.
The
Sheets.
icon appears in Required
4 Press the
(right) button once.
The
icon appears.
5 Press the Print button.
Nozzle check pattern is printed. When printing
ends, the
icon appears.
6 Press the Maintenance button to exit
the Maintenance mode.
7 Check the nozzle check pattern.
1
If pattern 1 is broken, the print head must be
cleaned. See "Cleaning the Print Head" on page
52.
If the vertical lines in pattern 2 stand out, the
print head position must be adjusted. See
"Adjusting the Print Head" on page 20.
2
51
■ Cleaning the Print Head
Clean the print head if a nozzle in the print head becomes clogged. Perform print head
cleaning only when necessary because the operation consumes a lot of ink.
➥Note
You can also perform print head cleaning by pressing the Reset button on the printer.
Follow the procedure below.
1 Check that the printer is on.
2 Keep the Reset button pressed down, and release it when the power
lamp blinks once.
1 Press the Maintenance button.
The
Sheets.
icon appears in Required
2 Press the
(right) button twice.
The icon
is displayed.
3 Press the Print button.
Print head cleaning starts. When cleaning ends,
the
icon appears.
4 Press the Maintenance button to exit
the Maintenance mode.
5 Print the nozzle check pattern, and
check that the pattern is printed
correctly.
See "Printing the Nozzle Check Pattern" on page
51.
6 If there is no improvement, repeat print
head cleaning up to three times.
7 If there is still no improvement, perform
print head deep cleaning.
See "Deep cleaning the Print Head" on page 53.
52
■ Deep cleaning the Print Head
If print head cleaning is not effective, perform print head deep cleaning, which is a stronger
cleaning process.
Perform print head deep cleaning only when necessary because the operation consumes a
lot of ink.
1 Press the Maintenance button.
The
Sheets.
2 Press the
icon appears in Required
(right) button three
times.
The
icon appears.
3 Press the Print button.
Print head deep cleaning starts. When deep
cleaning is completed, the
is
displayed.
4 Press the Maintenance button to exit
the Maintenance mode.
5 Print the nozzle check pattern, and
check that the pattern is printed
correctly.
See "Printing the Nozzle Check Pattern" on page
51.
If there is no improvement, the print head may be
damaged. Contact the store where you bought
the printer or a nearby repair center.
53
■■ 5 ■ If an Error Is Displayed on the Operation Panel ■■■■■
If an error number is displayed on the operation panel, correct the error according to the
procedure below.
➥Note
If the display or buttons on the operation panel
are not operating properly even through an error
is not displayed, turn off the printer, unplug the
power cord, and then turn on the power again.
error number
Black
Cyan
Magenta
➥Note
The colour of the ink tank affected by the error can
be checked in Media Type. An error has occurred
in the ink tank indicated by the blinking position.
Yellow
Error number: 001
Cause: Printer is being used.
Corrective action:
Printing starts when printing from the computer is completed. Press the Cancel button to stop
printing.
Error number: 002
Cause: Printer is not ready.
Corrective action:
Wait until preparations are completed. Printing will start when preparations are completed.
Error number: 101
Cause: Ink level is low.
Corrective action:
Prepare a replacement ink tank. Press the Print button to restart printing even though the print level
is low. Printing will start when the ink tank is replaced (see page 57). Press the Cancel button to
stop printing.
Error number: 102
Cause: Position of paper thickness lever is not correct.
Corrective action:
Printing will start when you set the paper thickness lever to the correct position. Press the Print
button to start printing with paper thickness lever position that is currently set. Press the Cancel
button to stop printing.
54
Error number: 103
Cause: Position of paper thickness lever is incorrect and ink level is low.
Corrective action:
Prepare a replacement ink tank. Replace the ink tank (see page 57), and set the paper thickness
lever to the correct position to start printing. Press the Print button to restart printing under the
current conditions.
Error number: 201
Cause: Ink has run out.
Corrective action:
Press the Cancel button to stop printing, and then replace the ink tank (see page 57). Press the
Reset button on the printer to start printing without any ink.
Error number: 202
Cause: Waste ink tank is full.
Corrective action:
Press the Reset button on the printer to restart printing. Immediately contact the store where you
bought the printer or a repair center and request replacement of the waste ink tank.
Error number: 301, 302
Cause: No paper, paper cannot be fed, or paper jam
Corrective action:
Load paper correctly, and press the Reset button on the printer to start printing. If a sheet is
jammed, remove the jammed sheet (see page 2), load paper correctly, and then press the Reset
button on the printer.
Error number: 401
Cause: Front cover is open.
Corrective action:
Close the front cover to start printing.
Error number: 402
Cause: Print head is not attached.
Corrective action:
Attach the print head (see page 6). If the print head is attached, remove the print head, ensure that
the contact sections are clean, and then reattach the print head.
Error number: 611, 612
Cause: • Time Out is activated during communication with the digital camera.
• A message that this printer does not support is sent from the digital camera.
Corrective action:
Remove the connected cable to reset the error. Reconnect the cable to the digital camera, and then
start printing. For instructions on printing from a digital camera, see the user's guide that comes with
the digital camera.
Error number: 802, 803, 809
Cause: Error occurred in printer.
Corrective action:
Press the Cancel button to stop printing, turn off the printer, wait awhile, and then turn on the power
again. If the condition does not improve, contact the store where you bought the printer or a nearby
repair center.
55
Error: Photograph cannot be read from memory card (indicator lamp does not go on)
Cause: • Memory card is not set properly.
• Memory card was ejected while data was being read.
• Memory card that cannot be used was set.
• Memory card does not contain readable photographs.
Corrective action:
• Insert a memory card deeply that can be used (see page 29).
If a memory card is already set, eject the card, set it again, and check that the indicator lamp goes
on.
• Check whether the PC card adapter is ATA-compliant.
➥Notes
• If the memory card details are amended or processed on a computer, they must be
printed from the computer.
• If application software for printing via a computer is included with the digital camera
used, please use the application software to make prints.
• If the error is not corrected by the above procedure, turn off the printer, unplug the
power cord, and then turn on the power again.
56
Print Head Maintenance
■ If Blurring Occurs or If a Specific Colour Does Not Print
➥Note
The steps below can be performed only from the computer. If you perform them from the
operation panel, refer to “If Photographs Cannot Be Printed Clearly” on page 50.
Perform print head cleaning to improve the print quality. Ensure that the printer is turned
on and follow the instructions below.
• Windows
Open the printer driver settings screen and click the Maintenance tab. Click the Cleaning icon.
See page 16 for details on how to open the setting screen.
• Macintosh
Open the Page Setup dialog box and click the Utilities button. Click the Cleaning icon.
■ When the Printer Runs out of Ink
Replace the empty ink tank with a new one.
Specify the following ink tanks when purchasing.
Yellow
Magenta
Cyan
Black
BCI-3eY
BCI-3eM
BCI-3eC
BCI-3eBK
1 Open the front cover and remove the
empty ink tank.
Do not touch the lock lever.
2 Install the new ink tank.
Close the front cover when finished.
➥Note
For more details about maintenance, refer to
the User’s Guide.
57
Notes on Handling the USB Interface (for Windows Users)
If installation of the printer driver does not proceed as instructed in this Quick Start Guide,
there may be a problem with the USB driver installation.
Try reinstalling the printer driver.
■ Reinstalling
If you cannot proceed beyond the Printer Port screen:
1 Click Cancel.
2 When the Abort Installation screen is
displayed, click Abort.
3 When the Terminate Installation screen
is displayed, click OK.
4 Turn the printer off.
5 Reinstall the printer driver (see page 10).
58
For Further Details...
For more information, place the Setup Software & User’s Guide CD-ROM in the CD-ROM
drive.
■ User’s Guide Contents
The “User’s Guide” is in PDF format and can be found on the same CD-ROM as the printer
driver. You can view this Guide on screen and print out any sections you require.
Contents
• Printer driver functions
• Using Memory Card Utility
• Routine maintenance
• Printing media
• Troubleshooting
• Specifications
■ How to View the User’s Guide
For Windows
(1) Load the CD-ROM in your computer.
(2) Click Documentation on the left of the
screen.
(3) Click View Documents.
If Acrobat Reader is not installed or
Acrobat Reader 4.0 is installed, a
message appears. Click Yes. Follow the
instructions on screen to install the
program. The User’s Guide will appear
once installation is complete.
For Macintosh
(1) Load the CD-ROM in your computer.
If Acrobat Reader 3.0 or later is not
already installed, double-click the
Acrobat Reader 4.0 folder in the
CD-ROM folder, then double-click
Reader 4.0 Installer. Follow the
instructions on the screen to install
Acrobat Reader.
(2) Double-click the Manual folder.
(3) Select a language folder.
(4) Double-click the icon for the
S530D_UG_UK.PDF file.
■ BJ Printer Driver Systems Requirements
For Windows
• Windows XP, Windows Me, Windows 2000, Windows 98
• USB interface
* Use a computer on which Windows XP, Windows Me, Windows 2000 or Windows 98
has been preinstalled (including computers preinstalled with Windows Me, Windows 98
upgraded to Windows XP or Windows 2000).
• 15MB of available hard-disk space for Windows Me/Windows 98
• 50MB of available hard-disk space for Windows XP/Windows 2000
• 16MB of available RAM for Windows 98
• 32MB of available RAM for Windows Me/Windows 2000 Professional
• 64MB of available RAM for Windows 2000 Server
• 128MB of available RAM for Windows XP
For Macintosh
• Macintosh series computer equipped with USB interface
• Preinstalled Mac OS 8.6 - Mac OS 9.x
• 30MB of available hard-disk space (including temporary storage space)
59
Additional Systems Requirements for User's Guide
To install Adobe Acrobat Reader and view the User's Guide:
• 8MB of available hard-disk space for Windows
• 13MB of available hard-disk space for Mac OS
• 640 x 480 pixels or greater, minimum 256 colours video display
■ Specifications
Printing method:
Bubble Jet on-demand
Printing resolution:
2400 (horizontal) x 1200 (vertical) dpi. max.
Print speed (printing with Canon standard pattern):
Black printing
Fast (Draft):
14 ppm
Standard:
12 ppm
Colour printing
Fast (Draft):
10 ppm
Standard:
6 ppm
Print direction:
Bi-directional
Print width:
203.2 mm/8.0 in max.
(for borderless printing: 216.0 mm/8.5 in)
Resident print control mode:
Canon extended mode
Receive buffer:
56 KB
Interface:
USB Full Speed
Interface connector:
USB standard Series B receptacle (USB interface)
Recommended printer cable:
Material:
AWG28 (data wiring pair) or AWG20 to 28 (distribution pair)
Type:
Twisted-pair shielded cable
Length:
Up to 5.0 m (16.4 ft)
Connectors:
USB standard Series B pluggable
Acoustic noise level:
Approx. 42 dB (A) (in the best quality mode)
Operating environment:
Temperature: 5 to 35˚C (41 to 95˚F)
Humidity:
10 to 90%RH (no condensation)
60
Storage environment:
Temperature: 0 to 35˚C (32 to 95˚F)
Humidity:
5 to 90% RH (no condensation)
Power supply:
Europe
AC 230 V±10%, 50 Hz
USA/Canada AC 120 V, 60 Hz
Australia
AC 240 V, 50 Hz
Power consumption:
Standby:
6W
Printing:
36 W
Dimensions (without a paper rest and paper output tray):
430 (W) x 301 (D) x 188 (H) mm
16.9 (W) x 11.9 (D) x 7.4 (H) in
Weight:
Approx. 5.7 kg (12 lb.)
Feed method:
Continuous feed through auto sheet feeder
For Plain Paper, Envelopes, High Resolution Paper,
Glossy Photo Paper, High Gloss Photo Film,
Glossy Photo Cards, Photo Paper Pro, Photo Paper Plus Glossy, Matte Photo Paper
Transparencies, T-shirt Transfers, Banner Paper
Sheet feeder capacity:
Plain Paper (75 gsm)
High Resolution Paper
Envelopes
Glossy Photo Paper
High Gloss Photo Film
Glossy Photo Cards
Photo Paper Pro PR-101
100 sheets max.
80 sheets max.
10 pieces max.
1 sheet
1 sheet
20 sheets max.
A4: 1 sheet
4" × 6": 20 sheets max.
Photo Paper Pro PC-101S
20 sheets max.
Photo Paper Plus Glossy PP-101 A4: 1 sheet
4" × 6": 20 sheets max.
Matte Photo Paper MP-101
10 sheets max.
Transparencies
30 sheets max.
T-Shirt Transfers
1 sheet
Banner Paper
1 sheet
61
Ordinary print media:
Regular size: A4, A5, B5, 4”x6”, Letter, Legal, European DL, US Com.#10
Custom size:
width:
height:
90.0 to 215.9 mm (3.54 to 8.5 in)
120.0 to 584.2mm (4.72 to 23.0 in)
Weight:
64 to 105 g/m2 (17 to 28 lb) for non-Canon brand media
Canon Special media:
High Resolution Paper
Glossy Photo Paper
High Gloss Photo Film
Glossy Photo Cards
Photo Paper Pro
Photo Paper Pro
Photo Paper Plus Glossy
Matte Photo Paper
Transparencies
T-Shirt Transfers
Banner Paper
HR-101N
GP-301/GP-301N
HG-201
FM-101
PR-101
PC-101S
PP-101
MP-101
CF-102
TR-201
Graphic image printing:
Data format: Canon extended mode:
Resolution:
Canon extended mode:
Print Head:
Black:
Cyan, Magenta, Yellow:
Ink Tanks:
Capacity (page):
Black (BCI-3eBK)
Cyan (BCI-3eC)
Magenta (BCI-3eM)
Yellow (BCI-3eY)
Raster image format
300, 600, 1200, 2400 dpi
320 nozzles (600 dpi)
256 nozzles (1200 dpi)
approx. 695*1, approx. 1250*2
approx. 460*2
approx. 395*2
approx. 300*2
*1 1500 characters per page, normal text, at standard and plain paper mode with Windows
Me/Windows 98
*2 Based on printing the ISO JIS-SCID No.5 pattern at standard and plain paper mode with
Windows Me/Windows 98
Supported recording media:
Compact flash, smart media*3, memory stick, SD memory card, multimedia card, micro
drive, flash ATA card PCMCIA Type (II)
*3 Some digital cameras do not support 64-MB or 128-MB memory cards. Photographs
stored on a memory card that is not supported by the camera cannot be read may be
destroyed.
Supported recording formats:
JPEG(DCF/CIFF/Exif 2.1 or later/JFIF), TIFF (Exif-compliant)
DPOF support
62
Storage function:
Supported operating systems
Windows XP, Windows 2000, Windows Me, Windows 98
Mac OS 8.6 or later
Utilities
Use the storage utility that comes with the printer.
Functions
Read, write
Direct print function:
Interface
Card slot, Connector for digital camera print
Operation panel
Large LCD panel, 8 keys, 6 LEDs
Supported paper types (The letters enclosed in brackets ([ ]) are the selection items in Media
Type on the operation panel.)
[A]Photo Paper Pro for Borderless printing (PR-101)
[B]Photo Paper Plus Glossy 4" × 6" (PP-101)
[C]Photo Paper Pro (PC-101S)
[D]Photo Paper Pro Letter size (PR-101)
[E]Photo Paper Pro A4 size (PR-101)
[F]Plain Paper Letter
[G]Plain Paper A4
Supported layouts
Photo Paper Pro series
Photo Paper Pro for Borderless printing 101.6 mm × 152.4 mm (PR-101)
:Borderless printing (from computer and operation panel), 2/4/8/16 patterns in one sheet,
index
Photo Paper Plus Glossy (PP-101)
:Borderless printing (from computer and operation panel), 2/4/8/16 patterns in one sheet,
index
Matte Photo Paper (MP-101)
:Borderless printing (from computer and operation panel), 2/4/8/16 patterns in one sheet,
index
Photo Paper Pro (PC-101S)
:Borderless printing, index
Photo Paper Pro Letter size (PR-101)
:Borderless printing (from computer and operation panel), 2/4/8/16 patterns in one sheet,
index
Photo Paper Pro A4 size (PR-101)
:Borderless printing (from computer and operation panel), 2/4/8/16 patterns in one sheet,
index
Plain Paper*4
Plain Paper Letter
:2/4/8/16 patterns in one sheet, index
Plain Paper A4
:2/4/8/16 patterns in one sheet, index
*4 If printing with borders is executed from the operator panel, the printable areas are
shown below. (These values are different from when printing is executed from a
computer.)
A4:
203.2 × 257.0 mm (Top/bottom margins: 20 mm each, left/right margins:
3.4 mm each)
63
Print quality
Up to three levels
Date printing
Supported
Correction function
Photo Optimizer PRO, VIVID Photo
DPOF function
Ver. 1.00-compliant (Print index prints, Set the number of copies, Select images for
print, Include the date on the print, Include the file number on the print)
Resolution
Up to 1200×1200 dpi
Specifications subject to change without prior notice.
64
QA7-2102-V01
XXXXXXXX
©CANON INC.2002
PRINTED IN THAILAND