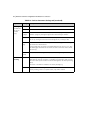
1
eCopy™ ShareScan® 4.5
Installation and Setup Guide
for Canon® ScanFront™devices
Part Number: 73-00330-1 (01/2009)
Licensing, Copyright, and Trademark Information
The information in this document is subject to change and does not represent a commitment on
the part of eCopy, Inc. The software described in this document is furnished under a license
agreement. The software may be used or copied only in accordance with the terms of the
agreement. It is against the law to copy the software on any medium except as specified in the
license agreement. No part of this document may be reproduced, transmitted in any form or by
any means, electronic or mechanical, including photocopying, recording, or information storage
and retrieval systems, or translated into any language for any purpose other than the purchaser’s
personal use, without the written permission of eCopy, Inc.
©
1992 - 2009 eCopy, Inc.
eCopy, the eCopy logo, eCopyFax, the Simplify logo, the MailRoom logo, eCopy ShareScan,
eCopy ScanStation, eCopy Desktop, eCopy Quick Connect, eCopy Xpert Compression, UniDoc,
SpeedFax, and SpeedPrint are trademarks of eCopy, Inc. ShareScan, Simplify, and MailRoom are
registered trademarks of eCopy, Inc.
Canon and MEAP are registered trademarks and imageRUNNER is a trademark of Canon, Inc.
Captaris and RightFax are trademarks of Captaris, Inc.
IBM, Lotus, and Lotus Notes are trademarks and/or registered trademarks of Lotus
Development Corporation and/or IBM Corporation in the United States, other countries or
both.
Intel and Pentium are registered trademarks of Intel Corporation.
ISIS is a registered trademark of EMC Corporation.
Microsoft, Windows, Windows NT, Outlook, and MS-DOS are registered trademarks and
Windows Server and Windows Vista are trademarks of Microsoft Corporation in the USA and in
other countries.
Part of the software embedded in this product is gSOAP software. Portions created by gSOAP are
Copyright (C) 2001-2004 Robert A. van Engelen, Genivia inc. All Rights Reserved.
The software in this product was in part provided by Genivia Inc and any express or implied
warranties, including, but not limited to, the implied warranties of merchantability and fitness for
a particular purpose are disclaimed. in no event shall the author be liable for any direct, indirect,
incidental, special, exemplary, or consequential damages (including, but not limited to,
procurement of substitute goods or services; loss of use, data, or profits; or business interruption)
however caused and on any theory of liability, whether in contract, strict liability, or tort (including
negligence or otherwise) arising in any way out of the use of this software, even if advised of the
possibility of such damage.
All other terms and products are trademarks or registered trademarks of their respective owners
and are hereby acknowledged.
Table of Contents
Getting Started
Further information
. . . . . . . . . . . . . . . . . . . . . . . . . . . . . . . . . . . . .1
. . . . . . . . . . . . . . . . . . . . . . . . . . . . . . . . . . . . . . . . . . . . . . . . . . . . . . . .2
Customer support services
. . . . . . . . . . . . . . . . . . . . . . . . . . . . . . . . . . . . . . . . . . . . . . . . . . .3
Contact information
. . . . . . . . . . . . . . . . . . . . . . . . . . . . . . . . . . . . . . . . . . . . . . . . . . . .3
Quick Start: Installing and setting up ShareScan
Product components
Installation tasks
. . . . . . . . . . . . . . . . . . . . . . . . . . . . . . . . . . . . . . . . . . . . . . . . . . . . . . .6
. . . . . . . . . . . . . . . . . . . . . . . . . . . . . . . . . . . . . . . . . . . . . . . . . . . . . . . . . .8
Installing eCopy ShareScan
Licensing devices
. . . . . . . . . .5
. . . . . . . . . . . . . . . . . . . . . . . . . . . . . . . . . . . . . . . . . . . . . . . . . .9
. . . . . . . . . . . . . . . . . . . . . . . . . . . . . . . . . . . . . . . . . . . . . . . . . . . . . . . . .11
Configuring and activating connector profiles
. . . . . . . . . . . . . . . . . . . . . . . . . . . . . . . . . . .15
Specifying properties for a connector profile
Specifying services for a connector profile
Setting up the Canon ScanFront device
Web administration
. . . . . . . . . . . . . . . . . . . . . . . . . . . . . . . . .16
. . . . . . . . . . . . . . . . . . . . . . . . . . . . . . . . . . .24
. . . . . . . . . . . . . . . . . . . . . . . . . . . . . . . . . . . . . . . .26
. . . . . . . . . . . . . . . . . . . . . . . . . . . . . . . . . . . . . . . . . . . . . . . . . . . .27
Activating connector profiles
. . . . . . . . . . . . . . . . . . . . . . . . . . . . . . . . . . . . . . . . . . . . . . . .32
Reference: Configuring the system
Starting, stopping, and restarting the Services Manager
Setting security options for a Services Manager
Configuring system properties
. . . . . . . . . . . . . . . . . . . . 35
. . . . . . . . . . . . . . . . . . . . . . . . . . . .36
. . . . . . . . . . . . . . . . . . . . . . . . . . . . . . . . . .37
. . . . . . . . . . . . . . . . . . . . . . . . . . . . . . . . . . . . . . . . . . . . . . .39
Configuring general system properties
. . . . . . . . . . . . . . . . . . . . . . . . . . . . . . . . . . . . .39
Configuring advanced system properties
Configuring keyboard settings
. . . . . . . . . . . . . . . . . . . . . . . . . . . . . . . . . . . .39
. . . . . . . . . . . . . . . . . . . . . . . . . . . . . . . . . . . . . . . . . . . .41
Configuring Session Logon
. . . . . . . . . . . . . . . . . . . . . . . . . . . . . . . . . . . . . . . . . . . . . .42
Configuring system tracing
. . . . . . . . . . . . . . . . . . . . . . . . . . . . . . . . . . . . . . . . . . . . . .44
Licensing devices
. . . . . . . . . . . . . . . . . . . . . . . . . . . . . . . . . . . . . . . . . . . . . . . . . . . . . . . . .45
Adding product keys
. . . . . . . . . . . . . . . . . . . . . . . . . . . . . . . . . . . . . . . . . . . . . . . . . . .46
Deleting product keys
. . . . . . . . . . . . . . . . . . . . . . . . . . . . . . . . . . . . . . . . . . . . . . . . . .47
Adding a device with an embedded Client
Activating licenses
. . . . . . . . . . . . . . . . . . . . . . . . . . . . . . . . . .48
. . . . . . . . . . . . . . . . . . . . . . . . . . . . . . . . . . . . . . . . . . . . . . . . . . . . .49
Generating a license report
. . . . . . . . . . . . . . . . . . . . . . . . . . . . . . . . . . . . . . . . . . . . . .50
iv | Table of Contents
Monitoring scanning activity
Reporting scanning activity
. . . . . . . . . . . . . . . . . . . . . . . . . . . . . . . . . . . . . . . . . . . . . . . . 51
. . . . . . . . . . . . . . . . . . . . . . . . . . . . . . . . . . . . . . . . . . . . . . . . . 52
Backing up and sharing configuration files
Remote administration
. . . . . . . . . . . . . . . . . . . . . . . . . . . . . . . . . . . . . 53
. . . . . . . . . . . . . . . . . . . . . . . . . . . . . . . . . . . . . . . . . . . . . . . . . . . . 55
Reference: Common configuration information for
connectors . . . . . . . . . . . . . . . . . . . . . . . . . . . . . . . . . . . . . . . 57
Installing and removing connectors
Configuring connector profiles
. . . . . . . . . . . . . . . . . . . . . . . . . . . . . . . . . . . . . . . . . . 58
. . . . . . . . . . . . . . . . . . . . . . . . . . . . . . . . . . . . . . . . . . . . . . 60
Configuring and updating connector profiles
Activating connector profiles
. . . . . . . . . . . . . . . . . . . . . . . . . . . . . . . . 60
. . . . . . . . . . . . . . . . . . . . . . . . . . . . . . . . . . . . . . . . . . . . 61
Configuring common Properties settings
. . . . . . . . . . . . . . . . . . . . . . . . . . . . . . . . . . . . . . 63
Configuring the Display properties
. . . . . . . . . . . . . . . . . . . . . . . . . . . . . . . . . . . . . . . . 64
Configuring the Content properties
. . . . . . . . . . . . . . . . . . . . . . . . . . . . . . . . . . . . . . . 65
Configuring the Express properties
. . . . . . . . . . . . . . . . . . . . . . . . . . . . . . . . . . . . . . . . 67
Configuring the Search while typing option
Configuring file name and index fields
Configuring the fax address format
. . . . . . . . . . . . . . . . . . . . . . . . . . . . . . . . . 70
. . . . . . . . . . . . . . . . . . . . . . . . . . . . . . . . . . . . . 71
. . . . . . . . . . . . . . . . . . . . . . . . . . . . . . . . . . . . . . . 73
Configuring support for local address books
Configuring connector Services
Copying Services settings
. . . . . . . . . . . . . . . . . . . . . . . . . . . . . . . . 75
. . . . . . . . . . . . . . . . . . . . . . . . . . . . . . . . . . . . . . . . . . . . . 80
. . . . . . . . . . . . . . . . . . . . . . . . . . . . . . . . . . . . . . . . . . . . . . . 80
Configuring Document Settings
Configuring Scanner Settings
ScanFront scanner settings
Configuring Tracing settings
. . . . . . . . . . . . . . . . . . . . . . . . . . . . . . . . . . . . . . . . . . 81
. . . . . . . . . . . . . . . . . . . . . . . . . . . . . . . . . . . . . . . . . . . . 85
. . . . . . . . . . . . . . . . . . . . . . . . . . . . . . . . . . . . . . . . . . . . . . 86
. . . . . . . . . . . . . . . . . . . . . . . . . . . . . . . . . . . . . . . . . . . . 89
Reference: Connector-specific configuration information
eCopy Connector for Microsoft Exchange
. . . . . . . . . . . . . . . . . . . . . . . . . . . . . . . . . . . . . 92
About Exchange Environment connection protocols
Exchange Connectors Wizard Settings
. . . . . . . . . . . . . . . . . . . . . . . . . . . 92
. . . . . . . . . . . . . . . . . . . . . . . . . . . . . . . . . . . . . 96
Exchange Connectors Properties Settings
. . . . . . . . . . . . . . . . . . . . . . . . . . . . . . . . . . . 97
eCopy Connector for Microsoft Exchange Local Address Book Settings
eCopy Connector for Fax via Microsoft Exchange
eCopy Connector for Lotus Notes Mail
eCopy Connector for Fax via Lotus Notes
. 91
. . . . . . . . . . . 104
. . . . . . . . . . . . . . . . . . . . . . . . . . . . . . . 105
. . . . . . . . . . . . . . . . . . . . . . . . . . . . . . . . . . . . . . . 107
. . . . . . . . . . . . . . . . . . . . . . . . . . . . . . . . . . . . . 110
|v
eCopy Connector for SMTP using LDAP
. . . . . . . . . . . . . . . . . . . . . . . . . . . . . . . . . . . . . . .113
SMTP using LDAP connector Wizard settings
. . . . . . . . . . . . . . . . . . . . . . . . . . . . . . . .114
eCopy Connector for SMTP using LDAP Properties
eCopy Connector for Fax via SMTP
Scan to eCopy
Desktop™
. . . . . . . . . . . . . . . . . . . . . . . . . . . .118
. . . . . . . . . . . . . . . . . . . . . . . . . . . . . . . . . . . . . . . . . .123
. . . . . . . . . . . . . . . . . . . . . . . . . . . . . . . . . . . . . . . . . . . . . . . . . .125
About eCopy Desktop scan inboxes and home directories
About the Inbox root directory
. . . . . . . . . . . . . . . . . . . . . . . . . . . . . . . . . . . . . . . . . .128
Preconfiguring Scan to eCopy Desktop
Configuring Scan to eCopy Desktop
About the Inbox Agent
Scan to Printer
. . . . . . . . . . . . . . . . . . . . . .126
. . . . . . . . . . . . . . . . . . . . . . . . . . . . . . . . . . . .130
. . . . . . . . . . . . . . . . . . . . . . . . . . . . . . . . . . . . . .131
. . . . . . . . . . . . . . . . . . . . . . . . . . . . . . . . . . . . . . . . . . . . . . . .138
. . . . . . . . . . . . . . . . . . . . . . . . . . . . . . . . . . . . . . . . . . . . . . . . . . . . . . . . . .140
Reference: Managing eCopy-enabled devices
Specifying a default device
. . . . . . . . . . 143
. . . . . . . . . . . . . . . . . . . . . . . . . . . . . . . . . . . . . . . . . . . . . . . . .144
Specifying default scanner settings
Configuring Activity Tracking
. . . . . . . . . . . . . . . . . . . . . . . . . . . . . . . . . . . . . . . . . . .145
. . . . . . . . . . . . . . . . . . . . . . . . . . . . . . . . . . . . . . . . . . . . . . .146
Configuring the Activity Logging function
. . . . . . . . . . . . . . . . . . . . . . . . . . . . . . . . . .147
Configuring the Additional Fields function
. . . . . . . . . . . . . . . . . . . . . . . . . . . . . . . . . .150
Configuring the Document Tracking function
Configuring the ID Services function
. . . . . . . . . . . . . . . . . . . . . . . . . . . . . . .151
. . . . . . . . . . . . . . . . . . . . . . . . . . . . . . . . . . . . . .153
Reference: Using eCopy Connectors
Using the fingerprint scanner
. . . . . . . . . . . . . . . . . . . . . . . . . . . . . . . . . . . . . . . . . . . . . . .156
Registering fingerprints at the device
. . . . . . . . . . . . . . . . . . . . . . . . . . . . . . . . . . . . . .156
Logging on using the fingerprint scanner
Using the on-screen keyboard
. . . . . . . . . . . . . . . . . . . . . . . . . . . . . . . . . .156
. . . . . . . . . . . . . . . . . . . . . . . . . . . . . . . . . . . . . . . . . . . . . .157
Quick reference to using an eCopy Connector
. . . . . . . . . . . . . . . . . . . . . . . . . . . . . . . . . .158
General procedure for using an eCopy Connector
Reference: Installation environment
Network environment
. . . . . . . . . . . . . . . . . . . . . . . . . . . .159
. . . . . . . . . . . . . . . . . . 165
. . . . . . . . . . . . . . . . . . . . . . . . . . . . . . . . . . . . . . . . . . . . . . . . . . . .166
Hardware configuration guidelines
Services Manager PC worksheet
Device worksheet
. . . . . . . . . . . . . . . . . . 155
. . . . . . . . . . . . . . . . . . . . . . . . . . . . . . . . . . . . . . . . . . .167
. . . . . . . . . . . . . . . . . . . . . . . . . . . . . . . . . . . . . . . . . . . . .168
. . . . . . . . . . . . . . . . . . . . . . . . . . . . . . . . . . . . . . . . . . . . . . . . . . . . . . .170
Firewall and switch worksheet
. . . . . . . . . . . . . . . . . . . . . . . . . . . . . . . . . . . . . . . . . . . . . .171
Network infrastructure worksheet
. . . . . . . . . . . . . . . . . . . . . . . . . . . . . . . . . . . . . . . . . . .173
vi | Table of Contents
DNS considerations
. . . . . . . . . . . . . . . . . . . . . . . . . . . . . . . . . . . . . . . . . . . . . . . . . . . . . 174
Using a DNS server on the local network
Configuring the HOSTS file
Novell support
. . . . . . . . . . . . . . . . . . . . . . . . . . . . . . . . . . 174
. . . . . . . . . . . . . . . . . . . . . . . . . . . . . . . . . . . . . . . . . . . . 174
. . . . . . . . . . . . . . . . . . . . . . . . . . . . . . . . . . . . . . . . . . . . . . . . . . . . . . . . . 175
Index . . . . . . . . . . . . . . . . . . . . . . . . . . . . . . . . . . . . . . . . . . . . 177
vii
List of Tables
TABLE 1. Remote administration functions . . . . . . . . . . . . . . . . . . . . . . . . . . . . . . . . . . . . . . .27
TABLE 2. System properties: Advanced tab . . . . . . . . . . . . . . . . . . . . . . . . . . . . . . . . . . . . . . .40
TABLE 3. System information: Keyboard Settings tab . . . . . . . . . . . . . . . . . . . . . . . . . . . . . . .41
TABLE 4. System properties: Session Logon tab . . . . . . . . . . . . . . . . . . . . . . . . . . . . . . . . . . . .43
TABLE 5. System information: Tracing tab . . . . . . . . . . . . . . . . . . . . . . . . . . . . . . . . . . . . . . . .44
TABLE 6. Product key status options . . . . . . . . . . . . . . . . . . . . . . . . . . . . . . . . . . . . . . . . . . . .45
TABLE 7. Two profiles for the same connector activated on a single device . . . . . . . . . . . . . . .60
TABLE 8. Common functions . . . . . . . . . . . . . . . . . . . . . . . . . . . . . . . . . . . . . . . . . . . . . . . . .63
TABLE 9. Connector Properties: Display tab . . . . . . . . . . . . . . . . . . . . . . . . . . . . . . . . . . . . . .64
TABLE 10. Connector Properties: Content tab . . . . . . . . . . . . . . . . . . . . . . . . . . . . . . . . . . . . .65
TABLE 11. Connector Properties: Express tab . . . . . . . . . . . . . . . . . . . . . . . . . . . . . . . . . . . . .67
TABLE 12. Field Editor options . . . . . . . . . . . . . . . . . . . . . . . . . . . . . . . . . . . . . . . . . . . . . . . .71
TABLE 13. Field Editor: Available field types . . . . . . . . . . . . . . . . . . . . . . . . . . . . . . . . . . . . . .71
TABLE 14. Fax Address Format window access . . . . . . . . . . . . . . . . . . . . . . . . . . . . . . . . . . . .73
TABLE 15. Settings for creating a local address book database . . . . . . . . . . . . . . . . . . . . . . . .78
TABLE 16. Settings for enabling address books . . . . . . . . . . . . . . . . . . . . . . . . . . . . . . . . . . . .78
TABLE 17. Data Link Properties window: Connection tab . . . . . . . . . . . . . . . . . . . . . . . . . . . .79
TABLE 18. Services: Document Settings tab . . . . . . . . . . . . . . . . . . . . . . . . . . . . . . . . . . . . . .82
TABLE 19. Services: Scanner Settings tab . . . . . . . . . . . . . . . . . . . . . . . . . . . . . . . . . . . . . . . .85
TABLE 20. Canon ScanFront supported scanner settings . . . . . . . . . . . . . . . . . . . . . . . . . . . . .86
TABLE 21. Services: Tracing tab . . . . . . . . . . . . . . . . . . . . . . . . . . . . . . . . . . . . . . . . . . . . . . .89
TABLE 22. Exchange: Connection protocols . . . . . . . . . . . . . . . . . . . . . . . . . . . . . . . . . . . . . .93
TABLE 23. Wizard settings: Exchange environment . . . . . . . . . . . . . . . . . . . . . . . . . . . . . . . . .96
TABLE 24. Exchange Properties: Basic Settings tab . . . . . . . . . . . . . . . . . . . . . . . . . . . . . . . . .98
TABLE 25. Exchange Properties: Advanced Account Settings . . . . . . . . . . . . . . . . . . . . . . . . . .99
TABLE 26. Exchange Properties: General Settings tab . . . . . . . . . . . . . . . . . . . . . . . . . . . . . .101
TABLE 27. Exchange Properties: Fax Format Settings . . . . . . . . . . . . . . . . . . . . . . . . . . . . . . .102
TABLE 28. Exchange Properties: Advanced Settings tab . . . . . . . . . . . . . . . . . . . . . . . . . . . .103
viii | Table of Contents
TABLE 29. Lotus Notes Mail Properties: Configure tab . . . . . . . . . . . . . . . . . . . . . . . . . . . . . 108
TABLE 30. Fax via Lotus Notes Properties: Configure tab . . . . . . . . . . . . . . . . . . . . . . . . . . . 112
TABLE 31. Wizard settings: SMTP using LDAP . . . . . . . . . . . . . . . . . . . . . . . . . . . . . . . . . . . 114
TABLE 32. LDAP/SMTP Properties: Basic LDAP tab . . . . . . . . . . . . . . . . . . . . . . . . . . . . . . . . 118
TABLE 33. LDAP/SMTP Properties: Advanced LDAP tab . . . . . . . . . . . . . . . . . . . . . . . . . . . . 120
TABLE 34. LDAP/SMTP Properties: SMTP Settings tab . . . . . . . . . . . . . . . . . . . . . . . . . . . . . 121
TABLE 35. LDAP/SMTP Properties: User Logon tab . . . . . . . . . . . . . . . . . . . . . . . . . . . . . . . . 122
TABLE 36. LDAP/SMTP Properties: Fax Format Settings . . . . . . . . . . . . . . . . . . . . . . . . . . . . 122
TABLE 37. Scan to eCopy Desktop: Security for scan inboxes . . . . . . . . . . . . . . . . . . . . . . . 126
TABLE 38. Sample scan inbox locations . . . . . . . . . . . . . . . . . . . . . . . . . . . . . . . . . . . . . . . . 127
TABLE 39. Inbox root directory permissions (Windows) . . . . . . . . . . . . . . . . . . . . . . . . . . . . 128
TABLE 40. Inbox root directory permissions (Novell NetWare [NDS]) . . . . . . . . . . . . . . . . . . 129
TABLE 41. Scan to eCopy Desktop Properties: Environment settings . . . . . . . . . . . . . . . . . . 132
TABLE 42. Scan to eCopy Desktop Properties: General settings . . . . . . . . . . . . . . . . . . . . . . 133
TABLE 43. Scan to eCopy Desktop: Destination settings . . . . . . . . . . . . . . . . . . . . . . . . . . . 134
TABLE 44. Scan to eCopy Desktop: Advanced Account settings . . . . . . . . . . . . . . . . . . . . . 136
TABLE 45. Scan to Printer Properties: Configure tab . . . . . . . . . . . . . . . . . . . . . . . . . . . . . . 140
TABLE 46. Devices: Activity Logging tab . . . . . . . . . . . . . . . . . . . . . . . . . . . . . . . . . . . . . . . 148
TABLE 47. Activity Logging: Basic and Extended Fields . . . . . . . . . . . . . . . . . . . . . . . . . . . . 149
TABLE 48. Devices: Document Tracking folder settings . . . . . . . . . . . . . . . . . . . . . . . . . . . . 152
TABLE 49. Devices: ID Service Settings . . . . . . . . . . . . . . . . . . . . . . . . . . . . . . . . . . . . . . . . . 154
TABLE 50. Client: Send screen settings . . . . . . . . . . . . . . . . . . . . . . . . . . . . . . . . . . . . . . . . 162
TABLE 51. Client: Post-scanning options . . . . . . . . . . . . . . . . . . . . . . . . . . . . . . . . . . . . . . . 163
TABLE 52. Hardware configuration guidelines . . . . . . . . . . . . . . . . . . . . . . . . . . . . . . . . . . . 167
TABLE 53. Services Manager PC worksheet . . . . . . . . . . . . . . . . . . . . . . . . . . . . . . . . . . . . . 168
TABLE 54. Device worksheet . . . . . . . . . . . . . . . . . . . . . . . . . . . . . . . . . . . . . . . . . . . . . . . . 170
TABLE 55. Firewall and switch worksheet . . . . . . . . . . . . . . . . . . . . . . . . . . . . . . . . . . . . . . 171
TABLE 56. Network infrastructure worksheet . . . . . . . . . . . . . . . . . . . . . . . . . . . . . . . . . . . 173
eCopy ShareScan® Installation and Setup Guide | 1
Getting Started
This guide is intended for administrators responsible for installing and configuring eCopy™
ShareScan®. It provides a product overview and describes system requirements and installation
and configuration procedures.
In this chapter
■
Further information . . . . . . . . . . . . . . . . . . . . . . . . . . . . . . . . . . . . . . . . . . . . . . . . . . . . . . . . . . . 2
■
Customer support services . . . . . . . . . . . . . . . . . . . . . . . . . . . . . . . . . . . . . . . . . . . . . . . . . . . . . . 3
2
| Getting Started
Further information
The documentation set consists of the following documents:
■
■
ShareScan Installation and Setup Guide: The Quick Start section of this document
guides you through the initial installation and setup process. The Reference section
provides more detailed information about configuring the system and the eCopy
Connectors. It also describes how to manage the Client and use the eCopy™ Connectors.
ShareScan Help: The Help files contain information about configuring the system,
connectors, and devices. You can easily access the Help from the Administration console.
To access the Administration console help, in the console tree, select a node, such as
“ShareScan” and then click the Help button. The Help opens in the Microsoft
Management Console.
To access help for a specific connector, in the console tree, select the connector and
then click the Connector Help button, or right-click the connector name and then
select Connector Help from the menu.
eCopy ShareScan® Installation and Setup Guide | 3
Customer support services
Customer Support services include the following components:
■
Customer support for licensing, registration, and other non-technical issues
■
Technical support
eCopy does not provide hardware repair and RMA (Return Merchandise Authorization) services
for this product. Contact your dealer/distributor or system integrator for more information.
eCopy-provided services are available to registered users of eCopy software during the warranty
period or for the duration of your software maintenance and support agreement. Contact your
supplier for details.
As described in the maintenance and support agreement, your dealer or distributor will provide
you with Level 1 support (Help-line telephone or other assistance) for operating the covered
products during the hours established by your dealer or distributor. If you require technical
support after your dealer or distributor has provided Level 1 support, the dealer or distributor will
escalate the support issue to eCopy for resolution and will manage all related communications
with you.
In addition to support provided by your dealer or distributor, the Ask eCopy online resource—
www.askecopy.com—provides 24x7 access to a knowledge base that includes Frequently Asked
Questions (FAQs), product service packs, product support matrices, product information, and
other information.
Contact information
US/North America
Please visit the Ask eCopy Web site—www.askecopy.com—for Customer Support hours of
operation, contact information, policies, and process descriptions.
eCopy Corporate Headquarters Telephone: +1.603.881.4450
Outside North America
Please contact your local dealer or national sales organization.
eCopy ShareScan® Installation and Setup Guide | 5
Quick Start: Installing and
setting up ShareScan
ShareScan extends the capabilities of digital copiers and scanners. When installing and setting up
the software, you need to understand the product components and the installation tasks.
In this chapter
■
Product components . . . . . . . . . . . . . . . . . . . . . . . . . . . . . . . . . . . . . . . . . . . . . . . . . . . . . . . . . . . 6
■
Installation tasks . . . . . . . . . . . . . . . . . . . . . . . . . . . . . . . . . . . . . . . . . . . . . . . . . . . . . . . . . . . . . . 8
■
Installing eCopy ShareScan . . . . . . . . . . . . . . . . . . . . . . . . . . . . . . . . . . . . . . . . . . . . . . . . . . . . . . 9
■
Licensing devices . . . . . . . . . . . . . . . . . . . . . . . . . . . . . . . . . . . . . . . . . . . . . . . . . . . . . . . . . . . . . 11
■
Configuring and activating connector profiles . . . . . . . . . . . . . . . . . . . . . . . . . . . . . . . . . . . . . . 15
■
Setting up the Canon ScanFront device . . . . . . . . . . . . . . . . . . . . . . . . . . . . . . . . . . . . . . . . . . . 26
6
| Quick Start: Installing and setting up ShareScan
Product components
Administration console
Network computer running the
Services Manager and one or more
connectors (applications connected
to enterprise applications,
such as e-mail and fax).
Client
(running on a Canon
ScanFront device)
eCopy ShareScan® Installation and Setup Guide | 7
The ShareScan Client is installed on a Canon® ScanFront™device. It displays the user interface
on the device’s control panel and handles user input. It passes all information, including the raw
scanned image file, to the Services Manager for processing.
The ShareScan Services Manager resides on a network computer running Windows 2003
Server, Windows 2008 Server, Windows XP Professional (Service Pack 3), or Microsoft Vista
(Business and Enterprise, Service Pack 1). ShareScan does not require any special server hardware.
The Services Manager handles requests from the client, returns user interface screens and preview
images to the client, and creates the master image file according to the selected options (file type,
searchable text, encryption, etc.). It also manages all connected devices; a single Services Manager
can support multiple clients.
Apache Tomcat, which provides the Web client, resides on the PC running the ShareScan
Services Manager. It handles communications between the ScanFront device and the Services
Manager. It also keeps track of the hosted ScanFront devices, manages scanner settings, and
initiates scanning on the ScanFront device.
The Connectors, which reside on the same computer as the Services Manager, provide
connectivity to back-end applications. For example, the eCopy Connector for Microsoft
Exchange enables users to scan documents and e-mail them using Microsoft Exchange. The
eCopy Connector for Fax via Lotus Notes enables users to scan documents and fax them using
Lotus Notes.
The Administration console is a Microsoft Management Console (MMC) snap-in that enables
system administrators to configure and administer Services Managers, eCopy Connectors, eCopy
Services, and devices.
8
| Quick Start: Installing and setting up ShareScan
Installation tasks
Before installing the product, see page 165 for information about hardware, software, and
network requirements.
To install and configure ShareScan, you perform the following tasks:
■
Install the ShareScan software (Services Manager, Administration console, and the eCopy
Connectors supplied with the installation program) on a network computer.
■
License the devices.
■
Configure one or more connector profiles.
■
■
Set up the ScanFront device on the network and then connect it to the PC running the
ShareScan Services Manager.
Activate the connector profiles on the device.
eCopy ShareScan® Installation and Setup Guide | 9
Installing eCopy ShareScan
Use the ShareScan installation program to install the following components on a network
computer:
■
Client
■
Services Manager
■
Administration console
■
One or more eCopy Connectors supplied with the installation program.
Installing connectors is not the same as activating them. You can install all the connectors suitable
to your environment now and activate them when you need to use them. For example, if you are
in a Windows environment, you do not need to install the Lotus Notes Mail and Fax connectors.
(If you want to install a connector later, you must go through the installation process again.)
To install the software:
1
Insert the eCopy ShareScan CD (Disk 1) in the drive.
The Launch window opens.
2
Click Install ShareScan.
The InstallShield Wizard determines the locale on the computer where you are installing
ShareScan; the locale determines the language for the installation.
Note:
If you need to install ShareScan in a different language, browse to the ShareScan.exe file on
the CD and then double-click the file. The installation program will prompt you to select a
language for the installation.
The InstallShield Wizard displays a screen that identifies software that must be installed on
your system before you install ShareScan, including MSXML6.0-SP1, Microsoft Visual
Studio C++ Redistributables, Java 2 Standard Edition Runtime Environment 5.0 UPdate
14, and Apache TomCat 5.5.
3
Click Install to install the required software and then follow the prompts, accepting the
Apache Tomcat default settings.
When installation of the required software is complete, the Welcome window for the
ShareScan installation opens.
4
Click Next.
The Destination Folder window opens, where you can accept the default folder
(recommended) or select a different folder.
10
| Quick Start: Installing and setting up ShareScan
5
Click Next.
The Connector Selection window opens.
6
Select the connectors that you want to install. A red “X” next to a connector indicates that
it is not available for installation.
If you plan to install the Lotus Notes Mail and Fax via Lotus Notes Connectors, you must
first install the Lotus Notes client on the computer running the Services Manager. If you
attempt to install these connectors without first installing the Lotus Notes client, the Setup
program will display an error message indicating that it cannot register the connector.
Note:
7
If the Lotus Notes client installation program prompts you to choose between the Multi-User
Install option and the Single User Install option, make sure that you select the Single User
Install option.
Click Next.
The Ready to Install the Program window opens.
Click Install.
9 When the installation is complete, click Finish.
If you select an e-mail or fax connector and you want to use the product’s Internet Address Book
function to store manually entered addresses and fax numbers in a database, you must install
Microsoft SQL Server Express 2005 (SQL Express). You must install the version of SQL Express
provided on the ShareScan CD (see page 74).
8
eCopy ShareScan® Installation and Setup Guide | 11
Licensing devices
You license the product from the Administration console. To do this, you perform the following
tasks:
■
Connect to a Services Manager (see page 12).
Note:
The first time that you open the Administration console, ShareScan automatically connects to
the local Services Manager. The next section describes how to select a different Services
Manager.
■
Add the product key to the local license database (see page 14).
■
Configure one or more connector profiles (see page 15).
■
Set up the Canon ScanFront device (see page 26).
■
Add the Canon ScanFront device to the Services Manager (see page 29).
■
Activate the license and generate a license report (see page 30).
12
| Quick Start: Installing and setting up ShareScan
To select a different Services Manager:
Select Start > Programs > eCopy Applications > ShareScan Administration.
2 Right-click ShareScan and then select Discover Managers or click the Discover
ShareScan Managers button on the toolbar.
The Select ShareScan Manager window opens. The first Services Manager in the list is
most often the local computer, the one that you typically want to administer.
1
3
In the list, select the Services Manager that you want to use.
■
If the Services Manager that you want to use is not listed, click Discover to refresh the
list.
■
If the Services Manager is still not listed, enter the machine name and IP address in the
edit field, for example, enter ECOPY1 (10.10.10.10).
eCopy ShareScan® Installation and Setup Guide | 13
4
Click OK.
The Administration console opens.
14
| Quick Start: Installing and setting up ShareScan
To add the product key to the local license database:
1
In the console tree, select System Information and then select Licensing.
Note:
2
If you received your keys in electronic form, you may want to copy and paste them from a text
file (TXT).
Use any of the following methods:
■
Click New Key, enter the key (manually or by pasting a copied key), and then click OK.
■
■
Click <ENTER PRODUCT KEY> to make the edit field active, enter the product
key in the field, and then press ENTER.
Click Load Keys, select the text file containing the produt keys, and then click Open.
The License Information tab displays the product key or keys that you entered.
eCopy ShareScan® Installation and Setup Guide | 15
Configuring and activating connector
profiles
After licensing a device, you configure one or more profiles for each connector that you want to
use and then activate the profiles on a device.
When you configure a connector profile, you associate it with a button that appears on the main
ShareScan Client screen. When a user presses a button, the connector uses the properties and
services specified in the connector profile associated with the button. For example, the following
screens illustrate the relationship between the Display properties for an Exchange connector
profile and the Scan and Mail button on the Client screen.
You can configure multiple profiles for each connector.
This section describes the basic process of configuring and activating a connector profile, using
the eCopy Connector for Microsoft Exchange as an example. It does not provide any information
about configuring a local address book, which is a more advanced function. For detailed
information about configuring a profile for this connector, see page 92.
Before configuring this profile, you should create a generic Microsoft Exchange account for
ShareScan to use. The profile uses the ShareScan User Account information to log on to the
Exchange server and retrieve the Global Address List.
16
| Quick Start: Installing and setting up ShareScan
Specifying properties for a connector profile
This section describes the basic process of configuring the following properties:
■
Display
■
ShareScan user (on the Configure tab)
■
Content
■
Express mode
To access the Properties tab for a connector:
1
In the console tree, select Connectors.
The console displays all the installed connectors. (To change the view, right-click in the
right pane, click View, and then select the view you want to use.)
2
Double-click Exchange.
The console displays the Properties and Services icons.
eCopy ShareScan® Installation and Setup Guide | 17
3
Double-click Properties.
The Exchange Properties pane appears.
To configure the Display properties:
Select the Display tab.
2 To modify the image associated with the connector profile’s button, click the Browse
button next to the Image field, locate the image that you want to use, and then click
Open.
3 To modify the button label, click in the Label field and enter the new text.
4 Click Save.
The Save Profile window opens.
1
5
Enter exchange_express as the name of the profile, or leave “default” as the name, and
then click Save.
18
| Quick Start: Installing and setting up ShareScan
To configure the ShareScan User properties:
1
Select the Configure tab. This tab looks a little different for each connector, but most of
the connectors, especially the e-mail and fax connectors, contain similar types of settings.
Note:
Some connectors, such as the Exchange Connector, include a Wizard that walks you through
the standard environment settings. For information about using the Wizard to initially
configure an Exchange Connector profile, see page 94.
eCopy ShareScan® Installation and Setup Guide | 19
2
Click Properties.
The Exchange Properties window opens.
3
Select the Basic Settings tab.
4
Enter the ShareScan User information and then click Test.
20
| Quick Start: Installing and setting up ShareScan
5
When the “Test successful” message appears, select the General Settings tab.
■
■
■
To configure the profile to enable users to send scanned documents as e-mail
attachments from their personal Microsoft Exchange account, select the Send from
personal account option.
If you do not want to configure the profile to enable users to send scanned documents
as e-mail attachments from their personal Microsoft Exchange account, clear the Send
from personal account option. The connector will send the scanned documents from
the ShareScan User Account.
To configure the profile to enable users to send scanned documents only to the logged
on user, select the Send to self option. The Send screen will not appear on the Client
screen at the device.
6
When you have specified the basic and general settings, click OK.
The Settings Summary displays the current settings.
7
Click Save to save changes to the profile.
eCopy ShareScan® Installation and Setup Guide | 21
To configure the Content properties:
1
Select the Content tab.
The Content tab enables you to specify the default subject or note information that will be
available to a user at an eCopy-enabled device.
To specify the default subject that will be available to the user at the device, select it in the
Subjects list. The user can accept the default subject or enter a new subject.
3 To specify the default note, select Notes in the Message area and then select a note.
4 Click Save to save changes to the profile.
2
22
| Quick Start: Installing and setting up ShareScan
To configure Express properties:
1
Select the Express tab.
This feature enables you to create a profile that minimizes user interaction at the device;
the Send screen will not appear on the Client screen at the device.
Select the Enable check box.
3 Enter information in the Subject and Note fields.
The user at the device will not have to specify a subject line or a note.
2
Note:
When you enable Express, the connector profile will not use the default subject line or notes
that you may have already specified on the Content tab.
eCopy ShareScan® Installation and Setup Guide | 23
4
To specify one or more recipients, click the Add button associated with the To: field.
The Add Recipients window opens.
5
With the Search while typing option selected, enter the first few characters of a recipient’s
name. As you type, the system displays names that match the characters you entered.
6
Select each recipient that you want to include on the To: list and then click To -> in the
Message Recipients area.
7
Click OK.
The console displays the recipients in the To: list. The user at the device will not have to
select any recipients.
8
Click Save to save changes to the profile.
24
| Quick Start: Installing and setting up ShareScan
Specifying services for a connector profile
There are three core services available to connector profiles:
■
Document Settings
■
Scanner Settings
■
Tracing Settings
This section describes the basic process of configuring the Document Settings and Scanner
Setting services. For information about configuring Tracing Settings, see page 89.
To access the Services pane for a connector:
In the console tree, select Connectors.
2 Double-click Exchange.
3 Double-click Services.
The Services available for Exchange pane appears.
1
eCopy ShareScan® Installation and Setup Guide | 25
To configure the Document Settings service:
Select the Document Settings tab.
2 For each option, specify the default settings that you want available to the user at the
device.
If you want to allow the user to change the default setting for an option, select the User
modify check box.
1
3
Click Save to save changes to the profile.
To configure the Scanner Settings service:
Select the Scanner Settings tab.
2 Select the Enable Scanner Settings check box.
3 For each option, specify the default settings that you want this connector profile to use.
(You can create additional profiles for the same connector that use different scanner
settings at the same device.) The list of scanner settings is a subset of the scanner settings
that are available at the device.
1
4
Click Save to save changes to the profile.
26
| Quick Start: Installing and setting up ShareScan
Setting up the Canon ScanFront device
Setting up this device involves specifying a password for the device and then associating the
device with the PC running the ShareScan Services Manager, which is called the ShareScan Host.
To set up the device:
1
Power on the device.
The calibration screen appears.
2
Follow the on-screen instructions to calibrate the device screen.
When calibration is complete, the Password page appears.
3
Specify a password for the device and then select Next.
A password is not required. If you do not want to set a password, leave the password field
empty and then select Next.
The Network page appears. This page enables you to connect the device to a network.
4
Specify the device’s network settings and then select Save.
Note:
You must specify a valid device name, IP address (static address only), subnet mask, and
default gateway. If you do not have this information, see your network administrator.
When prompted, restart the device.
6 Enter the password and then select Next.
The ShareScan Address page appears.
5
7
Enter the IP address of the PC where you installed ShareScan. (Do not enter the IP address
of the ScanFront device.)
You can find the IP address of the Services Manager PC in the Administration console,
immediately under the ShareScan node. For example, the IP address in the following
sample screen is “10.10.14.217”.
8
Click Connect.
The ShareScan Client application appears, indicating that you can now add the device to
the ShareScan Services Manager (see page 29).
eCopy ShareScan® Installation and Setup Guide | 27
Web administration
After setting up the device, you can administer the ScanFront device from any Web browser or
from the Web browser accessed from the Manage node in the ShareScan Administration console.
To manage the ScanFront device remotely:
1
Access a Web browser using either of the following methods:
■
Open any Web browser and then enter the IP address of the Canon ScanFront device,
using the following format: http://<deviceIP>
In the ShareScan Administration console, select Devices > Manage. A Web browser
opens in the right pane.
■
2
In the upper right corner, select the language that you want to use: English, French, Italian,
German, or Spanish.
Note:
While the ShareScan Administration console enables you to select languages in addition to
French, Italian, German, and Spanish for the hard keyboard and the on-screen keyboard, the
Web administration component only supports French, Italian, German, and Spanish. In
addition, the Web administration component does not support auto-completion or special
keys.
3
Enter the administrator’s password, and then select Login.
The Web administration page appears.
4
Update the configuration settings (see Table 1).
TABLE 1. Remote administration functions
Configuration tool
Description
Password
Enables you to modify the administrator’s password. After modifying the password,
select Save.
Network
Enables you to update the device’s network settings, which are used to connect the
device to a network. After modifying the network settings, select Save.
ShareScan Address
Enables you to associate the device with the PC running the ShareScan Services
Manager, which is called the ShareScan Host.
Use https enables you to encrypt passwords and is selected by default. This
automatically sets the port to 443. eCopy recommends these settings.
If you do not select Use https, the port is automatically set to 8080 and password
encryption is not enabled.
After modifying the IP address, select Connect.
28
| Quick Start: Installing and setting up ShareScan
TABLE 1. Remote administration functions (continued)
Configuration tool
Description
SSL
Enables you to turn SSL on or off. The default is “On”.
Turning SSL off improves performance by about .1 second. However, if you turn SSL
off, passwords will not be encrypted.
Device restart
Enables you to restart the device.
Device software
update
Enables you to update the ShareScan device software. Select the ShareScan CAB file
that contains the updated firmware and then select Upload File.
About
Displays product information. Includes a button that enables you to calibrate the
device.
Logout
Displays the Password page.
Note:
To calibrate the device screen after the initial setup, select About from the ShareScan Home
screen.
eCopy ShareScan® Installation and Setup Guide | 29
To add an eCopy-enabled device to the Services Manager:
Make sure that the device is running.
2 Go to the Administration console.
3 In the console tree, right-click Devices and then select Add a new device.
The Add Device window lists all available ScanFront devices. The window displays IP
Address information, the name of the device, the Client software version, the Services
Manager that is currently managing the device, and the domain.
1
If a device that you want to add does not appear in the list of available devices, click
Refresh.
5 Select the device or devices that you want to license and then click OK.
6 When the system prompts you to confirm the device that you want to add to the device
list, click Yes.
The system displays the product key information.
4
30
| Quick Start: Installing and setting up ShareScan
To activate the license and generate a report:
1
To activate the license through the Internet, click Activate Now.
Note:
If you cannot activate a license immediately, you have 30 days in which to activate it.
The activation process only takes a couple of minutes.
2
Read the registration message, click OK, and then click Done.
Note:
3
The eCopy Registration Web site enables you to upload the product key information needed
to register eCopy-enabled devices from the license report. You typically complete the
registration process after adding one or more product keys to the License Information pane
and generating the license report. If you add more product keys later, you will need to repeat
the registration process.
Click Report to generate a license report.
eCopy ShareScan® Installation and Setup Guide | 31
To view the device list:
1
In the console tree, select Devices.
The new device is listed in the right pane. (To change the view, right-click in the right pane,
click View, and then select the desired view.)
32
| Quick Start: Installing and setting up ShareScan
Activating connector profiles
This section describes the process of activating a connector profile on a device.
To access the Device Properties pane for a device:
In the console tree, select Devices.
2 Select a device.
3 Select Properties.
The Device Properties pane displays the list of available connectors and the number of
profiles that have been created for each connector.
1
Note:
The Arrange button enables you to position connector buttons in a particular order on the
device’s touch screen.
eCopy ShareScan® Installation and Setup Guide | 33
To activate a connector profile on the selected device:
1
Select the Activate Connector check box for Exchange.
The Select Connector Profiles window opens. If you have not saved a profile’s settings,
the profile name appears in red.
34
| Quick Start: Installing and setting up ShareScan
Select a configured profile, such as “exchange_express”.
3 Click OK.
The No. of Profiles column indicates that you have activated one connector profile.
2
4
In the Device Properties pane, click Save to save changes to the profile.
At the device, the touch screen will display a button for each active connector profile.
eCopy ShareScan® Installation and Setup Guide | 35
Reference: Configuring the
system
When you install ShareScan, the Administration console, an MMC (Microsoft Management
Console) snap-in, is installed along with the Services Manager and any selected eCopy connectors.
You use the Administration console to manage Services Managers, connectors, and eCopyenabled devices.
The Services Manager supports multiple devices running ShareScan Embedded software.
The Administration console automatically detects the Services Managers on your network and lets
you select the one that you want to use.
In this chapter
■
Starting, stopping, and restarting the Services Manager . . . . . . . . . . . . . . . . . . . . . . . . . . . . . . 36
■
Setting security options for a Services Manager. . . . . . . . . . . . . . . . . . . . . . . . . . . . . . . . . . . . . 37
■
Configuring system properties . . . . . . . . . . . . . . . . . . . . . . . . . . . . . . . . . . . . . . . . . . . . . . . . . . 39
■
Licensing devices . . . . . . . . . . . . . . . . . . . . . . . . . . . . . . . . . . . . . . . . . . . . . . . . . . . . . . . . . . . . . 45
■
Monitoring scanning activity. . . . . . . . . . . . . . . . . . . . . . . . . . . . . . . . . . . . . . . . . . . . . . . . . . . . 51
■
Reporting scanning activity . . . . . . . . . . . . . . . . . . . . . . . . . . . . . . . . . . . . . . . . . . . . . . . . . . . . . 52
■
Backing up and sharing configuration files . . . . . . . . . . . . . . . . . . . . . . . . . . . . . . . . . . . . . . . . 53
■
Remote administration . . . . . . . . . . . . . . . . . . . . . . . . . . . . . . . . . . . . . . . . . . . . . . . . . . . . . . . . 55
36
| Reference: Configuring the system
Starting, stopping, and restarting the
Services Manager
The Services Manager runs as a Windows service. You start or stop, and restart, the Services
Manager from the Administration console.
To start, stop, or restart a Services Manager:
To start, stop, or restart a Services Manager, use either of the following methods:
■
■
In the console tree, right-click the name of the Services Manager. When the shortcut menu
displays the available commands, click the command that you want to use.
In the console tree, select the name of the Services Manager and then click the appropriate
button on the console toolbar.
Start
Stop
Restart
Note: Restarting a Services Manager also restarts the Canon ScanFront device.
eCopy ShareScan® Installation and Setup Guide | 37
Setting security options for a Services
Manager
The Security Options function, which you can configure for each Services Manager, enables you
to specify whether other Services Managers have the right to add or acquire devices managed by
that Services Manager.
In a ShareScan Embedded environment, you might want to set the security options for a specific
Services Manager to allow other Services Managers to add devices managed by it.
If you enable security for a Services Manager and add IP addresses to the list of allowed Services
Managers, and you later clear the Enable Security option, the addresses stay in the list, but the
Services Manager ignores it.
To block access by other Services Managers:
1
In the console tree, select the name of the Services Manager and then click the Display
Security Options button on the console toolbar.
The Security Options window opens.
Select the Enable option. By default, this option is disabled.
3 Select the Prevent addition of devices option. Other Services Managers will not have the
right to add or acquire devices managed by this Services Manager.
4 Click OK.
2
38
| Reference: Configuring the system
To grant access to other Services Managers:
1
In the console tree, select the name of the Services Manager and then click the Display
Security Options button on the console toolbar.
The Security Options window opens.
Select the Enable option. By default, this option is disabled.
3 Select the Allow addition of devices option.
4 In the address field, enter the IP addresses of the Services Managers to which you want to
grant access and then click Add.
The addresses appear in the Manager IP addresses list.
2
Note:
Even if addresses appear in the list of allowed Managers, access by those Services Managers
will be blocked if you select the Prevent addition of devices option.
Repeat step 4 until you have added the addresses of all the Services Managers to which you
want to grant access. Those Service Managers will have the right to add or acquire devices
managed by this Services Manager.
6 Click OK.
5
To remove access rights from a Services Manager:
1
In the console tree, select the name of the Services Manager and then click the Display
Security Options button on the console toolbar.
The Security Options window opens.
In the Manager IP addresses list, select the addresses and then click Remove.
3 Click OK.
The system prompts you to confirm that you want to remove the selected IP addresses.
2
4
Click OK.
eCopy ShareScan® Installation and Setup Guide | 39
Configuring system properties
You can specify system properties that apply to all devices connected to the selected Services
Manager. The System Properties pane contains tabs that enable you to specify general and
advanced properties, keyboard settings, Session Logon settings, and tracing information.
Configuring general system properties
The General tab displays version, language, and operating system information. It also specifies the
TCP/IP port used for communication between the Services Manager and eCopy-enabled devices.
To view general system properties:
In the console tree, select System Information > Properties and then select the General
tab.
2 Review the product information.
1
Configuring advanced system properties
The Advanced tab enables you to configure properties for encryption, the searchable text engine,
secure deletion of temporary files, and color compression.
To configure advanced system properties:
In the console tree, select System Information > Properties and then select the
Advanced tab.
2 Configure the advanced properties (see Table 2).
3 Click Save.
1
40
| Reference: Configuring the system
TABLE 2. System properties: Advanced tab
Section
Field Name
Description
Encryption
properties
Password
Minimum
The minimum number of characters that make up the password. When
you specify the minimum password length, remember that the longer
the password, the more difficult it is to break.
Lengtha
Password must
be alphanumeric
Requires that passwords include a combination of characters and
numbers. This helps ensure that passwords are not dictionary words
and are not easily guessed.
Searchable
Text Engine
Properties
Language for
Searchable Text
creation
The language that you want the Searchable Text engine (the OCR
engine) to use. The default is the language specified on the Keyboard
Settings tab.
The list of languages depends on the YTR files that are installed in the
ShareScanOPManager\OCR\Lib folder. The ShareScan installation
program installs the language files that are supported by the current
version.
Secure Delete
Enable secure
delete of
temporary files
Enables complete deletion of temporary image files from the PC
running the Services Manager. When this check box is selected,
ShareScan writes over the files in the ShareScanOPTemp folder multiple
times with random characters. There may be a small performance
penalty associated with selecting this option.
Color
Compression
High
The best text quality and the smallest file size.
Medium
The best image quality.
a. Document
encryption is only as strong as the password used to generate the encryption key. The rules specified on this
tab are enforced when you enable encryption on the Services > Document Settings tab for a connector profile. If a user
at a device enters a password that does not meet the requirements, an error message appears and the user must enter
a different password.
eCopy ShareScan® Installation and Setup Guide | 41
Configuring keyboard settings
The Keyboard Settings tab enables you to select a language for the hard keyboard as well as for
the on-screen keyboard. It also enables you to configure additional settings for the on-screen
keyboard.
Notes:
Some devices running ShareScan Embedded software support a hard keyboard and the on-screen
keyboard. For ScanFront devices, ShareScan automatically detects the USB hard keyboard (but not a
PS/2 hard keyboard).. You do not have to specify which keyboard to use on the device.
If you are using a Canon ScanFront device, eCopy recommends that you use a USB hard keyboard. If
the ShareScan for Canon ScanFront software detects a USB keyboard, a keyboard icon will not appear
to the right of fields that require text input.
To configure keyboard settings:
In the console tree, select System Information > Properties and then select the
Keyboard Settings tab.
2 Configure the keyboard settings (see Table 3).
3 Click Save.
1
TABLE 3. System information: Keyboard Settings tab
Section
Field Name
Description
Keyboard Settings
Select a language
for the keyboard
The keyboard language.
Default .com entry
On-screen keyboard only. The default extension for the .com
key, such as .com.
Add more entries
On-screen keyboard only. Used to specify additional extensions
to include in the list that appears when the user at the device
presses the arrow next to the .com key.
Additional entries can contain more than eight characters.
Used to add more entries.
Used to delete entry.
42
| Reference: Configuring the system
Configuring Session Logon
When you enable Session Logon, users at a device only need to log on a single time to ShareScan;
their logon information is effective for the entire session. The users do not have to enter their
logon information each time they select a connector during the current session; the Services
Manager passes the session logon information to the connector.
Note:
If a user needs to access different servers, and the logon credentials are not the same on those servers,
the system will prompt the user to enter logon information, even when Session Logon is enabled.
If you enable Session Logon for the Quick Connect, LDAP/SMTP, or Fax via SMTP connectors,
eCopy recommends that you refer to the connector-specific configuration section for information
about selecting the authentication type. Quick Connect, which is an add-on connector, has its own
administration guide.
To configure Session Logon:
1
2
3
4
5
In the console tree, select System Information > Properties and then select the Session
Logon tab.
Select Enable Session Logon.
Configure the Session Logon settings (see Table 4).
Click Save.
Restart the Services Manager to apply the settings.
eCopy ShareScan® Installation and Setup Guide | 43
TABLE 4. System properties: Session Logon tab
Section
Field Name
Directory
Services
Search
Parameters
Authentication
Type
Description
The directory service that manages your list of users: Windows
Active Directory or Novell Directory Services.
Domain
The Windows domain, or, for Novell, the preferred NDS Server
Name or IP address.
Search On
The search criterion by which the system searches the user list:
■
Windows Active Directory: First Name, Last Name, Display
Name, or Account Name.
■
Novell Directory Services: First Name, Last Name, or User ID.
Base DN
The base DN (distinguished name), or directory root, which is the
starting point of the search. This option defaults to the root of the
main tree. Use this option to select the specific DN or Context
where you want the search to begin.
Scope
The scope of the search at one level down from the Base DN or
down to the lowest level of the tree.
Directory Access
The type of access required to retrieve user names from the
directory:
■
Anonymous: No user name or password required. This is the
default setting.
■
Use Credentials: The user name and password required to
access the directory service.
Search while typing
Enables or disables the Search while typing option at the device.
The type of authentication required by the server: Windows or
Novell. Displays the authentication type selected under Directory
Services.
44
| Reference: Configuring the system
Configuring system tracing
The system can write transaction information to a trace file to help with troubleshooting. You
typically use this feature only when you are working with Customer Support. Enabling tracing will
slow down overall system performance.
To configure system tracing:
In the console tree, select System Information > Properties and then select the Tracing
tab.
2 Configure the settings (see Table 5).
3 Click Save.
1
TABLE 5. System information: Tracing tab
Section
Field Name
Description
File Tracing
Properties
Off/On
Disables or enables file tracing.
Directory
The location of the trace file.
Max. Size
The maximum size of the trace file.
eCopy ShareScan® Installation and Setup Guide | 45
Licensing devices
Every device that you use with eCopy software requires a valid license. To obtain a license, you
add a unique product key, valid for use with a single eCopy-enabled device, to the local license
database (see page 46). Site licenses, valid for activation with a predefined number of devices, are
also available (see page 46). eCopy recommends that you leave the license database on the local
hard drive. You activate the product key by obtaining a license code from the eCopy activation
Web site (see page 49).
To license a device running ShareScan Embedded software, you must add the device to the
Services Manager after entering the product key (see page 48).
A product key must be added to the license database before the Services Manager can assign it to
a device. Once the key is assigned to a device, it is no longer available for use with other devices.
Note:
If you assign a device to another Services Manager, the license moves with the device.
In the Administration console, the License Information tab displays the status of each product
key in the license database (see Table 6).
TABLE 6. Product key status options
Status
Description
Activated
The key has been assigned to a device and the license has been activated.
Not Activated
The key has been assigned to a device but the license has not been activated (30
day grace period is in effect).
Expired
The key has been assigned to a device but has expired (you must delete the key
and obtain a new key).
Activation Required
The key has been assigned to a device but has not been activated and the 30
day grace period has expired (you must activate the license to use the device).
Blank
The key has not been assigned to a device and is available for use.
46
| Reference: Configuring the system
Adding product keys
There are three ways to add product keys to the license database:
■
■
Enter each key manually (see page 46). To avoid typing errors, you should copy and paste
the key.
Import the keys from a text file (see page 46). This is the easiest method to use if you
receive your product keys electronically. If you buy a 10-pack of the product, you receive a
separate CD that contains a text file with the keys that you can import.
eCopy recommends that you use this method when licensing devices that are running
ShareScan Embedded software.
■
Use a site license.
When your organization purchases a site license, you receive a single site key, valid for
activation with a predefined number of devices. When you activate the key for a device,
eCopy associates the serial number of the device with the site key. When the number of
devices associated with the key reaches the predefined limit, you can no longer use the site
key to activate devices. To find out how many activations remain on your site license, call
Customer Support.
To enter a product key manually:
In the console tree, select System Information > Licensing.
2 Use either of the following methods to enter the product key:
■
Click <ENTER PRODUCT KEY> to make the edit field active, enter the product
key in the field, and then press ENTER.
1
■
Click New Key and enter the product key in the window that opens.
The system automatically fills in the remaining fields with information about the
product key.
3
Click OK.
When you add a product key for a device running ShareScan Embedded software, the
License Information tab displays product key information. You must now add the device
(see page 48).
eCopy ShareScan® Installation and Setup Guide | 47
To import product keys:
1
Create a text (.txt) file containing all your product keys, or, if you received a CD with
product keys, access the text file on the CD. If you received your product keys by e-mail,
you can copy and paste them into Notepad and save the file with a .txt extension.
Make sure you enter the product keys accurately. The Load Keys function does not report
invalid keys.
In the console tree, select System Information > Licensing.
3 Click Load Keys.
The Open window opens.
2
4
Select the text file containing the product keys and then click Open.
The License Information tab displays the imported keys.
Deleting product keys
You should only delete a key if you are upgrading the license type, for example, if you are
upgrading the key from “Evaluation” to “Full Product”. If you delete a key that has been
activated, you may lose the use of that key.
Note:
If you assign a device to another Services Manager, the license moves with the device; therefore, you
do not need to delete the key manually.
48
| Reference: Configuring the system
Adding a device with an embedded Client
An embedded device is a device running ShareScan Embedded software. You can manage
multiple devices with embedded Clients from the Administration console. Each device is
associated with a Services Manager. New devices, from the same manufacturer, inherit their initial
settings from the default device.
To add a device with an embedded Client:
Make sure the ShareScan Client is installed and running on the device.
2 In the console tree, select System Information > Licensing and then verify that you have
an available product key of the appropriate type (see page 46.)
3 In the console tree, right-click Devices and then click Add a new device.
The Services Manager can detect devices using Multicast UDP. While UDP is generally
faster, it may not work in certain network environments (see page 166).
1
■
Select the device or devices that you want to license and then click OK.
If the device is configured for use with another Services Manager, the system displays a
notification message.
If acquisition of the device has been disabled using the Security Options feature for the
Services Manager, ShareScan displays an error message prompting you to contact the
administrator for the device. For information about setting security options, see page 37.
4
If access is allowed, click Yes to transfer ownership to the current Services Manager.
An X will appear next to the device name in the original Services Manager’s device list. The
original Services Manager can re-acquire the device only by right-clicking the device name
and then clicking Re-acquire device; this is because the device no longer appears in the
device list.
5
If prompted, click Activate Now to activate your license immediately (recommended), or
click Activate Later to activate your license later (see page 49).
eCopy ShareScan® Installation and Setup Guide | 49
Activating licenses
When you assign a product key to a device, you can activate the device’s license immediately
(recommended), or you can activate it later. You have 30 days in which to activate the license.
Internet activation is fast and easy.
Important!
As soon as you activate your licenses, generate a license report (see page 50).
To obtain a license code manually:
If you do not have an Internet connection, use the Report button on the License
Information tab to generate a text file containing your product key information.
2 Print the report file.
3 From any computer with an Internet connection, go to https://activation.ecopy.biz and
obtain a license code for each key.
4 On the License Information tab, activate each license individually.
1
To activate all licenses via the Internet:
On the License Information tab, click Activate.
2 When prompted, click Yes to continue.
1
To activate a single license:
In the console tree, select System Information > Licensing.
2 On the License Information tab, double-click the product key you want to activate.
3 Use one of the following methods to activate the license:
■
If you have an Internet connection, click Activate via Internet.
1
The system sends information to the eCopy activation Web server, which returns a
license code. Use the license code to activate your license.
■
If you do not have an Internet connection, click Activate Manually and then follow
the instructions for obtaining a license code manually.
50
| Reference: Configuring the system
Generating a license report
The license report helps you recover your product keys and license codes, if necessary. You should
generate a license report whenever you activate your licenses. Keep the report in a safe place in
case you need to restore the license information. A printed report is also useful if you need to
manually activate product keys from another computer.
To generate a license report:
In the console tree, select System Information > Licensing.
2 On the License Information tab, click Report.
The Save As window opens.
1
Specify a location for the file.
4 Click Save.
3
eCopy ShareScan® Installation and Setup Guide | 51
Monitoring scanning activity
The Activity Monitor enables you to monitor scanning activity on a Services Manager. This is
useful for finding bottlenecks as it shows all activity and timing information in real time.
To access and manage the activity log:
1
In the console tree, select System Information > Activity Monitor.
The Activity area displays a list of all requests and status information.
Click Start Monitoring or Stop Monitoring.
3 In the Filter list, select “none” to view activity for all Services Managers or select a specific
Services Manager whose activity you want to view.
4 To send a text version of the activity log to a file, right-click in the list and then select Send
to File.
The Save As window opens.
2
Select a location and file name for the activity log and then click Save.
6 Click Clear if you want to clear all existing entries from the activity log.
5
52
| Reference: Configuring the system
Reporting scanning activity
The Reporting function enables you to display the total number of pages scanned. The report can
include activity for all devices connected to a Services Manager or for a single device.
To view a report of scanning activity:
In the console tree, select System Information > Reporting.
2 Select the appropriate option:
■
Manager: Displays the total number of pages scanned at each device connected to the
selected Services Manager.
1
■
Device: Displays the total number of pages scanned at the selected device. After
selecting a device, specify the time period for which you want to create the report.
Click Print to print the current bar graph.
4 Click Refresh to update the graph to reflect recent activity.
3
eCopy ShareScan® Installation and Setup Guide | 53
Backing up and sharing configuration files
The Export / Import utility enables you to perform the following administrative tasks:
■
Copy configuration files to a backup directory.
■
Restore the Services Manager to a previously-saved configuration.
■
Copy configuration files to other Services Managers.
The configuration files include the following items:
■
The system profile and forms, System*.xml.
■
The profiles and forms associated with all installed connectors, <connector>*.xml.
■
All image files used by the connectors.
Important!
When you import connector profiles and forms, the imported information overwrites the existing
information.
To export files:
1
To access the utility, use either of the following methods:
■
Select the Services Manager and then click the Export or Import Profiles icon on the
Administration console toolbar.
■
Right-click the Services Manager and then select Export / Import Utility.
The Export / Import Utility window opens.
Click Export configuration.
3 Select the items and connectors to back up.
4 Select the target folder.
If you are copying files to share with other Services Managers, select a shared folder that
the other Services Managers can access.
2
5
Click Export.
ShareScan creates a time-stamped subdirectory within the target folder and copies the
specified files from the \Data and \Images folders associated with each selected
connector, including the System connector.
6
When the copying is complete, click Done.
54
| Reference: Configuring the system
To import files:
1
To access the utility, use either of the following methods:
■
Select the Services Manager and then click the Export or Import Profiles icon on the
Administration console toolbar.
■
Right-click the Services Manager and then select Export / Import Utility.
The Export / Import Utility window opens.
Click Import configuration.
3 Select the files and connectors to import.
If you are importing files that were exported from another Services Manager, the utility
does not import system data.
2
Select the folder containing the files you want to use.
5 Click Import.
6 Click Yes to shut down the Services Manager while the files are imported.
ShareScan will restart the Services Manager when the import is complete.
4
7
Click Done.
eCopy ShareScan® Installation and Setup Guide | 55
Remote administration
When the Services Manager, the Administration console, and all available connectors are installed
on a network computer, for example, in an information technology (IT) department, you can
perform the following tasks for eCopy-enabled devices on the network:
■
Connect remotely to a single device and configure its system properties.
■
Connect remotely to a single device and configure its device properties.
Note:
You cannot configure connectors from an Administration console that is installed on a remote
computer.
Setting up remote administration involves installing ShareScan on a remote computer and then
granting the appropriate access rights.
By default, remote access to the Services Manager is limited to domain administrators. A domain
administrator must grant access rights to anyone else who needs remote access to a Services
Manager.
The only users who need remote access rights are those who will configure system and device
properties.
To provide users with remote access to a Services Manager:
1
To select the users to whom you want to provide remote access, use either of the following
methods:
■
Select the Services Manager and then click the Displays user list for remote access
icon on the Administration console toolbar.
■
Right-click the Services Manager and then click Display user list.
The Select Users window opens.
56
| Reference: Configuring the system
In the Domain list, select your domain controller.
3 In the Name field, enter the first few letters of the first name of the person whose name
you want to add to the list.
The system displays all the names that match the letters you entered.
2
4
Select a user and then click Add
The system adds the user to the user list.
5
Repeat steps 3 and 4 until you have added all the names you require to the list and then
click OK.
To remove a user from the user list:
1
To display the user list, use either of the following methods:
■
Select the Services Manager and then click the Displays user list for remote access
icon on the Administration console toolbar.
■
Right-click the Services Manager and then click Display user list.
The Select Users window opens. The list box displays the users who have been granted
remote access.
Select the user you want to remove from the list.
3 Click Remove.
2
eCopy ShareScan® Installation and Setup Guide | 57
Reference: Common
configuration information
for connectors
An eCopy™ ShareScan system can use the following types of connectors:
■
■
■
eCopy Connectors that are included with the ShareScan product, such as mail and fax
connectors for Microsoft Exchange, Lotus Notes, and SMTP using LDAP.
The following connectors are also available for download or purchase, depending on your
version of ShareScan: Quick Connect, Captaris™ RightFax™, Microsoft® SharePoint®,
Livelink ECM™, Interwoven WorkSite, OpenText™ Livelink ECM™-eDOCs DM,
EMC® Documentum®, and Canon® imageWARE™.
Third-party connectors, developed using the ShareScan Software Development Kit (SDK).
You configure connectors by creating connector profiles that specify various settings, such as the
appearance of the connector’s button and the image format that you want to use during scanning.
You can create multiple profiles for each connector and you can activate each connector profile
on multiple devices.
In this chapter
■
Installing and removing connectors . . . . . . . . . . . . . . . . . . . . . . . . . . . . . . . . . . . . . . . . . . . . . . 58
■
Configuring connector profiles. . . . . . . . . . . . . . . . . . . . . . . . . . . . . . . . . . . . . . . . . . . . . . . . . . 60
■
Configuring common Properties settings. . . . . . . . . . . . . . . . . . . . . . . . . . . . . . . . . . . . . . . . . . 63
■
Configuring connector Services . . . . . . . . . . . . . . . . . . . . . . . . . . . . . . . . . . . . . . . . . . . . . . . . . 80
58
| Reference: Common configuration information for connectors
Installing and removing connectors
During initial installation of the ShareScan software, you can install any of the eCopy Connectors
supplied on the installation CD (see page 9). To install a connector supplied with the ShareScan
installation CD that you did not install during the initial installation of ShareScan, you use the
Program Maintenance option. You access this option through the Add or Remove Programs
function in Control Panel or by running the ShareScan installation program again.
This topic also provides instructions on how to install connectors purchased separately and
supplied on their own CD. Depending on your version of ShareScan, you may also be able to
download connectors. For more information on downloading connectors please see the
instructions provided with your ShareScan CD.
To install a connector from the ShareScan CD after initial installation:
In Control Panel, select Add or Remove Programs.
2 Select eCopy ShareScan and then click Change.
The Wizard’s Welcome window opens.
1
3
Click Next.
The Program Maintenance window opens.
4
Click Modify and then click Next.
The Connector Selection window opens.
Select the connectors that you want to install and then click Next.
6 Click Install and then follow the instructions.
5
To remove a connector supplied on the ShareScan CD:
In Control Panel, select Add or Remove Programs.
2 Select eCopy ShareScan and then click Change.
The Wizard’s Welcome window opens.
1
3
Click Next.
The Program Maintenance window opens.
4
Click Modify and then click Next.
The Connector Selection window opens.
5
Select the connectors that you want to remove and then follow the instructions.
eCopy ShareScan® Installation and Setup Guide | 59
To install an eCopy Connector from a separate CD:
If you are installing any connector other than those supplied on the ShareScan CD, run the setup
program and follow the instructions. The setup program installs the software and registers it on
the Services Manager. The connector then appears in the console tree.
To remove an eCopy Connector supplied on a separate CD or by
download :
Run the connector's installation program and then select the Uninstall option.
2 When the uninstall process is complete, run ShareScan Administration.
The Remove icon appears next to the name of the connector that you uninstalled. It
indicates that the connector has been uninstalled or is otherwise unavailable
1
3
In the console tree, right-click the name of the connector you uninstalled and then click
Delete to remove it from the Connectors node.
To refresh the list of connectors:
To refresh the list of connectors, use either of the following methods:
■
■
In the console tree, right-click Connectors and then click Refresh Connectors.
Select the Connectors node and then click the Refresh connectors button on the
Administration console toolbar.
60
| Reference: Common configuration information for connectors
Configuring connector profiles
Each connector profile defines a set of configuration options for that connector. You can
configure multiple profiles for each connector. In addition, you can activate multiple profiles for
each connector on a single device. For example, you can create two unique profiles for the
Exchange connector and activate both on Device X.
TABLE 7. Two profiles for the same connector activated on a single device
Profile Name
Profile Description
Device
Expense Reports
Scans and sends expense reports to a Payroll inbox.
Device X
Resumes
Scans and sends resumes to a Human Resources inbox.
Device X
Configuring and updating connector profiles
Before you can activate a connector profile on a device, you must configure and save at least one
profile for the connector. After you configure a profile, it is available for activation in the device’s
Properties window.
You can use the Copy to option to copy settings between profiles for the same connector (see
page 80).
To configure and save a new profile:
In the console tree, select the connector for which you want to create a profile.
2 Select Properties, specify the settings for the profile, and then click Save.
The Save Profile window opens.
1
Enter a name for the new profile.
4 Click Save to save the changes to the profile.
5 Select Services and then specify the settings for the profile.
6 Click Save to save changes to the profile.
3
eCopy ShareScan® Installation and Setup Guide | 61
To update an existing profile:
1
2
3
4
5
In the console tree, select the connector whose profile you want to modify.
In the list of profiles, select the profile you want to modify.
Update the Properties settings and then click Save.
In the Save Profile window, select the target profile and then click Save.
Update the Services settings and then click Save.
Note:
If you update the Services settings before updating the Properties settings and you then click
Save, the Save Profile window opens. You must then select the target profile.
Activating connector profiles
To make connector profiles available at a device, you activate the connectors and then select the
connector profiles.
Each connector profile that is activated on a device is represented by a separate button on the
touch screen.
To activate connector profiles:
In the console tree, select Devices > <device_name> > Properties.
2 Select the Selection tab and then select the Activate Connector check box for the
connector that you want to activate.
The Select Connector Profiles window opens.
1
In the Select Profiles column, select the connector profile that you want to activate.
4 Click OK and then click Save.
You can only select configured profiles, which appear in black. Unconfigured profiles
appear in red.
3
62
| Reference: Common configuration information for connectors
5
Select the Selection tab and then click Arrange.
The Arrange Profiles window opens.
Use the Move Up and Move Down buttons to arrange the profiles in the list in the order
in which you want the connector buttons to appear on the touch screen and then click
Save.
7 Select the Selection tab and then click Save.
The profile is activated on the device.
6
eCopy ShareScan® Installation and Setup Guide | 63
Configuring common Properties settings
This section describes how to configure the properties and operations that are common to
multiple connectors.
■
Display (see page 64)
■
Content (see page 65)
■
Express (see page 67)
■
Search while typing (see page 70)
■
Field creation (see page 71)
■
Fax address format (see page 73)
■
Support for address books via SQL Express (see page 75)
For a table that lists each setting and the connector that uses it, see the “About configuring general
Properties settings” topic in the Administration console Help.
Common functions
The following table describes functions that are common to many ShareScan operations.
TABLE 8. Common functions
Function
Description
Defaults
Restores the default settings, such as the Display properties. Deletes any custom entries.
Edit
Edits the selected entry.
Delete
Deletes the selected entry.
Move Up
Moves the selected entry up in a list. The top item in a list is the default.
Move Down
Moves the selected entry down in the list.
64
| Reference: Common configuration information for connectors
Configuring the Display properties
The Display tab specifies the image and label that will be used on the connector button, which
appears on the touch screen.
To configure the Display properties:
In the console tree, select <connector_name> > Properties.
2 Select the Display tab and then specify the settings (see Table 9).
3 Click Save, select or specify the profile name, and then click Save.
1
TABLE 9. Connector Properties: Display tab
Field
Description
Image
Used to select a .gif or .jpg file. .gif files have the advantage of transparency.
Maximum dimensions for the image are 64x64 pixels.
Label
Used to enter up to three short lines of text. Press ENTER between each line.
To make sure the lines of text fit on the button, save the connector profile, activate the connector,
and then view the button on the device’s touch screen.
eCopy ShareScan® Installation and Setup Guide | 65
Configuring the Content properties
The Content tab specifies the properties for subjects, notes, and bylines that are included in
messages sent by e-mail and fax connector profiles. Users at the device can select an existing
subject or note or enter their own subject or note. Subjects appear on the subject lines; notes are
included in the message body.
To configure the Content properties:
In the console tree, select > <connector_name> > Properties.
2 Select the Content tab and then specify the settings (see Table 10).
3 Click Save, select or specify the profile name, and then click Save.
1
TABLE 10. Connector Properties: Content tab
Section
Field/Button
Description
Message
For e-mail connectors,
the Subjects and Notes
options appear in the
Message list.
For fax connectors, only
the Subjects option
appears in the Message
list.
Add
Adds a new subject or note to the list of subjects and notes
available to the user at the device.
You can use the following variables:
■
$$USER_NAME$$: Can be used in a subject line or in a
note. Replaces the variable with the sender name.
■
$$RECIPIENTS$$: Can be used only in a note. Replaces the
variable with the recipient name(s).
■
$$FILESIZE$$: Can be used in a subject line or in a note.
Replaces the variable with the size of the file (in KB).
■
$$FILENAME$$: Can be used in a subject line or in a note.
Replaces the variable with the name of the file.
■
$$PAGECOUNT$$: Can be used in a subject line or in a
note. Replaces the variable with the number of pages in the
document.
66
| Reference: Common configuration information for connectors
TABLE 10. Connector Properties: Content tab (continued)
Section
Field/Button
Email Address Format
in Message Content
(applies to the Lotus
Notes Mail Connector)
Determines how recipient names will appear in the body of the
message when the $$RECIPIENTS$$ variable is included.
Tip! When you send mail to multiple recipients from a personal
Lotus Notes account, the eCopy agent on the Domino server
creates an individual message for each recipient. Including the
$$RECIPIENTS$$ variable in a note enables recipients to see
who else received the message.
Name@Domain
.com
Displays the recipient’s Internet e-mail address.
FirstName MI
LastName
Displays the recipient’s “friendly” name, as it appears in the
Lotus Notes address list. If the name does not appear in the
Lotus Notes address list, the recipient’s Internet e-mail address
appears.
Byline
(applies only to e-mail
connectors)
.
Description
Appears at the bottom of the message body. The byline used
depends on the format of the scanned document attachment.
Custom
Includes the specified byline for scanned documents whose
format is PDF or TIFF.
Enable .cpy file
format byline
Includes the standard eCopy byline for scanned documents
whose format is eCopy (CPY). The standard byline is:
"To view .cpy files, download the latest free eCopy Viewer at:
http://www.ecopy.com/downloads/viewer."
eCopy ShareScan® Installation and Setup Guide | 67
Configuring the Express properties
The Express function enables you to reduce the amount of time that your users spend at the
device. You do this by enabling Express in a connector profile and specifying information, such as
a recipient's name, on the Express tab. The profile enables the user at the device to scan and send
documents without having to enter additional information.
Note:
When you configure an Express profile for a connector and Session Logon is enabled for the system,
users must still enter their session logon credentials on the main ShareScan Logon screen.
You can configure multiple profiles with Express enabled. Each profile can store documents in
different locations.
Depending on the connector, the Express tab enables you to preconfigure information that
accompanies the scanned document.
To configure the Express properties:
1
Configure the properties on all the other tabs for the connector profile.
If you configure Express first and then try to save the profile, the system will display an
error message and you will not be able to save the profile.
Select the Express tab.
3 Select Enable and then specify the settings (see Table 11). The available settings depend
on the connector.
4 Click Save, select or specify the profile name, and then click Save.
2
.
TABLE 11. Connector Properties: Express tab
Connector
Field/Button
Description
eCopy Connectors for:
Microsoft Exchange
Lotus Notes
SMTP using LDAP
Subject
The subject line for the e-mail to which the scanned document
is attached.
Note
The text included in the body of the e-mail to which the
scanned document is attached.
To:
List of e-mail addresses that will receive the e-mail. To add
more recipients, press Add and then use the Add Recipients
window to add recipients from your address book. See
“Express Add Recipients settings” in the Connector Help.
Cc:
68
| Reference: Common configuration information for connectors
TABLE 11. Connector Properties: Express tab (continued)
Connector
Field/Button
Description
eCopy Connectors for:
Fax via Microsoft
Exchange
Fax via SMTP
Destination List
When you enable the Express mode, you can use the available
buttons to add, edit, remove, and change the positions of the
destinations in the Destinations list.
Fax Destination
window
The window opens when you click the Add or Edit buttons.
The window enables you to name your destination, add
account information, and enable and configure a cover sheet
for the destination.
Subject
The subject line for the fax to which the scanned document is
attached.
Fax Number
The fax number to which the scanned document is sent.
Attach Cover
Page/Sheet
Attaches a cover page to the fax.
eCopy Connector for
Fax via Lotus Notes
eCopy ShareScan® Installation and Setup Guide | 69
Setting up Scan to eCopy Desktop with Express functions
There is no separate Express tab for the Scan to eCopy Desktop Connector. The following
procedure enables you to configure Scan to eCopy Desktop to use Express functions.
To configure Scan to eCopy Desktop to use Express:
In the console tree, select System Information > Properties and then select the Session
Logon tab.
2 Configure Session Logon (see page 42).
3 In the console tree, select Scan to Desktop > Properties and then select the Configure
tab.
4 You can create an Express connector profile for a scan inbox or for a destination folder.
To create an Express connector profile for a scan inbox:
1
■
Select Scan Inbox/Home Folder Settings and then click the Properties button.
The Scan to Desktop Properties window opens.
■
■
■
Configure and test the Environment Settings.
Select the General Settings tab and then select Scan to Self as the Recipient Type.
Authenticate Users is selected automatically.
Click OK to return to the Configure tab.
To create an Express connector profile for a destination folder:
■
Select Destination Settings and then click the Properties button.
The Scan to Desktop Properties window opens.
■
■
Select a destination folder and make sure that Enable subfolder navigation is not
selected.
Select one of the following user authentication options: None, Runtime credentials
from Scan to Desktop, Service account from Scan to Desktop.
These options do not require the user to provide credentials at the device.
■
5
Test the credentials and then click OK to return to the Configure tab.
Click Save, select or specify the profile name, and then click Save.
70
| Reference: Common configuration information for connectors
Configuring the Search while typing option
The Search while typing option enables ShareScan to automatically search for matching address
list entries after each character the user enters. This is a useful feature when the user is searching a
long list for an entry. The user does not have to type the entire name in the field.
Example:
A user wants to enter “Chris Levesque” in a user name field. As the user enters “c”, the Client displays the first
address entry that begins with “c”. As the user enters “h”, the Client displays the first address entry that begins
with “ch”. As the user enters “r”, the Client displays the first address entry that begins with “chr”. If there are
multiple users with the name “Chris”, the user can press the down arrow and select “Chris Levesque”.
eCopy recommends that you select this option only when the address list server responds fast
enough to allow rapid auto-completion.
By default, this option is enabled. If you do not want to use it, you must clear the Search while
typing check box.
If the Search while typing option is not enabled in the Administration console, users at the
scanning device will still be able to type in one or more characters and then activate the Search
while typing option using one of the following methods:
■
■
If the hard keyboard is selected, the user can press the built-in keyboard button located at
the end of the text control.
If the hard keyboard was not selected, or is not available, the user presses the Search button
on the soft keyboard screen.
Example:
A user enters “c”’ and nothing happens. The user then presses the Search icon or button. The Client then fills in
the field with the first address list entry beginning with “c”.
eCopy ShareScan® Installation and Setup Guide | 71
Configuring file name and index fields
You use the Field Editor or the Index Field Editor to add or edit fields that the user sees in the
Client. For information about index fields, which you use with the optional Quick Connect
Connector, see the eCopy Quick Connect Administrator’s Guide.
When you create file name fields or index fields, you select the field type in the editor. Quick
Connect, the Scan to eCopy Desktop Connector, the eCopy mail connectors, and the Activity
Tracking function use the Field Editor. For information about the field types used by Scan to
eCopy Desktop, the mail connectors, and the Activity Tracking function, see Table 13. For
information about the field types used by Quick Connect, see the eCopy Quick Connect
Administrator’s Guide.
The following fields are available in the Field Editor window:
TABLE 12. Field Editor options
Section
Field
Description
Properties
Name
The identifier for the field (15 characters maximum).
Type
The field type (see Table 13).
Default
The default value (optional).
User modify
Enables the user to modify the default value.
Minimum
The minimum number of characters allowed.
Maximum
The maximum number of characters allowed.
Remember
The number of most recently used values to display in the drop-down list.
Field Size
The following table lists available field types. Each connector, as well as Activity Tracking,
supports a unique group of field types.
TABLE 13. Field Editor: Available field types
Field Type
Available Settings
Alphanumeric
Field size: The minimum and maximum number of characters allowed.
Remember: The number of previous entries to display when the user is prompted for the
naming information. If set to zero, no previous values appear in the drop-down list.
Date
Format: The appropriate date format according to local conventions.
Device Name
No additional settings.
File Size
The size (in KB) of the scanned file.
72
| Reference: Conmmon configuration information for connectors
TABLE 13. Field Editor: Available field types (continued)
Field Type
Available Settings
Authenticated
User
The user whose credentials were used to scan the document at the device.
Number of Pages
The number of pages in the scanned document.
Numeric
Field Size: The minimum and maximum number of digits allowed.
Leading zeroes: Pads all values with leading zeroes to make their length equal to the
maximum field size.
Remember: The number of previous entries to display when the user is prompted for the
naming information. If set to zero, no previous values appear in the drop-down list.
Separator
Value: The field separator character.
Time
Format: The time format.
eCopy ShareScan® Installation and Setup Guide | 73
Configuring the fax address format
For fax connectors, you must define the fax address format required by your fax server
application or Internet fax service. A sample format is shown below:
Recipient Name
Fax Number
Prefix
Name Separator
Suffix
Fax Prefix
Cover Page Attached
To configure the fax address format:
You configure the fax address format in the Fax Address Format window. The following table
shows the location of the window for each fax connector:
TABLE 14. Fax Address Format window access
Connector
Window access
Fax via Microsoft
Exchange
From the connector Wizard or on the Fax Format tab of the Fax via Exchange
Properties window.
Fax via Lotus Notes
On the Fax Format tab in the connector's Properties window.
Fax via SMTP
From the connector Wizard or on the Fax Format tab of the Fax via SMTP
Properties window.
74
| Reference: Common configuration information for connectors
1
Open the Fax Address Format window..
2
Refer to the documentation for your fax server application to obtain the correct format for
fax addresses.
Important!
Since fax application vendors change these formatting schemes frequently, make sure
you obtain the current format.
Start building the address by adding components. For example, to include a prefix, select
Prefix from the list on the left and then click Add.
4 To change the order of the fax address components, select a component and then click
Move Up or Move Down.
5 For each component, perform the following tasks:
■
Select the Value field (for example, Fax Prefix Value).
3
■
Click Modify.
The Modify Value window opens.
■
Enter the appropriate prefix value.
■
Click OK.
The completed string appears in the Fax Address Format window.
6
When you finish building the fax address, click OK to close the window.
eCopy ShareScan® Installation and Setup Guide | 75
Configuring support for local address books
ShareScan supports the use of Microsoft SQL Server Express 2005 (SQL Express) for the storage
of e-mail and fax addresses in local address books.
Important!
You must use the version of the SQL Express installation program that is provided on the
ShareScan CD and accessed through the Optional Components menu. Using any other method
of installation, such as downloading SQL Express from the Internet, will not provide the
configuration settings required for SQL Express to work correctly with ShareScan.
When enabled, the ShareScan address book stores e-mail addresses and fax numbers typed in at
the eCopy-enabled device. This enables users at a device to select addresses and fax numbers from
a local address book instead of having to type a recipient’s complete address or fax number each
time.
All Services Managers can share the address book database, which can be on any computer on
your network. However, you may choose to create multiple databases on the same SQL Express
installation. For example, you may choose to create one database for the Engineering department
and another database for the Sales department. If you are using a combination of e-mail and fax
connectors, eCopy recommends that you create a separate database for each department.
Note:
All e-mail and fax connectors provided by eCopy, Inc., include global address book support that
enables users at an eCopy-enabled device to select recipients from a Global Address List. Therefore,
you do not need to configure SQL Express for global address book support. You only need to
configure SQL Express for local address book support.
76
| Reference: Common configuration information for connectors
Installing SQL Express
You must install SQL Express using the ShareScan installation program.
To install SQL Express:
Insert the ShareScan installation CD into the CD drive and then click Optional
Components.
2 Select Install SQL Express and follow the on-screen instructions.
During installation, SQL Server prompts you for a password. You will need this password
when you create an address book database. The password must contain a minimum of 6
characters and must include alpha and numeric characters.
1
Note:
The version of SQL Express provided with ShareScan does not require any further configuration.
However, should you need to check the configuration settings, you can access the SQL Server
Configuration Manager from the Start menu of your computer. For more information on the installed
SQL product, see the Help file available from the Help menu in the SQL Server Configuration Manager.
eCopy ShareScan® Installation and Setup Guide | 77
Creating a local address book database
You can create a local address book database on any PC running the Services Manager. Once you
have created the database, it is available to all other Services Managers on the network.
Note:
SQL Server must be running when you create the database.
If you are using a firewall, you must add SQLSERVER.exe and UDP Port 1434 to the exceptions list.
To create a local address book database:
In the console tree, select your e-mail or fax connector, select Properties, and then select
the Address Books or Local Address Book tab.
2 Under Local Address Book or under Address Books (for Lotus Notes connectors), click
Create.
The Create an Internet/Fax Address Book Database window opens.
1
Specify the settings (see Table 15) and then click Create.
4 To use the new address book with the current Services Manager, click Connect Now.
After connecting to the database, a sample entry appears.
3
To enable the local address book for use with the connector, select Enable (see Table 16).
6 Click Save, select or specify the profile name, and then click Save.
5
78
| Reference: Common configuration information for connectors
TABLE 15. Settings for creating a local address book database
Field/Button
Description
SQL Server Name list
The computer where you installed SQL Express.
If the server name does not appear on the list, you can enter it manually.
You must add the suffix \SQLEXPRESS to the server name.
For example: mycomputer\SQLEXPRESS.
Administrator’s user ID
User name: sa
Password: The password you entered when you installed SQL Express.
Address Book Name
The name you select for the address book.
The following table documents all the settings on the Address Books and Local Address Book
tabs, including the settings for the Lotus Notes Address Book and the LDAP Directory.
TABLE 16. Settings for enabling address books
Field/Button
Description
Enable
Enables users to search for and select recipients from the specified address book.
In addition, when a local address book is enabled, you can add, delete, import, and
export addresses that will then be available at the device. An imported address list
must be a text file with a list of comma-separated values (CSV) in the following format:
■
E-mail connectors: Last_Name,First_Name,Email_Address
■
Fax connectors: Last_Name,First_Name,Fax_Number
You export an address book database to a CSV file.
Search On
(available for Internet
address books and
Lotus Notes Address
Books)
The address book field against which you want the connector to search for addresses.
The available fields depend on the connector.
How ShareScan searches for a matching name depends on the Search Behavior
setting.
Address Book
(available for Lotus
Notes Address Books)
Selects the Global Address List.
Search
(available for Lotus
Notes address books)
Enables or disables the Search while typing option at the device (see page 70).
Note: For the Exchange mail and fax connectors, and for the SMTP mail and fax
connectors, the Wizard automatically activates the Search while typing option. You
can configure the option manually on the Basic Settings tab of the Properties window.
eCopy ShareScan® Installation and Setup Guide | 79
Configuring connector profiles to use address books
After creating and enabling address books, you can configure connector profiles to use them.
To configure connector profiles to use address books:
In the console tree, select your e-mail or fax connector, select Properties, and then click
the Local Address Book or Address Books tab.
2 Under Local Address Book or Address Book (for Lotus Notes connectors), click
Choose.
The Data Link Properties window opens.
1
Select the Provider tab and then select Microsoft OLE DB Provider for SQL Server.
4 Select the Connection tab and then specify your connection settings (see Table 17).
5 Click OK to close the window.
6 To verify that you can manually add an entry to the address book, click Add, enter user
information in the Add a Contact window, and then click Add.
3
If the address book is not enabled, select Enable.
8 Click Save, select or specify the profile name, and then click Save.
7
TABLE 17. Data Link Properties window: Connection tab
Step
Option
Select or enter a
server name.
Enter information to
log on to the server.
Description
The name of your server.
Use a specific user name
and password
User name: sa
Password: The password specified when you installed
SQL Express.
Allow saving password
Required for correct configuration of the address book.
Select the database
on the server.
The address book that you want the connector to use.
Test Connection
Tests the connection.
80
| Reference: Common configuration information for connectors
Configuring connector Services
This section describes how to configure the connector Services that are common to multiple
connectors.
■
Document Settings (see page 81)
■
Scanner Settings (see page 85)
■
Tracing settings (see page 89)
Copying Services settings
Each connector profile can have its own set of Services settings. When the settings are similar
between connector profiles, you may want to copy them. The Copy To button in the Services
pane enables you to copy settings. (If you have configured only one profile for the selected
connector, the button is not available.
To copy Services settings
1
In the console tree, select <<connector_name> > Services.
The Services pane appears.
Select the connector profile whose settings you want to copy.
3 Click Copy To.
The Copy Services Settings window opens. The Copy From field displays the name of
the currently selected connector profile.
2
In the To list, select the target profile.
5 In the Select Profile Settings area, select each profile setting (Document Settings, Scanner
Settings, or Tracing) that you want to copy to the target profile.
6 Click OK.
The Services pane appears.
4
7
Select the target profile and then click Save
eCopy ShareScan® Installation and Setup Guide | 81
Configuring Document Settings
The Document Settings tab enables you to specify default settings for options specific to a
connector profile, including encryption, searchable text, and file format. It also enables you to
specify whether users at the eCopy-enabled device can change the settings; user-modifiable
options are available when the user presses the Document Settings button on the Preview screen.
Note:
Each connector profile supports a unique group of settings.
To configure the default Document Settings:
In the console tree, select <connector_name> > Services and then select the Document
Settings tab.
2 Specify the default settings (see Table 18). To find out which settings are available for each
connector, see the Document Settings Matrix topic in the Help.
3 Click Save, select or specify the profile name, and then click Save.
1
82
| Reference: Common configuration information for connectors
TABLE 18. Services: Document Settings tab
Option
Setting
Description
Encryption
(for PDF and
eCopy file
formats
only)
On
Prompts the user to enter an encryption password. All scanned documents will be
encrypted.
If you also select the User modify option, the user can choose encryption on a
document by document basis.
Off
Document encryption will not be available for use with the profile.
User
modify
The user can override the default setting.
Document
Security
Sets document passwords and permissions (see the Document Security Settings
topic in the Connector help).
Searchable
Text
(for PDF,
PDF/A, and
eCopy file
formats
only)
On
Processes all scanned documents using the OCR engine and embeds searchable
text in the file.
If you also select the User modify option, the user can choose whether to make
the document text searchable on a document by document basis.
Off
Searchable text will not be available for use with the profile.
User
modify
The user can override the default setting.
File Format
TIF Fax
TIF
PDF
PDF/A
eCopy
Specifies the default format. TIF Fax supports Group3 2D 1-bit. TIF supports
Group4 2D 1-bit, GrayScale 8-bit, and Color 24-bit.
If you select a TIF option, you must disable the Searchable Text and Encryption
options; they are not compatible with the TIF format.
Color pages that are scanned using the PDF or eCopy format are automatically
compressed.
User
modify
The user can override the default setting.
eCopy ShareScan® Installation and Setup Guide | 83
TABLE 18. Services: Document Settings tab (continued)
Option
Setting
Document
Name
Default
Blank Page
Removal
(for blackand-white
documents
only)
Description
The default naming format for the scanned documents:
DeviceName_ConnectorID_<DateTime>.ext
Specify
Name
Specifies a default file name for the scanned documents.
Advanced
Specifies the fields that are used to build a file name for the scanned documents.
You use the Add/Edit File Name Fields window and the Field Editor to specify the
fields. See the Advanced file naming settings topic in the Help for more
information.
The system adds the Authenticated User name to the file name only if Session
Logon is enabled.
User
modify
The user can override the default setting. Only available if you select the Specify
Name option.
On
Removes blank pages from the scanned documents when the file size is within
the range specified in the Threshold field.
Canon ScanFront devices have a scanner setting called "Skip Blank Page" that
removes blank pages based on analysis of the content of each page. Therefore, if
a user enables the Skip Blank Page option at the device, blank pages will be
removed based on content, not on file size. In this case, the Services Manager will
not need to use the Blank Page Removal setting because the pages will have been
removed during scanning.
Off
Retains blank pages in the scanned documents.
Threshold
If Blank Page removal is set to “On”, the Threshold value is the size of the file, in
kilobytes, that triggers a search for blank pages. The threshold can be an absolute
value or a range, for example: “10” or “10-25”.
User
modify
The user can override the default setting.
84
| Reference: Common configuration information for connectors
TABLE 18. Services: Document Settings tab (continued)
Option
Setting
Description
Batching
(for PDF and
eCopy file
formats
only)
On
Will be available for use with the profile.
Off
Will not be available for use with the profile.
Number
of pages
Creates a new document after the specified number of pages. You specify the
number of pages by clicking the Pages button and entering the number.
File size
Creates a new document when the file reaches a specified size. You specify the
file size by clicking the Size button and entering the size, in kilobytes (KB).
Blank
page
Creates a new document when the system finds a blank page within the range
specified in the Threshold field.
For black-and-white documents, if the Blank Page Removal option is set to “On”,
the blank pages that divide the documents are removed from the final scanned
document(s).
User
modify
The user can turn batching on or off, but cannot change the type of batching.
On
When Activity Tracking is enabled for a device, this option creates a black-andwhite PDF file, without encryption or searchable text information, and stores the
file in the folder specified on the Document Tracking tab (in the Activity Tracking
pane).
The name of the PDF file is added to the Activity Tracking log.
Off
Disables Document Tracking.
Activity Tracking, which is a separate feature, may still be enabled.
Document
Tracking
eCopy ShareScan® Installation and Setup Guide | 85
Configuring Scanner Settings
The Scanner Settings tab enables you to attach default scanner settings to a connector profile. For
example, assume that a user always scans to Legal size paper with the scaling option set to 90%.
You can specify the settings in a profile so that the user at the device does not have to change
them.
If the device does not support a setting that you specify in the profile, the connector uses the
device’s default settings.
To configure the default Scanner Settings:
In the console tree, select <connector_name> > Services and then click the Scanner
Settings tab.
2 Specify the default settings (see Table 19). The list of scanner settings is a subset of the
scanner settings that are available at the device.
3 Click Save, select or specify the profile name, and then click Save.
1
TABLE 19. Services: Scanner Settings tab
Setting
Description
Enable Scanner
Settings
Activates the scanner settings for the profile.
Input Paper Size
Paper sizes currently supported by the Services Manager. The default setting is “Use
Default”, which enables the profile to use the device’s default setting for this option.
Output Paper Size
Paper sizes currently supported by the Services Manager. The default setting is “Use
Default”, which enables the profile to use the device’s default setting for this option.
Scaling
Available values between 20 and 100 percent.
Resolution
Supported resolutions between 100 and 600 dpi.
Two-Sided
Standard options, for example: single-sided, double-sided (book type) and doublesided (calendar type).
Color Depth (Pixel)
Supported color types.
86
| Reference: Common configuration information for connectors
ScanFront scanner settings
The list of scanner settings on the Scanner Settings tab is a subset of the scanner settings that are
available on the Canon ScanFront device (see Table 20).
TABLE 20. Canon ScanFront supported scanner settings
Option
Settings
Comments/Description
Paper Size
Mixed Originals, Letter, Legal, A4,
A5, A5R, A6, A6R, B5, B6, B6R,
Statement, StatementR
Two-Sided
Single-Sided
Double-Sided
Color Depth
(Pixel)
B&W, Text Enhance, Halftone
(error diffusion), Grayscale, Color
Resolution
100 DPI, 150 DPI, 200 DPI, 300
DPI, 400 DPI, 600 DPI
■
Feeding
Direction
Auto, 0 degrees, 90 degrees, 180
degrees, 270 degrees
The Auto setting rotates the scanned image based
on the orientation of the text.
Note: The Auto setting is available only when the
Paper Size option is set to "Mixed Originals".
JPEG
Compression
0-100 (by 10)
100% provides the highest image quality, but also
creates the largest file size.
Brightness
0-100 (by 10)
Deskew
Yes
No
Straightens a skewed image. This option can
correct a skew of up to 20%.
Note:The Deskew setting is available only when
the Color Depth option is set to “B&W”.
Inverse
Yes
No
Creates a “negative” of the original scanned
image, which is useful for blueprints and
microfilm.
300 DPI provides a good compromise between
image quality and file size for text documents.
■
400 DPI provides best results when creating
searchable text.
■
600 DPI may be necessary to maintain image
quality when documents include complex
graphics.
Note: For double-sided documents, the ScanFront
device does not support color scanning at 600 DPI.
eCopy ShareScan® Installation and Setup Guide | 87
TABLE 20. Canon ScanFront supported scanner settings (continued)
Option
Settings
Comments/Description
Skip Blank Page
Yes
No
During scanning, the device analyzes the content
of each page based on the Blank Page Sensitivity
value. If it determines that the page is blank, the
page is not included in the scanned document that
is sent to the ShareScan Services Manager.
Blank Page
Sensitivity
1-100
If the Skip Blank Page option is set to “Yes”, this
option is enabled. Use the slider option to specify
the sensitivity level. The default is “90”.
If you specify a value that is too low, pages with
text may be treated as blank pages and will not be
scanned.
If you specify a value that is too high, blank pages
may be scanned.
Sharpness
0-100 (by 10)
Color Dropout
None
Red Drop-Out, Green Drop-Out,
Blue Drop-Out, Red Enhance,
Green Enhance, Blue Enhance
The “drop-out” values leave out the specified
color during scanning. The “enhance” values
emphasize the specified color.
Affects the scanned image only when the Color
Depth setting is “B&W” or “Grayscale”. The
settings have no effect when the Color Depth
setting is “Color”.
Remove Bleed
Thru
Yes
No
Keeps the images on the reverse side of a thin
original document from appearing on the scanned
image.
Remove Bleed
Thru Level
0-100 (by 10)
Adjust the level to match the type of document.
Double-Feed
Detection
None
Ultrasonic sensors (SF-220eP only)
■
Output Paper
Size
Mixed Originals, Letter, Legal, A4,
A5, A6, B5, B6, Statement
Ultrasonic sensors: Enables the scanner to
detect by ultrasonic sensors when two or more
documents are fed together. The scanner
stops feeding when it detects a double feed.
This method is effective when documents
overlap by 1.97” (50mm) or more.
88
| Reference: Common configuration information for connectors
TABLE 20. Canon ScanFront supported scanner settings (continued)
Option
Settings
Orientation
Portrait, Landscape, Same As
Originals
Scaling
20-100 percent
Mirror
Yes
No
Comments/Description
Flips the image on the vertical axis to create a
mirror image.
eCopy ShareScan® Installation and Setup Guide | 89
Configuring Tracing settings
The Tracing tab enables you to configure the capture of trace information in a log file; this
information helps troubleshoot connector issues. You typically do this only when working with
Customer Support. Tracing will slow down overall system performance.
To configure the Tracing settings:
In the console tree, select <connector_name> > Services and then select the Tracing tab.
2 Specify the default settings (see Table 21).
3 Click Save, select or specify the profile name, and then click Save.
1
TABLE 21. Services: Tracing tab
Section
Field Name
Description
Enable Tracing
On/Off
Enables or disables tracing.
File
Daily
Creates a new log file each day.
Unlimited file size
Adds all log entries to a single file.
When file size reaches
Creates a new file when the file size reaches the specified limit.
Rolling filenames
If Tracing is configured for the automatic creation of new files,
appends a numeric identifier to ensure uniqueness of file names.
Log file Location
Specifies the folder where log files will be stored.
eCopy ShareScan® Installation and Setup Guide | 91
Reference: Connectorspecific configuration
information
This section provides information about configuring settings specific to each connector. For
information about configuring the properties and operations that are common to multiple
connectors, see page 63. For information about configuring connector Services that are common
to multiple connectors, see page 80.
In this chapter
■
eCopy Connector for Microsoft Exchange . . . . . . . . . . . . . . . . . . . . . . . . . . . . . . . . . . . . . . . . 92
■
eCopy Connector for Fax via Microsoft Exchange . . . . . . . . . . . . . . . . . . . . . . . . . . . . . . . . . 105
■
eCopy Connector for Lotus Notes Mail. . . . . . . . . . . . . . . . . . . . . . . . . . . . . . . . . . . . . . . . . . 107
■
eCopy Connector for Fax via Lotus Notes . . . . . . . . . . . . . . . . . . . . . . . . . . . . . . . . . . . . . . . 110
■
eCopy Connector for SMTP using LDAP . . . . . . . . . . . . . . . . . . . . . . . . . . . . . . . . . . . . . . . . 113
■
eCopy Connector for Fax via SMTP . . . . . . . . . . . . . . . . . . . . . . . . . . . . . . . . . . . . . . . . . . . . 123
■
Scan to eCopy Desktop™ . . . . . . . . . . . . . . . . . . . . . . . . . . . . . . . . . . . . . . . . . . . . . . . . . . . . . 125
■
Scan to Printer . . . . . . . . . . . . . . . . . . . . . . . . . . . . . . . . . . . . . . . . . . . . . . . . . . . . . . . . . . . . . . 140
92
| Reference: Connector-specific configuration information
eCopy Connector for Microsoft Exchange
The eCopy Connector for Microsoft Exchange enables a user to send scanned documents from
an eCopy-enabled device as e-mail attachments from a generic Microsoft Exchange account or
from the user’s personal Microsoft Exchange account. eCopy recommends that you create a
generic Microsoft Exchange account for use by ShareScan.
While ShareScan always uses the ShareScan User account information to log on to the Exchange
server and to retrieve the Global Address List, it sends scanned documents from this account only
if the Send from personal account option is not selected.
If the Send from personal account option is selected, the connector prompts the user to log on at
the device. The Wizard selects the Send from personal account option automatically.
About Exchange Environment connection protocols
The eCopy Connector for Microsoft Exchange supports four combinations of connection
protocols that can be used to connect to your Exchange server, depending on your environment.
The Wizard automatically selects the protocol based on the Exchange environment information
that you supply. For information about the available combinations of protocols and the
environments in which they can be used, see Table 22.
eCopy ShareScan® Installation and Setup Guide | 93
TABLE 22. Exchange: Connection protocols
Protocol
Combination
Microsoft
Outlook
Required?
Description
MAPI/MAPI
Yesa
Specifically designed for the Exchange 5.5 server only.
Performs best if the computer running the Services Manager is a member of
the forest where the Exchange server(s) reside.
LDAP/MAPI
Yesa
Best suited for intranet environments where the computer running the
Services Manager is a member of the forest where the Exchange server(s)
reside.
Requires that the specified Service Account has access to a Global Catalog
Server in the forest where the Services Manager is running.
Requires Exchange Server 2000 or later.
LDAP/WEBDAV
No
Best suited for intranet environments where the computer running the
Services Manager is not necessarily a member of the forest where the
Exchange server(s) reside.
Requires that the specified Service Account has access to a Global Catalog
Server in the forest where the Services Manager is running.
Requires Exchange server 2000 or later.
WEBDAV/
WEBDAV
No
Best suited for Internet environments where the computer running the
Services Manager is communicating with a front-end Exchange server on
the Internet. For example, in small satellite offices employees can use
Outlook Web Access (OWA) over the Internet to communicate with a frontend Exchange server located at a remote facility.
Requires the front-end Exchange server to be version 2000 or later.
a. You
must install Microsoft Outlook on the same computer as the Services Manager so that the two applications can
share common DLLs.
.
Note:
When Microsoft Outlook is required, you must configure it as the default mail package. You must
configure Microsoft Outlook 2000 to work with your Exchange server prior to using the ScanStation
Client. eCopy also recommends that you configure Microsoft Outlook 2002, 2003, and 2007 to work
with the Exchange server.
94
| Reference: Connector-specific configuration information
To configure eCopy Connector for Microsoft Exchange properties:
eCopy recommends that you use the Wizard to initially configure a connector profile.
In the console tree, select Exchange > Properties.
2 Select the Display tab and then specify the settings (see Table 9).
3 Select the Configure tab.
The Configure tab displays a summary of the settings that you specify using the Wizard or
using the Properties button.
1
4
Use the Wizard to specify the basic connector settings (see page 96).
Note:
Use the Properties button on the Configure tab only if you need to make custom
modifications after the initial configuration.
If you are configuring a connector profile for an environment that uses an External
Associated Account (EAA) and contains multiple forests, and you want to add additional
account forests, see page 95.
6 Select the Local Address Book tab and then specify the settings (see Table 15 and see
Table 16).
5
Note:
This tab allows you to create, configure, and enable an Internet address book. All the fields
are documented in the referenced tables.
Select the Content tab and then specify the settings (see page 65).
8 Select the Express tab and then specify the settings (see page 67).
9 Click Save, select or specify the profile name, and then click Save.
7
eCopy ShareScan® Installation and Setup Guide | 95
To configure eCopy Connector for Microsoft Exchange services:
1
In the console tree, select Exchange > Services.
The Services pane appears.
Configure the connector services (see page 80).
3 Click Save, select the profile name, and then click Save.
2
To add additional account forests:
This procedure applies only to environments that use an External Associated Account (EAA) and
contain multiple forests.
After using the Wizard to configure your environment settings, select Properties on the
Configure tab and then select the Advanced Settings tab.
2 Make sure that the current protocol matches the protocol for your environment.
If you change the protocol, the system will prompt you to re-enter the user credentials on
the Basic Settings tab (Table 24).
1
3
Select Use External Associated Account.
The Resource Forest Settings window opens.
4
Enter the Global Catalog Server information (see Table 28) and then click OK.
In the Exchange Properties pane, the Additional Account Forests section becomes
active.
5
Click New.
The Account Forest Settings window opens.
Enter the Account Forest and Service Account information for the new account forest.
7 Click Test.
8 When the test is successful, click OK.
The new account forest is added to the list.
6
9
Click OK to return to the Configure tab.
96
| Reference: Connector-specific configuration information
Exchange Connectors Wizard Settings
The settings that you see in the Wizard depend on the information you enter about your
Exchange environment. The information that you enter about your environment enables the
Wizard to select the correct connection protocol. The settings that appear in the subsequent
windows are a filtered subset of the settings in the Properties window. You will see only the
settings that are appropriate for the environment that you select.
TABLE 23. Wizard settings: Exchange environment
Field Name
Server type
Description
Enables you to select the type of server that your company uses:
Exchange 2000 or later: Enables you to choose any of the Environment options.
■
Exchange 5.5: Makes the other selections in the window inactive.
Note: If you are using Exchange 5.5, you must use Microsoft Outlook as your
default mail package.
■
Environment
Enables you to select the type of environment that your company uses:
Single Forest
■
Multiple Forests: Use this option if you have users spread across multiple forests
and are using EAA (External Associated Account) to associate users in the
resource forest.
■
Hosted over the Internet: Use this option if you have an Internet environment
where your users access the server using Outlook Web Access (OWA).
■
Connect using
Enables you to select the type of connection used by your environment:
Microsoft Outlook Libraries
■
HTTP/HTTPS
■
eCopy ShareScan® Installation and Setup Guide | 97
The Wizard prompts you to enter information based on your choice of environment settings. See
the following tables for descriptions of the information required for each field:
■
Windows Server Account window: see Table 24, Exchange Properties: Basic Settings
tab.
This window is available only if you select Exchange 5.5 as your server type.
■
■
Windows Active Directory Server Account window: see Table 24, Exchange Properties:
Basic Settings tab.
Exchange Server window: see Table 25, Exchange Properties: Advanced Account
Settings.
This window is available only if you select HTTP/HTTPS as your connection protocol.
■
Resource Forest window: see Table 28, Exchange Properties: Advanced Settings tab.
This window is available only if you select Multiple Forests as your environment.
■
Fax Format window: see Table 27, Exchange Properties: Fax Format Settings.
This window is available only if you are configuring the eCopy Connector for Fax via
Microsoft Exchange. It enables you to specify the format of the fax addresses used by your
server.
Exchange Connectors Properties Settings
The Properties window enables administrators who are more familiar with Exchange server
environments to fine-tune the settings without relying on the Wizard. eCopy recommends that
you use the Wizard to initially configure a connector profile.
The Properties settings that are available depend on the connection protocols supported by your
environment. Although the window opens to the Basic settings tab, you should verify that the
correct connection protocols are displayed on the Advanced tab before specifying the settings on
the other tabs. If you specify your settings and then change the protocol, the system prompts you
to re-enter the user credentials on the Basic Settings tab.
98
| Reference: Connector-specific configuration information
TABLE 24. Exchange Properties: Basic Settings tab
Section
Field/Button Name
Description
ShareScan
User name
The user name for logging on to the Exchange server.
The connector does not accept user names that contain spaces.
Make sure that the user logon name specified in the Windows
Active Server Directory or Exchange account does not contain
spaces.
Password
The Exchange account password.
Domain
The Windows domain to which this user belongs (for Windows
authentication).
Advanced
(Advanced Account
Settings)
The advanced settings depend on the connection protocol
selected for your Exchange environment (see page 92). For
information about the different protocol combinations and the
associated settings, see Table 25.
Test
Validates the logon information.
Search while typing
Enables or disables the Search while typing option at the device.
Usera
Search
a.
eCopy recommends that you create a generic Microsoft Exchange account for use by ShareScan.
eCopy ShareScan® Installation and Setup Guide | 99
The following table describes the advanced account settings for each combination of protocols.
For information about the protocols, see Table 22.
TABLE 25. Exchange Properties: Advanced Account Settings
Protocol Combination
(Advanced Settings tab)
Field/Button Name
Description
MAPI/MAPI
Uses MAPI to retrieve the user
information when the Search
while typing option is enabled,
and to send scanned documents.
Mailbox name different
from the User name
Tells the connector to use the name specified
in the Mailbox name field if the mailbox name
is different from the user name for any reason.
Mailbox name
The mailbox name that is used by the user
account.
E-mail ID
The e-mail ID of the user account.
Locate server at
runtime
Enables the user at the device to select a
server.
Always use the
following server
The name of the Global Catalog Server to be
used at the device.
Port
The port that you want the server to use.
Server requires SSL for
communication
Select this option if the Global Catalog Server
requires a Secure Socket Layer (SSL).
Add Base DN
Defines a starting point for the Global Catalog
Server search that takes place from the
authentication window at the device. When
you select a base DN (Distinguished Name),
the Search while typing option searches the
forest below the location of the Base DN.
The browse button opens the Start Search At
window, where you can select a Base DN in
the Active Directory forest.
Only users within the DN can authenticate;
however, documents can be sent to any user
in the forest.
If this field is left blank, the search includes the
entire forest.
LDAP/MAPI
If the connector cannot find a
Global Catalog Server, it prompts
you to use the Advanced Account
Settings window to configure the
Global Catalog Server settings.
100
| Reference: Connector-specific configuration information
TABLE 25. Exchange Properties: Advanced Account Settings (continued)
Protocol Combination
(Advanced Settings tab)
Field/Button Name
Description
LDAP/WEBDAV
Uses the same Global Catalog
Server options as the ones
available for the LDAP/MAPI
combination, along with the
following WEBDAV settings for
the Exchange server.
Server requires SSL for
communication
Select this option if the Exchange server
requires a Secure Socket Layer (SSL).
Use UPN format for
User Credentials
([email protected])
Enables you to pass user credentials to your ISP
(Internet Service Provider) using the UPN (User
Principal Name) format:
UserName@DNSDomainName.
The connector uses
NETBIOSDOMAIN\Username unless this option
is selected.
Server uses formsbased authentication
Presents an Outlook Web Access (OWA),
forms-based login screen to the user at the
device.
Server uses nonstandard port
Specifies a non-standard port for all WEBDAV
communication.
Note: Do not select this option if you are using
Exchange 2007 with LDAP/WEBDAV or
WEBDAV/WEBDAV.
Specify a front-end
Exchange server
Sends All WEBDAV communication through
the specified front-end Exchange server.
Enter the domain
names that the user can
select at the device.
Enables the user at the device to select a
domain from the domain names you enter in
the Domains field.
Username different
from mailbox name
Select this option if Active Directory user
names and mailbox names do not match.
When you select this option, the Search while
typing option will not be available on the
Logon screen at the device; the connector will
use the name that the user enters.
WEBDAV/WEBDAV
Uses the same WEBDAV settings
as the ones available for the
LDAP/WEBDAV combination:
■
Server requires SSL for
communication
■
Use UPN format for User
Credentials
■
Server uses forms-based
authentication
■
Server uses non-standard port
eCopy ShareScan® Installation and Setup Guide | 101
All the settings in this table apply to the eCopy Connector for Microsoft Exchange. Settings that
also apply to the eCopy Connector for Fax via Microsoft Exchange are indicated in the table.
TABLE 26. Exchange Properties: General Settings tab
Section
Field Name
Description
Sender
Settings
(Available in
the eCopy
Connector
for Fax via
Microsoft
Exchange.)
Send from personal
account
Enables users to send e-mail from their personal Exchange account,
rather than from the ShareScan User account (specified on the Basic
Settings tab).
Prompts the user at the device to log on to Exchange. The user can
enter his or her personal logon information or, if authorized, another
user’s logon information. The connector sends each e-mail from the
specified account.
Add messages to
Sent Items folder
Saves sent messages in the user’s Sent Items folder.
Allow user to select
recipients
Enables the user at the device to select recipients for the scanned
documents.
Allow user to add
recipients to Cc list
Enables the user at the device to send a copy of a message to one or
more recipients who are not the primary recipients.
Send to self
Disables the list of recipients and sends the scanned documents only
to the logged on user. You can use the $$FILENAME$$ variable on the
Subject or Notes line to distinguish among scanned documents.
Recipient
Settings
102
| Reference: Connector-specific configuration information
TABLE 26. Exchange Properties: General Settings tab (continued)
Section
Field Name
Description (continued)
Other
General
Settings
Search Global
Address List
Enables the user at the device to search the Global Address List and
select recipients from it.
Search Outlook
Contacts
(Available in the
eCopy Connector for
Fax via Microsoft
Exchange for LDAP/
WEBDAV and
WEBDAV/WEBDAV
protocols.)
Enables the user at the device to search the Outlook Contacts folder
and select recipients from it.
While Microsoft Outlook supports more than one Contacts folder per
user, the connector searches for addresses only in the default Contacts
folder. If a user needs access to addresses in a specific Contacts folder,
the user must make that folder the default folder. Since this procedure
is not the same for all Outlook clients, refer to your Outlook
documentation for information about how to make a Contacts folder
the default folder.
Enable user to
manually enter
addresses when
sending e-mail
Enables the user at the device to enter e-mail addresses that do not
belong to any of the other address books or to the Contacts folder.
Message
Options
Enables configuration message settings that are also available through Microsoft Outlook and
OWA (Outlook Web Access): Importance, Sensitivity, Delivery Receipt, Read Receipt.
Selecting the User Modify option for any of these settings enables the user to change the
settings at the device.
Fax Format settings are available only for the eCopy Connector for Fax via Microsoft Exchange.
TABLE 27. Exchange Properties: Fax Format Settings
Section
Field Name
Description
Fax Address
Format
Cover Page /
No Cover page
Displays the fax format that you define in the Fax Address Format
window.
Format
Opens the Fax Address Format window where you define the fax
address format required by your fax server application or Internet fax
service.
Refer to the documentation for your fax application to obtain the
correct format for the fax address.
Since fax application vendors change these formatting schemes
frequently, make certain you obtain the current format.
Valid characters in Fax number
Enables you to define the characters allowed by your fax application
or service as part of a fax address.
eCopy ShareScan® Installation and Setup Guide | 103
TABLE 28. Exchange Properties: Advanced Settings tab
Section
Field
Name
Description
Use External
Associated Account
Available only if the
LDAP/MAPI or LDAP/
WEBDAV combination
is selected.
Enables you to connect
between a resource
forest and one or more
Resource
Forest
Opens the Resource Forest Settings window where you specify
information about a Global Catalog Server in the resource domain:
■
Locate Global Catalog Server at runtime: Selects a server in the
specified domain at runtime.
■
Always use the following server in the Resource Forest: Specifies
the name of the Global Catalog Server to be used at the device.
■
Base DN: Defines a starting point for the Global Catalog Server
search from the authentication window at the device. When you
select a base DN (Distinguished Name), the Search while typing
option searches the forest below the location of the Base DN.
The connector uses the credentials specified on the Basic Settings tab
to log on to the specified Global Catalog Server.
Additional Account
Forests
List table
Enables you to add account forests to the list if you have more than
one forest or edit settings for existing account forests.
If there is a two-way trust between the account forest and the resource
forest, and the user account specified on the Basic Settings tab is an
enabled user in the resource forest, you do not need to specify
additional service accounts for additional account forests.
The Account Forest Settings window enables you to specify
information about the Account Forest and the Service Account:
■
Locate Global Catalog Server at runtime: Selects a server in the
specified domain at runtime.
■
Always use the following Global Catalog Server: Specifies the
name of the Global Catalog Server to be used at the device.
■
Use Account information specified on the Basic Settings tab or
Specify Account settings (see Table 24): Specifies the Service
Account for the account forest.
Connection Protocol
Current
Protocol
The connection protocol used by your environment (see Table 22). The
default is LDAP/MAPI.
If you change the protocol, the system will prompt you to re-enter the
user credentials on the Basic Settings tab. The only settings that are
preserved when you change protocols are the user name, password,
domain, and Exchange server.
account forestsa.
a. An
Exchange Resource Forest runs Exchange and hosts mailboxes. An Account Forest holds active users and groups.
EAA is useful if you want to manage multiple account forests from a central location.
104
| Reference: Connector-specific configuration information
eCopy Connector for Microsoft Exchange Local Address
Book Settings
This Local Address Book tab enables you to configure the local address books that store Internet
e-mail addresses entered at the device, addresses that are not in the Global Address List or in the
Contacts folder. For information about creating and configuring address books, see page 75.
When you select the Enable user to manually enter addresses when sending e-mail option on the
General Settings tab and you enable the Internet Address Book option on the Local Address
Book tab, the system automatically adds the addresses entered by a user at the device to the local
address book.
eCopy ShareScan® Installation and Setup Guide | 105
eCopy Connector for Fax via Microsoft
Exchange
The eCopy Connector for Fax via Microsoft Exchange enables users to scan and fax documents
from an eCopy-enabled device through an e-mail-to-fax gateway on the Microsoft Exchange
server. To use this connector, you must have a network fax server and the appropriate Exchange
server plug-in.
The recipient’s fax number is included in the To field (on the ShareScan Client) in the format
required by the fax server. The server plug-in recognizes the recipient address as a fax number and
hands the request off to the network fax server for delivery as a fax.
While ShareScan always uses the ShareScan User account information to log on to the Exchange
server and retrieve the Global Address List, it sends scanned documents from this account only if
the Send from personal account option is not selected.
If the Send from personal account option is selected, the connector prompts the user to log on at
the device. The Wizard selects the Send from personal account option automatically.
Note:
The eCopy Connector for Fax via Microsoft Exchange and the eCopy Connector for Microsoft
Exchange have many common functions and settings. Where common information exists, crossreferences in this section are to the relevant section of the eCopy Connector for Microsoft Exchange
documentation.
About Exchange Environment connection protocols
The eCopy Connector for Fax via Microsoft Exchange supports four combinations of connection
protocols that can be used to connect to your Exchange server, depending on your environment.
The Wizard automatically selects the protocol based on the Exchange environment information
that you supply. for more information about the available combinations of protocols and the
environments in which they can be used, see Table 22.
106
| Reference: Connector-specific configuration information
To configure eCopy Connector for Fax via Microsoft Exchange properties:
eCopy recommends that you use the Wizard to initially configure a connector profile. Use the
Properties button on the Configure tab only if you need to make custom modifications after the
initial configuration.
In the console tree, select Fax via Exchange > Properties.
2 Select the Display tab and then specify the settings (see Table 9).
3 Select the Configure tab.
The Configure tab displays a summary of the settings that you specify using the Wizard or
the Properties window (see page 96).
1
4
Use the connector Wizard to specify the basic settings (see Table 23).
This includes specifying the Fax Format (see page 73).
5
If you are configuring a connector profile for an environment that uses an External
Associated Account (EAA) and contains multiple forests, and you want to add additional
forests (see page 95).
Select the Local Address Book tab and then specify the settings (see Table 15 and see
Table 16).
Select the Content tab and then specify the settings (see Table 10).
Select the Express tab and then specify the settings (see Table 11).
Click Save, select or specify the profile name, and then click Save.
6
7
8
9
To configure eCopy Connector for Fax via Microsoft Exchange services:
1
In the console tree, select Fax via Exchange > Services.
The Services pane appears.
Configure the connector services (see page 80).
3 Click Save, select the profile name, and then click Save.
2
eCopy ShareScan® Installation and Setup Guide | 107
eCopy Connector for Lotus Notes Mail
The eCopy Connector for Lotus Notes Mail enables users to send scanned documents from an
eCopy-enabled device as e-mail attachments from a generic Lotus Notes account or from the
user’s personal Lotus Notes account. eCopy recommends that you create a generic Lotus Notes
account for use by ShareScan.
Before e-mail can be sent from a personal Lotus Notes account, you configure the eCopyMail
pass-through database on a Domino HTTP server. Refer to the technical documentation in the
following directory for further information and setup instructions:
c:\Program
Files\eCopy\ShareScanOP\ShareScanOPManager\Connectors\LNotesMail\PassThruDB
The connector provides access to the Lotus Notes address book as well as to the local Internet
address book. When a user sends e-mail from a personal Lotus Notes account, a copy of the
message is automatically delivered to the sender’s Inbox folder.
Important!
You must install the Lotus Notes client before you can install the Lotus Notes e-mail or fax
connector. The Lotus Notes e-mail and fax connectors will not be available for installation unless
the Lotus Notes client is installed on the computer running the Services Manager.
If the Lotus Notes client installation program prompts you to choose between the Multi-User
Install option and the Single User Install option, make sure that you select the Single User Install
option.
ShareScan typically uses the login name specified in the Active ID file to access the Global
Address List, while sending messages from the user’s personal Lotus Notes account.
To configure eCopy Connector for Lotus Notes Mail properties:
In the console tree, select Lotus Notes Mail > Properties.
2 Select the Display tab and then specify the settings (see Table 9).
3 Select the Configure tab and then specify the settings (see Table 29).
4 Select the Address Books tab and then specify the settings (see Table 15 and see
Table 16).
1
Note:
This tab allows you to configure and enable the Lotus Notes Address Book and create,
configure, and enable an Internet address book. All the fields are documented in the
referenced tables.
Select the Content tab and then specify the settings (see Table 10).
6 Select the Express tab and then specify the settings (see Table 11).
7 Click Save, select or specify the profile name, and then click Save.
5
108
| Reference: Connector-specific configuration information
TABLE 29. Lotus Notes Mail Properties: Configure tab
Section
Field/Button
Description
ShareScan User
The account used to
access the Global
Address List.
Active ID File
The name of the Lotus Notes ID file installed on the local
computer.
User Name
The user name associated with the Active ID file.
Password
The password associated with the Active ID file.
Test
Validates the logon information.
Send from personal
account
Sends e-mail from a personal Lotus Notes account, rather
than from the ShareScan User account. This option is
available only if the Lotus Notes Address Book option is
enabled (on the Address Books tab).
If you select this option, you must configure a Domino
HTTP/HTTPS server to use the eCopyMail pass-through
database and specify the Domino Server, Mail Send Port,
and encryption options.
Domino Server
The name of the HTTP/HTTPS server where the eCopyMail
pass-through database is installed:
■
For HTTP: Enter the server name, IP address, or fully
qualified domain name, as appropriate, for your
Domino environment.
■
For SSL/HTTPS: Enter the server name exactly as it
appears in the SSL certificate. For example, if the
name is “lsphere.ecopydocs.com”, enter this text in
the field.
Mail Send Port
The port number used to send mail (defaults are 80 for
HTTP; 443 for SSL/HTTP).
Use SSL/HTTPS
Encrypts communication with the server using SSL/HTTPS
Email Send Options
Send to self
Disables the list of recipients and sends the scanned
documents only to the logged on user. You can use the
$$FILENAME$$ name variable on the Subject or Notes line
to distinguish among scanned documents.
Enable user to Cc recipients when sending
mail
Enables the user at the device to send a copy of a
message to one or more recipients who are not the
primary recipients.
eCopy ShareScan® Installation and Setup Guide | 109
To configure eCopy Connector for Lotus Notes Mail services:
1
In the console tree, select Lotus Notes Mail > Services.
The Services pane appears.
Configure the connector services (see page 80).
3 Click Save, select the profile name, and then click Save.
2
110
| Reference: Connector-specific configuration information
eCopy Connector for Fax via Lotus Notes
The eCopy Connector for Fax via Lotus Notes enables users to scan and fax documents from an
eCopy-enabled device through an e-mail-to-fax gateway on the Lotus Notes server. To use this
connector, you must have a network fax server and the appropriate Lotus Notes server plug-in.
The scanned document, along with sender and recipient information, is sent to the Lotus Notes
server using the local Lotus Notes client.
Before faxes can be sent from a personal Lotus Notes account, you must configure the eCopyMail
pass-through database on a Domino HTTP server. Refer to the technical documentation in the
following directory for further information and setup instructions:
c:\Program
Files\eCopy\ShareScanOP\ShareScanOPManager\Connectors\LNotesMail\PassThruDB
The connector provides access to the Lotus Notes address book as well as to the local Internet
address book. When a user sends e-mail from a personal Lotus Notes account, a copy of the
message is automatically delivered to the sender’s Inbox folder.
Important!
You must install the Lotus Notes client before you can install the Lotus Notes e-mail or fax
connector. The Lotus Notes e-mail and fax connectors will not be available for installation unless
the Lotus Notes client is installed on the computer running the Services Manager.
If the Lotus Notes client installation program prompts you to choose between the Multi-User
Install option and the Single User Install option, make sure that you select the Single User Intall
option.
The recipient’s fax number is included in the To field (on the ShareScan Client) in the format
required by the fax server. The server plug-in recognizes the recipient address as a fax number and
hands the request off to the network fax server for delivery as a fax.
ShareScan typically uses the login name specified in the Active ID file to access the Global
Address List, while sending messages from the user’s personal Lotus Notes Mail account.
eCopy ShareScan® Installation and Setup Guide | 111
To configure the eCopy Connector for Fax via Lotus Notes properties:
In the console tree, select Fax via Lotus Notes > Properties.
2 Select the Display tab and then specify the settings (see Table 9).
3 Select the Configure tab and then specify the settings(see Table 30).
4 Select the Fax Format tab, which displays samples of the current fax address format, and
then specify the Fax format (see page 73).
If your fax server uses an embedded tag, enter the tag in the Cover Page Via Embedded
Tag field. (Some fax servers use an embedded tag to indicate that a cover page is required.)
When a user requests a cover page, ShareScan adds the embedded tag string to the body of
the message.
1
5
Select the Address Books tab and then specify the settings (see Table 15 and see
Table 16).
Note:
This tab allows you to configure and enable the Lotus Notes Address Book and create,
configure, and enable a fax address book. All the fields are documented in the referenced
tables.
Select the Content tab and then specify the settings (see Table 10).
7 Select the Express tab and then specify the settings (see Table 11).
8 Click Save, select or specify the profile name, and then click Save.
6
112
| Reference: Connector-specific configuration information
TABLE 30. Fax via Lotus Notes Properties: Configure tab
Section
Field/Button Name
Description
ShareScan Usera
The account used to
access the Global
Address List.
Active ID File
The name of the Lotus Notes ID file installed on the local
computer.
User Name
The user name associated with the Active ID file.
Password
The password associated with the Active ID file.
Test
Validates the logon information.
Send from personal
account
Sends e-mail from a personal Lotus Notes account, rather
than from the ShareScan User account. This option is
available only if the Lotus Notes Address Book option is
enabled (on the Address Books tab).
If you select this option, you must configure a Domino HTTP/
HTTPS server to use the eCopyMail pass-through database
and specify the Domino Server, Mail Send Port, and
encryption options.
Domino Server
The name of the HTTP/HTTPS server where the eCopyMail
pass-through database is installed:
■
For HTTP: Enter the server name, IP address, or fully
qualified domain name, as appropriate, for your Domino
environment.
■
For SSL/HTTPS: Enter the server name exactly as it
appears in the SSL certificate. For example, if the name is
“lsphere.ecopydocs.com”, enter this text in the field.
Mail Send Port
The port number used to send mail (defaults are 80 for
HTTP; 443 for SSL/HTTP).
Use SSL/HTTPS
Encrypts communication with the HTTP server using SSL/
HTTPS.
Email Send Options
a.
eCopy recommends that you create a generic Lotus Notes account for use by ShareScan.
To configure eCopy Connector for Fax via Lotus Notes services:
1
In the console tree, select Fax via Lotus Notes > Services.
The Services pane appears.
Configure the connector services (see page 80).
3 Click Save, select the profile name, and then click Save.
2
eCopy ShareScan® Installation and Setup Guide | 113
eCopy Connector for SMTP using LDAP
The eCopy Connector for SMTP using LDAP enables users to send scanned documents from an
eCopy-enabled device as e-mail attachments using an SMTP server on the network. When a user
sends e-mail from a personal SMTP account, the system prompts users to log on to validate their
identity. The Global Address List is provided by an LDAP server.
eCopy recommends that you use the Wizard to initially configure a connector profile.
To configure the eCopy Connector for SMTP using LDAP properties:
In the console tree, select LDAP/SMTP > Properties.
2 Select the Display tab and then specify the settings (see Table 9).
3 Select the Configure tab.
The Configure tab displays a summary of the settings that you specify using the Wizard or
using the Properties window.
1
Use the Wizard to specify the basic connector settings (see Table 31).
Note:
4
Use the Properties button on the Configure tab only if you need to make custom
modifications after the initial configuration.
Select the Local Address Books tab and then specify the settings (see Table 15 and see
Table 16).
Note:
This tab allows you to reate, configure, and enable an Internet address book. All the fields are
documented in the referenced tables.
Select the Content tab and then specify the settings (see Table 10).
6 Select the Express tab and then specify the settings (see Table 11).
7 Click Save, select or specify the profile name, and then click Save.
5
114
| Reference: Connector-specific configuration information
To configure the eCopy Connector for SMTP using LDAP services:
1
In the console tree, select LDAP/SMTP > Services.
The Services pane appears.
Configure the connector services (see page 80).
3 Click Save, select the profile name, and then click Save.
2
SMTP using LDAP connector Wizard settings
The Wizard enables administrators to initially configure the connector. Many windows contain a
Test button that enables you to validate the logon information or test the server connection.
TABLE 31. Wizard settings: SMTP using LDAP
Wizard Window
Field
Description
LDAP Server Type
Server Type
The available server types:
■
Generic LDAP Server
■
Windows Active Directory
■
Windows Active Directory (Untrusted)
■
Novell eDirectory
■
Netscape LDAP Server
■
Open LDAP Server
■
IBM Domino Server
Your selection enables the Wizard to set your user ID, e-mail address,
first name, last name, and common name. If your server type is not on
the list, select the Generic LDAP Server option.
Windows Active
Directory Server
Account
Available only if
you select Active
Directory as the
server type.
Account
Settings
Active Directory Server Account settings:
User name
■
Password
■
Domain
The Wizard uses this information to set the user DN and server name.
■
eCopy ShareScan® Installation and Setup Guide | 115
TABLE 31. Wizard settings: SMTP using LDAP (continued)
Wizard Window
Field
Description
LDAP Server
Settings
Not available if you
select Active
Directory as the
server type.
LDAP Server
Settings
■
Connect
Anonymously
Select LDAP User
Not available if you
select Active
Directory as the
server type.
LDAP server settings:
Server
■
Port
■
User DN
■
Password
You must provide the full user DN if the server requires it. The Wizard
assumes that the server is using the default port number (389). The
Wizard resets the port back to 389 if it was changed in the Properties
window.
Bypasses the Select LDAP User window and allows anonymous
connection to the LDAP server, if the server supports anonymous
authentication.
Enables you to select a user from the LDAP tree in the Select LDAP User
window.
116
| Reference: Connector-specific configuration information
TABLE 31. Wizard settings: SMTP using LDAP (continued)
Wizard Window
Field
Description
Search Settings
Start Search
At
The node on the LDAP tree from which all searches should begin. If
you do not know the node, click the Browse button and then select
the node from the tree structure in the selection window.
Search scope
Select a search level:
■
All levels below search starting point: Allows expanded searching.
■
One level below search starting point: Optimizes LDAP queries and
improves performance.
Sender Search
The search criterion that the server uses to find the sender:
■
First Name
■
Last Name
■
Common Name
■
User ID
The setting defines the information that the user sees on the Logon
screen at the device.
Recipient
Search
(for Mail via
SMTP using
LDAP only)
SMTP Settings
The search criterion that the server uses to find the recipient:
Common Name
■
First Name
■
Last Name
■
User ID
The setting defines the information that the user sees on the Send
screen at the device.
Tip: If you are using an Active Directory server and want the list of
recipients to display groups as well as individuals, eCopy recommends
that you retain the default setting, Common Name. If you select any
other search criterion, users who want to send documents to a group
must enter the complete e-mail address of the group at the device.
■
Search while
typing
Enables or disables the Search while typing option at the device (see
page 70)
Server
The SMTP server name.
Port
The SMTP port number.
eCopy ShareScan® Installation and Setup Guide | 117
TABLE 31. Wizard settings: SMTP using LDAP (continued)
Wizard Window
Field
Description
User Logon
Settings
None
Sends the user at the device directly to the Send screen without
displaying the Logon screen. If you select this option, you must specify
a generic e-mail address or select the User modify option, or select
both.
Generic email
A generic e-mail address that is used as the sender account for all email.
User modify
The user at the device can modify the sender’s e-mail address.
LDAP
Requires the user at the device to enter the user name and password
specified for the LDAP server.
Windows
domain
Enables users at the device to use their Windows logon information,
via the SAMAccountName attribute, to log on.
The Domain field specifies the Windows domain name, populated
from the Account Settings window. This is required if you select the
Windows option.
Available only if you select Active Directory as the server type.
Novell tree
The Novell tree. This is required if you select the Novell option.
Available only if you select eDirectory as the server type.
Cover Page /
No Cover
Page
Displays the fax format that you define in the Fax Address Format
window.
Format
Opens the Fax Address Format window where you define the fax
address format required by your fax server application or Internet fax
service (see page 73).
Refer to the documentation for your fax application to obtain the
correct format for the fax address.
Since fax application vendors change these formatting schemes
frequently, make certain you obtain the current format.
Fax Address
Format
(For Fax via SMTP
using LDAP only.)
Settings
Summary
Enables you to review your settings. Use the Back button if you need to
change any settings. Use the Finish button to apply your settings to the
connector profile.
118
| Reference: Connector-specific configuration information
eCopy Connector for SMTP using LDAP Properties
The Properties window enables administrators who are more familiar with LDAP to fine-tune the
settings, without relying on the Wizard. Many windows contain a Test button that you use to
validate the logon information or test the server connection.
TABLE 32. LDAP/SMTP Properties: Basic LDAP tab
Section
Field
Description
LDAP Server
The server that
will provide the
Global Address
List; the same
server is used for
sender
authentication if
LDAP
authentication is
enabled.
Server
The IP address, DNS name, or URL of the LDAP server associated
with the directory you want to use.
Port
The LDAP port number. The default is 389. If this does not work, try
3268.
Server requires SSL
for communication
Requires the client to use SSL to communicate with the server.
User DN
The distinguished name (DN) of the server account. The account
must have the appropriate permissions to query the supplied base
DN and extract attributes from the query results.
Password
The password associated with the server account.
Connect
Anonymously
Allows anonymous connection to the LDAP server, if the server
supports anonymous authentication.
eCopy ShareScan® Installation and Setup Guide | 119
TABLE 32. LDAP/SMTP Properties: Basic LDAP tab (continued)
Section
Field
Description
Search
Base DN
The DN of the base or root of the directory in which to search. This
varies depending on the server you are using and the portion of the
directory you wish to search.
Examples of potential base DNs are:
■
“DC=ecopy”
■
“CN=users”
■
“DC=ecopy “DC=com”
■
“OU=marketing,DC=ecopy”
If you leave this field blank, the connector uses “DC=” and tries to
obtain the directory root from the LDAP server automatically.
Search scope
Select a search level:
■
All levels below search starting point: Allows expanded
searching.
■
One level below search starting point: Optimizes LDAP queries
and improves performance.
Sender Search
The search criterion that the server uses to find the sender:
■
First Name
■
Last Name
■
Common Name
■
User ID
The setting defines the information that the user sees on the Logon
screen at the device.
Recipient Search
(for Mail via SMTP
using LDAP only)
Search while typing
The search criterion that the server uses to find the recipient:
Common Name
■
First Name
■
Last Name
■
User ID
The setting defines the information that the user sees on the Send
screen at the device.
Tip: If you are using an Active Directory server and want the list of
recipients to display groups as well as individuals, eCopy
recommends that you retain the default setting, Common Name. If
you select any other search criterion, users who want to send
documents to a group must enter the complete e-mail address of
the group at the device.
■
Enables or disables the Search while typing option at the device
(see page 70).
120
| Reference: Connector-specific configuration information
.
TABLE 33. LDAP/SMTP Properties: Advanced LDAP taba
Section
Field
LDAP
Attributes
If you use a nonstandard
attribute in the
e-mail, First
Name, Last
Name, and
Common Name
fields, enter the
attribute name
in the field.
Class
Description
The LDAP class to which the attributes you want to query belong:
DominoPerson
■
Person
■
User
■
User ID
The attribute that your system uses to query the user ID:
SAMAccountName
■
uid
■
e-mail
The attribute that your system uses to query the mail id:
mail
■
e-mail
■
First name
The attribute that your system uses to query the user’s first name:
givenName
■
sn
■
uid
■
SAMAccountName
■
Last name
Common
name
Custom LDAP
Attributes
The attribute that your system uses to query the user’s last name:
■
sn
■
givenName
■
uid
■
SAMAccountName
The attribute that your system uses to query the user’s common name:
uid
■
SAMAccountName
■
sn
■
cn
■
givenName
■
Control the display of sender and recipient information at the device.
Use square brackets to define custom attributes and static text to enter
elements that remain constant, as in the following example that displays
the sender or recipient’s title and their company (eCopy):
[title] – eCopy
John Smith (Software Engineer – eCopy)
“title” is an LDAP attribute that belongs to the Person class.
a. This
tab enables you to customize your queries to the LDAP database and choose the LDAP attributes to query
eCopy ShareScan® Installation and Setup Guide | 121
TABLE 34. LDAP/SMTP Properties: SMTP Settings tab
Section
Field/Button
Description
SMTP Server
Server
The IP address or DNS name of the SMTP server to use for outgoing
messages. If the server supports anonymous access, it must be
disabled if you want to use SMTP authentication.
Port
The SMTP port number (default is 25).
Allow user to
select recipients
Enables the user at the device to select recipients for the scanned
documents:
■
Allow user to add recipients to Cc list: Enables the user at the
device to send a copy of a message to one or more recipients
who are not the primary recipients.
■
Send copy to Sender: Automatically delivers a copy of the
message to the person specified in the From field.
Send to self
Disables the list of recipients and sends the scanned documents only
to the logged on user.
None
Use if the SMTP server does not require authentication.
Use Sender’s User
ID, LDAP
Attribute, and
runtime password
Uses the sender’s LDAP authentication information to connect to the
SMTP server.
Login As
Enables the user at the device to connect to the SMTP server without
being prompted for authentication information. The connector uses
the specified user name and password.
Runtime: Prompt
Sender for a user
name and
password
Prompts the user at the device to enter a user name and password
when the user presses the Send button on the Send screen.
Mail Account
(For Mail via
SMTP using
LDAP only.)
SMTP Server
Logon
Available only if
SMTP Basic
Authentication is
enabled on the
server.
Note: If Session
Logon is
enabled, and SSL
is not enabled,
eCopy
recommends
that you select
“None” or
“Login As”.
122
| Reference: Connector-specific configuration information
TABLE 35. LDAP/SMTP Properties: User Logon tab
Section
Field
Description
Logon
Send from a generic account
Sends the user at the device directly to the Send screen
without displaying the Logon screen. If you select this option
you must specify a generic e-mail address or select the User
modify option, or select both.
If you do not want to use the LDAP Address Book, you must
select this option.
Generic e-mail
A generic e-mail address that is used as the sender account
for all e-mail.
User modify
The user at the device can modify the sender’s e-mail address.
LDAP
Requires the user at the device to enter the user name and
password specified for the LDAP server.
Windows domain
Enables users at the device to use their Windows logon
information, via the SAMAccountName attribute, to log on.
The Domain field specifies the Windows domain name. This is
required if you select the Windows option.
Available only if you select Active Directory as the server type.
Novell
The Novell tree. This is required if you select the Novell
option.
Available only if you select eDirectory as the server type.
Fax Format settings are available for the eCopy connector for Fax via SMTP only.
TABLE 36. LDAP/SMTP Properties: Fax Format Settings
Section
Field Name
Description
Fax Address Format
Cover Page /
No Cover page
Displays the fax format that you define in the Fax Address Format
window.
Format
Opens the Fax Address Format window where you define the fax
address format required by your fax server application or Internet fax
service.
Refer to the documentation for your fax application to obtain the
correct format for the fax address.
Since fax application vendors change these formatting schemes
frequently, make certain you obtain the current format.
eCopy ShareScan® Installation and Setup Guide | 123
eCopy Connector for Fax via SMTP
The eCopy Connector for Fax via SMTP enables users to scan and fax documents from an
eCopy-enabled device through an SMTP e-mail-to-fax gateway. To use this connector, you must
have a network fax server and the appropriate SMTP server plug-in.
The scanned document along with the sender and recipient information is sent to the SMTP
server as a MIME-formatted mail message.
The recipient's fax number is included in the To field (on the ShareScan Client) in the format
required by the fax server. The server plug-in recognizes the recipient address as a fax number and
hands the request off to the network fax server for delivery as a fax.
To configure eCopy Connector for Fax via SMTP properties:
In the console tree, select Fax via SMTP > Properties.
2 Select the Display tab and then specify the settings (see Table 9).
3 Select the Configure tab
The Configure tab displays a summary of the settings that you specify using the Wizard or
the Properties window.
1
The Enable LDAP Address Book option is selected by default. To disable this option
you must select Send from a generic account as your User Logon setting (see Table 35).
5 Use the connector Wizard to specify the basic settings (see Table 31).
This includes specifying the Fax format (see Table 36).
4
Use the Properties button on the Configure tab only if you need to make custom
modifications after the initial configuration. (see page 118).
Select the Local Address Book tab and then specify the settings (see Table 15 and see
Table 16).
7 Select the Content tab and then specify the settings (see Table 10).
8 Select the Express tab and then specify the settings (see Table 11).
9 Click Save, select or specify the profile name, and then click Save.
6
.
Note:
The eCopy Connector for Fax via SMTP and the eCopy Connector for SMTP using LDAP have many
common functions and settings. Where common information exists, cross-references in this section
are to the relevant section of the eCopy Connector for SMTP using LDAP documentation.
124
| Reference: Connector-specific configuration information
To configure eCopy Connector for Fax via SMTP services:
1
In the console tree, select Fax via SMTP > Services.
The Services pane appears.
Configure the connector services (see page 80).
3 Click Save, select the profile name, and then click Save.
2
eCopy ShareScan® Installation and Setup Guide | 125
Scan to eCopy Desktop™
The eCopy™ Scan to eCopy Desktop Connector enables ShareScan users at an eCopy-enabled
device to scan documents and send them to recipients’ scan inboxes or to network home
directory folders, where the scanned documents can be retrieved by eCopy Desktop. For
information about using eCopy Desktop, refer to the eCopy Desktop documentation or Help.
Depending on the configuration of the connector, the recipient may be the user scanning the
document or any other eCopy Desktop user whose scan inbox is set up to receive scanned
documents via the connector. The connector can also be configured to send scanned documents
to storage destination, specifically Windows, Novell, or FTP folders, or to folders on a USB Flash
Drive.
The following list provides several notes about this connector:
■
■
■
You cannot configure a connector profile to send scanned documents to both scan
inboxes/home directories and a storage destination.
When a ShareScan user at an eCopy-enabled device chooses a recipient, the scanned
document is delivered to the recipient’s scan inbox or to the specified folder in the
recipient’s network home directory.
You can configure the connector to secure the scan inboxes of recipients. Users must enter
the network password associated with a recipient’s scan inbox before the connector can
send scanned documents to the scan inbox. The Authenticate users option is automatically
selected when the inbox type is set to “Home Directories”.
Any user can send a scanned document to any user’s scan inbox. However, only the owner
can read from the scan inbox.
■
The list of available recipients that appears on the Specify Recipient screen (in the
ShareScan Client) includes all users in the Windows Active Directory or Novell eDirectory,
unless you restrict usage by choosing a base DN that limits the scope of the search.
126
| Reference: Connector-specific configuration information
About eCopy Desktop scan inboxes and home directories
eCopy Desktop can use either scan inboxes or network home directories to store scanned
documents received from the Scan to eCopy Desktop Connector:
■
Scan inboxes: The connector creates scan inboxes when users first use the connector at a
device. The connector creates scan inboxes in folders located beneath the Inbox root
directory.
When the connector creates scan inboxes, it assigns the permissions needed to ensure the
appropriate level of scan inbox privacy. The connector uses the ShareScan Administrator
group you designate in the Scan to Desktop Properties window to implement the required
security.
TABLE 37. Scan to eCopy Desktop: Security for scan inboxes
System
Role
Permissions
Windows Active
Directory
Administrators
Full control
Domain Administrators
Full control
Not used in workgroups
<groupname>
(your designated ShareScan
Administrator group)
Full control
<owner>
Full control of the owner’s individual
inbox folder
Admin
Full control
<groupname>
(your designated ShareScan
Administrator group)
Full control
<owner>
Full control
Novell (NDS)
eCopy ShareScan® Installation and Setup Guide | 127
■
Home Directories: The network administrator must create these directories. If you
configure the connector to use a network home directory to store scanned documents, the
connector automatically uses the Scan to Self and Authenticate Users options.
Network security ensures that only the Local Administrator, the ShareScan Administrator,
and the local user can read from or write to the root of the network home directory or to
the specified subdirectory. Scan to eCopy Desktop must connect to the specified folder as
the owner of the home directory.
Important!
Network home directories configured through a logon script are not supported.
You configure a Scan to eCopy Desktop connector profile to scan to a single inbox type: scan
inboxes or network home directories. You cannot configure the connector profile to scan to both
types of inboxes. However, if you modify the inbox type in the connector profile, so that some
users have scan inboxes while others have network home directories, both types of inboxes can
co-exist on the same system.
The following table shows sample scan inbox paths:
TABLE 38. Sample scan inbox locations
System
User
Domain
Inbox path
Windows Active
Directory
User1
Single domain mode
(recommended)
\\Server\Inbox_Root\User1
Windows Active
Directory
User1
Multiple domain mode
option (only if required)
\\Server\Inbox_Root\xyz.com\<domain_nam
e>\User1
Novell (NDS)
Cn=testuser
ou=engineering
0=eCopy
Use user ID for folder
names (recommended)
\\Server\Inbox_Root\.testuser.engineering.e
copy
Novell (NDS)
Cn=testuser
ou=engineering
0=eCopy
Use eDirectory
hierarchy (only if
required)
\\Server\Inbox_Root\eCopy\engineering\test
user
128
| Reference: Connector-specific configuration information
About the Inbox root directory
The Inbox root directory, which was called “Inbox Management Directory” in previous versions
of ShareScan, contains scan inboxes and a file named “userdirs.txt”. When users at a device use
the connector for the first time, their names and the paths to their scan inboxes or network home
directories are added to the userdirs.txt file.
The Inbox Agent uses the userdirs.txt file to provide eCopy Desktop with the path information
that eCopy Desktop needs to connect to scan inboxes or network home directories (see
page 138).
Before you can use the Scan to eCopy Desktop Connector, you must configure the Inbox root
directory (see page 130).
The connector automatically assigns specific file and folder permissions to ensure inbox security
(see Table 39 or see Table 40) depending on your network environment.
TABLE 39. Inbox root directory permissions (Windows)
File or folder
Role
Permissions
<Inbox root
directory>
Administrators
Full control: applied automatically
<groupname>
(your designated ShareScan Administrator
group)
Full control: applied automatically.
Everyone
Read (List folder): applied automatically.
Administrators
Full control: applied automatically.
<groupname>
(your designated ShareScan Administrator
group)
Full control: applied automatically.
Everyone
Read: applied automatically.
userdirs.txt
eCopy ShareScan® Installation and Setup Guide | 129
TABLE 40. Inbox root directory permissions (Novell NetWare [NDS])
File or folder
Role
Permissions
<Inbox root
directory>
Admin
Full control
Domain Admins (not used in workgroups)
Full control: applied automatically
<groupname>
(your designated ShareScan Administrator
group)
Full control
Everyone
File scan
Admin
Full control
Domain Admins (not used in workgroups)
Full control: applied automatically
<groupname>
(your designated ShareScan Administrator
group)
Full control
Everyone
None
userdirs.txt
Supporting multiple Inbox root directories
For information on the support of multiple Inbox root directories, refer to the Ask eCopy
knowledge base, or contact eCopy Customer Support.
130
| Reference: Connector-specific configuration information
Preconfiguring Scan to eCopy Desktop
Notes:
If you are migrating from an earlier version of eCopy ShareScan and have already configured an Inbox
root directory, you can use the existing location and settings. You can also import profiles from earlier
versions of the connector using the Import / Export tool in the Administration console. For more
information see the Administration console Help.
If you have a Novell network with multiple trees, you must set the Preferred tree field in the Novell
client configuration so that the eCopy Inbox Agent and Scan to eCopy Desktop Connector will
function properly.
Before you can configure Scan to eCopy Desktop in the Administration console, a network
administrator must complete the following steps.
To preconfigure Scan to eCopy Desktop:
Create the Inbox root directory. If the directory is on a Microsoft or Novell network, you
must share it.
2 Create a service account that will deliver scanned documents to scan inboxes or to network
home directories.
3 Add the service account to a new or existing group in one of the following locations:
■
On the domain controller, for Windows domain-based networks.
1
■
On NDS , for Novell networks.
■
On the local machine, for workgroups.
ShareScan uses this group when assigning permissions to the Inbox root directory and
scan inboxes.
Note:
If multiple Services Managers are pointing to the same userdirs.txt file in the Inbox root
directory, the group to which the service account belongs must be identical on all those
Services Managers.
Give the group Full Control access rights to the Inbox root directory.
5 For workgroup implementations only, on the PC where the scan inboxes are located, create
a local account for each user of Scan to eCopy Desktop.
4
eCopy ShareScan® Installation and Setup Guide | 131
Configuring Scan to eCopy Desktop
After completing the pre-configuration steps, you can configure the connector.
To configure Scan to eCopy Desktop Connector properties:
In the console tree, click Scan to Desktop > Properties.
2 Select the Display tab and then specify the settings (see Table 9).
3 Select the Configure tab.
4 Select either Scan Inbox/Home Folder Settings or Destination Settings.
■
If the connector profile uses scan inboxes or home directories, select Scan Inbox/
Home Folder Settings and then click Properties, specify the settings (see Table 41
and see Table 42), and then click OK.
1
■
If the connector profile uses destinations, select Destination Settings, click
Properties, specify the settings (see Table 43 and see Table 44), and then click OK.
This option allows you to send scanned documents to network locations, such as
Windows, Novell, or FTP folders, or to folders on a USB Flash Drive.
5
Select Inbox Agent > Start Service. The Inbox Agent provides eCopy Desktop with the
path information that eCopy Desktop needs to connect to scan inboxes or network home
directories.
The first time you click Start Service, the Inbox Agent registry settings are automatically
configured.
6
Click Save, select or specify the profile name, and then click Save.
Scan Inbox/Home Folder settings
The environment settings depend on the environment type that you select in the Scan to Desktop
Properties window. The general settings are the same for all environments. The connector
supports the following environments:
■
Windows Active Directory
■
Novell eDirectory:
■
Local Computer (Workgroup): Select this option if you do not have a domain controller or
NetWare server on your network, or if you are authenticating in a workgroup. If you select
this option, each user must have an account on the local computer.
132
| Reference: Connector-specific configuration information
TABLE 41. Scan to eCopy Desktop Properties: Environment settings
Section
Field/Button
Description
Service Account
User Name
Password
The authentication information for the administrative user
account created by your network administrator.
If you select Windows Active Directory as the environment
type, you must also specify a domain.
If you select Novell eDirectory as the environment type, you
must also specify a tree.
Advanced
Enables you to configure the Advanced Account Settings.
Test
Validates the authentication information. If validation is
successful, the user name turns blue. If the user name remains
red, make sure that the account is a member of your
designated ShareScan Administrator group.
ShareScan
Administrator
Group
When the test is successful, the Group field is populated with
the list of groups to which the service account belongs.
Inbox Root
UNC Path
Specifies the path to the Inbox root directory. If the system
prompts you to update permissions, click the Yes button; this
ensures the security of scan inboxes and of the userdirs.txt file.
The system creates an empty userdirs.txt file in the selected
directory (unless a file already exists).
(Windows
environment)
Single domain
mode
(recommended)
Select this option if you upgraded from a version of ShareScan
prior to version 4.2, or if you are running ShareScan 4.2 or 4.5
as well as prior versions of ShareScan in the same
environment.
Multiple domain
mode (only if
required)
Select this option only if you are running ShareScan 4.2 or 4.5
exclusively.
Use user ID for
folder names
(recommended)
Select this option if you upgraded from a version of ShareScan
prior to version 4.2, or if you are running ShareScan 4.2 or 4.5
as well as prior versions of ShareScan in the same
environment.
Use eDirectory
hierarchy (only if
required)
Select this option only if you are running ShareScan 4.2 or 4.5
exclusively.
(Novell
environment)
eCopy ShareScan® Installation and Setup Guide | 133
TABLE 42. Scan to eCopy Desktop Properties: General settings
Section
Field/Button
Description
Inbox Settings
Inbox Type
Scan Inboxes: Scans documents to scan inboxes.
Home Directories: Scans documents to a network home
directory. This option is not available if you select Local
Computer (Workgroup) as the environment type.
Recipient Type
Multiple: Enables users at the device to select multiple
recipients for scanned documents. This option is not available
if you select Home Directories as the inbox type.
Scan To Self: Sends the scanned documents to the logged-on
user's scan inbox or network home directory.
Authenticate Users
Secures the scan inboxes of recipients. Users must enter the
network password associated with the recipient’s scan inbox
to send scanned documents.
This option can only be modified if you select Scan Inboxes as
the Inbox Type and Multiple as the Recipient Type.
Search while typing
Enables or disables the Search while typing function at the
device.
Search
If a scanned image file already exists
Specifies the action for the connector to take if the recipient’s
scan inbox already contains a scanned document with the
same file name:
■
Overwrite always: Replaces an existing scanned document
with the one the connector is currently saving.
■
Return error: Displays an error message prompting the
user at the device to change the file name.
■
Create unique file name: Adds a unique number to the file
name, for example filename.1, filename.2. The scanned
document is saved to the location using a unique file
name and the existing document is not overwritten.
134
| Reference: Connector-specific configuration information
Destination settings
Scan to eCopy Desktop enables you to scan to the following destination types:
■
Windows Folder
■
Novell Folder
■
FTP Folder
■
USB Flash Drive
For each type of folder, except for the USB Flash Drive, you must supply the folder location and
authentication settings.
TABLE 43. Scan to eCopy Desktop: Destination settings
Section
Field
Description
If scanned image file already exists
Specifies the action for the connector to take if the recipient’s scan
inbox already contains a scanned document with the same file
name:
■
Overwrite always: Replaces an existing scanned document with
the one the connector is currently saving.
■
Return error: Displays an error message prompting the user at
the device to change the file name.
■
Create unique file name: Adds a unique number to the file
name, for example filename.1, filename.2. The scanned
document is saved to the location using a unique file name and
the existing document is not overwritten.
Folder Location
(For an FTP folder
you must enter and
test the
authentication
information before
you select a folder
location.)
Path to the
folder
Destination information for the scanned documents.
Click the Browse button and then select a folder.
Enable
subfolder
navigation
Enables users to select a subfolder at the device.
Maximum
folder levels
The number of folder levels down that users may navigate.
eCopy ShareScan® Installation and Setup Guide | 135
TABLE 43. Scan to eCopy Desktop: Destination settings (continued)
Section
Field
Description
Authentication
Authenticate
User
■
The options are:
None: Sends scanned documents to the destination without
requiring user authentication.The Services Manager requires
write access to the destination.
The FTP server must be configured to allow anonymous login to
work with this option.
■
Logon as: Sends scanned documents to the destination using
the specified authentication information; the user does not need
to enter authentication information at the device. Specify the
domain/tree, user ID, and password to use for authentication.
The specified account requires write access to the destination.
■
RunTime: The user at the device must log on to the destination
before the scanned document is sent. You specify the domain/
tree to use for authentication.
Note: If you select FTP Folder as a destination type and Session
Logon is enabled, eCopy recommends that you select
"Anonymous" or "Logon as" as the authentication type.
Server
(FTP only)
The FTP Server name.
Advanced
Enables you to configure the Advanced Account Settings.
136
| Reference: Connector-specific configuration information
Advanced account settings are used in the configuration of scan inboxes and destinations for
Windows Active Directory and Novell eDirectory.
TABLE 44. Scan to eCopy Desktop: Advanced Account settings
Environment type
Field name
Description
Windows Active
Directory
Global Catalog
Server settings
Locate server at runtime: The connector finds the Global Catalog
Server at runtime.
Always use the following server: The name of the Global Catalog
Server to be used at the device.
LDAP Port
The port that you want the server to use. Default is 3268.
Server requires
SSL for
communication:
Select this option if the Global Catalog Server requires a Secure
Socket Layer (SSL).
Base DN
Defines a starting point for the Global Catalog Server search that
takes place from the authentication window at the device. When
you select a base DN (Distinguished Name), the Search while
typing option searches the forest below the location of the Base
DN.
The Browse button opens the Start Search At window, where you
can select a Base DN in the Active Directory forest.
Only users within the DN can authenticate. However, documents
can be sent to any user in the forest.
If this field is left blank, the search includes the entire forest.
Domain
Controller
settings
LDAP Port: The port that you want the domain controller to use.
Default is 389.
Server requires SSL for communication: Select this option if the
Global Catalog Server requires a Secure Socket Layer (SSL).
eCopy ShareScan® Installation and Setup Guide | 137
TABLE 44. Scan to eCopy Desktop: Advanced Account settings (continued)
Environment type
Field name
Description
Novell eDirectory
Novell
eDirectory
Server settings
Locate server at runtime: The connector finds the Global Catalog
Server at runtime.
Always use the following server: The name of the Novell
eDirectory Server to be used at the device.
LDAP Port
The port that you want the server to use. Default is 389.
Server requires
SSL for
communication
Select this option if the Novell eDirectory Server requires a Secure
Socket Layer
(SSL).
Server allows
Anonymous
Bind
eDirectory can obtain information from the server without
authenticating the user.
Search On
The search criterion that the server uses to find the sender:
■
First Name
■
Last Name
■
Common Name
■
User ID
The setting defines the information that the user sees on the
Logon screen at the device.
Note: eCopy recommends that you select First Name, Last Name,
or User ID. However, if you choose Common Name, eCopy
recommends that you select a base DN to improve the search
performance of this option.
Base DN
Defines a starting point for the Global Catalog Server search that
takes place from the authentication window at the device. When
you select a base DN (Distinguished Name), the Search while
typing option searches the forest below the location of the Base
DN.
The browse button opens the Start Search At window, where you
can select a Base DN in the Novell forest.
Only users within the DN can authenticate; however, documents
can be sent to any user in the forest.
If this field is left blank, the search includes the entire forest.
Examples of potential base DNs are:
■
“DC=ecopy”
■
“CN=users”
■
“DC=ecopy “DC=com”
■
“OU=marketing,DC=ecopy”
138
| Reference: Connector-specific configuration information
To configure Scan to eCopy Desktop Connector services:
In the console tree, select Scan to Desktop > Services.
2 Configure the connector services (see page 80).
3 Click Save, select the profile name, and then click Save.
1
About the Inbox Agent
The eCopy Inbox Agent is a Windows service that is installed with the Services Manager. It uses
the userdirs.txt file to provide eCopy Desktop with the path information that eCopy Desktop
needs to connect to scan inboxes or network home directories. eCopy Desktop uses the UDP
(User Datagram Protocol) to communicate with the Inbox Agent.
eCopy
Desktop
UDP
eCopy
Desktop
UDP
UDP
Inbox
Agent
Scan
inbox
userdirs.txt
eCopy
Desktop
Important!
The default UDP server port is 9999 and the client port is 8888. The default multicast server and
client IP address is 239.254.5.6. If you need to change these settings, contact Customer Support
for assistance.
Example
If you are logged on to your PC as <auser>, eCopy Desktop sends a UDP message to the Inbox Agent
requesting the path to your scan inbox. The Inbox Agent looks up <auser> in the userdirs.txt file and returns the
path to eCopy Desktop, which uses it to open <auser>’s scan inbox.
eCopy ShareScan® Installation and Setup Guide | 139
If you do not enable the Inbox Agent, each eCopy Desktop user must manually configure the
path to the scan inbox. For information about configuring eCopy Desktop, see the eCopy
Desktop documentation or Help.
140
| Reference: Connector-specific configuration information
Scan to Printer
The eCopy Scan to Printer Connector enables users at an eCopy-enabled device to scan and print
documents to a network printer, regardless of its physical location. Users can select various
printing and page layout options.
To configure eCopy Scan to Printer Connector properties:
In the console tree, select Scan to Printer > Properties.
2 Select the Display tab and then specify the settings (see Table 9).
3 Select the Configure tab and then specify the settings (see Table 45).
4 Click Save, select or specify the profile name, and then click Save.
1
TABLE 45. Scan to Printer Properties: Configure tab
Field/Button
Description
Enable Express
Mode
Does not display the settings screen to the user at the device. The scanned
documents print directly to the default printer, using the default print settings from
the print driver.
Available Printers
The printers that will be available at the device.
Set default printer
Used to specify the default printer. The name of the default printer appears in blue at
the top of the list.
eCopy ShareScan® Installation and Setup Guide | 141
To configure eCopy Scan to Printer Connector services:
In the console tree, select Scan to Printer > Services.
2 Configure the connector services (see page 80).
3 Click Save, select the profile name, and then click Save.
1
eCopy ShareScan® Installation and Setup Guide | 143
Reference: Managing eCopyenabled devices
Managing eCopy-enabled devices involves various tasks, such as specifying the default device. For
information about adding devices running ShareScan Embedded software, see the “Adding a
device with an embedded Client” section in the installation guide provided with the embedded
products.
In this chapter
■
Specifying a default device . . . . . . . . . . . . . . . . . . . . . . . . . . . . . . . . . . . . . . . . . . . . . . . . . . . . 144
■
Specifying default scanner settings . . . . . . . . . . . . . . . . . . . . . . . . . . . . . . . . . . . . . . . . . . . . . . 145
■
Configuring Activity Tracking. . . . . . . . . . . . . . . . . . . . . . . . . . . . . . . . . . . . . . . . . . . . . . . . . . 146
■
Configuring the Document Tracking function . . . . . . . . . . . . . . . . . . . . . . . . . . . . . . . . . . . . 151
■
Configuring the ID Services function . . . . . . . . . . . . . . . . . . . . . . . . . . . . . . . . . . . . . . . . . . 153
144
| Reference: Managing eCopy-enabled devices
Specifying a default device
You can specify a default device from which new devices inherit their initial configuration of
connector profiles. For example, if the default device is configured to use the Exchange and Scan
to Printer connectors, new devices are automatically configured to use the same connectors.
Note:
Devices can only inherit connector profiles from a default device from the same manufacturer.
If you do not specify a default device, new devices will not be configured to use any connectors.
To specify the default device:
In the console tree, right-click the device name.
2 Select Set as default device.
1
eCopy ShareScan® Installation and Setup Guide | 145
Specifying default scanner settings
You can specify default scanner settings for eCopy-enabled devices. (For information about
attaching default scanner settings to a connector profile, see page 85.)
To specify default scanner settings for a device:
In the console tree, select Devices > <device_name> > Properties.
2 Select the Scanner tab.
The information on the Preferences pane depends on the device you are using. See the
Administration console Help for a table that describes some of the scanning preferences
and associated options that you may see.
1
3
Specify the default scanner settings.
The User modify option enables you to specify whether or not users at the device can
override the default scanner settings (by pressing the Settings button)
4
Click Save.
146
| Reference: Managing eCopy-enabled devices
Configuring Activity Tracking
The Activity Tracking function writes detailed information about each job to a log file.
The Activity Tracking function enables you to perform the following tasks:
■
Configure the Activity Logging function (see page 147)
■
Configure additional activity tracking fields (see page 150)
■
Configuring the Document Tracking function (see page 151)
eCopy ShareScan® Installation and Setup Guide | 147
Configuring the Activity Logging function
When the Activity Logging function is enabled for a device, the Services Manager generates a log
file. The general format for each record in the log file is:
<Date>|<Time>|<Connector Label>|<Number of Pages in Document>|<ConnectorSpecific Fields>|<SUCCESS/FAILURE>|<Device Name>
If you select the Extended Fields function, the log file includes the preceding fields and may
include the following fields:
<Document Size>|<DOC SENT>|<DOC TRACKED>|<USERNAME>|<DOMAIN>
If a user sends a scanned document to multiple recipients, each name is separated with a
semicolon.
To configure the Activity Logging function:
In the console tree, select Devices > <device_name> > Activity Tracking.
2 Select the Activity Logging tab and then select Enable.
1
Specify the settings (see Table 46).
4 Click Save.
3
148
| Reference: Managing eCopy-enabled devices
TABLE 46. Devices: Activity Logging tab
Section
Field/Button
Description
Activity Log
Location
Activity Log Location
field
The full path and file name for the log file,
ShareScanOPActivity.log. The location must be in the
current Windows domain or in a trusted Windows domain.
Credentials
Enables you to create secured access to the log file. The
Credentials button opens the Enter Credentials window
where you enter the user name, password, and domain
that are required to access the location of the log file. The
specified user must have access rights to the location.
If you choose to put the log file in a location on your local
computer, you do not need to specify credentials. However,
the Local System account must have access rights to the
location.
Maximum Log Size
The maximum size for the log file, in kilobytes (KB).
Rolling filenames
Specifies whether to use rolling file names when the
existing log file reaches the maximum size and you want
the system to create a new log file. When you select this
option, the system renames the existing log file —
“ShareScan.001”, “ShareScan.002”, etc. — and then
creates the new log file.
Overwrite oldest events
Specifies whether to overwrite existing entries, starting at
the beginning of the log file.
Field Separator
The separator character to use between each log field.
The following characters are valid: , / \ |* ? " < > :
Extended Fields
Specifies additional fields to include in the log file, in
addition to the basic fields (see Table 47).
By default, this option is not selected.
Activity Log
Overflow
Log Field
Properties
eCopy ShareScan® Installation and Setup Guide | 149
TABLE 47. Activity Logging: Basic and Extended Fields
Field
Description
Date
The date the document was scanned.
Time
The time the document was scanned.
Connector label
The connector label specified on the Display tab.
Number of pages in
document
The number of pages in the scanned document.
Connector-specific
fields
Connector-specific fields. Typically this field in the log file includes “From”, “To”,
“Recipients” and “Destination List” information.
SUCCESS / FAILURE
Specifies whether the scan job completed successfully or failed.
Device name
The name of the device, such as “User01”.
Document size
The size in kilobytes of the scanned document.
DOC SENT
The file name of the scanned document that the connector creates and sends to a
destination, such as:
USER589_EXCHANGE_01252007-104003.PDF
DOC TRACKED
The file name of the copy of the scanned document that the Services Manager
creates and stores in a document tracking folder, when the Document Tracking
service (see page 151) is enabled for the connector profile, such as:
USER589_Exchange_01-25-2007-104009.pdf
USERNAME
The name of the user logged on through Session Logon.
In some cases the logged on user may not be the same as the user sending the
scanned document. For example, when a connector is configured to use a generic
e-mail account to send scanned documents, the Services Manager will record
both the name of the logged on user and the name used for the generic e-mail
account.
DOMAIN
The domain specified for Session Logon.
150
| Reference: Managing eCopy-enabled devices
Configuring the Additional Fields function
The Additional Fields function enables you to obtain more tracking information, such as an
account number or patient ID, from users at the device. The system prompts users to enter the
information before the document is scanned. The system adds the information to each entry in
the log file, immediately before the machine name.
To configure additional activity tracking fields:
In the console tree, select Devices > <device_name> > Activity Tracking.
2 Select the Activity Logging tab and then select Enable.
3 Select the Additional Fields tab and then select Enable.
1
4
To create a new activity tracking field, click New.
The Field Editor window opens.
Specify the settings (see page 71) and then click OK.
6 Click Save.
5
eCopy ShareScan® Installation and Setup Guide | 151
Configuring the Document Tracking function
The Document Tracking function enables you to save a copy of every scanned document, as a
PDF file, in a secure network location that is in the same domain as the Services Manager PC.
This function also adds the name of the PDF file to the Activity Tracking log.
The Document Tracking function works only when Activity Tracking is enabled for the device.
You turn the Document Tracking function on or off for individual connector profiles (see
Table 18).
To configure the Document Tracking function:
In the console tree, select Devices > <device_name> > Activity Tracking.
2 Select the Activity Logging tab and then select Enable.
3 Select the Document Tracking tab.
1
Specify the settings (see Table 48).
5 Click Save.
4
152
| Reference: Managing eCopy-enabled devices
TABLE 48. Devices: Document Tracking folder settings
Section
Field
Description
Folder
Location
Location field
The full path and file name for the folder. The location must be in the
current Windows domain or in a trusted Windows domain.
Credentials to
access the
folder
location
User Name
The user name, password, and domain that are required to access the
folder.
The user must have access rights to the specified location.
Password
Domain
Use Activity
Tracking
Credentials
Uses the same credentials that are specified using the Credentials button
on the Activity Logging tab. If you select this option, the system fills in the
credentials on this screen.
eCopy ShareScan® Installation and Setup Guide | 153
Configuring the ID Services function
ID Services are available on compatible MFP devices that use identification devices such as card
readers or proximity cards. ID Services allow user authentication credentials from the
identification device to be encrypted and passed to ShareScan. This preserves security and
streamlines the logon process by allowing the user to avoid entering authentication credentials at
the device.
To configure ID Services:
1
In the console tree, select the device for which you want to enable the ID Service and then
select Activity Tracking.
The right pane displays the Activity Tracking information.
2
On the Activity Tracking tab, select Enable and then click Save.
ID Services cannot be activated unless Activity Tracking is enabled.
3
Select the ID Services tab.
Enable the service and specify the settings (see Table 49).
5 Click Save.
The ID Service settings are saved for the selected device.
4
154
| Reference: Managing eCopy-enabled devices
6
Verify that Session Logon is configured correctly:
■
In the console tree, select System Information > Properties.
■
■
Select the Session Logon tab.
Depending on the requirements of your identification device, enable or disable the
Enable Session Logon option.
TABLE 49. Devices: ID Service Settings
Section
Field Name
Description
ID Services
Enable
Enables all functions on the ID Services tab.
Port
The port number must match the TCP port configured for the
identification device. The default port is 9425.
Enable Tracing
Writes ID Service transaction information to a trace file to help with
troubleshooting. You typically only do this when you are working with
Customer Support. Enabling tracing slows down overall system
performance.
Type
Enables encryption for your ID Service, if appropriate:
■
None: Passes credentials to ShareScan without encryption.
■
Triple DES: Enables you to encrypt the information that is sent from
the application that is supplying the credentials to ShareScan. You
do this by creating an encryption key that you store on the
computer where the Services Manager is running and on the ID
Service device.
Path
Specifies a path to the storage destination for the encryption key on the
device where the Services Manager is running.
Key
Generates the encryption key and stores it in the file:
Encryption
eCopyKey.txt.
You must manually copy this file to the ID Service device. If you
regenerate the key, you must copy the new key to the ID Service device.
Important: All devices that use ID Services and are managed by the
same Services Manager must use the same encryption key. After
generating a key for the first device, When you configure subsequent
devices you must select the same path you selected for the first device.
ShareScan automatically recognizes the key file that is already in the
storage destination.
eCopy ShareScan® Installation and Setup Guide | 155
Reference: Using eCopy
Connectors
After you configure connector profiles and activate them on a device, you use a profile by
selecting its button on the Client screen. The “look and feel” of the Client depends on the eCopyenabled device that you are using.
In this chapter
■
Using the fingerprint scanner . . . . . . . . . . . . . . . . . . . . . . . . . . . . . . . . . . . . . . . . . . . . . . . . . . 156
■
Using the on-screen keyboard. . . . . . . . . . . . . . . . . . . . . . . . . . . . . . . . . . . . . . . . . . . . . . . . . . 157
■
Quick reference to using an eCopy Connector . . . . . . . . . . . . . . . . . . . . . . . . . . . . . . . . . . . . 158
156
| Reference: Using eCopy Connectors
Using the fingerprint scanner
To configure the fingerprint scanner you must:
■
■
Use the ShareScan Administration console to configure Session Logon (see page 42) and
enable Activity Logging (see page 147) and ID Services (see page 153).
Register user fingerprints at the device.
Registering fingerprints at the device
The first time a user tries to use the fingerprint scanner, the device checks to see if the fingerprint
is already registered in its database. If the fingerprint is not found, the Fingerprint Registration
Wizard opens.
To register a fingerprint:
With the Fingerprint Registration Wizard open, swipe your finger three times across the
fingerprint scanner.
All three fingerprint swipes must match. If any fingerprint swipes do not match, press
Retry and then repeat the process.
2 When the fingerprints match, click Next.
The Login Information window opens.
3 Enter your user name, password, and domain, and then click Test.
The information is authenticated and is then associated with the scanned fingerprint.
4 Click Save to store the information.
The next time you use the device you can use the fingerprint scanner to log on.
1
Logging on using the fingerprint scanner
Make sure that Session Logon is configured, before you try to log on using the fingerprint
scanner. The fingerprint scanner only works when the Session Logon screen is displayed.
To log on using the fingerprint scanner:
When the device displays the Session Logon screen, swipe your finger across the
fingerprint scanner.
A window shows the progress of the authentication process.
2 When the main ShareScan client screen appears, continue scanning your document.
1
Notes:
■
If your fingerprint is already registered and the Registration screen appears when you try to log on using the
fingerprint scanner, click Cancel and re-swipe your finger.
■
If your password has changed, the Fingerprint Registration Wizard will prompt you to enter the new
password when you swipe your finger.
eCopy ShareScan® Installation and Setup Guide | 157
Using the on-screen keyboard
The sequence of some procedures depends on whether you are using a hard keyboard or the onscreen keyboard for text input.
Notes:
Some devices running ShareScan Embedded software support a hard keyboard and the on-screen
keyboard. For ScanFront devices, ShareScan automatically detects the USB hard keyboard (but not a
PS/2 hard keyboard).. You do not have to specify which keyboard to use on the device.
If you are using a Canon ScanFront device, eCopy recommends that you use a USB hard keyboard. If
the ShareScan for Canon ScanFront software detects a USB keyboard, a keyboard icon will not appear
to the right of fields that require text input.
The following list summarizes a few on-screen keyboard functions:
Enables you to move between fields without pressing the OK button,
.
When the Search while typing option is enabled, displays a list of available values
for the field.
Enables the Search while typing option.
Accepts or cancels an operation.
Enables the Caps lock key.
On a device with an embedded Client, the on-screen keyboard appears when you press a button
or field that requires text input.
158
| Reference: Using eCopy Connectors
Quick reference to using an eCopy
Connector
This section provides you with a general procedure for using an eCopy Connector to scan and
send a document. For information about functions unique to each connector, refer to the
connector-specific information in this guide.
This general procedure includes information about performing functions that are common to
many connectors, such as specifying document and scanner settings. The actual steps that your
users will perform will depend on the connector profile they use. For example, if you configure a
connector profile to use the Express function (see page 67), users will not need to perform many
of the steps included in the procedure in this section.
This procedure uses the eCopy Connector for Microsoft Exchange as an example. The connector
profile uses the following configuration settings:
■
Enable Session Logon
■
Send from personal account
■
Add messages to Sent Items folder
■
Allow user to select recipients
■
Allow user to add recipients to Cc list
■
Search Global Address List
■
Search Outlook Contacts
■
Enable user to manually enter addresses when sending e-mail
■
Default subject line and note
The process described in this section assumes that you are using the hard keyboard.
eCopy ShareScan® Installation and Setup Guide | 159
General procedure for using an eCopy Connector
Scan
1
Place your document in the feeder.
If your system is configured to use the Session Logon feature, enter your user credentials
on the Logon screen and then press Logon, or, if your device supports a fingerprint
scanner, swipe your finger across the scanner. If your Session Logon credentials are not
valid, the Logon screen for the connector will appear after you preview the scanned
document.
Notes:
If the profile is configured to send scanned documents from a generic ShareScan User
account; you will not need to log on.
If Search while typing is enabled on the Session Logon tab, ShareScan will search for
matching address list entries after each character you enter in the User Name field. Select
your name from the list that appears as you enter each character.
When you have successfully logged in, the Home screen appears.
2
Review the default scanner settings in the left pane; use the down arrow button to view
additional scanner options. To change a setting, press the option, such as “Paper size” and
then press the setting on the toolbar that appears.
ShareScan will use the modified scanner settings for all subsequent pages that you scan
during this session, unless you change settings from the Preview screen.
3
After changing the scanner settings, press a connector button, such as a Scan and Mail
connector button, to start scanning the document that is in the feeder.
The Client displays the “Processing” message in the lower left corner of the screen.
160
| Reference: Using eCopy Connectors
Preview
1
When the connector finishes scanning the document, review the scanned images.
The buttons on the Preview screen enable you to view, delete, rotate, and change the
magnification of the images. After pressing either of the Zoom buttons, you can scroll
through an image and move it by dragging your finger along the image, or by using Page
Up, Page Down, Home, or End keys or the arrow keys.
2
If necessary, scan additional pages or re-scan any of the original pages by placing the pages
in the feeder and then pressing the Scan More button. ShareScan uses the current scanner
settings.
When you scan additional pages, the Client inserts them after the page that is currently
displayed on the Preview screen. For example, if the Client is displaying page 5 of an 8page document and you scan 2 more pages, the Client inserts the new pages after page 5.
To review and change the scanner settings, press the Scanner Settings button on the
Preview screen. The Scanner Settings... screen appears. After changing the scanner
settings, press OK.
4 To review and change the document settings, press the Document Settings button on the
Preview screen. After changing the document settings, press OK.
5 When you have scanned all the pages in the document and are satisfied with the settings,
press Next.
6 If prompted, enter any additional document information requested by the connector
profile. For example, mail connector profiles can be configured to prompt you to specify
an output file name.
3
Authenticate (by Connector)
1
If Session Logon was not enabled, and if the connector profile is configured to send
scanned documents from a personal e-mail account, the system will prompt you to log on.
Note:
2
If the profile is configured to send scanned documents from a generic ShareScan User
account; you will not need to log on.
Enter your user name and password and then press Next.
eCopy ShareScan® Installation and Setup Guide | 161
Send
1
If the Send screen appears, select or enter the recipients of the scanned document and,
optionally, specify subject line and notes information. (The fields depend on the connector
[see Table 50].)
Note:
If the profile is configured to use the Express or Send to self features, the Send screen will not
appear.
If the connector profile allows you to manually enter recipient addresses, it may also be
configured to add those addresses to a local address book (see page 79). The next time you
want to send a document to those recipients, you will be able to select them from the local
address book. You will not have to manually enter the addresses again.
If the Search while typing option is enabled and the profile is configured to search the
Global Address List and the Outlook Contacts folder for recipient names, as well as to
allow you to manually enter e-mail addresses, the connector displays the first address in the
address list or Contacts folder that matches the characters that you type. For example,
assume that you want to enter [email protected] in the To field. When you type c, the
connector will display CentralShipping, if it is in the Global Address List or in the Contacts
folder. Continue entering the entire Internet e-mail address.
2
When you are ready to send the document, press Send.
After the connector sends the document, the Document successfully sent screen
appears.
3
Select one of the post-scanning options (see Table 51):
162
| Reference: Using eCopy Connectors
TABLE 50. Client: Send screen settings
Field/Option
Applicable
connectors
Description
To
E-mail
The primary recipients.
Search
Fax via Microsoft
Exchange and Fax
via SMTP
If the recipient is already in your address book or Exchange contacts (Fax
via Microsoft Exchange only) you can use the Search while typing
option. Depending on how the search is configured by your
administrator, search on the first or last name, or the email address of
the recipient. When you select a recipient, the fax number is displayed
in the Fax Number field.
Number or
Fax Number
Fax
The recipient's fax number (required).
For Fax via Microsoft Exchange or Fax via SMTP, if the recipient is not
already in your address book, you can add the recipientby clicking the
Save to Address book button.
CC:
E-mail
One or more recipients who are not the primary recipients.
First Name
Fax via Lotus
Notes
The recipient’s first name (optional for Fax via Microsoft Exchange and
Fax via SMTP, required for Fax via Lotus Notes).
Last Name
Fax via Lotus
Notes
The recipient’s last name (optional).
Subject
E-mail and fax
The subject to include in the subject line (optional).
Notes
E-mail, Fax via
Microsoft
Exchange, and
Fax via SMTP
Notes to include in the message body (optional).
Mail Options
Exchange (e-mail)
Message settings that are also available through Microsoft Outlook and
OWA (Outlook Web Access): Importance, Sensitivity, Delivery Receipt,
Read Receipt.
The availability of each setting depends on the configuration of the
connector profile.
Attach Cover
Page
or
Use Cover
Sheet
Fax
Specifies whether to attach a cover page to the fax.
eCopy ShareScan® Installation and Setup Guide | 163
TABLE 51. Client: Post-scanning options
Option
Description
Log Out
Displays the Logon screen. Appears only when Session Logon is enabled.
Home
Displays the Home screen.
New Document
Displays the Preview screen and enables you to scan a new document using the current
settings. Place the new document in the feeder and then press the Scan More button.
New Task
Enables you to send the scanned document to another connector. Press the button and
then select the target connector from the list. The Client opens the target connector and
displays the scanned document on the Preview screen. Press Next and then follow the
prompts provided by the target connector.
eCopy ShareScan® Installation and Setup Guide | 165
Reference: Installation
environment
eCopy™ ShareScan® is a client/server-based application that is designed to work with a wide
range of scanning devices
This section describes the hardware, software, and network requirements for setting up the
Services Manager and eCopy-enabled devices. Please complete the worksheets in this chapter
before your scheduled installation and make sure that all devices are configured as required.
In this chapter
■
Network environment . . . . . . . . . . . . . . . . . . . . . . . . . . . . . . . . . . . . . . . . . . . . . . . . . . . . . . . . 166
■
Hardware configuration guidelines . . . . . . . . . . . . . . . . . . . . . . . . . . . . . . . . . . . . . . . . . . . . . . 167
■
Services Manager PC worksheet. . . . . . . . . . . . . . . . . . . . . . . . . . . . . . . . . . . . . . . . . . . . . . . . 168
■
Device worksheet . . . . . . . . . . . . . . . . . . . . . . . . . . . . . . . . . . . . . . . . . . . . . . . . . . . . . . . . . . . 170
■
Firewall and switch worksheet . . . . . . . . . . . . . . . . . . . . . . . . . . . . . . . . . . . . . . . . . . . . . . . . . 171
■
Network infrastructure worksheet . . . . . . . . . . . . . . . . . . . . . . . . . . . . . . . . . . . . . . . . . . . . . . 173
■
DNS considerations . . . . . . . . . . . . . . . . . . . . . . . . . . . . . . . . . . . . . . . . . . . . . . . . . . . . . . . . . 174
■
Novell support. . . . . . . . . . . . . . . . . . . . . . . . . . . . . . . . . . . . . . . . . . . . . . . . . . . . . . . . . . . . . . 174
166
| Reference: Installation environment
Network environment
ShareScan uses TCP ports for communication between the Client and the server application on
the PC running the Services Manager. Several ports must be available (not blocked) in order to
enable this communication (see page 171). Internal network traffic between the client and server
is minimal.
You can use multicast UDP to automatically discover and connect to other Services Managers for
remote administration. Multicast UDP also provides a fast way to discover eCopy-enabled
devices.
ShareScan runs on domain-based networks and in workgroup environments. In a domain
environment, the system requires static IP addresses. The Domain Name
System (DNS) is used to resolve host names in a domain environment. In a workgroup
environment, all eCopy-enabled devices and Services Managers must have static IP addresses.
eCopy-enabled devices and the Services Manager can be on different subnets or virtual local area
networks (VLANs) provided that the devices can communicate with the Services Manager using
an IP address.
ShareScan does not support network attached storage (NAS) devices.
For information about Novell support, see page 175.
eCopy ShareScan® Installation and Setup Guide | 167
Hardware configuration guidelines
To help you gauge hardware requirements, there are three typical usage scenarios and the
hardware requirements for each scenario (see Table 52).
TABLE 52. Hardware configuration guidelines
Scenario type
Description
Hardware requirements
General office
use
A typical office environment where
multiple multifunction peripherals (MFPs)
support a combination of printing,
copying, and scanning.
Equivalent to an Intel® Pentium® 4 (P4)
2.4 GHz machine with Hyper-Threading
enabled and with 1 GB of RAM
(recommended). The minimum RAM
requirement is 512 MB.
Light production
scanning
An environment where multiple devices
scan simultaneously for continuous periods
with occasional creation of searchable text.
Requires CPU-intensive OCR processing by
the Services Manager.
Dual processor P4 3.2 GHz machines with
Hyper-Threading enabled and with at least
1 GB of RAM.
Heavy
production
scanning
Same as light production scanning except
that searchable text is created for all
scanned pages. Includes file batching.
Dual processor Xeon machines with at
least 1 GB of RAM.
For the most effective throughput, consider the following information:
■
■
■
Memory is the most important element in the achievement of efficient throughput. If the
Services Manager PC is supporting more than 3 devices, it must have at least 512 MB of
RAM.
While a fast IDE drive (7200 RPM) is acceptable, a fast SCSI drive (15,000 RPM) improves
throughput. NTFS is the required drive format.
Desktop or workstation P4 or Xeon class machines with more memory are more effective
than traditional server-class machines, such as Intel Pentium III class machines with high
I/O throughput.
For the maximum number of devices supported for each hardware configuration and usage
scenario, refer to the eCopy Web site. Your company's network configurations, the amount of
simultaneous scanning, and the use of the Create Searchable Text option can affect system
performance, which in turn can affect the supported number of devices.
168
| Reference: Installation environment
Services Manager PC worksheet
Each site requires at least one network PC to run the Services Manager; each Services Manager
can support multiple eCopy-enabled devices.
You should not install the Services Manager on a PC that is also running Microsoft Exchange
server.
Copy and complete the following worksheet for each Services Manager you plan to install.
TABLE 53. Services Manager PC worksheet
Item
Notes
CPU (type/speed)
Review the hardware configuration
guidelines (see page 167).
RAM
Services
Manager PC
Example
P4/2.4 GHz
512 MB
Operating system
Windows XP Professional (SP3)
Windows 2003 Server
Windows 2008 Server
Microsoft Windows Vista. ShareScan
Embedded supports Windows Vista
Enterprise SP1 and Windows Vista Business
SP1. Use the latest service packs and
critical updates.
Windows XP
Drive size
Minimum 40 GB.
40 GB
Drive type and format
IDE or SCSI drive. NTFS format is required.
IDE/NTFS
Network interface
card
10/100 NIC is required.
10/100
TCP/IP installed
Required.
Yes
Client for Microsoft
Networks installed
Required.
Yes
Novell® client
installed
Required only for Novell authentication of
scan inboxes on a Novell server.
No
IP address
Static IP address is required.
DNS server address
Required only if you are using DNS (see
page 174).
192.168.1.113
Domain or workgroup
Runs in either environment.
domain
eCopy ShareScan® Installation and Setup Guide | 169
TABLE 53. Services Manager PC worksheet (continued)
Item
Notes
Services
Manager PC
Example
Domain name
Enter a name, if applicable.
ecopy
Network login name
and password
Name used during normal operation (must
be a local administrator). Have password
available during installation.
sharescan
Local firewall
It is recommended that you disable
firewalls on this PC (see page 169).
Closed
Local security policy
Log on locally rights must be assigned to all
“Domain Users”.
Yes
Managing firewalls
If you choose to enable a firewall, make sure the required ports are open for communication
between the Services Manager and the eCopy-enabled devices.
In the Windows Firewall program, the firewall is on by default. On the Exceptions tab, you must
add the following programs and port:
■
ShareScanOPManager.exe
■
ShareScanOPAgent.exe
■
ShareScanOPClient.exe
■
MMC.exe
■
InboxAgent.exe
■
SQLServer.exe (if you are using the Internet Address Book)
■
UDP port 1434 (if you are using SQL Express)
170
| Reference: Installation environment
Device worksheet
Copy and complete the worksheet below for each eCopy-enabled device that you plan to use with
ShareScan.
TABLE 54. Device worksheet
Notes
Device
Example
Model
eCopy-enabled device.
ScanFront 220
Location
Physical location of the device.
1-B32
Language
English
IP address
Domain-based networks: eCopy requires
that you use static IP addresses.
Workgroups: You must use static IP addresses.
10.10.10.68
Gateway address
Leave blank unless required by other
applications.
<blank>
Primary DNS server
Domain-based networks: Not required.
However, if you do not specify a DNS server, the
Services Manager PC must have a static IP
address.
Workgroups: Leave this field blank.
10.10.10.10
Secondary DNS server
Leave blank.
<blank>
Host name
A unique name for the device that must not
exceed 60 characters.
eCopyClient1-B32
Domain name
Enter a name, if applicable.
ecopy
eCopy ShareScan® Installation and Setup Guide | 171
Firewall and switch worksheet
Certain TCP ports must be open for communication between the devices on the network. You
can open the required ports (on switches, routers, or firewalls) between specific devices; you do
not need to open a required port to all devices on the network.
9100 is the main port used for communication between the Services Manager and an eCopyenabled device. You can change the port number through the Administration console. If you
change the port number, make the appropriate changes to your device settings.
Copy and complete the worksheet for each router, switch, firewall, or multi-homed PC that could
affect communication.
TABLE 55. Firewall and switch worksheet
Item
Description
Manufacturer
Firewall or
other device
Example
Cisco
Model
Location
80, 8080, 443,
8081, 8082
2-C22
Ports 80 and 8080 and 443 (if you use HTTPS) must be
open for communication between Apache Tomcat (the
Web client) and the ScanFront device.
Port 8081 must be open for communication between
Apache Tomcat and the ScanFront device when sending
scanned documents from the ScanFront device to Apache
Tomcat.
Port 8082 is used to transfer the processed document from
Scan to eCopy Desktop to a USB drive plugged into the
ScanFront device.
Open
172
| Reference: Installation environment
TABLE 55. Firewall and switch worksheet (continued)
Item
Description
Firewall or
other device
Example
9030, 9100
Must be open for communication between the Services
Manager and eCopy-enabled devices. You can open the
required ports between specific devices.
Open
8899, 9988 on
multicast IP
address
Optional, for encrypted UDP communication between the
Services Manager and eCopy-enabled devices.
Open
8888, 9999 on
multicast IP
address
239.254.5.6
Required, if you are using the eCopy Inbox Agent with
Scan to eCopy Desktop.
Optional, for unencrypted UDP communication between
eCopy Inbox Agent, Services Manager, and eCopy Desktop
clients.
Open
9200 - 9250
Used internally on PCs where the Services Manager is
running. No special configuration is required.
Default
9010, 9101
Used for communication between the Administration
console and the eCopy Agent service.
7125
Used internally on PCs where the Services Manager is
running.
239.254.5.6a
a. 239.254.5.6
is an administratively scoped Class D IP address. It is used so that the packets are contained within the
network. The multicast source relies on multicast-enabled routers to forward the packets.
eCopy ShareScan® Installation and Setup Guide | 173
Network infrastructure worksheet
Multiple domains and multiple workgroups are supported only if the Services Manager and all
eCopy-enabled devices are configured to communicate with one other via TCP or UDP, without
any port filtering or blocking.
Depending on the topology of the network, degradation in performance can occur when devices
span multiple domains. ShareScan supports child domains provided that the devices and the
Services Manager can communicate using an IP address. When devices cross domains, the system
checks to see whether the device can resolve the IP address by name. If it cannot resolve the
address, the device communicates using the IP address of the Services Manager.
TABLE 56. Network infrastructure worksheet
Item
Notes
Workgroup or
domain-based
network?
Network
Example
Domain
Devices span single
or multiple domains?
eCopy recommends a single domain for
best performance.
Single domain
Devices span single
or multiple
workgroups?
eCopy recommends a single workgroup for
best performance.
Not applicable
Microsoft Active
Directory installed?
Required on domain-based networks to
support remote access to the Services
Manager.
Yes
Devices on different
subnets or VLANs?
eCopy-enabled devices and the Services
Manager can be on different subnets or
virtual LANs (VLANs), provided that the
devices can communicate with the Services
Manager using an IP address.
Yes
Router configured to
pass packets
between subnets or
VLANs?
Required when devices span multiple
subnets or VLANs.
Yes
174
| Reference: Installation environment
DNS considerations
The Services Manager must be able to resolve the names of associated devices, whether through a
Domain Name Service (DNS) server on the local network or through the HOSTS file on the
Services Manager PC.
DNS should only be enabled on an eCopy-enabled device when there is a DNS server on the
local network.
Using a DNS server on the local network
Make sure the DNS server on the local network automatically registers the host names and IP
addresses of all devices on the local network. Older versions of operating systems and DNS
servers do not do this automatically.
Configuring the HOSTS file
If you do not have a DNS server on the local network, add the IP addresses and host names to the
HOSTS file in the \Windows\System32\Drivers\Etc directory on the Services Manager PC, as
in the following example:
#
#
#
#
#
#
This is a sample HOSTS file used by Microsoft TCP/IP for Windows.
This file contains the mappings of IP addresses to host names. Each
entry should be kept on an individual line. The IP address should
be placed in the first column followed by the corresponding host name.
The IP address and the host name should be separated by at least one
space.
# For example:
#
#
102.54.94.97
38.25.63.10
127.0.0.1
rhino.acme.com
x.acme.com
localhost
10.10.10.99
EnabledDevice
# source server
# x client host
eCopy ShareScan® Installation and Setup Guide | 175
Novell support
On Novell networks, ShareScan does not support direct communication between the Services
Manager and eCopy-enabled devices. However, when the Novell client is installed on the PC that
is running the Services Manager, some connectors (Quick Connect, Scan to eCopy Desktop, and
LDAP/SMTP) can use a back-end Novell server for authentication and temporary file storage (of
scan inboxes).
Novell environment for eCopy-enabled devices with embedded Clients
Device 1
Services Manager
Device 2
TCP/IP
Novell server
Device 3
Novell client
Other connectors
Scan to eCopy Desktop
Although Windows includes the Microsoft Client for NetWare Networks, eCopy has not tested
ShareScan with this client software and cannot recommend it. You should install the same
NetWare client you are using on the rest of your networked PCs. eCopy strongly recommends that
you install the latest 32-bit Novell client.
Note:
If you have a Novell network with multiple trees, you must set the Preferred tree field in the Novell
client configuration for the eCopy Inbox Agent (see page 138) and Scan to eCopy Desktop connector
to function properly.
Index
A
access
to Activity Log file 148
to addresses in Contacts folder 102
to devices 37, 48
to Document Tracking folder 152
to Global Catalog Server
to Help 2
to LDAP server 115
to remote devices 173
to Session Logon directories 43
account forests (Exchange) 95
activating
connector profiles 61
licenses 49
See also licensing devices, product keys
Active Directory. See Windows Active
Directory
Active ID file 107, 108, 110, 112
Activity Logging 146, 148
Activity Tracking
configuring 147
configuring additional fields for 150
adding messages to Sent Items folder
Exchange 101
Additional Fields,configuring for Activity
Tracking 150
address books
adding recipients from 67
connector profiles and 79
creating databases for 77
in Microsoft Outlook 102
addresses
adding 79
in Contacts folder 102
Administration console 7
installing 9
remote administration from 55
advanced system properties 39
See also Services Manager
Alphanumeric field type 71
anonymous access
Session Logon and 43
to LDAP server 115, 118
to SMTP server 121
authentication
against Exchange server 98, 100
against LDAP server 115, 118
against SMTP server 121
home directories and (Scan to eCopy
Desktop) 127
scan inboxes on Novell server 168, 175
Session Logon and 43
automatic search for address list entries 70
B
backing up configuration files 53
base DN 43, 119
Batching option 84
blank page removal 83
blocking access to devices 37
bylines, in e-mail connectors 66
C
Cc recipients of scanned documents 67, 101,
108, 121
child domains 173
class, LDAP 120
Client
look and feel of 155
Client for Microsoft Networks 168
Client (embedded) 7
installing 9
Client (ScanStation) 7
installing 9
Color Compression setting 40
Color Depth setting 85
Common name attribute (LDAP) 120
common Properties settings 63
See also connector profiles.
configuration files 53
See also Services Manager
connecting to SMTP server without
authenticating 121
178 | Index
connection protocols, used by Microsoft
Exchange Connector See protocols, used by
Microsoft Exchange Connector
connector profiles 15, 60
activating 15, 61
address books and 79
common Properties settings 63
configuring 15, 60
inheritance of 144
updating 60
using 155
connectors 7
button image and label settings 64
installing 9
installing and removing 58
quick reference to using 158
refreshing list of 58
Services for, configuring 80
types of 57
Contacts folder, accessing addresses in 102
Content settings 65
Copitrak cost recovery system
activity tracking and 146
Cost Recovery Service 146
cover pages
attaching 68, 106, 123
CSV format
for address lists 78
custom LDAP attributes 120
customer support 3
D
data link properties (address books) 79
database
address books. See address books
eCopyMail pass-through 107, 108, 112
Date field type 71
default device, inheritance of connector
profiles from 144
default scanner settings 145
Default.com entry 41
deleting
product keys 47
temporary image files 40
detecting embedded devices 48
Device Name field type 71
device worksheet, for eCopy-enabled
devices 170
directory services for Session Logon 43
disabling list of recipients (LDAP/SMTP) 121
Display settings 64
distinguished name 118
DNS server 174
Document Settings
configuring 81
Document Name option 83
Document Security option 82
Document Tracking 151
configuring 151
enabling 84
location of folder for 152
Domain Name System (DNS) 166
domains
multiple, support for 173
Session Logon and 43
Domino HTTP server 107, 108, 112
DominoPerson attribute (LDAP) 120
dynamic IP addresses 166
E
eCopy Connector for Fax via Lotus Notes. See
Fax via Lotus Notes Connector
eCopy Connector for Fax via Microsoft
Exchange. See Fax via Microsoft Exchange
Connector.
eCopy Connector for Fax via SMTP. See Fax
via SMTP Connector.
eCopy Connector for Lotus Notes Mail. See
Lotus Notes Mail Connector
eCopy Connector for SMTP using LDAP. See
SMTP using LDAP Connector
eCopy format 82
eCopy Scan to eCopy Desktop Connector. See
Scan to eCopy Desktop Connector.
eCopy Scan to Printer Connector. See Scan to
Printer Connector
eCopyMail pass-through database 107, 108,
112
e-mail address format, in Lotus Notes Mail
messages 66
e-mail sending options 108, 112
embedded devices
adding 48
| 179
embedded tags, used by fax server 106, 110,
123
encryption properties 40, 82
Environment setting (Exchange) 96
Equitrac cost recovery system
activity tracking and 146
exceptions, firewall 169
Exchange server 98
Export utility 53
Express
configuring 67
Scan to eCopy Desktop and 69
Scan to Printer and 140
External Associated Accounts (EAA) 95
F
fax address books 79
fax address format, configuring 73
See also Fax via Lotus Notes Connector, Fax
via Microsoft Exchange Connector, Fax
via SMTP Connector, RightFax
Connector
fax number 68
Fax via Lotus Notes Connector 110
configuring 111
fax address format, configuring for 73
Fax via Microsoft Exchange Connector 105
configuring 106
fax address format, configuring for 73
Fax via SMTP Connector 123
configuring 123
fax address format, configuring for 73
field types 71, 72
fields (file name and index)
configuring 71
separator character 72
size of 71
types of 71, 72
File Format option 82
file name fields 71
File Size field type 71
fingerprint scanner 156
firewalls
firewall and switch worksheet 171
managing 169
firmware, updating on ScanFront device 28
forests. See account forests, resource forests
G
general system properties 39
See also Services Manager
generic e-mail accounts 117
Lotus Notes 107
Microsoft Exchange 98
generic e-mail accounts (SMTP using
LDAP) 122
generic LDAP server 114
Global Address List 107, 113
Global Catalog Server 93
groups, displaying in Active Directory list of
recipients (SMTP using LDAP) 116, 119
H
hard keyboard. See keyboard
hardware configuration guidelines 167
Help, accessing 2
hiding settings screen 140
Home screen 159
host names, resolving 166
HOSTS file 174
I
IBM Domino Server 114
ID Services 153
IDE drive 167
image files, naming 83
image format, of scanned document 82
Image Quality setting 40
image, for connector button 64
Import utility 54
Inbox Agent (Scan to eCopy Desktop) 138
ports used with 171
index fields (Quick Connect) 71
inheritance of connector profiles 144
Input Paper Size setting 85
installation environment 165
installing
connectors 58
Lotus Notes e-mail or fax connectors 10
ShareScan 9
SQL Express 76
Internet Address Book 79, 169
180 | Index
K
keyboard
on-screen, configuring 41
on-screen, using 156, 157
Search while typing option and 70
See also Services Manager
L
label, for connector button 64
language
for keyboard 41
for searchable text creation 40
LDAP
advanced and custom attributes 120
custom attributes 120
server 114, 115, 118
users, selecting from LDAP tree 115
LDAP/MAPI protocol configuration 93
LDAP/WEBDAV protocol configuration 93
license report, generating 50
licensing devices 11, 45
status options 45
See also product keys
Local Address Book 79, 94, 113, 161
log files
activity tracking information captured
in 146
tracing information captured in 89
look and feel of Client 155
Lotus Notes
Address Book 108, 112
client installation 10, 107
ID file See Active ID file
Lotus Notes Mail Connector 107
configuring 107
format of e-mail address in messages 66
M
magnifying scanned documents 160
Mail Account settings 121
Mail Send Port 108, 112
MAPI/MAPI protocol configuration
(Exchange) 93
memory, and Services Manager PC 167
message settings (e-mail and fax
connectors) 65
Microsoft
Active Directory. See Windows Active
Directory
Client for NetWare Networks 175
Management Console (MMC) snap-in 7
Outlook, configuration requirements 93
Microsoft Exchange Connector 92
basic Properties settings for 98
configuring 94
Properties window 97
Wizard settings 96
Multicast UDP. See UDP
multiple forests environment (Exchange) 96
N
naming file name and index fields 71
Netscape LDAP Server 114
NetWare client 175
network attached storage (NAS) devices 166
network environment 166
network home directories 127
notes (e-mail and fax connectors)
configuring 65
in e-mail messages 67
specifying 161
Novell
client 168
Directory Services 43
eDirectory 114
support for 175
NTFS drive format 167
Numeric field type 72
O
OCR engine 40, 82
on-screen keyboard. See keyboard
Open LDAP Server 114
opening
multicast UDP ports 166
ports 169, 171
Output Paper Size setting 85
| 181
P
P4 class machines 167
password
for encryption 40, 82
for LDAP server account 118
PDF files, saving scanned documents to 82,
151
permissions
for scan inboxes 126
See also encryption properties
Pixel setting 85
ports 166, 171
changing 171
LDAP server 118
numbers used by Inbox Agent (Scan to
eCopy Desktop) 138
opening 171
SMTP server 121
post-scanning options 161
Preferred tree field 175
Preview screen 160
printers
scanning and printing to 140
selecting 140
product keys 46, 50
activating 49
adding 46
deleting 47
recovering 50
See also licensing devices
profiles. See connector profiles
protocols, used by Microsoft Exchange
Connector 93
Q
quick reference to using connectors 158
R
recipients of scanned documents
disabling list of (LDAP/SMTP) 121
selecting 161
recovering product keys 50
refreshing list of connectors 58
remembering recently used values 71
remote administration 55, 173
access to Services Manager 173
ScanFront device 27
See also Services Manager
removing
blank pages, from scanned documents 83
connectors from system 58
users from user list 56
reporting scanning activity 52
See also Services Manager
resolution
of scanned documents 85
resolving mismatch between user names and
mailbox names (Exchange) 100
restoring Services Manager 53
reviewing scanned documents 160
rolling filenames
in Activity Log file 148
in tracing log files 89
S
SAMAccountName attribute (LDAP) 120,
122
saving scanned documents to PDF files 151
scaling during scanning 85
scan inboxes 126
permissions for 126
security for 126
See also Scan to eCopy Desktop Connector
Scan to eCopy Desktop Connector 125
configuring 131
Express function and 69
Scan to Printer Connector 140
configuring 140
ScanFront fingerprint scanner 156
scanner settings
changing at device 159
configuring 85
for ScanFront 86
specifying defaults for 145
scanning activity, reporting 52
scanning documents 159, 160
post-scanning options 161
selecting recipients for 161
sending 160
182 | Index
ScanStand Assembly Instructions 2
ScanStation 35
See also ShareScan Embedded
scope, of searches 43, 116, 119
SCSI drive 167
search settings
for Session Logon 43
for SMTP using LDAP 116, 119
Search while typing option 43, 70, 98, 116,
119, 161
searchable text engine properties 40, 82
Secure Delete option 40
security
for network home directories 127
for scan inboxes 126
for Services Managers 37, 48
See also encryption properties, Scan to eCopy
Desktop Connector
sending scanned documents
from generic account 122
from personal account 108, 112
only to self 108, 112
to sender or only to self 121
separator character, specifying for fields 72
Server type setting 96
Services Manager 7
address book databases and 77
installing 9
Microsoft Exchange Server and 168
selecting 12
starting and stopping 36
Session Logon
configuring 42
document naming and 83
Express function and 67
See also logon settings (ScanStation), Services
Manager
setting up ScanFront device 26
ShareScan Administrator group 126
ShareScan Embedded
See also ScanStation
ShareScan Host Address 26
ShareScan User account 98, 108, 112
ShareScan, installing 9
sharing configuration files 53
single forest environment (Exchange) 96
size of file name or index fields 71
SMTP server 121
e-mail-to-fax gateway 123
logon settings 121
settings 116
SMTP using LDAP Connector 113
advanced LDAP attributes 120
basic LDAP settings 119
configuring 113
Properties window 118
SMTP server settings 121
user logon settings 122
Wizard settings 114
SNMP 48, 166
soft keyboard. See keyboard
SQL Express
installing 76
SQL Server 79
SSL 118
SSL/HTTPS, using 108, 112
starting
Services Manager 36
static IP addresses 166
stopping
Services Manager 36
subject lines (e-mail and fax connectors) 67,
68
configuring 65
specifying 161
support, customer 3
system properties
configuring 39
See also Services Manager
system tracing
configuring 44
See also Services Manager
T
TCP ports. See ports
technical support 3
threshold setting 84
TIF formats 82
time format, selecting 72
Tracing settings
configuring 89
trace file 44
tracking. See Activity Tracking
transaction information 44
| 183
troubleshooting 44
two-sided scanning 85
type of file name or index field, specifying 71
U
UDP 48, 166
ports 171
used to connect to scan inboxes 138
used to detect embedded devices 48
user
DN 118
ID (LDAP) 120
User Logon Settings 117
userdirs.txt file 128
users, list of 128
V
variables in subject lines and notes (e-mail and
fax connectors) 65
VLANs 166, 173
W
WEBDAV/WEBDAV protocol configuration
(Exchange) 93
Windows Active Directory 43, 114
displaying groups in list of recipients 116,
119
domain-based networks and 173
logging on via Windows logon 117, 122
mismatch between user names and mailbox
names 100
Windows Firewall settings 169
workgroups
multiple, support for 173
worksheets 165
for eCopy-enabled devices 170
for firewalls and switches 171
for network infrastructure 173
for Services Manager PC 168
X
Xeon class machines 167
Y
YTR files, searchable text creation and 40