1
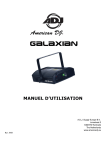
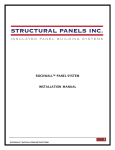
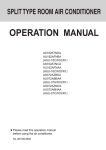
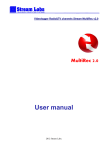
PUB. DIE-0407-000B
1
C
Y
P
O
Canon XF Utility
Instruction Manual
Windows
Version 1.3
Table of Contents
03 Introduction
03
About Canon XF Utility
03
Conventions in the Manual
17 Playing Back, Searching and
Managing Clips
17
18
04
Starting Up XF Utility
04
Exiting XF Utility
05 Overview of the Main Window
05
Media panel
06
Clips panel
06
Preview panel
07 Checking Clips
Using CF Cards
Reading a CF card with the computer
Removing a CF card from the computer
08
08
Using the Camcorder Directly
Connecting a camcorder equipped with a
USB terminal to the computer
Disconnecting the camcorder from the
computer
C
19
Searching for Clips
20
Displaying Relay Clips
21
21
21
21
Managing Clips
Copying clips
Moving clips
Deleting clips
22
22
22
23
23
Managing Virtual Media
Creating virtual media
Setting virtual media
Renaming virtual media
Deleting virtual media
24
Checking a Media's Properties
Y
P
O
07
07
07
08
19
18
19
04 Running XF Utility
02
Playing Back Clips
Adjusting the volume and selecting output
channels
Changing the playback position
Playing back clips recorded using Canon
Log gamma
Changing the clip’s thumbnail
09
09
10
10
11
Clip List View
Changing the way clips are displayed
Icons displayed on thumbnails
Sorting clips in detailed information view
Selecting the columns shown in detailed
information view
12
Displaying Additional Details About a
Clip
13 Importing and Writing Back
Clips
13
13
14
Importing Clips into the Computer
Importing all clips at once (Media Backup)
Importing selected clips
14
Writing Back Clips onto CF Cards
15
Exporting MXF Files to a Folder
25 Editing Clips and Associated
Metadata
25
25
26
Editing Marks
Adding a shot mark
Checking marks
26
26
28
Editing Metadata
Editing the metadata associated with a clip
Deleting all embedded custom picture files
29 Managing User Memo Profiles
29
Creating a User Memo Profile
30
Editing a User Memo Profile
31
Deleting a User Memo Profile
32 Reference and General
Information
32
32
34
Menus and Keyboard Shortcuts
Menu bar
Contextual menus
35
Troubleshooting Error Messages
Introduction
Introduction
About Canon XF Utility
Canon XF Utility offers various options for managing and playing back clips recorded with Canon HD
camcorders compatible with MXF files. Following are some of the things that Canon XF Utility lets you
do.
03
Checking and playing back clips
Display a list of all the clips recorded on a CF card, search the list
and play back clips.
Saving and writing back clips
Save clips that were recorded on a CF card to the computer, or
write back previously saved clips from the computer onto a CF
card.
Creating and editing User Memo
profiles
Create, edit and save User Memo profiles on SD memory cards.
Later, you can load a User Memo file from the SD memory card
to the camcorder and embed this information with the clips you
record.
Y
P
O
Conventions in the Manual
Important precautions related to the software’s operation.
Additional information that complements the main procedure.
0
Reference page number in this instruction manual.
File > Open This font is used to indicate menu options and commands, as they appear onscreen.
C
• For brevity’s sake, throughout the manual the application will be referred to simply as “XF Utility”.
• For the most part, screens shown in this manual were captured on a computer running Windows 7.
Actual screens may differ slightly.
Disclaimers
• This software was developed for exclusive use with clips recorded with Canon HD camcorders
compatible with MXF files. It should not be used to handle clips recorded or edited using other
devices.
• While every effort has been made to ensure that the information contained in this manual is accurate
and complete, Canon shall not be liable for any damages resulting from corrupted or lost data due to
mistaken operation or malfunction of the software.
• Your camcorder may not support all of the features and functions described in this manual. Screens
show clips recorded using a Canon EOS C300 camcorder.
• The software records internal operations, including full path information of the clips used, on a log file
kept on the hard disk. The information recorded will be used only for the purpose of providing
technical support in case of a problem with the software.
Running XF Utility
Running XF Utility
Starting Up XF Utility
Double-click the Canon XF Utility shortcut icon on the desktop. After a short while, the application’s
main window will appear.
04
Double-click
NOTES
Y
P
O
• Multiple instances of XF Utility cannot be opened simultaneously.
• If Windows’ display font size is changed from the default 96 dpi, some text and buttons on the main
window or dialog boxes may not be displayed correctly.
Exiting XF Utility
C
Using the menu: Click File > Exit.
From the main window: Click the
(Close) icon on the top right corner of the window.
Overview of the Main Window
Overview of the Main Window
Media Panel
Clips Panel
05
Preview Panel
Media Panel
Shows a list of CF cards and virtual media (0 22) –folders on the computer that can
be used in the same way as CF cards–. In the manual, CF cards and virtual media are
collectively referred to as “media”.
Clips panel
Shows a list of the clips saved in the selected media. You can change the display
mode of this panel (0 9).
Preview panel
Using the playback buttons, you can play back the clip selected in the clips panel
(0 17). You can also use some editing functions, for example to add or delete shot
marks (0 25).
Media panel
C
Y
P
O
Shows a list of connected CF cards and available virtual media. You can click on the tool buttons on the
top of the panel to backup media and to create or delete virtual media. To the far left of the status bar
you will see the space in use and the available space on the selected media*. When multiple media are
selected, the number of media selected will be displayed instead.
* When a virtual media is selected, the status bar will show the used/available space on the hard disk that contains the selected
virtual media.
Back Up Media tool (0 13)
Create Virtual Media tool (0 22)
Delete Virtual Media tool (0 23)
CF card
Virtual media
Media
Used and available space on the selected media or number of selected media
Overview of the Main Window
Clips panel
Shows a list of the clips recorded on the media selected in the media panel. You can change the way
the clips are displayed in the panel using the display mode tool buttons, or use the search toolbar to
search or filter clips by different criteria. In the center of the status bar you will see information regarding
the number of selected clips and their total duration and file size.
Display Mode tool buttons (0 9)
06
Search toolbar (0 19)
Selected clip
Clip
(from the status bar on the bottom of the screen)
Preview panel
Y
P
O
In this panel you can use the playback buttons to play back the clips you have selected. Additionally,
you can check all the marks registered in the clip and edit shot marks.
Playback position slider
C
Video display area
Time code display
Audio playback control buttons (0 18)
LUT (Apply Look-Up Table) button (0 19)
Add Shot Mark tool button (0 25)
Video playback control buttons (0 17)
Mark operation buttons (0 25)
Checking Clips
Checking Clips
Using CF Cards
After you have finished recording video with your camcorder, you can use a computer to read, access
and save the clips it contains.
07
Reading a CF card with the computer
Connect a commercially available card reader compatible with CompactFlash memory cards to your
computer. Start up XF Utility and then insert the CF card into the card reader. When the CF card is
correctly recognized*, it will appear in the list of available media in the media panel.
* Only CF cards that were initialized using the camcorder and have the designated folder structure will be correctly recognized.
NOTES
• When using a commercially available card reader, use of a UDMA-compatible card reader is
recommended.
Y
P
O
Removing a CF card from the computer
1. In the media panel, select the CF card you want to remove.
2. Click File > Eject to safely terminate the connection to the CF card.
• The CF card will disappear from the media panel, and XF Utility will no longer be able to access it.
• You can also right-click on the CF card icon in the media panel and select Eject from the
contextual menu that opens.
• If you logged in to Windows XP using a limited user account, you will not be able to use this
function. In that case, exit XF Utility and use Windows’ Safely Remove Hardware function before
removing the CF card.
C
3. Remove the CF card from the card reader.
Checking Clips
Using the Camcorder Directly
If your camcorder features a USB terminal, you can connect the camcorder directly to a computer
using a USB cable. In such case, if CF cards are inserted in both CF card slots, both CF cards will
appear in the media panel at the same time and you will be able the access and work on clips from
both media.
08
Connecting a camcorder equipped with a USB terminal to the computer
1. Power the camcorder using the compact power adapter.
• If you only want to read clips from the CF cards in the camcorder and do not need to write onto
them, you can connect the camcorder even if it is powered only by a battery pack.
2. Turn on the camcorder and set it in MEDIA mode.
• Insert the CF cards that contain the clips you want to check into the camcorder in advance.
3. Start up XF Utility.
4. Connect the camcorder to the computer using a USB cable.
• Use the optional IFC-400PCU USB cable or similar mini-B USB cable.
• The CF cards in the camcorder will appear in the media panel as CF A, CF B.
Y
P
O
Disconnecting the camcorder from the computer
C
1. In the media panel, select the icon of the CF A card.
2. Click File > Eject to safely terminate the connection to the CF card.
• The CF card will disappear from the media panel, and XF Utility will no longer be able to access it.
• You can also right-click on the CF card icon in the media panel and select Eject from the
contextual menu that opens.
• If there are two CF cards in the camcorder, repeat steps 1 and 2 to eject the second card (CF B)
in a similar manner.
• If you logged in to Windows XP using a limited user account, you will not be able to use this
function. In that case, exit XF Utility and use Windows’ Safely Remove Hardware function before
removing the camcorder.
3. Disconnect the USB cable from the camcorder and the computer and turn off the camcorder.
IMPORTANT
• Please observe the following precautions. Failing to do so may result in permanent data loss.
When a CF card appears in the media panel:
- Do not remove the CF card or the CF card reader without safely ejecting the media first.
- Do not access, change or delete any of the CF card’s folders or files directly from the computer.
Always save clips on the computer and write back clips onto the CF card using only XF Utility.
When the camcorder is connected directly to the computer:
- Do not open any of the CF card slot covers and do not remove the CF cards.
- Do not disconnect the USB cable without safely ejecting the camcorder first.
- Do not turn off the camcorder or the computer.
Checking Clips
Clip List View
When you select a CF card or a virtual media in the media panel (쐃), a list of all the clips in the media
will appear in the clips panel (쐇). When you select multiple media, all of the clips they contain will be
displayed in the clips area.
쐃
09
쐇
Changing the way clips are displayed
You can change the way clips appear in the clips panel using the Display Mode tool buttons or the
options in the View menu.
Large Thumbnails
Shows large thumbnails of the clips and for each clip, the clip’s name
and date and time of recording.
Small Thumbnails
Shows small thumbnails of the clips and for each clip, the clip’s name
and date and time of recording.
Thumbnails with
Information
Shows thumbnails of the clips and for each clip, the clip’s name, date
and time of recording, start time code, duration, video bit rate, resolution
and frame rate.
Detailed Information
By default, shows the following information about each clip in a tabular
format: clip name, media name, date and time of recording, duration,
start time code, status, clip title, creator, location and description.
You can customize the information displayed for each clip (0 11).
C
Y
P
O
Large thumbnails
Small thumbnails
Thumbnails with information
Detailed information
NOTES
• Thumbnails of clips recorded using Canon Log gamma will show the image before any adjustments,
as originally recorded. The appearance of the thumbnail image will not change even after applying a
LUT to play back the clip (0 19).
Checking Clips
Icons displayed on thumbnails
When you change the display mode to one of the views that display thumbnails, the following icons
may appear next to the thumbnail to give you additional information about the clip.
Relay recording icon
, ,
Appears for clips created when you continuously record video spanning two
or more CF cards. The icon displayed depends on the position of the clip in
the series:
first clip,
clip in the middle, or
last clip.
You can choose to display only clips that are part of the same relay
recording series (0 20).
Status icon
j, Z
Appears for clips that were tagged with an j mark or a Z mark in the
camcorder itself, or using XF Utility.
Custom Picture icon
k
Appears for clips that contain an embedded custom picture file. When you
select a clip with a k icon, you can display the detailed settings of the
embedded custom picture file (0 12).
Canon Log gamma
icon
Appears for clips that were recorded using the Canon Log gamma function.
10
Y
P
O
Icons next to small thumbnails
Icons next to large thumbnails
C
Sorting clips in detailed information view
When you choose to display the list of clips in detailed information view, you can click a column’s title to
sort the clips in ascending order by the selected field*. Click again to sort the clips in descending order.
* Clips cannot be sorted by Status field.
Click a column’s title to sort the clips by a different field
Click again to sort in descending order
Checking Clips
Selecting the columns shown in detailed information view
You can customize the information displayed in detailed information view by adding or removing
columns and rearranging the order in which they are displayed.
1. Click View > Customize Columns.
2. Select the fields you want to display in detailed information view.
11
• Check the fields you want to display and remove the checkmark from fields you do not want to
display (쐃). Scroll down to view all the available fields.
• You can use one of the quick-selection buttons (쐇): Show All to display all the information about
the clip, Hide All to display only the clip name*, or Reset to Default to show only the information
displayed by default (0 9).
* The Clip Name column cannot be removed.
3. If necessary, rearrange the order of the displayed columns.
• Click on a field from the list of available fields (쐋) and use the Move buttons (쐏) to move the field:
Click Up to move the field up the list (move the column left), or Down to move the field down the
list (move the column right).
4. Click OK (쐄) to apply the changes to the detailed information view.
쐃
쐋
쐇
쐏
쐄
C
Y
P
O
Checking Clips
Displaying Additional Details About a Clip
In addition to the clips panel, you can open three other information windows that offer a large number
of additional details about a selected clip. These windows do not require any user input (they are
modeless dialog boxes) so you can have them open all the time and use them as a reference while you
work on the clips in the main window.
Clip Properties
Displays general information about the clip, including the date and time of
recording, the clip’s duration, settings used while recording (resolution, video bit
rate, etc.), User Memo profile and more.
Camera Metadata
Displays information about the camcorder’s settings (shutter speed, aperture,
focus mode, gain, ISO speed, white balance, etc.) used when recording the
frame shown in the video display area. During playback, the information will be
continuously updated.
Custom Picture
Displays information about the custom picture settings used when recording the
clip. If the clip was recorded without using custom picture settings, only the clip
name will be displayed.
12
1. Select a clip in the clips panel.
Y
P
O
2. Click View > Clip Properties to display the clip properties’ window, View > Camera Metadata to
display the metadata window or View > Custom Picture to display the custom picture settings’
window.
• You can also right-click on a clip in the clips panel and select the desired window from the
contextual menu that opens.
C
Camera metadata
Clip properties
Custom picture
NOTES
• Fields with a
icon next to them (Status, and User Memo fields like Clip Title or Location in the Clip
Properties window) are the only fields that can be edited using XF Utility (0 26). All other fields are
for informational purposes only and cannot be changed.
Importing and Writing Back Clips
Importing and Writing Back Clips
Importing Clips into the Computer
You can import clips from a CF card displayed in the media panel to the computer. You can import all
the clips at once or select which clips to import. You can also select multiple CF cards to import in one
go all the clips they contain.
13
Importing all clips at once (Media Backup)
You can import all the clips contained in a CF card at once by backing up the CF card. When you back
up a CF card, a virtual media is created automatically.
1. In the media panel, select the CF card you want to back up (쐃).
2. Click
Backup (the Back Up Media tool, 쐇).
• You can also use the menu by clicking File > Back Up Media.
3. Only when backing up a CF card that has already been backed up previously, you will be asked
to select the type of backup you want to create.
• Select Full Backup to import all the clips again or Incremental Backup to back up only those clips
that have not been imported previously.
4. Click Yes (쐋).
Y
P
O
• A virtual media will be created automatically (쐏) and the clips will be copied to the local folder on
the computer.
• If in step 3 you selected the Incremental Backup option, any new clips will be copied to the folder
used for the original backup.
• Click Cancel to interrupt the operation.
• When the backup operation is completed, a confirmation dialog box will show the name
automatically given to the virtual media. (The name of the virtual media represents the date and
time of the backup operation.)
C
5. Click OK.
쐇
쐃
쐏
쐋
NOTES
• You can select the local folder used for backup files. Click Tools > User Configuration.
• If you prefer, you can rename virtual media later on (0 23).
• Depending on the system used (the computer’s performance specifications, transfer rate of the CF
card, etc.), importing clips can take some time.
Importing and Writing Back Clips
Importing selected clips
You can select which clips to import to the computer from the clips recorded on a CF card. In such
case, you will need to create in advance a virtual media in the local folder on the computer where you
want to save the clips.
1. If necessary, create a new virtual media (0 22).
2. In the media panel, select the CF card that contains the clips you want to import (쐃).
14
• You can select multiple CF cards.
3. In the clips panel, select the clips you want to import (쐇).
• To select multiple, non-successive clips: Click the desired clips while holding the Ctrl key (Ctrl +
Click).
• To select multiple, successive clips: Click the first clip and then click the last clip while holding the
Shift key (Shift + Click).
• To select all clips: Click Edit > Select All.
4. Drag the selected clips to the icon of the desired virtual media in the media panel (쐋).
• The selected clips will be copied to the local folder corresponding to the selected virtual media.
• Click Cancel to interrupt the operation.
쐃
Y
P
O
쐇
쐋
NOTES
C
• Depending on the system used (the computer’s performanc e specifications, transfer rate of the CF
card, etc.), importing clips can take some time.
Writing Back Clips onto CF Cards
You can transfer clips from the computer back onto a CF card in a card reader connected to the
computer. If your camcorder features a USB terminal, you can connect the camcorder to the computer
and transfer clips directly from the computer back to a CF card in the camcorder.
1. In the media panel, select the virtual media that contains the clips you want to write back (쐃).
2. In the clips panel, select the clips you want to write back (쐇).
• Use Shift + Click or Ctrl + Click to select multiple clips or click Edit > Select All to select all clips.
3. Drag the selected clips to the icon of the desired CF card in the media panel (쐋).
• To write clips back onto the camcorder, connect the camcorder to the computer and drag the
selected clips to one of the CF cards in the camcorder.
• The selected clips will be copied to the CF card.
• Click Cancel to interrupt the operation.
• You can also use the menu by clicking Edit > Copy and Edit > Paste.
쐋
쐃
쐇
Importing and Writing Back Clips
IMPORTANT
15
• While writing back to the camcorder clips that were previously saved on the computer, please
observe the following precautions. Failing to do so may result in corrupted clips that cannot be played
back on the camcorder.
- Do not remove the CF card and do not remove the CF card reader from the computer.
- Do not open any of the CF card slot covers on the camcorder.
- Do not disconnect the USB cable.
- Do not turn off the camcorder or the computer.
NOTES
• Initialize the CF card using the camcorder before writing back the clips to the CF card. If you initialize
the CF card using a computer or another device, you will not be able to use it for recording or
playback with the camcorder.
• When using a commercially available card reader, use of a UDMA-compatible card reader is
recommended.
• Depending on the system used (the computer’s performance specifications, transfer rate of the CF
card, etc.), writing back clips can take some time.
• To be able to write back clips to the camcorder, power the camcorder using the compact power
adapter and only then connect it to the computer. Clips cannot be written back to the camcorder if it
was connected to the computer while it was powered only by a battery pack.
C
Y
P
O
Exporting MXF Files to a Folder
You can export MXF stream files* of your clips and save them on a local folder on the computer. When
you export clips as MXF files, you will have the option to merge multiple clips, to rename the MXF
stream files and to change the audio output characteristics of the clips. You can then edit these files
with any non-linear editing (NLE) software that supports Canon MXF files. For details about using MXF
stream files, refer to the instruction manual of the video editing software.
* MXF (Material eXchange Format) is an SMPTE-defined container specification that includes video, audio, metadata and other
information.
1. In the clips panel, select the desired clips.
• Use Shift + Click or Ctrl + click to select multiple clips.
2. Click Edit > Export To MXF.
• The Export To MXF dialog box will appear.
3. Select the way the files will be exported from the pull-down menu (�).
Copy MXF Files
Copies the original MXF stream files exactly as they are.
Merge All Clips
Merges the MXF stream files within each clip and also merges multiple
selected clips into a single file.
Merge Each Clip
Merges the MXF stream files within each clip but keeps multiple selected
clips as separate files.
4. To change the folder where the exported MXF files will be saved, click Browse and then select
the Folder for Exported Files (�).
• By default, a new subfolder will be created automatically for the exported files. The name of the
subfolder represents the date and time of the export operation. To export the MXF files directly
into the selected destination folder, remove the checkmark from the Automatic Creation of
Subfolders box (쐋).
Importing and Writing Back Clips
5. To rename the exported files, check the Rename Files box and enter the desired file name in the
field below it (�).
• To number multiple MXF files consecutively enter the starting number in the Initial Value for
Consecutive Numbers field (�). You can check the Remember Consecutive Numbering box below
it to automatically continue the consecutive numbering also for future export operations.
6. If in step 3 you selected one of the merge options, you can change the way audio is exported in
the following step; otherwise, skip to step 8.
16
7. Select the Number of Audio Channels (�) and the Audio Bit Rate (�) from the respective pulldown menus.
• When you set Number of Audio Channels to 4 ch or 8 ch, 2 or 6 audio tracks will be added to the
original files and mute data will be recorded in these additional tracks. The default 2 ch will not add
any audio tracks to the original audio tracks.
• When you set Audio Bit Rate to 24-bit, the original audio will be converted from 16-bit to 24-bit
audio.
8. Click Export (�).
• When the operation is completed, a confirmation dialog box will show the name automatically
given to the destination folder.
9. Click OK.
쐃
�
�
�
C
�
�
�
�
Y
P
O
Playing Back, Searching and Managing Clips
Playing Back, Searching and Managing Clips
Playing Back Clips
You can play back the clip currently selected in the clips panel.
1. In the clips panel, select the clip you want to play back (쐃).
• The video display area will show the first frame from the clip.
2. Click
17
to start the playback (쐇) or double-click the clip in the clips area.
• The playback position slider and time code display will advance as the clip is played back.
• During the clip’s playback, the A button will change to C.
• To play back the clip in full screen: Click View > Full Screen. Press the Esc key to end fullscreen
playback. During fullscreen playback you can start/stop the playback and control the playback
position using the keyboard shortcuts (0 18).
3. Click
to stop the playback.
• Selecting a different clip in the clips panel will also stop the playback of the current clip.
쐃
Y
P
O
Video display area
C
쐇
Time code
Total duration of the clip
IMPORTANT
• Several factors, including your computer’s performance and the transfer rate of the CF card, can
affect the playback quality. In certain cases, for example when playing back clips in the camcorder
when it is connected directly to the computer, you may notice some of the following anomalies.
- Playback is not smooth and frames are dropped.
- The displayed time code does not match the actual frame being displayed.
- Parts of the screen freeze or take longer to be refreshed.
If you experience such anomalies while playing back clips from a CF card, import the clips into the
computer and play back the clips from the local virtual media.
NOTES
• When the input focus* is on the clips panel, media panel or the playback position slider in the preview
panel, you can press the space key to start/stop the playback. Additionally, you can use the space
key in the same manner during full-screen playback.
* “Input focus” refers to the window or item that can receive keyboard input from the user.
Playing Back, Searching and Managing Clips
Adjusting the volume and selecting output channels
Drag the volume slider to adjust the playback volume. You can click
to temporarily mute the sound
( ). Click on the audio channel selection buttons ( CH1 or
CH2) to select the audio channel that
will be played back.
Click to mute the audio
Volume slider
18
Audio channel selection
Changing the playback position
You can change the playback position during playback or in playback pause mode in the following
ways.
Jump to the previous/next shot mark
Shot mark
Playback position slider
Y
P
O
Event mark
C
Skip to the last frame
Next frame
Previous frame
Skip to the first frame
Jump to the previous/next event mark
Keyboard
shortcut 1*
Keyboard
shortcut 2*
Home
S
Skip to the first frame of the clip.
End
X
Skip to the last frame of the clip.
# arrow
A
Go back one frame.
$ arrow
Z
Advance one frame.
Shot
Shift + #
D
Jump to the previous shot mark (0 25) in the clip.
Shot
Shift + $
C
Jump to the next shot mark in the clip.
Event
Ctrl + #
F
Jump to the previous event mark (0 25) in the clip.
Event
Ctrl + $
V
Jump to the next event mark in the clip.
Mouse operation
Playback position
slider
Action
—
Drag it to bring the playback position to the desired
frame.
—
Click to jump directly to the selected shot mark.
—
Click to jump directly to the selected event mark.
* Use keyboard shortcut 1 when the input focus is on the playback position slider in the preview panel or during full-screen
playback. Use keyboard shortcut 2 when the input focus is on the media panel, clips panel, or playback position slider in the
preview panel, or during full-screen playback.
Playing Back, Searching and Managing Clips
Playing back clips recorded using Canon Log gamma
Clips that were recorded using Canon Log gamma will look darker when played back in their original
form. When playing back such clips (marked by the
icon in the clips panel), you can click
or
press the B key to apply a LUT (lookup table), which is a color profile that will let you see
the video closer to how it could appear in your final results.
The Canon Log gamma function is available only in some camcorder models.
19
Click to apply a LUT to clips recorded with Canon Log gamma
Changing the clip’s thumbnail
By default the image used for the thumbnails displayed in the clips panel is the first frame from the clip.
However, if you prefer so, you can select a different frame to use as the thumbnail image.
1. In the clips panel, select the clip whose thumbnail you want to change.
Y
P
O
2. In the preview panel, pause the playback at the frame you want to use as the thumbnail’s image.
3. Click Edit > Set Thumbnail Picture.
NOTES
• In some cases, the actual frame used for the thumbnail’s image may be off by up to 0.5 second from
the selected frame.
C
Searching for Clips
You can search for clips in the clips panel and filter the clips to display only clips that meet certain
criteria.
1. In the search toolbar, select the parameter by which you want to search or filter the clips from
the drop-down menu (쐃).
• You can search by clip name (Clip Name), recording date and time (Recording Date/Time), status
icon (Status), clip title (Clip Title), creator (Creator), shooting location (Location) or clip description
(Description).
2. Enter or select the search criterion (쐇).
Parameter
Criterion
Clip Name, Clip Title, Creator, Location,
Description
Enter a text string to search for. The search is case-sensitive
(a≠A).
Recording Date/Time
Select Today, One Week (within one week), or One Month
(within one month).
Status
Select OK, Check or None (no status icon).
Playing Back, Searching and Managing Clips
3. Click Search All (쐋).
• XF Utility will search all the clips in the selected media and display in the clips panel only those
clips that meet the search criteria.
• When you want to further narrow down and refine the search results, repeat the procedure
entering additional criteria and click Narrow Results (쐏).
4. Click Display All (쐄) to reset the search and display all the clips in the selected media.
20
쐃
쐇
쐋
쐏
Displaying Relay Clips
C
쐄
Y
P
O
After selecting a virtual media, you can display only those clips that were recorded continuously
spanning two or more CF cards and are part of the same relay recording series.
1. In the media panel, select a virtual media that contains relay clips.
2. In the clips panel, select a clip with a relay recording icon
,
or
(쐃).
3. Click View > Show Relay Clips.
• Only those clips that are part of the same relay recording series as the selected clip will appear in
the clips panel.
• You can also right-click on a clip with a relay recording icon in the clips panel and select Show
Relay Clips from the contextual menu that opens (쐇).
4. Click View > Show Relay Clips again to display all the clips in the selected media.
Playing Back, Searching and Managing Clips
Managing Clips
Using standard cut, copy, paste and drag & drop operations you can copy, move and delete the clips
stored in virtual media.
21
Copying clips
You can copy clips from a virtual media to other media.
1. In the media panel, select the virtual media that contains the clips you want to copy (쐃).
2. In the clips panel, select the clips you want to copy (쐇).
• Use Shift + Click or Ctrl + Click to select multiple clips or click Edit > Select All to select all clips.
3. Drag the selected clips to the icon of the desired media in the media panel (쐋).
• The selected clips will be copied to the selected media.
• Click Cancel to interrupt the operation.
• You can also use the menu by clicking Edit > Copy and Edit > Paste.
Moving clips
Y
P
O
You can move clips from a virtual media to other media.
1. In the media panel, select the virtual media that contains the clips you want to move.
2. In the clips panel, select the clips you want to move.
C
• Use Shift + Click or Ctrl + Click to select multiple clips or click Edit > Select All to select all clips.
3. Click Edit > Cut.
4. In the media panel, select the media where you want to move the clips and click Edit > Paste.
• The selected clips will be moved to the selected media.
• Click Cancel to interrupt the operation.
Deleting clips
You can delete clips you are not interested in keeping. Using XF Utility you can delete clips even if they
are tagged with an j mark.
1. In the media panel, select the media that contains the clips you want to delete.
2. In the clips panel, select the clips you want to delete.
• Use Shift + Click or Ctrl + Click to select multiple clips or click Edit > Select All to select all clips.
3. Press the Delete key and click OK.
• You can also use the menu by clicking Edit > Delete.
• The selected clips will be deleted.
IMPORTANT
• Be careful when deleting clips. Once deleted, clips cannot be recovered.
Playing Back, Searching and Managing Clips
Managing Virtual Media
Virtual media are simply local folders on the computer where you can save and organize clips. You can
create, set, rename or delete virtual media as necessary.
22
Creating virtual media
Create virtual media to easily organize clips on your computer. Virtual media have the same folder
structure as CF cards so XF Utility will recognize virtual media and be able to handle them in exactly the
same way as CF cards.
1. Click the Create Virtual Media tool
(쐃).
• You can also use the menu by clicking File > Create Virtual Media.
• The Create Virtual Media dialog box will open.
2. Enter the desired name for the virtual media in the Virtual Media Name field (쐇).
3. To select the folder where the virtual media will be saved, click Browse and select the Folder for
Virtual Media (쐋).
4. Select the Type of Virtual Media (NTSC, PAL or 24.00P) from the pull-down menu (쐏).
Y
P
O
• A virtual media can only contain clips recorded with the specified video configuration.
5. Click OK (�).
• The virtual media will be created and appear in the media panel (�).
쐃
C
�
쐇
�
쐋
�
Setting virtual media
You can set as virtual media a folder on the hard disk that has data in the same folder structure as a CF
card.
1. Click File > Set Virtual Media.
• The Set Virtual Media dialog box will appear.
2. Select the folder to set as virtual media and click OK.
• For example, if you select a folder called D:\Data that has the same folder structure as the CF
card, Data will appear in the media panel.
̈ To remove virtual media
Follow the procedure below when you no longer wish to have the folder set as virtual media. Doing so
will remove the folder from the media panel but the folder and clips in the folder will not be deleted.
1. In the media panel, select the folder set as virtual media.
2. Click File > Remove Virtual Media.
• A confirmation dialog box will appear.
Playing Back, Searching and Managing Clips
3. Click OK.
• The selected folder will no longer be set as virtual media and will be removed from the media
panel.
NOTES
• After you remove the virtual media, you can select Set Virtual Media to set the folder as virtual media
again.
23
Renaming virtual media
You can rename virtual media, for example, to give backup folders a more descriptive name.
1. In the media panel, select the virtual media that you want to rename.
2. Click File > Rename Virtual Media.
• The Rename Virtual Media dialog box will open.
3. Enter the desired name for the virtual media in the Virtual Media Name field (쐃) and click OK
(쐇).
• The virtual media’s new name will appear in the media panel.
쐃
쐇
Deleting virtual media
C
Y
P
O
You can easily delete virtual media and all the clips they contain, even those clips tagged with an j
mark.
1. In the media panel, select the virtual media that you want to delete (쐃).
2. Click the Delete Virtual Media tool
(쐇) or click File > Delete Virtual Media.
3. If the virtual media contains clips, a confirmation message will appear. Click OK to delete all the
clips.
• The virtual media will disappear from the media panel.
쐇
쐃
IMPORTANT
• Once deleted, clips cannot be recovered. To leave the clips and to just cancel the setting as virtual
media, select Remove Virtual Media.
Playing Back, Searching and Managing Clips
Checking a Media's Properties
You can display the properties of a media to check the type of clips (NTSC/PAL/24.00P) that are
contained. Also, for virtual media, you can check the local folder on the computer that contains the
files.
1. In the media panel, right-click on the media whose properties you want to check and select
24
Media Properties from the contextual menu that opens (쐃).
• ·The Media Properties dialog box will open.
2. Click OK (�) to close the dialog box.
쐃
�
C
Y
P
O
Editing Clips and Associated Metadata
Editing Clips and Associated Metadata
Editing Marks
When a clip contains shot marks or event marks, these marks will appear in the preview panel, below
or above the playback position slider.
25
Shot mark
There are two types of shot marks, Mark 1 and Mark 2, that you can add freely at
any point in the clip. The icon is the same regardless of the shot mark type.
Event mark
Event marks are added automatically while recording in response to predefined
changes. For details, refer to the camcorder’s Instruction Manual. The icon is the
same regardless of the trigger event but you can check the event type in the
Details column of the mark list.
Shot mark
Event mark
Add Shot Mark button
Mark List button (0 26)
Adding a shot mark
Y
P
O
You can add a shot mark at any point in the clip. Only Mark 1-type shot marks can be added using XF
Utility.
1. In the clips panel, select the clip to which you want to add shot marks.
C
2. In the preview panel, pause the playback at the frame you want to mark with a shot mark.
3. Click
.
• A Mark 1-type shot mark will be added at the selected position and a mark will appear over the
playback position slider.
• In some cases, the actual position of the shot mark may be off by up to 0.5 second from the
selected frame.
• You can also use the menu by clicking Edit > Add Shot Mark.
NOTES
• Up to 100 shot marks (Mark 1 and Mark 2 combined) can be added to a single clip.
• Shot marks cannot be added to the first frame of a clip.
• Mark 2-type shot marks can be added to a clip using the camcorder or the Wi-Fi Remote
application.
Editing Clips and Associated Metadata
Checking marks
You can click Mark List to display a list of all the shot- and event marks in a clip.
쐃
26
쐇
쐋
̈ To jump to a marked position
Select from the mark list the shot- or event mark you want to check (쐃) and click Jump (쐇). The
playback position slider will jump to the selected mark and the marked frame will appear in the video
display area.
̈ To delete a shot mark
Y
P
O
Select from the mark list the shot mark you want to delete (쐃) and click Delete (쐋).
NOTES
• Clip status marks (j, Z) can be added or deleted by editing the Status field in the Clip Properties
information window (0 26).
• Event marks cannot be deleted.
C
Editing Metadata
Using XF Utility you can edit the User Memo profile and other metadata associated with clips and
delete custom picture files embedded within clips.
Editing the metadata associated with a clip
Although camera metadata fields are for informational purposes only and cannot be changed, you can
edit some of the metadata fields associated with a clip, such as the User Memo fields.
1. In the clips panel, select the clip whose metadata you want to edit.
2. Click View > Clip Properties to display the clip properties’ window.
• You can also right-click on the clip in the clips panel and select Clip Properties from the
contextual menu that opens.
3. Edit the fields you want to change as explained below.
• The icon displayed next to fields that were edited will change to
(쐃).
Editing Clips and Associated Metadata
4. Click Save (쐇) to save the edited metadata with the clip.
쐃
27
쐃
쐇
Y
P
O
̈ To add or remove an j or Z mark
쐃 Select the Status field and double-click its current value.
쐇 Select the desired value from the list.
• Select None to remove the current mark, OK to add or change the current mark to an j mark
or Check to add or change the current mark to a Z mark. Both marks cannot be added
simultaneously.
C
Editing Clips and Associated Metadata
̈ To edit User Memo fields
쐃 Select Clip Title, Creator, Location or Description and double-click its current value.
• The Edit User Memo dialog box will open.
쐇 Edit each field as necessary and click OK.
• You can enter up to 1000 characters into the description field and a maximum of 100
characters for the other 3 fields.
• If you prefer, you can leave some of the fields blank.
28
Y
P
O
̈ To add geotagging (GPS) information
쐃 Select Altitude, Latitude, or Longitude and double-click its current value.
• The Edit GPS Information dialog box will open.
C
쐇 Enter the GPS values as necessary and click OK.
• Enter only valid numeric values.
Deleting all embedded custom picture files
You can delete custom picture files that were embedded with clips at the time of its recording. You can
only delete custom picture files from all the clips in a media; individual clips cannot be selected.
1. In the media panel, select the media from which you want to remove all embedded custom
picture files.
2. Click File > Delete All Custom Picture Files.
3. A confirmation message will appear. Click Yes to delete all embedded custom picture files from
all the clips in the media.
Managing User Memo Profiles
Managing User Memo Profiles
User Memo profiles contain useful identifying information, such as a clip’s title, creator, shooting
location or brief description. Create User Memo profiles using XF Utility and save them on an SD
memory card in advance. Then, you can read a User Memo file from the memory card to the
camcorder and use it for recording.
29
Creating a User Memo Profile
Enter the information for the User Memo profile and save the User Memo file on an SD memory card or
a local folder on the computer.
1. Connect a commercially available card reader to your computer and insert the SD memory card
where you want to save the User Memo files into the card reader.
2. Click File > Manage User Memo Profiles.
• The Manage User Memo Profiles dialog box will open.
3. Enter the necessary information in the Clip Title, Creator, Location and Description fields (쐃).
Y
P
O
• You can enter up to 1000 characters into the description field and a maximum of 100 characters
for the other 3 fields.
• If you prefer, you can leave some of the fields blank.
4. Check the Card Only box (쐇), select the drive of the card reader where the SD memory card is
inserted (쐋) and click Save (쐏).
• The Enter File Name dialog box will open.
C
5. Enter the file name (쐄) and click OK (쐂).
• The User Memo file will be saved on the SD memory card.
• You can enter a maximum of 8 characters for the file name. Do not use any special characters
other than the capital letters <A to Z> and numbers <0 to 9>.
쐄
쐂
̈ To save the User Memo file in a local folder
In step 4 above, leave the Card Only box unchecked and click Save. In the dialog box that opens,
select the local folder on the computer where you want to save the User Memo file, enter the file name
and click Save.
NOTES
• Up to 100 User Memo files can be saved on a single SD memory card.
Managing User Memo Profiles
Editing a User Memo Profile
You can read a User Memo file previously saved on an SD memory card or in a local folder to edit the
information it contains.
1. Connect a commercially available card reader to your computer and insert the SD memory card
that contains the User Memo file you want to edit.
30
2. Click File > Manage User Memo Profiles.
• The Manage User Memo Profiles dialog box will open.
3. Check the Card Only box and select the drive of the card reader where the SD memory card is
inserted.
4. Select the User Memo file you want to edit from the list and click Load.
• The content of the User Memo profile will appear in the User Memo fields in the Manage User
Memo Profiles dialog box.
5. Edit the Clip Title, Creator, Location and Description fields as necessary.
• You can enter up to 1000 characters into the description field and a maximum of 100 characters
for the other 3 fields.
• If you prefer, you can leave some of the fields blank.
6. Click Save.
Y
P
O
• The Enter File Name dialog box will open.
7. Enter the file name and click OK.
• The User Memo file will be saved on the SD memory card.
• You can enter a maximum of 8 characters for the file name. Do not use any special characters
other than the capital letters <A to Z> and numbers <0 to 9>.
C
̈ To read a User Memo file saved in a local folder
In step 3 above, leave the Card Only box unchecked and click Load. In the dialog box that opens,
select the local folder on the computer that contains the User Memo file you want to edit, select the
desired User Memo file and click Open.
̈ To save the edited User Memo file in a local folder
In step 6 above, uncheck the Card Only box before clicking Save. In the dialog box that opens, select
the local folder on the computer where you want to save the User Memo file, enter the file name and
click Save.
Managing User Memo Profiles
Deleting a User Memo Profile
Using XF Utility you can delete User Memo files saved on an SD memory card.
1. Connect a commercially available card reader to your computer and insert the SD memory card
that contains the User Memo file you want to delete.
2. Click File > Manage User Memo Profiles.
31
• The Manage User Memo Profiles dialog box will open.
3. Check the Card Only box and select the drive of the card reader where the SD memory card is
inserted.
4. Select the User Memo file you want to delete from the list.
• If you want to check the content of the User Memo file before deleting it, and click Load.
5. Click Delete.
6. In the confirmation dialog box that opens, click Yes to delete the User Memo file.
C
Y
P
O
Reference and General Information
Reference and General Information
Menus and Keyboard Shortcuts
Following the table for the main commands in the menu bar, you will find commands that appear in
contextual menus that open when you right-click certain icons.
32
Menu bar
Menu
submenu
Keyboard
Shortcut
Function
0
File
Eject
—
Removes a CF card from the media panel.
7
Back Up Media
—
Copies all the clips in a CF card to a virtual media
in a local folder on the computer.
13
Create Virtual Media
G
Creates a virtual media.
22
Delete Virtual Media
H
Deletes a virtual media and all the clips it contains.
23
Set Virtual Media
J
Sets a folder as virtual media.
22
Remove Virtual Media
K
Cancels the setting of a folder set as virtual media.
22
Rename Virtual Media
L
Renames a virtual media.
23
Manage User Memo
Profiles
—
Opens a dialog box where you can create, edit and
delete User Memo files.
29
Delete All Custom
Picture Files
—
Removes all the custom picture files embedded in
clips in the selected media.
28
Alt + F4
Exits XF Utility.
4
Ctrl + X
“Cuts” clips and places them in the clipboard,
ready to be moved to a different media.
21
Copy
Ctrl + C
Copies clips into the clipboard.
21
Paste
Ctrl + V
Moves or copies clips from the clipboard to the
selected media.
21
Delete
Delete
Deletes the selected clips.
21
Select All
Ctrl + A
Selects all the clips in the selected media.
—
Set Thumbnail Picture
Ctrl + P
Sets the selected frame as the picture used for the
clip’s thumbnail.
19
Exit
Edit
Cut
C
Y
P
O
Add Shot Mark
T
Adds a shot mark at the selected frame.
25
Mark List
P
Displays a list of all the shot- and event marks in
the selected clip.
26
Export To MXF
—
Exports the MXF stream files of the selected clips
to a local folder.
15
Reference and General Information
Menu
submenu
Keyboard
Shortcut
Function
0
View
33
Large Thumbnails
Q
Changes the display mode of the clips panel to
large thumbnails.
Small Thumbnails
W
Changes the display mode of the clips panel to
small thumbnails.
Thumbnails with
Information
E
Changes the display mode of the clips panel to
thumbnails with additional details about the clips.
Detailed Information
R
Changes the display mode of the clips panel to
tabular, detailed view.
Show Relay Clips
—
Shows only clips that were recorded continuously
in the same relay series as the selected clip.
Clip Properties
U
Displays the clip properties’ window.
Camera Metadata
I
Displays the metadata window.
Custom Picture
O
Displays the custom picture settings’ window.
Customize Columns
—
Opens a dialog box where you can select and
reorder the fields that will appear when using the
detailed view in the clips panel.
11
Plays back the selected clip in full screen.
17
Refreshes the display to show the latest
information about the selected media.
—
Opens a window where you can set your
preferences about the software’s operation.
—
Full Screen
Refresh
Tools
User Configuration
Help
About Canon XF
Utility
View Instruction
Manual
Y
P
O
Alt + Enter
F5
C
—
—
Displays details about the software’s version.
—
Opens XF Utility’s PDF instruction manual (this PDF
file).
9
20
12
—
—
Reference and General Information
Contextual menus
Following is a list of menus that appear when you right-click certain icons. The contextual menu
displayed will depend on the location of the mouse pointer at the time of clicking.
Contextual menu in the media panel
34
Menu
Keyboard
Shortcut
Eject
—
Removes a CF card from the media panel.
7
Backup Media
—
Copies all the clips in a CF card to a virtual media
in a local folder on the computer.
13
Create Virtual Media
G
Creates a virtual media.
22
Delete Virtual Media
H
Deletes a virtual media and all the clips it contains.
23
Set Virtual Media
J
Sets a folder as virtual media.
22
Remove Virtual Media
K
Cancels the setting of a folder set as virtual media.
22
Rename Virtual Media
L
Renames a virtual media.
23
Media Properties
—
Shows the types of clips the media contains. Also,
for virtual media, shows the local folder on the
computer where the virtual media is saved.
24
Moves or copies clips from the clipboard to the
selected media.
21
Paste
Menu
Y
P
O
Ctrl + V
Contextual menu in the clips panel
C
Function
Keyboard
Shortcut
Function
0
0
Ctrl + X
“Cuts” clips and places them in the clipboard,
ready to be moved to a different media.
21
Ctrl + C
Copies clips into the clipboard.
21
Paste
Ctrl + V
Moves or copies clips from the clipboard to the
selected media.
21
Delete
Delete
Deletes the selected clips.
21
Select All
Ctrl + A
Selects all the clips in the selected media.
—
20
Cut
Copy
Show Relay Clips
—
Shows only clips that were recorded continuously
in the same relay series as the selected clip.
Clip Properties
U
Displays the clip properties’ window.
Camera Metadata
I
Displays the metadata window.
Custom Picture
O
Displays the custom picture settings’ window.
12
Reference and General Information
Troubleshooting Error Messages
Following is a partial list of error messages in alphabetical order.
Cannot add a shot mark to this frame.
• A shot mark cannot be added to the first frame of a clip. Click
and try adding the short mark again.
35
(Next Frame) to advance a few frames
Cannot add the shot mark. A single clip can have up to 100 shot marks.
• The clip already has the maximum number of shot marks (100 marks). Remove any unnecessary shot
marks and try adding the shot mark again.
Cannot back up the clips because the number of clips in the target media will exceed 999.
• The maximum number of clips in a media is 999 clips. Select a different local folder on the computer as the
backup folder.
Cannot back up the media.
• Check the local folder on the computer designated as the backup folder.
Cannot change the shot mark information.
• Check the media that contains the selected clips.
Cannot copy the clip because the source clip is corrupted or cannot be accessed.
• Check the media from which you want to copy the clips (source media).
Y
P
O
Cannot copy the clips.
• The clips could not be copied to the selected media. Check the target media.
Cannot copy the clips because the number of clips in the target media will exceed 999.
• The maximum number of clips in a media is 999 clips. Reduce the number of clips to copy or select a
different target media.
C
Cannot copy the clips because the target media is an optical disc.
• Clips cannot be saved onto optical discs. Select a CF card or virtual media as the target media.
Cannot create the destination folder.
• Check the access privileges of the user account you are using.
Cannot create the folder.
• Check the access privileges of the user account you are using.
Unable create the folder. The folder already exists.
• A local folder with same name already exists on the computer. Check the local folder on the computer
where you wanted to create the virtual media.
Cannot create the target virtual media.
• Check the local folder on the computer designated as the backup folder.
Cannot create the virtual media.
• Check the local folder on the computer where you wanted to create the virtual media.
Cannot delete.
• The User Memo file could not be deleted because the SD memory card is write-protected.
Cannot delete the custom picture files.
• Check the media that contains the selected clips.
Cannot delete the folder where the virtual media was saved.
• Check the local folder on the computer where the virtual media was saved.
Cannot detect the virtual media. OK to delete the virtual media?
• The local folder on the computer where the virtual media was saved cannot be found. Display the Media
Properties (0 34) and check that the displayed path exists and is correct. If you click Yes, the virtual
media will be deleted from XF Utility; however, if the folder was renamed or moved, this will not delete the
actual files from the computer.
Reference and General Information
Cannot detect the virtual media. (The path of the virtual media is *****) The virtual media may be
used by connecting the external storage that contains the virtual media. OK to delete the virtual media?
• The local folder on the computer where the virtual media was stored cannot be found or was not correctly
detected. If the virtual media was created on a removable storage device, click No to avoid deleting the
virtual media and try again after reconnecting the removable storage device.
36
Cannot eject the removable drive.
• The connection with the CF card or other removable media could not be terminated. Exit XF Utility and use
the Windows Safely Remove Hardware function to disconnect the hardware and only then restart XF Utility.
• The connection with the external hard disk or other removable mass storage device could not be
terminated. Exit XF Utility and use the Windows Safely Remove Hardware function to disconnect the
device and only then restart XF Utility.
Cannot export the clips because errors were found.
• There is not enough free memory. Restart the computer and try again.
• The source clip is corrupt or damaged. Use a backup copy of the clip, if you have one.
Cannot export the clips because the destination folder is not found.
• The drive or storage device that contains the folder selected as the destination folder was removed.
Connect the drive or storage device to the computer.
Cannot export the clips if the selected files include more than 10 different clips with the same clip name
and media name.
• As long as you select different folders (paths) in the camcorder, you can create different virtual media with
the same media name and save in them clips with the same clip name. However, you cannot select more
than 10 such clips when exporting MXF files. Reduce the number of duplicated clips selected.
Y
P
O
Cannot export the MXF files.
• Check the access privileges of the user account you are using.
Cannot move the clips.
• The clips could not be moved to the selected media. Check the target media.
C
Cannot move the clips because the number of clips in the target media will exceed 999.
• The maximum number of clips in a media is 999 clips. Reduce the number of clips to move or select a
different target media.
Cannot read the clips.
• The clip’s information file or stream file is corrupt or damaged. Use a backup copy of the clip, if you have
one.
Cannot rename the virtual media.
• Check the local folder on the computer where the virtual media was saved.
Cannot save.
• The User Memo file could not be saved because the SD memory card is write-protected.
Cannot save the clip properties.
• Check the media that contains the selected clips.
Cannot save the file. A memory card can store up to 100 user memo files.
• The maximum number of User Memo files on a single SD memory card is 100 files. Delete any
unnecessary User Memo files or save the file on a different memory card.
Cannot set the selected folder as virtual media.
• An invalid folder was selected.
• The selected folder contains files that are not compatible or the selected folder’s structure is not correct.
Canon XF MPEG2 Decoder is not installed
• Reinstall the software using the Canon XF Utilities CD-ROM. For details refer to the camcorder’s Instruction
Manual.
Clip not exported: Source clip is corrupted or could not be accessed.
• The clip’s information file or stream file is corrupt or damaged. Use a backup copy of the clip, if you have
one.
Clips recorded using different video configurations (resolution/frame rate/bit rate) cannot be merged.
• When exporting MXF files, select only clips recorded using the same video configuration.
Reference and General Information
Folder for backup files not found.
• Check the local folder on the computer designated as the backup folder.
Media not found.
• The local folder on the computer where the virtual media was stored cannot be found or was not correctly
detected. Display the Media Properties (0 34) and check that the displayed path exists and is correct.
• The CF card was removed. Reinsert the CF card into a card reader connected to the computer.
37
Memory card is not detected.
• The SD memory card was removed while you were editing a User Memo profile. Always close the Manage
User Memo Profiles dialog box before removing he SD memory card.
NTSC/PAL/24.00P clips cannot be stored in the same media.
• Replace the CF card.
The path of the folder for backup files is incorrect.
• Check the local folder on the computer designated as the backup folder.
The selected frame could not be saved as the thumbnail picture.
• Check the media that contains the selected clips.
The user memo file is corrupted or damaged.
• Check the SD memory card or the local folder on the computer where the User Memo file is saved.
• Use a different User Memo file or create and save a new User Memo file.
Y
P
O
Virtual media currently in use by another user.
• Wait until other users finish using the files in the virtual media before continuing the operation.
Virtual media not found or currently in use by another user. Cannot rename the virtual media.
• The local folder on the computer where the virtual media was saved cannot be found. Display the Media
Properties (0 34) and check that the displayed path exists and is correct.
C
Trademark Acknowledgements
• Microsoft and Windows are trademarks or registered trademarks of Microsoft Corporation in the
United States and/or other countries.
• Other names and products not mentioned above may be trademarks or registered trademarks of
their respective companies.
For support concerning this software, please contact a Canon Service Center. For details see the
back cover of your camcorder’s Instruction Manual.
The information in this manual is verified as of April 2012. Subject to change without previous notice.
PUB. DIE-0407-000B
© CANON INC. 2012