1
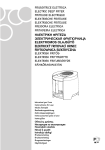
TOUCH THE SOUND
BV Subwoofer
VECCHIO
Owner's Manual
1
Thank you for choosing Bolzano Villetri loudspeakers!
Bolzano Villetri loudspeakers represent a unique approach towards loudspeakers
manufacturing. The fundamentals of our work are based on our long-term
theoretical research; together with the mastery of our skilled experts; our modern
advanced design and our serious attitude towards all stages of the loudspeakers
creation process. It is through this we have achieved perfection of form and content.
Our loudspeakers are graphical evidence of that!
It is important for us that your new Bolzano Villetri loudspeakers be set up and
connected optimally. This manual contains our recommendations for setup,
connection and maintenance.
To extract the best standards of your system please refer closely to this manual. It
may be also necessary for you to refer to your other components' user guides to
prevent any damage or loss in performance which may occur from incorrect
installation.
Enjoy!
General Information
BV subwoofer VECCHIO is based on semi-counteraperture
principle.
Subwoofers extend the bass response of your system
beyond the limitation of most speakers. They are used
with, not in the place of, your existing left and right
speakers. A subwoofer can dramatically enhance a
dynamic range on low frequency of stereo systems, or a
full fledged home theater.
This active subwoofer features a highly efficient ported
enclosure, a rugged 12-inch reinforced driver and a 500watt amplifier with a passive low frequency crossover
network. A line level input is provided for fast and easy
connection to virtually any system.
2
1
4
Subwoofer amplifier
MODEL: DB 5004 BP-AB
3
5
6
7
10
9
11
8
12
13
1 Power/Standby indicator
2 VOLUME control
3 LOW-PASS FREQUENCY control
4 MODE On/Auto/Standby switch
5 LOW-PASS FILTER defeat switch
6 Phase switch
7 LINE IN
8 LINE OUT
9 Fuse
10 Power input socket
11 POWER on/off switch
12 Speaker Level Input
13 Speaker Level Output
Unpacking the product
Unpack the subwoofers and check the contents. If you suspect damage from transit, report it
immediately to your dealer and/or delivery service. Keep the shipping cases for future use.
2
3
Warnings
1. Read Instructions All the safety and operating instructions should be read before the appliance is
operated.
2. Retain Instructions The safety and operating instructions should be retained for future reference.
3. Heed Warnings All warnings on the appliance and in the operating instructions should be adhered
to.
4. Follow Instructions All operating and use instructions should be followed.
5. Installation Install in accordance with the manufacturer's instructions.
6. Power Sources This product should be operated only from the type of power source indicated by
the marking situated on the rear panel. If you are not sure of the type of power supply to your home,
consult your product dealer or local power company.
7. Grounding or Polarisation The appliance is not required to be grounded. Ensure the plug is fully
inserted into the wall outlet or extension cord receptacle to prevent blade or pin exposure. Some
versions of the product are equipped with a power cord fitted with a polarized alternating line plug
(a plug having one blade wider than the other). This plug will fit onto the power outlet only one way.
This is a safety feature. If you are unable to insert the plug fully into the outlet, try reversing the plug.
If the plug should still fail to fit, contact your electrician to replace your obsolete outlet. Do not defeat
the safety purpose of the polarised plug. When using an extension power-supply cord or a powersupply cord other than that supplied with the appliance, it should be fitted with the appropriate
mouldedon plugs and carry safety approval appropriate to the country of use.
8. Power Cord Protection Power-supply cords should be routed so that they are not likely to be walked
on or pinched by items placed on or against them, paying particular attention to cords at plugs,
convenience receptacles and the point where they exit from the appliance.
9. Overloading Do not overload wall outlets, extension cords or integral convenience receptacles, as
this can result in a risk of fire or electric shock.
10. Ventilation The amplifier panel at the rear of the product forms part of the cooling mechanism and
must not be obscured by placing the product on a bed, sofa, rug, or other similar surface. Do not
cover the amplifier panel with any items such as tablecloths, newspapers, etc. Ensure the heat sink fins
are aligned vertically to ensure proper cooling. There should be a clear gap of at least 50mm (2-in)
between the back of the product and any wall or partition.
11. Wall or Ceiling Mounting The product should be mounted to a wall or ceiling only as recommended
by the manufacturer.
12. Water and Moisture To reduce the risk of fire or electric shock, do not expose the product to rain or
excessive moisture such as in a sauna or bathroom. Do not use this product near water for example,
near a bathtub, washbowl, kitchen sink, laundry tub, in a wet basement, or near a swimming pool and
the like.
13. Object and Liquid Entry Never push objects of any kind into this product through openings, as they
may touch dangerous voltage points or short out parts that could result in a fire or electric shock.
Never spill liquid of any kind on the product. Do not place any object containing liquid on top of the
product.
14. Cleaning Unplug the product from the wall outlet before cleaning. The cabinet of the subwoofer may
be cleaned by dusting with a dry cloth.
15. Attachments Do not use attachments not recommended by the product manufacturer, as they may
cause hazards.
16. Non-use Periods The power cord of the appliance should be unplugged from the outlet during
lightning storms or when the apparatus is left unused for a long period of time.
17. Servicing Do not attempt to service this product yourself, as opening or removing covers may expose
you to dangerous voltage or other hazards. Refer all servicing to qualified service personnel.
Important Safety Instructions
18. Damage Requiring Service Unplug this product from the wall outlet and refer servicing to
qualified personnel under the following conditions:
a.
When the power-supply cord or plug has been damaged.
b.
If liquid has been spilled or objects have fallen into the appliance.
c.
If the product has been exposed to rain or water.
d.
If the product does not operate normally by following the operating instructions. Adjust only
those controls that are covered by the operating instructions, as an improper adjustment of other
controls may result in damage and will often require extensive work by a qualified technician to
restore the product to its normal operation.
e.
If the product has been dropped, or damaged in any way.
f.
When the product exhibits a distinct change in performance this indicates a need for
service.
19. Replacement Parts When replacement parts are required, be sure the service technician has used
replacement parts specified by the manufacturer or have the same characteristics as the original
part. Unauthorised substitutions may result in fire, electric shock or other hazards.
20. Mains Fuses For continued protection against fire hazard, use fuses only of the correct type and
rating. The amplifier is designed to operate with nominal mains supplies in the range 115V to 230V
AC, but different types of fuse are used, dependent on the mains voltage. The correct fuse
specification for each voltage range is marked on the product.
Explanation of graphical symbols
The lightning flash within an equilateral triangle is intended to alert you to
the presence of uninsulated “dangerous voltage” within the product's
enclosure that may be of sufficient magnitude to constitute an electric
shock to persons.
To reduce the risk of electric shock, do not remove the back panel and do
not expose the apparatus to rain or moisture. No userserviceable parts
inside. Refer servicing to qualified personnel.
The exclamation point within an equilateral triangle is intended to alert
you to the presence of important operating and maintenance (servicing)
instructions in the literature accompanying the appliance.
4
5
Connecting the subwoofer
Hi Level In
These inputs are designed to accept an amplified signal from the speaker outputs of a receiver,
power amp or other device not equipped with line level outputs.
Hi Level Out
The original amplified signal from your source is present at these outputs, for connection to the
existing left and right speakers (direct connection from amplifier is the best).
Line In
The RCA-type jack of your Subwoofer is designed to accept a line level signal from a receiver, preamp, surround sound decoder, television or similar device. When using a single line level output from
another unit, a Y connector (not included)should be used to send the signal to both the left and right
inputs.
Hi Level Connections
Here the signal is already amplified as it leaves the receiver/amplifier. The speaker terminals of this
unit are connected to the hi level inputs of the Subwoofer. The left and right speakers receive the
original amplified signal from the Subwoofer hi level outputs.
Line Level Connections
In this example, the pre-amp outputs of a stereo receiver are connected to the Subwoofer line inputs.
Dedicated Subwoofer Connections
Many surround sound decoders, home theater processors and audio/video receivers are equipped
with a dedicated subwoofer line output. In this case, the signal is already processed and does not
need to return to the system or other speakers. Connect this line output to the line inputs of the
Subwoofer. AY connector (not included) should be used to feed this single output to both the left and
the right line inputs.With this type of connection we recommend that the Low-Pass Filter should be
switched off.
Hi Level Connections
L
R
L
R
LR
L
R
Line Level Connections
L
R
LR
L
R
LR
L
R
Dedicated Subwoofer Connections
L
R
LR
L
R
LR
L
LR
Subwoofer amplifier
Subwoofer amplifier
Subwoofer amplifier
MODEL: DB 5004 BP-AB
MODEL: DB 5004 BP-AB
MODEL: DB 5004 BP-AB
R
Using the Controls
Power
The subwoofer is equipped with both a Power switch and an Auto On switch. In order to function, the
Power switch must be turn on, indicated by the green color of the LED. The Auto On has two Positions:
ON The subwoofer is on at all time and ready to play program material. AUTO ON As long as no
audio signal is received, the subwoofer is in Standby mode to conserve power. When an audio signal
is sensed, the subwoofer will switch itself into the fully On mode and begin playing the program
material. When a period of about 2 minutes goes by during which no signal is sensed, the subwoofer
will return to Standby mode.
If you plan to be away for an extended time, or if the subwoofer will not be used, you may wish to
turn off the Power switch.
Subwoofer Volume
The level control adjusts the volume of the subwoofer. Once set, the level control should not require
further adjustment. Begin with the level control at the minimum position. Slowly increase the level until
you can hear the subwoofer. A subwoofer playing too loud can give your system a muddy sound, so
be sure to balance the subwoofer carefully with you other speakers. Output level is relative and can
be different from location to location. Always return to the normal listening location to evaluate any
setting changes.
Low pass
The crossover frequency control determines the highest frequency at which the subwoofer reproduces
sounds. It can be adjusted from 26 Hz to 140Hz.
Specifications
BV Subwoofer VECCHIO
Description
Active subwoofer based on semi-counteraperture principle
Drive unit
1x12” polypropylene cone bass
Frequency response
26-140 Hz
Amplifier:
Output power
Line Level Inputs
Variable Crossover Control
Phase control
AC Power Line in Voltage
Main Socket
Fuse
500 W
Stereo L&R RCA Connector
Dual linear taper potentiometer; Variable from 40-120Hz
2 position toggle switch; normal (0), Reverse (180)
115/230Vac+/-10%; 50/60Hz
Standard 2 conductor IEC socket with 1.83m power coard
The correct fuse specification for each voltage range
Is marked on the product
Dimensions:
Height
Width
Depth
16.9” (430 mm)
19.7” (500 mm)
19.7” (500 mm)
Net weight
45 kg
6