1
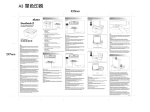
Battery Backup with
Surge Protection
User Manual
F6H400ukUSB F6H600ukUSB
Introduction
Thank you for purchasing the Battery Backup with Surge Protection (the unit). Each year, frequent natural and man-made power
disturbances disrupt the power supplied to your home or office electronics. These power problems place your hardware, software,
and data at risk. Belkin Battery Backups provide an uninterruptible power supply (UPS) with advanced features as the industry-leading
solution.
Package Contents
You should have received the following:
1 –
Battery Backup unit
1 –
Installation CD containing Belkin Automatic Power Management Software (the Belkin APM Software)
1 –
USB Cable
1- CD user manual
System Requirements
The Battery Backup can be used without the software with any computer using up to a 17” CRT or LCD monitor. You do not have to
have the software installed to utilize the battery-backup sockets.
To fully utilize the Battery Backup and its software, your computer must be running one of the following operating systems:
Windows XP / 2003 / 2000 / ME / 98 / NT 4.0 (SP6) or Linux, and have a USB port.
Overview | Features and Functions
Before installation, please inspect the unit upon receipt. Make sure that nothing is damaged.
Your Battery Backup features three LED indicators. Each is marked by a power icon; please familiarize yourself with this chart, as it will
assist you in the use of your Battery Backup.
Indicator
Condition
Meaning
On-Line
Solid Green
The unit is operating and supplying the utility power to connect loads.
On-Battery
* Flashing Yellow
When the unit is operating from battery:
Low Battery
1. The light blinks every 5 seconds if the unit is operating on battery mode.
2. T
he light illuminates rapidly every 1 second if the unit’s battery is very nearly
depleted.
UPS Fault
Solid Yellow
The LED lights steadily and the buzzer beeps if a fault is found.
Overview | Important Safety Instructions
Please save this User Manual!
It contains important operating instructions and warranty information pertaining to your Battery Backup.
Please save or recycle the packaging materials!
The unit’s packaging was designed with great care to provide protection during shipment and delivery. These materials are invaluable if
you ever have to return the unit for service. Damage sustained during transit is not covered under the warranty.
Overview | Top Panel
1. Battery-Backup Outlets
Data-sensitive equipment such as a computer, monitor and external drive should be plugged into these sockets. Battery power is
automatically provided in case of a power outage. Power (AC or battery) is not supplied to these sockets when the unit is switched off.
(Do not plug surge protectors or power strips into the battery-backup sockets.)
Caution: Never connect a laser printer or scanner to the backup sockets along with other computer equipment.
To do so might overload the unit.
2. The “On/Off” button has 2 functions:
1.
Turns on the unit. Press button for at least two seconds. The green light illuminates.
2.
Cold start function. If the battery is charged, the unit will work without being plugged into an
socket. Press and hold the key for at least two seconds to turn on the unit.
1- UK
Overview | Side Panel
1. AC Input Power Cord (See #1 on Fig. 1)
Provides power to your Battery Backup.
2. AC Breaker (Circuit Breaker; see #2 on Fig. 1)
Should a power overload occur, the circuit breaker triggers the unit to turn
off AC power. To restore power, press the “circuit breaker” button to reset,
then press the “Power” button.
3
3. USB Communication Port (See #3 on Fig. 1)
The unit features a USB communication port. Installation of the cable and the Bulldog Plus Software, which allows the unit to connect
to your computer, is optional. The unit will provide backup power whether or not the cable and software are installed; however, without
them you will be unable to utilize the data management product features.
Overview | Alarms
Backup (Slow Alarm)
When the unit is in “backup” mode (running on battery), the YELLOW LED illuminates and the unit emits an audible alarm. The alarm
stops when the unit returns to normal online operation.
Low Battery (Rapid Alarm)
In “backup” mode, when the battery energy runs low, the unit beeps rapidly until it either shuts down from a depleted battery or returns
to normal online operation.
Fault (Continuous Alarm)
When the unit fails, it emits an audible alarm continuously to warn of a fault condition. Disconnect the equipment prior to checking it.
Overview | Storage
Storage Conditions
Store the unit covered and upright in a cool, dry location with its battery fully charged. Before storing, charge the unit for at least twelve
(12) hours.
Extended Storage
During extended storage in environments where the ambient temperature is -15 en +30 °C, charge the unit’s battery every six (6)
months. During extended storage in environments where the ambient temperature is +30 en 45 °C, charge the unit’s battery every
three (3) months.
Note:
Overview | Technical Specifications
F6H400ukUSB
F6H600ukUSB
Model
F6H400exUSB
F6H600exUSB
Capacity
F6H400evUSB
400VA/200W
Input
Output
(inverter Mode)
Transfer Time
VA/W
Voltage
Frequency
Max input current
Phase
Voltage Range
Frequency
Max output current
Waveform
Typical
Battery Type
Backup Time at a PC load with monitor
Battery
(Typical 100W)
Protection
Full Protection
Physical
Shucko
Environment
10-15 Minutes
(recharge up to 90% capacity)
Power on, Backup, Fault
Sounding every 5 seconds
Sounding every second
Sounding every 0.5 second
Continuously Sounding
Overload, Overcharge, Modem/Phone Line Surge
Protection and Short Circuit Protection
352mm*134mm*86mm
2.9KG
4 sockets for surge protection with battery backup
0-40oC
0-90%
LED
Battery Mode
Low Battery
Overload
Fault
Audible Alarm
6-11 Minutes
16 hours max
Recharging Time
Display
F6H600evUSB
600VA/300W
220/230/240VAC
50/60Hz
5A
Single
220/230/240VAC+10%
50Hz or 60Hz+1Hz
5A
Modified Sinwave
2-6ms
12V4.5Ahx1
12V5Ahx1
Dimension (DxWxH)
Net Weight
France
UK
Operation Temperature
Operation Humidity
All specifications are subject to change without prior notice.
2- UK
Installation
Note: Before installation, please inspect the unit.
Make sure that nothing inside the package is damaged.
A. Connect to AC Utility Power
Plug in the AC cord to a wall socket. Please make sure there are no devices plugged into the unit. Check to see whether
the “SITE WIRING FAULT” indicator is lit. If it is lit, please have the utility wiring inspected by an electrician.
B. Charge the Battery
For best results, charge the battery for twelve hours prior to initial use. The unit charges its battery whenever it is
connected to the utility power.
C. Turn on the unit
Turn on your unit by depressing the “On/Off” button for approximately two seconds. You will see the green indicator
light come on.
D. Plug in Power Devices
Plug your devices into the AC sockets on the unit. To use the unit as a master on/off switch, make sure all of the
loads are switched on.
Caution: Never connect a laser printer or scanner to the backup sockets along with other computer equipment. A
laser printer or scanner draws significantly more power when in use than when idle. This may overload the Battery Backup.
E Connect the USB Communication Port
A USB port is provided to relay the signal to support Windows. To fully utilize the Belkin Automatic Power Management Software, you
will need to connect the unit to your computer. Connect the USB cable to the unit, then connect the other end to your computer’s USB
port.
F. Install Belkin APM Software
a) Platforms supported by Belkin APM Software.
The following operating system (OS) is arranged by the alphabetical order:
•
AIX 4.3.3, 5.1, 5.2
•
Compaq Tru64 Alpha
•
FreeBSD x86
•
HP-UX 11.x, 11i.x
•
Linux
•
Mac PPC OSX
•
SCO UnixWare 7.1.1, 7.1.3, SCO Unix 8.0, and SCO OpenServer 5.0.6, 5.0.7
•
SGI Irix 6.5.x
•
Solaris / Sparc 2.6, 7, 8, 9 , and Solaris / Intel 2.6, 7, 8, 9
•
Windows XP / 2003 / 2000 / ME / 98 / NT 4.0 (SP6).
b)
Belkin Automatic Power Management Software Installation Steps. (For most common operating systems)
For Windows platform
•
Run setup.exe in the \Windows\Disk1\InstData\VM\ directory of your CD to start the installation program.
•
Read the information provided, then click Next.
•
Review the installation options that you have selected. If the options are correct, then click “Install” to begin the installation.
•
When the installation program is completed, click Done.
For Mac OS X platform
•
Run setup.app in the \MacOXS\Disk1\InstData\ directory of your CD to start the installation program.
•
Read the information provided, then click Next.
•
Review the installation options that you have selected. If the options are correct, then click “Install” to begin the installation.
•
When the installation program is completed, click Done.
Trouble shooting
PROBLEM
POSSIBLE CAUSE
SOLUTION
Power LED is not lit
“On/Off” button not pushed or pushed
less than 2 seconds
Press the “On/Off” button button more than 2 seconds
unit will not power on
Battery voltage is too low
Recharge the unit for 24 hours
UPS fault
Contact Belkin Technical Support at [email protected]
Power cord loose
Re-plug the power cord
AC breaker is tripped
Reset the breaker
Power disturbances have occurred
Normal operations
Battery is not fully charged
Recharge the unit for 24 hours
unit is overloaded
Remove unnecessary power loads (devices
UPS fault
Contact Belkin Technical Support at [email protected]
unit always on battery mode
Backup time is very short
3- UK
Imoprtant safety instructions
Please read the following information carefully and save this manual for future reference. Disregard of these safety notes may endanger
life or health, as well as the function of the equipment and the safety of your data.
• Do not connect this product to another battery backup, power board, surge protector, extension cord or double adapter.
• Risk of Electric Shock. Heatsinks are live. Disconnect unit before servicing.
• Risk of Electric Shock. This unit receives power from more than one source.
Disconnection of AC sources and the DC source is required to de-energise this unit before servicing.
• Risk of Electric Shock. Hazardous live parts inside this unit are energised from the battery supply even when the power cord is
connected.
• Risk of Electric Shock. Do not remove cover. No user serviceable parts inside.
Refer servicing to qualified service personnel.
• The sum of the leakage current of the UPS and the connected equipment should not exceed 3.5mA.
• Do not dispose of batteries in a fire as they may explode.
• Do not open or damage the battery. Released electrolyte is harmful to the skin and eyes. It may be toxic.
• Do not let liquids and/or other foreign bodies into the UPS.
• A battery can present a risk of electric shock and high short circuit current.
The following precaution should be observed when working on batteries:
- Remove watches, rings or other metal objects from the handles
- Use tools with insulated handles
- Wear rubber gloves and boots
- Do not lay tools or metal parts on top of the batteries
- Disconnect charging source prior to connecting or disconnecting batteries terminal.
• Servicing of batteries should be performed or supervised by personnel knowledgeable about batteries and required precautions.
• When replacing batteries, use the same type and number of batteries or batter packs.
• The mains socket t that supplies the UPS shall be installed near the UPS and shall be easily accessible . When the UPS power cord
must be connected to an earthed mains socket for safety reasons.
• The maximum ambient temperature rating is 40 C˚
4- UK
Battery Backup with
Surge Protection
Belkin Tech Support
+44 (0) 1933 352000
Europe: www.belkin.com/support
Belkin Ltd.
Express Business Park
Shipton Way, Rushden
NN10 6GL, United Kingdom
+44 (0) 1933 35 2000
+44 (0) 1933 31 2000 fax
Belkin SAS
130 rue de Silly
92100 Boulogne-Billancourt,
France
+33 (0) 1 41 03 14 40
+33 (0) 1 41 31 01 72 fax
Belkin GmbH
Hanebergstrasse 2
80637 Munich
Germany
+49 (0) 89 143405 0
+49 (0) 89 143405 100 fax
Belkin Iberia
C/ Anabel Segura, 10 planta baja, Of. 2
28108, Alcobendas, Madrid
Spain
+34 91 791 23 00
+34 91 490 23 35 fax
Belkin Italy & Greece
Via Carducci, 7
Milano 20123
Italy
+39 02 862 719
+39 02 862 719 fax
Belkin B.V.
Boeing Avenue 333
1119 PH Schiphol-Rijk,
Netherlands
+31 (0) 20 654 7300
+31 (0) 20 654 7349 fax
© 2007 Belkin International, Inc. All rights reserved. All trade names are registered trademarks of respective manufacturers listed. Mac, Mac
OS, Apple, and AirPort are trademarks of Apple Inc., registered in the U.S. and other countries. Windows, NT, Microsoft, and Windows Vista
are either registered trademarks or trademarks of Microsoft Corporation in the United States and/or other countries.
P73996uk