1
Personal Call Manager User Guide
BCM
Business Communications Manager
Document Status: Standard
Document Version: 04.01
Document Number: NN40010-104
Date: August 2008
Copyright © Nortel Networks 2005–2008
All rights reserved.
The information in this document is subject to change without notice. The statements, configurations, technical data, and
recommendations in this document are believed to be accurate and reliable, but are presented without express or implied
warranty. Users must take full responsibility for their applications of any products specified in this document. The
information in this document is proprietary to Nortel Networks.
Trademarks
Nortel, Nortel (Logo), the Globemark, and This is the way, This is Nortel (Design mark) are trademarks of Nortel
Networks.
Microsoft, MS, MS-DOS, Windows, and Windows NT are registered trademarks of Microsoft Corporation.
All other trademarks and registered trademarks are the property of their respective owners.
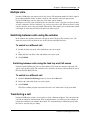
Task list
3
Task list
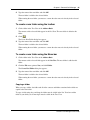
To install Personal Call Manager on a BCM50, BCM450
or a BCM running version 4.0........................................................................................18
To install Personal Call Manager on a BCM running versions 3.5, 3.6, or 3.7 ..............19
To start Personal Call Manager from the shortcut icon .................................................20
To start Personal Call Manager using the Start button..................................................20
To display the toolbar ....................................................................................................23
To display the Address Book.........................................................................................24
To display the Current Calls ..........................................................................................24
To display the Status bar...............................................................................................26
To choose a line ............................................................................................................27
To access dialing properties ..........................................................................................28
To create a new location ...............................................................................................30
To select a location........................................................................................................31
To delete a location .......................................................................................................31
To select a country ........................................................................................................31
To enter an area code ...................................................................................................32
To set the prefixes that are long distance......................................................................33
To add a prefix that is considered long distance ...........................................................33
To delete a prefix that is considered long distance .......................................................34
To add a prefix that is considered local .........................................................................34
To delete a prefix that is considered local .....................................................................34
To stop using a calling card ...........................................................................................34
To set up a calling card .................................................................................................34
To add a custom calling card.........................................................................................36
To enter the numbers required to disable call waiting: ..................................................36
To change the outside line access numbers .................................................................37
To define toll prefixes ....................................................................................................37
To make a call using the right mouse button: ................................................................39
To make a call using the drag-and-drop feature............................................................39
To call the prime telephone number using the Address Book .......................................39
To place a call ...............................................................................................................40
To place a call using the toolbar ....................................................................................41
To redial one of the last ten telephone numbers ...........................................................42
To return a call...............................................................................................................42
To call a number from the Quick Dial list using the Address Book ................................43
To call a number from the Quick Dial list using the PCM task tray or Calls menu ........43
To answer a call using the You Have a New Call dialog box ........................................45
To answer the call from the window ..............................................................................45
To answer a call from the task tray or Calls menu ........................................................45
To display the Notes tab ...............................................................................................46
To put a call on hold using the window..........................................................................46
To put a call on hold using the task tray or Calls menu .................................................46
To answer a held call using the window ........................................................................46
To answer a held call using the task tray or Calls menu ...............................................46
To switch to a different call ............................................................................................47
To switch to a different call ............................................................................................47
To transfer a call using the window ...............................................................................48
To transfer a call using the right mouse button .............................................................48
To transfer a call using the task tray or Calls menu ......................................................50
Personal Call Manager User Guide
4
Task list
To transfer a call using the keyboard ............................................................................51
To transfer a call with an announcement using the window ..........................................52
To transfer a call with an announcement using the right mouse button ........................52
To transfer a call with an announcement using the task tray or Calls menu .................52
To create a conference call using the Conference pane ...............................................53
To create a conference call using the Calls pane..........................................................54
To create a conference call using the task tray or Calls menu ......................................54
To put the conference calls on hold using the window ..................................................55
To put conference calls on hold using the task tray or Calls menu ...............................55
To restore a held conference call using the window......................................................55
To restore a held conference call using the task tray or Calls menu .............................55
To split a conference call using the window ..................................................................56
To split a conference call using the icons in the window ...............................................56
To split a conference call using the task tray or Calls menu .........................................56
To end a conference call using the release button........................................................57
To end a conference call using the window...................................................................57
To end a conference call using the keyboard ................................................................57
To end a conference call using the task tray or Calls menu ..........................................57
To end a call using the release button...........................................................................58
To end a call using the window .....................................................................................58
To end a call using the task tray or Calls menu.............................................................58
To end a call using the keyboard...................................................................................58
To turn DND on or off ....................................................................................................59
To call forward your telephone ......................................................................................59
To view the Calls Log ....................................................................................................60
To view the Incoming Calls............................................................................................61
To view the Outgoing Calls............................................................................................61
To update the Calls Log ................................................................................................62
To make a call from the Calls log ..................................................................................62
To print the Calls Log information..................................................................................63
To delete a call from the Calls Log...............................................................................63
To close the Calls Log Window ....................................................................................63
To view the Address Book in large icons.......................................................................65
To view in the Address Book in small icons ..................................................................65
To view in List View .......................................................................................................65
To view in Details View..................................................................................................66
To add a contact using the toolbar ................................................................................66
To add a contact using the right mouse button .............................................................66
To add a contact using the Menu bar ............................................................................67
To add or change the voice announcement for this contact ..........................................70
To add or change the bitmap image ..............................................................................71
To remove the image file ...............................................................................................71
To add a caller...............................................................................................................72
To find a contact ............................................................................................................74
To find a contact ............................................................................................................75
To change the properties of a contact using the right mouse button.............................76
To change the properties of a contact using the toolbar ...............................................77
To change the properties of a contact using the Menu bar ...........................................78
To copy a contact using drag-and-drop .........................................................................79
To copy a contact using the toolbar...............................................................................80
To copy a contact using the right mouse button ............................................................80
To copy a contact using the Menu bar ..........................................................................80
NN40010-104
Task list
5
To copy a contact using the right mouse button ............................................................81
To copy a contact using the Menu bar ..........................................................................81
To move a contact using drag-and-drop........................................................................81
To move a contact using the toolbar .............................................................................82
To move a contact using the right mouse button...........................................................82
To move a contact using the Menu bar .........................................................................82
To delete a contact using the right mouse button..........................................................83
To delete a contact using the Menu bar ........................................................................83
To delete a contact using the keyboard.........................................................................83
To print a contact list .....................................................................................................83
To print a contact list for all of the contacts in a folder ..................................................84
To print contact details ..................................................................................................84
To create a new folder using the right mouse button ....................................................84
To create a new folder using the toolbar .......................................................................85
To create a new folder using the Menu bar ...................................................................85
To copy a folder.............................................................................................................86
To copy a folder using the right mouse button ..............................................................86
To copy a folder using the toolbar .................................................................................86
To copy a folder using the Menu bar .............................................................................86
To move a folder............................................................................................................87
To move a folder using the toolbar ................................................................................87
To move a folder using the right mouse button .............................................................87
To move a folder using the Menu bar ............................................................................87
To change the name of a folder using the right mouse button ......................................88
To change the name of a folder using the toolbar .........................................................88
To change the name of a folder using the Menu bar.....................................................88
To delete a folder using the right mouse button ............................................................88
To delete a folder using the Menu bar...........................................................................89
To import addresses......................................................................................................89
To export contacts .........................................................................................................91
To access the About Personal Call Manager window ................................................92
To access the Help window ...........................................................................................93
To display the Tip of the Day window ..........................................................................93
To turn the off Tip of the Day.........................................................................................94
To turn the on Tip of the Day.........................................................................................94
To change the Search mode from the Menu bar...........................................................95
To change the Search mode from the task tray ............................................................95
To change the Startup Option from the Menu bar .........................................................96
To change the Startup Option from the task tray...........................................................96
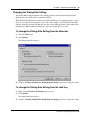
To change the Dialing Rule Setting from the Menu bar.................................................97
To change the Dialing Rule Setting from the task tray ..................................................97
To change Caller’s Record Display Setting from the Menu bar.....................................98
To change the Dialing Rule Setting from the task tray ..................................................99
To quit Personal Call Manager using the task tray ........................................................99
To quit Personal Call Manager using the window .........................................................99
To remove the Personal Call Manager software .........................................................100
Personal Call Manager User Guide
6
Task list
NN40010-104
7
Contents
Task list. . . . . . . . . . . . . . . . . . . . . . . . . . . . . . . . . . . . . . . . . . . . . . . . . . . . . . . 3
How to get help . . . . . . . . . . . . . . . . . . . . . . . . . . . . . . . . . . . . . . . . . . . . . . . 11
Chapter 1
Getting started with Personal Call Manager . . . . . . . . . . . . . . . . . . . . . . . . 13
About Personal Call Manager . . . . . . . . . . . . . . . . . . . . . . . . . . . . . . . . . . . . . . . . . . . 13
Audience . . . . . . . . . . . . . . . . . . . . . . . . . . . . . . . . . . . . . . . . . . . . . . . . . . . . . . . . . . . 13
Acronyms . . . . . . . . . . . . . . . . . . . . . . . . . . . . . . . . . . . . . . . . . . . . . . . . . . . . . . . . . . . 14
Symbols and text conventions . . . . . . . . . . . . . . . . . . . . . . . . . . . . . . . . . . . . . . . . . . . 15
Related publications . . . . . . . . . . . . . . . . . . . . . . . . . . . . . . . . . . . . . . . . . . . . . . . . . . 16
Chapter 2
Personal Call Manager. . . . . . . . . . . . . . . . . . . . . . . . . . . . . . . . . . . . . . . . . . 17
Before you start . . . . . . . . . . . . . . . . . . . . . . . . . . . . . . . . . . . . . . . . . . . . . . . . . . . . . . 17
Using a handsfree telephone with Personal Call Manager . . . . . . . . . . . . . . . . . . . . . 18
Installing Personal Call Manager . . . . . . . . . . . . . . . . . . . . . . . . . . . . . . . . . . . . . . . . . 18
Starting Personal Call Manager . . . . . . . . . . . . . . . . . . . . . . . . . . . . . . . . . . . . . . . . . . 19
Personal Call Manager icons . . . . . . . . . . . . . . . . . . . . . . . . . . . . . . . . . . . . . . . . . . . . 20
Personal Call Manager task tray icon . . . . . . . . . . . . . . . . . . . . . . . . . . . . . . . . . . 20
Personal Call Manager task tray menu . . . . . . . . . . . . . . . . . . . . . . . . . . . . . . . . . 21
Personal Call Manager window . . . . . . . . . . . . . . . . . . . . . . . . . . . . . . . . . . . . . . . . . . 21
Opening the window . . . . . . . . . . . . . . . . . . . . . . . . . . . . . . . . . . . . . . . . . . . . . . . 21
Components of the window . . . . . . . . . . . . . . . . . . . . . . . . . . . . . . . . . . . . . . . . . . 22
Address Book . . . . . . . . . . . . . . . . . . . . . . . . . . . . . . . . . . . . . . . . . . . . . . . . . . . . . . . 24
Current Calls . . . . . . . . . . . . . . . . . . . . . . . . . . . . . . . . . . . . . . . . . . . . . . . . . . . . . . . . 24
Status bar . . . . . . . . . . . . . . . . . . . . . . . . . . . . . . . . . . . . . . . . . . . . . . . . . . . . . . . 25
Closing the window . . . . . . . . . . . . . . . . . . . . . . . . . . . . . . . . . . . . . . . . . . . . . . . . 26
Setting up Personal Call Manager . . . . . . . . . . . . . . . . . . . . . . . . . . . . . . . . . . . . . . . . 26
Defining the line used . . . . . . . . . . . . . . . . . . . . . . . . . . . . . . . . . . . . . . . . . . . . . . 26
Changing the dialing properties . . . . . . . . . . . . . . . . . . . . . . . . . . . . . . . . . . . . . . 27
Location name . . . . . . . . . . . . . . . . . . . . . . . . . . . . . . . . . . . . . . . . . . . . . . . . . . . . 30
Country/region . . . . . . . . . . . . . . . . . . . . . . . . . . . . . . . . . . . . . . . . . . . . . . . . . . . . 31
Setting up a calling card . . . . . . . . . . . . . . . . . . . . . . . . . . . . . . . . . . . . . . . . . . . . 34
Adding a custom calling card . . . . . . . . . . . . . . . . . . . . . . . . . . . . . . . . . . . . . . . . 35
Defining long distance numbers in your area code . . . . . . . . . . . . . . . . . . . . . . . . 37
Placing a call . . . . . . . . . . . . . . . . . . . . . . . . . . . . . . . . . . . . . . . . . . . . . . . . . . . . . . . . 38
Placing a call using the Address Book . . . . . . . . . . . . . . . . . . . . . . . . . . . . . . . . . 39
Placing a call using the task tray or Calls menu . . . . . . . . . . . . . . . . . . . . . . . . . . 40
Personal Call Manager User Guide
8
Contents
Placing a call using the toolbar . . . . . . . . . . . . . . . . . . . . . . . . . . . . . . . . . . . . . . . 41
Redialing a number . . . . . . . . . . . . . . . . . . . . . . . . . . . . . . . . . . . . . . . . . . . . . . . . 42
Returning a call . . . . . . . . . . . . . . . . . . . . . . . . . . . . . . . . . . . . . . . . . . . . . . . . . . . 42
Calling from the Quick Dial list . . . . . . . . . . . . . . . . . . . . . . . . . . . . . . . . . . . . . . . 42
Answering a call . . . . . . . . . . . . . . . . . . . . . . . . . . . . . . . . . . . . . . . . . . . . . . . . . . . . . 43
Knowing when someone is calling . . . . . . . . . . . . . . . . . . . . . . . . . . . . . . . . . . . . 43
Knowing who is calling . . . . . . . . . . . . . . . . . . . . . . . . . . . . . . . . . . . . . . . . . . . . . 43
Answering a call using the You Have a New Call dialog box . . . . . . . . . . . . . . . . . . . 44
Accessing the Notes tab . . . . . . . . . . . . . . . . . . . . . . . . . . . . . . . . . . . . . . . . . . . . 45
Putting a call on hold . . . . . . . . . . . . . . . . . . . . . . . . . . . . . . . . . . . . . . . . . . . . . . . . . . 46
Multiple calls . . . . . . . . . . . . . . . . . . . . . . . . . . . . . . . . . . . . . . . . . . . . . . . . . . . . . . . . 47
Switching between calls using the window . . . . . . . . . . . . . . . . . . . . . . . . . . . . . . . . . 47
Switching between calls using the task tray and Call menus . . . . . . . . . . . . . . . . 47
Transferring a call . . . . . . . . . . . . . . . . . . . . . . . . . . . . . . . . . . . . . . . . . . . . . . . . . . . . 47
Transferring a call without an announcement . . . . . . . . . . . . . . . . . . . . . . . . . . . . . . . 48
Transferring a call with an announcement . . . . . . . . . . . . . . . . . . . . . . . . . . . . . . 51
Conference calls . . . . . . . . . . . . . . . . . . . . . . . . . . . . . . . . . . . . . . . . . . . . . . . . . . . . . 53
Creating a conference call . . . . . . . . . . . . . . . . . . . . . . . . . . . . . . . . . . . . . . . . . . 53
Putting conference calls on hold . . . . . . . . . . . . . . . . . . . . . . . . . . . . . . . . . . . . . . 55
Taking a conference call off hold . . . . . . . . . . . . . . . . . . . . . . . . . . . . . . . . . . . . . 55
Splitting a conference call . . . . . . . . . . . . . . . . . . . . . . . . . . . . . . . . . . . . . . . . . . . 56
Ending a conference call . . . . . . . . . . . . . . . . . . . . . . . . . . . . . . . . . . . . . . . . . . . . 57
Ending a call . . . . . . . . . . . . . . . . . . . . . . . . . . . . . . . . . . . . . . . . . . . . . . . . . . . . . . . . 58
Calling features . . . . . . . . . . . . . . . . . . . . . . . . . . . . . . . . . . . . . . . . . . . . . . . . . . . . . . 58
Do Not Disturb (DND) . . . . . . . . . . . . . . . . . . . . . . . . . . . . . . . . . . . . . . . . . . . . . . 59
Call Forward . . . . . . . . . . . . . . . . . . . . . . . . . . . . . . . . . . . . . . . . . . . . . . . . . . . . . 59
Calls Log window . . . . . . . . . . . . . . . . . . . . . . . . . . . . . . . . . . . . . . . . . . . . . . . . . . . . . 60
Updating the Calls log . . . . . . . . . . . . . . . . . . . . . . . . . . . . . . . . . . . . . . . . . . . . . . 62
Sorting the Calls Log . . . . . . . . . . . . . . . . . . . . . . . . . . . . . . . . . . . . . . . . . . . . . . . 62
Making a call from the Calls Log . . . . . . . . . . . . . . . . . . . . . . . . . . . . . . . . . . . . . . 62
Printing call information from the Calls Log . . . . . . . . . . . . . . . . . . . . . . . . . . . . . . 63
Deleting calls from the Calls Log . . . . . . . . . . . . . . . . . . . . . . . . . . . . . . . . . . . . . . 63
Closing the Calls Log Window . . . . . . . . . . . . . . . . . . . . . . . . . . . . . . . . . . . . . . . 63
Address Book . . . . . . . . . . . . . . . . . . . . . . . . . . . . . . . . . . . . . . . . . . . . . . . . . . . . . . . 64
The Tree View of the Address Book . . . . . . . . . . . . . . . . . . . . . . . . . . . . . . . . . . . 64
List View portion of the Address Book . . . . . . . . . . . . . . . . . . . . . . . . . . . . . . . . . 65
Contacts . . . . . . . . . . . . . . . . . . . . . . . . . . . . . . . . . . . . . . . . . . . . . . . . . . . . . . . . 66
Address Properties dialog box . . . . . . . . . . . . . . . . . . . . . . . . . . . . . . . . . . . . . . . 67
Adding a caller to the Address Book . . . . . . . . . . . . . . . . . . . . . . . . . . . . . . . . . . . 72
Finding a contact in the Address Book . . . . . . . . . . . . . . . . . . . . . . . . . . . . . . . . . 73
Slow Search . . . . . . . . . . . . . . . . . . . . . . . . . . . . . . . . . . . . . . . . . . . . . . . . . . . . . 74
Organizing the Address Book . . . . . . . . . . . . . . . . . . . . . . . . . . . . . . . . . . . . . . . . 78
NN40010-104
Contents
9
Copying a contact . . . . . . . . . . . . . . . . . . . . . . . . . . . . . . . . . . . . . . . . . . . . . . . . . 78
Printing Contacts . . . . . . . . . . . . . . . . . . . . . . . . . . . . . . . . . . . . . . . . . . . . . . . . . . 83
Folders . . . . . . . . . . . . . . . . . . . . . . . . . . . . . . . . . . . . . . . . . . . . . . . . . . . . . . . . . 84
Quick Dials . . . . . . . . . . . . . . . . . . . . . . . . . . . . . . . . . . . . . . . . . . . . . . . . . . . . . . . . . 92
Adding Quick Dials . . . . . . . . . . . . . . . . . . . . . . . . . . . . . . . . . . . . . . . . . . . . . . . . 92
Displaying the information about Personal Call Manager . . . . . . . . . . . . . . . . . . . . . . 92
Synchronization with the telephone . . . . . . . . . . . . . . . . . . . . . . . . . . . . . . . . . . . . . . . 93
Accessing Help . . . . . . . . . . . . . . . . . . . . . . . . . . . . . . . . . . . . . . . . . . . . . . . . . . . . . . 93
Accessing context-sensitive Help . . . . . . . . . . . . . . . . . . . . . . . . . . . . . . . . . . . . . 93
Opening the Help contents window . . . . . . . . . . . . . . . . . . . . . . . . . . . . . . . . . . . . 93
Accessing the Tip of the Day . . . . . . . . . . . . . . . . . . . . . . . . . . . . . . . . . . . . . . . . 93
Personal Call Manager preferences . . . . . . . . . . . . . . . . . . . . . . . . . . . . . . . . . . . . . . 94
Changing the Search preferences . . . . . . . . . . . . . . . . . . . . . . . . . . . . . . . . . . . . . . . . 94
Changing the Startup Option . . . . . . . . . . . . . . . . . . . . . . . . . . . . . . . . . . . . . . . . . 96
Changing the Dialing Rule Setting . . . . . . . . . . . . . . . . . . . . . . . . . . . . . . . . . . . . 97
Changing the Caller’s Record Display Setting . . . . . . . . . . . . . . . . . . . . . . . . . . . 98
Quitting Personal Call Manager . . . . . . . . . . . . . . . . . . . . . . . . . . . . . . . . . . . . . . . . . . 99
Removing Personal Call Manager . . . . . . . . . . . . . . . . . . . . . . . . . . . . . . . . . . . . . . . . 99
Glossary . . . . . . . . . . . . . . . . . . . . . . . . . . . . . . . . . . . . . . . . . . . . . . . . . . . . 101
Index . . . . . . . . . . . . . . . . . . . . . . . . . . . . . . . . . . . . . . . . . . . . . . . . . . . . . . . 103
Personal Call Manager User Guide
10
Contents
NN40010-104
11
How to get help
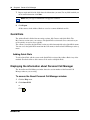
This section explains how to get help for Nortel products and services.
Getting Help from the Nortel Web site
The best way to get technical support for Nortel products is from the Nortel Technical Support
Web site:
http://www.nortel.com/support
This site provides quick access to software, documentation, bulletins, and tools to address issues
with Nortel products. More specifically, the site enables you to:
•
download software, documentation, and product bulletins
•
search the Technical Support Web site and the Nortel Knowledge Base for answers to
technical issues
•
sign up for automatic notification of new software and documentation for Nortel equipment
•
open and manage technical support cases
Getting Help over the phone from a Nortel Solutions Center
If you don’t find the information you require on the Nortel Technical Support Web site, and have a
Nortel support contract, you can also get help over the phone from a Nortel Solutions Center.
In North America, call 1-800-4NORTEL (1-800-466-7835).
Outside North America, go to the following Web site to obtain the phone number for your region:
http://www.nortel.com/callus
Getting Help from a specialist by using an Express Routing Code
To access some Nortel Technical Solutions Centers, you can use an Express Routing Code (ERC)
to quickly route your call to a specialist in your Nortel product or service. To locate the ERC for
your product or service, go to:
http://www.nortel.com/erc
Getting Help through a Nortel distributor or reseller
If you purchased a service contract for your Nortel product from a distributor or authorized
reseller, contact the technical support staff for that distributor or reseller.
Personal Call Manager User Guide
12
How to get help
NN40010-104
13
Chapter 1
Getting started with Personal Call Manager
This section contains information on the following topics:
•
•
•
•
•
“About Personal Call Manager” on page 13
“Audience” on page 13
“Acronyms” on page 14
“Symbols and text conventions” on page 15
“Related publications” on page 16
About Personal Call Manager
Business Communications Manager (BCM) Personal Call Manager is a Telephony Application
Programming Interface (TAPI)-based application that provides an easy-to-use interface between
your computer and your telephone. You can use the telephone to speak with a caller. You can
customize your Address Book and your calls. Basic functions that Personal Call Manager
performs include:
•
•
•
•
making and answering calls
putting calls on hold
transferring calls
making conference calls
Audience
This guide is intended for users who want to manage their own calls and who have Personal Call
Manager installed on their PC. Your PC must be registered with the BCM server. This guide
assumes that you have the following background:
•
•
working knowledge of the Windows operating system
some experience with windows-based systems or graphical user interfaces (GUI)
Personal Call Manager User Guide
14
Chapter 1 Getting started with Personal Call Manager
Acronyms
This guide uses the following acronyms:
API
Application Programming Interface
CLID
Calling Line Identification
CTE
Computer Telephony Engine
CTI
Computer Telephony Integration
DND
Do Not Disturb
ERC
Express Routing Code
IP
Internet Protocol
O/S
Operating System
PCM
Personal Call Manager
PIN
Personal Identification Number
TAPI
Telephony Application Programming Interface
TSP
TAPI Service Provider
URL
Uniform Resource Locator
NN40010-104
Chapter 1 Getting started with Personal Call Manager
15
Symbols and text conventions
These symbols are used to highlight critical information for the [Product Name (short)] system:
Caution: Alerts you to conditions where you can damage the equipment.
Danger: Alerts you to conditions where you can get an electrical shock.
Warning: Alerts you to conditions where you can cause the system to fail or work
improperly.
Note: A Note alerts you to important information.
Tip: Alerts you to additional information that can help you perform a task.
!
Security note: Indicates a point of system security where a default should be changed,
or where the administrator needs to make a decision about the level of security required
for the system.
Warning: Alerts you to ground yourself with an antistatic grounding
strap before performing the maintenance procedure.
Warning: Alerts you to remove the [Product Name (short)] main unit
and expansion unit power cords from the ac outlet before performing any
maintenance procedure.
Personal Call Manager User Guide
16
Chapter 1 Getting started with Personal Call Manager
These conventions and symbols are used to represent the Business Series Terminal display and
dialpad.
Convention
Example
Used for
Word in a special font (shown in
the top line of the display)
Pswd:
Command line prompts on display telephones.
Underlined word in capital letters
(shown in the bottom line of a two
line display telephone)
PLAY
Display option. Available on Enterprise Edge 7310
and 7324 telephones. Press the button directly
below the option on the display to proceed.
£
you press on the to select a particular option.
These text conventions are used in this guide to indicate the information described:
Convention
Description
bold Courier
text
Indicates command names and options and text that you need to enter.
Example: Use the info command.
Example: Enter show ip {alerts|routes}.
italic text
Indicates book titles
plain Courier
text
Indicates command syntax and system output (for example, prompts
and system messages).
Example: Set Trap Monitor Filters
FEATURE
HOLD
RELEASE
Indicates that you press the button with the coordinating icon on
whichever set you are using.
separator ( > )
Shows menu paths.
Example: Protocols > IP identifies the IP option on the Protocols
menu.
Related publications
Related publications are listed below. To locate specific information, you can refer to the
Master Index of your product documentation suite.
LAN CTE Configuration Guide (NN40010-601)
NN40010-104
17
Chapter 2
Personal Call Manager
BCM Personal Call Manager is a TAPI-based application that provides an easy-to-use computer
interface for your telephone.
With Personal Call Manager you can:
•
•
•
•
•
•
•
•
•
•
make calls
redial telephone numbers
return calls
answer calls
put calls on and take calls off hold
manage multiple calls
transfer calls
conference calls
activate and de-activate Do Not Disturb
forward calls
Personal Call Manager also has an address book that enables you to store the names, addresses,
and telephone numbers of your contacts on your computer, where they are easy to find and use.
Note: Personal Call Manager provides several ways to perform each task. Although this
document describes all of the possible methods, you only need to use one of the methods
to perform the task.
Before you start
You must install the Nortel Local Area Network Computer Telephony Engine (LAN CTE) client
on your computer before you can use Personal Call Manager. Your system administrator must
configure the BCM to provide access for your computer and you must have a LAN CTE seat
license to run Personal Call Manager. Refer to LAN CTE Configuration Guide (NN40010-601) for
instructions on how to install the LAN CTE client.
Personal Call Manager is not supported on the 64-bit version of Windows Vista Business,
Windows Vista Ultimate, Windows Vista Enterprise, or Windows XP operating systems.
Personal Call Manager User Guide
18
Chapter 2 Personal Call Manager
Using a handsfree telephone with Personal Call Manager
Personal Call Manager is a tool designed to accompany your telephone. Personal Call Manager
provides tools to make processing calls easier, but you must still use your telephone to speak with
the caller. It is recommended that you use a telephone equipped with a handsfree function. When
you use a handsfree telephone, you can perform all of the Personal Call Manager functions without
lifting the telephone handset.
Installing Personal Call Manager
Personal Call Manager must be installed on your computer before you can use it. The files
required to install Personal Call Manager are on the BCM base unit. Use one of the following
installation procedures for the appropriate BCM version you are running.
Personal Call Manager has the same functionality on the BCM450 platform as it does on the
BCM50 or 200/400 4.0 platforms.
To install Personal Call Manager on a BCM50, BCM450
or a BCM running version 4.0
1
Exit any Windows programs that are running.
2
Start a browser session, and connect to the BCM web page.
To access the BCM web page, enter http://<bcmip>, where <bcmip> is the IP address of your
BCM.
The BCM Login dialog box appears.
3
Enter your username and password, and click OK.
The Welcome to BCM page appears.
4
Click User Applications.
The User Applications page appears.
5
Click Personal Call Manager.
The Personal Call Manager download page appears.
6
Click Download Personal Call Manager.
The File Download dialog box appears.
7
Click Save and save the application to the location from which you want to install it.
8
After the application downloads, double-click the application to launch the installation.
9
Follow the instructions in the installation wizard.
10 Restart your computer after the installation is complete.
If you do not restart your computer, you cannot assign a TAPI line or define the dialing
properties for that line.
After a reboot, you can only select the lines that the administrator configured for you. If you
NN40010-104
Chapter 2 Personal Call Manager
19
reboot before the administrator configuration is complete, you will have to reboot to see the
configured lines.
To install Personal Call Manager on a BCM running versions 3.5,
3.6, or 3.7
1
Exit any Windows programs that are running.
2
From the Unified Manager front page, click Install Client.
The Client Install Application page appears.
3
Click Personal Call Manager.
The Personal Call Manager page appears.
4
Click Install Personal Call Manager.
A file download window appears.
5
Select Save this program to disk, and click OK.
The Save As dialog box appears.
6
Choose a location to which to save this file and click Save.
The file begins downloading.
7
When the file is finished downloading, double-click the file.
The install application begins.
8
Follow the on-screen instructions.
Note: The installation files for Personal Call Manager are not deleted by the installation
wizard. These files are stored in a folder named
C:\Program Files\Nortel\ClientInstall\Personnal Call Manager.
You can delete the installation files; they are not needed by Personal Call Manager.
Starting Personal Call Manager
You can start Personal Call Manager from the shortcut icon on the desktop, or from the Windows
Start button.
Personal Call Manager User Guide
20
Chapter 2 Personal Call Manager
To start Personal Call Manager from the shortcut icon
1
Double-click on the Personal Call Manager shortcut icon
.
To start Personal Call Manager using the Start button
1
Click the Start button,
2
Follow the Programs > Nortel >Personal Call Manager > Personal Call Manager menu
path.
The Personal Call Manager introduction window appears briefly. The Personal Call Manager icon
is added to the task tray and task bar, and the Personal Call Manager window opens.
Note: When you install Personal Call Manager, the shortcut icon is installed by default.
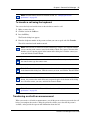
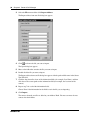
Personal Call Manager icons
When Personal Call Manager starts up, two icons are added to the screen: the taskbar icon and the
task tray icon. These two icons have different tasks. The taskbar icon opens the Personal Call
Manager window. The task tray icon gives you access to Personal Call Manager functions when
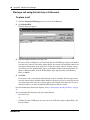
you are using another program. The he following figure shows where these icons are located.
Taskbar icon
Task tray icon
Personal Call Manager task tray icon
The Personal Call Manager icon
appears on the right side of the task tray.
When you move the mouse pointer over the Personal Call Manager icon, the number of current
calls is displayed. The number displayed includes active calls, conference calls, and calls on hold.
When you right-click on the Personal Call Manager icon, a menu appears. Use this menu to exit
Personal Call Manager, set Personal Call Manager options, or open the Personal Call Manager
window. The Personal Call Manager window provides access to additional features, such as the
Address Book.
When you click on the Personal Call Manager icon, the task tray menu, appears. From the task tray
menu you can perform most basic call functions, such as making and answering calls, putting calls
on hold, transferring calls, and conferencing calls.
NN40010-104
Chapter 2 Personal Call Manager
21
Personal Call Manager task tray menu
The Personal Call Manager task tray menu is divided into two main sections. The lower portion of
the menu contains the following call control options:
•
•
•
•
•
•
Callers List: lists the telephone numbers of the last ten incoming calls
Redial List: lists the telephone numbers of the last ten outgoing calls you dialed
Quick Dials: lists telephone numbers to which you want quick access
Transfer: allows you to transfer the active call to another telephone
Manual Dial: allows you to call someone by entering their telephone number on the computer
keyboard
DND: turns on or off the Do Not Disturb feature
The upper portion of the menu contains the current calls. Each of these calls has an icon beside it
to indicate the status of the call. If there are currently no calls, the upper portion of the menu does
not appear.
Active Call
Appears beside the call on which you are currently.
Held Call
Appears beside calls that are on hold. Any call that is not
active is on hold.
Conference Call
Appears beside the two calls to which you are connected
when you are on a conference call.
Held Conference
Appears beside conference calls that are on hold.
Ringing
Appears beside calls that are ringing.
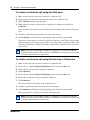
Personal Call Manager window
From the Personal Call Manager window, you can perform all of the functions of the Personal Call
Manager task tray icon, as well as access the Address Book, the Help files, and Personal Call
Manager setup.
Opening the window
When you start Personal Call Manager, the window appears. If you do not want the window to
appear when you start Personal Call Manager, refer to “Changing the Startup Option” on page 96.
When you change this option, the window is minimized to an icon on the taskbar when you start
Personal Call Manager. You also can minimize the window at anytime by clicking the minimize
button in the top right corner of the window.
To maximize the window:
•
click the Personal Call Manager icon in the taskbar
or
•
right-click the Personal Call Manager icon in the task tray, and select Open
Personal Call Manager User Guide
22
Chapter 2 Personal Call Manager
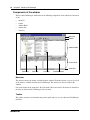
Components of the window
The Personal Call Manager window shows the following components, all of which you can turn on
or off:
•
•
•
•
•
menu bar
toolbar
Address Book
current calls
status bar
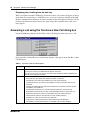
Menu Bar
Toolbar
Address Book
Current Calls
Status Bar
Tree View
Calls box
List View
Conference box
Menu bar
The menu bar shows the menus available from the window. From these menus, you can access all
of the features available from Personal Call Manager. The menu bar is always visible in the
window.
One of the menus on the menu bar is the Calls menu. The items on the Calls menu are identical to
the items on the Personal Call Manager task tray menu.
Toolbar
The toolbar contains several buttons that provide quick and easy access to Personal Call Manager
functions.
NN40010-104
Chapter 2 Personal Call Manager
23
To display the toolbar
1
Click the View menu
2
Click Toolbar.
The toolbar toggles between being displayed and not being displayed. When the toolbar is set
to be displayed, 4 appears beside the Toolbar menu item in the View menu.
Using the toolbar
The toolbar buttons provide access to commonly used features.
Up One Level
Exits from the current directory and moves one level up in the contact
tree.
New Folder
Adds a new folder to the Address Book.
New Contact
Adds a new contact to the Address Book.
Cut
Copies the selected folder or contact onto the clipboard, and deletes
it.
Copy
Copies the selected folder or contact onto the clipboard.
Paste
Copies the folder or contact stored on the clipboard to the selected
folder.
Properties
Displays the Address Properties dialog box if a contact is selected, or
the Folder Property dialog box if a folder is selected.
Print
Prints information about the currently selected contact. If a folder is
selected, prints information about all of the contacts in the folder.
Large Icons
Displays the folders and contacts in the Address Book in large icons.
Small Icons
Displays the folders and contacts in the Address Book in small icons.
List
Displays the folders and contacts in the Address Book in small icons
organized in vertical columns.
Detail
Displays the folders and contacts in the Address Book in a report view
format. In this format, the icon, first name, last name, telephone
numbers, and e-mail information of the contact appear.
Find Person
Displays the Search dialog box. The Search dialog box is used to find
a particular contact within the Address Book.
Calls Log
Displays the Calls Log Window. This window shows all of the calls
placed or received while Personal Call Manager was operating.
About
Displays a dialog box containing information about the Personal Call
Manager software, such as the software version.
Personal Call Manager User Guide
24
Chapter 2 Personal Call Manager
Address Book
The Address Book is a list of all the contacts stored in Personal Call Manager. The Address Book
consists of two parts:
•
•
the Tree View that shows the structure of your folders
the List View that shows the folders and contacts stored in the currently selected folder
For more information about the Address Book, refer to “Address Book” on page 64.
To display the Address Book
1
Click the View menu.
2
Click Only Address Book to display only the Address Book.
or
1
Select the View menu.
2
Click Both Address Book and Calls to display both the Address Book and the Current Calls.
The symbol • appears beside the current selection.
Current Calls
The Current Calls section of the screen shows which calls are active. The Current Calls section
consists of two parts:
•
•
a calls box that shows the calls that are currently on your telephone
a conference box that shows the conference calls that are currently on your telephone
To display the Current Calls
1
Click the View menu.
2
Click Only Calls.
or
1
Click the View menu.
2
Click Both Address Book and Calls to display both the Address Book and the Current Calls.
The symbol • appears beside the current selection.
NN40010-104
Chapter 2 Personal Call Manager
25
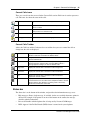
Current Calls icons
There are several icons that are used in the Current Calls section. Each icon is used to represent a
call. The icons also show the status of the calls.
Active Call
Appears beside the call on which you are currently.
Held Call
Appears beside calls that are on hold. Any call that is not
active is on hold.
Conference Call
Appears beside the two calls to which you are connected
when you are on a conference call.
Held Conference
Appears beside conference calls that are on hold.
Ringing
Appears beside calls that are ringing.
Current Calls Toolbar
Above the Calls box and the Conference box are toolbars that you use to control the calls or
change how the calls are displayed.
Manual Dial
Displays the Dial dialog box. This dialog box allows you to call the
number of someone not found in the Address Book.
Release
Hangs up the selected call. If only there is only one call, that call is
selected automatically.
Properties
Displays the Notes tab of the Address Properties dialog box for the
selected call. If the selected call is not in the Address Book, a
message appears asking if you want to add this caller.
Large Icons
Displays the current calls or conference calls in large icons.
Small Icons
Displays the current calls or conference calls in small icons.
List
Displays the current calls or conference calls in small icons
organized in vertical columns.
Detail
Displays the current calls or conference calls in a report view format.
In this format the icon, the caller’s name, telephone number, and call
duration appears. The duration is a running count of how many
minutes the call has been connected.
Status bar
The Status bar is at the bottom of the window, and provides four information message areas:
•
•
•
Help messages: Shows a help message, if available, for the area on which the mouse pointer is
directed. For example, if the pointer is on one of the buttons on the toolbar, the message
describes what the button does.
Line used: Identifies which telephone line is being used by Personal Call Manager.
DND: Appears if the Do Not Disturb (DND) feature is turned on for your telephone.
Personal Call Manager User Guide
26
Chapter 2 Personal Call Manager
•
Call Forward: Indicates that the Call Forward feature is activated, and to which number your
telephone is call forwarded.
Help messages
Line used
DND
Call Forward
To display the Status bar
1
Select the View menu.
2
Click Status Bar.
The Status bar toggles between being displayed and not being displayed. When the Status bar
is set to be displayed, 4 appears beside the Status Bar menu item.
Closing the window
To close the window, click the minimize button in the top right corner of the window. The window
is minimized to an icon on the taskbar.
When you close the window, call control features are still available from the Personal Call
Manager icon in the task tray.
Setting up Personal Call Manager
Before you can use Personal Call Manager you must choose a TAPI line and define the dialing
properties for that line.
You must restart your computer after you install Personal Call Manager. If you do not restart your
computer, you cannot assign a TAPI line or define the dialing properties for that line.
Defining the line used
If there are several lines available, you can choose which line Personal Call Manager uses to make
calls.
NN40010-104
Chapter 2 Personal Call Manager
27
To choose a line
1
Click the Tools menu
2
Click Dial Using.
The Choose a TAPI Line dialog box appears.
3
Click the TAPI Line drop-down list
4
Select the line Personal Call Manager uses.
5
Click the Address drop-down list.
6
Select the address for the line you chose.
7
Click OK.
Note: When using the BCM TSP, the name of the TAPI line is the same as the extension
name for your telephone.
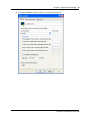
Changing the dialing properties
Note: The following description and windows are samples. The window you see
displayed can contain similar information but the presentation can vary depending on the
version of the Windows operating system you are using. Refer to the Windows
documentation that came with your system for further specifications.
Use the dialing properties to define where you are located and what information is required to dial
from your location.
Personal Call Manager User Guide
28
Chapter 2 Personal Call Manager
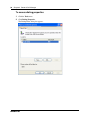
To access dialing properties
1
Click the Tools menu
2
Click Dialing Properties.
The Dialing Rules dialog box appears.
NN40010-104
Chapter 2 Personal Call Manager
3
29
Click New or Edit to add information or edit existing information.
Personal Call Manager User Guide
30
Chapter 2 Personal Call Manager
From the Dialing Properties dialog box, you can control the following options:
•
•
•
•
•
•
•
location you are dialing from (Location name)
country you are in (Country/Region)
area code you are dialing from (Area Code Rules)
calling card usage (Calling Card)
the number used to disable Call Waiting (To disable call waiting, dial)
access to lines (To access an outside line)
type of dialing system (Dial Rules)
Location name
Use the Location name to save different sets of dialing properties. You can use the Location Name
when you have a computer (such as a laptop) that you use in different locations. You can save the
settings for the different locations under different names in the Location Name field. You can then
change quickly to the new settings when you switch locations.
For example, you can have a laptop computer that you use at both north and south locations. If the
north and south locations have different dialing requirements (such as call waiting in the north, but
not in the south), you can set up two different sets of dialing properties using the Location name
setting. When you switch locations, you can change the dialing properties by changing the name
that appears in the Location name field.
Creating a new location
When you create a new location, you create the name that is used to access the new set of dialing
properties. After you create the location, any changes made to the Dialing Properties dialog box
are saved with this name.
To create a new location
1
Click the Tools menu.
2
Click on Dialing Properties.
3
Click the New button.
4
In the Location Name box, type the name of a new location.
5
Change the other parameters in the New location dialog box to match the dialing properties
required for this location.
The fields in the Dialing Properties dialog box are described later in this section.
6
Click Apply to store the changes with the new location.
NN40010-104
Chapter 2 Personal Call Manager
31
Selecting a location
When you select a location, all of the dialing properties are changed to the settings that are stored
for that location.
To select a location
1
Click the Tools menu.
2
Click on Dialing Properties.
A list of locations appears.
3
Select your current the location.
The dialing properties change to the setting stored for your current the location.
Deleting a location
When you no longer need a location, you can delete it from the list of locations.
To delete a location
1
Click the Tools menu.
2
Click on Dialing Properties.
A list of locations appears.
3
Select the location you want to delete.
4
Click Delete.
A confirm deletion message appears.
5
Click Yes.
Country/region
This drop-down list defines the country you are currently in.
To select a country
1
Click the Tools menu
2
Click Dialing Properties.
The Dialing Rules dialog box appears.
3
Click New or Edit to select a country for your location.
Personal Call Manager User Guide
32
Chapter 2 Personal Call Manager
4
Select the country in which you are currently located.
Note: You can navigate quickly through the list of countries by typing the first few letters
of the country’s name. As you type, the list finds the country that matches the letters you
type.
Area Code
The Area Code field defines the area code for your current location. Personal Call Manager uses
the number in this tab to determine if a call is local (within the same area code) or long distance.
To enter an area code
1
Click the Tools menu
2
Click Dialing Properties.
The Dialing Rules dialog box appears.
3
Select a location.
4
Click Edit.
5
In the Area Code field enter the area code.
In some locations, the area code always must be added when dialing a telephone number.
Dialing Rules
In some locations, calls within the same area code are considered long distance calls. These calls
require the country code and area code (for example, 1-403) to be added to the front of the
telephone number before they are dialed.
Use the Dialing Rules feature to define the prefixes (for example, 222-xxxx) that are long distance
calls in your area code.
NN40010-104
Chapter 2 Personal Call Manager
33
To set the prefixes that are long distance
1
Click the Tools menu
2
Click Dialing Properties.
The Dialing Rules dialog box appears.
3
Select a location.
4
Click Edit.
5
Complete the Dialing Rules fields.
To add a prefix that is considered long distance
1
Click the Tools menu
2
Click Dialing Properties.
The Dialing Rules dialog box appears.
3
Select a location.
4
Click Edit.
5
Click Area Code Rules tab.
The New Area Code Rules tab appears.
Personal Call Manager User Guide
34
Chapter 2 Personal Call Manager
6
Complete the fields.
To delete a prefix that is considered long distance
1
Click the prefix you want to delete.
2
Click Delete.
To add a prefix that is considered local
1
Click the Tools menu
2
Click Dialing Properties.
The Dialing Rules dialog box appears.
3
Select a location.
4
Click Edit.
5
Click Area Code Rules tab.
The New Area Code Rules tab appears.
6
Complete the fields.
To delete a prefix that is considered local
1
Click the prefix you want to delete.
2
Click Delete.
Using a calling card for long distance
Select the Calling Card tab if you want to use a calling card for long distance telephone numbers.
Use the Calling Card tab to define which calling card you are using.
To stop using a calling card
•
From the Calling Card tab, delete the calling card you do not want to use.
Setting up a calling card
You must set up the calling card parameters before you can use a calling card.
To set up a calling card
1
Click the Tools menu
2
Click Dialing Properties.
The Dialing Rules dialog box appears.
3
Select a location.
NN40010-104
Chapter 2 Personal Call Manager
4
Click Edit.
5
Click the Calling Card tab.
35
The Calling Card tab appears.
6
Click the drop-down list at the top of the dialog box.
7
Scroll through the list to find the calling card you are using, and then select the calling card.
8
Click Edit.
Note: If the calling card you are using is not on this list, refer to “Adding a custom calling
card” on page 35.
9
In the Account Number field, type the calling card telephone number.
10 In the Personal Identification Number field, type the calling card PIN number.
11 Click OK.
Adding a custom calling card
The dialing parameters for some calling cards are configured already in Personal Call Manager,
and appear in the list of calling cards. If the calling card you are using is not on the list of cards,
you must set up how to use your calling card.
Personal Call Manager User Guide
36
Chapter 2 Personal Call Manager
To add a custom calling card
1
Click the Tools menu
2
Click Dialing Properties.
The Dialing Rules dialog box appears.
3
Select a location.
4
Click Edit.
5
Click the Calling Card tab.
6
Click New.
The New Calling Card dialog box appears.
7
In the Calling Card Name field, type the name of the calling card.
8
In the Calling Card Phone Number box, type the calling card number.
9
In the PIN number box, type your calling card PIN number.
10 To add rules for the calling card, select the Long Distance, International or Local Calls tabs
and complete the appropriate fields
Note: Refer to the documentation that came with your calling card for the sequence of
steps that are required with your card.
11 When all of the required steps are added, click OK.
12 Click OK to return to the Dialing Properties dialog box.
Disable call waiting by dialing
If call waiting is available for the current location, use this field to define the numbers required to
disable call waiting. Your telephony application uses these numbers to disable call waiting, when
required.
To enter the numbers required to disable call waiting:
1
Select the Disable call waiting, dial: check box.
2
From the Disable call waiting, dial; drop-down list, select the appropriate disable call waiting
code.
If the appropriate code does not appear in the list, type the disable call waiting code in the
drop-down list.
To identify that call waiting is not used, clear the Disable call waiting, dial: check box.
NN40010-104
Chapter 2 Personal Call Manager
37
Accessing outside lines
There are two boxes for accessing outside lines. The first box is for the digits required to access
local numbers, and the second box is for the digits required to access long-distance lines. These
access numbers are required if you use a line pool or call routing to place calls. These numbers are
the same numbers you dial when you make an outside call from your telephone.
If you do not dial an extra number (for example, 9) when placing a call from your telephone, leave
these boxes blank.
To change the outside line access numbers
1
In the for long distance box, type the number required to access an outside line for a long
distance call.
2
In the for local box, type the number required to access an outside line for a local call.
Choosing Dial using
Use these options to choose tone dialing signals or pulse dialing signals when making a call. To
select pulse dialing, click the Pulse dial option. To select tone dialing, click the Tone dial option.
Defining long distance numbers in your area code
In some locations, calls within the same area code are considered long-distance calls. These calls
require the country code and area code (for example, 1-403) to be added in front of the telephone
number before they can be dialed.
The Toll Prefixes feature enables you to define the prefixes (for example, 222-xxxx) that are long
distance calls in your area code.
To define toll prefixes
1
Select the Tools menu.
2
Click Toll Prefixes.
The Toll Prefixes dialog box appears.
Personal Call Manager User Guide
38
Chapter 2 Personal Call Manager
3
From the list of prefixes in the Local phone numbers, select the prefix that requires an area
code added.
4
Click Add->.
5
Repeat steps 3 and 4 for each prefix that requires an area code added.
Note: If you add a prefix to the Dial first list that does not require an area code, remove it
by clicking the prefix and clicking the <-Remove button.
6
When you have finished moving all of the prefixes that require an area code, click OK.
The Toll Prefixes dialog box closes.
The Toll Prefixes feature is available only if the country you choose in the Dialing Properties
dialog box has a country code of 1. For more information about dialing properties, refer to
“Changing the dialing properties” on page 27.
Placing a call
Using Personal Call Manager, you can place a call using the Calls menu, the Personal Call
Manager task tray menu, the toolbar, or the Address Book. When you place a call, the Ringing
icon appears in the Calls box, the Personal Call Manager task tray menu, and the Calls menu.
When the call is answered, the icon changes to the Active Call icon. Both the Ringing and the
Active icons use a label to identify the call.
If you make a call using the Address Book, the name in the Address Book is used as the label for
the call.
If you manually dial the telephone number, Personal Call Manager compares the number dialed to
the numbers stored in the Address Book. If a match is found, the name from the Address Book is
used as the label. If no match is found, the number dialed is used as the label.
NN40010-104
Chapter 2 Personal Call Manager
39
Placing a call using the Address Book
Before you can call a number from the Address Book, you must add the number to the Address
Book. For more information about adding numbers to the Address Book, refer to “Adding a new
contact to the Address Book” on page 66.
To make a call using the right mouse button:
1
Look in the Address Book to find the icon of the person you want to call.
2
Right-click on the icon.
3
Select Dial.
4
Click the telephone number you want to dial for the person (for example, the contact’s
business number).
To make a call using the drag-and-drop feature
1
Look in the Address Book to find the icon of the person you want to call.
2
Use the right mouse button to drag the icon into the Calls panel.
3
Click the telephone number you want to dial (for example, the contact’s business number).
To call the prime telephone number using the Address Book
1
Look in the Address Book to find the icon of the person you want to call.
2
Make the call by double-clicking on the icon, or dragging the icon to the Calls panel.
Note: When you add a contact, you define one of the telephone numbers as the prime
number.
Personal Call Manager User Guide
40
Chapter 2 Personal Call Manager
Placing a call using the task tray or Calls menu
To place a call
1
Click the Personal Call Manager task tray icon or the Calls menu
2
Click Manual Dial.
The Dial dialog box appears.
3
Type the telephone number you want to dial.
If you have the Search Option set to Fast Search, Personal Call Manager compares the number
you enter to the contacts stored in the Address Book. Any contacts that match the numbers you
enter appear in the bottom of the dialog box. To dial one of these contacts, click the contact
you want to call. The default number appears in the Phone Number Type drop-down list. To
choose a different number, from the Phone Number Type drop-down list, select Business,
Home, or Mobile.
4
Click Dial.
If you want to call a contact in the Address Book, and you remember only the contact name,
enter the contact name in the Enter Phone Number or Name box. If you are using Fast Search,
any contacts that match the name you enter appear in the bottom of the dialog box. If you are
using Slow Search, you must click the Find Now button to find the contacts.
For more information about Search Options, refer to “Changing the Search preferences” on page
94.
You can open the Dial dialog box using two other methods:
•
Press the F3 key.
or
•
Click the Personal Call Manager task tray icon or the Calls menu, point to Quick Dials, and
then click Other.
NN40010-104
Chapter 2 Personal Call Manager
41
Placing a call using the toolbar
To place a call using the toolbar
1
Click
.
The Dial dialog box appears.
2
Enter the telephone number you want to dial.
If you have the Search Option set to Fast Search, Personal Call Manager compares the number
you enter to the contacts stored in the Address Book. Any contacts that match the number you
enter appear in the bottom of the dialog box. To dial one of these contacts, click the contact
you want to call. The default number appears in the Phone Number Type drop-down list. To
choose a different number from the Phone Number Type drop-down list, select Business,
Home, or Mobile.
3
Click Dial.
If you want to call a contact in the Address Book, and you remember only the contact name,
enter the contact name. If you are using Fast Search, any contacts that match the name you
enter appear in the bottom of the dialog box. If you are using Slow Search you must click the
Find Now button to find the contacts.
For more information about Search Options, refer to “Changing the Search preferences” on page
94.
You can open the Dial dialog box using two other methods:
•
Press the F3 key.
or
•
Click the Personal Call Manager task tray icon or the Calls menu, point to Quick Dials and
then click Other.
Personal Call Manager User Guide
42
Chapter 2 Personal Call Manager
Redialing a number
Personal Call Manager keeps a list of the last ten telephone numbers you called. The most recent
call is at the top of the list, and the oldest call is at the bottom. When there are ten calls on the list,
and you make another call, the new call is added to the top of the list, and the oldest call is deleted.
If you call a number that is on the list, the number does not appear on the list a second time. The
number is moved from its previous location to the top of the list.
To redial one of the last ten telephone numbers
1
Click the Personal Call Manager icon on the taskbar or the Calls menu
2
Click Redial List.
3
Select the number you want to redial.
Returning a call
Personal Call Manager keeps a list of the telephone numbers of the last ten people who called you.
The Callers List shows both the calls you answered and the calls you were unable to answer. You
can use this list to return the calls.
The calls on the Callers List are numbered from one to ten. Call number one is the most recent call,
and is stored at the top of the list. Call number ten is the oldest call, and is stored at the bottom of
the list. When there are ten calls on the list, and you receive another call, the new call is added to
the top of the list, and the oldest call is deleted. If you receive a call from a number that is on the
list, the number does not appear on the list twice. The number is moved from its previous location
to the top of the list.
Telephone numbers appear on the Callers List if:
•
you subscribe to a Caller ID (CLID) service.
or
•
you receive an internal call through Business Communications Manager.
To return a call
1
Click the Personal Call Manager task tray icon or the Calls menu.
2
Point to Callers List.
3
Select the number of the person you want to call.
Calling from the Quick Dial list
Before you can call a number from the Quick Dial list, you must add the number to Quick Dials.
For more information about Quick Dials, refer to “Quick Dials” on page 92.
NN40010-104
Chapter 2 Personal Call Manager
43
To call a number from the Quick Dial list using the Address Book
1
Click the Quick Dials icon in the Tree View portion of the Address Book.
The icons of all the Quick Dials appear in the List View of the Address Book.
2
Drag the icon of the contact you want to call into the Calls box.
To call a number from the Quick Dial list using the PCM task tray
or Calls menu
1
Click the Personal Call Manager task tray icon or the Calls menu.
2
Point to Quick Dials.
3
Click the icon of the person you want to call.
Answering a call
Knowing when someone is calling
Personal Call Manager notifies you when there is an incoming call. When someone calls you, the
You Have a New Call dialog box appears, and the Ringing icon appears in the Calls box, the
Personal Call Manager task tray menu and the Calls menu. If you subscribe to a Caller ID service,
or you receive an internal call through Business Communications Manager, the name or number of
the caller appears both below the icon and in the You Have a New Call dialog box.
Knowing who is calling
When a call is made or received, an icon appears in the Calls box, Calls menu, and Personal Call
Manager task tray menu. These icons are given a label to help identify who is on the call. The
information on the label depends on several factors.
If you subscribe to a Caller ID service, Personal Call Manager compares the received number to
the numbers stored in the Address Book. If a match is found, the name from the Address Book
appears with the Active Call icon. If a match is not found, the name sent with the Caller ID
information appears. If a match is not found, and a name is not sent with the Caller ID information,
the telephone number appears.
If no Caller ID information is available, or you do not subscribe to this service, the word Unknown
is used as the label.
Internal calls show the name of the contact stored in the Address Book. When there is no name for
the caller in the Address Book, the Business Communications Manager extension name appears.
Personal Call Manager User Guide
44
Chapter 2 Personal Call Manager
Displaying who is calling from the task tray
When you click the Personal Call Manager icon in the task tray, the current call appears at the top
of the menu. If you subscribe to a Caller ID service, or you are receiving an internal call through
Business Communications Manager, the name or number of the caller appears beside the icon. To
perform a function on one of the current calls, point at the name or number of the caller, and a
menu appears.
Answering a call using the You Have a New Call dialog box
Personal Call Manager displays the You Have a New Call dialog box when you receive a call.
If you subscribe to Caller ID services, information about the caller appears in the You Have a New
Call dialog box.
Table 1 You Have a New Call descriptions
Heading
Description
From
If the caller is one of the contacts in your Address Book, the name and telephone number you
assign to this contact in your Address Book appears in this box.
If the caller is not one of your contacts, the name and/or telephone number supplied by the
Caller ID service appears in this box.
Type
A short description of how the call was routed to your extension. The type can be:
• Direct Call: the caller dialed your telephone number or extension.
• Forward Busy: the caller was forwarded to you from a busy extension
• Forward No Answer: the caller was forwarded to you from an extension that was not
answered.
• Forward Unconditionally: the caller was forwarded from an extension that has all calls
forwarded to your telephone.
• Pick Up From Another Ext: you used the Call Pickup feature to answer this call.
• Retrieved As a Parked Call: you used a Call Park Retrieval code to answer this call.
• Redirect To This Stn: the caller was forwarded to you from another extension.
• Transferred: the caller was transferred to you from another extension.
• Reminder: the caller was returned to your extension.
• Unknown: the Caller ID information is unknown and cannot be displayed.
• Unavailable: the Caller ID information is unavailable and cannot be displayed.
NN40010-104
Chapter 2 Personal Call Manager
45
Table 1 You Have a New Call descriptions
Heading
Description
Dept
If the caller is one of the contacts in your Address Book, the Department name you assign to
this contact in your Address Book appears in this box.
If the caller is not one of your contacts, this box is empty.
Company
If the caller is one of the contacts in your Address Book, the Company name you assign to this
contact in your Address Book appears in this box.
If the caller is not one of your contacts, this box is empty.
Also, if the caller is one of the contacts in your Address Book, and you assign a picture or voice
announce message to the contact, a small picture appears in the dialog box, and a voice announce
message plays. For more information about adding contacts to the Address Book, refer to “Adding
a new contact to the Address Book” on page 66.
To answer a call using the You Have a New Call dialog box
1
Click Answer.
Note: The Cancel button cancels only the You Have a New Call dialog box, not the call. If
you click the Cancel button, the You Have a New Call dialog box closes but the call
continues to ring on your telephone.
To answer the call from the window
1
Double-click the Ringing icon.
The icon changes to the Active Call icon, and the call is answered.
or
2
Right-click the Ringing icon in the Calls box.
3
Click Answer.
To answer a call from the task tray or Calls menu
1
Click the Personal Call Manager task tray icon or the Calls menu.
2
Point to the label of the call.
3
Click Answer.
Accessing the Notes tab
After you have answered the call, you can display the Notes tab of the Address Properties dialog
box. Use the Notes tab to record information about the contact, such as recent orders, meeting
locations and so on. For instructions about adding information to the Notes tab, refer to “Notes” on
page 72.
Personal Call Manager User Guide
46
Chapter 2 Personal Call Manager
To display the Notes tab
1
Click the icon of the caller.
2
Click
.
or
1
Right-click on the icon of the caller.
2
From the pop-up menu, select Properties.
Putting a call on hold
When a call is put on hold, the icon for the call changes from the Active Call icon to the Held Call
icon. For information about the various icons, refer to “Personal Call Manager task tray menu” on
page 21 and “Current Calls icons” on page 25.
To put a call on hold using the window
1
Make or answer the call.
2
Right-click the icon of the call in the Calls box.
3
Click Hold.
To put a call on hold using the task tray or Calls menu
1
Make or answer the call.
2
Click the Personal Call Manager task tray icon or the Calls menu.
3
Point to the call you want to put on hold.
4
Click Hold.
To answer a held call using the window
1
Right-click on the icon of the call in the Calls box.
2
Click UnHold.
To answer a held call using the task tray or Calls menu
1
Click the Personal Call Manager task tray icon or the Calls menu.
2
Point to the caller with whom you want to speak.
3
Click UnHold.
NN40010-104
Chapter 2 Personal Call Manager
47
Multiple calls
Personal Call Manager can control several calls at once. The maximum number of calls is equal to
the maximum number of lines available. All of the calls currently connected appear on the
Personal Call Manager task tray menu, the Calls menu, and the window.
Although several calls can be controlled, only one call can be active at any time, except if you have
an active conference call. In a conference, you can have two active calls. When you answer a held
call, the currently active call is put on hold automatically. This enables you to switch between held
calls simply by answering the caller with whom you want to speak.
Switching between calls using the window
In the window, the currently connected calls appear in the Calls box. The currently active call
shows the Active Call icon while the rest of the calls show the Held Call icon.
To switch to a different call
1
Double-click the icon of the caller with whom you want to speak.
or
2
Right-click the icon of the caller with whom you want to speak.
3
Click UnHold.
Switching between calls using the task tray and Call menus
On the Personal Call Manager task tray menu and the Calls menu, the currently connected calls
appear at the top of the menu. The currently active call shows the Active Call icon while the rest of
the calls show the Held Call icon.
To switch to a different call
1
Click the Personal Call Manager task tray icon or the Calls menu.
2
Point to the caller with whom you want to speak.
3
Click UnHold.
The caller to whom you point to becomes the active call, and the other call is put on hold.
Transferring a call
Personal Call Manager enables you to transfer a call to a different telephone. You can transfer the
call with or without an announcement. With an announcement, you call the person to whom you
transfer the call before you complete the transfer. Use announcements to inform the person who
the caller is, and why they are calling.
Personal Call Manager User Guide
48
Chapter 2 Personal Call Manager
You can use the right mouse button and the icons in the window to transfer a call or you can use
the keyboard and the icons.
Note: Transferring your telephone to an external telephone number is not supported.
Transferring a call without an announcement
When you transfer a call without an announcement, you transfer without checking if the person is
available to answer the call. This also is known as a blind transfer.
To transfer a call using the window
1
Make or answer the call.
2
Drag the icon of the call to another call icon in the Calls box, or to a contact icon in the
Address Book.
If you transfer the call to a contact in the Address Book, the contact must show in the List
View portion of the Address Book. For information about finding a contact, see “Finding a
contact in the Address Book” on page 73.
To transfer a call using the right mouse button
1
Make or answer the call.
2
Right-click the icon in the Calls box.
3
Point to Transfer.
A menu of the current calls appears.
4
Click one of the current calls.
The call is transferred to the person selected.
NN40010-104
Chapter 2 Personal Call Manager
49
5
If the person to whom you want to transfer the call does not appear on the list of current calls,
repeat steps 4 and 5.
6
Click Other.
The Transfer dialog box appears.
7
Type the telephone number of the person to whom you want to transfer the call and click the
Transfer button.
The call is transferred to the number entered.
Note: If Fast Search is enabled, Personal Call Manager compares the telephone number
you are entering to the contacts stored in the Address Book. Any contacts that match the
numbers you are entering appear in the bottom of the dialog box. Click the contact you
want, and click the Transfer button.
.
Note: If you want to call a contact that is in the Address Book, and you remember only
the contact name, type the contact name.
Note: If Fast Search is enabled, any contacts that match the name you are entering appear
in the bottom of the dialog box. Click the contact you want, and click the Transfer button.
Note: If Slow Search is enabled, you must enter the name, and then click the Find Now
button. Any contacts that match the name you entered appear in the bottom of the dialog
box. Click the contact you want, and click the Transfer button.
Personal Call Manager User Guide
50
Chapter 2 Personal Call Manager
Note: For information about Fast and Slow Search, see “Changing the Search
preferences” on page 94.
To transfer a call using the task tray or Calls menu
1
Make or answer the call.
2
Click the Personal Call Manager task tray icon or the Calls menu.
3
Point to Transfer.
A menu of the current calls appears.
4
Click one of the current calls.
The call is transferred to the person selected.
5
If the person to whom you want to speak does not appear on the list of current calls, repeat
steps 4 and 5.
6
Click Other.
The Transfer dialog box appears.
7
Type the telephone number of the person to whom you want to speak and click Transfer.
The call is transferred to the number you entered.
Note: If Fast Search is enabled, Personal Call Manager compares the telephone number
you are entering to the contacts stored in the Address Book. Any contacts that match the
numbers you are entering appear in the bottom of the dialog box. Click the contact you
want and click the Transfer button.
Note: If you want to call a contact that is in the Address Book, and you only remember
the contact name, type the contact name.
Note: If Fast Search is enabled, any contacts that match the name you are entering appear
in the bottom of the dialog box. Click the contact you want, and click the Transfer button.
Note: If Slow Search is enabled, you must enter the name, and then click the Find Now
button. Any contacts that match the name you entered appear in the bottom of the dialog
box. Click the contact you want, and click the Transfer button.
NN40010-104
Chapter 2 Personal Call Manager
51
Note: For information about Fast and Slow Search, see “Changing the Search
preferences” on page 94.
To transfer a call using the keyboard
You can use the keyboard and the icons on the window to transfer a call.
1
Make or answer the call.
2
Click the icon in the Calls box.
3
Press the F4 key.
The Transfer dialog box appears.
4
Enter the telephone number of the person to whom you want to speak and click Transfer.
The call is transferred to the number entered.
Note: If Fast Search is enabled, Personal Call Manager compares the telephone number
you are entering to the contacts stored in the Address Book. Any contacts that match the
numbers you are entering appear in the bottom of the dialog box. Click the contact you
want and click the Transfer button.
Note: If you want to call a contact that is in the Address Book, and you only remember
the contact name, type the contact name.
Note: If Fast Search is enabled, any contacts that match the name you are entering appear
in the bottom of the dialog box. Click the contact you want, and click the Transfer button.
Note: If Slow Search is enabled, you must enter the name, and then click the Find Now
button. Any contacts that match the name you entered appear in the bottom of the dialog
box. Click the contact you want, and click the Transfer button.
Note: For information about Fast and Slow Search, see “Changing the Search
preferences” on page 94.
Transferring a call with an announcement
When you transfer a call with an announcement, you call the person to whom you transfer the call
before you complete the transfer. Calling the person first allows you to check if the person is
available, and to provide that person with information about the call.
Personal Call Manager User Guide
52
Chapter 2 Personal Call Manager
To transfer a call with an announcement using the window
1
Make or answer the call.
2
Put the call on HOLD.
3
Call the person to whom you are transferring the call.
4
Provide the person with any pertinent information about the call.
5
Drag the icon of the call you are transferring to the Active Call icon.
To transfer a call with an announcement using the right mouse
button
1
Make or answer the call.
2
Put the call on HOLD.
3
Call the person to whom you are transferring the call.
4
Provide the person with any pertinent information about the call.
5
Right-click the icon in the Calls box and point to Transfer.
A menu of the current calls appears.
6
Click the icon of the person you are transferring.
To transfer a call with an announcement using the task tray or
Calls menu
1
Make or answer the call.
2
Put the call on HOLD.
3
Call the person to whom you are transferring the call.
4
Give the person any pertinent information about the call.
5
Click the Personal Call Manager task tray icon or the Calls menu.
6
Point to the Transfer menu item.
A menu of the current calls appears.
7
Click the icon of the person you are transferring (the first call you made or answered).
NN40010-104
Chapter 2 Personal Call Manager
53
Conference calls
In a conference call, you connect yourself and two or more other callers into a single call. If you
are using a BCM50 or BCM450, a conference call can extend only to include yourself and only
two other callers; however, with BCM 4.0, a conference call can extend to include yourself and
two or more callers.
Creating a conference call
To create a conference call, you must have two or more available lines, one for each caller. These
lines can be external lines or internal lines.
To create a conference call using the Conference pane
1
Make or answer the calls you want to connect in a conference call.
2
Drag the icon of the first call from the Calls panel to the Conference panel.
3
Drag the icon of the second call from the Calls panel to the Conference panel.
The icons for the two calls change to Conference icons.
4
Continue to drag the icons for the calls from the Calls panel to the Conference panel until all
the callers participating in the conference call are added.
The first two icons change to a Conference icon in the Conference panel. When you add a third
and subsequent calls to a conference call, all the calls collapse into a single line with the name
Conference, followed by a number. The number assigned to the Conference line is generated
by the system.
Note: If you are using a BCM50 or BCM450, a conference call can extend to include
yourself and only two other callers; however, with BCM 4.0, a conference call can extend
to include yourself and two or more callers.
Note: In the Conference pane, you can do the following:
• Drag a call icon onto another call icon and the two calls are
conferenced together.
• Drag a call icon onto a conference call icon and the call is added to
the conference call.
• Drag a call icon into the white space of the conference pane. A
pop-up menu appears allowing you to add the call to an existing
conference call or to create a new conference call. When you drag a
call icon into a white space that contains only one other call icon that
is not already part of a conference call, the two calls are automatically
conferenced together. The pop-up menu does not appear.
Personal Call Manager User Guide
54
Chapter 2 Personal Call Manager
To create a conference call using the Calls pane
1
Make or answer the calls you want to connect in a conference call.
2
Right-click the icon of the first call you want to connect in a conference call.
3
Select Conference from the pop-up menu.
4
Right-click the icon of the second call to be connected in a conference call and click
Conference.
The icons for the two calls move to the Conference pane and their icons change to Conference
icons.
5
Continue to right-click the icons for the calls you want to connect.
6
Click Conference until all the callers participating in the conference call are added.
The first two icons change to a Conference icon in the Conference panel. When you add a third
and subsequent calls to a conference call, all the icons collapse into a single line with the name
Conference, followed by a number. The number assigned to the Conference line is generated
by the system.
Note: If you are using a BCM50 or BCM450, a conference call can extend to include
yourself and only two other callers; however, with BCM 4.0, a conference call can extend
to include yourself and two or more callers.
To create a conference call using the task tray or Calls menu
1
Make or answer the calls you want to connect in a conference call.
2
In the task tray, click the Personal Call Manager icon or select the Calls menu.
3
Point to the first call you want to add to the conference.
4
Click Conference.
5
In the task tray, click the Personal Call Manager icon or select the Calls menu.
6
Point to the second call you want to add to the conference.
7
Click Conference.
The icons for the two calls change to the Conference icon.
8
Continue to point to the calls you want to add to the conference.
9
Click Conference until all the callers participating in the conference call are added.
Each icon changes to a Conference icon in the Conference pane.
Note: If you are using a BCM50 or BCM450, a conference call can extend to include
yourself and only two other callers; however, with BCM 4.0, a conference call can extend
to include yourself and two or more callers.
NN40010-104
Chapter 2 Personal Call Manager
55
Putting conference calls on hold
When you put a conference call on hold, all calls are put on hold. Callers cannot speak with you,
but callers can speak with each other.
To put the conference calls on hold using the window
1
Right-click one of the calls in the Conference box.
2
Click HoldConf.
The calls are put on hold and the icons change to Held Conference icons.
To put conference calls on hold using the task tray or Calls menu
1
Click the Personal Call Manager task tray icon or select the Calls menu
2
Select one of the calls in the conference.
3
Click HoldConf.
The calls are put on hold and the icons change to Held Conference icons.
Taking a conference call off hold
There are two ways to take a conference call off hold.
To restore a held conference call using the window
1
Right-click one of the calls in the Conference box.
2
Click UnHoldConf.
The calls in the conference become active and the icons change to Conference icons.
To restore a held conference call using the task tray or Calls
menu
1
Click the Personal Call Manager task tray icon or the Calls menu.
2
Point to one of the calls in the conference.
3
Click UnHoldConf.
The calls in the conference become active, and the icons change to Conference icons.
Personal Call Manager User Guide
56
Chapter 2 Personal Call Manager
Splitting a conference call
When you split a conference call, the conference call ends, but the calls remain connected to you.
One of the callers becomes the active call and the other caller is put on hold.
Note: You cannot split a conference call that connects more than two other callers to you.
You must disconnect additional calls from the conference before you can split a three-way
conference call.
To split a conference call using the window
Note: If the conference call contains more than three callers (you and two other callers),
additional callers must drop from the conference call before you can split the three-way
conference.
•
Drag one of the icons from the Conference box.
The call of the icon you remove from the Conference box becomes the active call, and the
other call is put on hold. The icons for both calls move to the Calls box.
To split a conference call using the icons in the window
Note: If the conference call contains more than three callers (you and two other callers),
additional callers must drop from the conference call before you can split the three-way
conference.
1
Right-click one of the icons in the Conference box.
2
Click Split Conf.
The caller you select becomes the active call, while the other caller is put on hold. The icons
for both calls move to the Calls box.
To split a conference call using the task tray or Calls menu
Note: If the conference call contains more than three callers (you and two other callers),
additional callers must drop from the conference call before you can split the three-way
conference.
1
Click the Personal Call Manager task tray icon or the Calls menu.
2
Point to the icon of one of the callers in the conference.
3
Click Split Conf.
The caller you select becomes the active call and the other caller is put on hold.
NN40010-104
Chapter 2 Personal Call Manager
57
Ending a conference call
When you disconnect yourself from a conference call, the remaining callers can to continue to
speak to each other by using two or more of your telephone lines. Even though you have
disconnected yourself from the conference call, the call does not end until the last internal caller
disconnects from the call.
To end a three-way conference call and disconnect both the callers, split the conference call and
end each of the calls.
To end a conference call using the release button
1
Click the icon of one of the conference calls in the Conference box.
2
In the Conference box, click
.
To end a conference call using the window
1
Right-click one of the icons in the Conference box.
2
Click Release Conf.
The conference call ends.
To end a conference call using the keyboard
1
Click one of the icons in the Conference box.
2
Press the Delete key on your keyboard.
The conference call ends.
Note: When you use the keyboard to end a call, ensure you click one of the icons in the
Conference box before you press the Delete key. If you do not, and a contact in the
Address Book is highlighted, the contact is deleted. To retrieve a contact that is deleted
accidentally, click the Edit menu, and then click Undo.
To end a conference call using the task tray or Calls menu
1
Click the Personal Call Manager task tray icon or Calls menu.
2
Point to the icon of one of the calls in the conference call.
3
Click Release Conf.
The conference call ends.
Personal Call Manager User Guide
58
Chapter 2 Personal Call Manager
Ending a call
To end a call using the release button
1
Click the icon of the call in the Calls box.
Note: If there is only one call in the Calls box, you do not need to select the call.
2
In the Calls box, click
.
To end a call using the window
1
Right-click the icon of the call in the Calls box.
2
Click Release.
To end a call using the task tray or Calls menu
1
Click the Personal Call Manager task tray icon or the Calls menu.
2
Point to the call you want to disconnect.
3
Click Release.
To end a call using the keyboard
To end a call using the keyboard, the Personal Call Manager window must be visible.
1
Click the icon of the call in the Calls box.
2
Press the Delete key on your keyboard.
Note: When you use the keyboard to end a call, ensure you click the icon in the Calls box
before you press the Delete key. If you do not and a contact in the Address Book is
highlighted, the contact is deleted. To retrieve a contact that is deleted accidentally, click
the Edit menu, and then click Undo.
Calling features
Personal Call Manager provides easy access to two common calling features: Do Not Disturb and
Call Forward.
NN40010-104
Chapter 2 Personal Call Manager
59
Do Not Disturb (DND)
When DND is enabled, the telephone does not ring when someone calls, but the line indicator
flashes. In Personal Call Manager, the You Have a New Call dialog box appears and the icon for
the call appears in the Calls box.
You can turn the Do Not Disturb (DND) feature on or off from the Calls menu, or the Personal
Call Manager icon in the task tray.
To turn DND on or off
1
Click the Personal Call Manager task tray icon or the Calls menu.
2
Click DND.
When DND is on:
•
•
•
the Personal Call Manager task tray icon changes to
a check mark appears beside the DND menu item on the Calls menu and the Personal Call
Manager task tray menu.
DND appears in the Status bar.
Call Forward
To call forward your telephone
1
Click the Tools menu.
2
Click Forward.
The Forward dialog box appears.
3
Type the telephone number to which you want to call forward your telephone.
Personal Call Manager User Guide
60
Chapter 2 Personal Call Manager
4
Click the Forward button.
The number to which your telephone is forwarded appears on the “Status bar””.
Note: If Fast Search is enabled, Personal Call Manager compares the telephone number
you are entering to the contacts stored in the Address Book. Any contacts that match the
numbers you are entering appear in the bottom of the dialog box. Click the contact you
want and click the Forward button.
Note: If you want to forward your telephone to a contact that is in the Address Book, and
you remember only the contact name, enter the contact name.
Note: If Fast Search is enabled, any contacts that match the name you are entering appear
in the bottom of the dialog box. Click the contact you want, and click the Forward button.
Note: If Slow Search is enabled, you must type the name, and then click the Find Now
button. Any contacts that match the name you enter appear in the bottom of the dialog box.
Click the contact you want, and click the Forward button.
Note: For information about Fast and Slow Search, see “Changing the Search
preferences” on page 94.
Note: Call forwarding your telephone to an external telephone number is not supported.
Calls Log window
The Calls Log consists of two parts: the Incoming Calls Log, and the Outgoing Calls Log. The
Incoming Calls Log shows all of the calls received on your telephone. The Outgoing Calls Log
shows all of the calls you place from your telephone. Calls placed or received while Personal Call
Manager is not active do not appear.
The Calls Log shows the name and telephone number of the caller, if available. The Calls Log also
shows the date and time the call is placed the length of the call.
To view the Calls Log
1
Click
.
or
1
Click the Tools menu.
2
Click Show Call Log Window.
NN40010-104
Chapter 2 Personal Call Manager
61
The Calls Log window appears with either the Incoming Calls showing or the Outgoing Calls
showing.
To view the Incoming Calls
1
Click
on the Toolbar.
or
1
Click the View menu.
2
Click Incoming Calls Log.
To view the Outgoing Calls
1
Click
.
or
1
Click the View menu.
2
Click Outgoing Calls Log.
Personal Call Manager User Guide
62
Chapter 2 Personal Call Manager
Updating the Calls log
To update the Calls Log
If you make or answer a call while the Calls Log is open, the Calls Log is not updated. To update
the Calls Log:
1
Click
.
or
1
Click the View menu.
2
Click Refresh.
Sorting the Calls Log
You can sort the Calls Log by name, telephone number, duration, or date and time. To sort the
Calls Log by:
•
•
•
•
name of the caller, click Name
telephone number of the caller, click Phone No
length of the call, click Duration
time the call is made or received, click Date & Time
Making a call from the Calls Log
You can call any of the numbers stored in the Incoming or Outgoing Call Log.
To make a call from the Calls log
1
Click the number you want to dial.
2
Click
.
or
1
Click the number you want to dial.
2
Click the Edit menu.
3
Click Redial.
Note: The appropriate call resource must be assigned as the TAPI Line before you can
place a call from the Calls Log.
For example, the TAPI line cannot be an intercom line, if you want to make a call to an
external telephone number.
NN40010-104
Chapter 2 Personal Call Manager
63
Printing call information from the Calls Log
You can print the Calls Log information for any call in the Calls Log.
To print the Calls Log information
1
Click the call you want to print.
Note: You can select several calls to print by holding down the Control or Shift key, and
clicking other calls.
2
Click
.
or
1
Click the Edit menu.
2
Click Print.
Deleting calls from the Calls Log
To delete a call from the Calls Log
1
Select the call you want to delete.
2
Click
.
or
1
Click the Edit menu.
2
Click Delete.
Closing the Calls Log Window
To close the Calls Log Window
1
Click the File menu.
2
Click Exit.
You also can close the Calls Log Window by clicking the Close Window button in the upper right
corner of the window.
Personal Call Manager User Guide
64
Chapter 2 Personal Call Manager
Address Book
The Address Book is the portion of Personal Call Manager where you store telephone numbers and
addresses of the people and businesses you contact. Each entry in the Address Book is called a
contact. A contact is normally the telephone number of a person or business, but a contact can be
any number you want to record or store in Personal Call Manager.
The Tree View of the Address Book
When you view the Address Book, the left side shows the tree structure of the Address Book. The
tree structure shows how the folders are organized. It also enables you to select the folder you want
to view. A sample tree view appears below.
The contacts are stored in two main areas:
•
•
Quick Dials: Contacts added to the Quick Dials section appear on the Calls menu, and the
Personal Call Manager task tray menu. You can add contacts to the Quick Dials section, but
not folders.
My Contacts: Contacts added to the My Contacts section do not appear in the Calls, or
Personal Call Manager task tray menu, but can easily be accessed from the Address Book. In
the My Contacts section, you can add contacts and folders.
Folders are added to help organize the contacts. By grouping the contacts into smaller groups of
similar contacts, the contacts are easier to view on the window, and easier to find and access.
You can change which folders appear by clicking certain portions of the Tree View. Clicking a “+”
box expands the folder, and shows the folder contents. Clicking a “-” box collapses the folder and
hides the folder contents. Double-click a folder to open or close the folder. When a folder is open,
the contents of the folder appear in the List view portion of the Address Book.
NN40010-104
Chapter 2 Personal Call Manager
65
List View portion of the Address Book
On the right side of the screen is the List View of the Address Book. The List View shows the
contacts and folders stored in the folder selected in the Tree View.
The List View of the Address Book can be viewed in four different formats: large icons, small
icons, list, and detail.
Viewing the Address Book in large icons
If you select large icons, each contact appears with the last name of the contact below the icon.
To view the Address Book in large icons
1
Click
.
or
1
Click the View menu.
2
Click Large Icon.
Viewing the Address Book in small icons
If you select small icons, the contacts appear horizontally with the last name of each contact on the
right of the icon.
To view in the Address Book in small icons
1
Click
.
or
1
Click the View menu.
2
Click Small Icon.
Viewing the Address Book in List View
If you select List View, the contacts appear vertically with the last name of each contact on the
right of the icon.
To view in List View
1
Click
.
or
1
Click the View menu.
2
Click List.
Personal Call Manager User Guide
66
Chapter 2 Personal Call Manager
Viewing the Address Book in Details View
If you select Details View, the last name, first name, telephone numbers, you can call and E-mail
Address and E-mail type are shown for each contact.
To view in Details View
1
Click
.
or
1
Click the View menu.
2
Click Detail.
Contacts
A contact is any entry in the Address Book. A contact can be a person, business, or any number or
address you want stored in Personal Call Manager.
Adding a new contact to the Address Book
You can add contacts to the Address Book using the Address Properties dialog box.
To add a contact using the toolbar
1
Click
.
The Address Properties dialog box appears.
2
Enter the address information for this contact.
For descriptions of the address fields, refer to “Address Properties dialog box” on page 67.
3
Click OK.
The contact is added to the folder shown in the List View of the Address Book.
Note: If a contact with the same name is in the Address Book, a message appears asking
if you want to make a duplicate. If you want to make a duplicate of a contact, use the copy
method described in “Copying a contact” on page 78.
To add a contact using the right mouse button
1
Right-click in an open area in the List View portion of the Address Book.
2
Point to New and click Contact.
The Address Properties dialog box appears.
3
Type the address information for this contact.
For descriptions of the address fields, refer to “Address Properties dialog box” on page 67.
NN40010-104
Chapter 2 Personal Call Manager
4
67
Click OK.
The contact is added to the folder shown in the List View of the Address Book.
Note: If a contact with the same name is in the Address Book, a message appears asking
if you want to make a duplicate. If you want to make a duplicate of a contact, use the copy
method described in “Copying a contact” on page 78.
To add a contact using the Menu bar
1
Click the File menu.
2
Point to New.
3
Click Contact.
The Address Properties dialog box appears.
4
Type the address information for this contact.
For descriptions of the address fields, refer to “Address Properties dialog box” on page 67.
5
Click OK.
The contact is added to the folder shown in the List View of the Address Book.
Note: If a contact with the same name is in the Address Book, a message appears asking
if you want to make a duplicate. If you want to make a duplicate of a contact, use the copy
method described in “Copying a contact” on page 78.
Address Properties dialog box
The Address Properties dialog box has four tabs. Use each tab to enter different types of contact
information.
•
•
•
•
Business: Enter the name, address, and telephone number of the contact.
E-mail Address: Enter the e-mail address and type.
Settings: Enter the default telephone number.
Note: Enter any other information about the contact.
Personal Call Manager User Guide
68
Chapter 2 Personal Call Manager
Business
Use the Business tab to enter the name, address, and telephone number of a contact.
The first information you enter is the contact name. The contact name is divided into the first name
and the last name. Both the first name and the last name must be entered before a contact can be
added to the Address Book. The last name is used as the label for the contact in the Address Book.
The first name is used as the label in the Calls box when you are on a call to the contact. When you
search for a contact, you can search using the first name or the last name.
After you enter the name you can enter the contact address. There are five different boxes for the
address: Address, City, State, Zip code, and Country.
After entering the address, you can enter the Title, Company, Department, Office, and Assistant of
the contact.
The final information to enter is the contact telephone numbers. The Phone number box has a
drop-down list that enables you to enter four different telephone numbers. You can enter the
Business, Home, Mobile, and Fax telephone numbers for the contact. The Business, Home, or
Mobile telephone number can be dialed from the task tray or the Personal Call Manager window.
NN40010-104
Chapter 2 Personal Call Manager
69
E-mail Address
The EMail Address tab has two boxes: E-mail address and E-mail type.
E-mail address specifies the location of the contact E-mail account. E-mail type specifies the type
of E-mail service used by the contact.
Personal Call Manager User Guide
70
Chapter 2 Personal Call Manager
Settings
Use the Settings tab to select the dialing default used for the contact, the picture appears, and a
voice announcement plays when this contact calls you.
For the default telephone number dialed, you can choose Business, Home, or Mobile. The settings
you specify define the telephone number automatically used for this contact only. Other contacts
are not affected by the defaults you choose for this contact. You can choose to override these
settings when making a call by selecting any other telephone number defined for the contact in the
Address Book.
You can select a voice announcement to play when you receive a call from this contact. This voice
announcement enables you to identify who is calling without looking at the computer screen or
telephone display.
To add or change the voice announcement for this contact
1
Record the voice announcement message you want to play when this contact calls, and save it
in a .WAV file format. The message is typically the contact name, but can be any .WAV file.
Note: You can record the voice announcement using the Sound Recorder accessory
included with Windows or any other sound editing application.
2
Click
3
Move to the folder where the voice announcement file is stored.
NN40010-104
beside the Voice Announce File Path field.
Chapter 2 Personal Call Manager
4
71
Double-click the voice announcement file you want to use.
If you decide you no longer want a voice announcement for this contact, you can remove the
voice announcement from the contact.
To remove the voice announcement:
•
Click
beside the Voice Announce File Path field.
The voice announcement no longer plays for this contact.
Note: The .WAV file you delete from the contact is not deleted from the computer hard
drive, and can be used again later.
You can select an image that displays on the You Have a New Call dialog box when you receive a
call from this contact. This image provides a visual reminder of who the caller is. The image is
typically a picture of the contact, but can be any image that reminds you of the contact.
Note: You must use a 16-color or 256-color bitmap file (*.bmp) as the image for the
contact.
To add or change the bitmap image
1
Create or find the image you want to display when this contact calls. You can create this file
with any graphics application that saves the image as a .BMP file.
2
Click
3
Move to the folder where the image file is stored.
4
Double-click the image file you want to use.
beside the Image File Path field.
If you decide you no longer want Personal Call Manager to display an image when this contact
calls, you can remove the image file from the contact.
To remove the image file
•
Click
beside the Image File Path field.
The image file no longer appears for this contact.
Note: The .BMP file you delete from the contact is not deleted from the computer hard
drive, and can be used again later.
Personal Call Manager User Guide
72
Chapter 2 Personal Call Manager
Notes
Use the Note tab to record miscellaneous information about the contact. You can enter significant
dates, recent orders, meeting locations, or any information you want to access when you call the
contact.
Adding a caller to the Address Book
When you receive a call, you can add the caller to your Address Book. You must open the Personal
Call Manager window before you add a caller.
To add a caller
1
Click the caller’s icon in the Calls dialog box.
2
Click
.
A dialog box appears asking you if you want to create a new contact.
3
Click Yes.
The Address Properties dialog box appears.
NN40010-104
Chapter 2 Personal Call Manager
4
73
Enter the address information for this contact.
For descriptions of the address fields refer to “Address Properties dialog box” on page 67.
5
Click OK.
The contact is added to the folder shown in the List View of the Address Book.
Note: If you subscribe to Caller ID service, the telephone number, and name, if available,
are entered automatically into the dialog box.
Finding a contact in the Address Book
The Address Book has a search feature to help you find a contact. You can search for a contact
using the contact name or telephone number.
The Search feature operates in two different modes: Slow Search and Quick Search. In Slow
Search mode, you enter the characters you want to find, and click the Find Now button. Personal
Call Manager searches the Address Book to find the contact. In Quick Search mode, Personal Call
Manager starts searching through contacts as soon as you type a character.
To change the Search mode used, refer to “Changing the Search preferences” on page 94.
Personal Call Manager User Guide
74
Chapter 2 Personal Call Manager
Slow Search
To find a contact
1
Click the Tools menu.
2
Click Find Person.
or
Click
.
The Search dialog box appears.
3
Type the name or telephone number of the contact you want to find.
4
Click the Find Now button.
A list of the contacts that match the name or number you entered appears in the Search dialog
box.
5
Click the last name of the contact you want.
6
Click OK.
The folder containing the contact opens and the selected contact is highlighted.
NN40010-104
Chapter 2 Personal Call Manager
75
Quick Search
To find a contact
1
Click the Tools menu.
2
Click Find Person.
or
Click
.
The Search dialog box appears.
3
Enter the first character of the name or telephone number of the contact you want to find.
Personal Call Manager compares the letter or number you entered with the contacts stored in
the Address Book. Any contacts that match the character you entered appear in the bottom of
the Search dialog box.
If you have several contacts starting with that character, enter the next character in the name or
telephone number. Personal Call Manager then displays only the contacts that match both of
those characters.
4
Continue entering characters to find the contact in the Search dialog box.
5
Click the last name of the contact you want.
6
Click OK.
The folder containing the contact opens, and the selected contact is highlighted.
Entering names or numbers
If you know only part of the name or telephone number of the contact you want to find, you can
type the letters or digits you know, and the Search feature finds any contacts that match the
information you enter.
Personal Call Manager User Guide
76
Chapter 2 Personal Call Manager
If the portion of the name or number you know is at the beginning, type the portion you know, and
click the Find Now button. Personal Call Manager finds any contacts that start with the letters or
digits you enter.
If you remember the contact first name, but not last name, type a comma followed by the contact
first name. For example, if you are looking for a contact named Tom, type “,Tom”. All of the
contacts whose first name is Tom are found.
If the portion you know is not at the start, you can use “wild card” characters at the start of the
name or number. There are two wild card characters you can use:
•
•
Use the question mark (?) to represent any single character.
Use the asterisk (*) to represent any characters that precede the characters you entered.
For example, the following names are in the Address Book:
Chatterton
•
•
•
•
•
Jones
Mason
Smith
Stanley
Steward
Washington
If you enter “S” the names found are Smith, Stanley and Steward.
If you enter “Ste” the only name found is Stewart.
If you enter “?a” the names found are Mason and Washington.
If you enter “??a” the names found are Chatterton and Stanley.
If you enter “*a” the names found are Chatterton, Mason, Stanley, Steward, and Washington.
Note: You can also enter a comma (,) as a special character. This special character adds a
pause between the numbers dialed.
Editing the properties of a contact
The information stored with a contact can be changed whenever required. A typical example is
when a contact moves or changes telephone numbers.
To change the properties of a contact using the right mouse
button
1
Find the contact in the Address Book.
You can find the contact manually or use the Personal Call Manager Search feature.
2
Right-click the contact.
NN40010-104
Chapter 2 Personal Call Manager
3
77
Click Properties.
The Address Properties dialog box appears.
4
Click the tab that has the information you want to change and then make the changes.
“Adding a new contact to the Address Book” on page 66 describes the information that can be
entered.
To change the properties of a contact using the toolbar
1
Find the contact in the Address Book.
You can find the contact manually or use the Personal Call Manager Search feature.
2
Select the contact.
3
Click
.
The Address Properties dialog box appears.
4
Move to the tab that has the information you want to change and then make the changes.
“Adding a new contact to the Address Book” on page 66 describes the information that can be
entered.
Personal Call Manager User Guide
78
Chapter 2 Personal Call Manager
To change the properties of a contact using the Menu bar
1
Find the contact in the Address Book.
You can find the contact manually, or use the Personal Call Manager Search feature.
2
Select the contact.
3
Click the File menu.
4
Click Properties.
The Address Properties dialog box appears.
5
Click the tab that has the information you want to change, and then make the changes.
“Adding a new contact to the Address Book” on page 66 describes the information that can be
entered.
Organizing the Address Book
As you add contacts to the Address Book, divide the contacts into logical groups. This makes it
easier for you to find the contacts you enter.
You group the contacts together by adding folders to the Address Book, and moving your contacts
into the appropriate folders. A simple example is to add two folders, one named Personal, and one
named Business. All of your business contacts are then stored in the Business folder, and all of
your personal contacts are stored in the Personal folder. For more information, refer to “Creating a
new folder in the Address Book” on page 84.
Copying a contact
When you copy a contact, you create a new contact in the Address Book based on the original
contact. Personal Call Manager provides two ways to copy a contact: a linked copy, and a template
copy. In the linked copy, all of the information about the contact is copied. In a template copy, all
of the information about the contact, except the contact name, is copied. In both methods of
copying, the original contact remains in the original folder.
NN40010-104
Chapter 2 Personal Call Manager
79
Deciding which copy method to use
The copy method you choose depends on what you want to do. Refer to the following table to
decide which copy method to use.
Table 2 Copy Methods
Linked Copy
The new contact contains the exact same
Information information as the original contact.
copied
Template Copy
The new contact has a different name than the
original contact. The other contact information is
the same.
Changes
are linked
Yes.
When you change one of the properties of the
contact, Personal Call Manager automatically
updates the original contact, and all of the copies
of the contact.
No.
When you change one of the properties of the
contact, the other copies are not changed.
Purpose
Use a linked copy when you want to have identical Use a template copy to create a new contact that
copies of a single contact in several different
is similar, but not identical to, an existing contact.
folders. You do this to make the contact easier to
find and organize.
Example
You know a person who is both your sales
representative and a member of your baseball
team. Put the original contact in your Business
folder, and make a linked copy of the contact in
your Personal folder. You then can find contact
information for this person when you are looking
for sales representatives or baseball players. If
this person’s telephone number changes, you can
change either copy of the contact, and both copies
are updated.
A new person joins a company for which you
already have a contact. The address and
telephone number of the new contact is the same
as the existing contact, but the name is different.
To make a contact for the new person, make a
copy of the existing contact, and change the
name.
For information about how to make a linked copy of a contact, refer to “Copying a contact using
the linked copy method” on page 79.
For information about how to make a template copy of a contact, refer to “Copying a contact using
the template copy method” on page 80.
Copying a contact using the linked copy method
Use this method of copying a contact when you want to create a copy that is linked to the original
contact. For information about the two different methods of copying a contact, refer to “Deciding
which copy method to use” on page 79.
To copy a contact using drag-and-drop, the contact must be visible in the List View and the folder
you are copying it to must be visible in the Tree View.
To copy a contact using drag-and-drop
1
Press and hold the Control key on your keyboard.
2
Drag the contact you want to copy to the new folder.
Personal Call Manager User Guide
80
Chapter 2 Personal Call Manager
To copy a contact using the toolbar
1
Click the contact you want to copy.
2
Click
3
Open the folder you want to copy the contact into.
.
The contents of the folder appear in the List View box.
4
Click
.
The contact is copied to the new folder.
To copy a contact using the right mouse button
1
Right-click the contact you want to copy, and then click Copy.
2
Open the folder you want to copy the contact into.
The contents of the folder appear in the List View dialog box.
3
Right-click an open area in the folder and then click Paste.
The contact is copied to the new folder.
To copy a contact using the Menu bar
1
Click the contact you want to copy.
2
Click the Edit menu and then click Copy.
3
Open the folder you want to copy the contact into.
The contents of the folder appear in the List View box.
4
Click the Edit menu and then click Paste.
The contact is copied to the new folder.
Copying a contact using the template copy method
Use this method of copying a contact when you want to create a new contact that is based on an
existing contact. All of the contact information except the contact name is copied to the new
contact. This feature allows you to quickly add contacts that are similar to existing contacts. For
information about the two different methods of copying a contact, refer to “Deciding which copy
method to use” on page 79.
NN40010-104
Chapter 2 Personal Call Manager
81
To copy a contact using the right mouse button
1
Right-click the contact you want to copy and then click Copy.
2
Open the folder you want to copy the contact into.
The contents of the folder appear in the List View box.
3
Right-click one of the contacts in the folder.
The contact click is not affected by the pasting procedure.
4
Click Paste Special.
You are prompted to enter a name.
5
Type the name of the contact and click OK.
After the contact is copied into the folder, you can open the contact properties, and change any
properties.
To copy a contact using the Menu bar
1
Click the contact you want to copy.
2
Click the Edit menu and then click Copy.
3
Open the folder you want to copy the contact into.
The contents of the folder appear in the List View box.
4
Click the Edit menu and then click Paste Special.
You are prompted to enter a name.
5
Type the name of the contact and click the OK button.
After the contact is copied into the folder, you can open the contact properties, and change any
properties.
Moving a contact
Contacts can be moved from one folder to another to help organize the Address Book. When you
move a contact, the contact does not remain in the original folder.
To move a contact using drag-and-drop, the contact must be visible in the List View, and the folder
to which you move the contact must be visible in the Tree View.
To move a contact using drag-and-drop
•
Drag the contact you want to copy to the new folder.
Personal Call Manager User Guide
82
Chapter 2 Personal Call Manager
To move a contact using the toolbar
1
Click the contact you want to move.
2
Click
.
The icon for the contact dims.
3
Open the folder in which you want to move the contact.
The contents of the folder appear in the List View box.
4
Click
.
The contact is moved to the new folder.
To move a contact using the right mouse button
1
Right-click the contact you want to move and then click Cut.
The icon for the contact dims.
2
Open the folder you want to move the contact into.
The contents of the folder appear in the List View box.
3
Right-click an open area in the folder, and then click Paste.
The contact is moved to the new folder.
To move a contact using the Menu bar
1
Click the contact you want to move.
2
Click the Edit menu and then click Cut.
The icon for the contact dims.
3
Open the folder you in you want to move the contact.
The contents of the folder appears in the List View box.
4
Click the Edit menu and then click Paste.
The contact is moved to the new folder.
Note: After you use the Cut command (indicated by the contact icon dimming), you must
use the Paste command to move the contact before using the Cut or Copy commands
again. If you use the Cut or Copy command before pasting the contact, the contact remains
in the original folder, and does not move.
NN40010-104
Chapter 2 Personal Call Manager
83
Deleting a contact
To delete a contact using the right mouse button
1
Right-click on the contact you want to delete.
2
Click Delete.
To delete a contact using the Menu bar
1
Click the contact you want to delete.
2
Click the Edit menu.
3
Click Delete.
To delete a contact using the keyboard
1
Click the contact you want to delete.
2
Press the Delete key.
Printing Contacts
There are two printing formats you can use to print information about any of the contacts stored in
the Address Book. You can print a contact list or contact details.
Printing a contact list
When you print a contact list, the name, company, and telephone numbers stored in the Address
Book for the contact are printed. You can print contact list information for one or many contacts.
Note: When printing a contact list, set your page orientation to Landscape.
To print a contact list
1
Click the contacts you want.
Note: Use the Control or Shift keys to select more than one contact.
2
Select the File menu and then click Print Contact List.
or
Click
3
.
Click OK.
Personal Call Manager User Guide
84
Chapter 2 Personal Call Manager
To print a contact list for all of the contacts in a folder
1
Click the folder or folders that contain the contacts you want to print.
Note: Use the Control or Shift keys to select more than one folder.
2
Click the File menu and then click Print Contact List.
or
Click
3
.
Click OK.
Print Contact Details
When you print the contact details, all the information in the Address Book for the selected contact
is printed. You can print contact detail information for one or many contacts.
To print contact details
1
Click the contact or contacts you want.
Note: Use the Control or Shift keys to select more than one contact.
2
Select the File menu and then click Print Contact Detail.
Folders
Folders can be added only to the My Contacts section, and the folders in the My Contacts section.
You cannot add folders to the Quick Dials section. For more information on, refer to “Quick
Dials” on page 92.
Creating a new folder in the Address Book
To create a new folder using the right mouse button
1
Click a folder in the Tree View of the Address Book.
The contents of the selected folder appear in the List View. The new folder is added to this
folder.
2
Right-click an open area in the List View.
3
Point to New and then click Folder.
The Create New Folder dialog box appears.
NN40010-104
Chapter 2 Personal Call Manager
4
85
Type the name of the new folder and click OK.
The new folder is added to the selected folder.
When naming the new folder, you must use a name that does not exist already in the selected
folder.
To create a new folder using the toolbar
1
Click a folder in the Tree View of the Address Book.
The contents of the selected folder appear in the List View. The new folder is added to this
folder.
2
Click
.
The Create New Folder dialog box appears.
3
Type the name of the new folder and click OK.
The new folder is added to the selected folder.
When naming the new folder, you must use a name that does not exist already in the selected
folder.
To create a new folder using the Menu bar
1
Click a folder in the Tree View of the Address Book.
The contents of the selected folder appear in the List View. The new folder is added to this
folder.
2
Click the File menu, point to New, and click Folder.
The Create New Folder dialog box appears.
3
Type the name of the new folder and click OK.
The new folder is added to the selected folder.
When naming the new folder, you must use a name that does not exist already in the selected
folder.
Copying a folder
When you copy a folder, the folder and all of the contacts and folders contained in the folder are
copied to the new folder.
To copy a folder using drag-and-drop, the folder must be visible in the List View box and the
folder to you which you are moving it must be visible in the Tree View.
Personal Call Manager User Guide
86
Chapter 2 Personal Call Manager
To copy a folder
1
Press and hold the Control key on your keyboard.
2
Drag the folder you want to copy to the folder to which you want it copied.
The folder must be in the List View box to use the right mouse button.
To copy a folder using the right mouse button
1
Right-click the folder you want to copy and then click Copy.
2
Open the folder to which you want to copy the folder.
The contents of the folder appear in the List View box.
3
Right-click an open area in the List View box, and then click Paste.
To copy a folder using the toolbar
1
Click the folder you want to copy.
2
Click
3
Open the folder to which you want to copy the folder.
.
The contents of the folder appear in the List View box.
4
Click
.
To copy a folder using the Menu bar
1
Click the folder you want to copy.
2
Click the Edit menu and then click Copy.
3
Open the folder to which you want to copy the folder.
The contents of the folder appear in the List View box.
4
Click the Edit menu and then click Paste.
Moving a folder
Folders can be moved from one enclosing folder to another. When you move a folder, you move
the folder, and all of the contacts and folders that the top folder contains.
To move a folder using drag-and-drop, the folder must be visible in the List View box and the
folder you are moving it to must be visible in the Tree View.
NN40010-104
Chapter 2 Personal Call Manager
87
To move a folder
1
Drag the folder you are moving to the folder you want it moved to.
To move a folder using the toolbar
1
Click the folder you want to move.
2
Click
3
Open the folder to which you want to move the folder.
.
The contents of the folder appear in the List View box.
4
Click
.
The folder must be in the List View box to use the right mouse button.
To move a folder using the right mouse button
1
Right-click the folder you want to move and click Cut.
2
Open the folder you want to move the folder to.
The contents of the folder appear in the List View box.
3
Right-click an open area in the folder and click Paste.
To move a folder using the Menu bar
1
Click the folder you want to move.
2
Select the Edit menu and click Cut.
3
Open the folder to which you want to move the folder.
The contents of the folder appear in the List View box.
4
Select the Edit menu and click Paste.
Personal Call Manager User Guide
88
Chapter 2 Personal Call Manager
Renaming a folder
To change the name of a folder using the right mouse button
1
Right-click the folder you want to rename and click Properties.
The Folder Property dialog box appears.
2
Type the new name of the folder and then click OK.
To change the name of a folder using the toolbar
1
Click the folder you want to rename.
2
Click
.
The Folder Property dialog box appears.
3
Type the new name of the folder and click OK.
To change the name of a folder using the Menu bar
1
Click the folder you want to rename.
2
Select the File menu.
3
Click Properties.
The Folder Property dialog box appears.
4
Type the new name of the folder and click OK.
Deleting a folder
When you delete a folder, the folder and all the contacts and folders contained in the folder are
deleted.
To delete a folder using the right mouse button
1
Right-click the folder you want to delete.
2
Click Delete.
3
Click OK to confirm deleting the folder and its contents.
NN40010-104
Chapter 2 Personal Call Manager
89
To delete a folder using the Menu bar
1
Click the folder you want to delete.
2
Select the Edit menu.
3
Click Delete.
4
Click OK to confirm deleting the folder and its contents.
Importing Contacts
If you have a list of contacts in another application, you can save your list of contacts as a text file,
and then import those contacts into Personal Call Manager.
To import addresses
1
Open the application that contains your existing contact list and save the list as a comma
delimited text file. Make a note of the order of the information fields in the existing file.
Note: Refer to the documentation that came with the application for instructions on how
to save the contact list as a comma delimited text file.
2
Open the Personal Call Manager window.
Personal Call Manager User Guide
90
Chapter 2 Personal Call Manager
3
Select the File menu and then click Import Address.
The Import address from text file dialog box appears.
4
Click
to choose the file you want to import.
The Open dialog box appears.
5
Move to the folder that contains the file you want to import.
6
Double-click the file you want to import.
The Import address from text file dialog box appears with the path and file name in the Source
Text File field.
7
Click the drop-down list of one of the information fields (for example, Last Name), and then
click the text that corresponds to that information field (for example, the last name of the
contact).
8
Repeat step 7 for each of the information fields.
Choose None if the information for the field is not in the file you are importing.
9
Click Import.
The contacts from the text file are added to your Address Book. You now can move the new
contacts into their folders.
NN40010-104
Chapter 2 Personal Call Manager
91
Exporting Contacts
You can save all of the contacts in your Address Book into a comma delimited text file. You can
use this file in other applications. For example, you can add your contacts to a customer database,
or use the contacts to create a mailing list.
To export contacts
1
Select the File menu and click Export Address.
The Export address into a text file dialog box appears.
2
Click
to enter the name of the text file.
The Save as dialog box appears.
3
Move to the folder to which you want to store the text file.
4
In the File name box type the file name.
5
Click Save.
The Export address into text file dialog box appears with the path and file name in the
Destination Text File field.
6
From the Field 1 drop-down list, select the information you want to appear in the first field of
the text file (for example, Last Name).
Personal Call Manager User Guide
92
Chapter 2 Personal Call Manager
7
Repeat step 6 until all of the fields show the information you want. For any field in which you
do not want information, click None.
Note: Only one type of information can appear in each box.
8
Click Export.
All the contacts in the Address Book are saved to a comma delimited text file.
Quick Dials
The Address Book is divided into two mains sections: My Contacts and Quick Dials. The
My Contacts section stores your contacts. The Quick Dials section used stores contacts that you
use frequently, or need to access quickly.
The contacts you add to the Quick Dials section are added automatically to the Quick Dials menu.
You can access the Quick Dials menu from the Calls menu, or the Personal Call Manager task tray
menu.
Adding Quick Dials
To add a Quick Dial, add the contact to the Quick Dials section of the Address Book. Any of the
methods described earlier to add a contact can be used to add Quick Dials.
Displaying the information about Personal Call Manager
The About Personal Call Manager window shows the version number of the Personal Call
Manager software you are using.
To access the About Personal Call Manager window
1
Click the Help menu.
2
Click About PCM.
or
Click
NN40010-104
.
Chapter 2 Personal Call Manager
93
Synchronization with the telephone
Common call control operations can be performed on either the telephone or on Personal Call
Manager. For example, to end a call, you can press the Rls (Release) key on the telephone, or click
Release in Personal Call Manager.
Any telephone programming you use to customize your telephone is not synchronized. For
example, the personal speed dials programmed on the telephone are not copied automatically into
Personal Call Manager.
Accessing Help
Accessing context-sensitive Help
You can access context-sensitive Help by pressing the F1 key. The Help information that appears
pertains to the currently active window, dialog box, or menu item.
Opening the Help contents window
You can access Help from the Menu bar.
To access the Help window
1
Select the Help menu.
2
Click Help topics.
The main Help window gives you access to all of the Help information.
Use the Contents tab to view the Help topics. To view one of the topics, double-click the topic.
Use the Index tab to view an alphabetically sorted list of Help topics. The topics on the Index tab
are more detailed than the topics on the Contents tab. To view a topic, click the topic.
Use the Find tab to enter a word or topic for which you need help information. The Find feature
searches through the Help information, and displays information about the word or topic you enter.
Accessing the Tip of the Day
The Tip of the Day window shows helpful information about how to use Personal Call Manager.
To display the Tip of the Day window
1
Select the Help menu.
2
Click Tip of the Day.
Personal Call Manager User Guide
94
Chapter 2 Personal Call Manager
Turning the Tip of the Day off
The Tip of the Day window appears when you start Personal Call Manager.
To turn the off Tip of the Day
1
Select the Help menu.
2
Click Tip of the Day.
3
Clear the Show Tips at Startup check box.
When the Show Tips at Startup check box is empty, the Tip of the Day window does not
appear when you start Personal Call Manager.
To turn the on Tip of the Day
1
Select the Help menu and then click Tip of the Day.
2
Select the Show Tips at Startup check box.
When the Show Tips at Startup check box contains a check mark, the Tip of the Day window
appears when you start Personal Call Manager.
Personal Call Manager preferences
Personal Call Manager preferences determine how the Address Book is searched, how Personal
Call Manager appears when you start it up, and whether the dialing rules are used.
Changing the Search preferences
The Search feature operates in one of two different modes: Slow Search and Quick Search. In
Slow Search mode, you type the characters you want to find, and click the Find Now button.
Personal Call Manager searches through the Address Book to find the contact. In Quick Search
mode, Personal Call Manager starts searching through the contacts as soon as you type a character.
Note: If you plan on using the Quick Search mode, your computer must have a Pentium
processor or better. If you use a slower processor, Fast Search is slower.
NN40010-104
Chapter 2 Personal Call Manager
95
To change the Search mode from the Menu bar
1
Select the Tools menu and then click Options.
The Options dialog box appears.
2
Select the Search Option you want to use.
To change the Search mode from the task tray
1
Right-click the Personal Call Manager task tray icon.
2
Click Options.
The Options dialog box appears.
3
Select the Search Option you want to use.
Personal Call Manager User Guide
96
Chapter 2 Personal Call Manager
Changing the Startup Option
The Startup Option determines if the window is open or minimized when you start Personal Call
Manager.
To change the Startup Option from the Menu bar
1
Select the Tools menu.
2
Click Options.
The Options dialog box appears.
3
Select the Startup Option you want to use.
To change the Startup Option from the task tray
1
Right-click the Personal Call Manager task tray icon.
2
Click Options.
The Options dialog box appears.
3
Select the Startup Option you want to use.
NN40010-104
Chapter 2 Personal Call Manager
97
Changing the Dialing Rule Setting
The Dialing Rule Setting determines if the dialing properties entered in the Dialing Properties
dialog box are used. This feature is enabled by default.
When the Dialing Rule Setting is enabled, Personal Call Manager uses dialing properties, such as
the local area code and the outside line access code, when making a call. When the Dialing Rule
Setting is disabled, Personal Call Manager does not use the dialing properties, and you must enter
manually any additional dialing information, such as the outside line access code.
To change the Dialing Rule Setting from the Menu bar
1
Select the Tools menu.
2
Click Options.
The Options dialog box appears.
3
Click the Use Rules defined in the Dialing Property Dialog check box to change the setting.
To change the Dialing Rule Setting from the task tray
1
Right-click the Personal Call Manager task tray icon.
2
Click Options.
The Options dialog box appears.
3
Click the Use Rules defined in the Dialing Property Dialog check box to change the setting.
Personal Call Manager User Guide
98
Chapter 2 Personal Call Manager
Changing the Caller’s Record Display Setting
When the Caller’s Record Display Setting is on, Personal Call Manager compares the incoming
telephone number with the entries in the Address Book. If a match is found, the Notes tab of the
Address Properties dialog box appears showing the information for the caller. If a match is not
found, a message appears asking if you want to add the caller to the Address Book.
Personal Call Manager receives the incoming telephone number only if:
•
You subscribe to a Caller ID (CLID) service.
or
•
You are receiving an internal call through Business Communications Manager.
To change Caller’s Record Display Setting from the Menu bar
1
Click the Tools menu.
2
Click Options.
The Options dialog box appears.
3
Click the Auto display contact’s notes page upon answering the call check box to change
the setting.
NN40010-104
Chapter 2 Personal Call Manager
99
To change the Dialing Rule Setting from the task tray
1
Right-click the Personal Call Manager task tray icon.
2
Click Options.
The Options dialog box appears.
3
Click the Auto display contact’s notes page upon answering the call check box to change
the setting.
Quitting Personal Call Manager
You can quit Personal Call Manager from the task tray or the window.
To quit Personal Call Manager using the task tray
1
Right-click the Personal Call Manager task tray icon.
2
Click Exit.
To quit Personal Call Manager using the window
1
Select the File menu.
2
Click Exit.
You also can quit Personal Call Manager by clicking the close button in the upper right corner of
the Personal Call Manager window.
Removing Personal Call Manager
You can remove Personal Call Manager from your computer. For example, if you install a new
computer, you want to move Personal Call Manager to the new computer. The Uninstall program
ensures all of the files that comprise Personal Call Manager are removed from the computer hard
disk.
Note: If you are moving Personal Call Manager to a new computer, make a copy of the
PCMAddressBook.mdb file before you remove Personal Call Manager. (Use Find or look
in the Nortel folder.) You then can copy this file to the new computer where Personal Call
Manager is installed. This procedure copies all of the contacts you have added to the
Address Book to the new computer.
Personal Call Manager User Guide
100
Chapter 2 Personal Call Manager
To remove the Personal Call Manager software
1
Make sure you quit Personal Call Manager.
2
Click the Windows Start button.
3
Point to Settings.
4
Click Control Panel.
5
Double-click the Add/Remove Programs icon.
6
Click Personal Call Manager.
7
Click the Add/Remove button.
All of the files associated with Personal Call Manager are removed from your computer hard
drive.
NN40010-104
101
Glossary
Address Book
The portion of Personal Call Manager where you store the telephone numbers and
addresses of people and businesses.
Call Forward
A feature that forwards all the calls arriving at your telephone to another telephone.
Calling Line Identification (CLID)
A service provided by the telephone company that enables you to see the caller’s
telephone number, and in some cases the caller’s name. If you subscribe to this service,
Personal Call Manager then shows you the caller’s name or telephone number on the
computer screen.
Contact
A contact is any entry in the Address Book. A contact can be a person, business, or any
number or address you want stored in Personal Call Manager.
Dialing properties
The dialing properties define where you are located, and what is required to dial from this
location.
Do Not Disturb
A feature that stops calls from ringing at your telephone. The You Have a New Call
dialog box still appears.
Business Communications Manager TSP
The application that provides Personal Call Manager with access to the TAPI functions.
Extension name
The name used to identify your telephone on the Business Communications Manager
system.
Handsfree
A feature you can use to make calls without using the telephone handset.
Icon
A graphic symbol used to represent an object (such a contact or call), or a task (such as
manual dialing) in Personal Call Manager.
Personal Call Manager User Guide
102
Glossary
List View
The portion of the Address Book that shows the contacts and folders stored in the selected
folder.
Menu bar
The menu bar shows the menus available from the main window.
PC (Personal Computer)
A Windows® compatible computer that runs the Personal Call Manager software.
Quick dials
A group of telephone numbers that you can call by selecting a menu item.
Status bar
An area at the bottom of the computer screen that provides information messages about
Personal Call Manager.
TAPI
Telephony Application Programming Interface is a set of programming tools that allows
Personal Call Manager to communicate with the telephone system.
TAPI line
The telephone line that Personal Call Manager uses to place a call.
Task tray
An area in the bottom right hand corner of the PC screen that contains the Personal Call
Manager task tray icon used to perform several common call control functions.
Taskbar
An area at the bottom of the computer screen that contains the Personal Call Manager
taskbar icon that is used to maximize the Personal Call Manager Window, or bring it to
the foreground.
Tool bar
The Tool Bar that contains several buttons that provide quick and easy access to Personal
Call Manager functions.
Tree View
The portion of the Address Book that shows how the folders used to store the contacts are
organized.
Wild card character
A special character that can be used represent any letter or number.
NN40010-104
Index
103
Index
A
acronyms 14
Active Call icon 21, 25, 43
Address Book 22
adding a contact 66
changing the view 65
displaying 24
icons 64
list view 65
tree view 64
Address of contact 68
Answering a call
Call Answer dialog box 44
held call 46
when is someone calling 43
who is calling 43
B
Blind transfer 48
Buttons
About 23
Copy 23
Cut 23
Detail 23, 25
Find Person 23
Large Icons 23, 25
List 23, 25
Manual Dial 25
New Contact 23
New Folder 23
Paste 23
Small Icons 23, 25
toolbar 23
Up One Level 23
C
redialing 42
returning 42
Calling card 34
Calling Line Identification service 42, 43, 98
Calls
displaying the number of 20
ending 58
switching between several calls 47
Calls menu 22
Closing the window 26
Conference
creating 54
ending 57
hold 55
splitting 56
Conference Call icon 21, 25
Contact
adding 66
address 68
changing 76
copying 78, 80
cutting 82
default telephone number 70
deleting 83
e-mail address 69
finding 50, 51, 60, 73
moving 81
name 68
pasting 80, 82
telephone number 68
Copying
contact 78
folders 85
copyright 2
Call Answer dialog box 44
Current Calls box 22
displaying 24
Call duration 25
D
Call Forward 26, 59
Dialing properties 27
Call Waiting 36
Do Not Disturb (DND) 25, 59
Calling
last callers 42
last calls 42
prime telephone number 39
Quick Dials 42
Duration, call 25
E
E-Mail Address 69
Personal Call Manager User Guide
104
Index
redialing a number 42
returning a call 42
task tray 40
toolbar 41
Exiting Personal Call Manager 99
F
Finding a contact 73
entering a name or number 75
using wild cards 75
Folders
adding 84
copying 85
cutting 87
deleting 88
moving 86
pasting 86, 87
H
Held Call icon 21, 25, 46
Held Conference icon 21, 25
Help
contents tab 93
find tab 93
index tab 93
messages 25
opening 93
Hold
answering a held call 46
conference calls 55
how to get help, support 11
I
Icons
active call 21, 25, 43
Address Book 64
conference call 21, 25
held call 21, 25, 46
held conference 21, 25
Personal Call Manager 44
ringing 21, 25
task tray menu 21
Menu bar 22
Moving
contacts 81
folders 86
My Contacts 64
N
Name 68
New Call dialog box 43
Nortel distributor 11
O
On-line help
accessing 93
contents tab 93
find tab 93
index tab 93
opening 93
Outside lines 37
P
Personal Call Manager
about 92
exiting 99
location 30
preferences 94
quitting 99
removing 99
starting 19
task tray icon 20, 44
Preferences
dialing properties 27
Personal Call Manager 94
search 94
L
Prime telephone number, calling 39
Last callers 42
Pulse dialing 37
Last calls 42
Q
Line used 27
List View 65
M
Making a call 38
Address Book 39
Calls menu 40
Quick Dials 42
NN40010-104
Quick Dials 64
adding 92
list 42
Quitting Personal Call Manager 99
R
Redialing a telephone number 42
Index
regulatory information 2
related publications 16
Removing Personal Call Manager 99
Returning a call 42
Ringing icon 21, 25
S
Search
entering a name or number 75
for a contact 73
options 95, 96, 97, 99
preferences 94
wild cards 75
Search mode 73
Quick Search 75
Slow Search 74
Starting Personal Call Manager 19
Status bar 22
displaying 26
support 11
express routing code 11
how to get help 11
Nortel reseller 11
Nortel Solutions Center 11
Nortel Web site 11
Large Icons button
List button 23, 25
Manual Dial button
New Contact 23
New Folder 23
Paste button 23
Small Icons button
Up one level button
105
23, 25
25
23, 25
23
trademarks 2
Transferring a call
blind 48
Calls menu 50
task tray 50
window 48
with an announcement 51
without an announcement 48
Tree View 64
W
Wild cards 75
Window
closing 26
components 22
opening 21
Synchronization with the telephone 93
T
Task tray icon 20
displaying the number of calls 20
menu 20
who is calling 44
Task tray menu 21
icons 21
Telephone line used 25, 27
Telephone lines 37
Telephone number of contact 68
default 70
Telephone synchronization 93
Tone dialing 37
Toolbar 22
About button 23
buttons 23
Copy button 23
Cut button 23
Detail button 23, 25
displaying 23
Find Person button 23
Personal Call Manager User Guide
106
Index
NN40010-104