1
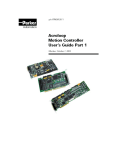
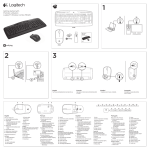
AS PRG-1000
AUTOSTART TECH TOOL
USER GUIDE
AS PRG-1000
AS PRG-1000
AUTOSTART TECH TOOL
PRG-1000 Parts
The PRG-1000 includes:
•
The handheld unit and a 9-volt battery;
•
The PC-LINK adaptor, which enables communication between the PRG-1000 and
a personal computer. This connectivity with a personal computer offers the
capability of upgrading the PRG-1000 firmware and other additional features,
such as saving/recalling personal programming options files on a computer.
To PRG-1000
PC-LINK
connector
To computer USB
port
Fig. 1
To PC-LINK
adapter
•
The MODULE cable enables communication between the remote starter and the
PRG-1000. This T harness, which connects to the remote starter antenna, allows
the unit to be programmed and/or read even when the remote starter is powered
off.
Fig. 2
Female to
Antenna
Male to Antenna
cable
To
PRG-1000
AS PRG-1000
AUTOSTART TECH TOOL
•
The OBDII cable enables communication between the PRG-1000 and a
vehicle’s OBDII system. The PRG-1000 recognizes multiple car networks – i.e.,
J1850, ISO9141, KWP2000 and CAN. The user can erase most GENERIC
OBDII DIAGNOSTIC TROUBLE CODES (DTCs). The PRG-1000
does not erase specific codes – i.e., most airbags and antipollution DTCs.
Fig. 3
•
The PRG-1000 comes with two test leads and alligator clips, which can be used
to locate a valid tachometer source.
Fig. 4
AS PRG-1000
AS PRG-1000
AUTOSTART TECH TOOL
AUTOSTART TECH TOOL
14. Abbreviation Table of Functions and
PRG-1000 Options
•
•
•
•
•
•
•
•
The remote starter can be programmed even when it is solely powered by the
PRG-1000.
The remote starter or alarm system must be disarmed or in Valet Mode to access
the programmer’s menu. The PRG-1000 displays a “COMMUNICATION
ERROR” message when trying to program an armed unit.
Select one of the PRG-1000 functions (TACH/Hz, OBDII SCAN, REMOTE,
DIAG.,
FUNCT,
MODULE
PROGRAMMING
or
INSTALLER
PROGRAMMING FILES) to enter its menu.
Use the “UP” and “DOWN” buttons to scroll the available options.
Press “ENTER” to access the desired option.
Repeat the above procedure if there are additional options you would like to
access.
Press “EXIT” to go back to the preceding option.
Press “ENTER” followed by “WRITE” to save the new settings into the unit’s
processor. New settings can be saved either one at the time or all at once, after all
changes have been completed.
Buttons & Functions
1. ON/OFF BUTTON
Press the “ON/OFF” button for 1 second to turn the PRG-1000 on.
• You will hear 3 beeps.
To turn it off, press the “ON/OFF” button for 3 seconds.
• You will hear 2 beeps.
The PRG-1000, if operating on its 9-volt battery, will turn off by itself if left unattended
for more than 5 minutes.
The programmer cannot be turned off, and will not automatically turn off, when it is
powered through one of its link cables. As a reminder, 2 beeps will be heard every 5
minutes if the programmer is left unattended.
This tool is made for a 12-volt DC operation. To avoid damages, do not use it with
other types (24-volt DC, 120 AC, etc.) of power sources.
Options in Short Words
No.
1
2
3
4
5
6
7
8
9
10
11
12
13
14
15
16
17
18
19
20
21
22
23
24
25
26
27
28
29
30
31
32
33
34
35
36
Abbreviation
ACC
AUX
Bsc
Btn
CF
Conf
Config
Const
Cus
CWM
Dis
DomLite
DZL
F
Gen
Ide
IGN
LK
m
Mcr
Mon
ms
Notif
Pass
PriorT
RS
s
SK
SWS
Temp
Trk
Tub
ULK
V/S
W/
W/O
Description
accessories
auxiliary
basic operation
button
car finder
confirmation
configuration
constant
customized operation
cold weather mode
disarm
dome light supervision
diesel
function
generation
idle
ignition
lock
minute(s)
multi-car operation
monitoring
millisecond(s)
notification
passive
priority door unlock
remote start
second(s)
starter kill
swap start
temperature
trunk
turbo
unlock
voltage sense
with
without
AS PRG-1000
AS PRG-1000
AUTOSTART TECH TOOL
AUTOSTART TECH TOOL
12. SAVE BUTTON
2. UP & DOWN BUTTONS
The “SAVE” button allows the installer to save customized settings of specific models
for future units programming. Installers can save up to 10 customized settings.
Please use the proper cable (see Fig. 2).
Use the “UP” and “DOWN” buttons to scroll the PRG-1000 menu.
3. EXIT & ENTER BUTTONS
1. Press “READ” and select the brand you wish to use.
2. If you want to save the unit’s current settings to a file, press “SAVE”.
3. Select “Auto Save” to store the settings in a new file, or select the file you want
to replace.
4. Press “ENTER” to save the file. A message displaying the file location will
appear.
If you wish to save the settings you are currently working on to a file, program all
the desired changes into the PRG-1000. Before pressing “WRITE”, press “SAVE”
and repeat steps 3 and 4.
Use the “EXIT” button to go back to the preceding menu without modifying the unit’s
settings.
Use the “ENTER” button to access or validate the unit’s programming options.
4. TACH/Hz
13. PC-LINK BUTTON
The “PC-LINK” button enables communication between the PRG-1000 and the
interface of a computer.
Please use the proper cable( see Fig. 1).
This allows the PRG-1000 firmware to be upgraded and offers some programming
conveniences to the person using the web or the desktop application.
To use this function, you must first download and install the PC-LINK application. The
installation program includes the adaptor’s software and pilot and the desktop
application. It can be downloaded at: http://www.autostart.ca/dealer section.php.
You have to be a registered Autostart technical support user to access this section.
For any question, contact the Autostart Technical Support department at: 1-800-2285190 or [email protected].
Warning:
The
personal
computer
requires
a
software
installation
before
it
can
enable
communication. Please install the software before connecting the PC-LINK adaptor to your PC.
PC-LINK
The “TACH/Hz” button provides the following 3 options:
Please use proper cable (see Fig. 2 and 4).
1. “Read From Vehicle” enables the PRG-1000 tachometer signal finder. Connect
the (-) lead of the PRG-1000 to the vehicle’s (-) ground source. Use only the (+)
lead to test and locate a proper tachometer signal. To avoid damages, do not
connect it to the ignition coil high voltage output. The programmer will display
the tachometer frequency and its validity.
2. “View Stored Tach” allows the user to read the tachometer frequency directly
from the remote starter and make adjustments if the tachometer is already stored.
You can also adjust and write the final tachometer setting back in the remote
starter’s memory.
3. “Learn Tach” makes it easy to program the tachometer setting on a remote
starter that does not have one programmed yet. Connect the (-) lead of the PRG1000 to the vehicle’s (-) ground source. Use only the (+) lead to test and locate a
proper tachometer signal. To avoid damages, do not connect it to the ignition coil
high voltage output. In order to exit the “Learn Tach” mode you must turn the
ignition switch ON and then OFF.
AS PRG-1000
AS PRG-1000
AUTOSTART TECH TOOL
AUTOSTART TECH TOOL
5. OBDII SCAN BUTTON
Once the PRG-1000 is connected to the vehicle, the user can erase most generic OBDII
DTCs. Press the “OBDII SCAN” button and follow the instructions displayed.
10. WRITE BUTTON
The “WRITE” button is used to save the programming changes to the unit’s processor.
In order to avoid the unit’s EEPROM corruption, do not disconnect the PRG-1000
during its writing process.
Please use the proper cable (see Fig. 2).
Do not use the OBDII cable with any apparatus other than the Autostart’s PRG-1000.
Please use the proper cable (see Fig. 3).
Warning: When erasing OBD II codes, some vehicles delete the memory bank used for fuel
economy and anti pollution. We recommend that the user gets from the manufacturer all the
required information before erasing OBD II codes.
6. REMOTE BUTTON
The “REMOTE” button provides 5 options:
Please use the proper cable (see Fig. 2).
1. “LEARN NEW REMOTE” makes it possible for the user to learn a new
transmitter without having to go through the regular programming mode. Follow
the instructions displayed to learn a new transmitter.
2. “USE REMOTE” allows the use of an already learned transmitter to test and
operate the remote starter without having to unplug the antenna from the PRG1000. To use this function, follow the instructions displayed. (Note: A 2-way
remote will not receive confirmation in this option.)
3. “ERASE ALL REMOTES” erases, at once, all existing transmitter codes from
the unit. Follow the instructions displayed to delete all transmitters from the
remote starter’s memory.
4. “# REMOTE LEARNED” identifies the number of transmitters that are coded
in the remote starter or alarm. Follow the instructions displayed to view how
many transmitters are programmed into the unit.
5. “TEST REMOTE BUTTON” allows the user to test the transmitter’s
operations. Establish which generation of remote (1ST generation -- 4 buttons or 5
buttons with a STOP button, or 2nd generation -- with advanced options such as
AUX and / or SHIFT button(s)) is being tested and follow the instructions
displayed in order to test the transmitter. Note that the transmitter does not have
to be coded into the remote starter. The PRG-1000 displays which button is
pressed when this function is used.
•
Press “ENTER” followed by “WRITE” to store the unit’s new settings. The
PRG-1000 will display “OPTIONS WRITTEN SUCCESSFULLY” if the
programming was done properly. A “COMMUNICATION ERROR” message
will appear if the programming was unsuccessful.
11. RECALL BUTTON
The “RECALL” button allows the installer to recall customized settings of specific
models for future units programming. Installers can recall and save up to 10 customized
settings.
Please use proper the cable (see Fig. 2)
1. Press “RECALL”.
2. Select the file containing the customized settings you wish to review or apply.
3. Review the settings or press “WRITE” to program them into the unit’s processor.
AS PRG-1000
AS PRG-1000
AUTOSTART TECH TOOL
AUTOSTART TECH TOOL
9. READ BUTTON
7. DIAGNOSTIC BUTTON
The “READ” button displays the remote starter’s information and allows modification
of its options.
Please use the proper cable (see Fig. 2).
1. Press “READ” and select one of the brand names displayed on the PRG-1000. If
the unit is not compatible, the PRG-1000 will display a “PRODUCT VERSION
NOT SUPPORTED” message that prompts you to “Upgrade Programmer With
PC Interface”. When the unit is compatible, the PRG-1000 displays the unit’s
model number and software version.
2. Select the programming “Mode” you wish to access by scrolling “UP” or
“DOWN” and pressing “ENTER”. You can always return to the previous menu
by pressing “EXIT”.
3. Select the programming “Function” you wish to access by scrolling “UP” or
“DOWN” and pressing “ENTER”. You can always return to the previous menu
by pressing “EXIT”.
4. Select the programming “Option” you wish to change by scrolling “UP” or
“DOWN” and pressing “ENTER”.
5. At that moment you can either immediately save the newly entered setting by
pressing “ENTER” followed by “WRITE”, or wait until all changes are made
and then press “WRITE” to save the new settings all at once to the remote
starter.
6. Press “SAVE” to save the new settings to the PRG-1000 file.
Warning: Modifications made to the customizable options will apply solely when writing to the remote
starter EEPROM is completed. Never disconnect the AS PRG-1000 during the writing process. Cable
disconnection may lead to remote starter EPROM corruption.
The “DIAG” button is used to troubleshoot units. It offers 3 options:
Please use the proper cable ( see Fig. 2).
1. “START FAILURE” displays the last recorded remote start failure.
2. “LAST ALARM” displays the last event that generated a full alarm trigger.
3. “ERASE START FAILURE” deletes the last stored remote start failure.
8. FUNCTION BUTTON
The “FUNCT” button is used to reset a unit to its factory settings, or to erase all of the
installer’s programming files.
Please use the proper cable( see Fig. 2).
1. “RESET STARTER” clears all previous settings, events loggings, tachometer
references and transmitter codes stored in the unit, and resets them to the factory
settings. After selecting “RESET STARTER”, you are prompted to confirm your
choice by pressing “ENTER”. If you do not wish to reset the unit completely,
press “EXIT” to go back to the preceding menu.
2. “RESET PRG-1000” erases all of the installer’s programming files at once.
After selecting “RESET PRG-1000”, you are asked to confirm your choice by
pressing “ENTER”. If you do not wish to reset the programmer’s files
completely, press “EXIT” to go back to the preceding menu.
SAVE (reference 12)
RECALL (reference 11)
READ (reference 9)
EXIT (reference 3)
UP (reference 2)
REMOTE (reference 6)
ON/OFF (reference 1)
TACH Hz (reference 4)
BUTTONS
BLUE LCD DISPLAY
DISPLAY
Abbreviation Table of
Functions and Options in
Short Words (reference 14)
PC-LINK (reference 13)
WRITE (reference 10)
DOWN (reference 2)
ENTER (reference 3)
DIAG. (reference 7)
FUNCT (reference 8)
OBD II SCAN (reference 5)
BUTTONS
TACHOMETER LEADS
OBDII CONNECTOR
ANTENNA CONNECTOR
REMOTE STARTER
PC-LINK CONNECTOR
HEADERS
AUTOSTART TECH TOOL
AS PRG-1000