1
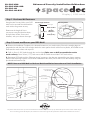
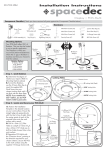
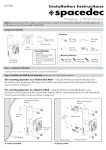
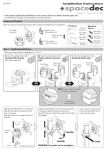
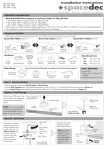
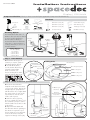
Step 4. (Optional) Install Monitor Security Cable Step 3. Attach Screw Cover Remove the paper backing from the Screw Cover and adhere to the POS base as shown. Screw Cover (Security Cable NOT Included) A. Loop the Security Cable (Kensington or similar) around the internal post of the POS Assembly. B. Feed the other end of the cable through the POS Assembly and out the Cable Management Hole. C. After you have attached the monitor (As directed in Step 8) install the lock to the monitor as per the manufacturer guidelines. Step 5. Install Top Cap Step 6. Install Monitor Cables Top Cap Prior to attaching your monitor, install the monitor cables. PUSH Cable Management Hole IN Run them through the Cable Management Hole, down the pole and out the Cable Access Hole in the work surface. OUT Push down firmly to attach the Top Cap. Step 7. Attach the VESA plate to your Display There are two mounting hole configurations: UÊÇxÊÝÊÇx UÊ£ääÊÝÊ£ää Choose appropriate Mounting Screws from the Hardware supplied to suit your Display. Mounting Screws (x4) VESA Plate Top of Display Çx (3”) £ää (4”) Çx (3”) £ää (4”) Back of Display Step 8. Attach your Display to the POS Assembly Hook the top of the VESA plate onto the Quickshift Mount. Gently push the bottom of the Display into the Mount until you hear a ‘CLICK’. Insert the Security Screw, and tighten using the 2mm Allen Key supplied. HOOK TIGHTEN PUSH Security Screw CLICK Back of Display Step 9. Adjust the VESA Ball Mount Position your Display to the desired viewing angle, using the 40° angular movement allowed by the VESA Ball Mount. 2mm Allen Key Advanced Security Installation Tension Plate Loosen (-Kg) If the display does not hold its position, or is too resistant, adjust the Tension Plate (see diagram right). Tightening Tool To make any adjustments, use the Tightening Tool supplied. These Installation Instructions secure the POS Multi using the provided fasteners from above thework surface. For advanced Security Installation from below the work surface. Please refer to the Advanced Security Installation Addendum. Tighten (+Kg) No portion of this document or any artwork contained herein should be reproduced in any way without the express written consent of Atdec Pty Ltd. Due to continuing product development, the manufacturer reserves the right to alter specifications without notice. Published: 27.07.09 ©