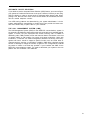
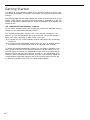
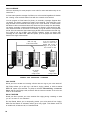
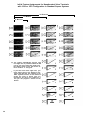
1
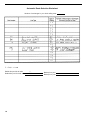
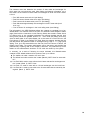
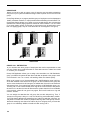
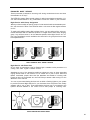
AT&T
MERLIN
COMMUNICATIONS SYSTEM
PLANNING GUIDE:
MODELS 1030 AND 3070
WITH FEATURE MODULE 5
®
Table of Contents
Page
Introduction
2
Decisions
Square vs. Pooled Decision
About Square Systems
Standard Square Configurations
Customized Square Configurations
About Pooled Systems
Button Access vs. Dial Access to Line Pools
Automatic Route Selection
The Call Management System
3
3
3
4
4
6
8
9
9
Getting Started
Administrator/Attendant Console
Types of Consoles
Using the Console
Specifying Touch-Tone and Rotary Signaling
Call Restrictions
Allowed Lists
Automatic Route Selection (ARS)
ARS Default Tables
Group Page
Group Call Distribution
Enhanced Night Service
Night Service with Group Assignment
Night Service with Extra Alert
Night Service with Outward Restriction
Night Service with Time Set
Station Message Detail Recording (SMDR)
System Speed Dial Codes
Return interval for Transferred Calls
One-Touch Hold with Call Announcement
10
10
11
14
14
15
15
16
17
20
20
21
21
21
22
22
22
22
23
23
Voice Terminal Programmability
Auto lntercom
Automatic Line Selection
Call Coverage
Call Pickup
Do Not Disturb
Last Number Radial
Line Pickup
Notify (Send, Receive)
Outside Auto Dial
Personal Speed Dial
Personalized Ring
Privacy
Saved Number Redial
Simultaneous Voice and Data Calls
Touch-Tone Enable
Voice Announcement Disable
24
25
25
26
26
26
27
27
27
27
27
27
27
28
28
28
28
29
Initial Feature Assignments
Nonattendant Voice Terminals with 1030 or 3070 Configuration in Standard
30
Square Systems
Nonattendant Voice Terminals with 1520 Configuration in Standard Square
31
Systems
32
Nonattendant Voice Terminals in Pooled Systems
Administrator/AttendantConsole for Small Systems in Attendant Mode 3 3
Administrator/Attendant Console for Large Systems in Attendant Mode 3 4
Documents
35
Introduction
®
The advanced technology of the MERLIN communications system allows you to
customize the system to meet your business needs. As the system administrator, you
are responsible for selecting MERLIN system options and features that will enhance
your business operations.
This guide will help you decide which features to assign to your MERLIN system,
and to each voice terminal. Voice terminals are MERLIN system telephones. We
would like you to read through this guide and also the System Configuration Forms
before the Technical Customer-Support Specialist (TC-SS) assigned to your account
contacts you. Reading this guide beforehand will enable you to have an understanding of the questions the TC-SS will ask you, and also how you want your system to
operate. Since the needs of customers vary, we need you to supply the information
contained in the System Configuration Forms to customize your system.
This planning guide explains everything you need to know to customize your
MERLIN communications system.
Here is what you need to do:
1. Read this planning guide, which is divided into the following sections:
● Decisions:
This section helps you make the following systemwide
choices:
— How will people access outside lines? Will you have a square or pooled
system?
— If you decide to have a pooled system, how will people access the line
pools? Will they press a button or dial a number to get an outside line?
— Will you be using the Automatic Route Selection feature with your
MERLIN communications system?
— Will you have a Call Management System working with your M E R L I N
communications system?
● Getting Started: This section discusses systemwide features that will be
set by you when your system is installed. If necessary, you can change
these features at any time.
● Voice Terminal Programmability: This section discusses the features that
are programmed at each voice terminal. Voice terminals can also be programmed from the administration console.
● Initial Feature Assignments: This section shows you the initial features
preassigned to voice terminal buttons.
● Documents: This section discusses the documentation that you will
receive with your MERLIN system and who the appropriate person for each
document would be.
2. After reading through this guide, remove the forms from the front pocket of
this package. Read through the “Instructions for Completing System and
Voice Terminal Configuration Forms.” If you want to begin filling out the forms,
follow the directions in those instructions to complete:
● The System Configuration Form.
● One Voice Terminal Configuration Form for each voice terminal in your
system (make enough photocopies of this form for all the voice terminals
in your system). When filling out this form, make certain that you have the
correct form for your system; there are several of these forms.
3 . If you have any questions, please call the Technical Customer-Support
Specialist responsible for your account. You will find his or her name on the
letter that accompanies this package.
2
Decisions
SQUARE VS. POOLED DECISION
One of the first decisions you must make about your system is how people will access
outside lines from their voice terminals. The MERLIN communications system gives
you two configuration options for arranging your outside lines: square or pooled. In
a square system, each outside line appears on a separate button at each voice terminal, except for those voice terminals with too few buttons to accommodate all the
lines. In a pooled system, outside lines are grouped together so that one button provides access to several outside lines. On administrator/attendant consoles, however,
each outside line appears on a separate button, whether your system is pooled or
square, and you cannot change this arrangement.
Whether your system should be square or pooled depends on your specific business
needs. If you want to use the Automatic Route Selection (ARS) feature, your lines
must be pooled and your system must be set for Dial Access to Line Pools (Dial
Access is discussed on page 8. The characteristics of both configurations are discussed in detail in the paragraphs that follow.)
ABOUT SQUARE SYSTEMS
A square configuration is one in which outside lines are represented by separate buttons on every voice terminal in the system. A square configuration simplifies call
handling because people can join in on calls or pickup calls on hold just by touching
the appropriate line button at almost any voice terminal.
You can choose between two kinds of square configurations: standard or customized. In the standard configuration, you give all voice terminals in the system
access to the same lines. In the customized configuration, you assign specific lines
or sets of lines to selected groups of voice terminals. You can also assign personal
lines to individual voice terminals in a customized square configuration.
3
Standard Square Configurations
The standard square configuration is ideal for offices in which all employees use the
same lines to make and receive calls. In this arrangement, every line in the system
appears at each voice terminal that has enough buttons to accommodate that number
of lines. Depending upon the size of your system, you can assign up to 30 lines to
as many of your voice terminals as you want.
You assign each of your lines to the same buttons at each voice terminal. To get the
most from a standard square configuration, all your voice terminals should have
enough buttons to handle all the lines in your system. If you have ordered many
5-button voice terminals, keep in mind that they will be more difficult to use in a square
arrangement. An example of a standard square configuration appears below. All six
lines in the system are available for general use and appear on the same buttons
at each voice terminal, as shown.
Customized Square Configurations
In a customized square configuration, you assign individual lines or groups of lines
to selected voice terminals with similar requirements for placing and receiving calls.
This arrangement lets you tailor your communications system to meet the needs of
different departments. Calls are easily passed between departments using the Line
Pickup feature. This configuration also simplifies keeping records of calling patterns
within your business.
EXAMPLE OF STANDARD SQUARE CONFIGURATION
4
For example, the departments at a car dealership may have different calling needs.
Say that Ultimate Motors has eight local lines, three WATS lines, and one Foreign
Exchange (FX) line. The sales and office staff use the out-of-state WATS line frequently
to speak with manufacturers’ representatives, haulers, and other dealerships. This
group uses an in-state WATS line to contact customers, vendors, and the Division
of Motor Vehicle Registration in the state capital. The third WATS line is an incoming
in-state WATS line used by customers who live outside the immediate area. The service staff doesn’t usually have to make long distance calls; however, one major equipment supplier is located 25 miles away, and calls to this supplier would normally be
toll calls. To reduce this expense, Ultimate has a Foreign Exchange line for the supplier’s exchange code, 560, When the staff uses this line, calls to the supplier are
treated as the equivalent of local calls. The manager handles many confidential
negotiations over the telephone and so requires a personal line.
A customized square configuration is the most appropriate system arrangement for
Ultimate Motors’ varied communications requirements. The administrator assigns
the three WATS lines and three of the eight local lines to the sales and office staff.
The service department’s voice terminals get three other local lines and the Foreign
Exchange line. The seventh local line is assigned to the voice terminal at the parts
desk, and the eighth is assigned as a personal line at the manager’s voice terminal.
The figure below illustrates this type of configuration.
Telephone Lines of Automobile Dealership
EXAMPLE OF CUSTOMIZED SQUARE CONFIGURATION
5
ABOUT POOLED SYSTEMS
For many businesses large enough to need the MERLIN system, Model 1030 or
Model 3070, pooled operation is more cost-efficient than a square one because:
●
The lines in the pool are shared by many people, so each line gets more use.
As a result, you may need fewer outside lines.
● Only two buttons on each voice terminal are necessary to represent up to 30
interchangeable lines, so you can use more of the smaller, less expensive voice
terminal models.
● Voice terminal buttons that would otherwise represent lines are used for system
features — a substantial advantage in systems with a large number of outside
lines or many 5- and 10-button voice terminals.
● Automatic Route Selection allows you to determine which of your line pools provide the lowest cost, most efficient dialing methods for particular types of calls.
SIMPLE POOLED SYSTEM
The diagram above shows all lines assigned to a pool. You do not need to assign
all your lines to pools; you can assign individual lines that are not included in any
pool to any voice terminal in your system. For example, you can assign individual
6
special-purpose lines such as personal or WATS lines. Assigning a special line to
a button on one voice terminal in no way affects the use of the corresponding button
on other voice terminals. A diagram of a pooled system with eight lines appears below.
Line C
Line H
Line B
Line G
Line A
Line F
Intercom
Voice
Line E
Intercom
Ring
Line D
Attendant console
Main pool =
Line pool 2 =
Line pool 3 =
Line not assigned to pool =
Voice terminal 1
Line pool 3
Line D
Main pool
Main pool
IntercomVoice
IntercomVoice
Voice terminal 2
Lines A, B, C
Lines E, F
G, H
Line D
Line pool 2
Main pool
IntercomVoice
Voice terminal 3
POOLED SYSTEM WITH 8 LINES
7
Button Access vs. Dial Access to Line Pools
NOTE: If you want to use Automatic Route Selection, you must select Dial Access
to Line Pools.
If you have decided to configure your system as pooled, you must also decide how
voice terminals will access the pools. You can choose one of two options for line
pools: Button Access to Line Pools or Dial Access to Line Pools.
If you have only one or two line pools, Button Access is the best option for your system.
If your system has several line pools, however, Dial Access is preferable because
you can access all pools by using only two buttons on each voice terminal. Dial
Access is also preferable if you want basic telephones to have access to more than
one line pool or if you want 5-button voice terminals to have access to more than one
special pool.
DIAL ACCESS TO POOLS
Assume that you have five line pools. With the Dial Access option (see the diagram
above), you arrange the system so that people can access any line pool by lifting
the handset, touching one of the two buttons above Intercom-Voice, and dialing the
access code assigned to the pool (9 for the main pool or 890 through 899 for the
others). Even if you set your system for Dial Access, you can still assign some pools
to particular buttons, if you like.
With the Button Access option (see the diagram below), people access all line pools
directly through pool buttons on each voice terminal. In such an arrangement, the
first two buttons above Intercom-Voice provide access to the main pool. You may
assign additional buttons for access to other pools that may include WATS lines, FX
lines, or lines used for special purposes.
BUTTON ACCESS TO POOLS
8
AUTOMATIC ROUTE SELECTION
If you decide to use the Automatic Route Selection (ARS) feature, you must configure
your system as Pooled with Dial Access to the pools. However, because you are using
ARS, the dialing of codes to access pools is eliminated when placing calls. When
placing a call, the user has to touch a Pool Access button, lift the handset, and then
dial the outside telephone number.
Your ARS routing patterns are determined by your system administrator. It is the
system administrator’s responsibility to decide which lines provide the lowest cost
and most efficient way to place calls for your business.
THE CALL MANAGEMENT SYSTEM (CMS)
The Call Management System (CMS) for the MERLIN communications system is
an automatic call distributor that answers calls and connects them to available agents.
Agents, of course, are your employees who answer incoming calls. In addition to
distributing calls, CMS provides current and historical data to a business in the form
of reports relative to call handling, line usage, and agent productivity. Using such
information, a business can make management decisions concerning how many
agents and lines it needs to support a specific function such as inside sales or
customer services, inquiries, or complaints. In addition, CMS offers a business a great
amount of flexibility to change the number of agents or line configurations to handIe
the needs of callers in the best way possible. If your business has CMS for the
MERLIN communications system, you need to administer your system to be compatible with this automatic call distributor.
9
Getting Started
Your MERLIN communications system can be tailored to meet your specific communications requirements. To customize your system, you can add a variety of system
features.
The following pages discuss those features and explain the effect they have on your
system. These features are the first ones that should be administered to get your
system up and running. Read through this section and determine which features your
system will use.
THE ADMINISTRATOR/ATTENDANT CONSOLE
Do you have a 34-button deluxe voice terminal with or without an Attendant Intercom
Selector as your administrator/attendant console?
The administrator/attendant console is the voice terminal connected to the
intercom-10 Voice Terminal Module jack in the control unit. The console operates in
either of two ways, depending on which mode you put it in.
●
It functions as your primary attendant console under day-to-day call-handling
conditions.
● It functions as the administrator console when you use it to establish options
and features for the system as a whole or for individual voice terminals.
To change the administrator/attendant console from one mode of operation to the
other, you just set a switch on the control unit and then set another switch on the console itself. When the console is in administration mode, some of its buttons take on
different functions than they have when the console is in the call-handling mode.
Therefore, when you administer the system, you insert in the console a special set
of administration-mode button labels so that you know which buttons to touch. Button labels are provided in the back of the Administration Manual.
10
Types of Consoles
The type of administrator/attendant console you have depends primarily on the
number of the voice terminals and lines in your system.
In systems with eight or fewer lines and 20 or fewer voice terminals (small systems),
the administrator/attendant console is a 34-button deluxe voice terminal. A 34-button
deluxe model is suitable as the administrator/attendant console for small systems
because it has enough buttons to show the status of each line and each voice terminal in the system. The system assigns lines and intercom numbers to these buttons automatically. You can use the lights next to each button to keep track of what
is happening on the lines and at the voice terminals you are working with.
For systems with more than eight lines or more than 20 voice terminals (large
systems), two consoles are available:
● The
administrator/attendant console with Attendant Intercom Selector for large
systems is a 34-button deluxe voice terminal with an attached Attendant intercom Selector.
The administrator/attendant console with Attendant Intercom Selector is convenient for administering a large system because up to 70 voice terminals can
be represented using the Auto Intercom buttons on the Attendant Intercom
Selector. This leaves all 30 buttons on the console available to show the status
of each line in the system. On this console, all your lines and intercom numbers
are assigned to buttons automatically when the system is activated.
● The economy administrator/attendant console for large systems is a 34-button
deluxe voice terminal without an Attendant Intercom Selector.
If you don’t need the extra capacity or convenience provided by the Attendant
Intercom Selector, you can use the economy administrator/attendant console
to administer a large system. On this console, all your lines are assigned to buttons automatically when the system is activated. Any buttons not used for lines
can be programmed as Auto Intercom buttons for use in the attendant mode,
but they are not used during administration. Because the economy
administrator/attendant console has no Auto Intercom buttons in the administration mode, you must specify a particular voice terminal by dialing its intercom
number.
Administrator/attendant consoles for small and large systems in administration mode
are illustrated on pages 12 and 13.
11
Administrator/Attendant Consoles for
Small Systems* in Administration Mode
1 . T/P switch: Set to P when performing sysytem
administration.
2 . Adm Tel button: Used when assigning lines to
voice terminals and assigning voice terminals Dial
Access to Line Pools.
3 . Adm Pool button: Used when setting up line pools.
4 . Line buttons.
5 . Auto Intercom buttons (10 through 29).
6 . Adm Misc button: Used when specifying TouchTone or rotary signaling, assigning allowed-list call
restrictions, and administering other system options.
12
7. Call Rstr button: Used when setting lines to detect
a toll prefix or area code only and when assigning
outward and toll call restrictions.
8 . Message button: Used when giving a voice terminal the same assignments as one that has already
been administered.
9. Conference button: Used to assign features to individual voice terminals from the administrator/
attendant console.
* Systems with 8 or fewer lines and 20 or fewer voice
terminals — switch H on control unit is up
Administrator/Attendant Consoles for
Large Systems* in Administration Mode
1.
2.
T/P switch: Set to P when performing system administration
10. Shift button: Used to access Auto Intercom buttons for inter-
Adm Tel button: Used when assigning lines to voice terminals
and asslgnlng voice terminals Dial Access to Line Pools.
11. Shift button: Used to access Auto Intercom buttons for inter-
3.
4.
Adm Pool button: Used when setting up line pools.
5.
6.
Auto Intercom buttons (10 through 79).
7.
Line buttons and programmable buttons: Buttons in first two
left-hand columns are always line buttons.
com numbers 40 through 69.
com numbers 70 through 79.
12. Message Status button: Not used for system administration.
13. Adm Misc button: Used when administering allowed-list call
Auto Intercom buttons: Buttons in this column represent intercom numbers 10-19,40-49, or 70-79, depending on which Shift
button you touch.
14. Call Rstr button: Used when setting lines to detect a toll prefix
Auto lntercom buttons: Buttons in this column represent intercom numbers 20-29 or 50-59, depending on which Shift button you touch.
15. Message button: Used when giving a voice terminal the same
8.
Auto Intercom buttons: Buttons in this column represent intercom numbers 30-39 or 60-69, depending on which Shift button you touch.
9.
Shift button: Used to access Auto Intercom buttons for intercom numbers 10 through 39.
or area code only and when assigning outward and toll call
restrictions to voice terminals.
assignments as one that has already been administered.
16. Conference button: Used when assigning features to individual
voice terminals from this console.
* Systems with more than 8 lines or more than 20 voice terminals—
switch H on control unit is down.
13
Using the Console
If you have a 34-button deluxe voice terminal without an Attendant Intercom Selector for your administrator/attendant console in a large system, you’ll use the dial pad
to specify particular voice terminals during administration. In the attendant mode,
buttons not used for lines, Night Service, or Send Message can be used for programming features, including Auto Intercom. If you have a 34-button deluxe voice terminal
with Attendant Intercom Selector for your administrator/attendant console, you’ll use
Shift buttons along with your Auto Intercom buttons. The paragraphs below describe
how to use these buttons.
Auto Intercom Buttons. Each person’s voice terminal has a unique 2-digit intercom
number similar to an extension number. These intercom numbers (10 through 39 for
a Model 1030 system, 10 through 79 for a Model 3070 system) are automatically
assigned to Auto Intercom buttons on the Attendant Intercom Selector if you have
one or on the administrator/attendant console in small systems. During attendant
operation, you use the lights next to each Auto Intercom button to determine the status
of voice terminals in your system.
Shift Buttons (console with Attendant Intercom Selector only). Consoles with
Attendant Intercom Selectors have three Shift buttons that let you administer as many
as 70 voice terminals using only the 30 Auto Intercom buttons on the Attendant intercom Selector. When you touch the left Shift button, you change the intercom numbers
to 10 through 39 in the blue band. Use the center Shift button, labeled 40-50-60, to
change the intercom numbers to 40 through 69 in the white band. Touch the right
Shift button, labeled 70-80-90, to change the intercom numbers to 70 through 79 in
the gray band. If you want to dial a particular intercom number, you must first touch
the Shift button that provides access to the group of intercom numbers that includes
the one you want. For example, if you want to assign lines to the voice terminal
represented by intercom 31, touch the left Shift button. The light next to the Shift button comes on, and the Auto Intercom buttons now represent intercom numbers 10
through 39.
Message Status Button (console with Attendant Intercom Selector only). The
Message Status button is used only when your console is in the attendant mode.
You use this button to find out which voice terminals have messages waiting for them.
SPECIFYING TOUCH-TONE AND ROTARY SIGNALING
Do you have any rotary lines coming into your system?
When first installed, your MERLIN communications system will be set to generate
Touch-Tone signals. If some of your lines are rotary, your system will have to be reset
to accommodate them. If you are not sure whether you have any rotary lines, call
your local telephone company. You will also need this information to complete the
System and Voice Terminal Configuration Forms.
14
CALL RESTRICTIONS
Do you need to limit some voice terminals to incoming calls only while leaving others
with no limitations?
You may want to restrict some voice terminals to intercom or local calls if, for example, the employees using these voice terminals do not need to make outside or long
distance calls. You may also want to restrict voice terminals located in a public area
such as a lobby. If you want the restrict voice terminals to have limited additional calling capacity, you can set up allowed lists. You can assign one of the following basic
calling ranges to each of your voice terminals:
● Outward
Call Restricted. Permits intercom calls only, with allowed list(s) for
specific local or toll calls if required.
● Toll Call Restricted. Permits intercom and local calls only, with allowed list(s)
for specific toll calls if required.
● Unrestricted. All calls permitted.
976-3067
Restricted
CALL RESTRICTIONS
ALLOWED LISTS
Do some of your employees with call restrictions need to call numbers within a specific
area code or exchange code?
Allowed lists add a group of permitted numbers to the calling range of an outwardor toll-restricted voice terminal. Permitted numbers consist of an area code and/or
exchange code (the first three digits of a 7-digit telephone number) or an emergency
number such as 911.
For example, a New York City (area code 212) customer service representative with
a toll-restricted voice terminal might need to speak with customers in northern New
Jersey (area code 201). This person should have area code 201 in his or her allowed
list. A clerk in Houston with an outward-restricted voice terminal might need to call
several local vendors and the company’s headquarters in Chicago. The clerk’s
allowed list would include the first three digits of the local vendors’ telephone numbers
and the area code and first three digits of the firm’s Chicago telephone number.
15
AUTOMATIC ROUTE SELECTION (ARS)
Would you like to be sure your employees place long distance calls through the most
cost-efficient route?
Automatic Route Selection (ARS) allows you to specify which of your line pools provide the lowest cost and which of your dialing methods is most efficient for particular
types of calls. For example, you may have several WATS line pools that provide the
most economical means of making calls to different areas of the country. For certain types of long distance calls, you may also use an alternate long distance
telephone company, whose lines are accessible through your main pool. When ARS
is activated, the system automatically selects the available line pool that contains
the lines preferred by the system administrator for a call to that area code or exchange.
The caller does not have to dial the number of a pool to make an outside call. He
or she just has to:
● Touch
a Pool Access button.
● Lift the handset.
● Dial the outside number.
To get the maximum benefit from ARS, it is important to consider the calling patterns
of people in your business and the relative costs of calls placed on different lines
in your system. If people in your business place calls through different types of lines
(e.g., local lines, in-state WATS lines, cross-country WATS lines, or an alternate long
distance telephone company service) to different areas of the country, you can
designate which type of line you want ARS to choose for different area codes and
exchanges. For example, if you are located in Massachusetts (area code 612) and
want employees to use the cross-country Band 5 WATS lines to call San Francisco,
then you can program ARS to route all calls to area code 415 through the Band 5
WATS line pool. If you also want employees to be able to call San Francisco through
an alternate long distance telephone company service when all Band 5 WATS lines
are busy, then you can program the alternate service as your second choice for
routing long distance calls to area code 415.
Note that ARS is flexible and allows you to accommodate the dialing habits of your
employees. There are two dialing choices available with ARS:
●
●
dialing an entire number (up to 11-digits)
dialing a portion of a number (as few as 4-digits)
For example, in a company that uses Foreign Exchange (FX) lines to place calls and
employees have become accustomed to dialing only 7 digits to place calls, you can
choose this method of dialing using ARS. If employees do not use the 7-digit dialing
method or new employees are unfamiliar with this method, digit absorption may be
the preferred dialing method. When using digit absorption the complete 11 digit
number (1 + area code + 7-digit number) is dialed. Using the ARS Table, your system
places the call ignoring any unnecessary extra digits.
With ARS you can design the most efficient call routing system for your business.
Once you program ARS, your MERLIN system will automatically place each call
using the line pool that you have designated as the best one for that type of call.
16
ARS Default Tables
The following example shows how to use ARS to best advantage when handling your
calling needs. The objective of using the ARS tables is to decide which line pools
are the most efficient and least costly for most of your employee’s calls. Those line
pools that serve the most 1 + area code dialing should be included in the Default
Toll Table (Table 8) and those that serve the most 7-digit or 1 + 7-digit dialing should
be included in the Default Local Table (Table 9). For example:
A customer in the 617 area code of Massachusetts has the following type of lines:
— Local lines
— In-state (Band 0) WATS lines
— Regional (Band 1) WATS lines
The customer separates his or her line pools into two categories: toll calls and local
calls. The list of toll-call line pools appears as follows:
— Pool 890 (Band 0, in-state WATS for area code 413)
— Pool 891 (Band 1, regional WATS lines)
— Pool 9 (Local lines)
The list of local line pools for this customer is shown below.
— Pool 890 (Band 0, in-state WATS for area code 617)
— Pool 9 (Local lines)
Using the toll and local line pools lists, the customer begins to fill in an ARS worksheet
(see example below). In the Pool Number column he or she begins with number 890.
Next to it in the Line Type column he or she lists “In-state WATS”. He or she then circles
T in the Type of Dialing column to show that this item is from the toll call list. The
customer continues in the same manner with line pool numbers 891 and 9. The next
entry in the Pool Number column is 890 again because this pool also serves for local
dialing. In the Type of Dialing column he or she now circles L to show that this entry
is for local calls. The customer then goes on to fill in line pool 9 and circles L.
17
Automatic Route Selection Worksheet
Number of exchanges in your local calling area:
T = Toll, L = Local
Default Iine pool for toll calls:
Default line pool for local calls:
18
9
890
Backup line pool
Backup line pool
The customer must now determine the number of area codes and exchanges for
which each line pool should be used. After finding the following Information, he or
she writes it in the “Number of Area Codes or Exchanges for which Line Pool is Used”
column:
— Pool 890 serves area code 413 (toll dialing).
— Pool 891 serves 16 area codes in its region (toll dialing).
— Pool 9 serves all the area codes in the U.S. (toll dialing).
— Pool 890 serves approximately 500 exchanges in the 617 area code (local
dialing).
— Pool 9 serves 19 exchanges in the local calling area (local dialing).
The information in the ARS Worksheet allows the customer to complete his or her
default tables. The customer turns to the Form for Automatic Route Selection Tables
page (found with the instructions in this Planning Guide) that contains Tables 8 and
9. Looking at his or her completed worksheet, the customer decides that the local
lines (pool 9) handle the greatest amount of 1 + area code (toll) dialing since they
serve all area codes in the United States. He or she enters 9 on the first line in the
Pool column of Table 8, the Default Toll Table. Next the customer decides that line
pool 890 serves the greatest number of exchanges using 7-digit or 1 + 7-digit (local)
dialing. Thus, he or she enters 890 on the first line of the Pool column of Table 9, the
Default Local Table. The system administrator will be the person who decides the
preferred way of placing calls in this company’s business. The preferred way will be
based on the administrator’s decisions of how calls are routed by the system.
In summary, as a result of following the steps indicated, this Massachusetts
customer’s ARS default tables and line pools are set up as follows:
●
The default toll table contains the local lines.
The default local table contains the in-state (Band 0) WATS lines for area code
617.
● Line Pool 890 is used to route calls to the 413 area code and its exchanges over
the in-state (Band 0) WATS lines.
● Line Pool 9 is used to route calls to 19 local exchanges over the local lines.
● Line Pool 891 is used to route calls to the 16 area codes that are served by the
regional (Band 1) WATS lines.
●
19
GROUP PAGE
Would you like to be able to page a group of people at one time without disturbing
everyone on your system and without having to make a phone call to each one in the
group?
Group Page allows you to page a particular group of employees such as department
heads, committee members, or a project team without disturbing the entire staff. The
Group Page feature allows you to page up to ten people through the voice terminal
speakers. No external paging system is needed to use this feature. You can create
up to seven paging groups, and though a voice terminal can be assigned to more
than one paging group, only ten voice terminals can be assigned to one group.
Hello
Hello
Hello
GROUP PAGE
GROUP CALL DISTRIBUTION
In your business are there groups of employees with similar responsibilities so that
any one of them can provide information or some other service to callers from inside
or outside your business?
Group Call Distribution allows you to assign voice terminals to a Call Distribution
group; your MERLIN system will then direct calls that are placed to the group to each
voice terminal in turn. As a result, call handling duties are shared equally.
When a call comes in on a line associated with a Call Distribution group it will ring
at the first available voice terminal in the group. All other members of the group will
receive a visual alert which will change to an audible alert if the call is not answered
after several rings. If you assign lines and line pools to a Call Distribution group, any
incoming call on one of those outside lines rings at the voice terminal of the person
whose turn it is to take the next call. Because the system searches for an available
voice terminal, callers will not get a busy signal, the line will continue to ring until
someone answers.
You can assign the attendant the call group line but with delayed ring. Then, if
everyone in the group is busy on a call, the call will ring at the attendant’s position.
If you find that the attendant is answering a lot of calls for a particular call group, you
may want to increase the number of people answering calls in that group. If the attendant is answering more than a few calls a day for a call group, then you know the
group is not sufficiently staffed to handle all calls coming into it.
20
ENHANCED NIGHT SERVICE
Should personnel be alerted to incoming calls during nonbusiness hours and when
the attendant is off duty?
The MERLIN system offers several options for after-hours telephone operation. YOU
can select these features in any combination to meet the needs of your business.
Night Service with Group Assignment
Would you like the ability to specify groups of voice terminals with each attendant position, and alert each of those voice terminals when a call comes in after regular business
hours?
To make call handling easier after business hours, you can assign all the voice terminals associated with an attendant position to a Night Service with Group Ringing
group. Any call that comes in to the attendant position while Night Service is in effect rings immediately at each available voice terminal in the group that has access
to that particular line.
NIGHT SERVICE WITH GROUP RINGING
Night Service with Extra Alert
Do you have an area where a bell or flashing light is needed to alert personnel to incoming calls after regular business hours?
Attendants at one of the answering positions activate as many as three extra-alert
ringing devices when a call comes in on an outside line or pool of lines. When this
feature IS activated, people other than the attendant are alerted to incoming calls.
People at other voice terminals can use Call Pickup to answer calls coming in to the
attendant voice terminal.
You can connect extra-alerting devices such as bells or flashing lights to your system
to provide Enhanced Night Service for your business when the person who usually
answers calls is not on duty. Three extra-alerting devices can be connected to the
optional Services Module in the control unit to alert people to incoming calls.
NIGHT SERVICE WITH EXTRA ALERT
21
Night Service with Outward Restriction
Would you like to prevent unauthorized after-hours use of your business’ telephones?
When Night Service with Outward Restriction is in effect, only persons knowing your
system password can make outgoing telephone calls. Anyone not knowing the system
password can dial only emergency numbers such as local police, fire department,
or ambulance service. If someone tries to dial without first entering the password,
the call will not go through.
The MERLIN system allows you the ability to exclude voice terminals from outward
restriction. If you place a voice terminal on the Night Service Exclusion list, it will have
whatever calling restrictions have been placed on it when Night Service is not in effect.
Night Service with Time Set
Would you like the ability to turn Night Service on and off automatically?
If your MERLIN system has an SMDR module (see next section), you can turn Night
Service on and off automatically for all your voice terminals by entering the time of
day at which you want Night Service to begin and end. Your attendants can override
this automatic operation and turn Night Service on and off manually.
For example, if your Monday through Friday business hours are 8:00 a.m. to 5:00
p.m., you can set Night Service to go off automatically at 8:00 a.m. and come on again
at 5:00 p.m. In addition, assuming you do not have business hours on Saturday and
Sunday, you can administer Night Service to come on at 5:00 p.m. Friday and go
off at 8:00 a.m. Monday. If your receptionist occasionally arrives at 7:30 a.m., he or
she can turn Night Service off as soon as he or she arrives.
STATION MESSAGE DETAIL RECORDING (SMDR)
Would you like to keep records of your business’ incoming and outgoing calls?
SMDR generates call reports that include such information as the date and time of
each call, its duration, and the line and voice terminal on which the call was made.
The call report can help you develop records of your system and individual telephone
traffic patterns so you can use your system effectively. You can assign account
numbers to clients, and then use the account numbers to identify who to bill for calls.
In order to print out your call reports, you need to have a printer connected to your
SMDR Module in your control unit.
SYSTEM SPEED DIAL CODES
Do many of your employees repeatedly call the same telephone numbers (for example, customers or vendors)?
You can assign System Speed Dial codes to selected numbers and store them in
your system so that people can reach the numbers by dialing the abbreviated codes.
The System Speed Dial feature allows all employees to have access to the same
Speed Dial codes without specially programming their own voice terminals; it also
allows voice terminals that have call restrictions to dial these numbers. You can assign
up to 40 System Speed Dial Codes for your system. Assigning System Speed Dial
Codes does not affect the ability of individuals to assign their own Personal Speed
Dial numbers (See page 27.)
22
System Speed Dial codes may be unmarked or marked. Marked codes are very useful
for alternate long distance company numbers, access codes, and other numbers you
may not want everyone in your business to know. When Station Message Detail
Recording is used, an unmarked System Speed Dial code will printout the telephone
number and not the code that was actually dialed. However, a marked System Speed
Dial code will print out the code that was dialed (for example, #63) and not the
telephone number.
#63
#63
SYSTEM SPEED DIAL CODES
RETURN INTERVAL FOR TRANSFERRED CALLS
When transferring calls from one voice terminal to another how many times would
you like the second voice terminal to ring?
When your system is installed, it is set up so that a call transferred from one voice
terminal to another rings four times at the second voice terminal. If no one answers,
the call continues to ring at this voice terminal and also begins to ring again at the
voice terminal from which it was transferred. If you wish, you can vary the number
of times that transferred calls ring before they are returned to the sender.
For example, if your voice terminals serve large areas or if employees cannot stop
their work immediately to answer calls, you may want transferred calls to ring as many
as nine times before they are returned. On the other hand, if you prefer to minimize
ringing at voice terminals that are unattended or in public places, you can set the
return interval for one or two rings. You can also set your system not to return transferred calls at all.
ONE-TOUCH HOLD WITH CALL ANNOUNCEMENT
Would you like the ability to place a call on hold while you place an intercom call?
One-Touch Hold with Call Announcement allows you to place a call in progress on
hold while you place an intercom call with voice announcement, by simply pressing
the Auto Intercom button of the coworker you wish to contact. A call on Hold can be
accessed by using Line Pickup or, if the line appears on the voice terminal, by pressing the appropriate line button.
Your MERLIN system is delivered to you set for OneTouch Transfer rather than for
One-Touch Hold with Call Announcement. With OneTouch Transfer, a person talking with someone from outside your business can transfer the call to a coworker by
simply touching the coworker’s Auto Intercom button.
23
Voice Terminal Programmability
Several types of voice terminals maybe connected to your Model 1030 or 3070. The
different types of voice terminals are distinguished from each other by the number
of silver membrane buttons above and to the right of the dial pad. These buttons give
access to lines and features; most buttons are programmable, so you can customize
each voice terminal by programming different features on these buttons.
Most of the custom features are designed primarily for the convenience of the person using them, but some have a broader application because they affect the calling patterns of your business. These features include Automatic Line Selection, Programmable Line Ringing, Call Coverage, and Line Pickup. Because these features
have a businesswide influence, you may want to assign them yourself or oversee
their assignment. By using Centralized Voice Terminal Programming, you can assign
features conveniently to all voice terminals from the administrator console.
Available MERLIN communications system voice terminals are illustrated below.
24
Individuals can program their voice terminals to meet their particular needs. The
features that people can program on the membrane buttons or general options are
discussed on the following pages.
AUTO INTERCOM
Would you like to call another intercom number by pressing only one button?
Auto Intercom allows you to program buttons on voice terminals for one-touch dialing of frequently called intercom numbers. Before using your programmed Auto intercom button to call someone, look at the lights next to the button to see if his or her
voice terminal is in use; the green light goes on when the voice terminal is in use
or the Do Not Disturb feature is activated. Auto lntercom, also allows you to transfer
a call simply by touching the appropriate Auto Intercom button, if your system is configured for One-Touch Transfer.
AUTOMATIC LINE SELECTION
Would you like to be connected to a free line just by lifting your handset?
Automatic Line Selection selects a free line when you lift your handset to make a
call so that you do not need to touch a line button to obtain a free line. You can program the order in which lines are to be selected by the system. When your first-choice
line is in use, the system will automatically connect you to your second choice.
AUTOMATIC LINE SELECTION
25
CALL COVERAGE
Will it be necessary for some people to cover calls for others with whom they do not
share lines ?
A Cover button permits coverage of all lines on a voice terminal regardless of whether
the covering voice terminal shares lines with the covered voice terminal.
You can program a Cover button for primary or secondary coverage. Suppose that
you assign Jim primary coverage for Susan’s voice terminal. Then each time a call
rings at Susan’s voice terminal it also rings at Jim’s voice terminal. To make certain
that Susan’s calls are answered when both Susan and Jim are away from their desks,
you assign secondary coverage with delayed ring for Susan’s voice terminal to Bill.
This means that when a call comes in for Susan, it rings at Susan’s voice terminal
and at Jim’s voice terminal, then starts ringing at Bill’s voice terminal on the fifth ring.
Jim’s calls do not ring at Bill’s voice terminal, however, unless you assign Call
Coverage for Jim’s calls to Bill. With this system, up to six people can have Cover
buttons for a single voice terminal.
Same call rings
at Jim's voice terminal.
If call isn't answered at
Susan's or Jim's voice
terminal after 4 rings, it
begins to ring at Bill's
voice terminal as well.
Susan
Bill
Jim
Jim provides
primary
coverage for Susan.
Bill provides
secondary
coverage for Susan.
PRIMARY AND SECONDARY COVERAGE
CALL PICKUP
Would you like to answer an incoming call that does not ring at your voice terminal?
Call Pickup allows you to pick up a call that is ringing, parked, or held at another
MERLIN system voice terminal. To pickup a call touch Intercom-Ring or lntercomVoice, dial the Call Pickup code, and then dial the intercom number of the voice terminal to be answered.
DO NOT DISTURB
Would you like to prevent your voice terminal from ringing during a meeting or when
you do not want to be disturbed?
Do Not Disturb allows you to temporarily prevent your voice terminal from ringing.
While Do Not Disturb is activated, callers get a busy signal. This feature works for
an outside call, an intercom call, or a transferred call.
26
LAST NUMBER REDIAL
Do you often dial a number only to get a busy signal, then end up dialing the number
five or six times before finally getting through to the person you are trying to reach?
Last Number Redial automatically stores the last number you dial. You can redial
an outside number that is busy or doesn’t answer simply by pressing one button.
Last Number Redial also eliminates the need to remember or look up the telephone
number next time you want to dial it.
LINE PICKUP
Would you like to answer an incoming call that has been put on hold at another voice
terminal?
Line Pickup allows you to pick up a specific line that is ringing, held, or parked
anywhere in the system. To pick up a line touch Intercom-Ring or Intercom-Voice,
dial the Line Pickup code, and then dial the two-digit number of the Iine to be picked
up.
NOTIFY (SEND, RECEIVE)
Will it be necessary for someone to take messages frequently for someone else?
A light turned on next to a Notify Receive button indicates that a message has been
taken by someone at another voice terminal. For every Notify Send button you program, the corresponding voice terminal must program a Notify Receive button and
each must have a light. An example of the use of this feature would be with a boss
and secretary. The secretary (Notify Send) would notify the boss (Notify Receive) that
a message has been taken. The boss when returning to his or her office would notice
that the Notify Receive light is on and call his or her secretary for the message. After
the message has been received, either the boss or the secretary can turn off the Notify
light by touching the button associated with it.
OUTSIDE AUTO DIAL
Would you like to dial a frequently called outside number by touching one button?
Outside Auto Dial allows you to store each frequently called outside number on a
separate button for one-touch dialing, Outside Auto Dial buttons are a fast, easy, and
accurate method of dialing your most frequently dialed numbers.
PERSONAL SPEED DIAL
Would you like to store frequently called numbers, without taking up buttons on your
voice terminal?
People with 5- and 10-button voice terminals can assign a 3-character Personal Speed
Dial code to each telephone number they frequently dial, then dial the Personal
Speed Dial code whenever they want to call one of those numbers. Each person
assigns Personal Speed Dial codes for use at his or her own voice terminal.
PERSONALIZED RING
Would you like your voice terminal to have a distinctive ring so that you can easily
distinguish calls to your voice terminal from calls to other voice terminals nearby?
Your MERLIN communications system allows you to select one of eight different
ringing signals for each voice terminal,
PRIVACY
Do you share a line with someone else? Would you like to be assured that confidential
calls are made in private?
Privacy prevents others from joining calls on a shared line in a square system. This
feature is automatic on pooled lines and intercom lines.
27
SAVED NUMBER REDIAL
Do you sometimes get a busy signal, then make several more telephone calls to other
numbers before trying the first again?
Saved Number Redial allows you to store a dialed number for later redialing with the
touch of a button. The stored number remains the same until you replace it with
another. By touching the button, you can redial the saved number after making other
calls. You can program only one Saved Number Redial button onto your voice
terminal.
SIMULTANEOUS VOICE AND DATA CALLS
Using your voice terminal, would you like to make an outside call while connected to
a computer?
When a voice terminal in your system is connected to a General Purpose Adapter
and a modem, it can link your computer terminal to a local or remote host computer.
Simultaneous Voice and Data Calls allows you to place or receive calls on your voice
terminal without interrupting the exchange of data between the computer terminal
and the host computer.
TOUCH-TONE ENABLE
Do you have any rotary lines that need to access services (for example, alternate long
distance company banking-by-phone, credit card authorization, or other electronic
services) that require Touch-Tone dialing?
Touch-Tone Enable makes it possible for the system to generate Touch-Tone signals
over rotary lines.
VOICE ANNOUNCEMENT DISABLE
Do you want to make sure that voice announcements are not heard in certain rooms
(for example, lobbies or conference rooms)?
People who do not wish to be disturbed by voice announcements can use Voice
Announcement Disable to receive intercom calls through their handset instead of
through their voice terminal speaker. Voice Announcement Disable automatically
turns voice intercom calls into ringing intercom calls at individual voice terminals.
Hello
VOICE ANNOUNCEMENT DISABLE
28
Initial Feature Assignments
The following diagrams show you the features that are automatically assigned to buttons
when your system is first installed. You can leave the feature assignments as
they are, or you can change the initial assignments by programming new features
on the buttons.
29
Initial Feature Assignments for Nonattendant Voice Terminals
with 1030 or 3070 Configuration in Standard Square Systems
34-Button
10-Button
5-Button
30
●
The system automatically assigns Your
first eight lines to positions above the dial
pad. If you have fewer than eight lines,
the feature shown on the left of each of
these buttons is assigned.
†
If you have more than eight lines, you
must assign them to the buttons to the
right of the dial pad. The numbers in the
lower right-hand corner of each button indicate the order in which lines are
assigned. If you don’t use a button for a
line, you can program a feature on the
button.
Initial Feature Assignments for Nonattendant Voice Terminals
with 1520 Configuration in Standard Square Systems
34-Button
10-Button
5-Button
● Your system assigns your first eight lines
automatically to positions above-the dial pad.
You must assign the remaining lines to the buttons to the right of the dial pad. The numbers
in the lower right-hand corner of each button
show the order in which lines are assigned to
buttons. If you don’t use a button for a line,
you can program a feature on the button.
31
Initial Feature Assignments for
Nonattendant Voice Terminals in Pooled Systems
34-Button
10-Button
5-Button
● When you assign lines or pools to a
voice terminal, they appear on the buttons
in the order indicated by the
numbers.
†
32
These buttons may be used for Button
Access or Dial Access to Line Pools.
Initial Feature Assignments for Administrator/Attendant Console
for Small Systems* in Attendant Mode
34- Button Deluxe Voice Terminal
Control unit jack numbers represent the
outside line plugged into that jack.
For systems with 8 or fewer
lines and 20 or fewer voice terminals — switch H on control
unit is in the up position.
33
34
Documents
Listed below are the documents you should receive when your MERLIN communications system is installed. If for some reason you do not receive all the documentation, please contact the TC-SS assigned to your account.
●
Administration Manual: This document steps you through the procedures involved in customizing your system. It should be used only by the System
Administrator.
●
Attendant’s Guide: This document contains the information you need to use
your attendant console to your best advantage. It should be used only by persons who will be using the attendant console.
●
User’s Guide: This document contains information on how to program individual voice terminals. It should be used by all individuals with MERLIN voice
terminals.
35
MERLIN is a registered trademark of AT&T.
© Copyright 1986 AT&T. Printed in U.S.A.
999-502-143IS