1
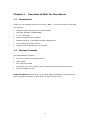
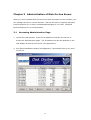
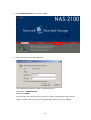
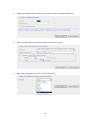
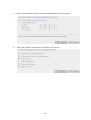
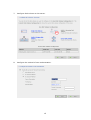
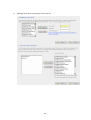
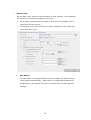
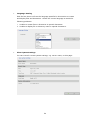
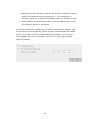
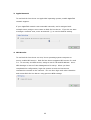
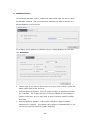
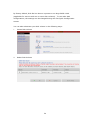
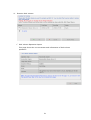
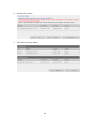
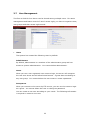
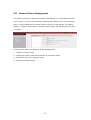
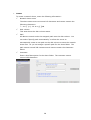
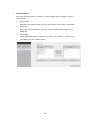
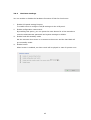
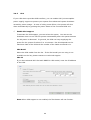
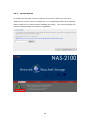
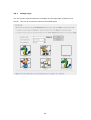
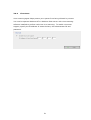
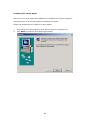
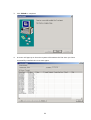
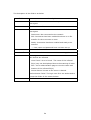
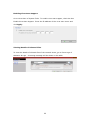
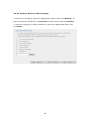
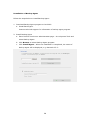
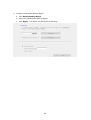
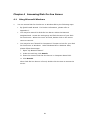
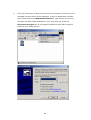
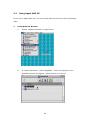
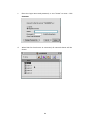
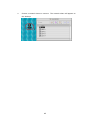
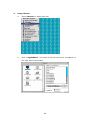
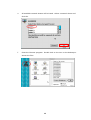
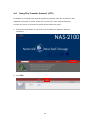
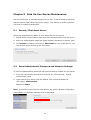
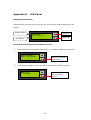
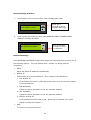
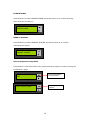
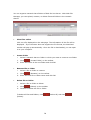
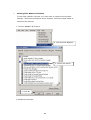
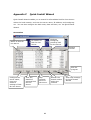
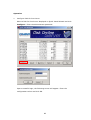
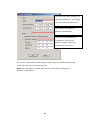
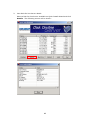
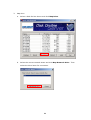
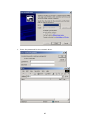
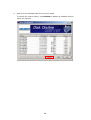
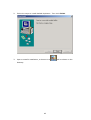
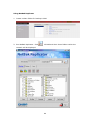
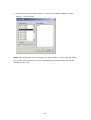
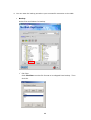
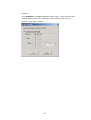
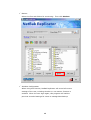
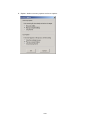
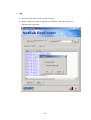
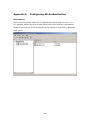
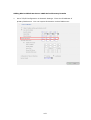
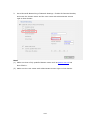
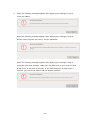
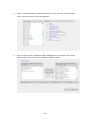
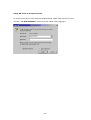
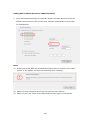
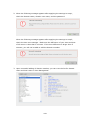
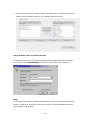
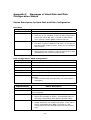
Disk On-line Server
QNAP Systems, Inc.
NAS-2100
User Manual
Broadband Network Attached Storage
NAS-2100
User Manual (Version: 4.1.4)
©Copyright 2005. QNAP Systems, Inc. All Rights Reserved.
March 29, 2005
2
CUSTOMER SERVICE
For the contact details of customer service and technical support, please refer to
the registration card.
LIMITED WARRANTY
In no event shall the liability of QNAP Systems, Inc. (QNAP) exceed the price paid
for the product from direct, indirect, special, incidental, or consequential software,
or its documentation. QNAP offers no refunds for its products. QNAP makes no
warranty or representation, expressed, implied, or statutory, with respect to its
products or the contents or use of this documentation and all accompanying
software, and specifically disclaims its quality, performance, merchantability, or
fitness for any particular purpose. QNAP reserves the right to revise or update its
products, software, or documentation without obligation to notify any individual
or entity.
CAUTION
1. Back up your system periodically to avoid any potential data loss.
2. Should you return any components of Disk On-line Server package for refund
or maintenance, make sure they are carefully packed for shipping. Any form
of damages due to improper packaging will not be compensated.
3
Table of Contents
Chapter 1
Overview of Disk On-line Server ...........................................6
1.1
Introduction ...................................................................................6
1.2
Package Contents............................................................................6
1.3
System Overview ............................................................................7
Chapter 2
2.1
Installation of Disk On-line Server........................................8
Network Configuration .....................................................................8
Chapter 3
Administration of Disk On-line Server...................................9
3.1
Accessing Administration Page ..........................................................9
3.2
Server Administration .................................................................... 11
3.3
Quick Configuration ....................................................................... 12
3.4
System Settings............................................................................ 18
3.5
Network Settings .......................................................................... 21
3.6
Disk Configuration......................................................................... 29
3.7
User Management ......................................................................... 33
3.8
Network Share Management ........................................................... 37
3.9
System Tools ................................................................................ 41
3.9.1
SNMP Settings ........................................................................ 41
3.9.2
Alert Notification...................................................................... 42
3.9.3
Restart/ Shutdown................................................................... 42
3.9.4
Hardware Settings ................................................................... 43
3.9.5
UPS ....................................................................................... 44
3.9.6
System Update........................................................................ 45
3.9.7
Change Logo........................................................................... 46
3.9.8
Remote Replication .................................................................. 47
3.9.9
Virus Scan .............................................................................. 51
3.9.10
Backup/ Restore/ Reset Settings ............................................. 56
3.9.11
Backup Agent ....................................................................... 57
3.10
Statistics & Logs......................................................................... 60
Chapter 4
Accessing Disk On-line Server ............................................61
4.1
Using Microsoft Windows ................................................................ 61
4.2
Using Apple MAC OS...................................................................... 63
4.3
Using Unix/ Linux OS ..................................................................... 69
4.4
Netware Service............................................................................ 69
4.5
Using Web Browser ....................................................................... 69
4.6
Using File Transfer Protocol (FTP) .................................................... 70
Chapter 5
Disk On-line Server-Maintenance........................................72
4
5.1
Restart/ Shut down Server ............................................................. 72
5.2
Reset Administrator Password and Network Settings .......................... 72
5.3
Disk Failure or Malfunction.............................................................. 73
5.4
Power Outage or Abnormal Shutdown .............................................. 73
Appendix A
LCD Panel.........................................................................74
Appendix B
Web File Manager ............................................................77
Appendix C
Quick Install Wizard.........................................................82
Appendix D
NetBak Replicator ............................................................91
Appendix E
Configuring AD Authentication.......................................102
Appendix F
Messages of Hard Disk and Disk Configuration Status ...111
5
Chapter 1
1.1
Overview of Disk On-line Server
Introduction
Thank you for choosing Disk On-line Server (NAS). This product has the following
key features:
•
Desktop/ Rack-mount dual form factor design
•
VIA Eden 400MHz/ 128MB DRAM
•
2 x 3.5’’ IDE HDD
•
Maximum capacity up to 600GB
•
Supports RAID 0, 1 and JBOD storage management
•
10/100 Mbps fast Ethernet port
•
Supports UPS management via USB port
1.2
Package Contents
Your NAS package contains:
•
Disk On-line Server (stands inclusive)
•
Power cable
•
CAT-5 Ethernet cable
•
Companion CD (user manual, Quick Install Wizard and software inclusive)
•
Quick Installation Guide
Important Notice: Please back up your disk data periodically to avoid data loss
due to improper operation or disk failure of Disk On-line Server.
6
1.3
System Overview
Front View
LCD panel
Enter button
LED Indicators:
Disk 1, Disk 2,
and Network
Down button
Rear View
Reset button
Power button
10/100 Mbps RJ-45
Ethernet port
USB ports
7
Power Connector
Chapter 2 Installation of Disk On-line Server
2.1
Network Configuration
By factory default, Disk On-line Server will search the network via DHCP
(Dynamic Host Configuration Protocol) to detect IP address settings automatically.
If your network does not support DHCP protocol, Disk On-line Server will use the
default settings as below:
IP Address: 192.168.0.1
Subnet Mask: 255.255.255.0
When Disk On-line Server completes its boot-up process, the LCD panel will
display current IP address settings.
If your network does not support DHCP protocol, you must configure your Disk
On-line Server to proper LAN settings before using it for the first time. (If you
are not sure about the LAN settings, please contact your network administrator).
You can change the network settings of Disk On-line Server by the following ways:
1. Use the LCD panel to change the network settings. For more information,
please refer to Appendix A.
2. Use Quick Install Wizard in the companion CD to change the network settings.
For more information, please refer to Appendix C.
8
Chapter 3 Administration of Disk On-line Server
When you have installed Disk On-line Server and connected it to the network, you
can manage the server via web browser. Disk On-line Server supports Microsoft
Internet Explorer 5.0 or later, and Netscape Navigator 4.5 or later. Microsoft
Internet Explorer 5.5 is recommended.
3.1
Accessing Administration Page
1. Launch the web browser. Enter the IP address of Disk On-line Server to
access the administration page. The IP address can also be obtained on the
LCD display of Disk On-line Server (see Appendix A).
2. Run Quick Installation Wizard (see Appendix C) and double-click on an entry
on the list.
9
3. Click Administration on the main page.
4. Enter the user name and password.
The default administrator name and password are:
User name: administrator
Password: admin
The first time you login Disk On-line Server, Quick Configuration page will be
shown. Please refer to the Quick Configuration section for more details.
10
3.2
Server Administration
There are eight main sections in server administration, which are listed below:
Quick
Configuration
Server Name
System Settings
Date & Time
Language Setting
View System Settings
TCP/IP Configuration
Network
Settings
Microsoft Networking
Apple Networking
NFS Service
Netware Service
Web Service
FTP Service
View Network Settings
Create Disk Volume
Disk
Configuration
Delete Disk Volume
Examine Disk Volume
Format Disk Volume
View Disk & Volume Status
User
Management
Users
User Groups
Quota
Create
Network Share
Management
Create
Create Private Network Share
Assign Users
Delete
Property
Access Control
Delete
SNMP Settings
Alert Notification
Restart / Shutdown
Hardware Settings
System Tools
UPS
System Update
Change Logo
Remote Replication
Virus Scan
Backup/ Restore/ Reset Settings
Backup Agent
Active Users
Statistics & Logs
Event Logs
DHCP Logs
11
Create
Create Multiple Users
Change Password
Create Private Network
Share
Assign User Groups
Quota Settings
Delete
3.3
Quick Configuration
You can configure Disk On-line Server step by step in Quick Configuration section.
1.
Enter the server name.
12
2.
Change the administrator password or select to use the original password.
3.
Enter the date, time and select the time zone for the server.
4.
Select the language the server uses for file names.
13
5.
Enter the IP address, subnet mask and default gateway for the server.
6.
Select the network file services to provide on the server.
14
7.
Configure disk volume on this server.
8.
Configure the method of user authentication.
15
9.
Manage users and user groups of this server.
16
10. Manage network shares on this server.
11. Finish.
It may take several to tens of minutes to complete Quick Configuration,
depending on your system settings.
17
3.4
System Settings
Basic system settings include the server name, date, time, language settings, and
view system settings.
•
Server Name
Enter the name of Disk On-line Server. The server name can be 14
characters long at maximum, which can contain alphabets, numbers and
hyphens (-). The server does not accept names containing empty characters,
period (.), or names with only numbers.
18
•
Date & Time
Set the date, time, and time zone according to your location. If the settings
are incorrect, the following problems may occur:
9
When using a web browser to access or save a file, the display time of
the action will be incorrect.
9
The system event log time will be incorrect compared to the actual time
when an action occurs.
9
NTP Server
You can enable or use specified NTP server to update the date and time
of the system automatically. When there is no specified IP address for
the NTP server, the system will refer to internal clock for date and time
settings.
19
•
Language Setting
Disk On-line Server will use the language specified in this section to create
and display files and directories. Select the correct language to avoid the
following problems:
i.
Unable to create files or directories in special characters.
ii. Unable to display file or directory name in special characters.
•
View System Settings
You can view all current system settings, e.g. server name, on this page.
20
3.5
1.
Network Settings
TCP/IP Configuration
•
Obtain IP address settings automatically via DHCP
If your network supports DHCP, Disk On-line Server will automatically use
DHCP protocol to retrieve the IP address and related information.
•
Use static IP address
To use fixed IP address for network connection, enter the following
information:
9
Fixed IP Address
IP address is a 32-bit digit used to differentiate each single entity on a
network. IP address is divided into four groups of eight bits separated
by dots, e.g. 192.168.0.1.
9
Subnet Mask
Subnet mask defines computers within the same local network. It is a
32-bit digit, e.g. 255.xxx.xxx.xxx.
9
Default Gateway
Gateway is generally referred to an interchange point that connects
two networks, such as LAN and WAN.
21
Primary DNS Server: Enter the IP address of primary DNS server that
provides DNS service for NAS in external network.
Secondary DNS Server: Enter the IP address of secondary DNS server
that provides DNS service for NAS in external network.
You can also configure the following settings:
9
Enable DHCP server
If there is no DHCP server on your network, you can enable this
option to provide IP address settings to the clients.
9
Start IP address
The first IP address to be dynamically allocated for DHCP service.
9
End IP address
The last IP address to be dynamically allocated for DHCP service.
9
Lease time
Define the lease time for the dynamic IP address.
9
Primary DNS server
When the system allocates an IP address to your computer, the
primary DNS server address is also specified to it.
9
Secondary DNS Server
When the system allocates an IP address to your computer, the
secondary DNS server address is also specified to it.
Network Speed
Network speed settings provide an advanced option for configuring
network speed. You can select auto-negotiation to determine network
speed automatically. It is recommended to use the default setting.
22
2. Microsoft Networking
Enable file service for Microsoft networking: For users using Microsoft
Windows, enable this service to access the files on network share folders.
Assign a workgroup name. The name can be 15 characters long at maximum
but must not include the following:
"+=[],;/\:|*?<>."
Note: The first character cannot be a period (.).
9 Standalone Server
Use local users for user authentication.
9 NT Domain Member
Use Microsoft NT domain for user authentication.
9 AD Domain Member
Use Microsoft AD domain for user authentication.
¾
Server Description: Describe Disk On-line Server, e.g. administrator
name, department, or location of the server, for users to identify the
server. Users using Disk On-line Server on the Microsoft Windows
operating systems must enable Microsoft Network Services.
23
¾
Workgroup: When configuring Disk On-line Server as standalone server,
specify the workgroup the server belongs to. The workgroup is a
computer group unit in Microsoft Windows network for network sharing.
¾
Domain Name: Microsoft domain name. Enter the domain name when
you select NT domain or AD domain.
If the local network has a WINS server installed, specify the IP address. Disk
On-line Server will automatically register its name and IP address with WINS
service. If you do not want to enable WINS server support, or you do not
have a WINS server on your network, enter 0.0.0.0 in the field for WINS
server IP address.
24
3. Apple Network
To use Disk On-line Server on Apple MAC operating system, enable AppleTalk
network support.
If your AppleTalk network uses extended networks, and is assigned with
multiple zones, assign a zone name to Disk On-line Server. If you do not want
to assign a network zone, enter an asterisk (*) to use the default setting.
4. NFS Service
To use Disk On-line Server on Unix/ Linux operating system computer or
server, enable NFS service. Disk On-line Server supports NFS version 2.0 and
3.0. To correctly use NFS service, assign a user’s UID and IP address. Go to
NFS Settings in Users of User Management for setup. When you have
completed the configuration, login the system as root and use mount
command to connect to the network. You can then login with other identities
and access Disk On-line Server using previous NFS settings.
25
5. NetWare Service
To use Novell Netware service, enable this option and enter the server name
for Netware network. The server will then operate in a manner similar to a
Novell NetWare 3.12 file server.
To configure more options for Netware service, enable Netware service and
click Advanced.
•
Frame Type: If you have a Novell server on your local network, select the
same frame type as the server's.
•
Internal Network Number: This is a unique number to identify the server
on a network. The system will set it to the IP address if Auto-configure
option is selected. Or you may enter a unique internal network number
manually.
•
External Network Number: This number identifies a logical network
segment on a network. The system can configure it automatically, or you
can set the external network number manually.
26
6. Web Service
To access files on Disk On-line Server via web browser, enable Web File
Manager. If Disk On-line server is connected to the Internet and uses a valid
IP address, you can access files on the server by web browser from anywhere.
7. FTP Service
To download files from or upload files to Disk On-line Server by using file
transfer protocol (FTP), activate FTP service.
27
8. View Network Settings
You can view current network settings and status in this section.
28
3.6
Disk Configuration
Your Disk On-line Server can accommodate two disks at maximum. You can set
the disk volume to the following configurations:
1. Single Disk Volume
You can select to use a standalone disk. In case of disk crash, all data will be
lost.
2. RAID 1 Mirroring Disk Volume
Mirroring Disk protects your data by automatically backing up the contents of
one disk onto the second disk of a mirrored pair. This protects your data if
one of the disks fails. However, the storing capacity is equal to a single disk,
as the second disk is used to automatically back up the first one. Mirroring
disk volume is suitable for personal or corporate use to store important data.
3. RAID 0 Striping Disk Volume
Striping disk combines two or more disks into one larger disk. It offers the
fastest disk access but it does not have any protection of your data if the
striped array fails. The disk capacity equals the number of disks in the array
times the size of the smallest disk. Striping disk is usually used to maximize
your disk capacity or for fast disk access but not for storing important data.
4. Linear Disk Volume
You can combine two or more disks into one larger disk. During file saving,
the file will be saved on physical disks sequentially but does not have a disk
failure file protection function. The overall capacity of linear disk is the sum of
all disks. Linear disk is generally used for storing large data and is not
appropriate to use for file protection of sensitive data.
29
By factory default, Disk On-line Server is preset to one large RAID 0 disk
(applicable for servers with two or more disk volumes). To use other disk
configurations, the settings can be changed during the first Quick Configuration
access.
You can also administer your disk volume in the following ways:
i.
Create Disk Volume
ii.
Delete Disk Volume
30
iii.
Examine Disk Volume
9 Disk Volume Operation Report
This page shows the current status and information of disk volume
operation.
31
iv.
Format Disk Volume
v.
View Disk & Volume Status
32
3.7
User Management
The files on Disk On-line Server can be shared among multiple users. For easier
management and better control of users’ access right, you have to organize users,
user groups and their access right control.
•
Users
The system has created the following users by default:
Administrator
By default, administrator is a member of the administrator group and has
access to system administration. You cannot delete administrator.
Guest
When you use a non-registered user name to login, the server will recognize
the user as a Guest and will allow limited access. A guest does not belong to
any user group. You cannot delete the user Guest or create a password.
Anonymous
When you connect to the server by FTP service, you can use the name to login
as a guest. You cannot delete this user or change its password.
You can create a new user according to your needs. The following information
is required to create a new user:
33
9
User name
The user name must not exceed 32 characters. It is case-insensitive and
can contain double-byte characters, such as Chinese, Japanese, and
Korean except:
" / \ [ ] : ; | = , + * ? < >` '
9
Password
The password must be 6~16 characters long. Avoid using codes that are
easily decipherable.
You can perform the following settings for users:
i.
Create
ii.
Create Multiple Users
iii.
Change Password
iv.
Create Private Network Share
v.
Assign User Groups
vi.
Quota Settings
vii. Delete
34
•
User Groups
User group is a collection of users with the same access right to files or
folders. Disk On-line server has created the following user groups by default:
9
Administrators
All members of administrators group have the right to perform system
management. You cannot delete this group.
9
Everyone
All registered users belong to everyone group. You cannot delete this
group.
You can manage user groups with the following options:
i.
Create
ii.
Create Private Network Share
iii.
Assign Users
iv.
Delete
User groups name must not exceed 256 characters. It is case-insensitive
and can contain double-byte characters, such as Chinese, Japanese, and
Korean, except the following ones:
" / \ [ ] : ; | = , + * ? < >` '
To properly manage security, it is very important to manage users and user
groups. You may set the share access parameters of each user or user group
accordingly.
35
•
Quota
To allocate disk volume efficiently, you can specify the quota that can be used
by each user. When quota is set, users are not allowed to further use disk
space once they have reached their quota limit. By default, no limitations are
set for users. You can modify the following two options:
9 Enable quota for all users
9 Quota size on each disk volume
36
3.8
Network Share Management
The primary purpose of network storage is file sharing. In a standard operation
environment, you can create different network share folders for various types of
files, or provide different file access rights to users or user groups. By factory
default, a “public” share folder is created, which allows full access from all users
or guests.
There are four options in Network Share Management:
i.
Create a network share
ii. Change the name, path and comment of a network share
iii. Set access right for a network share
iv. Remove a network share
37
•
Create
To create a network share, enter the following information:
9
Network share name
The share name must not exceed 12 characters and cannot contain the
following characters:
".+=/\:|*?<>;[]%
9
Disk volume
This area shows the disk volume status.
9
Path
All data are stored under the assigned path onto the disk volume. You
can select “Specify path automatically” to allow the server to
automatically create a new path on the disk volume to store the network
share files. Or you can assign a specific path for the share folder. The
path cannot exceed 256 characters and cannot contain the characters
below:
9
Comment
Enter a brief description for the share folder. The comment cannot
exceed 128 characters.
38
•
Access Control
Once the network share is created, you can assign access rights to users or
user groups:
9
Deny access
Access to the network share will be denied when this option is selected.
9
Read only
Users can read the files only on the network share when read only is
assigned.
9
Full access
Users with full access are allowed to read, write, create, or delete files
and folders on the network share.
39
•
Property and Delete
To edit the property of an existing network share, select a share and click
Property. You can then edit the content of that share.
You can also select to delete an existing network share. Click OK to confirm
the deletion or Cancel to abort.
40
3.9
System Tools
System Tools enable you to optimize the maintenance and management of Disk
On-line Server.
3.9.1
SNMP Settings
Enable SNMP (Simple Network Management Protocol) service and complete all
necessary settings to manage network components of the server by SNMP. When
enabling SNMP Trap Notification, a message will be sent to a specified trap host
when an error occurs.
41
3.9.2
Alert Notification
Enter the e-mail address of administrator and SMTP server IP address. In case of
warning or malfunction, an email will be sent to the administrator automatically.
3.9.3
Restart/ Shutdown
Select to restart or shut down Disk On-line Server.
42
3.9.4
Hardware Settings
You can enable or disable the hardware functions of Disk On-line Server.
i.
Enable LCD panel setting function
To enable users to configure TCP/IP settings via the LCD panel.
ii.
Enable configuration reset switch
By enabling this option, you can press the reset button for a few seconds to
reset the administrator password and system settings to default.
iii.
Enable hard disk standby mode
Set the minutes when there is no access to the server and the hard disk will
go to standby mode.
iv.
Enable buzzer
When buzzer is enabled, an alert sound will be played in case of system error.
43
3.9.5
UPS
If your UPS device provides USB interface, you can enable UPS (uninterruptible
power supply) support to protect your system from abnormal system shutdown
caused by power outage. In case of utility power failure, the system will shut
down automatically by probing the power status of the connected UPS unit.
9
Enable UPS support
To activate the UPS support, you can select this option. You can set the
shutdown timer to turn off the system automatically after the system detects
the AC power is abnormal. In general, the UPS can keep supplying the
power for the system for about 5 to 10 minutes. But this depends on the
maximum load of the UPS and the number of the loads connected to it.
UPS Model
Select the UPS model from the list. If the UPS model you are using is not
available on the list, please contact our technical support.
UPS IP
If you have selected APC UPS with SNMP for UPS model, enter the IP address
of the UPS.
Note: When UPS support is not enabled, the Test button will not function.
44
3.9.6
System Update
To update the firmware version of Disk On-line Server, make sure you have
obtained the correct version of image file. It is suggested to back up all existing
data on Disk On-line Server before updating the image. The current settings will
remain unchanged after the system is upgraded.
45
3.9.7
Change Logo
You can choose a personal picture to display on the login page of Disk On-line
Server. The size of the picture cannot exceed 20K bytes.
46
3.9.8
Remote Replication
Remote Replication enables you to replicate local files to remote folders on
another server. The files will be compressed before the replication process in
order to save time for data transfer.
Using Remote Replication
Login Disk On-line Server, go to Remote Replication in System Tools.
47
i.
New
a. Click New to enter the following page.
b. Complete all settings and click OK to save or Cancel to quit
Note: To use remote replication, enable Microsoft Networking service,
make sure the destination network share and directory have been created,
and the user name and password are valid to login the destination folder.
48
ii.
Edit
a.
Select the job to be edited.
b.
Click Edit.
c.
Modify the settings.
d.
Click OK to save or Cancel to quit.
49
iii. Delete
a. Select the job to be deleted.
b. Click Delete.
50
3.9.9
Virus Scan
Virus scanning agent helps protect your system from being infected by viruses.
You need to operate Windows NT or Windows 2000 server with virus-scanning
software installed to perform real-time virus scanning. To enable virus scan
support, specify the IP address of network share, the administrator ID and
password.
51
Installing Virus Scan Agent
Make sure virus scan agent and software are installed on the same computer
which performs virus scanning before activating the agent.
Follow the steps below to install Virus Scan Agent:
1.
Run Install Virus Scan Agent in Disk On-line Server companion CD.
2.
Click Next to continue Virus Scan Agent Setup.
52
3.
Click Finish to complete.
4.
A screen will pop up to show the system information the first time you have
successfully installed the virus scan agent.
53
The description of the fields is as below:
Fields
Server Name
Description
Name of the network share under the protection of virus
scan agent
IP Address
The IP address of the network share
Status
Connection status of the host network share with the virus
scan agent:
•
Disconnect: Not connected to the network
•
Idle: Connection has been enabled but there is no file
transfer for three minutes or more.
•
Ready: Connection has been enabled and ready to be
scanned
•
--: User name and password have not been set up
Infected
Number of infected files
Last Scan Time
Date and time of the most recent virus scanning job
Result
Scanning result:
OK: No files are infected
•
Virus Found: Virus is found. The name of the infected
file(s) may not be displayed due to the scanning of other
files. Go to administration page to view the name and
location of the infected file(s).
•
Access Denied: Access to the server is denied.
Authentication Failed: The login user ID is not authorized to
access the folder of the network share.
Path
The file location on the network share
54
Enabling Virus Scan Support
Go to Virus Scan of System Tools. To enable virus scan support, check the box
Enable Virus Scan Support. Enter the IP address of the virus scan server and
click Apply.
Viewing Details of Infected Files
To view the details of infected files of the network share, go to Event Logs of
Statistics & Logs. A warning message will be shown in the table.
55
3.9.10 Backup/ Restore/ Reset Settings
To backup the setting(s), select the appropriate option(s) and click Backup. To
restore a backup settings file, click Browse to select the file and click Restore.
To reset the setting(s) to factory default(s), select the appropriate option and
click Reset.
56
3.9.11 Backup Agent
Backup agent enables Disk On-line Server to support particular backup programs.
In addition to being compatible with more tape drives and tape library, backup
agent also supports backup and restoration among multiple servers on different
OS.
57
Installation of Backup Agent
Follow the steps below to install Backup Agent:
1. Download Backup Agent program to local disk
a. Install Back Agent.
Contact technical support for information of backup agent program.
2. Install Backup Agent
a. Enter Disk On-line Server administration page. Go to System Tools and
select Backup Agent.
b. Click Browse to select Backup Agent program.
c. Click Install Agent. When the installation is completed, the name of
backup agent will be displayed, e.g. NetVault 6.5.3:
58
3. Configure and enable Backup Agent
a. Click Enable Backup Agent.
b. Enter the password for Backup Agent.
c. Click Apply. The status will be shown as Running.
59
3.10 Statistics & Logs
You can view the event logs of all currently online users on Disk On-line Server
for system monitoring.
•
Active Users
This page shows all users that are currently logged on to the system.
•
Event Logs
Disk On-line Server can store thousands of recent event logs, including
warning, error and information messages. In case of system malfunction,
the event logs can be retrieved to help analyze the system problem.
•
DHCP Logs
If DHCP server function is activated, you can use it to monitor all of the
assigned dynamic addresses, client MAC addresses and other information.
60
Chapter 4 Accessing Disk On-line Server
4.1
1.
Using Microsoft Windows
You can access Disk On-line Server in Windows OS by the following ways:
•
By Quick Install Wizard. For further information, please refer to
Appendix C.
•
You may also search for Disk On-line Server within the Network
Neighborhood. Locate the workgroup and find the name of your Disk
On-line Server. When the server is found, double-click on the server
name to connect.
•
You may also use “Search for Computers” function to look for your Disk
On-line Server in Windows. Under Windows ME or Windows 2000,
please follow these steps:
i.
Open “My Network Places”.
ii. Under the tool bar, click Search.
iii. Enter the name of Disk On-line Server in Computer Name field.
iv. Click Search.
When Disk On-line Server is found, double click the item to access the
server.
61
2.
Once the connection to Disk On-line Server is successful, all listing on your
available network share will be displayed. Select an appropriate network
share folder and select Map Network Drive by right clicking on the item.
To make the share folder available for your next start-up, check the
Reconnect at logon box on the popup window and click OK to map the
folder as your network drive.
62
4.2
Using Apple MAC OS
If you are an Apple MAC user, you can access Disk On-line Server by the following
ways:
1.
Using Network Browser
a.
Choose “Network Browser” in Apple menu.
b.
In “Network Browser”, choose AppleTalk. A list of computers on the
AppleTalk network will appear. Select Disk On-line Server.
63
c.
Enter the login name and password, or use “Guest” to enter. Click
Connect.
d.
When Disk On-line Server is connected, all network shares will be
shown.
64
e.
Choose a network share to connect. The network share will appear on
the desktop.
65
2.
Using Chooser
a.
Select Chooser on Apple menu bar.
b.
Click on AppleShare. The name of Disk On-line Server will appear on
the right side of the window.
66
c.
Use the mouse to highlight Disk On-line Server and click OK.
d.
Enter the correct login name and password or use “Guest” to login, and
then click Connect.
67
e.
All available network shares will be listed. Select a network share and
click OK.
f.
Close the Chooser program. Double click on the icon on the desktop to
access the files.
68
4.3
Using Unix/ Linux OS
In addition to Microsoft and MAC OS, Disk On-line Server also supports Unixbased systems such as IBM AIX, HP-UX, Sun Solaris, Linux, Free BSD, etc.
through the NFS service:
Note: Configure NFS settings in User Management page for users who use this
feature before proceeding to the steps below.
1.
On Unix, run the command:
mount -t nfs <Disk On-line Server IP address>:/<Network Share Name>
<Directory to Mount>
For example, if your Disk On-line server’s IP address is 192.168.0.1 and you
want to link the network share folder “public” under the /mnt/pub directory,
use the following command.
mount -t nfs 192.168.0.1:/public /mnt/pub
Note: You must login as “root” user to initiate the above command.
2.
Login as the user id that you define, you can use the mounted directory to
access your network share files.
4.4
Netware Service
To use Novell Netware service, enable this option and enter the server name for
Netware network. The server will then operate in a manner similar to a Novell
NetWare 3.12 file server.
4.5
Using Web Browser
Other than OS support, your Disk On-line Server also provides a convenient web
file management interface that allows using a standard web browser to access
your data. If you link Disk On-line Server to the Internet and use a public IP
address, you can access the files on the server anywhere. For more information,
please refer to Appendix B.
69
4.6
Using File Transfer Protocol (FTP)
In addition to working with multiple operating systems, Disk On-line Server also
supports connection via FTP. Enter the correct user name and password to
connect the server or access the public share folders as guest.
1. Follow the steps below to use FTP service (based on Windows 2000 as
example):
2. Click FTP.
70
3. Enter user name and password.
4. The share folder will be shown. You can then manage the folder by dragging
and dropping files to it, as well as rename or delete the files.
71
Chapter 5 Disk On-line Server-Maintenance
Disk On-line Server is specially designed to run 24 x 7 and be ready at all times
against system crash caused by power outage. This section provides a general
overview on system maintenance.
5.1
Restart/ Shut down Server
Follow the steps below to restart or shut down Disk On-line Server.
1. Ask all active users of NAS to save their files and disconnect from the server.
2. Enter the administration page and select Restart/ Shutdown in System Tools.
3. Click Restart to reboot the server or Shut Down to turn off the server. You
can perform these actions by the LCD panel.
5.2
Reset Administrator Password and Network Settings
To reset the administrator password and network settings of Disk On-line Server,
1. Press the reset button of Disk On-line Server for a few seconds. A beep
sound will be heard.
2. Login Disk On-line Server with the default user name and password:
User name: administrator
Password: admin
Note: To reset the system by the reset button, the option “Enable configuration
reset switch” in Hardware Settings must be activated.
72
5.3
Disk Failure or Malfunction
When you encounter disk malfunction or failure, please do the following:
1.
Record the malfunction status or error messages.
2.
Stop using the failed Disk On-line Server and turn off the server.
3.
Contact customer service for technical support.
Note: Your Disk On-line Server must be repaired by professional technicians,
please do not try to repair the server yourself.
Please back up any important files or folders to avoid potential data loss due to
disk crash.
5.4
Power Outage or Abnormal Shutdown
In case of power outage or improper shutdown of Disk On-line Server, the system
will resume to the state before it is shut down. If your server does not function
properly after restart, please do the following:
1. If the system configuration is lost, configure the system again.
2. In the event of abnormal operation of the server, contact customer service for
technical support.
To avoid the above situations, please back up your data periodically and make
sure you have done the following:
1. Follow the instructions described in Chapter 5.1 to restart or shut down the
server.
2. If there is an anticipated power outage, back up important data and turn off
the server properly until power supply is resumed.
73
Appendix A
LCD Panel
Displayed Information
When Disk On-line Server is turned on, the server name and IP address will be
shown.
System name
NAS-2100
172.17.26.19
IP address
Button A
Button B
Check disk information and firmware version
1.
Press button B to view disk information, i.e. number of disks and disk size.
DISK NUMBER: 2
SIZE: 76333.36MB
2.
Press to view disk
information
Press button B again to view the server model and firmware version.
NAS-2100
4.1.4 (0120)
Press to view model
and firmware
version
74
System Setting Function
1.
Press button A for two seconds to enter configuration page.
PRESS 2 SECONDS
FOR CONFIG. PAGE
2.
Press for 2
seconds to enter
configuration page
Press button B to select an item: NETWORK SETTINGS, POWER DOWN,
REBOOT SYSTEM, and EXIT.
SELECT 1:
NETWORK SETTINGS
Click this button
to select an item
to configure
Network Settings
Enter NETWORK SETTINGS configuration page and press button B to select one of
the following options. The one marked with * means it is being used for
connection.
•
DHCP
DHCP will obtain IP address automatically.
•
STATIC IP
Press button A to select STATIC IP. Then configure the IP address.
i.
SET STATIC IP
Press button B to enter 0~255 and press button A to set the next number
for the IP address.
ii. SET NETMASK
Follow the above procedure to set the netmask address.
iii. SET GATEWAY
Follow the above procedure to set the gateway address.
iv. SELECT STATIC IP
Press button B to select YES or NO. When YES is selected, you will be
asked to restart the system.
•
EXIT
To return to the previous menu.
75
POWER DOWN
Press button B to select POWER DOWN and press button A to confirm shutting
down Disk On-line Server.
SELECT 2:
POWER DOWN
REBOOT SYSTEM
Press button B to select REBOOT SYSTEM and press button A to confirm
restarting the system.
SELECT 3:
REBOOT SYSTEM
Exit Configuration Page-EXIT
Press button A and select EXIT, then press the button again to confirm exiting the
configuration page.
SELECT 4:
EXIT
EXIT CONFIG PAGE
Press this button
to select EXIT
Press again to
confirm
76
Appendix B
Web File Manager
Using Web File Manager
Launch the web browser and go to Disk On-line Server home page. Select Web
File Manager and enter the correct login name and password. You may also
enter “guest” in the login name field with no password to access the network
shares on Disk On-line Servers as an anonymous guest.
Note: Make sure a network share has been created before using Web File
Manager.
Select an existing network share for management.
77
You can organize network share folders of Disk On-line Server. With Web File
Manager, you can upload, rename, or delete files and folders in the network
shares.
•
View files online
Click on a file displayed on the web page. The information of the file will be
displayed. If your browser does not support the file format, the download
window will pop up automatically. Once the file is downloaded, you can open
it on your computer.
•
•
•
Create folder
i.
Select a network share or folder in which you want to create a new folder.
ii.
Click
iii.
Enter the name of the new folder and click OK.
(Create Folder) on the toolbar.
Rename file or folder
i.
Select a file or folder to rename.
ii.
Click
iii.
Enter the new file or folder name and click OK.
(Rename) on the toolbar.
Delete file or folder
i.
Select a file or folder to delete.
ii.
Click
iii.
Confirm to delete the file or folder.
(Delete) on the toolbar.
To delete all files and folders, click
(Select All) and then
(Delete).
78
•
•
•
Upload file
i.
Open the folder to upload file to.
ii.
Click Browse to select the file.
iii.
Click Upload.
Download file
i.
Select a file to download.
ii.
Right click the mouse and select “Save As” to save the file.
Logout
(Logout).
To exit Web File Manager, click
79
•
Viewing Files Named in Chinese
To view files named in Chinese, you may have to configure the browser
settings. Take Internet Explorer as an example, follow the steps below to
configure the settings.
1. Click on Tools in IE browser.
2. Click Internet Options.
3. Cancel this option.
4. Click OK.
5. Restart the browser.
80
Web File Manager Icons
Icon
Description
Up-return to the parent folder
Refresh-reload the current page
Home-return to network share list home page
Create folder
Rename file or folder
Delete file or folder
Select all
Cancel selection
Logout
Full access network share folder
Read-only network share folder
Malfunction network share folder
81
Appendix C
Quick Install Wizard
Quick Install Wizard enables you to search for all available Disk On-line Servers
within the local network, and view the server name, IP address, and workgroup
etc. You can also configure the disk name, date and time, etc. via Quick Install
Wizard.
Screenshot
Name of Disk Online Server
Windows
workgroup
joined by Disk
On-line Server
IP address of
Disk On-line
Server
System
version
Exit the
program
Configure the
server name,
time and
network
settings of Disk
On-line Server
View the
details of
selected Disk
On-line
Server
Map
network
drive for
the server
82
Refresh the
search results
within the
network
View help message
for Quick Install
Wizard
Operation
1.
Configure Disk On-line Server
Select a Disk On-line Server displayed on Quick Install Wizard and click
Configure. Enter the administrator password.
Upon successful login, the following screen will appear. Enter the
configuration values and click OK.
83
Set the name, date and time for
Disk On-line Server. The length
cannot exceed 14 characters.
The system will obtain IP
address automatically.
To use fixed IP address for
connection, enter the IP
address, subnet mask and
gateway for the server.
For further configuration of the system, please login the administration page
of Disk On-line Server via web browser.
Note: You may have to restart Disk On-line Server after changing the
network configuration.
84
2.
View Disk On-line Server details
Select a Disk On-line Server available on Quick Install Wizard and click
Details. The following screen will be shown:
85
3.
Map drive
a.
Select a Disk On-line Server and click Map Drive.
b.
Select the correct network share and click Map Network Drive. Then
select the drive letter for connection.
86
c.
Enter the password for the network drive.
87
4.
Search for all available Disk On-line Server again
To refresh the search results, click Refresh to display all available servers
within the network.
88
5.
Help
Click Help to view the instructions of Quick Install Wizard.
89
6.
Enter the home page of Disk On-line Server
Double click on Disk On-line Server to enter the administration page.
90
Appendix D
NetBak Replicator
NetBak Replicator is a program installed in user’s system (Windows only) for data
backup. You can upload any files or folders to server and back up the data.
Main Functions
1.
Backup
• File Filter
You can select particular file types to be excluded from backup. The
system will filter all files belonging to these file types when backing up
data.
• Schedule
You can specify a schedule for backing up data with this option, e.g. 12:00
every day or 05:00 every Saturday.
• Monitor
When this option is enabled, the system will upload all files or folders to
the server instantly for backup when the files or folders are modified.
2.
Restore
Select this option to restore backed up data to the original location of the file
or to a new directory.
3.
Log
Enable this option to record events of NetBak Replicator, e.g. the time when
NetBak Replicator starts and terminates, Restore and Monitor, backup time
and original location of all files, etc.
91
Installing Netbak Replicator
1.
Run Install NetBak Replicator in the companion CD.
92
2.
Follow the steps to install NetBak Replicator. Then click Finish.
3.
Upon successful installation, a shortcut icon
Desktop.
93
will be shown on the
Using NetBak Replicator
1. Create a share folder for backup in NAS.
2. Run NetBak Replicator. Click
. All NAS and their share folders within the
network will be displayed.
94
3. Select the server and share folder, or enter the IP address of NAS for data
backup. Then click OK.
Note: Only authorized users can access the share folders. Double click the folder.
The system will prompt for user name and password to authenticate the access
privilege of the users.
95
4. You can start the backup procedure upon successful connection to the NAS.
•
Backup
Select files and folders for backup.
9 File Filter
Click File Filter to select file format to be skipped from backup. Then
click OK.
96
9 Schedule
Click Schedule on NetBak Replicator main page. Then check the box
“Enable Backup Schedule” and select the frequency and time for
backup. Click OK to confirm.
97
9 Monitor
Select the files and folders for monitoring. Then click Monitor.
9 Initialize Configuration
When using this function, NetBak Replicator will record all current
settings of the user, including whether or not monitor function is
enabled. When the user login again, this program will load the
previous recorded settings for users to manage data backup.
98
•
Restore
a. Restore to original position: Select the location that the data will be
restored to.
b. Select new restore position: Click
to select the directory to restore
data to or select a previously chosen location from the drop-down menu.
c. Start: Select the folder(s) and sub-folder(s) for restoring data.
99
d. Option: Select recovery option and error option.
100
•
Log
a. Clear All: Click this button to clear all logs.
b. Option: Select the type of logs to be recorded― “Record all logs” or
“Record error logs only”.
101
Appendix E
Configuring AD Authentication
Environment
AD environment mixed mode can be supported by NAS firmware version 4.1.3.
For example, qatest.com.tw and sub2.qatest.com.tw are domains controlled by
Windows 2003 server, and sub1.qatest.com.tw domain is controlled by Windows
2000 server.
102
Adding NAS to Windows Server 2003 Active Directory Domain
1.
Go to TCP/IP Configuration in Network Settings. Enter the IP address of
primary DNS server. You can inquire AD domain via this DNS server.
103
2.
Go to Microsoft Networking of Network Settings. Enable AD Domain Member,
and enter the domain name and the user name with administrator access
right to that domain.
Note:
(1) Make sure that a fully qualified domain name such as qatest.com.tw has
been filled in.
(2) Make sure the user name with administrator access right to that domain.
104
3.
When the following message appears after applying the settings in step 2,
check the DNS IP.
When the following message appears after applying the settings in step 2,
domain name, domain user name, and the password.
When the following message appears after applying the settings in step 2,
check the time zone settings. Make sure the difference of your time and that
of AD server is less than 5 minutes. If the time difference is larger than 5
minutes, you will not be able to add the domain member.
105
4.
Upon successful adding of domain member, you can view the list for domain
users and local users in User Management.
5.
Go to Access Control in Network Share Management to configure the access
control right of AD users for all available network shares.
106
Using AD users to access services
To access services like FTP, Network Neighborhood, Apple Talk with an AD user
account, add DomainName\ before the user name when logging in.
107
Adding NAS to Windows Server 2000 NT Domain
1. Go to Microsoft Networking to enable NT Domain member and then enter the
domain name such as sub1 and the user who has administrator access right
for identification.
Note:
(1) Please notice that NAS and Windows 2000/2003 server must be in the same
section or the system will show the following error message.
(2) Make sure that a domain name such as sub1 has been filled in.
(3) Make sure the user name with administrator access right to that domain.
108
2. When the following message appears after applying the settings in step 1,
check the domain name, domain user name, and the password.
When the following message appears after applying the settings in step 2,
check the time zone settings. Make sure the difference of your time and that
of AD server is less than 5 minutes. If the time difference is larger than 5
minutes, you will not be able to add the domain member.
3. Upon successful adding of domain member, you can view the list for domain
users and local users in User Management.
109
4. Go to Access Control in Network Share Management to configure the access
control right of domain users for all available network shares.
Using domain users to access services
To access services like FTP, Network Neighborhood, Apple Talk with an domain
user account, add DomainName\ before the user name when logging in.
Note:
To join AD domain again, set NAS as standalone server in Microsoft Networking
section. Make sure all domain users are removed in User Management before
joining NAS to AD domain.
110
Appendix F Messages of Hard Disk and Disk
Configuration Status
Status Description for Hard Disk and Disk Configuration
Hard Disk
English Display
Ready
No disk
Invalid
Status Description
The hard disk status is normal
No disk currently
9 Disk tray is not installed or there is main board error.
Users can check disk tray. If there is main board
error, please contact QNAP customer service.
Indicates the disk does not have a record on NAS
9 The disk is used on NAS the first time, or the disk on
the same NAS model is used. Users can re-configure
disk volume.
R/W error
Disk fails
9 When R/W error is shown, users should back up data
immediately and replace the failed disk.
Disk Configuration/ RAID Configuration
English Display
Initializing
Initializing disk
Formatting
Formatting disk
Creating
Creating RAID configuration
Removing
Removing RAID configuration
Rebuilding
Rebuilding RAID configuration
Checking
Error checking on hard disk or disk configuration in
process
9 NAS will check disk automatically if it is shut down
improperly
English Display
Status Description
Status Description
Ready
The status of current disk or disk configuration is normal
Unmounted
Hard disk is not installed or hard disk configuration is
not configured
RAID configuration is damaged and cannot be enabled
9 When this message is shown, users should back up
disk data immediately and replace the failed disk.
Not Active
Uninitialized
Initialization fails
9 Single disk does not support hot swap. If the hard
disk is unplugged when NAS is turning on, disk
configuration will be damaged and will lead to data
loss.
111
In degraded mode
A disk of RAID 1 or RAID 5 configuration is unplugged or
fails. RAID data protection mechanism fails.
9 In this situation, users should back up disk data
immediately and replace the failed disk to rebuild
RAID configuration.
Note:
1. When R/W error is displayed for hard disk status, or “Not active” or “In
degraded mode” is displayed for RAID configuration, please replace the hard
disk immediately to ensure RAID data protection can work properly. QNAP is
not responsible for any data loss caused by delay in replacing failed disks in a
RAID configuration by users intentionally or unintentionally.
2. QNAP Systems, Inc. guarantees that all Disk On-line Server (NAS) released
have passed strict and complete QA test and can operate properly in normal
condition. QNAP offers conditional and limited maintenance for NAS within
warranty period. However, QNAP disclaims the responsibility for any data loss
or damage, or business loss of users. In no event shall the liability of QNAP
exceed the price paid for the product from direct, indirect, special, incidental,
or consequential software, or its documentation.
112


![Manual del usuario - [ [ [ ANSEL ] ] ]](http://vs1.manualzilla.com/store/data/006306298_1-4b727a9f513ab88544573091f86e1211-150x150.png)