1
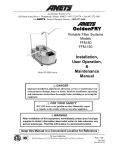
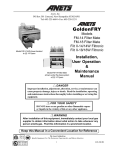
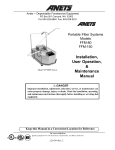
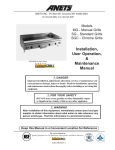
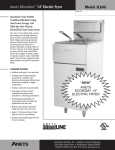
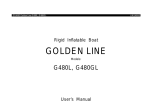
Anetsberger Brothers, Inc.
180 North Anets Drive • Northbrook, Illinois 60062 • 847-272-0770 • Fax 847-272-1943
For ANETS Factory Warranty Service • 800-837-2638
GoldenFR
Y
GoldenFRY
Models
FM-14 Filter Mate
FM-18 Filter Mate
Filt II-14/14W Filtronic
Filt II-18/18W Filtronic
Model Filt II-14W shown banked
to (2) 14” fryers
Model FM-14 Filter Mate
shown under the base system
of (2) 14” fryers
Installation,
User Operation,
&
Maintenance
Manual
! DANGER
Improper installation, adjustment, alteration, service, or maintenance can
cause property damage, injury or death. Read the installation, operating
and maintenance instructions thoroughly before installing or servicing this
equipment.
! FOR YOUR SAFETY
DO NOT store or use gasoline or other flammable vapors
or liquids in the vicinity of this or any other appliance.
! WARNING
After installation of this equipment, immediately contact your local gas
supplier to obtain information about what action to take whenever any
person smells gas. Post this information in a prominent location.
Keep this Manual in a Convenient Location for Reference
FM-14
FM-18
Filt II-14/14W
Filt II-18/18W
The Anets GoldenLine
Quality Equipment For The Restaurant, Supermarket, and Bakery Industries
Form I-225
Rev. 6/03
Price $20.00 US
1
TABLE OF CONTENTS
Shipping Container Inspection ....................................................... 2
Code Requirements ...................................................................... 2
Filter Unit Preparation Instructions ................................................ 3
Filter System Diagrams .................................................................. 4
Filtering Instructions ...................................................................... 5
Oil Disposal Instructions ............................................................... 6
Replacing The Filter Paper ............................................................ 7
Filter Troubleshooting Guide .......................................................... 8
Filter Warranty .............................................................................. 9
! D ANGER
Read these specifications, Code Requirements, Installation Requirements, Installation Instructions, and Operating Instructions very carefully. Failure to follow the Instructions could cause the filter system to malfunction. A filter system malfunction can result
in property damage, serious bodily injury, or death.
SHIPPING CONT
AINER INSPECTION
CONTAINER
1. Carefully examine the shipping container for external damage. When damage is noted, notify the
delivery carrier immediately. Save all packing materials for damage claim examination.
2. If no external damage is noted, remove the shipping container from the filter and examine the unit
carefully for damage. Place the filter in a safe location, if damage is noted, so that the freight damage
claims adjuster can examine it.
Models Co
ver
ed By T his Man
ual
Cov
ered
Manual
FM-14
FM-18
Filt II-14
Filt II-14W
Filt II-18
Filt II-18W
Filter Mate, Under Fryer Filter System - 14”
Filter Mate, Under Fryer Filter System - 18”
14” Filtronic Filter System in Cabinet
14” Filtronic Filter System with Heat Lamp
18” Filtronic Filter System in Cabinet
18” Filtronic Filter System with Heat Lamp
Standard Accessories furnished in the shipping carton with this filter include:
(1) Filter Screen Assembly
Box of Filter Paper (100 pcs.)
Other available Optional equipment may include a separate hose assembly for shortening removal and a
cleaning brush. These would be packed with the fryers, if ordered.
NOTE: A Parts List for each Anets Filter System is among the items shipped with each unit. If an
additional copy of this list is needed, please contact the factory as directed on the back cover.
2
INST
ALLA
TION
INSTALLA
ALLATION
This Manual will detail the Installation and Operation of the FilterMate system, with notes where the Filtronic II System differs.
Both the Filter Mate and Filtronic II Systems enable the user to safely and efficiently filter the cooking oil or
shortening from a fryer in a banked row while the other fryers in that row are still being used. Even though
these two Filtration Systems are slightly different in physical dimensions and design, the Installation and
Operation is basically the same.
FIL
TER ELECTRICAL SPECIFICA
TIONS
FILTER
SPECIFICATIONS
Please make sure that your desired filter location has electrical supply factors that are suitable for this
product. Requirements are 120 Volts, 60 Hz, 8 Amps, 1-phase, three-wire connection, including an
electrical ground.
! WARNING
!
Electrical Grounding Instructions
This appliance is equipped with a three-prong (grounding) plug for
your protection against shock hazard, and should be plugged
directly into a properly grounded, three-prong receptacle. DO NOT
cut or remove the grounding prong from this plug.
FIL
TER UNIT PREP
ARA
TION (Refer to Photos On Page 4)
FILTER
PREPARA
ARATION
1.
2.
3.
4.
5.
6.
7.
8.
9.
10.
Assemble filter envelope to filter screen by sliding the envelope over the filter screen, folding
back the open end over the filter screen. Make sure the hole in the filter envelope fits over
the fitting on the filter screen.
Assemble filter envelope clip over folded back end of envelope and over fitting on filter
screen.
Attach knurled retaining nut onto fitting on screen, securing the assembly.
Attach quick-connect coupling on drain tube to knurled retaining nut.
Place filter unit into the filter tank using the lift-out handle.
Connect the filter assembly to the pump using the quick-connect assembly.
Put the filter tank cover on the tank.
Slide the filter tank unit into its location under the fryers or in the filter cabinet.
Make the connection from the fryer return line to the filter pump with the quick-connect
fitting.
Plug the cord on the side of the filter unit into the receptacle on the fryer frame. Make sure
that the power switch located on the side or top of filter unit is ON.
3
FIL
TER MA
TE TANK
FILTER
MATE
Filter envelope clip
Lift out handle
Quick connect coupling
Knurled retaining nut
Pump quick-connect coupling
Filter envelope
Return line and optional hose
connection
FIL
TR
ONIC II TANK
FILTR
TRONIC
Lift out handle
Quick connect coupling
Pump quick-connect coupling
Knurled retaining nut
Filter envelope
Filter envelope clip
4
FIL
TERING INSTR
UCTIONS
FILTERING
INSTRUCTIONS
CAUTION
Never operate the filter unit unless the cooking oil or shortening in the
fryers has been brought up to cooking temperature.
WARNING
Always wear protective heat-resistant gloves when performing the filtering operation.
FIL
TERING
FILTERING
1. Before filtering the shortening in a fryer, turn the thermostat knob to “OFF” or the Gas Valve to “PILOT” to prevent the fryer from re-lighting during filtering. On some models the system automatically
prevents the burners from lighting when the door of the fryer is open.
2. Open the drain valve (black handle) on the fryer to be filtered, letting all the shortening drain into the
filter tank. Leave this valve open.
! DANGER !
Never drain more than one fryer at a time – the filter pan may overflow.
3. Open the return line valve (yellow handle) for the fryer being filtered. This activates the power to the
pump. If the pump does not start immediately check that the switch on the side or top of the pump
frame is “ON”. While the filter system is cycling, use a long-handled cleaning brush to wipe the bottom
of the fryer and push excess crumbs through the drain and into the filter machine.
WARNING
When cleaning the inside of the frypot, do not damage the temperature and
hi-limit probes that protrude into the frypot.
4. When the shortening returning into the fryer is clear, close the drain valve (black handle) and allow the
fryer to refill.
5. Allow the pump to run until no more oil is returning into the vat. Then close the return line valve
(yellow handle), which de-activates the power to the pump.
WARNING
If solid shortening is being used it is very important that all oil is allowed to flow back into
the vat and none is left in the hoses. Failure to do so could cause the pump to fail if the
oil solidifies in the line.
Note On Using Filter Powder
If filter powder is being used, add 1 cup of powder (for 14” fryers) or 2 cups (for 18” fryers) to
either the fry tank or the filter tank. If added to fry tank, make sure powder is completely flushed
during fry tank cleaning (Step 3) before closing drain valve (Step 4). If added to filter tank, the
powder will be removed when the filter envelope is changed and the filter tank is cleaned.
5
6. On gas-operated thermostat models (14G, 14GS, MXEG, 18EG, 20EG) the thermostat knob can now
be turned back to the desired temperature. CAUTION: On these models the thermostat must be set to
“OFF” or the Gas Valve to “PILOT” before filtering or the burners MAY come back on if the doors are
closed during filtering.
7. On electric-operated thermostat models (MX-14E, MX-14AA, 18E, 18AA, 20E, and 14EL-17) the
power switch on the control panel must be reset for the fryer to operate again.
8. The other fryers in the bank can be filtered using the same procedure.
IMPORTANT NOTE:
The pump on this filter unit is equipped with a safety that will turn off the motor if it overheats or an
electrical fault occurs. If this occurs, let the pump motor cool for 15 minutes, then press the manual
reset button on the bottom of the motor and restart the motor.
DANGER
Never run water through the filter system. This will cause rust and corrosion in the
motor and pump and will void the Warrranty.
OIL DISPOSAL
WARNING
Always wear protective heat-resistant gloves when performing the oil disposal operation.
If the cooking oil or shortening from a fryer is to be disposed, follow steps 1 and 2 from Filtering Instructions in previous section. Disconnect the line from the pump to the fryer return line, and connect the
optional hose assembly to the pump. Turn on the pump using the manual switch on the side or top of the
filter and direct the oil into an appropriate device such as an oil shuttle to move the used oil to its disposal
tank.
6
REPLA
CING THE FIL
TER P
APER
REPLACING
FILTER
PAPER
If the filter paper becomes torn, or if the time to filter the oil from one unit becomes excessive, it is time to
replace the Filter Envelope.
! DANGER !
Make sure the filter pan has cooled completely to room temperature before
attempting to change the paper.
1. Disconnect the oil return line from the pump.
2. Unplug the cord from the receptacle on the side of the cabinet.
3. Pull the filter unit from the cabinet.
4. Disconnect the line from the pump to the filter screen.
5. On the Filtronic II models, pivot the motor assembly up out of the way.
6. Remove the filter cover. Use lift out handle to remove screen assembly. Place on a clean surface for
disassembly.
7. Detach quick-connect coupling on drain tube from knurled retaining nut.
8. Detach knurled retaining nut from fitting in screen.
9. Remove filter envelope clip from end of filter screen and folded back end of envelope .
10. Remove filter envelope from filter screen.
WARNING
The oil soaked filter envelope may still be very hot and could cause burns.
11. Clean the filter pan, filter screen and all components thoroughly using a solution of hot water and
detergent. Make sure that all food and breading particles are removed from the pan and from the filter
screen.
12. Dry the pan, the screen and all components completely before starting to reassemble.
13. Follow instructions under FILTER UNIT PREPARATION to install new filter envelope.
7
FIL
TER SY
STEM TR
OUBLESHOO
TING GUIDE
FILTER
SYSTEM
TROUBLESHOO
OUBLESHOOTING
PROBLEM
SOL
UTION
SOLUTION
Pump does not
start when the
return line valve
(yellow handle) on
the fryer is opened.
1. Make sure the power cord is plugged into the receptacle in the cabinet and the
main power cord from the system is plugged into the appropriate power supply.
2. Turn the switch on the side of the filter to “ON”.
3. Close the return line valve (yellow handle) and try opening the return line valve
on another fryer. If the pump starts, the problem is with the microswitch that
contacts the return line valve on the first fryer.
4. If pump still hasn’t started, depress the thermal overload button on the bottom
of the motor. If the motor is hot to the touch, wait at least 45 minutes before trying
this.
5. If the pump starts and stops again in a short time, or if it hums but does not
pump, there is a restriction somewhere in the filter screen or in the pump itself. Go
to Step 6. If there is no reaction from the pump, go to step 7.
6. Allow the oil/shortening in the filter pan to cool, then empty the pan and verify
that the filter paper and screen assembly is assembled correctly. Disassemble the
filter screen and look for blockages of sediment or solid shortening within.
7. Problem is with the motor/pump or the wiring. Remove the motor from the
filter and bench test by connecting a 120V line to the motor leads. If it runs, the
problem is with the wiring between the motor and the power supply. If it does not
run, the motor needs to be replaced.
Filtering procedure is
very slow. Shortening/oil returning to the
fryer very slow.
1. After all the shortening/oil has been pumped back into the fryer, inspect the
filter paper envelope. Make sure that any excess sediment is removed from the
top of the filter paper envelope.
2. If the filter paper envelope is dirty or torn, disassemble the filter screen
assembly. Inspect for blockages in the lines. Replace with a clean filter paper
envelope.
WARNING
Only use filter paper envelopes from Anetsberger Brothers that have been
specifically designed for this filter system. Using the wrong type of filter paper
can cause damage to the pump system, and will void the warranty.
3. If the oil still returns to the fryer slowly, the problem may be a blockage within
the pump itself. The pump section of the motor can be easily disassembled to
look for blockages of sediment or solid shortening within.
Fryers do not re-fire
after filtering.
1. Make sure the door on the fryer is completely closed.
2. Reset the ON/OFF switch on the fryer by flipping to OFF position and
then back to ON. (Note: Each time the fryer door is opened the ON/OFF
switch needs to be reset.
8
LIMITED WARRANTY
ANETSBERGER BROTHERS, INC., Northbrook, Illinois, USA, certifies
that all equipment of its manufacture is, to the best of its knowledge, free from
defective material and workmanship.
ANETSBERGER BROTHERS, INC., agrees to replace any integral part of
its equipment that proves defective within 15 months of date of original shipment from the factory, or 12 months from the date of installation, whichever is
sooner. Buyer must return the defective part to the factory, freight prepaid,
for inspection. Anetsberger Brothers, Inc., further agrees to assume the cost
of installing said replacement part within the same period.
All frypots are covered by the warranty above for the first year of operation.
Various models have an extended warranty that cover the replacement of the
frypot only. See the individual specification sheets for details.
Overtime charges, calibration, adjustments and abnormal installation charges
shall not be at the expense of Anetsberger Brothers, Inc.
The conditions and warranty expressed above are valid only if equipment has
been properly installed and operated. No other warranty, expressed or implied, shall govern equipment manufactured by Anetsberger Brothers, Inc.
Under no circumstances shall Anetsberger Brothers, Inc., be liable for loss of
profits or any direct or indirect cost, expenses, loss or damages arising out of
defects in or failure of the equipment or any part thereof.
Anetsberger Brothers, Inc.
180 North Anets Drive • Northbrook, Illinois 60062 • 847-272-0770 • Fax 847-272-1943
Toll-free Customer & Warranty Service: 800/ 837-2638
Web Site: www.anetsberger.com
email: [email protected]
Keep this Manual in a Convenient Location for Reference
9