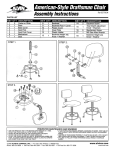
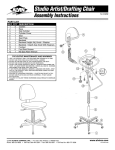
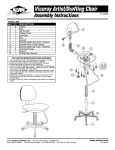
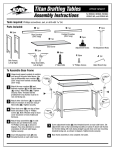
1
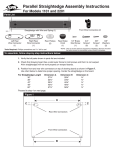
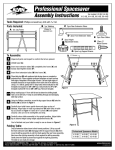
PXB Board Instructions
Thank you for purchasing an Alvin PXB Portable Drawing Board.
With proper care and handling, your PXB will provide you with years of accurate and productive use.
PXB Boards are available
in the following sizes:
PXB21
PXB24
PXB26
PXB31
PXB36
PXB42
16" x 21"
18" x 24"
20" x 26"
23" x 31"
24" x 36"
30" x 42"
Care and Handling
© Keep all adjustment knobs tight to
ensure straightedge stays parallel
© Clean board surface and underside of blade with mild detergent and soft cloth. Wipe dry
© Avoid direct exposure to sunlight or extreme heat
© Protect your PXB from damage by storing and transporting in a protective case
© Do not move straightedge with brakes tightened; always move straightedge with a smooth, easy motion
Adjustments
It is recommended that you follow this sequence when making
adjustments to the position of the straightedge blade:
1. Set the brakes for optimum braking strength
Side
© Unscrew brake knobs as far as they will go.
Bracket
© Retighten brake knobs one full revolution only
© Loosen top adjustment knobs
© Push metal side brackets toward the center until
both brake pads rest against edges of board
Brake
Knob
© Retighten top adjustment knobs
© Brakes are now set and ready to use. Simply
tighten and loosen brake knobs as necessary
© Be sure to keep top adjustment knobs tightly
Brake
secured or the brakes will not function
Pad
2. Set
©
©
©
straightedge blade parallel to edge of board
Loosen one wire capture screw on either side of the blade
Pivot the blade until it is in the desired parallel position
Retighten wire capture screw
Top
Adjustment
Knob
Straightedge
Blade
Board
Wire
Wire
Capture
Screw
Wiring Diagram
Troubleshooting
©
©
©
If brakes do not hold firmly,
follow brake setting instructions
on page 1
If straightedge is not parallel,
follow adjustment instructions
on page 1
If straightedge does not slide easily
up and down
© Check that brakes are not dragging
© Check that wires pass properly through pulleys
© Check that pulleys are spinning freely
© Check that spring is not running into pulleys
Spring rides on top of wire
Replacing or Resetting the Wire
©
©
©
©
©
Blade should be positioned in center of board when rewiring and spring should be centered
Attach eyelet to one end of wire. Connect eyelet to spring
Thread wire around pulleys as shown in wiring diagram
Extend spring approximately 1" beyond unstretched length
Secure wire to second eyelet and trim excess
Spare Parts
Spare parts can be ordered from your local Alvin dealer.
Visit our website www.alvinco.com for a dealer in your area
PXP
BX21
BX24
BX26
BX31
BX36
BX42
Kit contains wire, spring, metal side brackets,
top adjustment knobs, screws and cable eyelets
21" straightedge blade for PXB21
24" straightedge blade for PXB24
26" straightedge blade for PXB26
31" straightedge blade for PXB31
36" straightedge blade for PXB36
42" straightedge blade for PXB42
BX-2
KN6
PHX
TF2
BX-SM
BX-LG
Metal side brackets. Set of 2
Top adjustment knobs. Set of 6
Carrying handle
Rubber grip track. Set of 2
Folding legs for PXB21, 24, and 26. Set of 2
Folding legs for PXB31, 36, and 42. Set of 2
Alvin & Company, Inc.
Bloomfield, CT • Grand Prairie, TX
www.alvinco.com
Oct 2005