1
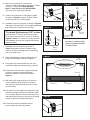
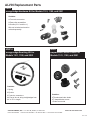
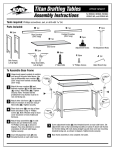
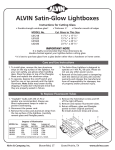
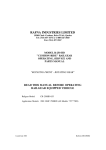
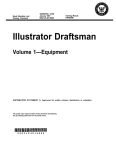
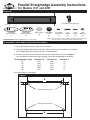
Parallel Straightedge Assembly Instructions
For Models 1101 and 2201
Parts List
Front Wire Connectors (2)
Straightedge with Wire and Spring (1)
wire
Left Rear
Wire Connector
(1)
Right Rear
Wire Connector
(1)
Rear Pulleys
(2)
Rear Brake
Knob
(1)
1/2" Brake
Stud Screw
(1)
3/4"
Screws*
(6)
5/8"
Screws*
(2)
*NOTE: Only six screws total are required for installation. We have included
two extra screws to accomodate various board thicknesses.
Tools Required: Phillips screwdriver and 1⁄16" drill or awl
To assemble, follow step-by-step instructions below:
1. Verify that all parts shown in parts list are included.
2. Check that drawing board has a solid outer frame to hold screws and that it is not warped.
Alvin straightedges will not work properly on warped boards.
3. Position front and rear wire connectors on top of drawing board as shown in Figure 1.
Use chart below to determine proper spacing. Center the straightedge on the board.
For Straightedge Length
30"
36"
42"
48"
60"
Dimension A
27¾"
33¾"
39¾"
45¾"
57¾"
Dimension B
28¾"
34¾"
40¾"
46¾"
58¾"
Dimension C
¾"
¾"
¾"
¾"
¾"
Proceed to step 4 on next page.
Figure 1
C
3/8"
Washers
(2)
A
Rear Wire Connectors
Front Wire Connectors
B
C
4. Mark screw positions for front and rear
connectors and pre-drill pilot holes about ¼" deep
using a 1⁄16" drill bit. TIP: Wrap masking
tape ¼" from drill tip to set drilling depth.
Use care not to drill through tabletop.
Figure 2
Figure 3
Front connector
¾"
Screw
Rear Brake
Knob
5. Fasten front connectors to front edge of board
as shown in Figure 2 using ¾" screws. Fasten
screws half way. Do not fully tighten.
6. Assemble right rear connector as shown in Figure 3
and fasten to board. Select screw length based upon
board thickness.* Fasten screws securely.
Screw
Pulley
Post
Figure 4
¾"
Screws*
If your board is ⁄8" thick or less please use the
5
⁄8" screws in place of the ¾" screws as shown in
Figures 3 and 4. Do not use ¾" screws included
with hardware kit since they might break through
bottom of board.
5
½" Brake
Stud Screw
* Use the 5⁄8" screws in place
of the ¾"screws for boards
5
⁄8" thick or less.
Left Rear
Connector
Figure 5
Center spring on board
9. Loop upper wires around pulleys in rear wire
connectors making sure that spring is centered.
Rear
Brake Knob
Stretch spring to 2½" in length
for proper tension
10. Thread lower left and lower right wires through
front wire connectors. Wire should pass
between connector and board as shown in
Figure 6.
Brake Knob
11. With spring still centered at top, pull slack out
of wire passing through lower left connector
and wrap wire around mounting screw. Fasten
screw securely.
13. Excess wire can be trimmed off leaving
several inches for future adjustment.
Right Rear
Connector
¾"
Screws*
7. Assemble left rear connector as shown in
Figure 4 and fasten to board. Fasten screws
securely. Pulleys are designed to be tight fitting
and do not spin freely.
12. Pull slack out of wire passing through lower right
connector until spring at top is stretched to about
2½" in length. Wrap wire around mounting screw
and fasten screw securely. Use care to set spring
tension as directed for best performance.
Washer
Screw*
¾"
*For board thicknesses of 5/8" or less:
8. Place straightedge in center of drawing board
parallel to front edge as shown in Figure 5.
⁄"
38
¾"
Brake Knob
Figure 6
Straightedge
ADJUSTMENTS
To Adjust Parallel Position:
1. Be sure all three brake knobs are free and loose. (See Figure 5 on previous page for brake locations.)
2. Grasp one end of straightedge and hold firmly against drawing board.
3. Gently pivot other end of straightedge up or down until desired parallel position is reached.
4. Secure wire under thumbscrew brake in upper right corner to maintain parallel.
To Lock Straightedge In Place:
1. With straightedge in desired position, gently tighten both left and right thumbscrew brakes.
Caution: Do not overtighten. Overtightening brake screws will damage wires.
REWIRING INSTRUCTIONS
If your wire ever breaks or needs to be replaced,
follow these steps:
Diagram 1
1. Release left and right end caps by removing
screws from below. Be sure not to remove screws
that keep top and bottom layers of blade together.
2. Remove all old wires.
3. Fold new replacement wire in half and thread
folded end through center of blade. Pull through
until wire is equal length on each side of the blade.
Cut wire at fold. There are now two independent wires
running through blade.
4. Grasp either wire on left side, pass around blade pulley
and brake screw as shown in wiring Diagram 2
and pass it around pulley in upper left corner of board.
Connect to spring at top.
5. Grasp the wire on right side not connected to spring
from left side. Trial and error method will be required
here. Pass this wire around blade pulley and brake
screw, then pass it around pulley in upper right corner
of board. Connect to spring at top.
Diagram 2
6. Pass lower left and lower right wires around blade
pulleys and brake screws as shown in wiring
Diagram 2.
7. To confirm wires have been strung correctly,
hold straightedge in place with one hand and pull
gently on lower left wire with other hand. The spring
at top should move to the right. Repeat by pulling the
lower right wire and the spring should move to the left.
8. Replace end caps and secure with screws from
below. Be sure that wires remain properly threaded
around pulleys and brake screws and pass properly
through exit slots in end caps. Do not over tighten or
strip screws.
9. Follow steps 8 through 13 on previous page to finish installation.
Brake Screw
ALVIN Replacement Parts
#HD4
Straightedge Hardware Kit for Models 1101, 1102, and 2201
Contains:
2 Front wire connectors
2 Rear pulley assemblies
8 Screws (6x 3⁄4" and 2x 5⁄8")
Wire not included and must be
ordered separately.
#PEP-2
Straightedge Rewiring Kit for
Models 1101, 1102, and 2201
#KN3
Replacement Brake Knobs for
Models 1101, 1102, and 2201
Contains:
1 Spring
2 Eyelets
2 Front wire connectors
30 Feet of wire to string straightedges from
30" to 72" in length
Contains:
3 Thumbscrew brake knobs
2 T-shaped brake screws
1 Brake screw stud
ALVIN & COMPANY, INC. • P.O. Box 188, Windsor, CT 06095-0722
Phone: 860-243-8991 • Toll-Free: 800-444-2584 • Fax: 860-242-8037 • Toll-Free Fax: 800-777-2896
Visit us at www.alvinco.com
A6333 10/06