1
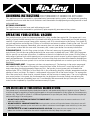
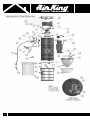
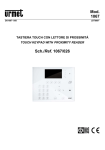
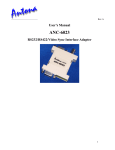
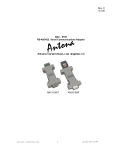
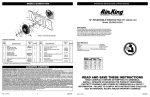
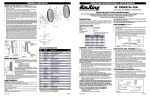
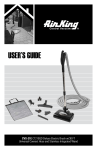
Owners Manual
table of contents
Safety instructions
pg. 2
Grounding Instructions
pg. 3-4
Operating Your Vacuum
pg. 4
Tips on the Care of Your Central Vacuum pg. 4-5
Maintenance
- Inverted Bag Units
pg. 5
Troubleshooting Guide
pg. 6-8
Serial Number Location
pg. 8
Warranty
pg. 9
Explosion
pg. 10-11
important: Carefully read and retain this booklet.
This appliance is for residential or commercial use.
IMPORTANT SAFETY INSTRUCTIONS
When using an electrical appliance, basic precautions should always be followed,
including the following:
* Read all instructionsbefore using this appliance.
WARNING: To reduce the risk of fire, electric shock or injury:
Always follow these safety instructions:
1.
2.
3.
4.
5.
Do not leave room when hose is plugged in to the inlet. Disconnect power before servicing.
Electric shock could occur if used on wet surfaces.
Do not allow to be used as a toy. Close attention is necessary when used by or near children.
Use only as described in this manual. Use only those attachments that are recommended.
D
o not use with damaged cord or plug. If appliance is not working as it should, has been dropped,
damaged, left outdoors, or dropped into water, return it to a service center.
6. Do not pull or carry by cord, use cord as a handle, close a door on cord, or pull cord around
sharp edges or corners. Do not run appliance over cord. Keep cord away from heated surfaces.
7. Do not unplug by pulling on cord. To unplug, grasp the plug, not the cord.
8. Do not handle plug or appliance with wet hands.
9. If your system is equipped with an electrical vacuum hose, do not use if damaged. Do not pull hose
around sharp corners, and keep hose away from heated surfaces. Do not run other appliances over
vacuum hose.
10. Do not unplug system by pulling on vacuum hose. To unplug, grasp the cuff, located on the end of the
hose. If you have a standard non-electric hose, pull out with a twisting motion. If your hose is an electric
hose with direct connect plug in, pull straight out.
11. Do
not put anything into vacuum inlets or vents. Keep all inlets and vents free of things that might slow
airflow, such as lint, dust and hair. Do not use the vacuum system if something is blocking an opening.
12. If equipped with an air turbine power brush unplug the vacuum hose before attaching power brush. Keep
fingers, hands and toes away from the base of the power brush. Failure to do so could result in injury from
moving parts.
13. Do not use the electric vacuum hose if it is damaged, cut or punctured. Do not pick up sharp objects with
the vacuum nozzle or hose. Hose may contain electrical wires.
14. In the event the power unit should get wet, do not use the vacuum system until it has been properly
serviced and examined by a serviceman or installer.
15. Do not handle electric hose or inlets with wet hands.
16. Keep hair, loose clothing, fingers and all parts of the body away from wand, other openings and
moving parts.
17. If so equipped, do not use your central vacuum system without dustbag and/or filters in place.
18. Always disconnect vacuum system before emptying dirt canister, cleaning filters or replacing dustbag.
19. Use extra care when cleaning on stairs.
20. Do not use to pick up flammable or combustible liquids such as gasoline or use in areas where such
liquids may be present.
21. Do not use to pick up dry wall or cement dust. Doing so will void warranty.
22. Do not pick up anything that is burning or smoking, such as cigarettes, matches or hot ashes.
23. W
hen finished put the vacuum hose and attachments away to prevent tripping accidents.
24. For a grounded appliance, connect to a properly grounded outlet only. See grounding instructions.
2
SAVE THESE INSTRUCTIONS
25. F or electric vacuum hose, connect to a properly wired 2-pole polarized outlet.
26. Electric vacuum hose, use only with the electric power brush for use with the central vacuum system.
27. The extension cord provided may only be used with the electric power brush for use with
the central vacuum system.
28. DO NOT USEthe electric vacuum hose or extension cord with any appliance other than the
central vacuum electric power brush for which it is intended.
CAUTION: Do not use when rug (or floor) is wet.
ATTENTION: Ne pas utiliser lorsque le tapis (ou le plancher) est moduille.
WARNING:
ELECTRIC SHOCK COULD OCCUR IF USED ON WET SURFACES
GROUNDING INSTRUCTIONS FOR CORD CONNECTED APPLIANCE:
This appliance must be grounded. If it should malfunction or breakdown, grounding provides a path of least
resistance for electric current to reduce the risk of electric shock. Your central vacuum system is supplied
with an electrical cord having a grounding pin. It is recommended that this plug be used only with an appropriate outlet that is properly installed and grounded in accordance with all local codes and ordinances.
This appliance is for use on a nominal 120-volt circuit (U.S. only) or 230/250 volt circuits where applicable,
and has a grounded plug that looks like the plug shown in Figure A. A temporary adapter, that looks like the
adapter illustrated in Figure B, may be used to connect this plug to a 2-pole receptacle as shown in Figure B
if a properly grounded outlet is not available.
The temporary adapter should be used only until a properly grounded outlet (Figure A) can be installed by a
qualified electrician. NOTE: Temporary adapters are not permitted in Canada. The green colored rigid
ear, lug or the like, extending from the adapter, must be connected to a permanent ground such as a properly grounded outlet box cover. Whenever the adapter is used, it must be held in place by a metal screw.
DANGER —
Improper connection of the equipment - grounding conductor can result in a risk of electric shock. Check
with a qualified electrician or your installer if you are in doubt as to whether the outlet is properly grounded.
Do not modify the plug provided with the appliance - if it will not fit the outlet use a temporary adaptor as
shown and have a proper outlet installed by a qualified electrician as soon as possible.
3
GROUNDING INSTRUCTIONS FOR PERMANENTLY CONNECTED APPLIANCE:
This appliance must be connected to a grounded metal, permanent wiring system; or an equipment grounding
conductor must be run with the circuit conductors and connected to the equipment grounding terminal or lead
on the appliance.
OPTIONAL EQUIPMENT:
For Electric hose or vacuum hose used with extension cord.
This appliance must be connected to a polarized (2-pole receptacle), permanent wiring system.
OPERATING YOUR CENTRAL VACUUM
Your central vacuum system has been engineered for a long, trouble-free service life. Your power unit is covered by a factory limited warranty that is enclosed with these instructions. Please read your limited warranty
carefully. If your owners manual came with a warranty card, fill it out and return to the factory. You should fill
out your registration card within ten (10) days of installation and return to address listed on the card. This will
validate our factory warranty. Remember, your warranty does not cover abuse or misuse of the equipment.
If your owners manual did not come with a warranty card, contact your dealer for warranty information.
CLEANING TOOLS - Your Air King system includes all the tools necessary for general cleaning of the
typical home. Consult the user guide packed with the accessories included with your ( VS80 ) Air King power
unit for specific use and care instructions. In addition to the tools included with your system, Air King offers a
wide range of optional tools which permit you to customize your central vacuum system to meet your specific
needs and preferences. To review optional tools and accessories that can enhance the benefits received from
your Air King central vacuum system visit us on line at www.airkinglimited.com or contact your local Air King
distributor.
VACUUM POWER UNIT - Your power unit does not require any oil. The bearings in the motor are greased
and sealed for life. The motor of the unit has contact brushes inside. As the unit is used, the brushes will
wear, even when functioning properly. Because of this, the brushes in most power units will need to be
replaced after 700 to 1,500 hours of use. Brush life is also affected by humidity, altitude, temperature and the
number of starts and stops. So, there is a wide spread in the actual life of the motor brushes. On average the
life of the motor brush, when used in a normal manner, will be from ten to twenty years. The cost of replacing
your motor brushes is not great; but, the damage that can be done to the motor through not replacing the
brushes before they are completely worn out is considerable. We recommend that you have your unit and
motor brushes inspected by a qualified serviceman every 4-6 years.
TIPS ON THE CARE OF YOUR CENTRAL VACUUM SYSTEM:
Your power unit is warranted against defective materials and workmanship but not against misuse. There is
a service charge for repairing or replacing damaged or misused components of the system or for unnecessary
service calls. Your built-in system is a lifetime improvement for you and your family. Follow these simple tips
and you will enjoy it for many years:
1. DO NOT PLACE ANYTHING ON TOP OF THE POWER UNIT.To do so would cause the motor to overheat as it will
impair the cooling air flow.
2. DO NOT OVERFILL YOUR DIRT CANISTER.Allowing the dirt canister to fill up to the bottom of the plastic cone will
nullify the cyclonic separator system and could cause debris to be drawn into the upper screen which may, in time, damage your power unit.
3. USE ONE INLET AT A TIME TO MAINTAIN PROPER AIR FLOW. Using more than one vacuum inlet at a time
reduces the air flow to a level below that which is required to effectively deep clean your carpets.
4
www.airkinglimited.com
MAINTENANCE INVERTED BAG SYSTEMS:
Inverted bag units provide a permanent filter and require occasional cleaning.
To clean the inverted bag units, follow these steps:
1. Remove the dirt canister by supporting the bottom canister with your knee*.
Then, unsnap the two dirt canister latches by grasping the lower end of each
latch and pulling straight away from the canister (see figure 1c).
FIG. 1
2. Carefully lower the dirt canister, dump the contents into trash container
(figure 2c), and then set aside.
3. It is not necessary to remove the inverted bag to clean. A plastic bag may be
placed over the bottom portion of the top canister. Then, while holding the
plastic bag tightly around the canister with one hand, push the bag up inside
with the other hand, and brush/shake the bag surface to loosen any dust and
debris that may have accumulated on the bag (see figure 3c). In this way, the
bag can be cleaned without getting any dust or debris on the floor or hands.
FIG. 2
4. R eplace the dirt canister by slipping the rim of the dirt canister over the lip of
the top can until it is seated against the rim gasket. Then while holding the
canister in place with your knee* (see Figure 1c) fasten the two latches. Do this
by hooking the top lip of each latch over the rim of the top can and then press
straight in on the bottom of the latches until they lock.
HOW OFTEN SHOULD I CHECK OR EMPTY MY DIRT CANISTER?
FIG. 3
Initially, the dirt canister should be checked or emptied weekly until some
idea can be obtained as to how long it takes to half fill the canister under
your normal cleaning routine. All vacuum systems will function more effectively if it is emptied frequently.
Under no circumstances should you allow your dirt canister to become more than 3/4 full before emptying.
(Note: The canister will fill more rapidly if NEW carpets are being cleaned for there is usually a tremendous
quantity of loose fibers that are retained in the carpet from the manufacturing process. In some instances it
may take several months before all of these loose fibers are removed.
HOW OFTEN SHOULD I CLEAN THE INVERTED BAG?
The inverted bag should be cleaned approximately 3-4 times a year or every time the dirt canister is dumped.
If your inverted bag should ever need replaced, contact your local dealer.
* If you have trouble removing or replacing the dirt canister using your knee, try supporting the can with one hand, unlatching
(or relatching) one side with the other hand. Then, reverse your hands to unlatch (or relatch) the other side.
4. STORE YOUR HOSE AND TOOLS PROPERLY.When not in use, always hang up your hose and store the cleaning
tools and wands in a place where they will not be damaged.
5. HOLD THE INLET DOOR OPEN WHEN REMOVING THE HOSE. After removing the hose from the inlet, hold the
inlet door open for a few seconds to:
a) Make sure the unit has stopped.
b) Clear any residual dirt out of the vacuum tubing
6. DO NOT PICK UP ANY LIQUIDS. Do not pull liquids into the vacuum tubing since any liquid left in the tubing may:
a) Drain back out of the wall inlet and cause streaking of the walls.
b) Cause dirt build-up in the tubing that could eventually clog the system.
Wet Pick-up Units are available for this type of use. Contact your local dealer.
7. BE CERTAIN TO FILL OUT AND RETURN THE WARRANTY CARD. Take just a few moments to fill out the
warranty card, cut it out, place a stamp on it and drop it in the mail.
5
TROUBLESHOOTING GUIDE
Please read the Warranty certificate before attempting any service on your power unit. The motor in
your power unit DOES NOT require oiling. The bearings have been lubricated and sealed at the factory. Tampering in any way with the motor blower will invalidate your warranty. Your central vacuum
system has been engineered to provide many years of carefree service. Should your system for
some reason fail to function properly, the following chart and instructions should help you to restore
efficient service promptly. Check the chart for symptoms and then read across to determine the probable cause. The probable causes are numbered for your convenience and after you have found your
symptom refer to the directions for checking that item.
SYMPTOM
NO
AIRFLOW
LOW
AIRFLOW
POWER
UNIT
DOES
NOT RUN
POWER
UNIT
CONTINUES
TO RUN
X X X X
X
X
X
X
X
X
X
X
X
X
X
X
X
X
X
X
X
X
X
X
X
X
X
X
X
X
X
X
X
X
X
X
X
X
X
CYCLES
OFF
AND ON
X
X
X
X
X
Check each X for
PROBABLE CAUSE
1. Power Cord
2. Push-to-reset Circuit Breaker on Unit
3. Circuit Breaker in House Panel
4. Internal Thermal Switch in Unit (some models)
5. Electrical Wall Outlet Plug
6. Switch in the Wall Inlet Stuck Off
7. Switch in Wall Inlet Stuck On
8. Remote Control Wire Broken
9. Remote Control Wire - Shorted
10. Flexible Hose Plugged
11. Tubing in Walls Clogged
12. Dirt Canister Overfilled
13. Filter Bag - Clogged (some models)
14. Dirt Canister Lid - Off
15. Dirt Canister Gasket Loose
16. Outside Exhaust Blocked
17. Dirt Canister Not Latched
18. Another Wall Inlet Door Open
19. Blower Protection Screen Clogged
20. Relay Stuck - On
21. Relay Stuck - Off
22. Transformer Burned Out
23. Loose Wire in Power Unit
24. A Hose Plugged into another Inlet
25. P.C. Board Relay Stuck ON
26. P.C. Board Transformer burned out
27. LED Light
1. Power Cord- Make sure that the power cord is plugged into an operating receptacle of the proper
voltage and current for your unit.
2. Push-to-Reset Circuit Breaker - If your unit has experienced an over current or extremely high temperature, the button will pop out. To reset, simply push the button in until it protrudes about 1/8 inch and stays in. If the breaker pops out again when the unit is used - call your service technician.
6
customer service: 800.465.7300
3. Circuit Breaker inHouse Panel - Check your house breaker panel - If the circuit breaker if off, you may
have too many appliances utilizing that circuit. For best results, your power unit should be on a separate
circuit. Try to remove some of the extra circuit load by unplugging other devices. If the breaker continues
to cut off - call your service technician.
4. Internal Thermal Switch in Unit - If your unit comes equipped with an internal thermal switch and
quits running, it may require 10 minutes to cool off before resetting itself.
5. Electrical Wall Outlet Plug - Sometimes the electric wiring from the house breaker panel to the wall outlet plug can become loose or broken. Plug a lamp or another electric appliance into the outlet
to assure that you are getting power. If not, call your electrical contractor.
6. Switch in the Wall Inlet Stuck in Off Position- Plug your flexible hose into the other wall inlets
- if your unit functions normally then the problem lies in the switch or remote control circuit to the inoperative inlet valve. The bolts holding the micro-switch in the inlet valve may have loosened allowing
it to move out of position. Remove the wall inlet face plate and tighten the bolts or call your service man.
7. Switch in the Wall Inlet Stuck in On Position- Use your finger to roll the steel ball located in the top of the neck of the inlet. Some foreign material may have become lodged in the hole with the ball, preventing it from moving into its proper position. Caution: if this procedure does not turn your unit off, unplug the power cord and notify your service technician.
8. Remote Control Wire - Broken - Usually, if more than one wall inlet is inoperative, the trouble is in the
remote control wiring, and the wire is either loose or broken, and should be tightened
or replaced.
9. Remote Control Wire - Shorted- Unplug one of the remote control wires that is attached to the
side of the power unit - if the unit stops, it indicates that the remote control wire is shorted or one of the wall inlet switches is stuck in the on position. If the procedure for number 6 does not shut the unit off and you cannot locate the short, notify your service man. If the unit does not stop
running when you unplug the remote control wire - either the short is in the power unit wiring or the relay is stuck. Refer to number 20. Caution: Checking the wiring in the power unit should only be attempted by a qualified service technician.
10. Flexible Hose - Plugged- If proper airflow is not obtained through the hose, remove the hose from the vacuum inlet, then start the power unit by activating the wall inlet switch. If the airflow, at the inlet, is good, then this will normally indicate a blockage in the hose or wand. If blockage is in the wand,
it can be disassembled and cleaned. If blockage is in the hose, the hose should first be laid out straight,
then with the hose plugged into the inlet valve and the power unit running, pick up the hose, starting at
the end furthest from the valve and gently stretch about two feet of it at a time as you proceed along the
length of the hose toward the inlet valve. It this does not clear the stoppage, then remove the hose cuffs
by unscrewing them, and switch them to the other ends of the hose (these cuffs have left hand screw
threads so rotate them in a clockwise direction to unscrew from the hose). After this has been done
replace the hose in the inlet valve and with the power unit operating, repeat the process of stretching the
hose. If this fails to unclog the hose, run (handle first) a screwdriver with at least a 3/4” diameter handle
through the hose.
11. Tubing in Wall - Clogged - Check the airflow at the power unit. If the airflow is good here but not at
locations further from the power unit, your tubing is either clogged or has broken open. If you cannot
repair this, contact your service man. If you turn the power unit on and leave the inlet valve furthest from
the power unit open and then check the exhaust from the power unit, you can determine whether you
have a break in the tubing or whether the tubing is clogged. If very little air is coming out of the exhaust
of the power unit, then it is probably an obstruction in the tubing and not a break.
12. Dirt Canister - Over Filled - Whenever low airflow is experienced the first thing to check is the dirt
canister for over filling or clogged filter bag (some models). Refer to Number 13. Read the Operations
section of this manual for information on how to clean your dirt canister.
7
13. Filter Bag - Clogged (some models)- Read the Operations section of this manual for information on
how to remove and clean your filter bag.
14. Dirt Canister Lid - Off- On those models with lift off dirt canister lids, (check the Operations section
of this manual) the lid must be replaced squarely on top of the canister or it will allow a vacuum leak.
15. Dirt Canister Gasket - Loose- If the dirt canister gasket has been pulled loose, it will allow a
vacuum leak. The gasket may be reattached with contact cement or any of the so called “super glues”.
16. Outside Exhaust - Blocked - Check the exhaust system by removing the tubing from the motor
blower exhaust and comparing the airflow at this point versus the airflow reaching the outside. If
blockage is detected and cannot be removed, contact you service technician.
17. Dirt Canister - Not Attached- If the dirt canister latches (some models) are not properly closed, it
will cause an air leak along the gasket and reduce your cleaning ability.
18. Another Wall Inlet Door - Open- Check all the inlet valves to make sure that only one inlet is in use
at a time. Attempting to clean from two or more inlets at a time will reduce the airflow below the level
required to deep clean your carpets.
19. Motor Protection Screen - Clogged - This usually occurs due to allowing the dirt canister to over
fill, or a broken filter bag (some models). Refer to the Operations section of this manual for instructions
on cleaning the blower protection screen.
20. Relay Stuck - On- Refer to Number 9. If after using the procedures described in Number 9 it appears
that the relay is sticking on, unplug the power cord to cut off all electricity to the power unit. Caution:
Checking the wiring in the power unit should only be attempted by a qualified service technician.
21. Relay Stuck - Off - If the procedures described in Numbers 1, 2, 3, 4, 5, 6 or 7, do not correct the
power unit not starting, then it could be a malfunction of the relay, the low voltage transformer could
be burned out, or there could be a loose wire in the power unit. If you suspect a malfunction in the
power unit, contact your service technician.
22. Transformer - Burned Out - Refer to Number 21.
23. Loose Wire In the Power Unit- Refer to Number 21.
24. A Hose Plugged Into Another Inlet Valve- Cleaning from more than one inlet at a time will reduce
the airflow to less than is required to deep clean your carpets.
25. P.C. Board Relay stuck on - Refer to Number 9. If after using the procedures described in
Number 8 it appears that the relay is sticking on, unplug the power cord to cut off all electricity to
the power unit. Caution: Checking the wiring in the power unit should only be attempted by a qualified
service technician.
26. P.C. Board Transformer burned out - If the procedures described in Numbers 1, 2, 3, 4, 5, 6 or 7,
do not correct the power unit not starting, then it could be a malfunction of the relay, the low voltage
transformer could be burned out, or there could be a loose wire in the power unit. If you suspect a
malfunction in the power unit, contact your service technician.
27. LED Light- Some units have an LED light at the unit. If the LED light is not on, refer to number 5. If you
have power at the unit but LED light is off, contact your local service technician.
IF YOU CANNOT DIAGNOSE OR REPAIR YOUR TROUBLE, CONTACT THE NEAREST DISTRIBUTOR.
IMPORTANT SERIAL NUMBER LOCATION FOR
CENTRAL VACUUM SYSTEM
The serial number for your wall mounted
central vacuum system can be found
located under the unit model label (see
representative diagram below). The unit
model label will be found on the left or
right side of the unit near the top and
close to the wall.
68
Unit Label
(representative only - yours may differ)
XXXX
XXXXXXXXXXX
Date Code
(representative only - yours may differ)
Serial Number
(representative only - yours may differ)
AIR KING AMERICA LIMITED WARRANTY:
WHAT THIS WARRANTY COVERS: This product is warranted against defects in workmanship
and/or materials.
HOW LONG THIS WARRANTY LASTS: This warranty extends only to the original purchaser of the
product and lasts for one (1) year from the date of original purchase or until the original purchaser of
the product sells or transfers the product, whichever first occurs.
WHAT AIR KING WILL DO: During the warranty period, Air King will, at its sole option, repair or
replace any part or parts that prove to be defective or replace the whole product with the same or
comparable model.
WHAT THIS WARRANTY DOES NOT COVER: This warranty does not apply if the product was damaged or failed because of accident, improper handling or operation, shipping damage, abuse, misuse,
unauthorized repairs made or attempted. This warranty does not cover shipping costs for the return
of products to Air King for repair or replacement. Air King will pay return shipping charges from Air
King following warranty repairs or replacement ANY AND ALL WARRANTIES, EXPRESSED OR IMPLIED (INCLUDING, WITHOUT LIMITATION, ANY IMPLIED WARRANTY OF MERCHANTABILITY), LAST ONE YEAR FROM THE DATE OF ORIGINAL PURCHASE OR UNTIL THE ORIGINAL
PURCHASER OF THE PRODUCT SELLS OR TRANSFERS THE PRODUCT, WHICHEVER FIRST
OCCURS AND IN NO EVENT SHALL AIR KING’S LIABILITY UNDER ANY EXPRESS OR IMPLIED
WARRANTY INCLUDE (I) INCIDENTAL OR CONSEQUENTIAL DAMAGES FROM ANY CAUSE
WHATSOEVER, OR (II) REPLACMENT OR REPAIR OF ANY HOUSE FUSES, CIRCUIT BREAKERS
OR RECEPTACLES. NOTWITHSTANDING ANYTHING TO THE CONTRARY, IN NO EVENT SHALL
AIR KING’S LIABILITY UNDER ANY EXPRESS OR IMPLIED WARRANTY EXCEED THE PURCHASE PRICE OF THE PRODUCT AND ANY SUCH LIABILITY SHALL TERMINATE UPON THE
EXPIRATION OF THE WARRANTY PERIOD.
Some states and provinces do not allow limitations on how long an implied warranty lasts, or the
exclusion or limitation of incidental or consequential damages, so these exclusions or limitations may
not apply to you. This warranty gives you specific legal rights. You may also have other rights which
vary from state to state and province to province. Proof of purchase is required before a warranty
claim will be accepted.
CUSTOMER SERVICE:
Toll-Free (800) 465-7300
Our Customer Service team is available to assist you with product questions, service center locations, and replacement parts. They can be reached Monday through Friday, 8am-4pm Eastern. Please
have your model number available, as well as the type and style (located on the label inside of your
product). Please do not return product to place of purchase.
www.airkinglimited.com
PARTS FOR DISCONTINUED, OBSOLETE AND CERTAIN OTHER PRODUCTS
MAY NOT BE AVAILABLE. DUE TO SAFETY REASONS, MANY ELECTRONIC COMPONENTS
AND MOST HEATER COMPONENTS ARE NOT AVAILABLE TO CONSUMERS FOR
INSTALLATION OR REPLACEMENT.
9
10
customer service: 800.465.7300
VS80 Build-Up Configuration
VS80 Power Unit Build-Up Sheet
ITEM NO.
PART NUMBER DESCRIPTION Default/QTY
1
2
3
4
5
7
8
9
10 11 12
13 14 15
16 17
18 19 20 21 22 23 24 25 26
27 28 29 30 31 32
33 34 36 37 38 39 40 41 42 43 57587
57598
57609
57620
57631
57653
57664
57675
57686
57697
57708
57719
57730
57741
57752
57763
57774
57785
57796
57807
57818
57829
57840
57851
57862 57873
57884
57895
57906
57917
57928
57939
57950
57972
57983
57994
58005 58016
58027
58038 58049
Main Canister Assembly 5.7” Cup Style Motor Gasket High Air Watt Ultra 2-Stage 5.7” Flow-Thru Motor
Motor Mount Bracket with Strap 1/4” x 20 x 3-1/4” Long Motor Bolt Strain Relief Plug 10-24 x 3/4” Phillips Round Head 10-24 Keeps Nut 3/8” Spacer for PC Board Remote Control Plug with Wire Connectors Bottom Dirt Canister Gasket Vacuum Cap Bag Protector Plate
1/4” x 20 x 3/4” Long Motor Bolt LED Panel Holder Zinc Pushnut Plastic 12” Cone Inverted Bag Low Voltage Boot Cover 120 Volt US Power Cord 14” Tall Dirt Canister with Air Channel and Latches - Chrome Bag Clip Label Bag Clip 4 Mil Platic Bag for Dirt Canister Crown Cover - Chrome 12” Foam Disc for Lid 120 Volt Avnon PC Board with Mounting Plate and Standoffs Electrical Shock Warning Label Power Unit Spec Label Serial Number Label Date Code Label Rocker Switch for On/Off Control of Power Unit Ultra and Ultra Lite Motor Foam 1/2” x 4” x 29-3/8” Plastic Bag Instruction Label Wall Hanger Bracket with Grommets - Blue Hanger Bracket Holding Strap AirKing Unit Label Nylon Spacer for Bag Protector Plate Mechanical Circuit Breaker - 16 Amp Exhaust Stem #6 x 7/16” Phil. TEK Screw 1
1
1
1
3
1
2
4
1
1
1
1
1
1
1
1
1
1
1
1
1
1
1
1
1
1
1
1
1
1
1
1
1
1
1
1
1
1
1
1
4
11
contact
Location Information
Corporate Headquarters for
United States division:
820 Lincoln Avenue
West Chester, PA 19380
Ph. 800.465.7300
#F51067