1
NetVanta Unified Communications
NetVanta Enterprise Communications Server
Personal Business Assistant User Guide
Version 4.5
619510003-1A
October 2009
619510003-1A
Copyright © 2009 ADTRAN, Inc.
1
Trademarks
Enterprise Communications Server
Trademarks
Any brand names and product names included in this manual are trademarks, registered trademarks, or
trade names of their respective holders.
To the Holder of the Manual
The contents of this manual are current as of the date of publication. ADTRAN reserves the right to change
the contents without prior notice.
In no event will ADTRAN be liable for any special, incidental, or consequential damages or for
commercial losses even if ADTRAN has been advised thereof as a result of issue of this publication.
Service and Warranty
For information on the service and warranty of ADTRAN products, visit the ADTRAN website at
http://www.adtran.com/support.
901 Explorer Boulevard
P.O. Box 140000
Huntsville, AL 35814-4000
Phone: (256) 963-8000
Copyright © 2009 ADTRAN, Inc.
All Rights Reserved.
2
Copyright © 2009 ADTRAN, Inc.
619510003-1A
Enterprise Communications Server
Conventions
Conventions
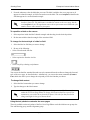
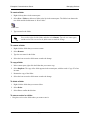
Notes provide additional useful information.
Cautions signify information that could prevent service interruption or damage to
equipment.
Warnings provide information that could prevent injury or endangerment to human
life.
619510003-1A
Copyright © 2009 ADTRAN, Inc.
3
Conventions
4
Enterprise Communications Server
Copyright © 2009 ADTRAN, Inc.
619510003-1A
Table of Contents
1 Getting Started . . . . . . . . . . . . . . . . . . . . . . . . . . . . . . . . . . . . . . . . . . . . . . . . . . . . . . . . . . . . . . 7
Overview . . . . . . . . . . . . . . . . . . . . . . . . . . . . . . . . . . . . . . . . . . . . . . . . . . . . . . . . . . . . . . . . . 7
Conventions . . . . . . . . . . . . . . . . . . . . . . . . . . . . . . . . . . . . . . . . . . . . . . . . . . . . . . . . . . . . . . 9
Requirements . . . . . . . . . . . . . . . . . . . . . . . . . . . . . . . . . . . . . . . . . . . . . . . . . . . . . . . . . . . . 10
Starting the Application . . . . . . . . . . . . . . . . . . . . . . . . . . . . . . . . . . . . . . . . . . . . . . . . . . . . . 10
First-time Access using the Desktop. . . . . . . . . . . . . . . . . . . . . . . . . . . . . . . . . . . . . . . . . . . 10
Changing your Password . . . . . . . . . . . . . . . . . . . . . . . . . . . . . . . . . . . . . . . . . . . . . . . . . . . 12
Accessing your Mailbox for the First Time . . . . . . . . . . . . . . . . . . . . . . . . . . . . . . . . . . . . . . 13
2 Customizing your Mailbox . . . . . . . . . . . . . . . . . . . . . . . . . . . . . . . . . . . . . . . . . . . . . . . . . . . . . 15
Overview . . . . . . . . . . . . . . . . . . . . . . . . . . . . . . . . . . . . . . . . . . . . . . . . . . . . . . . . . . . . . . . . 15
Customizing your Mailbox using your Telephone . . . . . . . . . . . . . . . . . . . . . . . . . . . . . . . . . 15
Customizing your Mailbox using your Computer. . . . . . . . . . . . . . . . . . . . . . . . . . . . . . . . . . 20
3 Customizing Incoming Call Options. . . . . . . . . . . . . . . . . . . . . . . . . . . . . . . . . . . . . . . . . . . . . .29
Overview . . . . . . . . . . . . . . . . . . . . . . . . . . . . . . . . . . . . . . . . . . . . . . . . . . . . . . . . . . . . . . . . 29
Managing Extensions and Identities Options . . . . . . . . . . . . . . . . . . . . . . . . . . . . . . . . . . . . 29
4 Managing Messages using your Telephone . . . . . . . . . . . . . . . . . . . . . . . . . . . . . . . . . . . . . . . 31
Overview . . . . . . . . . . . . . . . . . . . . . . . . . . . . . . . . . . . . . . . . . . . . . . . . . . . . . . . . . . . . . . . . 31
Accessing your Mailbox using your Telephone. . . . . . . . . . . . . . . . . . . . . . . . . . . . . . . . . . . 31
Listening to Messages Remotely . . . . . . . . . . . . . . . . . . . . . . . . . . . . . . . . . . . . . . . . . . . . . 31
Sending Messages from your Mailbox . . . . . . . . . . . . . . . . . . . . . . . . . . . . . . . . . . . . . . . . . 33
Caller Options . . . . . . . . . . . . . . . . . . . . . . . . . . . . . . . . . . . . . . . . . . . . . . . . . . . . . . . . . . . . 37
5 Managing Messages using your Computer . . . . . . . . . . . . . . . . . . . . . . . . . . . . . . . . . . . . . . . . 39
Overview . . . . . . . . . . . . . . . . . . . . . . . . . . . . . . . . . . . . . . . . . . . . . . . . . . . . . . . . . . . . . . . . 39
Managing Messages in Microsoft Outlook . . . . . . . . . . . . . . . . . . . . . . . . . . . . . . . . . . . . . . 39
Managing Messages in Lotus Notes . . . . . . . . . . . . . . . . . . . . . . . . . . . . . . . . . . . . . . . . . . . 45
Managing Messages in the Mailboxes Menu in the NetVanta UC client. . . . . . . . . . . . . . . . 51
6 Using SIP Telephones. . . . . . . . . . . . . . . . . . . . . . . . . . . . . . . . . . . . . . . . . . . . . . . . . . . . . . . . 55
Overview . . . . . . . . . . . . . . . . . . . . . . . . . . . . . . . . . . . . . . . . . . . . . . . . . . . . . . . . . . . . . . . . 55
Customizing your Phone . . . . . . . . . . . . . . . . . . . . . . . . . . . . . . . . . . . . . . . . . . . . . . . . . . . . 55
Using SIP Phones . . . . . . . . . . . . . . . . . . . . . . . . . . . . . . . . . . . . . . . . . . . . . . . . . . . . . . . . . 57
7 Faxing . . . . . . . . . . . . . . . . . . . . . . . . . . . . . . . . . . . . . . . . . . . . . . . . . . . . . . . . . . . . . . . . . . . . 67
Overview . . . . . . . . . . . . . . . . . . . . . . . . . . . . . . . . . . . . . . . . . . . . . . . . . . . . . . . . . . . . . . . . 67
Sending Faxes . . . . . . . . . . . . . . . . . . . . . . . . . . . . . . . . . . . . . . . . . . . . . . . . . . . . . . . . . . . 68
Receiving Faxes . . . . . . . . . . . . . . . . . . . . . . . . . . . . . . . . . . . . . . . . . . . . . . . . . . . . . . . . . . 91
8 Creating Distribution Lists . . . . . . . . . . . . . . . . . . . . . . . . . . . . . . . . . . . . . . . . . . . . . . . . . . . . . 93
Overview . . . . . . . . . . . . . . . . . . . . . . . . . . . . . . . . . . . . . . . . . . . . . . . . . . . . . . . . . . . . . . . . 93
9 Creating Custom Call Answering Services . . . . . . . . . . . . . . . . . . . . . . . . . . . . . . . . . . . . . . . . 95
Overview . . . . . . . . . . . . . . . . . . . . . . . . . . . . . . . . . . . . . . . . . . . . . . . . . . . . . . . . . . . . . . . . 95
Managing Services . . . . . . . . . . . . . . . . . . . . . . . . . . . . . . . . . . . . . . . . . . . . . . . . . . . . . . . . 96
Using the Service Editor . . . . . . . . . . . . . . . . . . . . . . . . . . . . . . . . . . . . . . . . . . . . . . . . . . . 100
Working with Elements to Build a Service. . . . . . . . . . . . . . . . . . . . . . . . . . . . . . . . . . . . . . 102
Customizing Services using Parameters . . . . . . . . . . . . . . . . . . . . . . . . . . . . . . . . . . . . . . 104
Validating Services . . . . . . . . . . . . . . . . . . . . . . . . . . . . . . . . . . . . . . . . . . . . . . . . . . . . . . . 105
Troubleshooting Services . . . . . . . . . . . . . . . . . . . . . . . . . . . . . . . . . . . . . . . . . . . . . . . . . . 106
619510003-1A
Copyright © 2009 ADTRAN, Inc.
5
Enterprise Communications Server
10 Using Elements to Create Call Answering Services . . . . . . . . . . . . . . . . . . . . . . . . . . . . . . . 107
Overview . . . . . . . . . . . . . . . . . . . . . . . . . . . . . . . . . . . . . . . . . . . . . . . . . . . . . . . . . . . . . . . 107
Using Standard Elements . . . . . . . . . . . . . . . . . . . . . . . . . . . . . . . . . . . . . . . . . . . . . . . . . . 111
Using Advanced Elements . . . . . . . . . . . . . . . . . . . . . . . . . . . . . . . . . . . . . . . . . . . . . . . . . 130
11 Using Announcements in Call Answering Services. . . . . . . . . . . . . . . . . . . . . . . . . . . . . . . . 143
Overview . . . . . . . . . . . . . . . . . . . . . . . . . . . . . . . . . . . . . . . . . . . . . . . . . . . . . . . . . . . . . . . 143
Using Prerecorded Announcements . . . . . . . . . . . . . . . . . . . . . . . . . . . . . . . . . . . . . . . . . . 143
Recording Announcements. . . . . . . . . . . . . . . . . . . . . . . . . . . . . . . . . . . . . . . . . . . . . . . . . 145
Managing Announcements . . . . . . . . . . . . . . . . . . . . . . . . . . . . . . . . . . . . . . . . . . . . . . . . . 153
12 Using Databases in Call Answering Services . . . . . . . . . . . . . . . . . . . . . . . . . . . . . . . . . . . . 155
Overview . . . . . . . . . . . . . . . . . . . . . . . . . . . . . . . . . . . . . . . . . . . . . . . . . . . . . . . . . . . . . . . 155
Managing Data Sources . . . . . . . . . . . . . . . . . . . . . . . . . . . . . . . . . . . . . . . . . . . . . . . . . . . 155
Accessing Data using Database Service Elements . . . . . . . . . . . . . . . . . . . . . . . . . . . . . . 159
Using Database Elements. . . . . . . . . . . . . . . . . . . . . . . . . . . . . . . . . . . . . . . . . . . . . . . . . . 163
13 Importing and Exporting . . . . . . . . . . . . . . . . . . . . . . . . . . . . . . . . . . . . . . . . . . . . . . . . . . . . 173
Overview . . . . . . . . . . . . . . . . . . . . . . . . . . . . . . . . . . . . . . . . . . . . . . . . . . . . . . . . . . . . . . . 173
Starting the Import/Export Wizard . . . . . . . . . . . . . . . . . . . . . . . . . . . . . . . . . . . . . . . . . . . . 173
Importing and Exporting Items . . . . . . . . . . . . . . . . . . . . . . . . . . . . . . . . . . . . . . . . . . . . . . 173
14 Setting Options . . . . . . . . . . . . . . . . . . . . . . . . . . . . . . . . . . . . . . . . . . . . . . . . . . . . . . . . . . . 175
Setting General Options . . . . . . . . . . . . . . . . . . . . . . . . . . . . . . . . . . . . . . . . . . . . . . . . . . . 175
Setting Message Delivery Options . . . . . . . . . . . . . . . . . . . . . . . . . . . . . . . . . . . . . . . . . . . 176
Customizing your Mailbox . . . . . . . . . . . . . . . . . . . . . . . . . . . . . . . . . . . . . . . . . . . . . . . . . . 178
Setting Integrated Messaging Options . . . . . . . . . . . . . . . . . . . . . . . . . . . . . . . . . . . . . . . . 180
Compressing Voice Messages . . . . . . . . . . . . . . . . . . . . . . . . . . . . . . . . . . . . . . . . . . . . . . 181
15 Troubleshooting. . . . . . . . . . . . . . . . . . . . . . . . . . . . . . . . . . . . . . . . . . . . . . . . . . . . . . . . . . . 183
Overview . . . . . . . . . . . . . . . . . . . . . . . . . . . . . . . . . . . . . . . . . . . . . . . . . . . . . . . . . . . . . . . 183
Troubleshooting Message Waiting Indicators . . . . . . . . . . . . . . . . . . . . . . . . . . . . . . . . . . . 183
Troubleshooting the NetVanta UC Server. . . . . . . . . . . . . . . . . . . . . . . . . . . . . . . . . . . . . . 184
Using the NetVanta UC Server Logs . . . . . . . . . . . . . . . . . . . . . . . . . . . . . . . . . . . . . . . . . 185
Accessing Documentation and Training . . . . . . . . . . . . . . . . . . . . . . . . . . . . . . . . . . . . . . . 191
Accessing Technical Support . . . . . . . . . . . . . . . . . . . . . . . . . . . . . . . . . . . . . . . . . . . . . . . 191
16 Appendix A - Glossary. . . . . . . . . . . . . . . . . . . . . . . . . . . . . . . . . . . . . . . . . . . . . . . . . . . . . . 193
17 Appendix B - Installing the NetVanta UC Client Application . . . . . . . . . . . . . . . . . . . . . . . . . 197
6
Copyright © 2009 ADTRAN, Inc.
619510003-1A
Enterprise Communications Server
1
Getting Started
Getting Started
This chapter introduces the NetVanta Enterprise Communications Server client application in Personal
Business Assistant mode and presents some basic operations. This chapter covers the following topics:
•
•
•
•
•
•
•
Overview on page 7
Conventions on page 9
Requirements on page 10
Starting the Application on page 10
First-time Access using the Desktop on page 10
Changing your Password on page 12
Accessing your Mailbox for the First Time on page 13
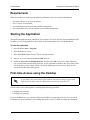
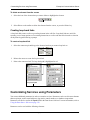
Overview
The UC Server application in Personal Business Assistant mode provides not only the most commonly
used unified communications features, but also the opportunity to design your own auto attendent services
and to record customized announcements. Master the basic functions and manage your personalized
greetings and delivery features with efficiency and ease, right from your desktop. The user interface is
remarkably user-friendly.
The UC Server is integrated with Microsoft Outlook so that you can access voice, fax, and email messages
from a single inbox. The type of each new message is signaled by a distinctive icon that you can recognize
at a glance, just as you are familiar with the envelope that indicates reception of an email message.
You can use a local or remote telephone to log on to the system and retrieve not only voice messages but
email. With a single keypad command, the text-to-speech engine reads email messages to you over the
phone. You are also informed if you have received fax messages.
Please note that your system administrator needs to set your call answering mode to Personal Business
Assistant for you to have access to this mode.
All users on the system manage, and are managed by, user profiles, identities, and authorizations.
619510003-1A
Copyright © 2009 ADTRAN, Inc.
7
Overview
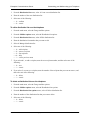
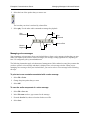
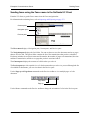
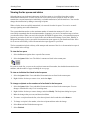
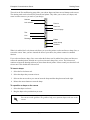
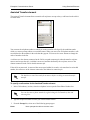
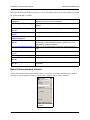
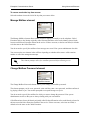
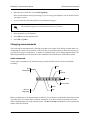
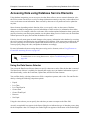
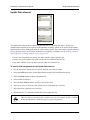
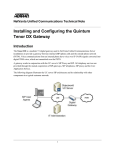
Enterprise Communications Server
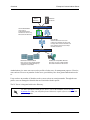
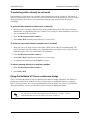
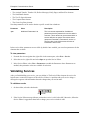
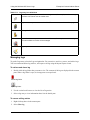
Active
Directory
NetVanta
UC Server
User Authentication
User Authentication:
Users may be
authenticated with the
NetVanta UC Server or by
Microsoft Active Directory.
User Profile
User Profile:
Authenticated users have a user
profile in the NetVanta UC Server that
manages their business assistants and
their message stores across multiple
identites and devices.
Identities
Business Communications:
Various SIP-Compatible Devices:
Each user can have multiple identities
associated with traditional telephony
equipment such as PBXs.
Each user can have multiple identites
associated with different SIP devices
Authorizations give some users access to the profiles of other users, for management purposes. Likewise,
users can have access to any number of other users, provided they have been granted authorization to do
so.
Users can have any number of identities on the system, such as an extension number. Through the user
profile, users can manage the identities that are associated with their profile.
The UC Server is integrated with Active Directory.
For more information about the UC Server, refer to the ADTRAN website at http://
kb.adtran.com. Here you will find reference materials, a quick reference card, and SIP
phone user guides.
8
Copyright © 2009 ADTRAN, Inc.
619510003-1A
Enterprise Communications Server
Conventions
Conventions
Document conventions
Text
Bold font is used to indicate important input data and keywords.
Shortcut menus
Steps for procedures generally instruct readers to use shortcut menus, although commands can also be
made using menus and toolbar buttons.
To obtain a shortcut menu, right-click the icon or folder you want to access then select the command you
want.
Voice recording conventions
Computer audio card device
Telephone handset device
You can select the icon of the audio device when you play or record. The settings are
saved and the last device that you selected is automatically used.
Record button
Stop button
Play button
619510003-1A
Copyright © 2009 ADTRAN, Inc.
9
Requirements
Enterprise Communications Server
Requirements
Before proceeding, you need to get the following information from your network administrator:
•
•
•
•
The name of the server to which to connect
The UC Server access number
Your default password for performing mailbox management
The system-defined key used to perform remote mailbox management
Starting the Application
The application might already be installed on your computer. If it is not, ask your network administrator for
assistance, or refer to Appendix B in this manual for instructions about how to do the installation.
To start the application
1. Select Windows Start > Programs.
2. Select NetVanta UC client.
3. Select UC Client and the Choose UC Server dialog box opens.
4. Type the UC Server name in the Server name text box.
5. Enable the Save server as default check box, and then select OK. In the Server login dialog box,
type your user name and password. From now on, the application remembers the server name so that
you do not have to enter it again. When you start the application for the first time, the First-time
Access Wizard Welcome menu appears.
First-time Access using the Desktop
If you change your password using the telephone and want to change it again in the
application, you must restart the application to synchronize the password.
The First-time Access Wizard guides you through the following procedures:
• Changing your password
• Recording your greetings
If you are an IMAP user, you can also configure your IMAP user name and password. If you are not an
Exchange user, the wizard allows you to change the contact system if it finds more than one compatible
10
Copyright © 2009 ADTRAN, Inc.
619510003-1A
Enterprise Communications Server
First-time Access using the Desktop
contact system (for example, Outlook Express and Outlook).
For Lotus Notes integration, the contacts default to Microsoft Exchange. For
information about Lotus Notes integration, refer to the Lotus Notes integration
document, which is available online at http://kb.adtran.com..
To change your password and record your greetings
1. Start the Client application to start the First-time Access Wizard.
2. Select Next and the Mailbox dialog box opens.
3. Type a numeric password in the Password text box. This is the password that you use to access your
mailbox using the telephone. Your password must contain only digits. It must be at least four digits
long.
4. In the Re-enter text box, type the numeric password again.
5. Select Next and the Identifier menu appears. The identifier greeting consists of your name. It is
played to callers who reach your mailbox.
6. Make sure that the audio device you want is selected.
7. Select record. If you are using your telephone, wait for the beep before you begin to record. The timer
runs as you record.
8. Select stop when you have finished. If you use the telephone, you can hang up the phone or press the
Release button on the phone to end the recording.
9. Select Next to open the Greeting dialog box.
10. Choose one of the following greeting types to record:
• Use standard greeting plays a default greeting to callers.
• Record same greeting for internal and external callers allows you to record a single greeting
for all callers.
• Record different greetings for internal and external callers allows you to record two messages,
one for callers from within your organization, the other for callers from outside your organization.
11. Select Next.
• If you select Use standard greeting, go to step 16.
• If you select Record same greeting for internal and external callers, the Internal/External
Greeting menu appears.
• If you select Record same greeting for internal and external callers, the Internal Greeting
dialog box opens.
In the text box, you can type the greeting that you want to record. This is useful for eliminating pauses
when you record.
619510003-1A
Copyright © 2009 ADTRAN, Inc.
11
Changing your Password
Enterprise Communications Server
12. Make sure that the audio device you want is selected.
13. Select record. If you are using a telephone, wait for the beep before you begin to record. The timer
runs as you record.
14. Select stop when you have finished. If you use the telephone, you can hang up the phone or press the
Release button on the phone to end the recording.
15. Select Next.
• If you chose to make two distinct greetings, the External Greeting dialog box opens. Repeat steps
12 to 15 to record an external greeting.
• If you chose to make a single greeting, the Completion menu appears.
16. Select Finish.
The main Client window opens.
To set the number of rings on your telephone
In the Number of rings box in the Identities pane, select the number of rings for the identity that you want.
The UC Server answers the telephone after the number of rings that you specify.
Changing your Password
If your user profile menu has access to multiple profiles, you can view those profiles as tabs across the top
of the window. You can change the password only for the owned user profile.
If you are an Active Directory user, the change user password option is unavailable.
12
Copyright © 2009 ADTRAN, Inc.
619510003-1A
Enterprise Communications Server
Accessing your Mailbox for the First Time
To change the password
1. Select the tab of the profile for which you want to change the password.
2. Select Tools > Change User Password.
3. In the Change Password dialog box, do all of the following:
• In the Old password box, type the old password.
• In the New password box, type the new password.
• In the Confirm new password box, retype the new password.
The new password takes effect immediately.
Accessing your Mailbox for the First Time
You can access your mailbox using your telephone extension or a remote telephone. To access your
mailbox using your telephone extension, you need the UC Server access number and your default
password. You can obtain these from your system administrator.
To access your mailbox using your telephone extension
1. On your telephone keypad, enter the UC Server access number.
2. Enter your password followed by #. You are prompted to change your password.
If you have already changed your password and recorded your greetings using the Firsttime Access Wizard, you can enter your password followed by #.
3. Follow the prompts and record your greetings. If you do not record any greetings now, you are not
prompted to do so the next time you call in to manage your mailbox.
To access your mailbox using a remote telephone you need the system-defined key for
remote mailbox management. You can get this from your system administrator. You must
also have your extension number and password.
To access your mailbox using a remote telephone
1. Call your workplace number that has the UC Server as the auto attendant.
2. At the prompt, press the system-defined key used to perform remote mailbox management.
3. Enter your extension number and then your password at the prompt. The message summary lists the
number and type of messages in your mailbox.
You can press # after you enter the extension and password. Pressing # speeds up
logging into your mailbox.
619510003-1A
Copyright © 2009 ADTRAN, Inc.
13
Accessing your Mailbox for the First Time
Enterprise Communications Server
Your system administrator might have set up a different behavior. Contact your
administrator for more information.
14
Copyright © 2009 ADTRAN, Inc.
619510003-1A
Enterprise Communications Server
2
Customizing your Mailbox
Customizing your Mailbox
Overview
You can customize your mailbox, such as recording greetings, using either a telephone or UC Client. There
are other features which can only be enabled using either a telephone or UC Client, such as setting up a
one-time message for a specific caller, using UC Client. For more information on customizing your
mailbox and using mailbox features, refer to the following sections:
• Customizing your Mailbox using your Telephone on page 15
• Customizing your Mailbox using your Computer on page 20
Customizing your Mailbox using your Telephone
You can customize your mailbox in many ways including creating greetings, changing your password, and
changing the amount and type of information that plays about your messages. You can adjust the message
waiting light on your phone, and you can also create distribution lists.
You can use your telephone to manage the following mailbox items:
•
•
•
•
•
•
•
Recording and selecting greetings
Changing your password
Changing message information
Changing the message summary
Changing the notification option
Changing message sorting options
Managing distribution lists
You can perform mailbox management using a remote telephone or your workplace extension. For
information about accessing your mailbox using a telephone, refer to Accessing your Mailbox using your
Telephone on page 31.
When calling from your extension, enter the access number set up by your network administrator. This is
not the same number as the system-defined key that you use when performing remote mailbox
management. You can obtain the access number from your system administrator. After you enter the access
number, you are prompted to enter your password.
The following management tasks assume that you are accessing the system from your workplace
extension.
Recording and selecting greetings
Using your telephone, you can record and listen to greetings, and select a type of greeting to play to callers.
619510003-1A
Copyright © 2009 ADTRAN, Inc.
15
Customizing your Mailbox using your Telephone
Enterprise Communications Server
You cannot select a greeting unless it has an audio recording. If you try to select a greeting without a
recording, you are prompted to record one.
Disabling a greeting does not delete it. You can enable a greeting at any time. Recording a new greeting
replaces an existing one.
If the out-of-office greeting is enabled, the user is prompted to turn it off or leave it on. For information
about managing greetings using the computer, refer to Customizing your Mailbox on page 15.
To manage your greetings
1. From the main menu, select 4: Change mailbox options.
2. From the Change mailbox options menu, select 1: Manage greetings.
3. From the Manage greetings options menu, select one of the following:
•
•
•
•
•
•
1 — external greeting
2 — internal greeting
3 — mailbox identifier
4 — out-of-office greeting
0 — help menu
* — return to previous menu
The greeting status plays (on or off).
4. Select one of the following:
•
•
•
•
1 — record
2 — listen
3 — turn on/off
* — cancel
5. After the tone, record your greeting, and then press #.
6. Select one of the following:
•
•
•
•
1 — keep the greeting
2 — record the greeting again
3 — review the greeting
* — cancel
The maximum length of a recorded greeting is 15 minutes.
If the Out of Office greeting is not enabled, you cannot listen to the greeting. You are
informed that no greeting is recorded.
16
Copyright © 2009 ADTRAN, Inc.
619510003-1A
Enterprise Communications Server
Customizing your Mailbox using your Telephone
Changing your password
To change your password
1. From the main menu, select 4: Change mailbox options.
2. From the Change mailbox options menu, select 2: Change password.
3. Enter the new password followed by #.
4. Confirm the new password by doing one of the following:
• 1 — keep the password
• 2 — re-enter the password
• * — cancel
Changing message information
Message information plays before each message. For voice messages, information includes the caller ID
and the date and time that the message was received. For email messages, the sender and subject title are
included. The default setting for Message information is on. If you change this option to off, you do not
receive message information before you review each message.
To change message information
1. From the main menu, select 4: Change mailbox options.
2. From the Change mailbox options menu, select 3: Change status options.
3. From the Change status options menu, select 1: Turn message information on or off.
Changing the message summary
A message summary plays as soon as you enter your password. The Message Summary lists the number
and type of messages you have received and whether they are new or saved. There are three modes for
message summary. They are:
Disabled
No message summary is provided.
Quick
The message summary provides limited information. For example, “You have five new
messages and six saved messages.” This is the default mode.
Verbose
The message summary provides detailed information. For example, “You have five new
voice messages, four new fax messages, 30 new email messages, and 50 saved
messages.”
To change the message summary
1. From the main menu, select 4: Change mailbox options.
2. From the Change mailbox options menu, select 3: Change status options.
619510003-1A
Copyright © 2009 ADTRAN, Inc.
17
Customizing your Mailbox using your Telephone
Enterprise Communications Server
3. From the Change status options menu, select 2: Obtain message summary options.
4. Select one of the following:
•
•
•
•
1 — Disable
2 — Set to quick mode
3 — Set to verbose mode
* — Cancel
Changing the notification option
When you receive a message, an alert is displayed on your telephone that notifies you that you have mail.
This notification option allows you to turn the alert light on or off.
To change the notification option
1. From the main menu, select 4: Change mailbox options.
2. From the Change Mailbox Options menu, select 4: Notification option.
3. Select one of the following:
• 1 — turn notification on
• 2 — turn notification off
Changing message sorting options
Message sorting options allow you to listen to your messages in the order that you choose. Listening to
voice and fax messages only is the default option.
To change message sorting options
1. From the main menu, select 4: Change mailbox options.
2. From the Change mailbox options menu, select 5: Message sorting options.
3. Select one of the following:
• 1 — plays voice and fax message only
• 2 — plays voice and fax messages first, and then email messages
• 3 — plays all messages in the order that they were received
Managing distribution lists
You can use system and personal distribution lists over the telephone. Create, edit, and delete distribution
lists using the telephone. For more information about distribution lists, refer to Creating Distribution Lists
on page 93.
To create a distribution list over the telephone
1. From the main menu, select 4: Change mailbox options.
2. From the Mailbox options menu, select 6: Distribution list options.
18
Copyright © 2009 ADTRAN, Inc.
619510003-1A
Enterprise Communications Server
Customizing your Mailbox using your Telephone
3. From the Distribution list menu, select 1: Create a new distribution list.
4. Enter the number of the new distribution list.
5. Select one of the following:
• 1 — confirm
• 2 — cancel
To edit a distribution list over the telephone
1. From the main menu, select 4: Change mailbox options.
2. From the Mailbox options menu, select 6: Distribution list options.
3. From the Distribution list menu, select 2: Edit distribution list.
4. Enter the distribution list number that you want to edit.
5. Select 1: Manage distribution list.
6. Select one of the following:
•
•
•
•
•
1 — add recipient
2 — remove recipient
3 — list recipients
0 — help
* — exit to previous menu
7. If you selected 1, to add a recipient, enter the new recipient number, and then select one of the
following:
• 1 — save
• * — cancel
8. If you select 2, to remove a recipient, enter the number of the recipient that you want to remove, and
then select one of the following:
• 1 — delete
• * — cancel
To delete a distribution list over the telephone
1. From the main menu, select 4: Change mailbox options.
2. From the Mailbox options menu, select 6: Distribution lists options.
3. From the Distribution lists options menu, select 3: Delete distribution list.
4. Enter the number of the distribution list that you want to delete.
5. Select one of the following:
• 1 — delete
• * — cancel
619510003-1A
Copyright © 2009 ADTRAN, Inc.
19
Customizing your Mailbox using your Computer
Enterprise Communications Server
Customizing your Mailbox using your Computer
This section explains how to customize your mailbox, such as recording greetings and one-time messages,
using UC Client voice message features on your user extension.
You manage all voice message features using the main window or Assistant menu. This menu appears by
default when you start the application. You can access voice-messaging features by selecting the feature
icons in the navigation pane.
For more information on setting mailbox options from your computer, refer to
Customizing your Mailbox on page 178.
Recording and selecting greetings
Using the Greeting Management pane, you can create and record new greetings, or play and delete existing
greetings. You can manage four types of greetings:
•
•
•
•
External greeting
Internal greeting
Mailbox identifier greeting
Out-of-office greeting
Callers from outside your workplace hear the external greeting. This greeting is longer and more
informative than the internal greeting. Here is an example of an external greeting:
“Thank you for calling [your workplace name]. We are unable to take your call at this time; please leave a
message at the sound of the beep and we will get back to you before the end of the day.”
Callers from another extension at your workplace hear the internal greeting. This greeting is shorter than
an external greeting and can be more informal because it is intended for internal callers. Here is an
example of an internal greeting:
“Hi, I’ll be in a meeting all morning, but I’ll get back to you after lunch. Thanks for your patience.”
The mailbox identifier greeting consists of your name. Callers hear this greeting when their call is
transferred to your extension. The mailbox identifier is always available in the greetings list and you
cannot delete it.
Enable the out-of-office greeting when you are away from the office for an extended time. The caller
cannot interrupt the out-of-office greeting. Callers hear the entire greeting before they can leave a message.
You can record an out-of-office greeting and enable it only when you need it. You can re-use the same
greeting each time you are out of the office. When you start the application, a notice reminds you that the
20
Copyright © 2009 ADTRAN, Inc.
619510003-1A
Enterprise Communications Server
Customizing your Mailbox using your Computer
out-of-office greeting is enabled. You can turn it off or leave it on.
If you enable the out-of-office greeting, it plays in place of the internal and external
greeting. If you record an external greeting but no internal greeting, all callers hear
your external greeting. If you record an internal greeting but no external greeting,
external callers hear a default greeting. If you do not record any greetings, the following
default greeting plays to callers: “We are unable to take your call. Please record a
message after the tone.”
Available greetings are listed alphabetically. A new greeting appears at the bottom of the list until you
refresh the content pane.
Creating and recording greetings
You can create and record a new greeting, or re-record an existing greeting. There is no limit to the number
of greetings that you can create, provided there is enough disk space to accommodate them.
For information about managing greetings using the telephone, refer to Managing Messages using your
Telephone on page 31.
To create a new greeting
1. In the Available Greetings section, select the New button.
2. Type a name for the new greeting.
3. Press Enter, and the new greeting appears at the bottom of the list.
619510003-1A
Copyright © 2009 ADTRAN, Inc.
21
Customizing your Mailbox using your Computer
Enterprise Communications Server
To record a greeting
1. In the Available Greetings list, select the name of the greeting that you want to record.
2. Select the Record button next to the greeting that you want to record to open the record Audio box.
3. Choose replace all from the Insert New Audio list.
4. Select record and record the greeting.
5. Select stop when you are finished recording.
6. Select OK.
The maximum length of a recorded greeting is 15 minutes.
Playing and deleting greetings
To play a greeting
1. From the Available Greetings list, select the greeting that you want to play.
2. Make sure that the audio device you want is selected.
22
Copyright © 2009 ADTRAN, Inc.
619510003-1A
Enterprise Communications Server
Customizing your Mailbox using your Computer
3. Select play to play the greeting.
To delete a greeting
1. From the Available Greetings list, select the greeting that you want to delete.
2. Select the trash button to delete the greeting.
3. Select Yes to confirm the deletion.
Re-recording and deleting greetings using the Audio Editor
For more information about using the Audio Editor for advanced management of audio greetings, refer to
Using Announcements in Call Answering Services on page 143.
To re-record a greeting using the Audio Editor
1. From the Available Greetings list, select the greeting that you want to re-record.
2. Make sure that the audio device you want is selected.
3. Select the advanced button to open the Audio Editor.
Advanced button
In the text area of the Audio Editor, you can type the greeting that you want to record.
This is useful to eliminate pauses when you are recording.
4. Select record to open the Record Audio box.
5. From the Insert new audio list, select a position on the waveform:
• At the current position—records from the marker’s position on the waveform (from the
beginning, if you did not make a selection)
• At the beginning—records from the beginning
• At the end—records from the end of the current greeting
• Replace all—replaces the current greeting with the new greeting
6. Select record and record the greeting.
7. Select stop when you are finished recording.
8. Select OK.
9. Select play to listen to the re-recorded greeting.
10. Select File > Exit to close the Audio Editor and update the greeting.
619510003-1A
Copyright © 2009 ADTRAN, Inc.
23
Customizing your Mailbox using your Computer
Enterprise Communications Server
11. Select Yes to update the greeting and return to the Greeting Management pane.
The maximum length of a recorded greeting is 15 minutes.
To edit a greeting using the Audio Editor
1. From the Available Greetings list, select the greeting that you want to edit.
2. Make sure that the audio device you want is selected.
3. Select the advanced button to open the Audio Editor.
Advanced button
In the text area of the Audio Editor, you can type the greeting that you want to record.
This is useful to eliminate pauses when you are recording.
4. Select the position or area of the waveform that you want to edit.
5. Select record to open the Record Audio box.
6. From the Insert new audio list, select one of the following:
•
•
•
•
In place of the current selection—replaces the selected area with the new recording
After the current selection
Before the current selection
At the current position—records from the marker’s position on the waveform (from the
beginning, if you did not make a selection)
• At the beginning—records from the beginning
• At the end—records from the end of the current greeting
• Replace all—replaces the current greeting with the new greeting
7. Select record and record the greeting.
8. Select stop when you are finished recording.
9. Select OK.
10. Select play to listen to the edited greeting.
11. Select File > Exit to close the Audio Editor and update the greeting.
24
Copyright © 2009 ADTRAN, Inc.
619510003-1A
Enterprise Communications Server
Customizing your Mailbox using your Computer
12. Select Yes to update the greeting and return to the Greeting Management pane.
The maximum length of a recorded greeting is 15 minutes.
Selecting greetings
For each greeting type, you can specify a greeting from a list of possible greetings. If you select none for a
greeting type, the system plays the default greeting.
To specify a greeting
1. On the Greeting Management content pane, select one of the following greeting types:
• External greeting
• Internal greeting—by default, it is the same as the external greeting
• Mailbox identifier—it can be only on or off, there are no other greetings available in the list
• Out-of-office greeting—if you specify an out-of-office greeting, the external and internal
greetings are unavailable
2. Select a greeting from the list.
You cannot select a greeting if there is no audio recorded for it.
Recording one-time messages
The One-time Messages feature allows you to record a message intended for a specific caller. The caller’s
name and telephone number are recorded in the Contacts list that you maintain in Outlook. You need caller
ID to be able to use this feature.
You can change or remove a one-time message that you leave for a caller. However, once a caller has
telephoned your extension and heard the one-time message, it is automatically deleted.
619510003-1A
Copyright © 2009 ADTRAN, Inc.
25
Customizing your Mailbox using your Computer
Enterprise Communications Server
To create a one-time message for a contact
1. In the Assistant navigation pane of the main Client menu, select One-time Messages to open the Onetime Messages content pane.
2. Select Add to open the One-time Messages recording dialog box.
3. From the For list, select the contact that you want to receive the one-time message. The contacts are
from the list of contacts that you maintain in Outlook.
In the text area of the One-time Message dialog box, you can type the greeting that you
want to record. This is useful to eliminate pauses while you record.
4. Select record to open the Record Audio dialog box.
5. Make sure that the audio device you want is selected.
6. From the Insert new audio list, select at the beginning.
7. Select record. If you are using your telephone, wait for the beep before you begin to record. As you
record, the clock runs and the red record button turns grey.
8. Select stop when you have finished. If you used your telephone, you can also press the Release button
on the phone to end the recording.
9. Select play to hear the greeting.
26
Copyright © 2009 ADTRAN, Inc.
619510003-1A
Enterprise Communications Server
Customizing your Mailbox using your Computer
10. Select OK to keep the greeting. The contact to receive your one-time message appears in the Onetime Messages content pane. Any other contacts that you record a one-time message for are added to
this list.
To change a one-time message for a contact
1. In the One-time messages content pane, select the contact for the one-time message that you want to
change.
2. Select Change.
3. Follow steps 4 to 10 of To create a one-time message for a contact on page 26.
4. Select Done when you are finished changing the message.
To delete a one-time message
1. In the One-time messages content pane, select the contact whose one-time message you want to
delete.
2. Select Delete.
3. Select Yes to confirm the deletion.
619510003-1A
Copyright © 2009 ADTRAN, Inc.
27
Customizing your Mailbox using your Computer
28
Copyright © 2009 ADTRAN, Inc.
Enterprise Communications Server
619510003-1A
Enterprise Communications Server
3
Customizing Incoming Call Options
Customizing Incoming Call Options
Overview
This section explains how to manage identities.This section covers the following topics:
• Managing Extensions and Identities Options on page 29
Managing Extensions and Identities Options
An identity typically corresponds to a user extension or an email address. When callers dial in to the
system, they can access, for example, a user extension or an employee’s email address. The Administrator
creates and assigns identities. If you have identities assigned, they appear in the identities pane, on the
bottom-left of the client window.
You can change the number of rings on an identity, which determines the number of times a call rings on an
extension before it is answered by the auto attendant.
To change the number of rings using the Identities pane
1. On the Identities pane, select the Number of rings box that corresponds to the identity that you want
to change.
2. Select the number of rings that you want for the identity. The default number of rings is 4.
To edit an active service using the Identities pane
1. On the Identities pane, select the active service icon.
Active Service icon
2. Select Edit Active Service. The service that is active on the identity opens in the Service Editor. For
information about editing services using the Service Editor, refer to Creating Custom Call Answering
Services on page 95.
To locate an active service using the Identities pane
1. On the Identities pane, select the active service icon.
Active Service icon
2. Select Locate Active Service. The Services navigation pane opens with the active service highlighted
in the Services content pane.
619510003-1A
Copyright © 2009 ADTRAN, Inc.
29
Managing Extensions and Identities Options
Enterprise Communications Server
To change a service using the Identities pane
1. On the Identities pane, select the arrow in the services list box that corresponds to the trunk identity
that you want to change.
2. Select Services.
3. Select the service to apply to this identity.
For information about services and how to build and activate them, refer to Creating
Custom Call Answering Services on page 95.
To view the SIP Authentication
Active Service icon
1. On the Identities pane, select the active service icon.
2. Select SIP Authentication. You can view your user name and password. The Administrator needs
this information to assign a phone to an identity.
30
Copyright © 2009 ADTRAN, Inc.
619510003-1A
Enterprise Communications Server
4
Managing Messages using your Telephone
Managing Messages using your Telephone
This chapter covers how to manage your mailbox messages using your telephone. It includes the following
topics:
•
•
•
•
•
Overview on page 31
Accessing your Mailbox using your Telephone on page 31
Listening to Messages Remotely on page 31
Sending Messages from your Mailbox on page 33
Caller Options on page 37
Overview
You can use a local or remote telephone to log on to the system and retrieve not only voice messages but
email. With a single keypad command, the text-to-speech engine reads email messages to you over the
phone. You are also informed if you have received fax messages.
You can send messages from your mailbox to another mailbox. You can also transfer callers to your
mailbox. You can forward and reply to messages from your mailbox. You can also search your contacts list
for information, from your mailbox.
Callers dialing into the system also have options to choose from. These options include bypassing or
skipping out of a greeting, changing to another extension, or dialing the operator.
Accessing your Mailbox using your Telephone
You can access your mailbox using your telephone extension or a remote telephone. To access your
mailbox using your telephone extension, you need the UC Server access number, which you can obtain
from your system administrator, and your password.
To access your mailbox using your telephone extension
1. On your telephone keypad, enter the UC Server access number.
2. Enter your password followed by #.
Listening to Messages Remotely
When you call your extension from another location and access UC Server, you are performing remote
mailbox management. This might include listening to messages and sending them to another phone
number or managing some of your mailbox options.
619510003-1A
Copyright © 2009 ADTRAN, Inc.
31
Listening to Messages Remotely
Enterprise Communications Server
To listen to your messages from a remote location
1. Call your workplace phone number that has UC Server as the auto attendant.
2. When prompted, press the system-defined key used to access mailbox management. The default key
for remote mailbox management is #.
3. When prompted, enter your extension number.
4. When prompted, enter your password followed by #. Before you hear the main menu, the mailbox
summary lists the number and types of messages in your mailbox.
5. The main menu lists basic options. If you do not make a selection right away, the menu is repeated
until you press a key.
Table 4–1: Main Menu
1,1
to review new messages
1,2
to review new voice messages
1,3
to review new email messages
1
to review all messages
2
to send a message
4
to change mailbox options
5
to search contacts
*
exit
Press 1,1 to hear new messages or press 1 to hear all messages.
You can use the following playback commands on your telephone keypad as you listen to each message:
Table 4–2: Playback commands
1
= rewind 3 seconds
1,1
= rewind to start of message
2
= pause then resume playback
3
= forward 3 seconds
3,3
= forward to end of message
5
= play message information (caller ID, date, time)
7,7
= delete message
8
= reset to normal volume
8,8
= reply/call back to messages
9
= increase volume
9,9
= save message
0
= help
#
= skip to end of message (message marked as unheard)
*
= done
32
Copyright © 2009 ADTRAN, Inc.
619510003-1A
Enterprise Communications Server
Sending Messages from your Mailbox
Playback commands are different depending on the type of message you are checking.
6. At the end of each message, the end of message menu plays. If you press # to skip the message, it is
marked as unheard.
Table 4–3: End of message menu
3
to forward
4
to replay
5
to play message information
7
to delete
8
to reply to messages
9
to save
#
skip message
0
help
Sending Messages from your Mailbox
You can send a voice message to another person directly from your mailbox to their mailbox, without
calling their extension.
To send a voice message from your mailbox:
1. Access your mailbox using a telephone.
2. Press 2 to send a message.
3. Record the message, and then press # when you are finished recording.
4. When you finish recording, do one of the following:
•
•
•
•
Press 1 to keep the message.
Press 2 to re-record the message. Follow the prompts.
Press 3 to listen to the message. When you are satisfied with the message, press 1 to keep it.
Press * to cancel.
Table 4–4: Post-recording options
1
keep
2
re-record
3
listen
*
cancel
619510003-1A
Copyright © 2009 ADTRAN, Inc.
33
Sending Messages from your Mailbox
Enterprise Communications Server
5. To enter recipients, do one of the following:
• Enter the extension or phone number followed by #.
• Press 1 to send to a name. Enter the name followed by #.
• You are prompted to press 1 to confirm the selection or to press * to cancel selection
6. If you want to send the same message to more than one mailbox, press 1 to enter another recipient’s
phone number. To send the message, press 2.
Transferring calls to a mailbox
To transfer a call directly to a mailbox
1. While you have a caller on the telephone, press Transfer on the telephone keypad.
2. Dial the UC Server telephone number.
3. When you are prompted to enter a password, followed by #.
4. When you are prompted for an extension number, enter the extension number of the mailbox where
you want to transfer the caller.
5. Hang up.
Forwarding messages
You can forward any type of message from your mailbox, as either a voice or email message. If you have
contact integration, you can forward an email message to a user and another email address.
The forward to email feature works only if UC Server has an email server and the
contact management system configured.
To forward a voice message from your mailbox
1. Access your mailbox using a telephone.
2. After you listen to the message that you want to forward, press 3.
3. Record an annotation to the message, and then press # when you are finished recording.
4. When you finish recording, select one of the following Post-recording options on page 33:
•
•
•
•
Press 1 to keep the message.
Press 2 to re-record the message. Follow the prompts.
Press 3 to listen to the message. When you are satisfied with the message, press 1 to keep it.
Press * to cancel.
5. To enter recipients, do one of the following:
• Enter the extension or phone number followed by #.
• Press 1 to send to a name. Enter the name followed by #.
• You are asked to press 1 to confirm the selection or to press * to cancel selection
34
Copyright © 2009 ADTRAN, Inc.
619510003-1A
Enterprise Communications Server
Sending Messages from your Mailbox
6. If you want to send the same message to more than one mailbox, press 1 to enter another recipient’s
phone number.
7. If you want to send the message, press 2.
8. After the delivery confirmation, the end-of-message options play.
To forward a message by email from your mailbox
1. Access your mailbox using a telephone.
2. Listen to the message that you want to forward, and then press 3.
3. Do one of the following:
• Press 1 to record an annotation to the message
• Press 2 to skip the recording
4. To record an annotation, select one of the following Post-recording options on page 33:
•
•
•
•
Press 1 to keep the message.
Press 2 to re-record the message. Follow the prompts.
Press 3 to listen to the message. When you are satisfied with the message, press 1 to keep it.
Press * to cancel.
5. To enter recipients, do one of the following:
• Enter the extension or phone number followed by #.
• Press 1 to send to a name. Enter the name followed by #.
• You are asked to press 1 to confirm the selection or to press * to cancel selection.
To forward the email using the dial-by-name options, the contact that you choose must
have at least one valid email address.
6. If you want to send the same message to more than one email address, press 1 to enter another
recipient’s phone number. To send the message, press 2.
7. After the delivery is confirmed, the end-of-message options play.
Local message store users receive the forwarded email message as a voice message that
details where it is from, and plays the annotation, if there is one recorded for it.
Replying to messages
You can reply to a voice message or an email message directly from your mailbox. UC Server uses the
contact management software, for example Outlook, to reply to a message or call back the sender. You can
reply to a voice message that is from an internal caller. If the message is from an external caller, you can
call back the person who left the message. You can call that person back at any number that is in your
contacts list. You can send a voice message in reply to an email message using a wave file attachment.
619510003-1A
Copyright © 2009 ADTRAN, Inc.
35
Sending Messages from your Mailbox
Enterprise Communications Server
If you press # after you record a message, you can choose from any of the end-of-record options, listed
below.
Table 4–5: End-of-record options
1
deliver
2
re-record
3
listen
4
append
5
discard
*
cancel
To reply to an internal voice message
1. Access your mailbox using a telephone.
2. Listen to the voice message that you want to reply to.
3. Press 8 to reply to the message.
4. If the message is from a caller with an internal mailbox do one of the following:
• Record your message at the tone
• Press 1 to call back the extension
To reply to an email message
1. Access your mailbox using a telephone.
2. Listen to the email message that you want to reply to.
3. Press 8 to reply to the message.
4. Record your message after the tone.
5. When you finish recording your message press #.
When you reply to an email message, the reply is delivered as a wave file attachment to
the sender of the email. The recipient opens the attachment to hear your voice message.
To call back in response to a voice message
1. Access your mailbox using a telephone.
2. Listen to the voice message that you want to respond to.
3. Press 8 to call back in response to the voice message.
36
Copyright © 2009 ADTRAN, Inc.
619510003-1A
Enterprise Communications Server
Caller Options
4. Do one of the following:
• If you have the sender’s Calling Line ID, press 1 to call back the sender.
• If the sender’s telephone number is in your contacts list, press 2 to call back the sender at any of
the numbers listed.
• If you want to call a separate number in your contacts list, press 3 and enter the first few digits of
the person’s last name.
To call back in response to an email message
1. Access your mailbox using a telephone.
2. Listen to the email message.
3. Press 8 to call back in response to an email message.
4. If the sender’s email address is in your contacts list, press 2 to call back the sender at any of the
numbers listed.
Searching your contacts list
From your mailbox, you can transfer to a telephone number, search your contacts for a number to transfer
to, or search for information—such as address, email addresses, or telephone numbers—about your
personal contacts.
To search your contacts
1. Access your mailbox using a telephone.
2. From the Main Menu, press 5.
3. If you want to transfer to a telephone number, enter the number.
4. If you want to search your contacts list, do either of the following:
• Press 1 to search your contacts and transfer to a contact on your list
• Press 2 to search your contacts and retrieve information about a contact on your list
The type of information that you can retrieve includes the address, telephone number, or
email address for a contact, if already specified in the contact fields.
Caller Options
Callers that dial into the system have several options. While callers are listening to user greetings or
leaving messages, they can bypass a greeting, skip out of a greeting, skip out to another extension after
they leave a message, or dial the operator. A caller that accidentally ends up in the wrong voicemail, or
decides they want to call someone else instead, can skip out of a greeting. After leaving a message, a caller
can go to another extension and leave a message for another user without having to hang up and redial the
system.
619510003-1A
Copyright © 2009 ADTRAN, Inc.
37
Caller Options
Enterprise Communications Server
To bypass a greeting
Press # while listening to a greeting.
If the out-of-office greeting is enabled, the caller must listen to the initial system status
message before pressing the # key. The caller cannot press any key until the greeting has
played: “The user at this extension is out of the office”.
To skip out from a greeting
Press * while listening to a greeting. The caller hears the following: “If you wish to be transferred to an
extension, please dial the extension number now. If you are not sure of the extension number, but know the
name, press 1 now. Press * to manage you mailbox.”
This feature depends on how the system is configured. The administrator can change the
key access skip out option and whether it is enabled.
To skip out to another extension after leaving a message
1. After you record a message, press # to send a message.
2. Choose an option from the End of message menu on page 33. The caller hears the following:
“You may hang up now or if you wish to be transferred to an extension, please dial the extension
number now.”
This feature works correctly only if it is enabled by the system administrator.
To dial an operator
While listening to a greeting, press the operator key. By default, the operator key is 0.
The operator key can be configured by the system administrator. It might be a key other
than 0.
38
Copyright © 2009 ADTRAN, Inc.
619510003-1A
Enterprise Communications Server
5
Managing Messages using your Computer
Managing Messages using your Computer
This chapter explains how the UC Server works with Microsoft Outlook, Lotus Notes, and an integrated
messaging client to provide a unified communications solution. The chapter covers the following topics:
•
•
•
•
Overview on page 39
Managing Messages in Microsoft Outlook on page 39
Managing Messages in Lotus Notes on page 45
Managing Messages in the Mailboxes Menu in the NetVanta UC client on page 51
Overview
The UC Server works with Microsoft Exchange, Lotus Notes, an integrated messaging client (using the
Mailboxes menu in the UC Server), and other IMAP-compliant email systems to provide users with a
single storage and access point for voice, fax, and email messages. Users can retrieve and manage
messages either over the telephone or directly from the desktop. This chapter explains how to retrieve and
manage messages from your desktop.
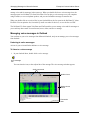
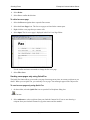
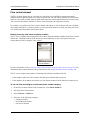
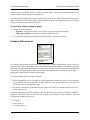
Managing Messages in Microsoft Outlook
The UC Server can be integrated with Microsoft Outlook so that all your messages appear in the same
inbox. Here is what an Outlook inbox looks like:
Message icons
You are already familiar with email messages and how to manage them from your desktop. You can
619510003-1A
Copyright © 2009 ADTRAN, Inc.
39
Managing Messages in Microsoft Outlook
Enterprise Communications Server
manage voice and fax messages in the same way. When you double-click on a voice message icon, the
message opens in a NetVanta UC client VoiceForm. You can play a voice message over your computer
using a headset, or over a telephone speaker, and you can forward the message to someone else.
When you double-click on a received fax in your Outlook Inbox, the fax opens in the NetVanta UC client
FaxForm. You can print the fax, forward it by email or to other fax devices, or save the fax as a PDF.
The NetVanta UC client custom VoiceForm and FaxForm allow you to manage voice and fax messages as
you would any other email. You can forward, move, delete, and save a message.
Managing voice messages in Outlook
You can listen to your voice messages from Microsoft Outlook, and you can manage your voice messages
from Outlook.
Listening to voice messages
An icon in your voicemail inbox indicates a voice message.
To listen to a voice message
1. In your Outlook inbox, double-click a voice message.
Voice message
icon
You can select the icon, or the subject line of the message.The voice message window appears.
Audio commands
Speaker icons
Sliding volume
control
Connection
state
40
Copyright © 2009 ADTRAN, Inc.
619510003-1A
Enterprise Communications Server
Managing Messages in Microsoft Outlook
2. Select the icon of the speaker that you want to use.
The icon that you select is enclosed by a dotted line.
3. Select play. Use the other audio commands to manage the playback.
Skip
Backwards
Stop
Skip
Forwards
Pause
Move to
Beginning
Move to End
Play
Managing voice messages
You can manage voice messages from your Outlook inbox or from a voice message window that you open.
When you connect to the server to retrieve messages, the message waiting light turns off, depending on
how it is configured by the system administrator.
The following instructions apply to both means of management. Unless otherwise stated, they assume that
you have opened a voice message and that it is displayed in a voice message window. When you are
managing voice messages from your Outlook inbox, you need to select a voice message before following
the steps.
To print text or an annotation associated with a voice message
1. Select File > Print.
2. Change the print options that you want.
3. Select OK.
To save the audio component of a voice message
1. Select File > Save As.
2. In the File name text box, type a name for the message.
3. From the Save In list, choose a location for the saved file.
4. Select Save.
619510003-1A
Copyright © 2009 ADTRAN, Inc.
41
Managing Messages in Microsoft Outlook
Enterprise Communications Server
To delete a voice message from the inbox
1. Select the voice message that you want to delete.
2. Select the Delete icon.
Delete icon
By default, Outlook deletes the voice message from the inbox and puts it in the Deleted Items folder
in Outlook.
To move a voice message to a different Outlook folder
1. Select the voice message that you want to move.
2. Drag the message to the Outlook folder where you want to move the message. Outlook folders appear
in the folder list of your inbox.
To forward a voice message
1. Select the Forward message icon.
Forward message
icon
The following window opens.
Wave form
Text area
2. In the text area, type comments or additional information that you want to include. Internal recipients
can listen to the voice message and read your comments in the text area. External recipients can read
your comments in the text area and receive the audio as an attachment.
3. Select To.
42
Copyright © 2009 ADTRAN, Inc.
619510003-1A
Enterprise Communications Server
Managing Messages in Microsoft Outlook
4. Select a recipient from your Outlook contacts list. The information for the recipient must include an
email address if you want the message to be forwarded successfully. If the recipient is not internal or
is not included on your contacts list with an email address, then do the following: in the Select Names
dialog box, select To and type the recipient’s email address in the Forward Voicemail To text box.
5. Select OK.
6. Select File > Send.
Managing fax messages in Outlook
You can identify fax messages in your Microsoft Outlook Inbox by the following fax message icon.
Fax message icon
To view a fax message
From your Outlook inbox, double-click a fax message. You can select the fax message icon or the subject
line of the message. The fax message opens in the NetVanta UC client FaxForm.
If you do not see the fax icon, and if the fax message opens in NetVanta UC client Fax
Viewer instead of the NetVanta UC client FaxForm, then you may not have the NetVanta
UC client FaxForm installed on your NetVanta UC client. See your system administrator
for more information.
To print a fax message
1. Select the fax message that you want to print.
2. Select File > Print.
To save a fax message
1. Select the fax message that you want to save.
2. Select File > Save as TIF file.
3. In the File name text box, type a name for the message.
4. From the Save in list, choose a location for the saved file.
5. Select Save.
To save a fax message as a PDF
Save as PDF File icon
1. Double-click the fax message that you want to save. The NetVanta UC client FaxForm opens
2. Select File > Save as PDF file, or select the Save as PDF File icon on the toolbar.
619510003-1A
Copyright © 2009 ADTRAN, Inc.
43
Managing Messages in Microsoft Outlook
Enterprise Communications Server
3. In the File name text box, type a name for the message.
4. From the Save in list, choose a location for the saved file.
5. Select Save.
To delete a fax message from your inbox
1. Select the fax message that you want to delete.
2. Select the Delete icon.
Delete icon
By default, Outlook deletes the voice message from the inbox and puts it in the Deleted Items folder
in Outlook.
To move a fax message to a folder
1. Select the fax message that you want to move.
2. Drag the message to the Outlook folder where you want to move it. Outlook folders appear in the
folder list of your inbox.
To forward a fax message by fax
1. Select the fax message that you want to forward.
2. Select the Forward message icon.
Forward message
by fax icon
3. In the text area, type comments or additional information that you want to include.
4. Select To.
5. Select a recipient from your Outlook contacts list. The information for the recipient must include an
email address if you want the message to be forwarded successfully. If the recipient is not internal or
is not included on your contacts list with an email address, then type the recipient’s email address in
the To text box.
6. Select OK.
7. Select File > Send.
44
Copyright © 2009 ADTRAN, Inc.
619510003-1A
Enterprise Communications Server
Managing Messages in Lotus Notes
To forward a fax message by email
1. Double-click the fax that you want to forward.
Forward message as a
a PDF file
The NetVanta UC client FaxForm opens.
2. If you want to save a copy of the fax as a PDF before forwarding the fax then select File > Save as
PDF file.
• In the File name box, type a name for the message.
• In the Save in list, choose a location where you want to save the file.
• Select Save.
3. Select the Forward message by email icon.
Forward message by
email icon
4. In the text area at the bottom of the window, type any comments or additional information that you
want to include with the fax.
5. Select To.
6. Select a recipient from your Outlook contacts list. The information for the recipient must include an
email address if you want the message to be forwarded successfully. If the recipient is not internal or
is not included on your contacts list with an email address, then type the recipient’s email address in
the To text box.
7. Select File > Send.
Managing Messages in Lotus Notes
The UC Server integrates with Lotus Notes through an IMAP-compliant email server. With administrator
and user mailboxes and passwords, the UC Server puts voice and fax messages into the appropriate
mailbox.
Lotus Notes users can view voice messages in their inbox and can play voice messages through either a
computer sound card or over the telephone. Lotus Notes users can also view fax messages without opening
additional programs.
Launching Lotus Notes
When you launch the Lotus Notes client, it attempts to connect to the UC Server. At the first attempt, you
are prompted for the location of the UC Server.
619510003-1A
Copyright © 2009 ADTRAN, Inc.
45
Managing Messages in Lotus Notes
Enterprise Communications Server
To launch Lotus Notes with the UC Server the first time
1. Launch Lotus Notes.
2. In the Server Name box, select the machine name or IP address of the UC Server.
3. Enable the Save as default check box to automatically select the server the next time you launch
Lotus Notes.
4. Select OK.
5. Type your user name in the User name box. In most cases, the user name is your mailbox number.
6. Type your password in the Password box. In most cases, the password is your telephone mailbox
password.
7. Enable the Save as default check box to automatically log in to the UC Server the next time you
launch Lotus Notes. Incoming voice and fax messages appear in the Lotus Notes inbox. Here is what
a Lotus Notes inbox looks like:
Lotus Notes automatically associates custom icons with voice and fax messages.
Voice icon
Fax icon
46
Copyright © 2009 ADTRAN, Inc.
619510003-1A
Enterprise Communications Server
Managing Messages in Lotus Notes
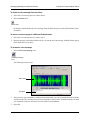
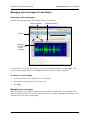
Managing voice messages in Lotus Notes
Listening to voice messages
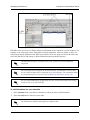
Open the voice message to open the following form and client plug-in.
Audio commands
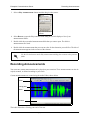
Playback selection
Toolbars
Waveform
representation
of voice
messages
The form allows you to select the playback type: associated telephone handset, or speaker phone. The
waveform representation allows you to highlight and select sections of audio to play back.
To listen to a voice message
1. In your Lotus Notes inbox, double-click a voice message.
2. Select the icon of the speaker that you want to use.
3. Select play.
Managing voice messages
When you manage voice messages from the Lotus Notes inbox, you can select a voice message in the
inbox, or open the message. You can access the same options—replying, forwarding, and deleting—from
either the inbox or the open message dialog.
619510003-1A
Copyright © 2009 ADTRAN, Inc.
47
Managing Messages in Lotus Notes
Enterprise Communications Server
To reply to a voice message
1. Select Reply. If you want to reply to everyone who is on the To list, select Reply to All.
2. Select one of the following:
•
•
•
•
Reply
Reply with History
Reply without Attachment(s)
Reply with Internet-Style History
3. Type a message in the message area.
4. Select Send. If you want to save a copy of the reply, select Send and File... and select a location to
save to.
To forward a voice message
1. Select Forward.
2. Select one of the following:
• Forward
• Forward without Attachment(s)
• Forward with Internet-Style History
3. Type the email address to which you want to forward the memo.
4. If you want to add a message, type it in the message area.
5. Select Send. If you want to save a copy of the forward email, select Send and File... and select a
location to which to save the copy.
To delete a voice message from the inbox
1. Select the message that you want to delete.
2. Select Delete.
Managing fax messages in Lotus Notes
Opening an incoming fax message opens the following form and client plug-in.
48
Copyright © 2009 ADTRAN, Inc.
619510003-1A
Enterprise Communications Server
Managing Messages in Lotus Notes
Viewing commands
Toolbars
Displayed fax
Sent Items—Fax transmission reports
Faxes that you send from a client computer are automatically put into the Sent Items folder.
The “Sent Items” folder used by Lotus Notes IMAP is not the same as the Lotus Notes
“Sent” folder. To review fax transmission reports, you might have to create a folder
called “Sent Items.”
For information about the fax transmission report, refer to Managing outgoing faxes on page 73.
Managing fax messages
Using the fax form, you can view and print messages in Lotus Notes. You can also move fax messages to
other folders.
To view a fax message
Double-click a fax message. Scroll in the Fax Viewer to view the fax.
619510003-1A
Copyright © 2009 ADTRAN, Inc.
49
Managing Messages in Lotus Notes
Enterprise Communications Server
To print a fax message
1. Open the fax message that you want to print.
2. In the Fax Viewer, select the Print icon to open the print dialog box.
Print icon
Make sure that the correct printer is selected in the Name list.
3. Select OK.
To save a fax message to a folder as a PDF file
Save as PDF
1. Double-click a fax message
2. Select on the Save as PDF... icon in the fax control
3. In the file name box, type a name for the message.
4. In the Save in list, choose a location where you want to save the file.
5. Select Save.
Synchronizing your password with Lotus Notes
If you do not receive voice or fax messages, or are unable to access your mailbox, you might have to
synchronize your password with Lotus Notes.
Lotus Notes uses two different internal passwords: Lotus Notes and Internet password. The Lotus Notes
password is used exclusively with the Lotus Notes client. The Internet password is for all other login
authentications using Internet protocols, including Web access, POP, and IMAP4.
Changing your Lotus Notes password does not automatically change the Internet password. When creating
a Lotus Notes user, there is an option to synchronize the Internet password with Lotus Notes. The
synchronization occurs only when the user is created, otherwise the passwords must be individually
managed.
To change your IMAP4 password in the UC Server
1. Launch the NetVanta UC client.
2. Log in with the Lotus Notes user name and telephone password.
3. Select Tools > Options.
4. Select the External Systems tab.
50
Copyright © 2009 ADTRAN, Inc.
619510003-1A
Enterprise Communications Server Managing Messages in the Mailboxes Menu in the NetVanta UC client
5. Make sure that the information in the IMAP mailbox management section is correct.
6. Select the password button.
7. Enter the new Lotus Notes Internet password.
Managing Messages in the Mailboxes Menu in the
NetVanta UC client
The Mailboxes menu provides an integrated messaging client and displays all your voice and fax messages
in one inbox. You can play messages, forward messages to an email address, create attachments, and
archive messages.
The navigation pane displays the folders in which messages are stored. Open a folder to view the contents
in the content pane. An icon indicates a voice or fax message. The information pane displays details about
the history of the message that you open. In the preview pane, you can view the waveform of a voice
message or contents of a fax message.
Managing messages
Using the content pane of the Mailboxes menu, you can open, delete, or mark a message.
To open a fax message in the Fax Viewer
1. Right-click the fax message that you want to open.
2. Select Open.
To delete a fax or voice message
1. Right-click the fax or voice message that you want to delete.
2. Select Delete.
3. Select Yes to confirm the deletion.
To mark a fax or voice message as heard or unread
1. Right-click the fax message that you want to mark.
2. Select Mark as Heard or Mark as Unread.
Playing voice messages
You can play voice messages using the telephone or computer speakers.
619510003-1A
Copyright © 2009 ADTRAN, Inc.
51
Managing Messages in the Mailboxes Menu in the NetVanta UC clientEnterprise Communications Server
To play a voice message
1. In the Content pane, select the message that you want to play.
2. If the waveform of the message does not automatically appear in the preview pane, select the
Download button.
3. Select the icon of the device that you want to use to play the message.
4. Select the Play button to play the voice message.
Using attachments
You can drag a voice or fax message to an email message in your email client. The message that you drag
becomes an attachment. You can create attachments for new messages, reply emails, or forward emails.
The Save Attachment option enables you to save a voice or fax message attachment to your hard drive,
which you can then forward to other users using your regular email client.
To create an email attachment
1. Open your email client.
2. Do one of the following:
• Create a new email message.
• Create a reply to an existing email message.
• Create a forward email for an existing email message.
3. Drag the voice or fax message that you want from the content pane of the Mailboxes menu to the
email message. The message automatically becomes an email attachment.
To save an email or fax locally as an attachment
1. Select the Mailboxes navigation bar.
2. Select the voice or fax message that you want to save as an attachment.
3. Right-click the selected message, and select Save Attachment.
Alternatively, select File > Save Attachment.
4. Browse to the location where you want to save the file locally, and select Save.
To save a fax message to a folder as a PDF file
1. Double-click a fax message
2. Select on the Save as PDF... icon in the fax control
Save as PDF
3. In the file name box, type a name for the message.
52
Copyright © 2009 ADTRAN, Inc.
619510003-1A
Enterprise Communications Server Managing Messages in the Mailboxes Menu in the NetVanta UC client
4.
In the Save in list, choose a location where you want to save the file.
5. Select Save.
Archiving messages
You can save voice and fax messages in an archive directory on the hard drive.
To archive a message
1. Create a directory where you want to archive voice and fax messages.
2. Drag the voice or fax message that you want from the content pane of the Mailboxes menu to the
directory that you created. The message is automatically copied to the directory.
619510003-1A
Copyright © 2009 ADTRAN, Inc.
53
Managing Messages in the Mailboxes Menu in the NetVanta UC clientEnterprise Communications Server
54
Copyright © 2009 ADTRAN, Inc.
619510003-1A
Enterprise Communications Server
6
Using SIP Telephones
Using SIP Telephones
This chapter presents the basics of using SIP telephones, and includes the following topics:
• Overview on page 55
• Customizing your Phone on page 55
• Using SIP Phones on page 57
Overview
The SIP solution provides extensive telephone features including superior voice quality, customer costsavings, support for real-time communications, and improved efficiency of communications.
SIP-enabled phones, in conjunction with the UC server, offer a wide range of phone features, such as call
park/pickup, overhead paging, auto attendant, single button voicemail access, caller ID, conferencing, hunt
groups, ring groups, message waiting indicator, music on hold, and more.
The UC server works with many types of SIP-compliant phones. However, phones from different
manufacturers are configured differently, and the phone features are accessed in a different way.
This chapter does not replace individual phone installation and configuration manuals.
SIP telephone user guides for manufacturers that are part of the ADTRAN Connect or
Connect PLUS program are available on the ADTRAN website www.adtran.com/
support. Refer to the SIP user guide for information about how to use the phone with the
UC server.
Customizing your Phone
In the UC server you can customize your phone to suit your personal preferences. For example, you can set
the number of rings before your phone goes to voicemail. You can also set how the message waiting light
on your phone operates. For example, whether the message waiting light on your phone turns off when
you've accessed your first new voicemail message, or when you've accessed all your new voicemail
messages. You can also customize your phone according to your particular phone's make and model. For
information on customizing your phone in the UC server, refer to the following sections.
• Changing the number of rings before calls go to voicemail on page 56
• Setting the message waiting light on your phone on page 56
For more information on customizing your phone, refer to the phone user guide that
applies to the make and model of your phone. User guides for ADTRAN supported
phones are available from the ADTRAN website at www.adtran.com/support.
619510003-1A
Copyright © 2009 ADTRAN, Inc.
55
Customizing your Phone
Enterprise Communications Server
Changing the number of rings before calls go to voicemail
You can change the number of times a call rings on your extension, before the call is directed to voicemail.
An identity refers to a user extension, an auto attendant, or an email address. The Administrator creates and
assigns identities for you, which typically refer to your extension numbers. If you have identities assigned,
they appear in the identities pane, on the bottom-left of the UC client window.
To change the number of rings
On the identities pane, select the identity that you want to change, and select the Number of rings from the
drop list. The default number of rings is 4.
Setting the message waiting light on your phone
Through the NetVanta UC client, you can set how the message waiting light on your phone operates.
To set the message waiting light on your phone
1. Select Tools > Options.
2. In the General tab, select one of the following options.
Use system defaults
The message waiting light behavior for your phone is
set according to the system wide setting set by your
administrator.
Never turn on or off
UC Server does not manage the message waiting
light
Turn on when new message arrives
Turn off when first message is accessed in
mailbox
The light turns off when you access the first new
message in your mailbox.
Turn off when no more new messages in
mailbox
The light turns off when you access the last new
message in your mailbox.
56
Copyright © 2009 ADTRAN, Inc.
619510003-1A
Enterprise Communications Server
Using SIP Phones
3. Select OK.
Any changes to the message waiting light options come into effect immediately.
Using SIP Phones
Depending on the manufacturer, SIP phones and the UC server offer a variety of features, such as the
following:
•
•
•
•
•
•
•
•
Accessing voicemail messages
Transferring callers directly to voicemail
Using the NetVanta UC Server conference bridge
Paging
Parking calls and picking up parked calls
Working with call queues
Picking up ringing calls
Changing phones during a call
Accessing voicemail messages
Some telephones provide a single button to access your voicemail. This is useful when accessing messages
from your phone. You can press the Messages button and go directly to voicemail to check your messages.
You might have one or several identities (typically extensions) assigned to your telephone. The number of
buttons on the phone determines the number of possible identities that can be configured on it.
To use the message button on a phone with one identity
4. Press the Messages button on your phone. Enter your telephone Personal Identification Number (PIN)
at the prompt to access your personal voicemail.
To use the message button on a phone with more than one identity
1. Press the Messages button on your phone.
2. From the Line Select menu, select using the telephone keypad, or the arrow keys on the telephone line
for which you want to review your messages.
As long as there is a user profile associated with the identity, callers are prompted for
their telephone PIN.
619510003-1A
Copyright © 2009 ADTRAN, Inc.
57
Using SIP Phones
Enterprise Communications Server
Transferring callers directly to voicemail
You can transfer a caller directly to voicemail, without ringing the recipient’s telephone. This feature is
useful if a caller needs to leave a message for a user, but does not need to speak to the user directly. After a
direct transfer, the caller hears the user’s personal assistant greeting, and can follow the prompts
accordingly.
To perform a blind transfer to another user’s voicemail
1. During an active call, begin a blind transfer, which puts the caller on hold. The steps to perform a
blind transfer vary depending on the type of phone you are using. For more information, refer to the
user documentation for your phone.
2. Enter *86<Destination mailbox number>.
3. Press Send or Dial, depending on the phone type you are using.
To perform a supervised transfer to another user’s voicemail
1. During an active call, begin a supervised transfer, which puts the caller on consultation hold. The
steps to perform a supervised transfer vary depending on the type of phone you are using. For more
information, refer to the user documentation for your phone.
2. Enter *86<Destination mailbox number>.
3. Press Send or Dial, depending on the phone type you are using.
4. To complete the transfer, press the Transfer key again.
To leave a message directly in a recipient’s mailbox
1. Enter *86<Destination mailbox number>.
2. Press Send or Dial.
Using the NetVanta UC Server conference bridge
The UC server has the ability to support a limited-sized conference bridge application. The number of
participants is limited to the number of licenses available, however additional conference expansion
licenses can be purchased. See your system administrator for more details. You can use your SIP phone
during the conference to access several options, such as muting or adding participants.
Any lone user in a conference bridge hears the sound of “crickets,” which is
confirmation that they are the only person in the conference.
58
Copyright © 2009 ADTRAN, Inc.
619510003-1A
Enterprise Communications Server
Using SIP Phones
To access the conference bridge
1. From an internal telephone, dial the conference bridge number. The default number is 7050.
You can also dial 7050 to access the conference bridge from the dial by extension or
dial by name directory.
2. Enter the 4-digit conference ID.
3. Follow the prompts to access the conference bridge.
To access the list of options, you can press * while the conference is in progress.
Conference option list
When you press * during a conference, the following options are available. The available options depend
on at which point during the conference you press *. Only relevant options are available.
• Press 1 to mute yourself. Response: “You are now muted.”
• Press 2 to unmute yourself. Response: “You are now unmuted.”
• Press 3 to disable entry and exit notifications. Response: “Entry and exit notifications have been
disabled.”
• Press 4 to mute all other participants. Response: “All others have been muted.”
When you press 4 to mute all participants, this does not apply to new callers who join the
conference. To mute new callers, press 4 again.
• Press 5 to unmute all other participants. Response: “All others have been unmuted.”
• Press 7 to toggle between closing and reopening the conference to additional participants. Response:
“The conference is now closed to additional participants.” Response: “The conference is now reopened
to additional participants.”
• Press 9 to end the conference.
• Press 0 to report the number of participants. Response: “Including yourself, there are x participants.”
• Press # to return to the conference.
Paging
You can send live pages. Live paging allows you to instantly broadcast a page . For instructions on sending
619510003-1A
Copyright © 2009 ADTRAN, Inc.
59
Using SIP Phones
Enterprise Communications Server
recorded pages, see your system administrator.
In order to send a live page, your system administrator must have enabled access for
you to do so. For more information, see your system administrator.
To send a live page
1. From your phone, dial *72 (or *PA).
2. After you hear the tone, begin speaking.
3. When you are finished with the page, hang up or use the end call function on your phone.
Parking calls and picking up parked calls
You can park an active call, and the parked call can be retrieved on another phone. This feature is useful if
you want to change phones during a call.
Call park/pickup must be enabled by your system administrator for use on your phone.
There are two methods of parking calls. In one method, the UC server selects the next available park
number. Alternatively, you can select your own park number. Having the UC server select the park number
is useful if you are uncertain whether a call is already parked at a particular number.
If more than one identity (for example, more than one extension number) is assigned to your phone, then
transfer the call rather than putting the active call on hold.
If a person whose call has been parked then puts the call on hold, the person retrieving
the parked call will hear dead air or silence until the other party resumes the call.
To park a call at the next available number
1. Put the active call on hold.
If your phone has more than one identity assigned to it, then Transfer the call instead of
putting it on hold.
2. Dial *99.
60
Copyright © 2009 ADTRAN, Inc.
619510003-1A
Enterprise Communications Server
Using SIP Phones
3. Note the hold position that plays over the telephone. The hold position is used by the person who
answers the parked call. The UC server selects the park number for the caller starting at 1, or the next
available higher number.
4. Press DIAL. The call is removed from the hold position, and put in the system park position.
To park a call at a selected park number
1. Put the active call on hold.
If your phone has more than one identity assigned to it, then Transfer the call instead of
putting it on hold.
2. Dial *99.
3. Enter the number that you want to use as the park number. The hold position is used by the person
who answers the parked call. For example, if you enter 1234, then the call is parked at 1234, and can
be picked up at 1234.
4. Press DIAL. The call is removed from the hold position, and put in the park position.
To answer a parked call
1. Typically, a company announcement informs you that a call is on hold for you.
2. Dial *98. The system prompts you for the park hold position.
3. Dial the number of the park hold position. The system disconnects the current call and presents a new
call.
4. Answer the new call to speak to the parked caller.
If nobody answers the parked call, the call rings the extension that originally put the call
on system park.
Working with call queues
Call queuing allows incoming calls to be distributed to an individual within a specified group of agents.
The feature is useful for companies that handle a lot of incoming phone calls, and where the caller is not
trying to reach a specific individual, but wants to talk to a member of an agent group, such as a salesperson,
as quickly as possible. Call queuing allows callers to remain in a queue while they wait for their call to be
answered by the appropriate agent.
The total number of simultaneous calls that can be queued in the system is 64.
619510003-1A
Copyright © 2009 ADTRAN, Inc.
61
Using SIP Phones
Enterprise Communications Server
The agent is typically associated with a particular area of expertise, for example, sales or support. A
support agent who is ready to answer calls can log into the call queue and receive support calls in a
specified order, for example, in order of arrival or priority.
Calls are distributed to the most idle agent. If an agent is logged in, the caller hears an introductory queue
greeting. If no agents are logged in, the caller is directed to the overflow destination. The overflow
destination then provides an additional greeting.
If callers know the queue number, they can dial directly into a queue.
Logging in and out of a queue
Agents can log in or log out of a queue. Agents who log in to a queue receive calls that are directed to that
queue.
The maximum number of agents that can log in to a queue at the same time is 64.
To subscribe to a queue
1. Dial *81<QueueNumber>. Ensure that you enter the correct queue number.
2. Hang up.
To avoid errors when entering queue numbers, use speed dial to login and out of queues
without errors.
To unsubscribe from a queue
1. Dial *82<QueueNumber>.
2. Hang up.
To present a call to the queue
1. Dial *80<QueueNumber>.
2. Hang up.
Contact your system administrator to obtain the queue number for your queue.
Temporarily stop accepting queued calls
If you are logged into a queue to accept incoming queued calls, there may be times when you wish to
temporarily stop accepting queued calls, without logging out of the queue. You can manually set your
62
Copyright © 2009 ADTRAN, Inc.
619510003-1A
Enterprise Communications Server
Using SIP Phones
status to unavailable to prevent accepting further incoming queued calls, without logging out of the queue.
Temporarily setting your status to unavailable does not change your longest idle position in the agent
group. When you make yourself available again by logging back into the queue, your idle time is based on
the time since your last call, including the time that you were unavailable.
To set your agent status to unavailable
1. Dial *83.
2. Press a number from 1 to 9 to indicate your reason for being unavailable.
3. Hang up.
To set your agent status to available
1. Dial *83.
2. Press 0 at the prompt.
3. Hang up.
Checking your agent status in a call queue
You can check your agent status to verify whether you're currently logged into a call queue, whether your
status is set to temporarily unavailable, or whether you're currently logged out of the call queue.
To check your agent status
1. Dial *84<QueueNumber>. Ensure that you enter the correct queue number.
The system will indicate your current status as:
• Logged in
• The agent is not available, service code <#>
• Not Logged in
2. Hang up.
Picking up ringing calls
Ringing call pick up allows you to answer other ringing telephones, which means that you no longer have
to run to answer another person’s telephone. You can divert a ringing call from another telephone, typically
within earshot, to your own telephone to answer.
To use ringing call pick up, you must know the extension of the phone that is ringing.
This feature also allows for night bell support. Many small companies have an audible bell that rings after
business hours. Night bell support can also allow employees to contact security after hours. This feature
can allow employees, for example on manufacturing floors, who are not stationed at a particular desk to
619510003-1A
Copyright © 2009 ADTRAN, Inc.
63
Using SIP Phones
Enterprise Communications Server
answer any telephone.
To use ringing call pick up, your phone must be configured to receive incoming calls.
Make sure that such features as call forwarding and do not disturb are not enabled on
the phone.
To answer a call on another user’s phone
1. When you hear a phone that you want to answer, dial *78<Extension>. Make sure that you dial, on
your own phone, *78 plus the extension of the phone that is ringing.
2. If the phone has stopped ringing by the time you dial the *78 code, the system prompts you to enter
your pickup ID.
If the pickup ID that you enter is invalid, the system prompts you with “That is not a
valid pickup ID,” and asks you to enter a valid pickup ID.
Changing phones during a call
Using connected call pickup, you can seamlessly transfer calls from one device to another, such as from a
cell phone to your desk phone. This feature is most commonly used with mobile twinning, where calls to
one phone number can ring simultaneously at multiple devices, such as an internal extension number and a
cell phone number. For example, if you were away from your desk and you answered a call that was
transferred or twinned to your cell phone, then when you return to your desk, using the connected call
pickup feature, you can pickup that call on your desk phone, without the caller being aware that you
changed phones.
To configure mobile twinning, see your system administrator.
Benefits of using connected call pickup
The benefits of using connected call pickup include using one phone number and multiple devices to be
accessible to callers, while minimizing costs by then transferring calls to your internal extension or to
another land line phone.
Requirements for using connected call pickup
To pickup a connected call, the called number must go through the UC server. That is, the call must be
64
Copyright © 2009 ADTRAN, Inc.
619510003-1A
Enterprise Communications Server
Using SIP Phones
transferred, forwarded, or twinned to your alternate phone number. For example:
• Calls can be made directly from another extension to your alternate phone number
• Calls can be transferred by internal users to your alternate phone number
• Calls can be transferred using the Transfer Call options available from your Personal Assistant or
Personal Business Assistant to your alternate number
• Using mobile twinning, calls can ring your alternate phone number and your internal extension
simultaneously
Unless your system administrator has configured this mode differently, you must know the phone number
of the phone that answered the call, that is, the extension number or the external telephone number, in order
to pickup the connected call.
Your phone must be able to receive another call. That is:
• A line must be available
• Do Not Disturb (DND) must be off
• Call forwarding must be off
The connected call pickup feature must be enabled.
Your system administrator may disable this feature due to privacy concerns.
To change phones during a call
1. From the phone that you want to transfer the call to, dial *27 <called phone number>. The called
phone number can be an internal extension number or an external phone number, and refers to the
number of the phone that answered the call. Your system administrator may configure this option so
that you can only pickup connected calls from your cell phone using your desk phone. If this is the
case, then dial *27 only. To connect the call, the phone that you are dialing from rings.
2. Answer the ringing phone. When you answer the phone, the call automatically connects to this phone,
and is dropped from the phone that you originally answered the call with. The call is transferred from
one phone to another silently, so the user may be unaware that you have changed phones.
619510003-1A
Copyright © 2009 ADTRAN, Inc.
65
Using SIP Phones
66
Enterprise Communications Server
Copyright © 2009 ADTRAN, Inc.
619510003-1A
Enterprise Communications Server
7
Faxing
Faxing
This chapter provides information about how to send and manage fax documents. A fax printer driver is
included, which allows you to send a fax directly from whichever application you are using. There is also a
Fax Wizard to help you with fax transmissions. As with other features, you can select recipients quickly
from those listed in your Outlook Contacts or enter the recipient fax number yourself. You can also set an
account code to apply to the fax numbers that you choose.
This chapter also includes an overview of how faxes are received, and how to set up automatic
notifications when you receive a fax.
This chapter covers the following topics:
• Overview on page 67
• Sending Faxes on page 68
• Receiving Faxes on page 91
Overview
Use the Faxes menu to send and manage fax documents and their cover pages from the UC client. There
are several methods of sending faxes including:
•
•
•
•
•
Sending a fax from other applications using the ADTRAN Fax print driver
Sending a cover page only from the UC client using Quick Fax
Sending a prepared fax from the UC client
Automatically sending faxes requested by callers using the Fax-on-demand element in a service.
Sending faxes to a specific fax number using the Send fax element
The Faxes menu is not used for receiving faxes. Incoming faxes are received and viewed through a user’s
mailbox, for example, through Microsoft Outlook, Microsoft Exchange Server, Lotus Notes, or through an
Integrated messaging client (a Mailboxes navigation bar on the user’s UC client) or IMAP4.
The UC server can always receive a fax, provided adequate fax channels are available, whenever a fax tone
is detected.
Other methods of receiving faxes include:
• A dedicated fax number (fax identity). That is, a Personal Fax DID (direct-inward-dial) number.
• A shared voice and fax number (using the same identity)
You can also use the receive fax element in a service to customize receive fax behavior.
619510003-1A
Copyright © 2009 ADTRAN, Inc.
67
Sending Faxes
Enterprise Communications Server
Sending Faxes
You can send a fax document from another application or using the Faxes menu of the UC client. When a
fax document is ready to send, the fax is added to the fax queue. Before you send a fax, you can change the
user that you want to send the fax from. This is useful if a user manages several mailboxes, or as part of a
Fax-on-demand element.
You can send a fax cover page only using Quick Fax. For more information, refer to
Sending cover pages only using Quick Fax on page 90.
Sending faxes from other applications using the ADTRAN Fax Printer
You can send faxes from other applications using the ADTRAN Fax Printer. You can also change user
profiles to send a fax from another user, or to save a fax to another user’s profile.
To send a fax document from another application
1. Open the document that you want to send as a fax.
2. Select File > Print to open the Print dialog box.
3. From the printer name list select the ADTRAN Fax Printer, and select OK.
4. If you are prompted, enter the user name and password for the user from which you want to send the
fax, and select OK.
68
Copyright © 2009 ADTRAN, Inc.
619510003-1A
Enterprise Communications Server
Sending Faxes
5. In the UC client fax printer dialog box, select one of the following:
• Send now—sends the fax now, after having made your fax selections
• Save to file—allows you to save the file as a fax to send later
To change the user from which you want to send the fax, refer to To change users when
sending or saving a fax on page 70.
6. If you select Save to file, refer to To save a document as a fax on page 69.
7. If you select Send now, select OK to open the Fax Recipients dialog box.
8. Select Addresses to select recipients from your Outlook Contacts list. Otherwise, type the recipient
names and fax numbers.
9. Select Add to List for each recipient that you specify.
To delete a recipient from the Recipient list, select the recipient and then select Remove.
10. Select Next and the Fax Scheduling dialog box opens.
11. Specify when you want to send the fax, select Next, and the Select Cover Page dialog box opens.
12. To include a fax cover page select Yes, and double-click a folder to view its contents.
13. Select the cover page that you want, select Next and the Cover Page Details dialog box opens. Use the
arrow if you want to return to the previous folder.
Go back arrow
14. Type the subject and notes that you want to add to the cover page, and then select Next.
15. At the Finished menu select Finish. The fax is sent according to the instructions.
Saving a document as a fax to send later
To save a document as a fax
1. Open the document that you want to save as a fax.
2. Select File > Print to open the Print dialog box.
3. In the Name list, select the ADTRAN Fax Printer, and select OK.
619510003-1A
Copyright © 2009 ADTRAN, Inc.
69
Sending Faxes
Enterprise Communications Server
4. If you are prompted, then enter the user name and password for the user from which you want to send
the fax, and select OK.
5. If the Server dialog box opens then select UC Server from the list, enable the Save server as default
check box, and select OK to open the UC client Fax Printer dialog box.
6. Enable the Save to file button.
7. Select the Browse button to open the Select Fax Name dialog box.
Browse Button
8. In the text box, type a name for the file and then select Select.
9. On the Fax Printer dialog box, select OK. The fax document is saved in your fax documents folder.
Changing users when sending a fax or saving a fax to send later
When you send a fax from another application, or when you save a document as a fax to send later, you can
change the user that you want to send or save the fax from. This is useful if a user has several mailboxes, or
as part of the Fax-on-demand element.
If you are faxing from another application, or saving a document as a fax, then from the Print dialog once
you have selected the ADTRAN Fax Printer and selected Print, then you are presented with the UC
client Fax Printer dialog.
To change users when sending or saving a fax
1. From the UC client Fax Printer dialog box, select the Change user button.
Change user button
2. Type the user name and password for the user from which you want to send the fax. The user’s
information appears in the Current user information section of the Fax Printer dialog box.
3. Select OK.
70
Copyright © 2009 ADTRAN, Inc.
619510003-1A
Enterprise Communications Server
Sending Faxes
Sending faxes using the Faxes menu in the NetVanta UC Client
From the UC client, to get the Faxes menu select the Faxes navigation bar.
For information about sharing faxes, refer to Importing and Exporting on page 173.
Content pane
Navigation pane
Preview pane
The Faxes menu displays a Navigation pane, Content pane, and Preview pane.
The Navigation pane displays the fax folders. You can use these to store fax documents and cover pages
that are saved to disk. The Queue folder contains the list of fax transmissions that you have scheduled.
Each entry includes the recipient’s name and fax number, the number of pages to be transmitted, the time
and date of transmission, and the cover page that you have associated with it.
The Content pane displays the contents of a folder when you select it.
The Preview pane provides a partial view of a fax document that you select. As you scroll through the list
of available fax documents, you can view them in the Preview pane.
Use the Page up and Page down commands on the Preview toolbar to view multiple pages of a fax
document.
Page down
Page up
Use the Rotate commands on the Preview toolbar to change the orientation of a fax in the Preview pane.
619510003-1A
Copyright © 2009 ADTRAN, Inc.
71
Sending Faxes
Enterprise Communications Server
You can rotate only one page of a fax document, or the entire document.
Rotate single page
180 degrees
Rotate single page left
Rotate single page right
Rotate document
180 degrees
Rotate document left
Rotate document right
To view faxes in more detail, you can use the Fax Viewer. For more information about the Fax Viewer,
refer to Managing outgoing faxes on page 73.
The Faxes menu is not used to receive faxes. If you are an Exchange user, any faxes that
you receive can be viewed in your Outlook Inbox. Local message store users can view
faxes through the integrated client.
To send a fax using the Faxes menu
1. Select the Faxes navigation bar to open the Faxes menu.
2. Select the Fax Documents folder containing the document that you want to send. The folder’s
contents are listed in the content pane.
Faxes Folder
3. Select the fax document that you want to send.
4. Select File > Print to open the Print dialog box.
5. Follow steps 3 to 18 in Sending faxes from other applications using the ADTRAN Fax Printer on
page 68.
To specify fax numbers and account code
1. Select the telephone icon in the Fax Recipients dialog box.
Telephone icon
2. Type the area code and telephone number for the fax that you want to specify.
72
Copyright © 2009 ADTRAN, Inc.
619510003-1A
Enterprise Communications Server
Sending Faxes
3. Choose a country code from the Country code list.
4. Enable the Use Account Code check box. The administrator must have enabled this option in order
for it to be available.
5. Type an account code in the text box, and select OK.
Sending faxes to a specific fax number using the Send Fax element
The Send Fax element allows you to set up a list of fax documents to be sent to a specific fax number. You
can specify the fax number, choose a cover page, and then select the list of documents that you want to
send. For more information, refer to Send Fax element on page 124.
Automatically sending faxes requested by callers using a Fax-ondemand element
You can use a Fax-on-demand element to set up a fax-on-demand service. The Fax-on-demand element
allows you to select a fax document and an accompanying cover page, and then have the fax transmitted to
callers who select the service from a menu. When callers select Fax-on-demand, they are prompted to enter
a fax number. The fax that you selected is then transmitted. For information about using the Fax-ondemand element, refer to Fax-on-demand element on page 128.
Managing outgoing faxes
You can preview or print fax documents that you have prepared for transmission. Likewise, you can
prepare a document, save it, and make it available for transmission at a later time. Prepared fax documents
can be stored in folders for efficient organization and easy retrieval. You can also copy or rename a fax.
A fax transmission report is created and sent with each fax that is sent successfully. A fax transmission
report consists of a graphic page image that contains both the text-based transmission report, and a
reduced-size image of the first page of the fax. The report includes information such as the date and time
the fax was sent, sender’s name, fax number, and total number of attempts. Depending on how your system
has been configured, you may be able to print the fax transmission report, along with the first page of the
fax, by using the File > Print First Page command in the Fax Viewer.
Fax transmission reports are sent to your Sent Items folder when a fax is sent successfully. If the fax is
unsuccessful, an email stating the failure appears in your mailbox.
To preview a fax document
1. Select the Faxes navigation bar to open the Faxes menu.
2. Select the fax documents folder containing the document that you want to preview. The folder’s
contents are listed in the content pane.
Faxes Folder
619510003-1A
Copyright © 2009 ADTRAN, Inc.
73
Sending Faxes
Enterprise Communications Server
3. Right-click the fax document that you want to preview, and select Open to display the fax in the Fax
Viewer.
74
Copyright © 2009 ADTRAN, Inc.
619510003-1A
Enterprise Communications Server
Sending Faxes
.
Use the zoom control icons to zoom in or out of the fax.
Zoom in
Zoom out
Use the rotate control icons to rotate only one page of a document, or the entire document. Rotate to the
left, right, or 180 degrees.
Rotate single page
619510003-1A
Rotate entire document
Copyright © 2009 ADTRAN, Inc.
75
Sending Faxes
Enterprise Communications Server
Use the page control icons to scroll through a multiple-page document.
Previous page
Next page
To print the fax document from the Fax Viewer, select the printer icon on the Fax Viewer
toolbar.
To print a fax document
1. Select the Faxes navigation bar to open the Faxes menu.
2. Select the fax documents folder containing the document that you want to print. The folder’s contents
are listed in the content pane.
Faxes Folder
3. Right-click the fax document that you want to print, and select Open to display the fax in the Fax
Viewer.
4. Select File > Print Setup to open the Print Setup dialog box.
5. Select a printer, and select OK.
To print the first page only of a fax document
1. Select the Faxes navigation bar to open the Faxes menu.
2. Select the fax documents folder containing the document that you want to print. The folder’s contents
are listed in the content pane.
3. Right-click the fax document that you want to print, and select Open to display the fax in the Fax
Viewer.
4. Select File > Print First Page to print the first page only of the fax. Depending on how your system
is configured, the fax transmission report may also be printed.
To rename a fax document
1. Select the Faxes navigation bar to open the Faxes menu.
2. Select the fax documents folder containing the document that you want to rename. The folder’s
contents are listed in the content pane.
3. Right-click the fax document that you want to rename, and select Rename.
4. Type a new name for the fax document.
76
Copyright © 2009 ADTRAN, Inc.
619510003-1A
Enterprise Communications Server
Sending Faxes
To copy a fax document
1. Select the Faxes navigation bar to open the Faxes menu.
2. Select the fax documents folder containing the document that you want to copy. The folder’s contents
are listed in the content pane.
3. Right-click the fax document that you want to copy, and select Duplicate. A copy of the fax
document appears in the content pane, with the words “Copy of” before its name. You can rename the
copied document.
To delete a fax document
1. Select the Faxes navigation bar to open the Faxes menu.
2. Select the fax documents folder containing the document that you want to delete. The folder’s
contents are listed in the content pane.
Faxes Folder
3. Right-click the fax document that you want to delete, and select Delete.
4. Select Yes to confirm the deletion.
When you create a fax document for transmission at an undetermined time, you can save it to a fax
documents folder. That makes it easy to find the fax when you open the Faxes menu and schedule its
transmission.
To create a folder for fax documents
1. Right-click anywhere in the content pane.
2. Select New > Folder. A new folder is added is added to the list in the content pane.
3. Type a name for the folder.
To put a fax document in a folder
Select the fax document that you want to store in a folder and drag it to the folder where you want to store
it.
Select a folder to view its contents.
On the toolbar, use the Go back arrow to return to the list previously displayed in the
content pane.
619510003-1A
Copyright © 2009 ADTRAN, Inc.
77
Sending Faxes
Enterprise Communications Server
Viewing the fax queue and status
Select the Queue icon in the navigation pane of the Faxes menu to view all the faxes that you have
scheduled for transmission. You can view the list of faxes that you have prepared, delete or cancel
transmission, suspend transmission indefinitely, reschedule transmission, and forward faxes. You can also
change the transmission by adding or removing recipients.
When a fax has been successfully transmitted, it is removed from the fax queue. You receive an email
message signaling successful transmission.
The system administrator has set the maximum number of transmission attempts. If a fax is not
successfully transmitted after the maximum number of attempts, you receive an email message to inform
you about the failure. When you send a fax using the ADTRAN fax printer driver, a fax transmission report
appears in your inbox. In the case of visual clients such as Microsoft Exchange, Lotus Notes, IMAP4, or
Integrated Messaging client, a successful fax transmission report appears in your Sent Items folder. If the
fax is not sent successfully, a failed fax transmission report appears in your inbox.
The fax transmission includes a history of the attempts and outcome of the fax. A fax transmission report is
also available in the call logs.
To view the fax queue
1. Select the Faxes navigation bar to open the Faxes menu.
2. Select the Queue folder icon. The folder’s contents are listed in the content pane.
For each fax in the list, you can see the recipient’s name and fax number, the scheduled transmission time
and date, and the number of pages including the cover page.
To view an individual fax listed in the fax queue
1. Select the Queue folder. Faxes scheduled for transmission are listed in the content pane.
2. Right-click the fax that you want to view, and select Open.
To change recipients or fax numbers of a fax listed in the fax queue
1. Select the Queue folder. Faxes scheduled for transmission are listed in the content pane. You can
change a scheduled fax only if it is in waiting status.
2. Right-click the fax that you want to change, and select Modify. The Recipients dialog box opens.
3. Make the changes that you want, and then select Next.
4. To remove a recipient from the list, select the recipient in the list and then select Remove.
5. To change a recipient’s fax number, select the recipient and then make the change.
6. Select Next until the Finished menu appears.
7. Select Finished.
78
Copyright © 2009 ADTRAN, Inc.
619510003-1A
Enterprise Communications Server
Sending Faxes
To reschedule transmission of a fax listed in the fax queue
1. Select the Queue folder. Faxes scheduled for transmission are listed in the content pane. You can
reschedule a fax only if it is in waiting status.
2. Right-click the fax whose transmission you want to reschedule, and select Reschedule to open the
Scheduling dialog box.
3. Change the scheduling information that you want and then select Next.
4. Select Next until the Finished menu appears.
5. Select Finished.
To forward a fax listed in the fax queue
1. Select the Queue folder.
Faxes scheduled for transmission are listed in the content pane. You can reschedule a fax only if it is
in waiting status.
2. Right-click the fax that you want to forward, and select Forward to open the Recipients dialog box.
3. Select Addresses to select a recipient from your Outlook contacts list. Otherwise, type the name and
fax number of the recipient to whom you want to forward the fax.
When you forward a fax document, it appears as a new entry in the fax queue.
4. Select Add to list.
5. Select Next until the Finished menu appears.
6. Select Finished.
To suspend transmission of a fax listed in the fax queue
1. Select the Queue folder. Faxes scheduled for transmission are listed in the content pane. You can
suspend a fax only if it is in waiting status.
2. Right-click the fax whose transmission you want to suspend indefinitely, and select Suspend. The fax
transmission is suspended indefinitely. View this information in the status field.
To resume transmission of a fax that had been suspended
1. Select the Queue folder. Faxes scheduled for transmission are listed in the content pane.
2. Right-click the fax whose transmission you want to resume, and select Resume. The fax transmission
is resumed. View this information in the status field.
619510003-1A
Copyright © 2009 ADTRAN, Inc.
79
Sending Faxes
Enterprise Communications Server
To delete a fax listed in the fax queue
1. Select the Queue folder. Faxes scheduled for transmission are listed in the content pane.
2. Right-click the fax that you want to delete, and select Delete.
3. Select Yes to confirm the deletion.
Using fax cover pages
This section provides information about how to create and manage fax cover pages. A cover page is sent as
the first page of your document and usually includes your name, your company name and fax number, as
well as that of the recipient, and some information relating to the subject of the fax.
There is a folder for fax cover pages in the navigation pane of the Faxes menu. When you open the Cover
Pages folder, your fax cover pages are listed in the content pane. From there you can create new cover
pages and manage those that already exist. For information about sharing fax cover pages, refer to
Importing and Exporting on page 173.
You can also send only a fax cover page using Quick Fax.
Creating fax cover pages
To create a new fax cover page
1. Select the Faxes navigation bar to open the Faxes menu.
2. Select the Cover Pages icon.
3. Right-click anywhere in the content pane.
4. Select New > Fax Cover Page. A new untitled cover page appears in the content pane.
5. Type a name for the cover page. You can use the Fax Cover Page Editor to design the appearance and
content of the cover page that you created.
6. Select File > Save after you finish the design.
To use an existing fax cover page
1. Select the Faxes navigation bar to open the Faxes menu.
2. Select the Cover Pages icon.
3. Right-click the cover page that you want to use. You can use one of the cover pages that is included,
which are called FaxCoverPage 1 or FaxCoverPage 2.
4. Select Duplicate to create a copy of the cover page.
5. Right-click the copy of the cover page.
80
Copyright © 2009 ADTRAN, Inc.
619510003-1A
Enterprise Communications Server
Sending Faxes
6. Select Rename.
7. Type a new name for the fax cover page.
8. Double-click the new fax cover page to open the Fax Cover Page Editor and make the changes that
you want.
If you do not make a copy of the cover page before you make the changes, the application
permanently replaces the original cover page template with your changed copy.
Customizing fax cover pages using the Fax Cover Page Editor
Use the Fax Cover Page Editor to customize the cover pages that you create and to change those that
already exist. You can design and manipulate images to give your cover pages a distinctive look, according
to your needs and preferences. Your cover page is like a template: you can use it, store it, change it, and
reuse it as often as you want. You can access the Fax Cover Page Editor by creating a new fax cover page
or by editing an existing fax cover page.
To access the Fax Cover Page Editor
1. From the UC client select the Faxes navigation bar to open the Faxes menu .
2. To open the Fax Cover Page Editor, right-click anywhere in the content pane, select New in the
shortcut menu and select Fax Cover Page. Alternatively, to open an existing fax cover page, select a
fax cover page, right-click, and select Open.
3. In the content pane, double-click the icon of the new cover page.
Menu bar
Toolbar
Tool palette
Canvas area
Status bar
The Fax Cover Page Editor consists of a standard Menu bar and Toolbar, a Tool palette, Canvas area, and
Status bar. You design your cover page on the canvas using the tools from the tool palette together with the
619510003-1A
Copyright © 2009 ADTRAN, Inc.
81
Sending Faxes
Enterprise Communications Server
toolbar and menu commands.
The Menu bar contains the File, Edit, View, Insert, Format, Layout, and Help menus.
The Toolbar contains shortcuts to the most frequently used menu items. Hold the pointer over a button to
show the tooltips.
The Tool palette contains tools for drawing, editing, and organizing your cover pages.
The Canvas is the design area. This is where you customize your cover page.
The Status bar shows the pointer’s status. For example, if you hold the pointer over a toolbar button, a
description of the button’s function is displayed on the status bar. The coordinates at the bottom right of the
status bar provide precise information about the pointer’s position.
Inserting and changing labels and message information
You can include information related to the recipient, sender, and message with your cover page. This
information can include the recipient’s name and fax number, your name and telephone number, a subject
line and short note related to the fax, along with the transmission time and date, for example. A complete
list of information options is provided below.
Note that you cannot insert labels with recipient information. This is because recipients are callers who use
the Fax-on-demand services that you set up. Such callers are unknown to you. Callers are prompted to
enter their fax number when their call encounters the Fax-on-demand element. The fax number is captured
and automatically entered on the cover page. The recipient’s name may also be captured. This is the only
recipient information that appears. The same is true for transmissions initiated by the Send Fax element:
the recipient’s fax number and name will appear on the fax cover page.
When you create a cover page, you select the type of information you want to include from the list of
information options. You do not enter specific sender or message content manually when designing your
cover page, because content will vary depending on each Fax-on-demand service that you set up. Instead,
you insert labels for the information using the Fax Cover Page Editor. A field is created on the canvas for
each of the labels you insert.
To:
[Label]
{Recipient’s Name}
[Field]
When a fax is transmitted, the UC server captures the fax number and associated name then inserts the
information as content in the field following the appropriate label on the cover page.
When designing the cover page, you can edit a label’s font, style and content. For example, you can change
the “fax” label so that it appears as “facsimile number.” However, you cannot change the actual content
that is associated with the field. This is because the content information is captured when a caller initiates a
fax request using a service element.
82
Copyright © 2009 ADTRAN, Inc.
619510003-1A
Enterprise Communications Server
Sending Faxes
The recipient information labels that you can insert include:
•
•
•
•
•
•
•
•
•
•
•
•
•
Name
Fax number
Company
Street Address
City
State/Province
Zip/Postal Code
Country
Title
Department
Office location
Home telephone number
Office telephone number
The sender information labels that you can insert include:
•
•
•
•
•
•
•
•
•
Name
Fax number
Company
Address
Title
Department
Office location
Home telephone number
Office telephone number
The message information labels that you can insert include:
•
•
•
•
•
Note
Subject
Date sent
Number of pages
Number of attachments
To insert an information label
1. From the Insert menu, choose one of the following label types:
• Recipient
• Sender
• Message
In this example, the choice is Recipient.
619510003-1A
Copyright © 2009 ADTRAN, Inc.
83
Sending Faxes
Enterprise Communications Server
2. From the submenu, select the label that you want. The label is added to the cover page canvas. It
appears in a dotted rectangle. A field is inserted next to the label. The word recipient’s identifies the
field that appears in a second dotted rectangle.
The label name appears in bold, while the word recipient’s is italicized and has a
bracket in front of it. The label name is included as content on the cover page, but the
word recipient’s is not. The application inserts the recipient name associated with a fax
number when a caller initiates a fax request.
To reposition a label on the canvas
1. Select anywhere inside the label’s dotted rectangle and then drag it to the desired position.
2. Do the same with the dotted rectangle of the associated field.
To change the font and style of a label or field
1. Select the label or field that you want to change.
2. Do any of the following:
• Select a font from the font list.
• Select a point size from the size list.
• Select a style by selecting a style button.
You can use the familiar, standard font and text style commands from the toolbar to change the font and
style of the cover page, as described above. Alternatively, you can use the menu commands (Format >
Font) which also allow you to change the script and preview the font that you choose.
To change label content
1. Select the label content that you want to change.
2. Type the changes to the label content.
You can change label content, but you cannot change associated field content from
within the Fax Cover Page Editor. To change field content related to a specific fax
transmission, you need to do so from the fax queue. Select the fax that you want to
change and right-click to get a shortcut menu.
Using the tool palette to customize fax cover pages
The tools available on the tool palette of the Fax Cover Page Editor can be divided into two groups: the
Text and Drawing group, and the Alignment group.
84
Copyright © 2009 ADTRAN, Inc.
619510003-1A
Enterprise Communications Server
Sending Faxes
The tools in the Text and Drawing group allow you to draw shapes and insert text or bitmaps on the canvas.
The drawing tools can be selected only from the tool palette. They allow you to select, use shapes, and
zoom in on the canvas as you work on your design.
Selector
Lock selector
Zoom in
Zoom out
Zoom full page
Text
Line
Rectangle
Ellipse
Insert bitmap
Gridlines
When it is enabled, the Lock selector tool allows you to use the pointer to select and insert a shape, line, or
text on the canvas. Once you have inserted the item of your choice, the pointer resumes its standard
function.
If you select and insert a shape, line, or text when the Selector tool is enabled, the selector tool does not
resume the standard pointer function once you have inserted a shape, line, or text. The Selector tool
continues to insert the drawing tool that you chose from the tool palette. It does so until you select the Lock
selector tool. This disables the Selector tool.
To insert a shape
1. Select the Lock selector tool.
2. Select the shape that you want to insert.
3. Select on the canvas where you want to insert the shape and then drag down and to the right.
4. Release the mouse button to create the shape.
To reposition a shape on the canvas
1. Select the shape to select it.
2. Drag the shape to the position that you want.
You can turn on the gridlines. The gridlines help you to position shapes with ease on the
canvas.
619510003-1A
Copyright © 2009 ADTRAN, Inc.
85
Sending Faxes
Enterprise Communications Server
To change the shape and size of a shape
• Select a handle and drag to change the size or shape of the selected object.
For example, you can change the shape of a circle so that it becomes an ellipse by selecting the handle, as
indicated, and dragging to the right.
To delete a shape
1. Select the shape that you want to delete.
2. Press Delete.
To draw a line
1. Select the Lock selector tool.
2. Select the Line tool.
3. Select on the canvas where you want the line to begin and drag to draw the line.
4. Release the mouse button to create the line.
5. Select anywhere on the canvas to cancel the selection.
To change or reposition a line
1. Select the line that you want to change to select it.
2. Do either of the following:
• To shorten or extend the line, select one of the boxes at the end of the line and then drag as desired.
• To reposition a line on the canvas, select the line and drag it to a new position.
3. Select anywhere on the canvas to cancel the selection.
To delete a line
1. Select the line you want to delete to select it.
2. Press Delete.
To insert text
1. Select the Lock selector tool.
2. Select the Text tool.
3. Select where you want to insert the text.
4. Drag down and to the right. A dotted text box appears on the canvas.
86
Copyright © 2009 ADTRAN, Inc.
619510003-1A
Enterprise Communications Server
Sending Faxes
5. Type the text that you want to insert. Choose the font, size, and style commands on the toolbar to
change the text.
To insert text in a text box
1. Select the lock selector tool.
2. Select the text tool.
3. Select where you want to insert the text box and then drag to the right and down. A dotted text box
appears on the canvas.
4. Select Format > Line, Fill and Color to open the Line, Fill and Color dialog box.
5. Select the Draw border/line check box. The text box lines are now solid.
6. Select line thickness from the Thickness box.
7. Type the text in the text box. Change the font size and style as desired.
To insert a bitmap
1. Select the Insert bitmap tool to open the Open dialog box.
2. Select the bitmap that you want to insert.
3. Select Open. The bitmap is inserted on the canvas.
Using the Alignment tools to customize fax cover pages
The second group of tools in the Fax Cover Page Editor is the Alignment group. These tools are used to
space or align selected objects on the canvas. Alignment tool commands can also be found in the Layout
menu.
Bring to front
Send to back
Space evenly across
Space evenly down
Align left edge
Align right edge
Align top edge
Align bottom edge
To move a shape to the front/back in relation to a second shape
1. Select the shape that you want to move to the front/send to the back to select it.
2. On the tool palette, select Bring to front/Send to back, as desired.
The shape that you selected is brought forward/sent back.
619510003-1A
Copyright © 2009 ADTRAN, Inc.
87
Sending Faxes
Enterprise Communications Server
To space two or more objects evenly across/down the canvas
1. Select the objects that you want to space.
2. On the tool palette, select one of the following:
• Space evenly across
• Space evenly down
Spacing tools
The items that you selected are spaced evenly on the canvas.
To align two or more objects on the canvas
1. Select the objects that you want to align.
2. On the tool palette, select the alignment tool that you want to apply.
Alignment tools
The items that you selected are aligned by the edges that you specify.
Managing fax cover pages
To preview a fax cover page
1. Select the Faxes navigation bar to open the Faxes menu.
2. Select the Cover Pages icon. The fax cover pages are listed in the content pane.
3. Select the fax cover page that you want to preview.
4. In the preview pane, select Download to get the file from the server. The cover page appears in the
preview pane.
88
Copyright © 2009 ADTRAN, Inc.
619510003-1A
Enterprise Communications Server
Sending Faxes
5. Use the cover page toolbar to view the cover page.
Zoom to
Fit All
Zoom in
Page up
Print
Normal
Page down
Rotate single page
180 degrees
Rotate single page left
Rotate single page right
Rotate document
180 degrees
Rotate document left
Rotate document right
To rename a fax cover page
1. Select the Faxes navigation bar to open the Faxes menu.
2. Select the Cover Pages icon. The fax cover pages are listed in the content pane.
3. Right-click the cover page that you want to rename.
4. Select Rename.
5. Type a new name for the cover page.
6. Select the icon of the new cover page to make the change.
To copy a fax cover page
1. Select the Faxes navigation bar to open the Faxes menu.
2. Select the Cover Pages icon. The fax cover pages are listed in the content pane.
3. Right-click the cover page that you want to copy.
4. Select Duplicate. The copy of the cover page appears in the content pane, with “Copy of” before its
name. You can rename the cover page if you want to.
To delete a fax cover page
1. Select the Faxes navigation bar to open the Faxes menu.
2. Select the Cover Pages icon. The fax cover pages are listed in the content pane.
3. Right-click the cover page that you want to delete.
619510003-1A
Copyright © 2009 ADTRAN, Inc.
89
Sending Faxes
Enterprise Communications Server
4. Select Delete.
5. Select Yes to confirm the deletion.
To edit a fax cover page
1. Select the Faxes navigation bar to open the Faxes menu.
2. Select the Cover Pages icon. The fax cover pages are listed in the content pane.
3. Right-click the cover page that you want to edit.
4. Select Open. The fax cover page is displayed in the Fax Cover Page Editor.
Use the toolbar and menu commands to change the fax cover page.
5. Select File > Save.
Sending cover pages only using Quick Fax
The Quick Fax feature allows you to send a one-page fax message at any time, to as many recipients as you
choose. When you use Quick Fax, you send only a cover page. Your messages appear in the subject area.
To send a cover page only using Quick Fax
1. On the toolbar, select the Quick Fax icon to open the Fax Recipients dialog box.
Quick Fax icon
2. Select Addresses to select recipients from your Outlook Contacts list. If you are not choosing a
recipient from your Outlook Contacts list, type the names and fax numbers.
90
Copyright © 2009 ADTRAN, Inc.
619510003-1A
Enterprise Communications Server
Receiving Faxes
3. Select Add to List for each recipient that you specify.
To delete a recipient from the Recipient list, select the recipient and then select Remove.
4. Select Next to open the Scheduling dialog box.
5. Specify when you want to send the fax.
“When phone rates are discounted” means at midnight of the same day.
6. Select Next to open the Select Cover Page dialog box.
7. Select a cover page to use as your Quick Fax document.
8. Select Next to open the Cover Page Details dialog box.
9. Type the subject of your Quick Fax and then type a message in the Notes section.
10. Select Next and the Finished menu appears.
11. Select Finish. The Quick Fax message is sent according to the instructions.
Receiving Faxes
There are different methods of receiving incoming faxes.
• The default behavior for incoming faxes is that the UC server detects the tone that signals a fax, the UC
server receives the fax, and then stores it in a general mailbox. Using email, an office administrator can
then distribute received faxes to user mailboxes. No configuration is required for this method to work,
however, no notifications are sent to the user that they have a received a fax.
• A company can have a corporate fax attendant identity using a direct-inward-dial (DID) number, which
receives all incoming faxes.
• A user can have a shared voice and fax number, using the same identity.
A shared voice and fax number is not recommended for high numbers of incoming fax
calls. If an incoming fax call is answered at the user’s extension, the user will have
difficulties transferring the call into their service.
Incoming faxes are received and viewed through a user’s mailbox, for example, through Microsoft
Outlook, Microsoft Exchange, Lotus Notes, or through an Integrated messaging client (a Mailboxes
navigation bar on the user’s UC client) or IMAP4.
619510003-1A
Copyright © 2009 ADTRAN, Inc.
91
Receiving Faxes
Enterprise Communications Server
Notifying users of an incoming fax on a shared voice and fax identity
Personal Business Assistant (PBA) users can have an identity specifically dedicated to receiving faxes,
using a direct-inward-dial (DID) number, and a custom service that defines the behavior when a fax is
received.
Alternatively, PBA users can receive faxes on a shared voice and fax identity, but they are not
automatically notified of incoming faxes. In order to receive notifications that a fax has been received, a
Receive Fax service must be created.
The user or the administrator can create a Receive Fax service using the Receive Fax element. For more
information on creating a Receive Fax service, refer to Receive Fax element on page 126.
92
Copyright © 2009 ADTRAN, Inc.
619510003-1A
Enterprise Communications Server
8
Creating Distribution Lists
Creating Distribution Lists
Overview
You can use the Distribution Lists menu to manage personal distribution lists. Distribution lists allow you
to send voice and fax messages to groups of users using the telephone. For information about using the
distribution lists over the telephone, refer to Managing distribution lists on page 18.
Three folders are included with the Client application—Everyone, Personal, and System. The Everyone
folder contains all the UC Server users that are configured for the system. You cannot add a new folder to
the Everyone folder.
You can use the System distribution lists over the phone but you cannot create or manage them. Your
system administrator does this.
To create a personal distribution list
1. Select the Distribution Lists navigation bar to open the distribution lists menu.
2. Select the Personal folder.
3. In the right content pane right-click, and select New > Distribution List.
4. Type a Name for the distribution list folder.
5. Type a unique number in the List Identifier box.
6. If you want to record an audio identifier for the distribution list, select Record and follow steps 2 to 7
in the procedure, To record an audio identifier for a distribution list on page 94.
7. Select OK.
To add a user to a distribution list
1. Select the folder that contains the user that you want to add to the list.
2. Drag the user name to the distribution list folder that you want to copy it to.
To delete a user from a distribution list
1. Select the folder that contains the user that you want to delete from the list.
2. Right-click the name of the user that you want to delete, and select Delete.
619510003-1A
Copyright © 2009 ADTRAN, Inc.
93
Overview
Enterprise Communications Server
To change distribution list information
1. From the Personal folder, right-click the personal distribution list that you want to change, and select
Open.
2. In the General Information section, do either of the following:
• Type a new name in the Name box.
• Type a new number in the List Identifier box.
3. If you want to change the audio identifier, select Record and follow steps 3 to 7 of the procedure To
record an audio identifier for a distribution list on page 94.
4. Select OK.
To rename a personal distribution list
1. Select the Personal folder, and right-click the distribution list that you want to rename, and select
Open.
2. Type a name for the distribution list, and select OK.
To copy a personal distribution list
1. From the Personal folder, right-click the distribution list that you want to copy.
2. Select Duplicate.
To delete a personal distribution list
From the Personal folder, right-click the distribution list that you want to delete, and select Delete.
To record an audio identifier for a distribution list
1. In the content pane, right-click the personal distribution list for which you want to record an audio
identifier, and select Open.
2. In the Audio Identifier section, select the Record button.
3. In the Record Identifier for box, select the Record button.
4. Make sure that the audio device you want is selected.
5. In the Insert new audio list, select replace all.
6. Select record. If you are using your telephone, wait for the beep before you begin to record.
7. Select stop when you are finished. If you used your telephone, you can hang up the phone or press the
Release button on the phone to end the recording.
8. Select play to hear the recording.
9. Select OK to keep the recording.
94
Copyright © 2009 ADTRAN, Inc.
619510003-1A
Enterprise Communications Server
9
Creating Custom Call Answering Services
Creating Custom Call Answering Services
This chapter describes call answering services, managing services, and building services using the Service
Editor. This chapter covers the following topics:
•
•
•
•
•
•
•
Overview on page 95
Managing Services on page 96
Using the Service Editor on page 100
Working with Elements to Build a Service on page 102
Customizing Services using Parameters on page 104
Validating Services on page 105
Troubleshooting Services on page 106
Overview
A service is like a map that the UC server follows when it answers a call. Services are made up of elements
that are linked together to create a call flow. You can design simple services made up of two or three
elements, or you can create complex call flows made up of a dozen elements or more. Use the Service
Editor to build a service.
You can build a service using the Service Editor and then assign it to an identity so that incoming calls
follow the path that you specify. You can create a new service for the purposes of setting up a 1-800 line, a
sales information line, or a line associated with a menu of options that callers can select to obtain specific
information. Likewise, you can set up a fax-back service and activate it on an identity.
You can build a service using the Service Editor and then assign it to your extension so that incoming calls
follow the path that you have specified.
For information about sharing services, refer to Importing and Exporting on page 173.
For information about designing and changing services, refer to Using Elements to Create Call Answering
Services on page 107. Services can be renamed, copied, organized in folders, and deleted.
Accessing Services
To create a service or change information associated with it:
619510003-1A
Copyright © 2009 ADTRAN, Inc.
95
Managing Services
Enterprise Communications Server
• Select the Services navigation bar to open the Services menu. Services are displayed in the content pane.
Managing Services
You can create a service, and then you can preview, activate, rename, copy, or delete that service. You can
create and manage the folders in which you save your services.
ADTRAN has provided some samples services to get you started. Before creating a new
service, preview the samples provided to see if a sample service exists that is similar to
what you are looking so. If you find a similar service, copy it, rename it, and then modify
it suit your needs.
Many of the sample services provided by ADTRAN use database integration. If your UC
server version is not licensed for database integration then the database elements used
in the sample services will not work as intended.
To create a service
1. Right-click anywhere in the content pane.
2. Select New > Service to add a new service to the list in the content pane. The service icon denotes the
new service and the default name is “Service.”
Service icon
3. Type a name for the service.
You can also right-click the service and then select Rename. Type the new name again,
and then select the icon next to the service name to make the change.
96
Copyright © 2009 ADTRAN, Inc.
619510003-1A
Enterprise Communications Server
Managing Services
In addition to services that you create, you also have access to shared services that the Administrator
creates and manages. You cannot save changes that you make to shared services. You can copy a shared
service and assign it to an auto attendent, or use it as a template to create a service of your own.
To copy a shared service
1. In the Services navigation pane, double-click the Shared folder.
2. Select the shared service that you want to copy.
3. Hold down the CTRL key and drag the service to the folder to which you want to copy it.
Working with services
When you select the Services navigation bar, the services you create are listed by name in the content pane.
You can use the Service Editor to view a service and change it. If you want only an overview of a service,
you can preview it in the Services menu.
To preview a service
• In the content pane, select the service that you want to preview.
If the service is in the cache, it appears immediately in the preview pane. Otherwise, select the
Download button in the preview pane to get the preview.
To activate a service on your extension
1. Right-click the service that you want to activate, and select Activate Service.
2. Enable the extensions that you want to activate the service on, and select OK.
The service must already be created and validated before activating it.
619510003-1A
Copyright © 2009 ADTRAN, Inc.
97
Managing Services
Enterprise Communications Server
Once you have activated a service on your extension, you cannot “deactivate” that
service. To change the service, activate another service on your extension.
To rename a service
1. Right-click the service that you want to rename.
2. Select Rename.
3. Type the new name for the service.
4. Select the icon next to the service name to make the change.
To copy a service
1. Right-click the service that you want to copy.
2. Select Duplicate. The copy of the service appears in the content pane, with the words “Copy of”
before its name.
3. Rename the copy of the service by following all the steps in To rename a service on page 98.
To delete a service
1. Right-click the service that you want to delete.
2. Select Delete.
3. Select Yes to confirm the deletion.
Creating and changing service folders
You can create and manage folders in much the same way as services, and you can use folders to organize
your services.
Only one service can be active on your extension at any time.
When you want to change the active service on your extension, you can do so quickly if related services
are kept in the same folder. You might have built some services that you are not currently using, for
example, those designed for statutory holidays. You can store these together in a folder called “Holidays,”
and then retrieve them when you need them.
98
Copyright © 2009 ADTRAN, Inc.
619510003-1A
Enterprise Communications Server
Managing Services
To create a folder
1. Right-click anywhere in the content pane.
2. Select New > Folder to add a new folder to the list in the content pane. The folder icon denotes the
new folder and the default name is “New Folder.”
Folder icon
3. Type a name for the folder.
You can also right-click the folder and then select Rename. Type the new name again,
and then select the icon next to the folder name to make the change.
To rename a folder
1. Right-click the folder that you want to rename.
2. Select Rename.
3. Type the new name for the folder.
4. Select the icon next to the folder name to make the change.
To copy a folder
1. In the content pane, right-click the folder that you want to copy.
2. Select Duplicate. The copy of the folder appears in the content pane, with the words “Copy of” before
its name.
3. Rename the copy of the folder.
4. Select the icon next to the folder name to make the change.
To delete a folder
1. Right-click the folder that you want to delete.
2. Select Delete.
3. Select Yes to confirm the deletion.
To store a service in a folder
• Drag the service to the folder where you want to store it.
619510003-1A
Copyright © 2009 ADTRAN, Inc.
99
Using the Service Editor
Enterprise Communications Server
Using the Service Editor
To access the Service Editor
From the application:
1. Select the Services navigation bar to open the Services menu. Services are displayed in the content
pane.
2. To open the Service Editor, right-click anywhere in the content pane. In the shortcut menu, select New
> Service. The newly created service is listed in the content pane. Double-click the service and the
Service Editor opens.
Alternatively, you can open the Service Editor by double-clicking an existing service.
The Service Editor
Menu bar
Toolbar
Element
Tool Palette
of Elements
Canvas area
The Service Editor consists of a standard Menu Bar and Toolbar, a Tool Palette of Elements, and a Canvas
area. You design a service on the canvas using a combination of elements that you choose from the tool
palette.
The Menu Bar contains the File, Edit, View, Tools, and Help menus. Use these menus to manage the
service design.
The Toolbar contains visual shortcuts to the most frequently used menu items. Hold the pointer over a
button to show the tool tips.
100
Copyright © 2009 ADTRAN, Inc.
619510003-1A
Enterprise Communications Server
Using the Service Editor
The Tool Palette contains all available elements. It has Standard, Advanced, and Database element tabs.
You can dock the Tool Palette to either side of the window.
To access database information, the system must be licensed for database integration. If
you are not licensed for database integration, the Database tab in the Service Editor is
unavailable.
The canvas is the design area. All elements and links are shown here. Each element performs a separate
function within the call flow. Connections between elements are referred to as links, and they define the
call flow.
To view an element
• Drag an element from the tool palette to the canvas. The element is automatically positioned in the topleft corner. Each Element has an icon, title area, T-bar control, help button, and a connector pin
associated with it. Some elements have more than one connector pin depending on their function.
T-bar
Icon
Help
Title
Connector
Pin
The Icon is a visual representation of the element type.
In the Title area you can type a description of the element’s function.
The T-bar control displays the properties associated with the element. To save canvas space, select the Tbar control to collapse the element as needed. To restore information about a collapsed element, select its
T-bar control. The three modes of display are illustrated below.
Open element
Collapsed element
Icon only
Select the Help button to access the appropriate help page.
The Connector Pin on the element is used to make a connection to the next element in the call flow. An
element might have more than one connector pin, depending on its function. If you do not connect at least
one pin to another element, the call is terminated.
619510003-1A
Copyright © 2009 ADTRAN, Inc.
101
Working with Elements to Build a Service
Enterprise Communications Server
Working with Elements to Build a Service
To build a call flow for incoming calls, you need to create a service and then open the Service Editor. To
begin the call flow, drag elements one by one from the tool palette and link them using the connector pins.
Repeat this procedure with as many elements as you need until the service is complete.
To create a service
1. Open the Services menu.
2. Right-click anywhere in the content pane.
3. Select New > Service to add a new service to the list in the content pane. The service icon denotes the
new service and the default name is “Service.”
Service icon
4. Type a name for the service. If you are unable to type the name, right-click the service and then select
Rename. Type the new name, and then select the icon next to the service name to make the change.
To initiate a call flow for a new service
1. Double-click the new service to start the Service Editor.
2. Drag an element from the tool palette to the canvas to start the call flow. The element is automatically
positioned in the top-left corner.
The Service Editor’s default menu displays the Standard elements tab. To view advanced
or database elements, select the Advanced or Database tab located at the bottom-left
corner of the menu.
The Database tab is available only if the system is licensed for database integration.
To add an element to the call flow
1. Right-click the connector pin of the first element that you put on the canvas, and then select Insert.
2. In the shortcut menu of standard elements, select the element that you want to add. The element is
linked to the first one that you put on the canvas.
To access the shortcut menu of advanced or database elements, select Advanced or
Database on the standard elements shortcut menu. The Database tab is available only if
your system is licensed for database integration.
102
Copyright © 2009 ADTRAN, Inc.
619510003-1A
Enterprise Communications Server
Working with Elements to Build a Service
You can also drag the element that you want from the tool palette to the canvas. Position
the pointer over the connector pin of the existing element until a red box appears around
the connector pin, and then drop the new element onto the canvas.
Build a service by adding elements until the call flow is complete.
Using and deleting links
If you link two elements and then change your mind, you can delete the link and reuse the element in the
service.
To delete a link between two elements
1. Right-click the connector pin linking the two elements that you want to separate.
2. Select Delete link to delete the link.
When you delete a link between two elements, the elements are no longer connected on the canvas. At first
glance, one of the elements seems to have been deleted because it disappears from the place it occupied in
the call flow. The element is repositioned at the bottom-left corner of the canvas. From there, you can
connect it elsewhere in the call flow by linking it with another existing element.
To link existing elements
1. Select and drag from the connector pin to the icon of the element that you want to link.
2. Release the mouse button to link the elements.If you link an element and then decide that you no
longer want to include it in the call flow, you can delete the element from the canvas.
619510003-1A
Copyright © 2009 ADTRAN, Inc.
103
Customizing Services using Parameters
Enterprise Communications Server
To delete an element from the canvas
1. Select the icon of the element that you want to delete to highlight the element.
Delete
2. Select Delete on the toolbar to delete the element from the canvas, or press the Delete key.
Creating loop-back links
A loop-back link returns a call to a preceding element in the call flow. Loop-back links are useful for
repeating a set of menu options or for restating instructions to a caller who has failed to make a selection
on the phone keypad following a prompt.
To create a loop-back link
1. Select the connector pin and drag to the element icon that you want to loop back to.
2. Release the mouse to create the loop-back link.
3. Point to the connector link. The loop-back path is highlighted in red.
Loop-back path
Customizing Services using Parameters
You can use additional parameters in order to customize services. Parameters can be used in most elements
that accept input, such as email addresses, log entries, transfer numbers, or database comparisons.
Parameters can also be used in the Equals field in the Data Source Selector. For more information, refer to
Using the Data Source Selector on page 159.
Parameters can be used with the following elements:
104
Copyright © 2009 ADTRAN, Inc.
619510003-1A
Enterprise Communications Server
Validating Services
• The Assisted Transfer, Transfer Call, Deliver Messages, Notify Pager, and Send Fax elements.
• The Send Email element.
• The Text To Speech element.
• The Compare Data element.
• The Create Log Entry element.
Note that parameters can be used to obtain a specific record from a database.
Parameter
Value
Description
-pm
Additional Parameters List
This is a comma separated list of additional
parameters that are passed to the service when it
executes. These values can be accessed within a
service definition as special Text values whose
names are Parameter1, Parameter2, and so on.
The first value in the list becomes the value of
Parameter1 and so forth.
In the service editor, parameters are not visible by default. Once enabled, you can select parameters for the
elements that use them.
To view parameters
1. From the Services navigation bar, right-click in the content pane, select New > Service.
2. Select the service, right-click and select Open to open the Service Editor.
3. In the Service Editor, select View > Parameters to enable the Parameters. Once Parameters are
enabled, then parameter values are available for selection.
Validating Services
After you finish building your service, you can validate it. The Service Editor inspects the service for
logical errors or unresolved aspects of the call flow. If there is a problem with your service design, a
message box appears with information about the changes that you need to make.
To validate a service
1. On the toolbar, select the check mark.
Check mark
2. If the Service Editor message informs you that the service is valid, select OK. Otherwise, follow the
Service Editor’s suggestions about how to change your service to make it valid.
619510003-1A
Copyright © 2009 ADTRAN, Inc.
105
Troubleshooting Services
Enterprise Communications Server
Troubleshooting Services
If you are having trouble running services, note that particular issues may be noted in the log files. The
following is a list of potential service warnings that may be noted in the System Errors and Warning logs.
To troubleshoot a warning, locate the log entry below, and note the possible causes of and solutions for the
warning.
Not all errors and warnings necessarily require action. For more information on logs,
refer to Using the NetVanta UC Server Logs on page 185.
To view service warning logs
1. Select the Logs navigation bar to open the Logs menu. All logs are presented in the Content menu.
2. If the logs are not already sorted into categories, then double-click the Logs folder.
3. Select System Errors and Warnings to view the logs in that category.
4. Verify whether either of the following entries appear.
Log Entry
Possible Causes and Solutions
Failed to update %s's database
with the received fax. The fax will
be saved instead to the default
mailbox.
There was a problem communicating with the database defined in
the Receive Fax element.
Check your database connection parameters, and ensure that the
database is available.
The data source, %s, referenced in ServiceStateMachine when an element refers to a data source that
the element, %s, is unknown.
no longer exists. Verify the following:
1.The ODBC data source, if applicable, is correctly configured
2.The fields in the reference data source may have been changed
or deleted. Verify the data source configuration.
106
Copyright © 2009 ADTRAN, Inc.
619510003-1A
Enterprise Communications Server
Using Elements to Create Call Answering Services
10 Using Elements to Create Call Answering
Services
This chapter presents information about the individual elements that you use to build a service. This
chapter covers the following topics:
• Overview on page 107
• Using Standard Elements on page 111
• Using Advanced Elements on page 130
If your system is licensed for database integration then you will also have a Database
elements tab available. For more information, refer to Using Database Elements on
page 163.
Overview
Elements are the building blocks of the services that you create for use on your extension. By combining
elements on the canvas of the Service Editor, you design a call flow that routes incoming calls.
Elements are on the tool palette of the Service Editor. They are divided into three groups: standard,
advanced, and database. Each group has its own tab.
To access database information, the system must be licensed for database integration. If
you are not licensed for database integration, the Database tab is unavailable. For
more information, refer to Using Database Elements on page 163.
For some of the standard elements, such as Transfer callers, Deliver messages, Pager notification, Fax on
demand, and the Fax Wizard, you can specify an account code. An account code is a specified set of digits
that the caller must enter after completing the dialing pattern. Account codes represent an accounting
category, for example, expenditures, revenues, or salaries. They are also used to ensure security so that a
caller who does not have an account code cannot access specified information.
You can use account codes to allow long distance dialing, in which the telephone company applies the long
distance charges to your account code.
You can set a default account code that applies to any service. If the administrator has enabled the use of
account codes, you can specify the account that you want callers to use.
User context and service elements
When you start a service, it begins by operating in the context of the user who owns the identity (for
example, the extension) that received the call. The different service elements access mailboxes and objects
that are related to this user context. You can change the user context by modifying the service.
619510003-1A
Copyright © 2009 ADTRAN, Inc.
107
Overview
Enterprise Communications Server
The service user context is characterized by an authentication and a user profile (that is accessible from the
authentication).
How elements affect user context
A service is associated with an identity. When a service starts, the identity is used to locate a user profile
(the one that owns the identity). The user context is then established with the user profile that owns the
identity and the authentication that owns that profile.
Elements cannot change the user context. In particular, Transfer Call does not change the user context.
Synchronizing contacts
The Synchronize contacts mode is only available to users who have a client-side contact database, where
contacts are stored on a user's computer, and not on a server like Microsoft Exchange. Examples of clientside contact databases include Microsoft Outlook (running in Internet Only Mode), Outlook Express, and
Windows Address Book.
The UC server cannot access contacts that are stored in these client-side contact databases, so in order to
perform real-time contact matching this contact information must be copied and stored on the UC server.
Client-side contacts are synchronized with the information stored on the UC server every time a user starts
the UC client and when the UC client is shut down. If a user makes changes to their client-side contact
database while the UC client is open, and they want the UC server to recognize these changes without
having to shut-down and restart the UC client, the user can force a contact synchronization by using the
Tools > Synchronize contacts menu mode.
To synchronize contacts from a user's computer to the NetVanta UC Server
Select the Tools menu > Synchronize contacts.
Selecting values within elements using the value selector
Use the Value Selector feature, which is available on some elements, to specify the following types of
values:
Literal values
For example, a number or piece of text
References to data files
For example, a fax, announcement, or greeting
References to database values
References that have been fetched from a database
System values
For example, caller ID
Strings of digits
Gathered by a Gather Digits element
For example, the Play Announcement element allows you to play a dynamic value, announcement,
108
Copyright © 2009 ADTRAN, Inc.
619510003-1A
Enterprise Communications Server
Overview
greeting, or temporary recording to a caller that encounters the element in a service.
The values that are available using the Value Selector depend on how your service and system are set up.
For example, to use database values, a database element must be included in the service. To specify Gather
Digits values, a Gather Digits element must be included in the service.
To use database values and elements, your system must be licensed for database
integration.
Allowing callers to make temporary recordings within a service
Some elements allow you to select audio files such as announcements, greetings, database values, or
temporary recordings. Using the Record Announcement element, a caller can record audio into a
temporary recording, and elements like Play Announcement can be used to play the audio.
Temporary recordings exist only for the duration of the service. That is, when a service starts, no
temporary recordings exist. If a caller makes a temporary recording, the recording is stored in a temporary
file that can be played by another element. All temporary recordings are discarded when the service ends.
Up to ten temporary recordings can be created.
Temporary recordings can be referenced in the following elements:
•
•
•
•
•
•
Play Announcement element
Menu element
Send Email element (custom)
Record Announcement element
Add Data element
Update Data element
In order to use the Add Data and Update Data elements, your system must be licensed
for database integration.
619510003-1A
Copyright © 2009 ADTRAN, Inc.
109
Overview
Enterprise Communications Server
Temporary recordings can be used with a Send Email element, or Add Data and Update Data elements to
record audio for form filling applications, such as requesting quotes, or answering general customer
service questions.
110
Copyright © 2009 ADTRAN, Inc.
619510003-1A
Enterprise Communications Server
Using Standard Elements
Using Standard Elements
The standard elements tab is shown to the left. A brief description is provided for each element available.
Table 10–1: Standard elements
Hang-up element on page 9 Terminates the call
Play One-time Message element on page 10 Allows you to leave a personalized message
for a specific caller
Play Announcement element on page 10 Plays a prerecorded announcement to callers
Menu element on page 13 Allows callers to make a selection using the
telephone keypad
Flow control element on page 14 Controls the call flow according to phone
number or time and day restrictions
Voicemail element on page 16 Provides basic voicemail service
Deliver Messages element on page 16 Delivers voice or fax messages from a
selected mailbox to a specified number
Transfer Call element on page 18 Transfers the call to another number or
extension
Assisted Transfer element on page 19 Allows a transfer call recipient to accept or
deny a call based on the caller’s recorded
name
Notify Pager element on page 20 Enables you to send a message from the
application to a pager number
Send Email element on page 21 Allows you to be notified by email when a
caller moves successfully through the Send
Email element
Send Fax element on page 23 Allows you to send a list of faxes
Receive Fax element on page 24 Receives a fax and puts it in a mailbox
Fax-on-demand element on page 27 Captures a caller’s number and faxes the
selected document to a caller
Hang-up element
The Hang-up element terminates the current incoming call. If a call is present, this element hangs up.The
same result occurs if a call flow leads to an unconnected connector pin.
Hang-up element
Play One-time Message element
Including the Play One-time Message element in a service allows you to leave a personalized message for
619510003-1A
Copyright © 2009 ADTRAN, Inc.
111
Using Standard Elements
Enterprise Communications Server
a specific caller. Once a message has played, the call flow follows the “Message played” connection. Calls
Play One-time
Message element
for which there is no customized message follow the “No message for current caller” connection. Enable
the Stop when key pressed button to stop the message when the caller presses a key. Enable the Play entire
message button to make sure that the caller listens to the message in its entirety.
You must use the One-time Messages pane of the Assistant menu to record customized
one-time messages. Refer to “Customizing your Mailbox” on page 15, for more
information about the One-time Messages pane.
Play Announcement element
Play Announcement
element
The Play Announcement element plays prerecorded audio to callers including audio files stored in a
database, announcements, greetings, or temporary recordings. You can select one of the prerecorded
announcements included with the UC server, or one that you recorded. Alternatively, you can record one as
you build the call flow.
Make sure that there is a sound card installed on the computer that you are using.
112
Copyright © 2009 ADTRAN, Inc.
619510003-1A
Enterprise Communications Server
Using Standard Elements
Play
Database Values
Supports playing audio stored in a data source. The audio must first
be fetched using a Fetch Data element on page 164, or a Dial for Data
element on page 165. Database values come from a data source
element and are not directly affected by user context.
Note: Your system must be licensed for database integration in order
to use this mode. In the Service Editor, if you have the Database tab of
elements available, then your system is licensed for database
integration.
Announcements
Announcements come from the list that belongs to the user profile in
the user context. For more information, refer to User context and
service elements on page 107.
Greetings
You can select [Called Extension], or [Selected Extension]. The
[Selected Extension] mode is available to Administrators only. If you
select Greetings, then select a Greeting type, as described below.
Temporary Recordings
Temporary recordings can be used to record audio temporarily, after a
service has started. Use the Select the Advanced tab on the tool
palette to view the advanced elements. A brief description is provided
for each element that is available. Record Announcement element on
page 131 to record the audio for a specific temporary recording. The
recordings are then stored in a temporary file, which can be played by
another element that plays audio such as the Play Announcement
element. All temporary recordings are discarded when the service
ends. Up to 10 temporary recordings can be made. For more
information on temporary recordings, refer to Allowing callers to make
temporary recordings within a service on page 109.
Greeting type
The Greeting type is only enabled if Greetings was selected for the Play mode.
Active Greeting
This is the default greeting.
Internal Greeting
Internal greetings are intended for callers calling from extensions at
your workplace.
External Greeting
External greetings are intended for callers calling from outside your
workplace.
Out-of-Office Greeting
Out-of-Office greetings are typically enabled when you are out of the
office for an extended period of time.
Mailbox Identifier
The mailbox identifier consists of your name. This greeting is typically
used when callers are transferred to your extension.
You do not need to specify the mailbox from which the greeting is played. Your system administrator does
this.
The Play status message mode pre-empts the user’s greeting message and cannot be interrupted.
619510003-1A
Copyright © 2009 ADTRAN, Inc.
113
Using Standard Elements
Enterprise Communications Server
• Enable the Stop when key pressed button to stop the message when the caller presses a key.
• Enable the Play entire message button to make sure that the caller listens to the message in its entirety.
To record an announcement for a Play Announcement element
1. On the Play Announcement element, select the record button.
2. In the Select Announcement dialog box, type a name for the announcement that you want to record.
3. Select Select to start the Audio Editor.
4. Select the record button and the Record Audio dialog box opens.
5. Select at the beginning from the Insert new audio list.
6. Select the icon for the computer audio device. The icon is enclosed by a dotted line.
7. Select the record button and then record the message. As you record, the clock runs and the red record
button turns grey.
8. Select the stop button when you are finished.
9. Select OK to keep the announcement.
10. Select File > Update.
To play a greeting from a mailbox using a Play Announcement element
1. On the Play Announcement element, select the Value Selector arrow on the Play box.
2. Select Greetings > Called Extension. If you specify [Called Extension], the greeting is fetched from
the user profile in the user context.
To enable the Play status message mode for greetings
On the Play Announcement element, enable the Play status message button.
Make sure that the Play status message mode is enabled on a corresponding voicemail
element (refer to Voicemail element on page 118).
To play temporary recordings
On the Play Announcement element, select the Value Selector arrow, select Temporary Recordings, and
select one of the ten temporary recordings available. You must use the Record Announcement element in
the service in order for a caller to record the audio to a temporary file.
Menu element
The Menu element allows you to make an announcement and then direct the call flow based on the DTMF
input received when a caller presses a number on the telephone keypad.
This element can play an announcement, database value, greeting, or temporary recording before it takes
114
Copyright © 2009 ADTRAN, Inc.
619510003-1A
Enterprise Communications Server
Using Standard Elements
the specified menu action. It retrieves announcements from the set of announcements that belong to the
user profile in the user context. Database values come from a data source element and are not affected
directly by user context. If you specify [Called Extension], the greeting is fetched from the user profile in
the user context.
Menu element
Temporary recordings are created using the Record Announcement element, to record the audio for a
specific temporary recording after a service has started, which is discarded after the service ends. For more
information on temporary recordings, refer to Allowing callers to make temporary recordings within a
service on page 109.
Callers are allowed to try only three times to select from the menu. If they make another attempt, they
follow the “Too many attempts” connector pin.
When callers press a selection key, they move through the connector pin to the next element, depending on
their choice. When you are finished setting selection keys, you can connect an element for each selection
key that you set.
To set selection keys on a Menu element
1. In the first On list box, select the number that you want. The number one appears by default.
2. Select Add to add an On list box for setting additional keys. The UC server enters the key in
numerical sequence. You can also select a key from the list. You can set a maximum of 12 keys. Keys
range from one to nine, then include zero, *, and #.
3. To delete a selection key on a Menu element, select the trashcan icon to the left of the key that you
want to delete. Remember to change the announcement associated with the menu so that it reflects the
changes.
For information about recording an announcement for the Menu element, refer to To
record an announcement for a Play Announcement element on page 114.
619510003-1A
Copyright © 2009 ADTRAN, Inc.
115
Using Standard Elements
Enterprise Communications Server
Flow control element
The Flow Control element acts as a decision tree, and allows for two different comparison methods:
matching based on phone numbers or on time of day and date. The call will be routed to the next element
based on a successful or failed match (a failed match routes the call through the Otherwise connector pin).
You can select either Phone Numbers or Times, which determines the comparison element.
For example, you could use the Flow Control element with a Receive Fax element to call your cell phone,
send a pager notification, or send an email to your personal email address, to notify you when you receive
a fax from a particular number after business hours.
Routing incoming calls based on phone numbers
The UC server compares the incoming caller ID to those telephone numbers included in the Flow Control
element list. Telephone numbers in the list can be entered manually, or they can be pulled from your
contact address book by using the value selector.
Flow Control element
- Phone Numbers
For more information, refer to Selecting values within elements using the value selector on page 108. For
information about contact address book synchronization, refer to Synchronizing contacts on page 108.
The UC server compares the numbers of incoming calls with those included in the list.
• If the numbers match, the call is routed to the subsequent element that you specify.
• If the numbers do not match, the call moves to the element connected to the Otherwise connector pin.
To set call flow according to an unknown phone number category
1. On the Flow Control element in the Compare list, select Phone Numbers.
2. Select the Value Selector arrow.
3. Select Contacts > Unknown.
4. Select one of the following categories:
• Unknown Number
• Private/Blocked Number
• Out-of-area Number
116
Copyright © 2009 ADTRAN, Inc.
619510003-1A
Enterprise Communications Server
Using Standard Elements
To enter a phone number manually
1. On the Flow Control element in the Compare list, select Phone Numbers.
2. Select the telephone icon to open the Enter Phone Number dialog box.
3. Type the phone number that you want in the Telephone number box, and select OK.
You can also enter a phone number by right-clicking the blank box and selecting New.
Routing incoming calls based on times and days
Flow Control element
- Times
You can specify days of the week and a time range. For time restrictions, if either the From or To box is
empty, a 24-hour period is assumed.
• Calls received within the specified time range are directed through the connector pin for Times.
• Calls received outside the specified time range move to the element connected to the Otherwise
connector pin.
To set call flow according to time restrictions
1. On the Flow Control element from the Compare list, select Times.
2. Enable the check boxes for the days of the week when the restrictions apply.
3. From the From list, select the hour and minutes when the time restriction begins. Use a 24-hour
clock.
4. From the To list, select the hour and minutes when the time restriction ends. Use a 24-hour clock.
619510003-1A
Copyright © 2009 ADTRAN, Inc.
117
Using Standard Elements
Enterprise Communications Server
Voicemail element
The voicemail element provides basic voicemail service.
voicemail element
It plays the mailbox greeting and can take a message from a caller. If the caller presses the access number
for mailbox management, the voicemail element allows mailbox management for the specified
mailbox.You do not need to specify the mailbox where messages are stored. Your system administrator
does this.
The Play status message mode is enabled by default. The status message pre-empts the user’s greeting
message and cannot be interrupted. Make sure the Play status message mode is also enabled on a Play
Announcement element, if required.
Deliver Messages element
The Deliver Messages element sends voice and fax messages from a selected mailbox to the phone
numbers that you specify. Called Extension refers to the identity originally called. Selected Extension
refers to the identity selected in the last successful Select Extension element in the service. If there was
none, or the last one failed, it defaults to be the same as the Called Extension.
The UC server calls the sequence of numbers, in the order that you specify, until the call is answered. The
call recipient must enter the password associated with the selected mailbox to retrieve messages over the
phone. You can limit deliveries to new messages or allow full mailbox management.
Specify call numbers by using the telephone icon, or use the Value Selector. For more information, refer to
Selecting values within elements using the value selector on page 108. For information about contact
address book synchronization, refer to Synchronizing contacts on page 108.
118
Copyright © 2009 ADTRAN, Inc.
619510003-1A
Enterprise Communications Server
Using Standard Elements
You do not need to specify the mailbox from which messages are sent. Your system administrator does
this, so that messages for your extension are stored in your mailbox and delivered from there.To specify
phone numbers for the Deliver Messages element
Deliver Messages
element
1. Select the telephone icon.
2. In the Enter Phone Number dialog box, type a phone number in the Telephone number box.
You can also enter a phone number by right-clicking inside the Call box and selecting
New.
3. If you want to specify an account code, enable the Use account code check box and type an account
code in the box.
4. Select OK. The target number appears in the Call Number(s) list. The UC server calls the target
number when it attempts to deliver messages.
5. Repeat steps 1 to 3 to add more target numbers to the list. The UC server calls each number in the list,
according to the order you specify, until the call is answered.
Refer to Selecting values within elements using the value selector on page 108 to select
a dynamic value for the element.
To change the sequence of target phone numbers listed for Deliver Messages
1. Select the number whose ranking you want to change.
2. Select an arrow to move the number up or down in the list.
Up and down arrows
619510003-1A
Copyright © 2009 ADTRAN, Inc.
119
Using Standard Elements
Enterprise Communications Server
To delete a target phone number from the list for Deliver Messages
1. Select the telephone number that you want to delete.
2. Select the trash icon.
Trash icon
Transfer Call element
Transfer Call
element
The Transfer Call element transfers calls to another number.
If the transfer fails, the caller leaves the element through the Otherwise connector pin. The UC server
automatically adds a voicemail element to the Otherwise connector pin if you do not add an element.
You can specify an account code only if the Administrator enabled the account code feature.
The telephone number that you specify is subject to the outgoing call restrictions that are specified by the
Administrator.
To specify a transfer target for the Transfer Call element
1. In the Transfer call to section, select one of the following:
• This number—if you want to specify a number to transfer callers to
• The operator—if you want to transfer callers to the operator
2. If you selected this number, do one of the following:
• Use the Value Selector to specify a value.
• Select the telephone icon, and type the number where you want to transfer the caller.
• Right-click the This number box, select New, and type the phone number that you want.
For information about selecting a dynamic value using a Value Selector, refer to
Selecting values within elements using the value selector on page 108. For information
about contact address book synchronization, refer to Synchronizing contacts on
page 108.
120
Copyright © 2009 ADTRAN, Inc.
619510003-1A
Enterprise Communications Server
Using Standard Elements
Assisted Transfer element
The Assisted Transfer element allows a transfer call recipient to accept or deny a call based on the caller’s
recorded name.
Assisted Transfer
element
You can enter the telephone number to which you want to transfer calls. Specify the conditions under
which you want to prompt callers to record their name. When you enter a list of telephone numbers, calls
are transferred to the numbers in the order that they appear. You can use the arrow buttons to change the
order of numbers in the list.
A call moves to the element connected to the Call is accepted connector pin when the transfer recipient
answers and accepts the call. A call that is answered, and then declined by the recipient, moves to the
element connected to the Call is denied connector pin.
If the call is not answered, is answered but not accepted within 10 seconds, or is transferred to an invalid
number, the call moves to the element connected to the Otherwise connector pin.
The default is to wait 20 seconds for an answer before recalling an assisted transfer
attempt.
To specify a call number for the Assisted Transfer element
1. In the Call number(s) section, select the telephone icon to open the Enter Phone Number box.
You can also enter a phone number by right-clicking the Call number(s) box and
selecting New.
2. Type the telephone number to which you want to transfer callers.
3. From the Prompt list, select one of the following prompt types:
Never
619510003-1A
Never prompts the caller to record a name.
Copyright © 2009 ADTRAN, Inc.
121
Using Standard Elements
Enterprise Communications Server
Always
Always prompts the caller to record a name.
Unknown caller
Prompts the caller to record a name if there is no match in the contact list.
Use the Value Selector to select a dynamic value for the element. For more information,
refer to Selecting values within elements using the value selector on page 108. For
information about contact address book synchronization, refer to Synchronizing contacts
on page 108.
Notify Pager element
The Notify Pager element allows you to send a message from the UC server to a specified pager number.
The message sent can be a numeric message with an attached caller ID.
To specify a pager number for the Notify Pager element
Notify Pager element
1. In the Pager number to dial section, do one of the following:
• Use the Value Selector to specify a value. For more information, refer to Selecting values within
elements using the value selector on page 108. For information about contact address book
synchronization, refer to Synchronizing contacts on page 108.
• Select the telephone icon and type the pager number that you want
• Right-click the Pager number to dial box, select New, and type the pager number that you want
2. Enable the Wait check box if you want to specify a pause before paging.
3. In the Wait...secs then text box, type the number of seconds that you want the pause to last.
4. In the Send Message text box, type a prefix that you want as part of the message, before caller ID is
displayed on the pager. Numeric prefixes and suffixes are useful to identify calls that are delivered.
The prefix helps you differentiate between callers whose messages you have instructed the UC server
to deliver, and other callers to the paging system. For example, you can use a prefix such as 123 or
000 to signal deliveries.
5. Enable the Add Caller-ID check box if you want to have caller ID sent with your messages.
6. In the Append...to message text box, type information that is part of the messages sent following any
caller ID information displayed on your pager.
122
Copyright © 2009 ADTRAN, Inc.
619510003-1A
Enterprise Communications Server
Using Standard Elements
To specify an account code for the Notify Pager element
1. Select the telephone icon.
2. In the Enter Phone Number box, enable the Use account code check box.
3. Type an account code in the text box.
4. Select OK.
Send Email element
Using the Send Email element, you can specify the UC server to notify you, or someone else, by email
when a caller moves successfully through the Send Email element. For example, you could have an email
sent to your personal email address when a caller leaves a voice message for you after hours, or when you
receive a fax. You can specify the type of message that you want to send and the address where you want to
send it, including multiple email addresses. You can also send attachments with the email notification. For
example, you could attach a fax of a property listing, or audio describing a property, or some other type of
fax or audio specific to your particular business.
Selecting a Custom notification allows you to type or select information that you want to include in the
notification. You can combine typed text and selected values in the Subject and Body sections of the
element. In the call flow, the text and values are linked together. From the Attach field you can also select
attachments to send with the notification, such as announcements, greetings, temporary recordings, faxes,
or database values (for example, audio or fax).
Temporary recordings are created using the Record Announcement element. Using the Send Email element
with a temporary recording can be used as a form filling application, such as requesting quotes, or
answering general customer service questions, and so on. For more information on temporary recordings,
refer to Allowing callers to make temporary recordings within a service on page 109.
To specify the NetVanta UC Server to send an email when you receive a voicemail
message
1. Select one of the following from the Send list:
• Entire Message—sends an email of all the information associated with the voice message that you
received, including the voice message (as a .wav attachment)
• Notification—sends only the information associated with the voice message
• Short Notification—sends only some of the information associated with the voice message. This
mode is useful for small menu devices, such as cell phones, that are capable of receiving email.
• Custom—allows you to add information that you want to include with the email notification. This
includes sending attachments such as announcements, greetings, temporary recordings, faxes, or
database values (for example, audio or fax).
• Custom With Message—allows you to send a custom email with the latest mail message
Custom notification sends an email notification of calls to a user’s mailbox, whether the
caller left a message or not. All other types of notifications send email notifications
only when a caller leaves a message.
619510003-1A
Copyright © 2009 ADTRAN, Inc.
123
Using Standard Elements
Enterprise Communications Server
2. In the To email address box, type the email address where you want the notification sent. If you want
to enter more than one email address, type them with a semicolon separating each one.
Refer to Selecting values within elements using the value selector on page 108 if you
want to select a dynamic value for the To email address box. You can enter only one
dynamic value.
Make sure that you enter a valid email address. The UC server does not authenticate
email addresses used with the Send Email element.
To specify a custom notification
1. From the Send list, select Custom.
2. In the To email address box, type the email address where you want the notification sent. Use a
semicolon to separate multiple email addresses.
3. In the Subject box, type a subject for the email, or use the Value Selector to select a value.
4. In the Body box, type the body of the email, or use the Value Selector to select a value.
Refer to Selecting values within elements using the value selector on page 108 to select a
dynamic value for the To email address, Subject, Body, or Attach text box. You can enter
only one dynamic value.
5. In the Attach field, select a database value (audio or fax), fax, announcement, greeting, or temporary
recording.
Send Fax element
The Send Fax element allows you to send a list of faxes to a specified fax number.
Send Fax element
You can enter the fax number to which you want to send a fax message. A cover page can accompany your
fax message and you can select the fax documents to include in the list. You can choose to send a list of
faxes, the latest fax in your mailbox, all faxes in your mailbox, or all unread faxes in your mailbox.
124
Copyright © 2009 ADTRAN, Inc.
619510003-1A
Enterprise Communications Server
Using Standard Elements
You do not need to specify the mailbox from which messages are sent. Your system Administrator does
this.
To specify a fax number for the Send Fax element
1. On the Send Fax element, select the telephone icon.
2. In the Enter phone number text box, type the fax number where you want the fax messages sent to.
3. If you want to specify an account code, enable the Use account code check box and type an account
code in the box.
4. Select OK.
Refer to Selecting values within elements using the value selector on page 108 to select
a dynamic value for the element. For information about contact address book
synchronization, refer to Synchronizing contacts on page 108.
To specify a list of faxes for a Send Fax element
1. Select List of Faxes from the Send list.
2. Follow all the steps in To specify a fax number for the Send Fax element on page 125.
3. In the To section, select the Value Selector and select the database value or fax that you want to send.
The fax appears in the To list.
4. Repeat step 3 until all the faxes that you want are added to the list.
To include a cover page for the Send Fax element
1. On the Send Fax element, enable the Include cover page check box, which opens the Fax Cover Page
Details box.
2. Select the browse button to open the Select Cover Page box.
3. Select the fax cover page that you want to include.
4. Select Select. The name of the fax cover page appears in the Select cover page text box.
5. In the Fax Cover Page Details box, type information about the fax recipient, the subject of the fax, and
comments that you want to include on the cover page. You can use a combination of typed text and
dynamic values.
Refer to Selecting values within elements using the value selector on page 108 to select
dynamic values for the cover page information.
6. Select OK.
619510003-1A
Copyright © 2009 ADTRAN, Inc.
125
Using Standard Elements
Enterprise Communications Server
To send faxes in your mailbox using a Send Fax element
1. From the Send list, select one of the following:
• Latest Fax in Mailbox
• All Faxes in Mailbox
• All Unread Faxes in Mailbox
2. Follow all the steps in To specify a fax number for the Send Fax element on page 125.
3. If you want to include a cover page, follow all the steps in To include a cover page for the Send Fax
element on page 125.
4. From the From list, select the mailbox from which you want to send the fax. Called Extension refers
to the identity originally called. Selected Extension refers to the identity selected in the last successful
Select Extension element in the service. If there was none, or the last one failed, it defaults to be the
same as the Called Extension.
Receive Fax element
Your Personal Business Attendant (PBA) can automatically receive faxes without using
a Receive Fax element, however you may want to use the Receive Fax element in order
to customize the receive fax behavior, or to create a service specifically for receiving
faxes.
The default behavior for incoming faxes for any PBA users is that the UC server detects the tone that
signals a fax, the UC server receives the fax, and then stores it in the user’s mailbox. No additional
configuration is required, however using the default behavior, no notifications are sent to the user that they
have received a fax.
The Receive Fax element receives incoming faxes and places them into a specified mailbox or database.
Receive Fax element
Use the Receive Fax element along with other elements in a service to customize receive fax behavior.
Depending on the configuration, you may have a dedicated fax number or identity to receive faxes. In this
case you may want to use the Receive Fax element in a service to initiate some behavior, such as storing
the fax in a database. Alternatively, you may have a shared voice and fax number or identity, where you
receive voice and fax messages on the same identity or extension. If you are using a shared voice and fax
number, then you may want to create a Receive Fax service, for example, in order to receive notifications
that you have received a fax.
126
Copyright © 2009 ADTRAN, Inc.
619510003-1A
Enterprise Communications Server
Using Standard Elements
Using the Receive Fax Element in a Service
Save Fax to Mailbox
Called Extension
Selecting this mode enables you to save incoming faxes to your
mailbox, or the extension number that the caller called.
Selected Extension
This mode refers to the Select Extension element, which is available to
admin users only. If an admin user creates a service using the Select
Extension element, and makes this service available to other users by
saving it to the Shared folder, then PBA users will have this mode
available. However, PBA users should not select this mode when
creating their own service.
Save Fax to Database
Selecting this mode enables you to save incoming faxes to a database,
if your system is licensed for database integration. If you have the
Database tab available in the UC client Service Editor, then you can use
the Data Source Selector to save incoming faxes to a database. For
more information, refer to Using the Data Source Selector on page 159.
Note: If the Save Fax to Database mode is selected and the database is
unavailable, the incoming fax is delivered to the default mailbox.
Otherwise
If a problem occurs receiving a fax, then the call exits through the
Otherwise connector pin, and the fax is not received in the selected
mailbox.
When the Receive Fax element is used in a voice service, it's typically placed after a Menu element on
page 114. Callers are instructed using a Play Announcement element on page 112 that they can press a key
on the telephone dialpad to send a fax. For example:
"If you would like to send a fax, please press 5 and then press the Send button on your fax machine."
When the Receive Fax element is used in a dedicated fax service it is typically the first element in the
service, and it can be combined with other elements to create a custom fax service, such as saving the fax
to a database, or receiving notifications of the received fax.
Using the Receive Fax service
The Receive Fax service is a particular type of service that has additional requirements beyond regular
service requirements. If you are using the same identity to receive both voice and fax messages, then you
may want to use the Receive Fax element to create a specific Receive Fax service, for example, to send a
notification to a pager, a phone number, or an email address to notify you that you’ve received a fax.
Your system administrator may have created a Receive Fax service for all users, available in the
Services\Shared folder. If a shared Receive Fax service is available then you do not need to create your
own service, unless you want to create a custom service. If you do not have a shared Receive Fax service
available, or if you want a custom service, then you can create your own custom Receive Fax service.
Requirements for using a Receive Fax service on a shared voice and fax identity
• The Receive Fax service must be called Receive Fax.
• The Receive Fax service must contain a Receive Fax element.
• The Receive Fax element must appear as soon as possible within the service, typically the first element
619510003-1A
Copyright © 2009 ADTRAN, Inc.
127
Using Standard Elements
Enterprise Communications Server
of the service.
• You do not need to activate the Receive Fax service. When a fax call comes in, your active service will
be initiated. When the UC server hears the fax tone, it automatically stops the regular active service and
activates the Receive Fax service.
• The Receive Fax service must be saved in one of the following two locations:
• The shared folder so that it is available to all users in the system (that is, \Services\Shared\Receive
Fax)
• The user's root folder so that it is only available for that user (that is, \Services\Receive Fax)
Creating a Receive Fax service to receive fax notifications
In order to receive a notification of a received fax you can follow the Receive Fax element in a Receive
Fax service with any or all of the following elements:
• Send Email element
• Deliver Messages element (to send a phone message)
• Notify Pager element
If you want to specify the days of the week or times of day when you want notifications sent, or specify
from which phone numbers you want to be notified of a received fax, then use the Flow control element on
page 116.
Receive Fax Service Example
The following example shows how you might use the Receive Fax element in a Receive Fax service to
notify you during particular days or times, that an incoming fax has been received from a specific fax
number. The example below illustrates that when a fax is received during business hours from a specific
number, then notifications are sent to the user’s cell phone, pager, and personal email account.
Fax-on-demand element
The Fax-on-demand element allows the UC server to send a fax to callers who move through this element.
You can select the fax document to be made available and a cover page to accompany the fax.
128
Copyright © 2009 ADTRAN, Inc.
619510003-1A
Enterprise Communications Server
Using Standard Elements
Some callers might cancel their request. You can add an element to the service to handle such cases and
route the call to the next element in the call flow. To select a fax document for a Fax-on-demand
element
Fax-on-demand
element
On the Fax-on-demand element, select the Value Selector to select a fax document or dynamic database
value. The name and icon of the document or value appear in the Fax document to send list.
To preview a fax document that you selected, select the [...] button in the Fax document
to send section. The preview fax button works only with a real fax, not a database
reference.
To select a fax cover page to accompany the fax document for a Fax-on-demand element
1. On the Fax-on-demand element, enable the Include cover page check box.
2. In the Fax Cover Page Details dialog box, select the Browse button.
Browse button
3. Select a fax cover page.
4. Select Select. The cover page title appears in the Select cover page file text box of the Select Cover
Page dialog box.
5. In the Subject and Comments text boxes, type information that you want to include on the fax cover
page.
6. If you want to include dynamic information in the Subject and Comments text boxes, use the Value
Selectors.
You can include both text and value information in the Subject and Comments boxes of
the Fax-on-demand element.
7. Select OK.
619510003-1A
Copyright © 2009 ADTRAN, Inc.
129
Using Advanced Elements
Enterprise Communications Server
Using Advanced Elements
130
Copyright © 2009 ADTRAN, Inc.
619510003-1A
Enterprise Communications Server
Using Advanced Elements
Select the Advanced tab on the tool palette to view the advanced elements. A brief description is provided
for each element that is available.
Record Announcement element
on page 29
Allows callers with user accounts to record over an existing
announcement from a remote telephone
Take Message element on page 33 Triggers the recording of an incoming message for storage to a
mailbox
Advanced Menu element on
page 34
Allows callers to make a selection using the telephone keypad
Manage Mailbox element on
page 35
Allows callers to retrieve messages remotely
Change Mailbox Password
element on page 35
Allows users to change their mailbox password
Verify Password element on
page 36
Enables the service to request a password from callers and
ensure that a given password matches a specified one or the
password for a particular mailbox
Loop Counter element on page 37 Allows you to limit the number of times the call flow executes a
path
Text To Speech element on
page 37
Reads text to the caller
Gather Digits element on page 38 Keeps track of information that is entered by callers
Compare Data element on
page 38
Compares patterns of data and directs the call flow accordingly
Create Log Entry element on
page 39
Allows users to capture and export detailed call log entry
information
Record Announcement element
The Record Announcement element allows callers to record over an existing announcement or mailbox
greeting, record a temporary recording, or record into a database, using a remote telephone.
Record Announcement
element
619510003-1A
Copyright © 2009 ADTRAN, Inc.
131
Using Advanced Elements
Enterprise Communications Server
This element is useful for audio information services that must be updated on a daily basis or at regular
intervals. A user can update the recorded information remotely when you include this element in a service.
You can specify where to record an announcement or mailbox greeting. You can choose a specific file
location and an associated greeting type.
Instructing callers how to make a recording
The Record Announcement element sends a voicemail prompt tone to the caller, and then starts to record
the caller. You may want to use a Play Announcement element before the Record Announcement element
to instruct the caller on how to stop the recording. The caller must press a telephone key to stop recording.
Action
Key
Description
Stop recording\Plays menu
options
4-9, 0, #
Stops recording and prompts the caller with the menu
options for 1, 2, 3, and the * key on the telephone
keypad. If the caller does not subsequently press a key,
then after repeating the menu options three times, the
element keeps the current recording and the call flow
proceeds. If a caller presses keys 4 to 9 or 0, the
prompt menu is repeated the first time, then
subsequently has the same effect as if the 1 key was
pressed.
Listen to the recording
3
Stops recording, plays the recorded audio to the caller,
and then prompts the caller with the menu options.
Record again
2
Stops recording, discards the current recorded audio,
sends a voicemail prompt tone to the caller, and allows
the caller to start recording again. The caller must
press a telephone key to stop the recording.
Keep the recording/cancel
1
Stops recording, keeps the recorded audio, and the call
flow proceeds.
Recording an announcement
Select the Announcement option for use with an audio information service. The caller is prompted to make
a recording. Otherwise, you can select a prerecorded announcement for use with this element.
The Greeting for mailbox option allows you to change the specified greeting from a remote location. You
do not need to specify the mailbox from which the greeting is played. Your system administrator does this.
To enable callers to change a specified announcement using a remote telephone
1. Enable the Specific button.
2. Select the Value Selector arrow, select Announcements, and select the recording that you want. The
name of the announcement appears in the Specific text box.
132
Copyright © 2009 ADTRAN, Inc.
619510003-1A
Enterprise Communications Server
Using Advanced Elements
Recording a greeting
To enable callers to change a specified extension or user greeting using a remote
telephone
1. Enable the Specific button. Select the Value Selector arrow, select Greetings, and select one of the
users or [Called Extension]. Called Extension refers to the identity originally called. Selected
Extension refers to the identity selected in the last successful Select Extension element in the service.
If there was none, or the last one failed, it defaults to be the same as the Called Extension.
Only Admin users can add a Select Extension element to a service. However, if an Admin
user shares such a service with a PBA user, then the Select Extension element within that
service becomes available to the PBA user.
The name of the greeting appears in the Specific text box.
2. From the Greeting type list, select one of the following greeting types:
•
•
•
•
Internal Greeting
External Greeting
Out-of-Office Greeting
Mailbox Identifier
Put a Verify Password element before this element if you want to prevent unauthorized
access.
Recording a temporary recording
You can use the Record Announcement element to record audio in a specific temporary recording, and
elements like Play Announcement can be used to play the audio. Temporary recordings exist only for the
duration of the execution of a service. That is, when a service starts, none of the temporary recordings
exist. If a caller records a temporary recording, then the recording is stored in a temporary file that can be
played by another element, and the recording is discarded when the service ends. Temporary recordings
can be referenced by the following elements:
•
•
•
•
Play Announcement element
Menu element
Send Email element (custom)
Add Data element
• Update Data element
To use the Add Data and Update Data elements, the system must be licensed for
database integration.
For more information on temporary recordings, refer to Allowing callers to make temporary recordings
619510003-1A
Copyright © 2009 ADTRAN, Inc.
133
Using Advanced Elements
Enterprise Communications Server
within a service on page 109.
To enable callers to create a temporary recording using a remote telephone
1. Enable the Specific button.
2. Select the Value Selector arrow, select Temporary Recordings, and select the temporary recording
that you want. The name of the temporary recording appears in the Specific text box.
Recording into a database
Record the announcement to a database by selecting a data source and specifying the filtering information.
To access database information, the system must be licensed for database integration.
To enable callers to change an announcement in a database
1. Enable the Database button.
2. Select the Data Source Selector arrow. For more information, refer to Deliver Messages element on
page 118.
3. Specify the Data source, Filter field, Equals, and Update information that you want.
Advanced Record Announcement Options
The Advanced Record Announcements allow you to define additional attributes for the recording. To
change the advanced options select on the show or hide advanced options button.
You can limit the length of the message that can be recorded and avoid recording silence. Enable the
corresponding check boxes to allow callers to signal the end of their message, enable a beep before
recording, and enable review message menu.
To limit the length of a recorded message
Type a number of seconds in the Record for at most text box. Callers cannot leave a message that lasts
longer than the time limit that you specify.
To avoid recording silence
1. Enable the Stop recording after check box.
2. Type a number of seconds in the text box.
If you set the number of seconds of silence too low, callers might be cut off while pausing
between phrases or speaking quietly.
134
Copyright © 2009 ADTRAN, Inc.
619510003-1A
Enterprise Communications Server
Using Advanced Elements
To set Take Message specifications
Enable any of the following check boxes:
• Stop when key pressed—callers proceed to the next element after they press a key
• Beep before recording
• Review message menu
Take Message element
The Take Message element records an incoming message. Called Extension refers to the identity originally
called. Selected Extension refers to the identity selected in the last successful Select Extension element in
the service. If there was none, or the last one failed, it defaults to be the same as the Called Extension. This
Take Message element
element can receive voicemail messages and store them in your mailbox. You do not need to specify the
mailbox where messages are stored. Your system administrator does this.
You can limit the length of the message that can be recorded and avoid recording silence. Enable the
corresponding check boxes to allow callers to signal the end of their message, enable a beep before
recording, and enable review message menu.
To limit the length of a recorded message
Type a number of seconds in the Record for at most text box. Callers cannot leave a message that lasts
longer than the time limit that you specify.
To avoid recording silence
1. Enable the Stop recording after check box.
2. Type a number of seconds in the text box.
If you set the number of seconds of silence too low, callers might be cut off while pausing
between phrases or speaking quietly.
619510003-1A
Copyright © 2009 ADTRAN, Inc.
135
Using Advanced Elements
Enterprise Communications Server
To set Take Message specifications
Enable any of the following check boxes:
• Stop when key pressed—callers proceed to the next element after they press a key
• Beep before recording
• Review message menu
Advanced Menu element
The Advanced Menu element allows callers to make a selection using the telephone keypad. It is advisable
to put an audio element (such as Play Announcement) that specifies menu options before the Advanced
Menu element. The Advanced Menu element can also be attached to the “on single digit” connection of
certain elements.
Some callers might not make a selection from the menu.
Advanced Menu
element
For this purpose, the No key in check box is provided. Select the check box and then type in a number of
seconds to wait in the associated text box. You can specify the amount of time the UC server waits for a
response before it moves to the next element.
To allow callers to move to the next element if they do not select a key
1. Enable the No key in check box.
2. In the text box, type the number of seconds to wait.
To set selection keys on a menu
1. In the first On list box, select the number of the key that you want. The number one appears by
default. When callers press a key, they are sent to the element that is adjacent to the connector pin,
depending on their choice.
2. Select New to add an On list box for setting an additional key. The UC server enters the keys in
numerical sequence. You can also select a key from the list. You can set a maximum of 12 keys. Keys
range from one to nine, then include zero, * and #.
When you have finished setting selection keys, you can connect the subsequent element for each selection
key that you set, as applicable.
136
Copyright © 2009 ADTRAN, Inc.
619510003-1A
Enterprise Communications Server
Using Advanced Elements
To remove a selection key from a menu
Select the trashcan icon to the left of the key that you want to delete.
Manage Mailbox element
Manage Mailbox
element
The Manage Mailbox element allows callers to retrieve messages remotely over the telephone. Called
Extension refers to the identity originally called. Selected Extension refers to the identity selected in the
last successful Select Extension element in the service. If there was none, or the last one failed, it defaults
to be the same as the Called Extension.
You do not need to specify the mailbox where messages are stored. Your system administrator does this.
You can set up the next element in the call flow depending on whether callers enter a valid extension
number or cancel the management attempt.
This element prompts callers for a mailbox password before allowing access.
Change Mailbox Password element
Change Mailbox
Password element
The Change Mailbox Password element allows you to change your mailbox password.
The element prompts you for a new password, waits until they enter a new password, and then confirms it
by playing it back to you. You are then prompted to accept the change or reject it.
You do not need to specify the mailbox for which you want to change the password. Your system
administrator sets this so that you are always dealing with your own mailbox.
Called Extension refers to the identity originally called. Selected Extension refers to the identity selected in
the last successful Select Extension element in the service. If there was none, or the last one failed, it
defaults to be the same as the Called Extension.
619510003-1A
Copyright © 2009 ADTRAN, Inc.
137
Using Advanced Elements
Enterprise Communications Server
For added security, you might want to put a Verify Password element before this element.
Verify Password element
Verify Password
element
The Verify Password element enables the service to request a numeric password from a caller, and verifies
that a given password matches a specified password, or the password for a particular mailbox. The Verify
Password element would typically be used to access or to change information based on authentication.
To use your mailbox password, for Password for mailbox select [Called Extension], which is the default
for this element. Selecting this option automatically selects the password for your own mailbox.
The [Selected Extension] option refers to the Selected Extension element, however this element is only
available to Administrators and is not available to users. Therefore, the value of the [Selected Extension] is
identical to the value of the [Called Extension].
If you select the Database value option, then be sure to include a database element (such as the Fetch Data,
Dial for Data, Move Current Row, or Prompt for Current Row elements) that indexes the Data Source
value that you wish to use to verify the password. The database element must occur before the Verify
Password element in the call flow, so that you can reference it in the Verify Password element’s Data
Source selector.
Data Sources cannot be referenced directly, so you must reference a filtered Data Source created by one of
the database elements referenced above. Ensure that the Data Source value that you use is a Number data
type, since only Data Source values that have this type can be selected.
The Otherwise connector pin is followed when:
• The password does not match the selection criteria after three sequential attempts, or
• The caller has not entered any digits after three sequential attempts.
You can set up the next element in the call flow depending on whether a caller enters a valid extension
number or cancels the attempt.
138
Copyright © 2009 ADTRAN, Inc.
619510003-1A
Enterprise Communications Server
Using Advanced Elements
Loop Counter element
Loop Counter element
The Loop Counter element allows you to limit the number of times the call flow makes a connection. This
element affects only call flow control. Callers do not hear anything or perform an action.
In the Repeat up to text box, enter the number of times you want a connection to be followed.
Once the loop counter is encountered the number of times you have specified, the call follows the When
finished connection.
All loop counters are reset at the beginning of each call.
Text To Speech element
The Text to Speech element allows users to convert text to speech. The supplied text is “spoken” to callers
by the Text-to-Speech engine. You can use this element when you prefer not to make audio recordings.
Type the text manually, or use the Value Selector to specify a dynamic value for the text.
Text To Speech
element
For more information, refer to Selecting values within elements using the value selector on page 238. You
can also use a combination of typed text and selected values.
Gather Digits element
The Gather Digits element allows the caller to enter digits on the telephone keypad that are compared to a
Compare Data element in the same service. The Gather Digits element is typically used with an element
that plays audio, such as the Play Announcement element, to give the caller instructions. When the UC
server has gathered the specified number of digits, the caller moves to the connected element.
If no digits are gathered, the caller moves to the element connected to the No digits collected connector
pin.
619510003-1A
Copyright © 2009 ADTRAN, Inc.
139
Using Advanced Elements
Enterprise Communications Server
If too few digits are gathered or the time limit for entering digits is exceeded, then the caller moves to the
element connected to the Otherwise connector pin.
The Gather Digits element works with the Compare Data element. The Gather Digits element must appear
in the call flow before the Compare Data element but does not need to be connected directly to it. You can
include elements between them in the call flow.
To specify the number of digits to gather
1. Enable one of the following:
• Stop after—the number of digits is fixed. It lets you specify the number of digits.
• Gather up to 20 digits—the number of digits is variable, up to 20
2. If you selected the Stop after button, then type the number of digits in the text box.
Compare Data element
Compare Data
element
The Compare Data element compares data that is collected by a Gather Digits element, system values (for
example, Today’s Date), or database values, and directs the call flow accordingly. For example, you might
want a caller to enter a four-digit number to continue in the call flow. Once the caller enters the number and
it is stored by the Gather Digits element, the Compare Data element can let you direct a specific caller
through the call flow based on that four-digit number.
The Compare Data element executes as follows:
• The first comparison value is evaluated for a match against the comparison selected. If the comparison
is true, then the call exits through the associated connector. If the comparison is not true, then the next
comparison value is evaluated for a match.
• If no match is found when comparing data, then the call proceeds to the element connected to the No
match connector pin.
Note that if comparisons other than Equals are selected, then the order of comparison values is important,
and can be used to match between two values. For example, if the Compare to value is a numeric value and
the following comparisons are used:
• Less Than: 5
• Greater Than: 10
• Less Than/Equal: 10
140
Copyright © 2009 ADTRAN, Inc.
619510003-1A
Enterprise Communications Server
Using Advanced Elements
Then the following results occur:
•
•
•
•
If the Compare to value is less than 5, then the first connector is taken.
If the Compare to value is greater than 10, then the second connector is taken.
If the Compare to value is between 5 and 10 (including 5 or 10), then the third connector is taken.
If the Compare to value had no value, then the No match connector pin is taken.
To direct a caller using the Compare Data element
1. From the Compare to Value Selector list, select the Gather Digits element, System Value, or database
reference that you want to compare to.
Refer to Selecting values within elements using the value selector on page 238 if you
want to select a dynamic value for the Compare to box.
2. From the drop-down list select a comparison mode that you want to associate with a specific caller.
3. Select Add to select additional comparison options. You can add up to ten compare data connectors.
Create Log Entry element
Create Log Entry
element
The Create Log Entry element allows detailed call information to be exported as a tab separated file or
XML-based file. You can specify the type of information that you want to include in the call log entry. Use
the Create Log Entry element with the Gather Digits element if you want to log the digits that a caller
enters.
To specify types of information using the Create Log Entry element
1. In the Enter text or insert value section, select the Value Selector arrow. For more information, refer
to Selecting values within elements using the value selector on page 238.
2. Select dynamic values for the log entry, and type any text that you want to appear in the log.
3. Repeat steps 1 and 2 until all the information that you want to include appears in the list.
Some of the information types appear blank in the call log, depending on the PBX.
619510003-1A
Copyright © 2009 ADTRAN, Inc.
141
Using Advanced Elements
Enterprise Communications Server
Applications for the Execute Program element include the following:
• Integrate with an electronic control system, for example, door controls, alarm systems, or climate control
systems, to retrieve information or to invoke changes to the system.
• Integrate with an Instant messaging (IM) client to provide another way of notifying callers of messages.
• Invoke an application that validates information received from a user, for example, a credit card
transaction.
• Integrate with a third party display device.
• A list of parameters to be passed to the application.
• The computer credentials to be used by the application.
142
Copyright © 2009 ADTRAN, Inc.
619510003-1A
Enterprise Communications Server
Using Announcements in Call Answering Services
11 Using Announcements in Call Answering
Services
This chapter provides information about how to select prerecorded announcements for your extension. It
also explains how to record personalized announcements using the Audio Editor. Make sure that there is a
sound card installed on the computer that you are using. This chapter covers the following topics:
•
•
•
•
Overview on page 143
Using Prerecorded Announcements on page 143
Recording Announcements on page 145
Managing Announcements on page 153
Overview
Announcements are the outgoing messages that callers hear when they telephone your extension. These
announcements typically initiate the call flow in a service and are used to guide the caller through the call
process. Announcements can inform callers of your business hours, explain menu options, or provide
instructions about how to leave messages or request information by fax.
The navigation pane presents folders used to store announcements. Select a folder to view its contents in
the content pane. Below the content pane is the preview pane. Select an announcement to view its
waveform representation in the preview pane. A variety of convenient, prerecorded announcements are
available. You can also create custom announcements using the Audio Editor.
Using Prerecorded Announcements
Male and female versions of prerecorded announcements are supplied with the application. They are stored
in the Male Voice and Female Voice folders on the navigation pane of the Announcements menu. For
information about sharing prerecorded announcements, refer to Importing and Exporting on page 173.
619510003-1A
Copyright © 2009 ADTRAN, Inc.
143
Using Prerecorded Announcements
Enterprise Communications Server
Some of the elements that you use to build services include a Browse button that allows you to select an
announcement to be played at that point in the call flow. Before selecting the announcements you want to
play while the service runs, you can preview them in the Announcements menu.
To preview a prerecorded announcement
Folders
1. Select the Announcements navigation bar to get the Announcements menu.
2. Select a folder to list its contents in the content pane.
3. Select the announcement that you want to preview.
4. Select Download in the preview pane. A waveform representation of the announcement appears in
the preview pane with a set of audio commands.
5. Select the icon of the device that you want to use.
The icon that you select is enclosed by a dotted line
6. Select play to listen to the announcement.
You can also preview announcements using the Service Editor while you are building a
service. You must first select a Play Announcement element and then use the Browse
button to choose an announcement to preview.
After you preview the announcements and note those that you want to use, open the service to which you
want to add prerecorded announcements. Locate an element that you want to change, or add one to the
service.
To select a prerecorded announcement for an element
1. Select the Services navigation bar to obtain the Services menu.
2. Double-click a service to open it and start the Service Editor.
144
Copyright © 2009 ADTRAN, Inc.
619510003-1A
Enterprise Communications Server
Recording Announcements
3. Select a Play Announcement element and then drag it to the canvas.
Play Announcement
element
4. Select Browse to open the Play Announcement dialog box, which displays a list of your
announcement folders.
5. Double-click the prerecorded announcement folder that you want to open. The folder’s
announcements are listed.
6. Double-click the announcement that you want to select for the element in your call flow. The title of
the announcement appears in the text area of the element.
Use the Go back arrow on the Play Announcement dialog box to return to the previous
folder.
Recording Announcements
You can create custom announcements to be played on your extension. These announcements can also be
copied, renamed, or deleted according to your needs.
Custom announcements are created using the Audio Editor, shown below.
Toolbar
Viewing pane
Marker
Text area
The Audio Editor has a Viewing pane and a Text area.
619510003-1A
Copyright © 2009 ADTRAN, Inc.
145
Recording Announcements
Enterprise Communications Server
The Viewing pane contains a waveform representation of your announcement. As you play an
announcement using the audio commands, the vertical announcement Marker moves across the viewing
pane from left to right so that you can identify the exact location of different parts of your recording. You
can edit any part of your announcement by manipulating the waveform and using the audio commands.
You can also remove parts of the message that are no longer required.
The Text area allows you to type your announcement before recording it. You can read the message from
the menu while recording to help you eliminate pauses in your announcement.
The Toolbar contains visual shortcuts to the most frequently used menu items. Hold the pointer over a
button to show the tool tips. The toolbar contains View, Select, and Process commands, as well as standard
Audio commands found on most applications.
Creating and recording announcements
To create an announcement
1. Select the folder where you want to store your new announcement. The folder’s contents are listed in
the content pane.
2. Right-click anywhere in the content pane.
Announcements
Folders
3. Select New > Announcement. A new announcement is added to the list in the content pane. The
announcement icon denotes the new announcement.
4. Type a name for the announcement.
To record an announcement
1. Create an announcement and give it a name by following all the steps in To create an announcement
on page 146.
2. Double-click the announcement that you want to record. The Audio Editor starts.
In the text area of the Audio Editor, you can type the announcement that you want to
record. This is useful for eliminating pauses when you are recording.
3. On the toolbar, select record to open the Record Audio dialog box.
4. Make sure that the audio device you want is selected.
146
Copyright © 2009 ADTRAN, Inc.
619510003-1A
Enterprise Communications Server
Recording Announcements
5. In the Insert new audio box, select at the beginning.
Select record and then record your message. If you are using your telephone, wait for the beep before
you begin to record.
6. As you record, the clock runs and the red record button turns grey.
The maximum length of a recorded announcement is 15 minutes.
7. Select stop when you are finished.
8. Select OK to keep the announcement.
9. Select File > Update.
Changing announcements
You can change an announcement by deleting a part that you no longer need, adding recorded audio to it,
or adjusting the volume. Delete portions of the waveform by selecting a portion in much the same way as
you select text using a word processor. A number of commands allow you to change announcements. The
following illustrations provide details about the command icons located on the Audio Editor toolbar.
Audio commands
Use the audio commands to play announcements, position the marker in the waveform, and make
recordings.
Stop
Skip
Backwards
Skip
Forwards
Record
Move to End
Pause
Move to
Beginning
Play
Before you delete part of an announcement or add to it, you can listen to it and identify the location on the
waveform where you want to make a deletion or insertion. If you have selected a part of the waveform,
audio commands apply only to the selected portion. The move and skip commands are used to position the
marker within the selection.
619510003-1A
Copyright © 2009 ADTRAN, Inc.
147
Recording Announcements
Enterprise Communications Server
View and select commands
Use the view and select commands to select a portion of the audio.
Zoom to Fit All
Select None
Zoom Out
Select All
Zoom In
The view commands allow you to zoom in and out when you view the waveform so that your selection is
as accurate as possible.
The select commands allow you to select and deselect the entire waveform. If you do not make a selection,
the changes that you make apply to the whole waveform.
To select part of the waveform
1. Select anywhere in the waveform.
2. Drag across the portion of the audio that you want to select.
Deselect the waveform by selecting anywhere in the waveform.
Process commands
Use the process commands to adjust the volume.
Decrease Volume
Maximize Volume
Increase Volume
148
Copyright © 2009 ADTRAN, Inc.
619510003-1A
Enterprise Communications Server
Recording Announcements
To delete part of an announcement
1. Select the announcements folder that contains the announcement part you want to delete. The
announcements contained in the folder are listed in the content pane.
Announcements
Folder
2. Double-click the announcement that contains the part you want to delete. The Audio Editor displays
the announcement as a waveform.
3. Select View > Zoom to Fit All.
4. Make sure that the audio device you want is selected.
5. On the toolbar, select play. Listen to the announcement once or twice to pinpoint the portion of the
waveform that you want to delete.
6. Select stop on the toolbar to stop playback before the part that you want to delete. Note the marker’s
position in the Position indicator at the bottom of the menu.
Position Indicator
619510003-1A
Copyright © 2009 ADTRAN, Inc.
149
Recording Announcements
Enterprise Communications Server
7. Select the waveform where you want to begin deleting and drag to select the portion of the
announcement that you want to delete.
If you do not select part of the waveform, the changes that you make affect the entire waveform.
8. Select play to review the selected portion of the announcement.
After you select part of an announcement, the audio commands apply only to the
selected part.
9. Select Erase on the toolbar of the Audio Editor to delete the selection.
10. Select File > Update.
150
Copyright © 2009 ADTRAN, Inc.
619510003-1A
Enterprise Communications Server
Recording Announcements
To add to an announcement
1. Select the announcement folder that contains the announcement that you want to add to. The
announcements contained in the folder are listed in the content pane.
2. Double-click the announcement that you want to add to.
The Audio Editor displays the announcement as a waveform.
Text area
In the text area of the Audio Editor, you can type the additional text that you want to add
to your recording. This is useful for eliminating pauses when you are recording.
3. Select View > Zoom to Fit All.
4. Select the audio playback mode that you want.
5. On the toolbar, select play. The announcement plays. Listen to it once or twice to pinpoint the portion
of the waveform to which you want to add. Position the pointer over the stop command on the toolbar
so that you can stop the playback just before the part to which you want to add. Use the view
commands for accuracy. Note the marker’s position in the Position indicator at the bottom of the
menu.
6. Select stop on the toolbar to stop playback on the waveform at the point where you want to add to the
announcement.
7. On the toolbar, select record to open the Record Audio dialog box.
8. Make sure that the audio device you want is selected.
9. In the Insert new audio text box, select at the current position.
Select record and then record your message. If you are using your telephone, wait for the beep before
you begin to record.
619510003-1A
Copyright © 2009 ADTRAN, Inc.
151
Recording Announcements
Enterprise Communications Server
10. As you record, the clock runs and the red record button turns grey.
The maximum length of a recorded announcement is 15 minutes.
11. Select stop when you are finished.
12. Select play to review the announcement.
13. Select OK to keep the announcement.
14. Select File > Update.
To change the volume of a recording
1. Select the announcements folder that contains the announcement of which you want to change the
volume. The announcements contained in the folder are listed in the content pane.
2. Double-click the announcement that you want to change. The Audio Editor displays the
announcement as a waveform.
3. Select Edit > Select All.
4. On the Process menu, select one of the following:
• Increase Volume
• Decrease Volume
• Maximize Volume
It is advisable to maximize the volume to make sure that your recording is audible to callers.
5. If you select Increase Volume or Decrease Volume, type the percent amount by which you want to
increase or decrease the volume of the announcement, and then select OK.
6. Select play to review the changes.
7. Select File > Update.
152
Copyright © 2009 ADTRAN, Inc.
619510003-1A
Enterprise Communications Server
Managing Announcements
Managing Announcements
You can organize announcements more efficiently by creating folders for them.
To create a folder for announcements
1. Right-click anywhere in the content pane.
2. Select New > Folder. A new folder is added to the list in the content pane.
Announcements
Folder
3. Type a name for the folder.
To put an announcement in a folder
Select the announcement that you want to store and drag it to the folder where you want to store it.
Double-click a folder to view its contents. On the toolbar, use the Go back arrow to
return to the list previously displayed in the content pane.
To copy an announcement
1. Select the announcements folder that contains the recording that you want to copy. The
announcements stored in the folder are listed in the content pane.
2. Right-click the announcement that you want to copy.
3. Select Duplicate. A copy of the announcement appears in the content pane.
To delete an announcement
1. Select the announcements folder that contains the recording that you want to delete. The
announcements stored in the folder are listed in the content pane.
2. Right-click the announcement that you want to delete.
3. Select Delete.
4. Select Yes to confirm the deletion.
To rename an announcement
1. Select the announcements folder that contains the recording that you want to rename. The
announcements stored in the folder are listed in the content pane.
2. Right-click the announcement that you want to rename.
619510003-1A
Copyright © 2009 ADTRAN, Inc.
153
Managing Announcements
Enterprise Communications Server
3. Select Rename. Type a new name for the announcement and then select its icon to make the change.
154
Copyright © 2009 ADTRAN, Inc.
619510003-1A
Enterprise Communications Server
Using Databases in Call Answering Services
12 Using Databases in Call Answering Services
This chapter introduces User Data Sources and how to manage them, how to use access database
information using database elements in call answering services, and includes the following topics:
• Overview on page 155
• Managing Data Sources on page 155
• Accessing Data using Database Service Elements on page 159
• Using Database Elements on page 163
To access database information the system must be licensed for database integration. If
you are not licensed for database integration then the Database tab of elements is not
visible.
Overview
You can use the UC server to access dynamic database information using services. A user with access to
the Administrator tab can create user data tables. Each user has a copy of the table where they can save
their personal data. All the user data tables that are used in your active services are displayed in the
Assistant pane.
For information about creating user data tables, refer to the Managing Data Sources section of the
ADTRAN UC Server Administrator Manual.
Managing Data Sources
Data sources are set up like tables. Each table row corresponds to a data row or record. Each table column
corresponds to a field (for example, a name, address, or fax).
619510003-1A
Copyright © 2009 ADTRAN, Inc.
155
Managing Data Sources
Enterprise Communications Server
Data tables allow you to access, change, and delete information on the computer or over the telephone. For
example, a real estate agent can use a data table to include information, such as an address or price, for
each property that the agent has listed. While away from the office, the agent can call into the office and
access the data table to add, change, or delete information about a particular property.
The data sources feature is available only if your system is licensed for database
integration.
For a user data source to appear in the Assistant pane, you must have a service that
accesses that user data source assigned to one of your identities. For information about
accessing data sources in a service, refer to Data Type Definitions on page 158.
If a new field is added to an existing table, then the value for that field for all existing
records will be set to [NO VALUE].
To add information in a user data table
1. In the Assistant menu, select the user data table to which you want to add information.
2. Select the Add button to add a row to the table.
The Add button is editable and might have a different title.
156
Copyright © 2009 ADTRAN, Inc.
619510003-1A
Enterprise Communications Server
Managing Data Sources
3. Select the column in which you want to add information.
4. Type the information that you want to add.
5. Select anywhere outside the column to deselect it.
6. Repeat steps 3 to 5 until all the information is added for the data row.
To change information in a user data table
1. In the Assistant menu, select the user data table that you want to change.
2. Select the column that has the information that you want to change.
3. Type the change.
4. Select anywhere outside the column to deselect it.
To delete a row in a user data table
1. In the Assistant menu, select the user data table from which you want to delete information.
2. Select the row that you want to delete.
3. Select the Delete button.
619510003-1A
Copyright © 2009 ADTRAN, Inc.
157
Managing Data Sources
Enterprise Communications Server
Data Type Definitions
Data Type
Value
Examples
Text
A string of characters
123 Maple Avenue
Number
A number with optional sign, decimal places, and commas 160,000.00
Logical
A string whose value can be only true, false, 1 or 0. The
numbers, 1 and 0, correspond to true and false,
respectively.
True
False
1
0
Phone Number Any string that can be parsed as a phone number into
canonical form.
A canonical telephone number represents a dialable
number that can be understood and interpreted around
the world, for example:
+Country Code (Area Code) Subscriber Number
In North America, the following is an example of a
canonical telephone number:
+1 (613) 555-1212
+1 (613) 555-1212
6135551212
Audio
The value of the field in valid .wav format
PropertyDescription.wav
Fax
The value of the field in valid .tif format
Data Sheet.tif
Day of Year
A date without a year, for example, January 1 is New
Year’s Day
September 16
09-16
Sep 16
Date
A date that includes the day, month, and year.
September 16, 2007
Valid formats include YY-MM-DD, YYYY-MM-DD, and text Sep 16, 2007
versions as illustrated in the examples.
07-09-16
2007-09-16
Day of Week
The full day name in English, as a string. The strings can
also be in abbreviated formats.
Sunday
Sun
Time of Day
A time that includes the hour, minutes, and seconds
(optional).
Valid formats include HH:MM AM/PM. The AM/PM is
optional, however AM is assumed unless the hour is
greater than or equal to 12. For example, 12:02 means
12:02 PM.
2:00 PM
Time Range
Two times of day separated by a hyphen, which indicates 2:00 PM - 4:00 PM
a time range.
Valid formats are HH:MM AM/PM - HH:MM AM/PM, with
AM/PM being optional. As above, AM is assumed unless
the hour is greater than or equal to 12. For example, 1:00
means 1:00 AM.
158
Copyright © 2009 ADTRAN, Inc.
619510003-1A
Enterprise Communications Server
Accessing Data using Database Service Elements
Accessing Data using Database Service Elements
Using database integration, you can set up services that allow callers to access current information. Also,
the service creator can call in to a service to change information remotely at any time, so that callers have
access to the most current information. Data accessed by data sources is dynamic and can be updated at
any time.
Some elements, depending on their function, allow you to specify values or data sources. Database
elements use database integration to provide information to callers and receive information from callers
during a service. For example, callers to a real estate office can hear updated information about a particular
property when they enter the property number over the phone during a service. In this case, the Fetch Data
element processes the query and searches the database for a match.
Likewise, the real estate agent can make changes to the property information in the database by accessing
the service remotely and entering the new information to the database. If the agent wants to change the list
price for a property, he can access the Update Data element in the service, access the price value for the
correct property, change the value, and update the database accordingly.
For more information about accessing data sources using service elements, refer to Using Elements to
Create Call Answering Services on page 107.
To troubleshoot services using data sources, refer to Troubleshooting Services on
page 106.
Using the Data Source Selector
You can use the Data Source Selector feature to specify a data source, and to filter the data that is returned.
The Data Source Selector is available for elements that require access to database information as part of
their functionality, such as the Fetch Data, Update Data, and Dial for Data elements.
You can filter data by selecting a data source field, a comparison operator, and a value. You can filter the
data by selecting the following comparison options:
•
•
•
•
•
•
•
Equals
Less Than
Less Than/Equal to
Greater Than
Greater Than/Equal
Between
Not Equal
Using the value selector you can specify the value that you want to compare to the filter field.
An easily recognizable icon appears in the Source dialog box to indicate the type of data that you are using
for the comparison value. For example, the Gather Digits icon appears with the name of the Gather Digits
619510003-1A
Copyright © 2009 ADTRAN, Inc.
159
Accessing Data using Database Service Elements
Enterprise Communications Server
element that is included in the service.
The values that are available depend on the data source that you choose; the other elements included in the
call flow, for example, a Gather Digits element; and the values that you have set up for your system.
To specify a data source for an element
1. Select the arrow in the Source section of the element.
2. Select the Data Source that you want from the list.
3. Select the Filter Field that you want from the list.
4. Select the comparison mode that you want. In the example above, Less Than/Equal was selected.
If you select Between A and C for example, then the values A and C are included.
5. Select the value type that you want. For example, Database values, Gather-Digits values, or System
values.
You can also type a filter value manually in the filter value box.
6. Select a specific value from the value types list.
The values that are available depend on the data source; the other elements that precede
the element in the call flow, for example, a Gather Digits element; and the values that
you have set up for your system.
160
Copyright © 2009 ADTRAN, Inc.
619510003-1A
Enterprise Communications Server
Accessing Data using Database Service Elements
7. Select a sort mode, and enable Descending if you wish the results to be sorted in a descending order.
When you choose a System Value in an element of a service, the information is taken from the current
call and from within your system and used, for example, to fetch a value for a Fetch Data element.
Table 12–1: System values
Name
Description
Example Format
Today
A UC server Date value representing today’s
date.
December 25, 2006
Current Time
A UC server Time of Day value representing the Format depends on location.
current time.
For US and Canada, 12:02
PM.
User Name
The user profile name of the profile that owns
the called extension.
Paul Smith
User Extension
The extension number where the call was
initially received.
224
Selected User Name
If a Select Extension element is executed, this
is the user profile name of the profile that owns
the selected extension. Otherwise, it is User
Name.
Mark Jones
Selected Extension
If a Selected Extension element is executed,
this is the selected extension. Otherwise, it is
User Extension.
225
Caller Name
The same as Matched Contact Name, if the
matched contact name is not blank. If it is, the
value of Caller-Id.
Paul Smith
Caller-Id
A UC server Text Value representing the caller. Paul Smith [613-599-9698]
Typically, it is the form “name [number]”.
However, if the name is blank, it is in the form
“number”. It might also have special values,
such as <Private Number>, <Long Distance> or
<Unknown Caller>. Phone number format
depends on the underlying transport.
Caller-Id Name
A UC server Text Value containing the caller
name as provided by the underlying transport.
Caller-Id Number
A UC server Text Value containing the raw caller 613-599-9698
telephone number as provided by the
underlying transport.
Caller-Id Canonical
Number
A UC server Phone Number Value containing
the complete, formatted number.
+1 (613) 599-9698
Caller-Id Area Code
A UC server Text Value containing the area
code of the number.
613
Caller-Id Area Code/
Exchange
A UC server Text Value containing the area
code and the exchange.
613599
Caller-Id Exchange
A UC server Text Value containing the
exchange.
599
619510003-1A
Copyright © 2009 ADTRAN, Inc.
Paul Smith
161
Accessing Data using Database Service Elements
Enterprise Communications Server
Table 12–1: System values (Continued)
5999698
Caller-Id Local
Number
A UC server Text Value containing the local
number without the area code and country
code.
Called-Id
A UC server Text Value representing the called Mark Jones [613-599-9698]
party. Typically, it is the form “name [number]”.
However, if the name is blank, it is in the form
“number”. It might also have special values,
such as <Private Number>, <Long Distance> or
<Unknown Caller>. Phone number format
depends on the underlying transport.
Called-Id Name
A UC server Text Value containing the called
party name as provided by the underlying
transport.
Called-Id Number
613-599-9698
A UC server Text Value containing the raw
called party’s telephone number, as provided by
the underlying transport.
Port Name
The name of the port the call is using.
UC server
Trunk Name
The name of the trunk the call is using.
Admin Trunk 1
Current Date/Time
A UC server Text Value containing the current
date and time
Format depends on the
location of the computer, but is
typically: December 25, 2006
12:02 PM
Matched Contact
Name
Sharon Allen
The caller is matched to the called party’s
contacts. This is a UC server Text Value
containing the contact display name (or blank if
no match).
Next Unique Id
A UC server Text Value containing a globally
unique string (36 characters long). This value
can be referenced only using the Add Data
element and is used to assign a unique value to
a database field. The Add Data element is
typically followed by a Fetch Data element
accessing the same table and using the Last
Unique Id value to fetch the record just added.
Do not depend on the specific format of these
unique values
Although the actual format is
not important, it is typically the
following:
0E49D111-55AC-4794-93611B7320D694BD
Last Unique Id
A UC server Text Value containing the most
recent unique string generated by Next Unique
Id.
Refer to Next Unique Id.
162
Copyright © 2009 ADTRAN, Inc.
Mark Jones
619510003-1A
Enterprise Communications Server
Using Database Elements
Using Database Elements
To access database information the system must be licensed for database integration. If
you are not licensed for database integration then the Database tab of elements is not
visible.
Database elements rely on database integration to provide data to callers during a service. Database
integration allows services to be dynamic and data driven.
The Database elements tab is shown above. A brief description is provided for each element available to
the Administrator.
Table 12–2: Database elements
Fetch Data element on page 164 This accesses the specified data source and fetches the required
data
Dial for Data element on
page 165
This accesses the specified data source and fetches the data
specified by the caller
Add Data element on page 167
This allows a caller to add data to a specified data source
Delete Data element on
page 168
This allows a caller to delete data from a specified data source
Update Data element on
page 169
This updates the data contained in a specified data source
Move Current Row element on
page 170
This allows callers to modify which row is the current row in a multi
row set, retrieved by either the Fetch Data or Dial for Data elements.
Prompt for Current Row element Using a series of prompts, this allows callers to use the keypad to
select which row becomes the current row.
on page 171
619510003-1A
Copyright © 2009 ADTRAN, Inc.
163
Using Database Elements
Enterprise Communications Server
Fetch Data element
The Fetch Data element allows you to specify a data source using the Data Source Selector, and query the
data source so that the UC server fetches the data that you want.
Use a second Fetch Data element to further filter or sort the results of the first, a third to further filter or
sort the results of the second, and so on. For example, a real estate service is set up to access a database of
real estate listings. A Fetch Data element is specified to fetch all rows that match a certain price range. If
several rows are fetched that match that criterion, the call moves through the Many rows fetched connector
pin to another Fetch Data element that further searches those listings and fetches rows based on the number
of bedrooms, until it finds the single listing that matches all criteria.
Fetch Data results
Fetch Data element
• If the Fetch Data element fetches one row, the call exits from the One row fetched connector pin.
• If the Fetch Data element fetches more than one row, then the call exits from the Many rows fetched
connector pin.
• If no rows of data are fetched, then the call exits the No rows fetched connector pin.
• If any other condition exists, such as an inability to access a Data Source (such as an external database
or internal User Data Table), then the call exits the Otherwise connector pin.
Sorting data rows
A Fetch Data element can retrieve more than one row depending on the number of rows in the source, and
your filter conditions. When one or more rows are fetched, a reference to a field by another element is
always a reference to the field’s value in the current row, in the set of rows fetched. The Move Current Row
and Prompt for Current Row elements can be used to change which row is current. Immediately after a
Fetch Data or Dial for Data element is executed, the current row is the first row.
• When only one row is fetched, the first row is the single row that was fetched.
• When multiple rows are fetched, which row is first depends on whether a sort order was defined by the
Administrator.
If no sort order was defined, then the order of the rows is determined by the data source, and you should
not make any assumptions about the order. If a sort order is defined, the first row is the first row in the sort
order specified. However, if the sort field contains duplicate values, the order of rows with the same sort
164
Copyright © 2009 ADTRAN, Inc.
619510003-1A
Enterprise Communications Server
Using Database Elements
value is determined by the data source, and you should not make any assumptions about the order.
For example, assume that you have a data source with a Date field, and that each row in the data source has
a unique date value. If the data source defines a sort order based on this Date field and descending order,
then any Fetch Data element that fetches from the data source will retrieve rows in descending date order.
If a Fetch Data element fetches multiple rows, then the first row will be the row in the fetched set of
records with the newest value in the Date field. Thus another element referencing this Fetch Data element
would always reference the newest row. Without the sort, you cannot predict which row in the retrieved set
would be first.
Selecting a row of data
When a Fetch Data element fetches one or many rows, the first row becomes the current row. The order of
the rows is determined by the sorting modes selected, as described above.
Other elements can refer to fields fetched by the Fetch Data element. These elements reference the value in
the current row. A different current row can be selected, using the Move Current Row element on page 170
or Prompt for Current Row element on page 171 elements.
For information about specifying data sources, filter fields, and values, refer to Using the Data Source
Selector on page 159.
Dial for Data element
The Dial for Data element allows you to specify a data source using the Data Source Selector. It is similar
to the Fetch Data element, except the caller uses the telephone keypad to define the data that is fetched.
The Dial for Data Source Selector allows you to specify the following:
• data source
• optional filter condition, for example a value
• Select On field
When a caller encounters the Dial for Data element, the element selects the records from the source that
match the filter condition (it fetches all the records if no filter condition is specified). Then the element
prompts the caller to enter the value for the Select On field. A search using the Dial for Data element
ignores blanks and special characters. The default search criteria include only alphabetic characters. If you
619510003-1A
Copyright © 2009 ADTRAN, Inc.
165
Using Database Elements
Enterprise Communications Server
specify Allow numbers, numeric characters are also included in the search.
Dial for Data element
The letters Q and Z appear on different keys on different phones. The Dial for Data
element works whether the letter Q corresponds to the 0 or the 7 key, and whether the
letter Z corresponds to the 0 or the 9 key.
Dialing for Data results
• If the Dial for Data element fetches one row, the call exits from the One row fetched connector pin.
• If the Dial for Data element fetches more than one row, then the call exits from the Many rows fetched
connector pin
• If no data rows are fetched, then the call exits the No rows fetched connector pin.
• If you enable the On Single Digit check box, the call exits that connector pin when the caller enters only
one digit, or the call times out after one digit is entered.
• If any other condition exists, such as the inability to access a Data Source, such as an external database
or internal User Data Table, then the call exits the Otherwise connector pin.
Sorting data rows
A Dial for Data element can fetch more than one row depending on the number of rows in the source, the
filter conditions, and the field the user will select on. When one or more rows are fetched, a reference to a
field by another element is always a reference to the field’s value in the first row, in the set of rows fetched.
• When only one row is fetched, the first row is the single row that was fetched.
• When multiple rows are fetched, which row is first depends on whether a sort order was defined by the
Administrator.
If no sort order was defined, then the order of the rows is determined by the data source, and you should
not make any assumptions about the order. If a sort order is defined, the first row is the first row in the sort
order specified. However, if the sort field contains duplicate values, the order of rows with the same sort
value is determined by the data source, and you should not make any assumptions about the order.
166
Copyright © 2009 ADTRAN, Inc.
619510003-1A
Enterprise Communications Server
Using Database Elements
For example, assume that you have a data source with a Date field, and that each row in the data source has
a unique date value. If the data source defines a sort order based on this Date field and descending order,
then any Dial for Data element that fetches from the data source will retrieve rows in descending date
order. If a Dial for Data element fetches multiple rows, then the first row will be the row in the fetched set
of records with the newest value in the Date field. Thus another element referencing this Dial for Data
element would always reference the newest row. Without the sort, you cannot predict which row in the
retrieved set would be first.
Selecting a row of data
When a Dial for Data element fetches one or many rows, the first row becomes the current row. The order
of the rows is determined by the sorting modes selected, as described above.
Other elements can refer to fields fetched by the Dial for Data element. These elements reference the value
in the current row. A different current row can be selected, using the Move Current Row element on
page 170 or Prompt for Current Row element on page 171. For information about specifying data sources,
filter fields, and values, refer to Using the Data Source Selector on page 159.
You can put a Play Announcement element before a Dial for Data element to give the
caller instructions about how to use the feature.
Add Data element
Add Data element
The Add Data element allows callers to add to the data in a specified data source. The Record
Announcement element can be used to record temporary recordings, which can be used with the Add Data
element as a form filling application, in order to request quotes, have callers answer general customer
service questions, and so on. For more information on temporary recordings, refer to Allowing callers to
make temporary recordings within a service on page 109.
• If the data is added successfully, the caller exits the regular connector pin.
• If the data is not added successfully, for any reason, the caller exits the Otherwise connector pin.
619510003-1A
Copyright © 2009 ADTRAN, Inc.
167
Using Database Elements
Enterprise Communications Server
To specify a source and fields for the Add Data element
1. Select a data source from the Source list.
2. Select the Add button to add a Field Assignment to the list.
3. Select the Field column to obtain a drop-down list of fields in the data source.
4. Select a field from the list.
5. Select the New Value column to specify a value for the field.
6. Type a value, or select the value selector arrow in the blank new value box.
7. Select anywhere outside the new value box.
8. Repeat steps 2 to 7 to add more fields to the Field Assignments list.
To delete a field assignment for the Add Data element
1. Right-click the Field column of the field assignment that you want to delete.
2. Press Delete.
Delete Data element
The Delete Data element allows callers to delete data in a specified data source.
Delete Data element
If some rows are deleted successfully, the caller exits the Source connector pin. If no rows are deleted, the
caller exits the No rows deleted connector pin. If any other condition exists, the caller exits the Otherwise
connector pin. For information about specifying data sources, filter fields, and values, refer to Using the
Data Source Selector on page 159.
For security reasons, when including a Delete Data element in a service, you might
want to put a Verify Password element before it. Make sure that you specify exactly the
data that you want to make available for deletion. For example, if you do not include a
filter field and value, all rows are deleted.
168
Copyright © 2009 ADTRAN, Inc.
619510003-1A
Enterprise Communications Server
Using Database Elements
Update Data element
Update Data element
The Update Data element allows callers to update the data in a specified data source. The Record
Announcement element can be used to record temporary recordings, which can be used with the Update
Data element as a form filling application, in order to request quotes, have callers answer general customer
service questions, and so on. For more information on temporary recordings, refer to Allowing callers to
make temporary recordings within a service on page 109.
• If some rows are updated successfully, the caller exits the regular connector pin.
• If some rows are not updated, the caller exits the No rows updated connector pin.
• If any other condition exists, the caller exits the Otherwise connector pin.
To specify field assignments for the Update Data element
1. Use the data source selector arrow to specify the data source that you want.
2. Select the Add button on the Update Data element to add a Field Assignment to the list.
3. Select the Field column to obtain a drop-down list.
4. Select a field from the list.
5. Select the New Value column to specify a value for the field.
6. Type a new value, or select the value selector arrow in the blank new value box.
7. Select anywhere outside the new value box.
8. Repeat steps 2 to 7 to add more fields to the Field Assignments list.
Make sure that you specify the filter condition correctly. For example, no filter condition
means that all rows are updated using the specified assignments.
619510003-1A
Copyright © 2009 ADTRAN, Inc.
169
Using Database Elements
Enterprise Communications Server
Move Current Row element
Move Current Row
element
When using the Fetch Data element on page 164 or Dial for Data element on page 165, a set of rows are
fetched from the database. The Move Current Row element moves the current row in a set of rows
fetched. The current row can be moved to be the first row in a set of rows, the last row, the next row, or the
previous row.
The Source element for a Move Current Row element can be the name of any other Fetch Data or Dial for
Data element in the service. The current row can be moved to the first row, last row, next row, or previous
row in the set of rows associated with the Fetch Data or Dial for Data element.
• If the current row moves to another row, then the element exits through the Source element connector
pin.
• If moving the current row moves it beyond the last row, before the first row, if there are no rows, or if
the Source element has not been executed yet, then the element exits through the No more rows
connector pin.
• If an error occurs, then the element exits through the Otherwise connector pin.
Applying the move current row element
We'll use a simplified version of a real estate listing service to illustrate how the Move current row element
works. For example:
• The first element is a Fetch Data element that fetches some real estate listings.
• The second element is the Text to Speech (TTS) element which speaks the property identifier from the
current row, and introduces the audio that follows.
• The third element is a Play Announcement element that plays the audio for the current row, and contains
the address and price for the current listing.
170
Copyright © 2009 ADTRAN, Inc.
619510003-1A
Enterprise Communications Server
Using Database Elements
• The fourth element is the Move current row element, which moves the current row to the next row.
• If there is another row, the service loops back to the TTS element, which now uses the value from
this row.
• If no more rows are available, the Move current row element exits through the No more rows
connector pin.
Prompt for Current Row element
The Prompt for Current Row element prompts callers to select a specific row from multiple rows fetched
by a Fetch Data element on page 164 or Dial for Data element on page 165. Callers press keys on the
keypad in response to prompts such as "For..., press 1, for..., press 2..." Callers select a specific item which
becomes the current row.
Prompt for Current
Row element
The Source element for a Prompt for Current Row element allows you to select a Fetch Data or Dial for
Data element in the service. The Select on list contains the names of fields in the Source element, with the
exception of Audio or Fax fields.
• If the Source element has exactly one row, the element exits immediately through the Source element
connector pin.
• If the record set indicated by the Source does not exist (the element has not been executed yet), or if it
has no rows, then the element exits immediately through the No more rows connector pin.
• If the caller presses an invalid key, or fails to press a key within a few seconds, then the last prompt is
619510003-1A
Copyright © 2009 ADTRAN, Inc.
171
Using Database Elements
Enterprise Communications Server
repeated. If this occurs three times, or if an internal error occurs, then the element exits through the
Otherwise connector pin.
Prompting callers when more than one row is returned
If the Source element has more than one row, using Text to Speech (TTS), the element prompts the callers
with "Press 1 for <value 1>, Press 2 for <value 2>," and so on, where the values of the Select on field are
from the set of rows associated with the source element. The caller is prompted for up to six choices.
• The element follows with the prompt "Press 8 to repeat these choices."
• If there are more than six rows, then it prompts with "Press 9 for more choices."
• Finally, the element prompts with "Press 0 to start over."
Caller input and results
If the caller enters the number associated with a specific row value, the associated row becomes the current
row, and the element exits through the Source element connector pin.
• If the caller presses 8, the prompts are repeated.
• If the caller presses 0, the same prompt for the first group of rows is repeated.
• If there are more than six rows and the caller presses 9, the element prompts with "Press 1 for <value>..."
as before, but the values are now taken from the next group of rows. This prompt is followed by "Press
7 for previous choices," and the other prompts as noted above. Pressing 7 causes the prompt for the
previous group of rows to be played.
The process continues until the caller selects a specific row. The caller uses the 7 and 9 keys to move
backwards and forwards through the set of rows.
Caller prompts
Key Pressed
Results
0
The prompt for the first row set is played.
1-6
This selects the associated row value, and becomes the current row. The element
exits through the Source element connector pin.
7
If there are previous row sets, the prompt is played for the previous six rows.
8
The previous prompt is replayed.
9
If there are more rows, the prompt is played for the next six rows or less.
172
Copyright © 2009 ADTRAN, Inc.
619510003-1A
Enterprise Communications Server
Importing and Exporting
13 Importing and Exporting
This chapter explains how to use the Import/Export Wizard and covers the following topics:
• Overview on page 173
• Starting the Import/Export Wizard on page 173
• Importing and Exporting Items on page 173
Overview
The Import/Export Wizard allows you to share announcements, services, faxes, and fax cover pages by
importing items from another location, or exporting them from your computer to another location so that
other people can import them and use them.
Starting the Import/Export Wizard
To start the Import/Export wizard
1. Select File > Import-Export Wizard to open the wizard welcome menu.
2. Select Next.
Importing and Exporting Items
The Import/Export Wizard guides you through the process of importing or exporting an item.
To import an item
1. In the Task Selection box, select Import data from the File System, and then select Next.
2. In the Import Directory box, make sure that the destination folders are correct. You can use the
Browse button to change the default destination folder.
The default destination is: C:\Documents and Settings\username\My
Documents\Export\
3. Select Next.
4. Select all the items that you want to import, and then select Next. Make sure that the box next to the
item has a check mark in it before you proceed.
5. If you want to delete an item in the change destination box, select the item and then select the Delete
button.
619510003-1A
Copyright © 2009 ADTRAN, Inc.
173
Importing and Exporting Items
Enterprise Communications Server
6. If you want to change the destination of an item, select the item and then select the Change
destination button.
7. Select Next to transfer the items.
8. Select Next when the wizard is done.
9. Select Finish.
To export an item
1. In the Select task to perform box, select Export to the File System, and then select Next.
2. Select the directory where the items that you want to export are located, and then select Next.
3. Select all the items that you want to export, and then select Next. Make sure that the box next to the
item has a check mark in it before you proceed.
4. Select Finish when the wizard is finished exporting the items.
174
Copyright © 2009 ADTRAN, Inc.
619510003-1A
Enterprise Communications Server
Setting Options
14 Setting Options
This chapter explains how to set various options. Options fall under the following categories:
•
•
•
•
•
Setting General Options on page 175
Setting Message Delivery Options on page 176
Customizing your Mailbox on page 178
Setting Integrated Messaging Options on page 180
Compressing Voice Messages on page 181
For more information on setting mailbox options, refer to Customizing your Mailbox on
page 15.
Setting General Options
If you are a local message store user, you are prompted to enter your mailbox number, name, or password
each time you log in. You can enable the automatic login option if you do not want to enter your
information each time you log in.
Your user profile has a time zone setting that indicates in which time zone you are typically located. The
time zone setting effects the times and dates that appear on voice, fax, and email messages when you
access your mailbox using the telephone user interface.
If you travel, or are relocating to another site for a period of time, you can change your time zone settings.
You can set how the message waiting light on your phone operates. The message waiting light behavior
can also be set by your administrator either system wide or individually, and this setting may differ from
your own setting. The message waiting light behavior in effect corresponds to the last option set. Thus if
the administrator changes the system wide setting or your individual setting after you have set your
message waiting light behavior, then you will need to reset it in order for your settings to take effect.
To change the automatic login option
1. Select Tools > Options.
2. Select the General tab.
3. Enable the Enable automatic login check box.
4. Select OK.
To change your time zone setting
1. Select Tools > Options.
2. Select the General tab.
619510003-1A
Copyright © 2009 ADTRAN, Inc.
175
Setting Message Delivery Options
Enterprise Communications Server
3. In the Time zone section, select the Time zone list.
4. From the Time zone list, select the time zone that you want.
When you run the First Time Access Wizard, the time zone setting for your profile is set
to the time zone of the computer running the first time access wizard. If the time zone is
the same as the server’s time zone, the setting is Same time zone as server system.
To change your message waiting light behavior
1. Select Tools > Options.
2. In the General tab, select one of the message waiting light options.
Use system defaults
The message waiting light behavior for your phone is
set according to the system wide setting set by your
administrator.
Never turn on or off
UC client does not manage the message waiting light
Turn on when new message arrives
Turn off when first message is accessed in
mailbox
The light turns off when you access the first new
message in your mailbox, regardless of whether you
disconnect before listening to the message.
Turn off when no more new messages in
mailbox
The light turns off when you access the last new
message in your mailbox.
3. Select OK.
Any changes to the message waiting light options come into effect immediately.
Setting Message Delivery Options
Message delivery options apply to the Deliver Messages element.
When a Deliver Messages element is included in an active service and a message has been received, the
application calls a list of specified numbers until it reaches you. You can set the number of attempts to
deliver messages. You can also specify the interval between successive delivery attempts.
You can also cancel Active Message Delivery by specifying certain conditions. When the condition is met,
Active Message Delivery is canceled. If the UC client is between calls, Active Message Delivery is
discontinued, and no further attempts are made. If an outgoing call is already in progress, that call
continues until completion.
You can specify a default account code for outgoing calls. An account code is used for accounting and
176
Copyright © 2009 ADTRAN, Inc.
619510003-1A
Enterprise Communications Server
Setting Message Delivery Options
security. A caller who does not have an account code cannot access specified information.
You can use account codes to allow long distance dialing, in which the telephone company applies the long
distance charges to your account code.
To set the number of attempts to deliver a message to each number you have specified
1. Select Tools > Options.
2. Select the Message Delivery tab.
3. In the Retry text box, select the number of attempts to deliver to each number. The default number of
attempts is 3.
4. Select OK.
To set the number of minutes to wait between delivery attempts
1. Select Tools > Options.
2. Select the Message Delivery tab.
3. In the Delay text box, select the number of minutes to wait between delivery attempts. The default
delay period is 3 minutes.
4. Select OK.
To specify a default account code
1. Select Tools > Options.
2. Select the General tab.
3. Type the default account code in the Account code box.
4. Select OK.
To specify conditions to cancel Active Message Delivery
1. Select Tools > Options...
2. Select the Message Delivery tab.
3. In the Cancel active message delivery section, select one of the following options:
• Mailbox is accessed—Active Message Delivery is discontinued when you access your mailbox
• Mailbox has no new voice or fax messages—Active Message Delivery is discontinued when
there are no new voice or fax messages in your mailbox
• Mailbox has no messages—Active Message Delivery is discontinued when there are no messages
in your mailbox
619510003-1A
Copyright © 2009 ADTRAN, Inc.
177
Customizing your Mailbox
Enterprise Communications Server
Customizing your Mailbox
Mailbox options allow you to customize your mailbox. Mailbox options include:
•
•
•
•
Changing the amount of information played about your messages
Changing the type of messages played and the order in which they are played
Setting whether to play information about each message
Setting whether to verify your password when checking messages from your extension
Changing the message summary
A message summary plays after you enter your password. The message summary includes:
• The number of messages in your mailbox
• The type of messages in your mailbox (voice, fax, or email)
• Whether messages are new or saved
There are three modes for message summary. They are:
Disabled
No message summary is provided.
Quick
The message summary provides limited information. For example:
“You have five new messages and six saved messages.”
This is the default mode.
Verbose
The message summary provides detailed information. For example:
“You have five new voice messages, four new fax messages, 30 new
email messages and 50 saved messages.”
To set the message summary mode using the desktop
1. Select Tools > Options.
2. Select the Mailbox tab.
3. In the Mailbox message summary section, select one of the following:
• Disabled
• Quick
• Verbose
4. Select OK.
Sorting messages
The message sorting options allow you to choose in what order you want to listen to your messages. You
can change the message sorting options using the desktop. The default message sorting option is to listen to
voice and fax messages only.
178
Copyright © 2009 ADTRAN, Inc.
619510003-1A
Enterprise Communications Server
Customizing your Mailbox
To change message sorting options
1. Select Tools > Options.
2. Select the Mailbox tab.
3. In the Mailbox message sorting section, choose one of the following options:
• Listen to all messages in the order they were received
• Listen to voice and fax messages only
• Listen to voice and fax messages first then email messages
4. Select OK.
Turning message information on or off
Message information is played before each message. It includes:
• Caller ID
• Date and time the message was received
The default setting for message information is on.
To turn message information on or off using the desktop
1. Select Tools > Options.
2. Select the Mailbox tab.
3. Enable the Play message information before message check box to enable message information.
To disable message information, clear the check box.
4. Select OK.
Turning password verification on or off
You can specify password verification when you call to check messages from your own extension. The
default setting is off.
To turn password verification on or off
1. Select Tools > Options.
2. Select the Mailbox tab.
619510003-1A
Copyright © 2009 ADTRAN, Inc.
179
Setting Integrated Messaging Options
Enterprise Communications Server
3. Enable the Password verification check box to turn Password verification on.
To turn password verification off, disable the check box.
4. Select OK.
Setting Integrated Messaging Options
Local message store users can specify display and notification options for new messages. IMAP users can
change the password they use to access their mailbox.
To specify display options for new LMS messages
1. Select Tools > Options.
2. Select the Integrated Messaging tab.
3. In the When a new message arrives section, enable any of the following check boxes:
• Display icon in tray—displays an icon in the bottom right-hand corner when you have a new
message
• Display dialog—displays a new message dialog for voice and fax messages
• Play wave file—plays a sound when a new message arrives
4. Select OK.
Regardless of the options that are selected, messages accessed by LMS users are always
played in order from oldest to newest.
To change the new LMS message notification sound
1. Select Tools > Options.
2. Select the Integrated Messaging tab.
3. Make sure that the Play wave file check box is enabled.
4. Select the Browse button and select the wave file that you want.
5. Select Open to select the wave file.
6. Select play to hear the wave file.
7. Select OK.
180
Copyright © 2009 ADTRAN, Inc.
619510003-1A
Enterprise Communications Server
Compressing Voice Messages
To change the IMAP user password
1. Select Tools > Options.
2. Select the External Systems tab.
3. In the IMAP mailbox management section, select the Password button.
4. In the Password box, type the new password.
5. In the Re-enter box, retype the new password.
6. Select OK.
7. In the Options dialog box, select OK.
The IMAP user password must match the Lotus Notes user Internet password,
configured on the Lotus Notes Server.
Compressing Voice Messages
The voice message compression level determines how incoming voice messages, greetings, and
announcements are recorded and stored. Compression affects the size and quality of voice messages.
• Increasing the compression level lowers the audio quality and the file size.
• Decreasing the compression level improves the audio quality and increases the file size.
The default compression level is medium, but this level can be adjusted. For example, if you are traveling
and working over modem connections, you can select the maximum compression level so that your
messages are smaller. However, the audio quality will also be noticeably decreased.
To set the level of voice message compression
1. Select Tools > Options.
2. Select the Incoming Messages tab.
3. Move the slider to adjust the level of compression. The default level is Medium. Select Defaults to
return the compression level to the default value.
4. Select OK.
When you save an attachment from your system from the Local Message Store/Integrated
Client, the attachment is saved in the compression format selected. However, when you
save from your system from Microsoft Exchange Server, the attachment is saved in the
native compression format, which is equivalent to no compression.
619510003-1A
Copyright © 2009 ADTRAN, Inc.
181
Compressing Voice Messages
182
Enterprise Communications Server
Copyright © 2009 ADTRAN, Inc.
619510003-1A
Enterprise Communications Server
Troubleshooting
15 Troubleshooting
Overview
You can use UC server logs to review calls, events, system errors or warnings.
You can configure the UC server to automatically generate diagnostic information in the event of errors or
problems. You can also configure the diagnostic system options such that ADTRAN, your reseller, and/or
yourself is notified if the UC server is not functioning properly.
If you cannot find the information you are looking for in this manual or in the online help, then you can go
to the ADTRAN website for further information such as training materials, and a quick reference card, and
SIP phone user guides. For more information, refer to the following sections:
•
•
•
•
Troubleshooting Message Waiting Indicators on page 183
Troubleshooting the NetVanta UC Server on page 184
Using the NetVanta UC Server Logs on page 185
Accessing Documentation and Training on page 191
Troubleshooting Message Waiting Indicators
Sometimes message waiting indicators (MWI) on phones are incorrect following a power failure or
changes to the PBX.
Symptoms
The MWI on phones are incorrect.
Possible Causes
• A power failure has occurred.
• Changes were made to the PBX.
Solution
You can resynchronize the MWI on phones.
To resynchronize message waiting indicators on phones
Select Tools > Resynchronize All message waiting indicators.
619510003-1A
Copyright © 2009 ADTRAN, Inc.
183
Troubleshooting the NetVanta UC Server
Enterprise Communications Server
Troubleshooting the NetVanta UC Server
ADTRAN has observed that third-party firewall and antivirus products can cause problems with the proper
operation of the UC server.
The UC server is tested with Microsoft security products, such as Windows Firewall and
Windows Defender.
Symptoms
• UC server services keep shutting down with Trend Micro software installed.
• The UC client crashes, doesn't load forms, or produces unknown software errors.
Possible Causes
Sometimes problems can arise from third-party firewall or antivirus software installed on computers
hosting the server or client software.
Solutions
Proceed with the following potential solutions in the order in which they appear. Only when solution A and
B have been attempted and failed, should solution C be tried.
If a problem occurs, ADTRAN Technical Support advises that the third-party product be
removed from the system prior to contacting Technical Support for assistance. For
more information, refer to Accessing Technical Support on page 191.
Solution A: Verify that the NetVanta UC Server files are excluded from antivirus
software scanning
Verify that the following folders are excluded from antivirus software scanning (as noted in the NetVanta
UC Server Deployment Guide, and in the NetVanta UC Server Installation Guide).
• C:\Program Files\ADTRAN
Or any folder in which the UC server application is loaded.
• C:\ADTRANLogs
Or the folder to which logging application is configured.
• C:\Program Files Microsoft SQL Server
Or the default location of the database folder.
184
Copyright © 2009 ADTRAN, Inc.
619510003-1A
Enterprise Communications Server
Using the NetVanta UC Server Logs
Solution B: Uninstall the third-party antivirus or firewall software
1. Uninstall the third-party antivirus or firewall software.
2. Shutdown the UC server and restart.
Antivirus and firewall behavior is unpredictable even after shutting down or
uninstalling.
Solution C: Uninstall all software and reinstall
Wipe clean the computer hosting the server/client software, including the OS, and reinstall.
Using the NetVanta UC Server Logs
This section explains how to manage alert notifications of errors and warnings, logging statistics, and logs
and the information that they record. Logs record events that occur while the application is enabled on your
extension.
Four categories of events are recorded in logs: events, system errors and warnings, sent items, and received
calls. You can view logs and store them for future reference, track activity that takes place, and
troubleshoot occasional problems. Using the Import/Export wizard, you can export call logs as a tab
separated or XML-based file. The call log files can be used by other reporting applications to provide
historical reports on voicemail activity. For more information about the Import/Export wizard, refer to
Importing and Exporting on page 173.
The Events log tracks information related to user attempts to perform mailbox management.
The System Errors and Warnings log provides information that you can use to troubleshoot problems
619510003-1A
Copyright © 2009 ADTRAN, Inc.
185
Using the NetVanta UC Server Logs
Enterprise Communications Server
that occur with your call answering.
To troubleshoot specific warnings, refer to Troubleshooting warning log entries on
page 190.
The Sent Items log tracks information on outgoing faxes and events related to the use of the Notify Pager
and Deliver Messages elements. Details for each delivery or dispatch attempt are recorded, including the
date and time of the attempt; the phone number dialed; the port that handled the attempt; and the final
outcome of the delivery or notification attempt.
The Received Calls log tracks incoming calls, regardless of whether the UC server answered them or not.
Information logged includes the caller name and phone number, if available; the date, time, and length of
the call; whether the call was answered, and by which port; and whether a message was left or not.
Errors and Warnings Alert Notifications
If an error or warning occurs, for example, the UC server was unable to deliver a message, then the UC
server generates an error or warning log. When an error or warning log is produced, and there were no
previous unacknowledged errors or warnings, then UC server also produces an entry in the Windows event
log to indicate what has happened. Administrators will see an orange bar displayed at the bottom of the UC
client window as an alert that some action may be required. Conversely, when errors and warnings are
acknowledged, and there are no more unacknowledged errors or warnings, then a different entry is created
in the Windows event log, and the orange bar in the UC client disappears.
To view system errors and warning logs
1. On the left side of the UC client, select the Logs navigation bar to open the Logs menu.
2. Select System Errors and Warnings. On the right side in the Logs content pane, the errors and
warning logs appear.
To acknowledge the alert notification
On the right side in the Logs content pane, right-click on an error or warning log to accept or acknowledge
the error or warning. The orange bar will no longer appear, and the error or warning message is no longer
visible at the bottom of the UC client window.
Managing NetVanta UC Server Alerts from Windows SBS 2008
Microsoft Windows Small Business Server (SBS) 2008 records unacknowledged errors or warnings in the
UC server. This simplifies management such that Administrators do not need to have the UC client open in
order to be aware of any error or warning messages.
When the UC server is installed on Windows SBS 2008, a custom alert is automatically configured for the
SBS 2008 Console. If the UC server is not installed on the SBS 2008 system, but is installed on another
system on the network, then consult the Microsoft documentation for how to create a custom alert.
186
Copyright © 2009 ADTRAN, Inc.
619510003-1A
Enterprise Communications Server
Using the NetVanta UC Server Logs
To create a custom alert definition when the NetVanta UC Server is not installed on the
SBS 2008 system
1. Refer to www.msdn.microsoft.com/en-us/library/cc721719.aspx for details on how to create a custom
alert.
2. Specify the following:
Path
Application
Provider
UC server
SetEventID
256
ClearEventID
512
The Windows SBS Console display is refreshed every 30 minutes. This means that the
console display will not change immediately when an error or warning occurs, or when
all errors or warnings are accepted or acknowledged.
To access the NetVanta UC Server alerts from Windows SBS 2008
1. From the Start menu access the Event Viewer.
2. Open the Windows SBS Console, and select the Network tab. Under Computers, any UC server
unacknowledged errors or warnings will appear.
The log entry types are represented by different icons. The following table explains some of the icons that
might appear in your list of log entries.
Table 15–1: Log entry icon definitions
Icon
Definition
Error—represents an error, for example in voice message delivery
Warning—represents a warning
Received calls—represents calls that come in on a specified port
619510003-1A
Copyright © 2009 ADTRAN, Inc.
187
Using the NetVanta UC Server Logs
Enterprise Communications Server
Table 15–1: Log entry icon definitions
Voicemail access—represents a voice message event, for example, a voice message
sent from a UC server user to another user
Pager access—represents events in which UC server users send or receive a page
Message delivered
Voicemail access—represents user voicemail access, for example, users accessing
their own mailbox to receive voice messages
Log entry
Managing logs
To get the Logs menu, select the Logs navigation bar. You can retrieve and view, remove, and archive logs.
You can rename and delete log archives, and export a call log using the Import-Export wizard.
To retrieve and view a log
1. Double-click the log folder that you want to view. The contents of the log are displayed in the content
pane. When a log folder is open, its icon appears as an open book.
Closed log folder
Open log folder
2. Use the vertical scroll arrows to view the list of log entries.
3. Select a log entry to view information about it in the details pane.
To remove old log entries
1. Right-click anywhere in the content pane.
2. Select Clear log.
188
Copyright © 2009 ADTRAN, Inc.
619510003-1A
Enterprise Communications Server
Using the NetVanta UC Server Logs
3. Select one of the following:
•
•
•
•
Everything
Entries created before today
Entries created before the beginning of the month
Entries created before a specific date
If there are unacknowledged errors or warnings, you cannot archive or clear log items.
You must accept the notifications first.
4. If you enabled Entries created before a specific date, type the date in the text box.
5. Select OK.
To archive a log
1. Right-click anywhere in the content pane.
2. Select Archive log.
3. Select one of the following:
•
•
•
•
Everything
Entries created before today
Entries created before the beginning of the month
Entries created before a specific date
If there are unacknowledged errors or warnings, you cannot archive or clear log items.
You must accept the notifications first.
4. If you enabled Entries created before a specific date, type the date in the text box. The new archive
is put in the navigation pane as a log with a default title based on the current date.
Log archive
5. Select OK.
To rename a log archive
1. Select the archive that you want to rename.
2. Select Edit > Rename.
3. Type a new name for the archive.
619510003-1A
Copyright © 2009 ADTRAN, Inc.
189
Using the NetVanta UC Server Logs
Enterprise Communications Server
To delete a log archive
1. Select the archive that you want to delete.
2. Select Edit > Delete.
3. Select Yes to confirm the deletion.
To export a call log using the Import-Export wizard
1. Select File > Import-Export Wizard, and then select Next.
2. Select Export Activity Report, and then select Next.
3. Select the types of logs that you want to export, and then select Next.
4. Enable either of the following, and then select Next:
• All logs—exports all call logs
• Date range—exports call logs from within a range of dates that you specify
5. Select the file type for the call log that you want to export.
6. Do either of the following, and then select Next:
• Type a location for the file in the Save exported file as box.
• Select Browse to find a location for the file.
7. If you want to save the configuration, type a name in the box.
8. Select Next to export the log.
9. Select Close.
View the call log files using the appropriate application, for example, Microsoft Excel.
Troubleshooting warning log entries
The following is a list of potential warnings that may be noted in the System Errors and Warning logs. To
troubleshoot a warning, locate the log entry below, and note the possible causes of and solutions for the
warning.
Not all errors and warnings necessarily require action.
190
Copyright © 2009 ADTRAN, Inc.
619510003-1A
Enterprise Communications Server
Accessing Documentation and Training
Log Entry
Possible Causes and Solutions
System did not receive Caller ID information from Verify that Caller ID is available when attempting to
the modem and hence, could not transmit it to your send a pager notification which includes sending
pager. Ensure that your phone rings at least twice the Caller ID.
before answering otherwise you will not receive
Caller ID information.
Failed to update %s's database with the received
fax. The fax will be saved instead to the default
mailbox.
There was a problem communicating with the
database defined in the Receive Fax element.
Check your database connection parameters, and
ensure that the database is available.
The data source, %s, referenced in the element,
%s, is unknown.
ServiceStateMachine when an element refers to a
data source that no longer exists. Verify the
following:
1. The ODBC data source, if applicable, is correctly
configured
2. The fields in the reference data source may
have been changed or deleted. Verify the data
source configuration.
Accessing Documentation and Training
If you want more information than what is available in this manual or in the online help, then go to the
ADTRAN website at http://kb.adtran.com. Here you will find training materials, and a quick reference
card, along with SIP phone user guides.
Accessing Technical Support
Unless there is a support contract in place, please see your reseller for support information. For more
information on ADTRAN Technical Support, refer to the ADTRAN website at www.adtran.com.
If you are contacting ADTRAN Technical Support, then please ensure that you have the following
information readily available.
• Product edition (Standard, SIP, or CEBP)
• Product version
• Service code
The Service code is an identification number to be used when contacting ADTRAN Technical Support. If
you are contacting ADTRAN Technical Support then you will need to enter the service code number over
the phone, so have the number ready when you call. The service contract type and expiry date are available
for your information.
To access the NetVanta UC Server product and service information
From the UC server select Help > About UC Client. Alternatively, select the ? button on the toolbar.
619510003-1A
Copyright © 2009 ADTRAN, Inc.
191
Accessing Technical Support
192
Enterprise Communications Server
Copyright © 2009 ADTRAN, Inc.
619510003-1A
Enterprise Communications Server
Appendix A - Glossary
Appendix A - Glossary
Account Codes
An account code is a specified set of digits that the caller must enter after completing the dialing pattern.
Account codes represent an accounting category, for example, expenditures, revenues, or salaries. They are
also used to ensure security because a caller who does not have an account code cannot access specified
information. Use account codes to allow long distance dialing, in which the telephone company applies the
long distance charges to your account code.
Active Message Delivery
Active Message Delivery is a feature of the UC server. The UC server calls you to deliver your messages.
It informs you of a new message and asks you to enter your password to review the message.
Active Service
Your active service is the service that is currently enabled and answering your calls.
Announcements
Announcements are outgoing recorded messages that play to callers. Announcements apply to trunk lines
and are managed by the network administrator.
Assisted Transfer
An option that allows the call recipient to accept or deny a call based on the caller’s recorded name.
Caller
A caller is a person who initiates an incoming call.
Call Park/Pickup
A type of hold that allows a user to “park” a caller on hold so that another user on the system can pick up
the call on another telephone.
Call Transfer
Have your calls transferred to an operator, to another number, or to a different extension using the Call
Transfer element in your service. Note that your workplace must have Call Transfer from your telephone
service provider or PBX to be able to use the Call Transfer element.
Contacts
Contacts are individuals from whom you receive calls, email messages or faxes. They are entered in the
Contacts database in Microsoft Outlook.
Cover Page Editor
The Cover Page Editor is the tool you use to create and design fax cover pages.
619510003-1A
Copyright © 2009 ADTRAN, Inc.
193
Appendix A - Glossary
Enterprise Communications Server
DTMF
Dual tone multi-frequency tones are also known as touchtone dialing.
Fax-on-demand
Fax-on-demand allows callers to dial in and retrieve a fax document completely unattended. The caller
follows instructions to select the desired document and the UC server automatically transmits it. The
administrator sets up fax-on-demand services on trunk lines.
Greetings
Users can record three types of standard greetings: an identifier, an internal greeting, and an external
greeting. The identifier states the user’s name. The internal greeting is played to internal callers, while
external callers making incoming calls hear the external greeting.
Identities
Any dialable string of numbers, such as an extension or email address, that reaches a specific user is an
identity. A user profile can have several identities.
Integrated Messaging
If Integrated Messaging is enabled for a user, then a Mailboxes navigation bar is added to the user’s UC
client. The user can then manage their voice and fax messages visually through the Inbox and Sent Items
folders in the UC client.
Logs
Logs are records of activity within the UC server. The UC server logs all events and provides information
on Errors and Warnings, Received Calls, Sent Items, and Events.
One-time Message
A One-time Message is a message that you record for an expected caller. The message is caller-specific
such that no others will receive it. When the message has been played, it is automatically erased.
Pager notification
Pager Notification is a feature of the UC server that calls your supported paging system to inform you of
new messages in your mailbox.
PBX
The Private Branch Exchange is a system of telephone lines that serves an organization and uses telephone
services, rather than supplies them. Users of the PBX share a certain number of outside lines for making
external calls.
194
Copyright © 2009 ADTRAN, Inc.
619510003-1A
Enterprise Communications Server
Appendix A - Glossary
Remote mailbox management
Remote mailbox management allows users to access their mailbox from an external, or remote, telephone.
SIP
Session Initiation Protocol is a signaling protocol that establishes sessions in an IP network for features
such as multi-media conferencing or call forwarding deployed over IP networks. This allows service
providers to integrate basic IP telephony services with Web and email. SIP server also supports traditional
telephony features, such as personal mobility, time-of-day routing, and call forwarding.
Text-to-speech
The text-to-speech engine reads back email messages over the phone when users call in to review their
messages.
User
A user is someone who has a UC server profile on the system.
Unified Messaging
Unified Messaging allows users to manage all message types from one central storage location. This
means a single inbox for voice, email, and fax messages that is accessible by both telephone and computer.
The UC server provides a unified messaging solution that allows you to receive all your messages in the
Microsoft Outlook Client. Users receive all of their messages at once, in one convenient location.
619510003-1A
Copyright © 2009 ADTRAN, Inc.
195
Appendix A - Glossary
196
Enterprise Communications Server
Copyright © 2009 ADTRAN, Inc.
619510003-1A
Enterprise Communications Server
Appendix B - Installing the NetVanta UC Client Application
Appendix B - Installing the NetVanta UC Client
Application
To install the application
1. Insert the NetVanta UC Client CD-ROM into the CD-ROM drive of the user’s computer.
2. On the desktop, select My Computer.
3. Double-click the CD-ROM drive icon to start the auto-run utility.
4. Select Install UC Client.
5. Double-click Setup to open the Welcome menu.
6. Select Next. Read the Software License Agreement menu carefully.
7. If you accept the agreement, select Yes to open the Choose Destination Location menu. The default
destination folder is:
C:\...\UC client.
8. Select Next to open the SetupType menu. The default setup is Typical.
9. Select Next to open the Select Program folder menu. The default program folder is ADTRAN UC
client.
10. Select Next. Wait while the program files are copied to your computer. The Setup Complete menu
appears when the UC client application is installed.
11. Select Finish.
619510003-1A
Copyright © 2009 ADTRAN, Inc.
197