Transcript
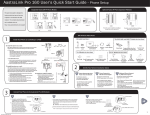
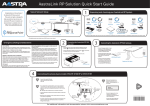
AastraLink Pro 160 Administrator’s Quick Start Guide
1
Typical Network Setup
SIP Service
Provider
This quick start guide is designed to
help you quickly set up and use your
AastraLink Pro 160
Small Home Office
Wa
ll M
Temounti
pla ng
te
CCFF
Router
complete documentation set
Internet
Internet
is available online at:
Router
Public
Telephone
Network
http://www.aastratelecom.com/support
Router
AastraLink Pro 160
Wall-Mounting Kit
Compact Flash Card
(installed in unit)
Rack-Mounted Unit: Attach the brackets using the 4 screws from
12V Power Adapter
with cord
the Rack Mounting Kit, to your AastraLink Pro. Mount the unit
in your rack in a flush-mount position.
Wall-Mounted Unit: Using the template, screws, and anchors from
Office 2
the Wall Mounting Kit, mount the AastraLink Pro to your wall.
The bottom of the unit should be against the wall when mounted.
Mounting Brackets (2)
Screws (4)
LAN
Ra ck-Mount Kit
CF
CF
AastraLink Pro 160
RJ11 C ables (6) f or FXO
RJ45 Cable for Ethernet LAN
AC Power Cord
Desktop Unit: Place the AastraLink Pro on a flat surface. Attach
the rubber feet to the bottom corners of the unit. These rubber
feet prevent the unit from sliding.
Office 1
3
4
Connect the AastraLink
t
Pro 160 to Your Network
On the back panel of the AastraLink Pro 160:
1. Attach the gray RJ11 cables to the FXO line ports 1 through 6, starting with line 1. Attach the other end of the gray cables to your telephone wall jacks or phone switch.
2. Attach the yellow RJ45 cable to the yellow LAN port and the other end of the cable to a 10/100baseT full-duplex Ethernet switch (half-duplex hub not supported).
3. (Optional Step) Connect Port A ( / FAX) to an incoming/outgoing FAX.
4. Connect Port B (
/ FAX ) to a phone or an outgoing FAX (lifeline phone is the default; outgoing-only FAX is optional).
5. Verify the CompactFlash card is installed in the front slot of the unit.
6. Connect the 12V power adapter cord to the 12VDC 1.25A power port on the unit.
7. Connect the black AC power cord into the 12V power adapter, and plug the other end of the power cord into an AC outlet.
On first bootup, the AastraLink Pro 160 updates its firmware. The Status LED on the front panel turns steady green during startup,
then flashes red/green during firmware update. The system is ready to use when the status LED flashes on/off green repeatedly.
WARNING: DO NOT interrupt the power during a firmware update; system corruption may result, rendering the system unusable.
Back Panel
Front Panel
CF
Power/Status LED
5
(Steady Green = booting.
Flashing Red/Green = updating firmware
Flashing Green = system ready for use)
Connect Your Administrator Phone to Your LAN
To connect your Administrator phone to the AastraLink Pro 160 network:
1 . Connect the Ethernet cable (provided with your phone) to the network port (marked
Compact Flash
Compact Flash Slot
(ships installed in drive)
12V Power Adapter
LAN
WAN
RJ45 Ethernet Cable
to full-duplex switch
3. (Optional) Connect an Ethernet cable to the PC port (marked
NOTE: For port locations on the various phone models, see the AastraLink Pro 160 Quick Start User Guide.
/ FAX
A
B
LINE
1
2
3
FXS-B Lifeline to
Phone (optional out FAX)
4
5
Your phone begins the startup sequence and the phone registration process.
Go to step 5 to continue.
6
WARNING: DO NOT unplug or remove power from the phone while it is starting up. The phone checks
for new configuration and firmware updates from the AastraLink Pro 160.
1.
2.
3.
4.
Choose the language to use on your AastraLink Pro 160, then press <Select>.
Choose the country where this AastraLink Pro 160 resides, then press <Select>.
Choose the time zone where the AastraLink Pro 160 resides, then press <Select>.
If the Internet is available on your network, choose “Automatic” then press <Select> to allow the
AastraLink Pro 160 to set the local Date/Time for your phone; if the Internet is not available, choose "Manual",
then press <Select> and follow the Phone UI prompts to set the date and time locally.
5. Choose “Use Default”, then press <Select>. The phone uses the following default settings:
Extension Length (3), First Extension (200)
You can edit these settings later, if required, using the AastraLink Pro 160 Web UI.
6. Choose the language to use on your Administrator phone, then press <Select>.
7. Enter the first name of the Administrator, then press <Enter>.
8. Enter the last name of the Administrator, then press <Enter>.
9. (Optional) Enter the Administrator email address, then press <Enter>.
(To enter the @ symbol, press the # key until it appears on your Phone UI.)
10. Enter a numeric password to be used for the Administrator password, then press <Enter>. Use the box
below to record your password for future reference.
Your Administrator phone reboots. When the startup process is complete, your Phone UI displays the IP address
of the AastraLink Pro 160. Use the box below to record your AastraLink Pro 160 address. You need this address to
access the AastraLink Pro 160 using the Web UI. Press <Exit> to complete the installation process.
Administrator
Password:
41-001134-03 REV 00
AastraLink Pro 160
IP Address:
6
60%
Checking for Firmware
Do not unplug phone!
FXO Cables
Register Your Administrator Phone in Your Network
The first phone registered to the AastraLink Pro 160 becomes the
Administrator phone by default. To register your Administrator phone
in the AastraLink Pro 160 network:
on the 9xxxi phones and PC on the 5xi phones).
4. (Optional) Connect the other end of the Ethernet cable to your PC.
/ FAX
FXS-A
(default for
in/out FAX)
on the 9xxxi phones and LAN on the 5xi phones).
2. Connect the other end of the Ethernet cable to an Ethernet hub/switch or wall-jack.
NOTE: If your Ethernet network DOES NOT provide power to the phone (either from the switch, or using an in-line power adapter),
you must use the supplied 48v AC adapter to power the phone. Connect the 48v adapter cable into the phone's power
connector
and plug the adaptor into an AC power source.
TM8DC
12 VDC 1.25A
Mount the AastraLink Pro 160
The AastraLink Pro 160 can be rack-mounted,
wall-mounted, or placed on a desktop.
Template
Screws (3)
Anchors (3)
CCFF
AastraLink Pro 160 system. The
2
Unpack and Check Your AastraLink Pro 160 Contents
Access the AastraLink Pro 160 Web UI
To access the AastraLink Pro 160 Web UI:
1. Enter the IP address of the AastraLink Pro 160 in your Web browser. For example, http://10.15.13.223.
2. In the Login window, enter your Administrator extension and the password chosen during registration.
3. Select <Login> to view the AastraLink Pro 160 Web UI Main Menu. The current AastraLink Pro 160 status displays
in the lower left corner of the Main Menu window.
7
Install and Register User Phones
After installing and registering your Administrator
phone, you can use the Administrator Web UI
to pre-add User/phone accounts or have users
self-register their phones on first connection
to the AastraLink Pro 160.
Refer to the AastraLink Pro 160 Quick Start User
Guide for more information.
AastraLink Pro Login Screen
Hold
Redia
l
Refer to the AastraLink Pro 160 Administrator’s
Guide for more information about using the Web UI
to configure and manage the Aastra IP Phones in
your network.
Go
od
bye
Op
tio
ns
35
Xfer
Co
nf
Ico
m
Servi
ce
s
AastraLink Pro Web UI Main Menu
For Administrator Guide, User Guides, Regulatory information and Conformance Statements regarding this product, refer to the online documentation at http://www.aastratelecom.com/support.