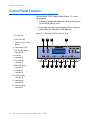
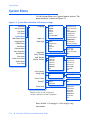
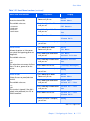
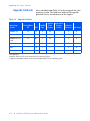
1
The Xerox
DocuPrint NC60
Color Laser Printer
System
Administrator
Guide
Version 1.0
Copyright protection claimed includes all forms and matters of
copyrightable materials and information now allowed by
statutory or judicial law or hereinafter granted, including without
limitation, material generated from the software programs which
are displayed on the screen such as styles, templates, icons, screen
displays, looks, etc.
Printed in the United States of America.
XEROX® and all Xerox product names and product numbers
mentioned in this publication are registered trademarks of the
Xerox Corporation. Other company trademarks are also
acknowledged. PCL is a trademark of the Hewlett-Packard
Company. MS, MS-DOS, Windows NT, Microsoft LAN Manager,
Windows 95 and Windows 98 are trademarks of Microsoft
Corporation. Adobe, Adobe Type Manager, Adobe PageMaker, and
PostScript are trademarks of the Adobe Systems, Inc. TrueType
and Apple ColorSync are trademarks of Apple Computer, Inc. OS/
2 is a trademark of International Business Machines Corporation.
SunOS and Solaris are trademarks of Sun Corporation.
MacroMedia FreeHand is a trademark of MacroMedia
Corporation. QuarkXpress is a trademark of Quark Corporation.
This printer contains an emulation of the Hewlett Packard
PCL 5C command language (recognized HP PCL 5C commands)
and processes these commands in a manner compatible with
Hewlett Packard LaserJet printer products.
Changes are periodically made to this document. Technical
updates will be included in subsequent editions.
© 1999 by Xerox Corporation. All rights reserved.
Contents
Chapter 1 Configuring the Printer ........................................... 1-1
Control Panel Features......................................................... 1-2
The Display ...................................................................... 1-3
The Indicator Lights.......................................................... 1-4
The Keys .......................................................................... 1-5
Navigating the Menu System............................................. 1-10
Menu Symbols ............................................................... 1-12
Setting a Menu Option................................................... 1-13
Access to Special Operating Modes ................................. 1-15
Control Panel Locks ........................................................ 1-16
Main Menu ....................................................................... 1-17
Job Menu .......................................................................... 1-19
Password Menu ................................................................. 1-22
Tray Menu ........................................................................ 1-25
PCL Menu ......................................................................... 1-29
System Menu .................................................................... 1-34
Color Adjust Menu............................................................. 1-42
Imaging Menu .................................................................. 1-46
DocuPrint NC60 System Administrator Guide
i
Parallel Menu .................................................................... 1-50
Serial Menu....................................................................... 1-53
Ethernet Menu .................................................................. 1-57
Token Ring Menu .............................................................. 1-69
Novell Menu...................................................................... 1-83
Print Menu ........................................................................ 1-91
Media Server Menu ........................................................... 1-96
Service Menu..................................................................... 1-99
Reset Menu ..................................................................... 1-109
Chapter 2 Managing Printer Usage ......................................... 2-1
Network Printer Services ...................................................... 2-2
CentreWare DP ................................................................... 2-3
CentreWare Internet Services ............................................... 2-4
Setup ............................................................................... 2-4
Chapter 3 Using the Hard Drive ............................................... 3-1
Hard Drive Considerations ................................................... 3-2
Disk Initialization ............................................................. 3-2
Downloading Fonts and Macros........................................... 3-3
FSDOWNLOAD Command ............................................... 3-4
FSDELETE Command ........................................................ 3-7
Using the Hard Disk Drive for Secure and Proof Jobs ............. 3-8
Creating Secure Jobs......................................................... 3-8
Creating Proof Jobs......................................................... 3-10
Printing or Deleting Secure or Proof Jobs ......................... 3-12
Chapter 4 Maintaining the Printer ........................................... 4-1
Regular Printer Maintenance................................................ 4-3
Cleaning the Printer............................................................. 4-4
Cleaning the Print Drum Charger...................................... 4-4
Cleaning the Grounding Roller and Feed Rollers ................ 4-5
DocuPrint NC60 System Administrator Guide
Adjusting Density and Color Balance .................................... 4-8
Printing a Test Page ......................................................... 4-9
Interpreting the Test Print............................................... 4-10
What To Look For........................................................... 4-11
Making Adjustments ...................................................... 4-12
Adjustment Recovery ...................................................... 4-15
Upgrading the Printer Software.......................................... 4-16
Before You Upgrade........................................................ 4-17
Upgrade Methods .......................................................... 4-18
Printer Controller Upgrade Process .................................. 4-19
Determining a Successful Upgrade .................................. 4-20
After the Upgrade........................................................... 4-20
Procedure A.................................................................... 4-21
Procedure B.................................................................... 4-22
Procedure C ................................................................... 4-24
Procedure D ................................................................... 4-26
Procedure E .................................................................... 4-28
Procedure F .................................................................... 4-29
Procedure G ................................................................... 4-31
General Troubleshooting ................................................ 4-32
Chapter 5 Troubleshooting ...................................................... 5-1
Control Panel Messages....................................................... 5-2
DocuPrint NC60 System Administrator Guide
DocuPrint NC60 System Administrator Guide
Configuring the Printer
1 r e tpahC
Control Panel Features ....................................................... 1-2
Navigating the Menu System ........................................... 1-10
Main Menu ..................................................................... 1-17
Job Menu ........................................................................ 1-19
Password Menu ............................................................... 1-22
Tray Menu ...................................................................... 1-25
PCL Menu ....................................................................... 1-29
System Menu .................................................................. 1-34
Color Adjust Menu ........................................................... 1-42
Imaging Menu ................................................................ 1-46
Parallel Menu .................................................................. 1-50
Serial Menu ..................................................................... 1-53
Ethernet Menu ................................................................ 1-57
Token Ring Menu ............................................................ 1-69
Novell Menu .................................................................... 1-83
Print Menu ...................................................................... 1-91
Media Server Menu ......................................................... 1-96
Service Menu ................................................................... 1-99
Reset Menu ................................................................... 1-109
Chapter 1: Configuring the Printer
❖ 1-1
Control Panel Features
Control Panel Features
The DocuPrint NC60 Control Panel (Figure 1.1) serves
two purposes:
1. It displays information about the status of the printer
(or the job in process) and
2. It provides the means for changing printer settings to
control how the DocuPrint NC60 operates.
Figure 1.1 DocuPrint NC60 Control Panel
1 On Line LED
2 Press Enter LED
1
2
3
5
6
7
4
3 Two line, user interface
display
4 Color Process LEDs
5 On Line/Off Line key
Password #0
6 Enter key
Password #1
7 Menu Up key
Password #2
8 Menu Down key
Password #3
9 Item Up key
Password #4
10 Item Down key
Password #5
11 Value Up key
Password #6
12 Value Down key
Password #7
1-2 ❖ DocuPrint NC60 System Administrator Guide
8
9
10
11
12
Control Panel Features
The Display
The Control Panel's display performs two functions.
• It informs you of printer status conditions, such as
when toner is low, when a paper tray is empty, when a
job is in process, and so on. For example, when you
turn on the printer, you see the following message on
the display:
Ready
This message appears whenever the printer is on-line
and ready to accept print jobs. The display will also
show:
Processing...
when processing data, and:
Waiting
when waiting for more data.
• It presents a hierarchy of menu options and settings to
configure and control the printer.
For example, when you press Menu Up or Menu
Down, you will see the following two-line message on
the display:
Menus
Item Menu
(such as System Menu or Job Menu)
See the section “Menu Symbols” (page 1-12) for more
information on indicators.
See the section “Main Menu” (page 1-17) for
information on the Menu system hierarchy.
Chapter 1: Configuring the Printer
❖ 1-3
Control Panel Features
The Indicator Lights
The Control Panel contains six indicator lights. Table 1.1
describes the function of each light.
Table 1.1
Control Panel indicator lights and their
functions
Light
Description
Online
When the printer is On-line the light is On.
When the printer is Off-line, it is OFF. When
transitioning from On-line to Off-line, it flashes
at a rate of 2 times per second. It also flashes to
indicate that data are being processed by
Postscript, PCL or PJL, or are being spooled to
the disk (e.g. secure or proof job).
Press Enter
The light is flashing when the Enter key should
be pressed to:
• Release a print job sent as a Hold Job.
• Release a PCL job where no End of Job has
been received (PCL Form Feed).
Black
Cyan
Magenta
Yellow
1-4 ❖ DocuPrint NC60 System Administrator Guide
Each light is on while the engine is processing
the corresponding toner color. When an out of
toner condition is encountered, the LED
corresponding to the low toner flashes.
Control Panel Features
The Keys
The Control Panel keypad consists of eight keys,
identified with international symbols and/or labeled in
English. The keys are also numbered 0 - 7. (Control Panel
overlays are available in some languages and are supplied
with the printer where applicable.)
Table 1.2 describes the function of each key.
Table 1.2
Key
Online
Control Panel keys and their functions
Description
• If the Printer is On-line and not in the Menu system, pressing this key causes a
transition to Off-line. All pages currently in the paper path are printed and then
printing pauses until the printer is placed On-line. Status information via SNMP is
provided while in the Off-line state. Data are still accepted over all network
interfaces, and page formatting continues as long as memory is available. The
exception is the Parallel port running in the Compatibility mode, or the Serial port.
In Parallel, Off-line forces the “Select” line false and forces the “Fault” line true. In
Serial, Off-line sends an XOFF if this handshaking mode is selected, and forces the
DTR line false.
• If the printer is On-line and in the Menu system, pressing this key exits the menu
system. The printer remains On-line.
• If the printer is Off-line and not in the Menu system, pressing this key causes the
printer to change to the On-line state, provided no operator intervention condition
exists. This key is ignored if an operator intervention condition exists.
• If the printer is Off-line and in the Menu system, pressing this key exits the Menu
system. The printer state changes to On-line, provided no operator intervention
condition exists.
• If in the Password menu, and the display indicates “Enter Password”, pressing this
key causes a password digit “0” to be entered.
Table 1.2 Page 1 of 5
Chapter 1: Configuring the Printer
❖ 1-5
Control Panel Features
Table 1.2
Control Panel keys and their functions (continued)
Key
Description
Enter
• If the current display is a value for an item, pressing this key causes the value to be
entered as the default value for this item. The currently displayed value is
immediately loaded in NVRAM. The display then returns to indicate the current
menu on the top line and the current item on the bottom line.
• Some values require a power cycle before taking effect.
• If the current display is an action to be invoked (e. g. “PCL Font List”, “Restart
Printer”), pressing this key causes the action to take place. Following the action, the
display returns to indicate “Ready” on the top line.
• If not in the Menu system, and the “Press Enter” LED indicates that a partial page
exists, pressing this key causes an implied PCL reset and the partial page is printed.
• If a paper mismatch condition exists, and a request to load paper is displayed,
pressing this key causes printing on the media currently loaded in the selected tray
(Print Anyway). See Value Up or Value Down for more information.
• If in the Password menu, and the display indicates “Enter Password”, pressing this
key causes a password digit “1” to be entered.
>
Menu Up ( )
• If in the menu system, pressing this key causes the Control Panel to scroll through
the menus in order bottom to top unless a higher priority message is displayed,
which preempts menu navigation. Menu scrolling is available without going to the
Off-line state. Scrolling wraps, such that if the displayed menu is the top menu,
pressing this key scrolls to the bottom menu.
• If an item, value or action is displayed, pressing this key returns to the top of the
current menu and removes the display of the item, value or action.
• If not in the menu system, pressing this key enters the menu system and displays
the first menu, Job Menu.
• If in the Password menu, and the display indicates “Enter Password”, pressing this
key causes a password digit “2” to be entered.
Table 1.2 Page 2 of 5
1-6 ❖ DocuPrint NC60 System Administrator Guide
Control Panel Features
Table 1.2
Control Panel keys and their functions (continued)
Key
Description
>
Menu Down ( )
• If in the menu system, pressing this key causes the Control Panel to scroll through
the menus in order top to bottom unless a higher priority message is displayed,
which preempts menu navigation. Menu scrolling is available without going to the
Off-line state. Scrolling wraps, such that if the displayed menu is the bottom
menu, pressing this key scrolls to the top menu. If an item, value or action is
displayed, pressing this key returns to the top of the current menu and removes the
display of the item, value or action.
• If not in the menu system, pressing this key enters the menu system and displays
the last menu.
• If in the Password menu, and the display indicates “Enter Password”, pressing this
key causes a password digit “3” to be entered.
>
Item Up ( )
• If in the menu system, pressing this key causes the Control Panel to scroll through
the items in the current menu in order bottom to top unless a higher priority
message is displayed, which preempts menu navigation. Scrolling wraps, such that
if the displayed item is the top item, pressing this key scrolls to the bottom item. If a
value is displayed, pressing this key returns to the current item in the current menu
and removes the value from the display.
• If not in the menu system, this key is ignored.
• If in the Password menu, and the display indicates “Enter Password”, pressing this
key causes a password digit “4” to be entered.
Table 1.2 Page 3 of 5
Chapter 1: Configuring the Printer
❖ 1-7
Control Panel Features
Table 1.2
Control Panel keys and their functions (continued)
Key
Description
>
Item Down ( )
• If in the menu system, pressing this key causes the Control Panel to scroll through
the items in the current menu in order top to bottom unless a higher priority
message is displayed, which preempts menu navigation. Scrolling wraps, such that
if the displayed item is the bottom item, pressing this key scrolls to the top item. If a
value is displayed, pressing this key returns to the current item in the current menu
and removes the value from the display.
• If not in the menu system, this key is ignored.
• If in the Password menu, and the display indicates “Enter Password”, pressing this
key causes a password digit of “5” to be entered.
Value Up (+)
• If in the menu system, and an item is displayed, pressing this key causes the Control
Panel to scroll through the values for the current item in order bottom to top unless
a higher priority message is displayed, which preempts menu navigation. Scrolling
wraps, such that if the displayed value is the top value, pressing this key scrolls to
the bottom value. If no value for the current item is displayed (Item key was pressed
but Value key not yet pressed for this item), pressing this key displays the default
value for the current item. When setting a numeric value, pressing this key increases
the value by the step amount. It is subject to auto-repeat if held down for more
than 1 second, after which the value scrolls repeatedly until the key is released. The
increment for each step may be greater than that for a single key press.
• If not in the menu system, and a paper mismatch condition does not exist, this key
is ignored.
• If a Paper Mismatch condition exists, pressing this key scrolls through the alternate
media that may be used instead of the requested media.
• If in the Password menu, and the display indicates “Enter Password”, pressing this
key causes a password digit “6” to be entered.
Table 1.2 Page 4 of 5
1-8 ❖ DocuPrint NC60 System Administrator Guide
Control Panel Features
Table 1.2
Control Panel keys and their functions (continued)
Key
Value Down (-)
Description
• If in the menu system, and an item is displayed, pressing this key causes the Control
Panel to scroll through the values for the current item in order top to bottom unless
a higher priority message is displayed (e.g. operator intervention required, etc.),
which preempts menu navigation. Scrolling wraps, such that if the displayed value
is the bottom value, pressing this key scrolls to the top value. If no value for the
current item is displayed (Item key was pressed but Value key not yet pressed for
this item), pressing this key displays the default value for the current item. When
setting a numeric value, this key decreases the value by the step amount. It is
subject to auto-repeat if held down by more than 1 second, after which the value
scrolls repeatedly until the key is released. The decrement for each step may be
greater than that for a single key press.
• If not in the menu system, and a paper mismatch condition does not exist, this key
is ignored.
• If a Paper Mismatch condition exists, pressing this key scrolls through the alternate
media that may be used instead of the requested media.
• If in the Password menu, and the display indicates “Enter Password”, pressing this
key causes a password digit “7” to be entered.
Table 1.2 Page 5 of 5
Chapter 1: Configuring the Printer
❖ 1-9
Navigating the Menu System
Navigating the Menu System
The Control Panel contains two menu structures.
1. Main Menu and its submenus.
— Job Menu
— Password Menu (when the Hard Disk Drive is
installed)
— Tray Menu
— PCL Menu
— System Menu
— Color Adjust Menu
— Imaging Menu
— Parallel Menu
— Serial Menu
— Ethernet Menu
— Token Ring Menu (when the Token Ring Card is
installed)
— Novell Menu
— Print Menu
— Media Server Menu (when the optional Media
Server is installed)
— Service Menu
Press Menu Up or Menu Down to access the Main
Menu. Each of the submenus may have other
submenus, settings, actions or functions.
1-10 ❖ DocuPrint NC60 System Administrator Guide
Navigating the Menu System
2. Reset Menu and its functions.
— Factory Defaults
— Network Defaults
— CRU Resets
— Restart Printer
— Delete All Jobs (requires Hard Disk Drive option)
— Disk Initialize (requires Hard Disk Drive option)
— Disk Format (requires Hard Disk Drive option)
The Reset Menu is included in the menu list by simultaneously
holding down Online and Enter when the printer is being
powered up. See the section “Reset Menu” (page 1-109) for
more information.
Chapter 1: Configuring the Printer
❖ 1-11
Navigating the Menu System
Menu Symbols
Table 1.3
Symbol
=
Two menu symbols (= and *) are used to furnish
information about menus and settings. The purpose of
each symbol is described in Table 1.3 below.
Symbols found in the Control Panel Menu systems
Purpose
When at a point where a value may be changed, the item
name is displayed on the top line with the = symbol in the last
character position, and the selected value is displayed on the
bottom line.
Example
Language
Français
=
Language
English
=
*
The example at the right tells you that Language is an option
that takes a specific setting. One setting for the Language
option is Français. Another setting is English. (The list of
available settings is displayed one setting at a time on the
bottom line of the display as you press Value Up or Value
Down.)
*
When first arriving at a point where a setting may be changed,
the current value is displayed on the bottom line and a *
symbol appears next to it in the last character position. Pressing
Up Value or Down Value scrolls through the possible values.
Whenever the current value is displayed, the * is displayed in
the last character position. Pressing Enter causes the * to
display in the last character position for the new value. Since
pressing Enter causes the display to indicate the current menu
and current item, the asterisk may not be seen until the item
and current value is displayed again by pressing a Value key.
The example at the right tells you that Language is currently set
to English.
1-12 ❖ DocuPrint NC60 System Administrator Guide
Navigating the Menu System
Setting a
Menu Option
To set an option or to invoke a function, follow the steps
below:
1
Press Menu Up or Menu Down to scroll through the
available submenus until you locate the one you want.
You will see:
Menus
Men u N ame
Where Menu Name is the current submenu displayed.
2
Press Item Up or Item Down to scroll through the items
of the submenu (all submenus except the Password
Menu).
You will see:
Menu Name
Ite m N ame
Where Item Name is the current item displayed. For the
Job, Print, Service and Reset (with the exception of the
Language option) Menus, the bottom line of the display
indicates the action to be taken (e.g., Config. Sheet or PCL
Font List).
Chapter 1: Configuring the Printer
❖ 1-13
Navigating the Menu System
3
Press Value Up or Value Down to select the appropriate
value for this item.
You will see:
Item Name
=
Current Value *
If a list of many values exists (e.g., 1 through 99 for
number of copies), you can scroll quickly by holding
down Value Up or Value Down.
When you see the value you want, press Enter to accept it.
4
If necessary, repeat Step 2 and Step 3 to go through other
menus, options, actions, functions and values.
After you press Enter to accept a value, the menu will
display:
Menu Name
Item Name
You may either continue to work in the Menu system by
repeating the steps above, or exit and return to normal
operation by pressing Online.
If you press Online at any time prior to pressing
Enter the new value will not be saved and the
Menu system is exited.
The printer automatically exits the Menu system
after 60 seconds of inactivity (i.e., no key has been
pressed).
1-14 ❖ DocuPrint NC60 System Administrator Guide
Navigating the Menu System
Access to Special
Operating Modes
The printer may be placed in special diagnostic or other
operating modes by turning on power while holding
down two keys on the Control Panel. The following are
the key combinations for each mode:
Table 1.4
Access to special operating modes
Key Combinations
Mode
On-line and Enter
(Keys numbered 0 and 1)
Sets a flag in RAM so that the
Control Panel enables the
“Reset” menu.
Menu Up and Menu Down
(Keys numbered 2 and 3)
Forces the “Software Update”
mode on the Parallel port.
Chapter 1: Configuring the Printer
❖ 1-15
Navigating the Menu System
Control Panel Locks
Some of the menus in the Control Panel may be “locked”
to prevent unauthorized access and changes to system
parameters. This is accomplished with the PJL “CPLOCK”
command. If the user scrolls to a locked menu, pushing
either “Item” key will cause the menu name to appear on
the top line, and “Menu Locked” to appear on the second
line. Menus are unlocked only with the corresponding PJL
“CPLOCK” command. Only the following menus are
available from the Control Panel when locked:
• Job Menu
• Password Menu (if optional Hard Disk is installed)
• Tray Menu
• Print Menu
• Media Server Menu (if Media Server is installed)
• Reset Menu
If you do not want users to have access to the Reset Menu,
power OFF and power ON the printer.
1-16 ❖ DocuPrint NC60 System Administrator Guide
Main Menu
Main Menu
The Main Menu is a system of submenus, each containing
options designed to configure the printer for your
environment. The Main Menu hierarchy is depicted in
Table 1.5 on page 1-18.
In this chapter, a boldfaced value followed by an asterisk (*)
indicates the factory default for that value. See the section
“Reset Menu” (page 1-109) for information on how to revert to
factory settings.
Items and values in italics are available only when the
applicable option is installed and operational.
Chapter 1: Configuring the Printer
❖ 1-17
Main Menu
Table 1.5
Main Menu hierarchy
Main Menu
Hierarchy and Factory Settings
Job Menu
See “Job Menu” (page 1-19).
Password Menu1
See “Password Menu” (page 1-22).
Tray Menu
See “Tray Menu” (page 1-25).
PCL Menu
See “PCL Menu” (page 1-29).
System Menu
See “System Menu” (page 1-34).
Color Adjust Menu
See “Color Adjust Menu” (page 1-42)
Imaging Menu
See “Imaging Menu” (page 1-46)
Parallel Menu
See “Parallel Menu” (page 1-50).
Serial Menu
See “Serial Menu” (page 1-53)
Ethernet Menu
See “Ethernet Menu” (page 1-57).
Token Ring Menu2
See “Token Ring Menu” (page 1-69)
Novell Menu
See “Novell Menu” (page 1-83).
Print Menu
See “Print Menu” (page 1-91)
Media Server Menu
See “Media Server Menu” (page 1-96)
Service Menu
See “Service Menu” (page 1-99)
Reset Menu3
See “Reset Menu” (page 1-109).
1
Appears only when the Hard Disk Drive is installed.
Appears only when the option is present.
3 Appears only when Online and Enter are simultaneously held down at power
ON.
2
1-18 ❖ DocuPrint NC60 System Administrator Guide
Job Menu
Job Menu
Use the Job Menu to cancel the job currently being
processed, force a form feed on a partially formatted job
in PCL, or restart the printer. The menu hierarchy is
shown in Figure 1.2.
Figure 1.2 Job Menu hierarchy
Job Menu
Cancel Job
Yes
No*
Formfeed
Yes
No*
Restart Printer
Yes
No*
Password Menu
Tray Menu
PCL Menu
System Menu
Color Adjust Menu
Imaging Menu
Parallel Menu
Serial Menu
Ethernet Menu
Token Ring Menu
Novell Menu
Print Menu
Media Server Menu
Service Menu
Reset Menu
Refer to Table 1.6 on page 1-20 for step-by-step
instructions.
Chapter 1: Configuring the Printer
❖ 1-19
Job Menu
Table 1.6
Job Menu functions
Menu Item and Function
Keystrokes
Display Reads
Cancel Job
1. Press Menu Up or Menu Down
until you see:
Menus
Job Menu
2. Press Item Up or Item Down until
you see:
Job Menu
Cancel Job
3. Press Value Up or Value Down until
you see:
Cancel Job
Yes
4. Press Enter. You will see:
Cancelling Job
Filename
5. When done, you will see:
Ready
1. Press Menu Up or Menu Down
until you see:
Menus
Job Menu
The available values are:
2. Press Item Up or Item Down until
you see:
Job Menu
Form Feed
Yes
No*
3. Press Value Up or Value Down until
you see:
Form Feed
Yes
4. Press Enter. You will see:
Job Menu
Form Feed
5. Press Online. You will see:
Ready
Cancel the job currently printing
(Postscript or PCL).
The available values are:
Yes
No*
Form Feed
Eject a partial PCL page when the
“Press Enter” LED is ON.
Table 1.6 Page 1 of 2
1-20 ❖ DocuPrint NC60 System Administrator Guide
Job Menu
Table 1.6
Job Menu functions (continued)
Menu Item and Function
Keystrokes
Display Reads
Restart Printer
1. Press Menu Up or Menu Down
until you see:
Menus
Job Menu
2. Press Item Up or Item Down until
you see:
Job Menu
Restart Printer
3. Press Value Up or Value Down until
you see:
Restart Printer
Yes
4. Press Enter. You will see:
[Startup Messages]
5. When the action is complete, you
will see:
Ready
Reinitialize the printer as if the
power was cycled, but bypassing
power on diagnostics.
The available values are:
Yes
No*
Table 1.6 Page 2 of 2
Chapter 1: Configuring the Printer
❖ 1-21
Password Menu
Password Menu
Use the Password Menu (available only when the optional
Hard Drive is installed) to print or delete secure or proof
jobs. Secure and proof jobs are enabled by drivers.
The menu hierarchy is shown in Figure 1.3.
Figure 1.3 Password Menu hierarchy
Job Menu
Password Menu
Tray Menu
PCL Menu
Enter Password
_xxx
System Menu
Color Adjust Menu
Imaging Menu
Parallel Menu
No Jobs
Press Menu
All Jobs
Print*
Delete
Filename n
Print*
Delete
Serial Menu
Ethernet Menu
Token Ring Menu
Novell Menu
Print Menu
Media Server Menu
Service Menu
Reset Menu
Refer to Table 1.7 on page 1-23 for step-by-step
procedures.
1-22 ❖ DocuPrint NC60 System Administrator Guide
Password Menu
Table 1.7
Password Menu functions
Menu Item and Function
Keystrokes
Display Reads
All Jobs
Print
1. Press Menu Up or Menu Down
until you see:
Menus
Password Menu
Print all jobs sent with a specific
password.
2. Press Item Up or Item Down. You
will see:
Enter Password
_xxx
3. Enter four-digit password using the
numbers on the Control Panel keys.
You will see:
All Jobs
Print
4. Press Enter. When print is
completed you will see:
Ready
Filename n
Print
1. Press Menu Up or Menu Down
until you see:
Menus
Password Menu
Print one or more jobs out of
several sent with a specific
password.
2. Press Item Up or Item Down. You
will see:
Enter Password
_xxx
A job with a name assigned to it
will replace the “Job n” with that
name.
3. Enter four-digit password using the
numbers on the Control Panel keys.
You will see:
All Jobs
Print
4. Press Item Up or Item Down until
you see:
Filename n
Print
5. Press Enter. You will see:
Printing
Filename n
6. Repeat Steps 4 and 5 until you have
identified all the jobs you wish to
print. When done, press Online.
You will see:
Ready
Table 1.7 Page 1 of 2
Chapter 1: Configuring the Printer
❖ 1-23
Password Menu
Table 1.7
Password Menu functions (continued)
Menu Item and Function
Keystrokes
Display Reads
All Jobs
Delete
1. Press Menu Up or Menu Down
until you see:
Menus
Password Menu
Delete all jobs sent with a specific
password.
2. Press Item Up or Item Down. You
will see:
Enter Password
_xxx
3. Enter four-digit password using the
numbers on the Control Panel keys.
You will see:
All Jobs
Print
4. Press Value Up or Value Down until
you see:
All Jobs
Delete
5. Press Enter. You will see:
Ready
Filename n
Delete
1. Press Menu Up or Menu Down
until you see:
Menus
Password Menu
Delete one or more jobs out of
several sent with a specific
password.
2. Press Item Up or Item Down. You
will see:
Enter Password
_xxx
3. Enter four-digit password using the
numbers on the Control Panel keys.
You will see:
All Jobs
Print
4. Press Item Up or Item Down until
you see:
Filename n
Print
5. Press Value Up or Value Down until
you see:
Filename n
Delete
6. Press Enter. You will see:
All Jobs
Print
7. Repeat Steps 4 to 6 until you have
deleted all the jobs you wish to
print. When done, press Online.
You will see:
Ready
Table 1.7 Page 2 of 2
1-24 ❖ DocuPrint NC60 System Administrator Guide
Tray Menu
Tray Menu
Use the Tray Menu to configure tray settings for both
PostScript and PCL jobs. The menu hierarchy is shown in
Figure 1.4. Items in italics appear only when the optional
Tray 2 is installed.
Figure 1.4 Tray Menu hierarchy with factory settings
Job Menu
Password Menu
Tray Menu
PCL Menu
System Menu
Color Adjust Menu
Imaging Menu
Parallel Menu
Serial Menu
Tray1 Cust. Size
Tray2 Cust. Size
Tray1 Type
Tray2 Type
Ethernet Menu
Token Ring Menu
Novell Menu
Print Menu
Media Server Menu
Service Menu
Tray Sequence
Statmt(5.5x8.5)
8x10
Folio(8.5x13)
SPFolio(216x315)*
A5(148x210)
B5-ISO(176x250)
Plain*
Transparency
Bond
Recycled
Color
(if 1 tray)
Off
(if 2 trays)
1-2
2-1
Reset Menu
Refer to Table 1.8 on page 1-26 for step-by-step
procedures.
Chapter 1: Configuring the Printer
❖ 1-25
Tray Menu
Table 1.8
Tray Menu functions
Menu Item and Function
Keystrokes
Display Reads
Tray1 Cust. Size
1. Press Menu Up or Menu Down
until you see:
Menus
Tray Menu
2. Press Item Up or Item Down until
you see:
Tray Menu
Tray1 Cust. Size
Statmt(5.5x8.5)
8x10
Folio(8.5x13)
SPFolio(216x315)*
A5(148x210)
B5-ISO(176x250)
3. Press Value Up or Value Down until
you see:
Tray1 Cust. Size
New Value
4. Press Enter. You will see:
Tray Menu
Tray1 Cust. Size
The factory default for paper size
is SPFolio, regardless of the
“Defaults” setting in the System
Menu.
5. Press Online. You will see:
Ready
Tray2 Cust. Size
1. Press Menu Up or Menu Down
until you see:
Menus
Tray Menu
2. Press Item Up or Item Down until
you see:
Tray Menu
Tray2 Cust. Size
Statmt(5.5x8.5)
8x10
Folio(8.5x13)
SPFolio(216x315)*
A5(148x210)
B5-ISO(176x250)
3. Press Value Up or Value Down until
you see:
Tray2 Cust. Size
New Value
4. Press Enter. You will see:
Tray Menu
Tray2 Cust. Size
The factory default for paper size
is SPFolio, regardless of the
“Defaults” setting in the System
Menu.
5. Press Online. You will see:
Ready
Define the paper size loaded into
Tray 1.
The available values are:
Define the paper size loaded into
the optional Tray 2.
The available values are:
Table 1.8 Page 1 of 3
1-26 ❖ DocuPrint NC60 System Administrator Guide
Tray Menu
Table 1.8
Tray Menu functions (continued)
Menu Item and Function
Keystrokes
Display Reads
Tray1 Type
1. Press Menu Up or Menu Down
until you see:
Menus
Tray Menu
2. Press Item Up or Item Down until
you see:
Tray Menu
Tray1 Type
3. Press Value Up or Value Down until
you see:
Tray1 Type
New Value
4. Press Enter. You will see:
Tray Menu
Tray1 Type
5. Press Online. You will see:
Ready
1. Press Menu Up or Menu Down
until you see:
Menus
Tray Menu
2. Press Item Up or Item Down until
you see:
Tray Menu
Tray2 Type
3. Press Value Up or Value Down until
you see:
Tray2 Type
New Value
4. Press Enter. You will see:
Tray Menu
Tray2 Type
5. Press Online. You will see:
Ready
Define the type of paper installed
in Tray 1.
The available values are:
Plain*
Transparency
Bond
Recycled
Color
Tray2 Type
Define the type of paper installed
in the optional Tray 2.
The available values are:
Plain*
Transparency
Bond
Recycled
Color
Table 1.8 Page 2 of 3
Chapter 1: Configuring the Printer
❖ 1-27
Tray Menu
Table 1.8
Tray Menu functions (continued)
Menu Item and Function
Keystrokes
Display Reads
Tray Sequence
1. Press Menu Up or Menu Down
until you see:
Menus
Tray Menu
2. Press Item Up or Item Down until
you see:
Tray Menu
Tray Sequence
3. Press Value Up or Value Down until
you see:
Tray Sequence
New Value
4. Press Enter. You will see:
Tray Menu
Tray Sequence
5. Press Online. You will see:
Ready
Define the order in which trays
are used when more than one
tray meets the size and type
requirements.
The available values are:
1-2
2-1
Off*
Tray switching is only available
when the optional Tray 2 is
installed.
=
The first tray of a sequence is
used until it runs out of paper, at
which time the next tray in the
sequence is used (if it has the
correct paper size and type).
Table 1.8 Page 3 of 3
1-28 ❖ DocuPrint NC60 System Administrator Guide
PCL Menu
PCL Menu
Use the PCL Menu to establish the default configuration
for the printer when printing PCL jobs. The menu
hierarchy is shown in Figure 1.5.
Figure 1.5 PCL Menu hierarchy
Job Menu
Password Menu
Font Number
Tray Menu
Pitch
PCL Menu
System Menu
Color Adjust Menu
Point Size
Imaging Menu
Parallel Menu
Serial Menu
Ethernet Menu
Symbol Set
Orientation
Form Length
Token Ring Menu
Novell Menu
Print Menu
Media Server Menu
Service Menu
Reset Menu
Line Termination
0*. . . 999
0.44 .. 10.00* .. 99.99
4.00 .. 12.00* .. 999.75
Portrait*
Landscape
005 .. 60* .. 128 (in)
005 .. 64* .. 128 (mm)
Off*
On
Desktop
ISO L1
ISO L2
ISO L5
ISO-4
ISO-6
ISO-11
ISO-15
ISO-17
ISO-21
ISO-60
ISO-69
Legal
Math-8
MS Publ.
PC-8*
PC-8 DN
PC-8 Tk
PC-850
PC-852
Pi Font
PS Math
PS Text
Roman-8
Vn Int’l.
Vn Math
Vn US
Win 3.0
Win L1
Win L2
Win L5
ISO Latin Cyr
PC Cyrillic
Refer to Table 1.9 on page 1-30 for step-by-step
procedures.
Chapter 1: Configuring the Printer
❖ 1-29
PCL Menu
Table 1.9
PCL Menu functions
Menu Item and Function
Keystrokes
Display Reads
Font Number
1. Press Menu Up or Menu
Down until you see:
Menus
PCL Menu
2. Press Item Up or Item Down
until you see:
PCL Menu
Font Number
To see the assigned font numbers,
print a PCL Font List.
3. Press Value Up or Value Down
until you see:
Font Number
New Value
The font number changes
incrementally to the next valid ID
each time either Value Up or Value
Down is pressed. Holding down
Value Up or Value Down causes
continuous scrolling through the font
numbers.
4. Press Enter. You will see:
PCL Menu
Font Number
5. Press Online. You will see:
Ready
Pitch
1. Press Menu Up or Menu
Down until you see:
Menus
PCL Menu
2. Press Item Up or Item Down
until you see:
PCL Menu
Pitch
3. Press Value Up or Value Down
until you see:
Pitch
New Value
4. Press Enter. You will see:
PCL Menu
Pitch
5. Press Online. You will see:
Ready
Set the ID of the default font in PCL.
The available values are:
0* - 999
Set the pitch when the font selected is
a scaleable fixed pitch font. Pitch is
measured in characters per inch or
c.p.i.
The available values are:
.44 - 99.99 (10.00*)
The pitch changes incrementally by
.01 each time either Value Up or
Value Down is pressed. Holding
down Value Up or Value Down
causes continuous scrolling through
the Pitch values.
=
=
Table 1.9 Page 1 of 4
1-30 ❖ DocuPrint NC60 System Administrator Guide
PCL Menu
Table 1.9
PCL Menu functions (continued)
Menu Item and Function
Keystrokes
Display Reads
Point Size
1. Press Menu Up or Menu
Down until you see:
Menus
PCL Menu
2. Press Item Up or Item Down
until you see:
PCL Menu
Point Size
3. Press Value Up or Value Down
until you see:
Point Size
New Value
4. Press Enter. You will see:
PCL Menu
Point Size
5. Press Online. You will see:
Ready
1. Press Menu Up or Menu
Down until you see:
Menus
PCL Menu
2. Press Item Up or Item Down
until you see:
PCL Menu
Symbol Set
3. Press Value Up or Value Down
until you see:
Symbol Set
New Value
4. Press Enter. You will see:
PCL Menu
Symbol Set
5. Press Online. You will see:
Ready
Set the point size when the font
selected is a scaleable font. Point size
is measured in parts per 72 of an inch.
The available values are:
4.00 - 999.75 (12.00*)
The point size changes incrementally
by .25 each time either Value Up or
Value Down is pressed. Holding
down Value Up or Value Down
causes continuous scrolling through
the point sizes.
Symbol Set
Set the default font symbol set used in
PCL.
The available values are:
Desktop
ISO L1
ISO L2
ISO L5
ISO-4
ISO-6
ISO-11
ISO-15
ISO-17
ISO-21
ISO-60
ISO-69
Legal
Math-8
Ms Publ.
PC-8*
PC-8 DN
PC-8 Tk
PC-850
PC-852
Pi Font
PS Math
PS Text
Roman-8
Vn Int’l.
Vn Math
Vn US
Win 3.0
Win L1
Win L2
Win L5
ISO Latin Cyr
PC Cyrillic
=
=
The symbol set is a collection of
characters available for a font,
including uppercase and lowercase
alphabets, punctuation marks, and
special characters such as open and
close quotation marks or international
characters.
Table 1.9 Page 2 of 4
Chapter 1: Configuring the Printer
❖ 1-31
PCL Menu
Table 1.9
PCL Menu functions (continued)
Menu Item and Function
Keystrokes
Display Reads
Orientation
1. Press Menu Up or Menu
Down until you see:
Menus
PCL Menu
2. Press Item Up or Item Down
until you see:
PCL Menu
Orientation
3. Press Value Up or Value Down
until you see:
Orientation
New Value
4. Press Enter. You will see:
PCL Menu
Orientation
5. Press Online. You will see:
Ready
1. Press Menu Up or Menu
Down until you see:
Menus
PCL Menu
2. Press Item Up or Item Down
until you see:
PCL Menu
Form Length
005 - 128
(60* when Default units = inches)
(64* when Default units = millimeters)
3. Press Value Up or Value Down
until you see:
Form Length
New Value
Form Length is automatically adjusted
when Paper Size is changed. The
Form Length is recalculated using the
formula: Form Length = ((page length
in inches - 1 inch) * 6).
4. Press Enter. You will see:
PCL Menu
Form Length
5. Press Online. You will see:
Ready
Set the default orientation used in
PCL.
The available values are:
Portrait*
Landscape
Form Length
Set the default text length (number of
lines on a page) used in PCL.
The available values are:
=
=
The Form Length value changes
incrementally by 1 each time either
Value Up or Value Down is pressed.
Holding down Value Up or Value
Down causes continuous scrolling
through the Form Length values.
The value of this setting after
performing a Factory Reset depends
on the value of the Default units
(inches, millimeters).
Table 1.9 Page 3 of 4
1-32 ❖ DocuPrint NC60 System Administrator Guide
PCL Menu
Table 1.9
PCL Menu functions (continued)
Menu Item and Function
Keystrokes
Display Reads
Line Termination
1. Press Menu Up or Menu
Down until you see:
Menus
PCL Menu
2. Press Item Up or Item Down
until you see:
PCL Menu
Line Terminat.
3. Press Value Up or Value Down
until you see:
Line Terminat.
New Value
4. Press Enter. You will see:
PCL Menu
Line Terminat.
5. Press Online. You will see:
Ready
Set to add a Carriage Return after
every Line Feed appearing in PCL text.
The available values are:
Off*
On
This setting enables the
<LF>=<CR><LF> line termination
mode in PCL as the default.
=
Table 1.9 Page 4 of 4
Chapter 1: Configuring the Printer
❖ 1-33
System Menu
System Menu
Use the System Menu to set general printer features. The
menu hierarchy is shown in Figure 1.6.
Figure 1.6 System Menu hierarchy with factory settings
Job Menu
Password Menu
Language
Tray Menu
PCL Menu
System Menu
Color Adjust Menu
Deutsch
English*
Español
Français
Italiano
Português(BRA)
Paper Size
Imaging Menu
Parallel Menu
Paper Type
Serial Menu
Ethernet Menu
Token Ring Menu
Novell Menu
Plain*
Transparency
Bond
Recycled
Color
Page Policy
Policy Timeout
Hold Timeout
Print Menu
Media Server Menu
Manual Timeout
Service Menu
Reset Menu
Print Quantity
Startup Page
10 Minutes
5 Minutes
4 Minutes
3 Minutes
2 Minutes
1 Minute*
Off
Yes*
No
Print PS Errors
Defaults1
Inches*
Millimeters
Power Saver
1
Defaults = Inches in 110V configuration.
Defaults = Millimeters in 220V configuration.
Statmt(5.5x8.5)
Exec(7.25x10.5)
8x10
Letter(8.5x11)*
Legal(8.5x14)
Folio(8.5x13)
SPFolio(216x315
A4(210x297)*
A5(148x210)
B5-ISO(176x250)
Ignore Size
Ignore Type
Ignore Size/Type
Off*
300 Seconds
180 Seconds
120 Seconds
60 Seconds
30 Seconds
0 Seconds
Off
1* . . . 999
On
Off*
180 Minutes
120 Minutes
90 Minutes
60 Minutes
30 Minutes*
15 Minutes
Off
Refer to Table 1.10 on page 1-35 for step-by-step
instructions.
1-34 ❖ DocuPrint NC60 System Administrator Guide
System Menu
Table 1.10 System Menu functions
Menu Item and Function
Language
Set the spoken language used for
Control Panel display messages,
Configuration Sheets, Font Lists,
Demo Pages, etc.
The available values are:
Deutsch
English*
Español
Français
Italiano
Português(BRA)
The value of this setting is not affected
by performing a “Factory Default”
reset; therefore it does not have a
default value apart from the initial
value of English that is used when the
printer is powered up for the first
time.
Keystrokes
Display
1. Press Menu Up or Menu
Down until you see:
Menus
System Menu
2. Press Item Up or Item Down
until you see:
System Menu
Language
3. Press Value Up or Value Down
until you see:
Language
New Value
4. Press Enter. You will see:
System Menu
Language
5. Press Online. You will see:
Ready
=
(in the language just set)
Table 1.10 Page 1 of 7
Chapter 1: Configuring the Printer
❖ 1-35
System Menu
Table 1.10 System Menu functions (continued)
Menu Item and Function
Paper Size
Set the default paper size used in
PostScript and PCL.
The available values are:
Statmt(5.5x8.5)
Exec(7.25x10.5)
8x10
Letter(8.5x11)*
Legal(8.5x14)
Folio(8.5x13)
SPFolio(216x315)
A4(210x297)*
A5(148x210)
B5-ISO(176x250)
Keystrokes
Display
1. Press Menu Up or Menu
Down until you see:
Menus
System Menu
2. Press Item Up or Item Down
until you see:
System Menu
Paper Size
3. Press Value Up or Value Down
until you see:
Paper Size
New Value
4. Press Enter. You will see:
System Menu
Paper Size
5. Press Online. You will see:
Ready
1. Press Menu Up or Menu
Down until you see:
Menus
System Menu
2. Press Item Up or Item Down
until you see:
System Menu
Paper Type
3. Press Value Up or Value Down
until you see:
Paper Type
New Value
4. Press Enter. You will see:
System Menu
Paper Type
5. Press Online. You will see:
Ready
=
The factory default is a function of the
Defaults setting (units=in/mm) in the
System menu.
Paper Type
Set the default paper type used in
PostScript and PCL.
The available values are:
Plain*
Transparency
Bond
Recycled
Color
=
Table 1.10 Page 2 of 7
1-36 ❖ DocuPrint NC60 System Administrator Guide
System Menu
Table 1.10 System Menu functions (continued)
Menu Item and Function
Page Policy
Allow the printer to automatically
select an alternate paper size and/or
type if the requested size and/or type
is not loaded.
The available values are:
Ignore Size
Ignore Type
Ignore Size/Type
Off*
If the requested paper (size/type) is
not installed, you will be prompted to
load the requested paper. If the Page
Policy is Off or the Page Policy does
not satisfy the request, the printer will
wait indefinitely until one of the
following actions is taken:
Keystrokes
Display
1. Press Menu Up or Menu
Down until you see:
Menus
System Menu
2. Press Item Up or Item Down
until you see:
System Menu
Page Policy
3. Press Value Up or Value Down
until you see:
Page Policy
New Value
4. Press Enter. You will see:
System Menu
Page Policy
5. Press Online. You will see:
Ready
=
• The job is cancelled from the
Control Panel.
• From the Control Panel, Value Up
or Value Down is pressed to select
an alternative tray to print from and
then Enter is pressed.
• A sheet of paper of any size or type
is inserted into the Manual Bypass
Feeder slot.
• The proper paper (size/type) is
loaded in the specified tray and the
tray designation for type and size is
corrected. See “Tray Menu”
(page 1-25).
If a Page Policy is set, the printer will
wait a time specified by the Policy
Timeout (page 1-38) before invoking
the Page Policy.
Table 1.10 Page 3 of 7
Chapter 1: Configuring the Printer
❖ 1-37
System Menu
Table 1.10 System Menu functions (continued)
Menu Item and Function
Keystrokes
Display
1. Press Menu Up or Menu
Down until you see:
Menus
System Menu
2. Press Item Up or Item Down
until you see:
System Menu
Policy Timeout
300
180
3. Press Value Up or Value Down
until you see:
Policy Timeout =
New Value
60
4. Press Enter. You will see:
System Menu
Policy Timeout
5. Press Online. You will see:
Ready
1. Press Menu Up or Menu
Down until you see:
Menus
System Menu
2. Press Item Up or Item Down
until you see:
System Menu
Hold Timeout
3. Press Value Up or Value Down
until you see:
Hold Timeout
New Value
4. Press Enter. You will see:
System Menu
Hold Timeout
5. Press Online. You will see:
Ready
Policy Timeout
Set how long the printer will wait
before taking the action defined by
the setting of Page Policy (page 1-37).
The available values, in seconds, are:
120
30*
0
Off
0 means immediately invoke Page
Policy. Off means never invoke Page
Policy (i.e., wait indefinitely).
Hold Timeout
Set the length of time a print job is to
be held at the printer when
designated as a Hold Job by the
printer driver.
The available values, in minutes, are:
10
5
4
3
2
1*
Off
=
The Control Panel display will indicate
“HOLD JOB” and the job filename.
The job will be released by pressing
the Enter key if the Hold Timeout
value has not been reached. If the
timeout value is exceeded, the job will
print.
Table 1.10 Page 4 of 7
1-38 ❖ DocuPrint NC60 System Administrator Guide
System Menu
Table 1.10 System Menu functions (continued)
Menu Item and Function
Manual Timeout
Set time to force printing of a job
designated by the print driver to use
media fed from the manual feeder. If
media is not inserted into the manual
feeder before timeout, the job will be
printed on the media present based
on printer settings.
The available values, in minutes, are:
10
5
4
3
2
1*
Off
Print Quantity
Set the number of times each page is
printed (uncollated). The setting is
usually overridden by the job stream.
Keystrokes
Display
1. Press Menu Up or Menu
Down until you see:
Menus
System Menu
2. Press Item Up or Item Down
until you see:
System Menu
Manual Timeout
3. Press Value Up or Value Down
until you see:
Manual Timeout =
New Value
4. Press Enter. You will see:
System Menu
Manual Timeout
5. Press Online. You will see:
Ready
1. Press Menu Up or Menu
Down until you see:
Menus
System Menu
2. Press Item Up or Item Down
until you see:
System Menu
Print Quantity
3. Press Value Up or Value Down
until you see:
Print Quantity =
New Value
4. Press Enter. You will see:
System Menu
Print Quantity
5. Press Online. You will see:
Ready
The available values are:
1* - 999
The number of copies changes
incrementally by 1 each time either
Value Up or Value Down is pressed.
Holding down Value Up or Value
Down causes continuous scrolling
through the number of copies.
Table 1.10 Page 5 of 7
Chapter 1: Configuring the Printer
❖ 1-39
System Menu
Table 1.10 System Menu functions (continued)
Menu Item and Function
Startup Page
Set to determine if a special startup
page shall be printed at each power
on.
Keystrokes
Display
1. Press Menu Up or Menu
Down until you see:
Menus
System Menu
2. Press Item Up or Item Down
until you see:
System Menu
Startup Page
3. Press Value Up or Value Down
until you see:
Startup Page
New Value
4. Press Enter. You will see:
System Menu
Startup Page
5. Press Online. You will see:
Ready
1. Press Menu Up or Menu
Down until you see:
Menus
System Menu
2. Press Item Up or Item Down
until you see:
System Menu
Print PS Errors
3. Press Value Up or Value Down
until you see:
Print PS Errors=
New Value
4. Press Enter. You will see:
System Menu
Print PS Errors
5. Press Online. You will see:
Ready
The available values are:
Yes*
No
Print PS Errors
Set to control the use of the built in
error handler or debugger in the
PostScript interpreter.
=
The available values are:
On
Off*
When On, PostScript error information
is printed. When Off, the job flushes
and no information is provided.
Table 1.10 Page 6 of 7
1-40 ❖ DocuPrint NC60 System Administrator Guide
System Menu
Table 1.10 System Menu functions (continued)
Menu Item and Function
Defaults
Sets default units. This is not changed
when a “Factory Default” is
performed.
Keystrokes
Display
1. Press Menu Up or Menu
Down until you see:
Menus
System Menu
2. Press Item Up or Item Down
until you see:
System Menu
Defaults
3. Press Value Up or Value Down
until you see:
Defaults
New Value
4. Press Enter. You will see:
System Menu
Defaults
5. Press Online. You will see:
Ready
1. Press Menu Up or Menu
Down until you see:
Menus
System Menu
2. Press Item Up or Item Down
until you see:
System Menu
Power Saver
3. Press Value Up or Value Down
until you see:
Power Saver
New Value
4. Press Enter. You will see:
System Menu
Power Saver
5. Press Online. You will see:
Ready
The available values are:
Inches* (for 110V configuration)
Millimeters (for 220V configuration)
The following defaults are affected by
changing this setting:
• System Menu>Paper Size
=
• PCL Menu>FormLength.
Power Saver
Set the time the printer will remain
idle before low power mode is
activated.
The available values, in minutes, are:
180
120
90
60
30*
15
Off (never enter Power Saver mode)
=
Table 1.10 Page 7 of 7
Chapter 1: Configuring the Printer
❖ 1-41
Color Adjust Menu
Color Adjust Menu
Use the Color Adjust Menu to control and adjust color
density, black density, and color balance. The menu
hierarchy is shown in Figure 1.7.
Figure 1.7 Color Adjust Menu hierarchy
Job Menu
Password Menu
Color Density
Tray Menu
PCL Menu
System Menu
Color Adjust Menu
Imaging Menu
Parallel Menu
+3 CMY
+2 CMY
+1 CMY
0 CMY*
-1 CMY
-2 CMY
-3 CMY
Black Density
Color Balance
Serial Menu
Ethernet Menu
Token Ring Menu
Novell Menu
Print Menu
Media Server Menu
Service Menu
Reset Menu
21
20
19
18
17
16
15
14
13
12
11
10
0
Cancel Changes
Yes
No*
Color Defaults
Yes
No*
+3 K
+2 K
+1 K
0 K*
-1 K
-2 K
-3 K
Refer to Table 1.11 on page 1-43 for step-by-step
instructions.
1-42 ❖ DocuPrint NC60 System Administrator Guide
Color Adjust Menu
Table 1.11 Color Adjust Menu functions
Menu Item and Function
Color Density
Set to allow fine adjustment to the
color density.
The available values are:
+3 CMY
+2 CMY
+1 CMY
0 CMY*
-1 CMY
-2 CMY
-3 CMY
A change to Color Density (i.e.
pressing Enter after a value change)
will cause a test print output, based
upon the changed value.
Black Density
Set to allow fine adjustment of the
black density.
The available values are:
+3 K
+2 K
+1 K
0 K*
-1 K
-2 K
-3 K
A change to Black Density (i.e.
pressing Enter after a value change)
will cause a test print output, based
upon the changed value.
Keystrokes
Display
1. Press Menu Up or Menu
Down until you see:
Menus
Color Adjust
2. Press Item Up or Item Down
until you see:
Color Adjust
Color Density
3. Press Value Up or Value Down
until you see:
Color Density
New Value
4. Press Enter. You will see:
Color Adjust
Color Density
5. Press Online. You will see:
Ready
1. Press Menu Up or Menu
Down until you see:
Menus
Color Adjust
2. Press Item Up or Item Down
until you see:
Color Adjust
Black Density
3. Press Value Up or Value Down
until you see:
Black Density
New Value
4. Press Enter. You will see:
Color Adjust
Black Density
5. Press Online. You will see:
Ready
Table 1.10 Page 1 of 3
Chapter 1: Configuring the Printer
❖ 1-43
Color Adjust Menu
Table 1.11 Color Adjust Menu functions (continued)
Menu Item and Function
Color Balance
Set to allow fine adjustment to the
color balance.
The available values are:
21
20
19
18
17
16
15
14
13
12
11
10
0
A change to Color Balance (i.e.
pressing Enter after a value change)
will cause a test print output, based
upon the changed value.
Cancel Changes
Set to cancel all changes made to
Color Adjustment during the current
session.
Keystrokes
Display
1. Press Menu Up or Menu
Down until you see:
Menus
Color Adjust
2. Press Item Up or Item Down
until you see:
Color Adjust
Color Balance
3. Press Value Up or Value Down
until you see:
Color Balance
New Value
4. Press Enter. You will see:
Color Adjust
Color Balance
5. Press Online. You will see:
Ready
1. Press Menu Up or Menu
Down until you see:
Menus
Color Adjust
2. Press Item Up or Item Down
until you see:
Color Adjust
Cancel Changes
3. Press Value Up or Value Down
until you see:
Cancel Changes
New Value
4. Press Enter. You will see:
Color Adjust
Cancel Changes
5. Press Online. You will see:
Ready
The available values are:
Yes
No*
This operation cancels any changes
made to the Color Density, Black
Density, and Color Balance values
during a “session” in the Color Adjust
Menu. The values current at the
entrance to the Color Adjust Menu are
restored. Note that this cancellation
also includes canceling Color Defaults.
Cancel Changes will not cause a test
print output. This operation cannot be
undone.
Table 1.10 Page 2 of 3
1-44 ❖ DocuPrint NC60 System Administrator Guide
Color Adjust Menu
Table 1.11 Color Adjust Menu functions (continued)
Menu Item and Function
Color Defaults
Set to allow “resetting” all color
adjustment (Color Density, Black
Density, and Color Balance) to their
factory default values.
The available values are:
Yes
No*
Executing Color Defaults will reset to
factory defaults values and cause a
test print output, based upon those
factory default values.
Keystrokes
Display
1. Press Menu Up or Menu
Down until you see:
Menus
Color Adjust
2. Press Item Up or Item Down
until you see:
Color Adjust
Color Defaults
3. Press Value Up or Value Down
until you see:
Color Defaults
New Value
4. Press Enter. You will see:
Color Adjust
Color Defaults
5. Press Online. You will see:
Ready
Table 1.10 Page 3 of 3
Chapter 1: Configuring the Printer
❖ 1-45
Imaging Menu
Imaging Menu
Use the Imaging Menu to set imaging features as printer
defaults. The menu hierarchy is shown in Figure 1.8.
Figure 1.8 Imaging Menu hierarchy
Job Menu
Password Menu
Edge Smoothing
Tray Menu
PCL Menu
Color Mode
Blk. Overprint
System Menu
Color Adjust Menu
Imaging Menu
Parallel Menu
Serial Menu
Ethernet Menu
Halftone Type
Enh. Alignment
On
Off*
Vivid*
Photo
Unadjusted
On
Off*
Quad Dot
Smooth Screen*
1200 Quality
Fast Black
On
Off*
Process Black
On
Off*
Token Ring Menu
Novell Menu
Print Menu
Media Server Menu
On
Off*
Service Menu
Reset Menu
Refer to Table 1.12 on page 1-47 for step-by-step
instructions.
1-46 ❖ DocuPrint NC60 System Administrator Guide
Imaging Menu
Table 1.12 Imaging Menu functions
Menu Item and Function
Edge Smoothing
Set the default image (resolution)
enhancement mode used in PCL and
PostScript.
Keystrokes
Display
1. Press Menu Up or Menu
Down until you see:
Menus
Imaging Menu
2. Press Item Up or Item Down
until you see:
Imaging Menu
Edge Smoothing
3. Press Value Up or Value Down
until you see:
Edge Smoothing =
New Value
4. Press Enter. You will see:
Imaging Menu
Edge Smoothing
5. Press Online. You will see:
Ready
1. Press Menu Up or Menu
Down until you see:
Menus
Imaging Menu
2. Press Item Up or Item Down
until you see:
Imaging Menu
Color Mode
3. Press Value Up or Value Down
until you see:
Color Mode
New Value
4. Press Enter. You will see:
Imaging Menu
Color Mode
5. Press Online. You will see:
Ready
1. Press Menu Up or Menu
Down until you see:
Menus
Imaging Menu
2. Press Item Up or Item Down
until you see:
Imaging Menu
Blk. Overprint
3. Press Value Up or Value Down
until you see:
Blk. Overprint =
New Value
4. Press Enter. You will see:
Imaging Menu
Blk. Overprint
5. Press Online. You will see:
Ready
The available values are:
On
Off*
Edge Smoothing cannot be used
when the Halftone Type is set to
1200 Quality.
Color Mode
Set to allow adjustment to the color
mode.
The available values are:
Vivid*
Photo
Unadjusted
Blk. Overprint
Set to select Black Overprint
operation.
The available values are:
On
Off*
=
Table 1.10 Page 1 of 3
Chapter 1: Configuring the Printer
❖ 1-47
Imaging Menu
Table 1.12 Imaging Menu functions (continued)
Menu Item and Function
Halftone Type
Set the halftoning method.
The available values are:
Quad Dot
Smooth Screen*
1200 Quality
Enh. Alignment
Set to improve image registration by
enabling a skip pitch printing mode.
The available values are:
On
Off*
Fast Black
Enable or disable printing on the
transfer drum seam when in
monochrome mode.
Keystrokes
Display
1. Press Menu Up or Menu
Down until you see:
Menus
Imaging Menu
2. Press Item Up or Item Down
until you see:
Imaging Menu
Halftone Type
3. Press Value Up or Value Down
until you see:
Halftone Type
New Value
4. Press Enter. You will see:
Imaging Menu
Halftone Type
5. Press Online. You will see:
Ready
1. Press Menu Up or Menu
Down until you see:
Menus
Imaging Menu
2. Press Item Up or Item Down
until you see:
Imaging Menu
Enh. Alignment
3. Press Value Up or Value Down
until you see:
Enh. Alignment =
New Value
4. Press Enter. You will see:
Imaging Menu
Enh. Alignment
5. Press Online. You will see:
Ready
1. Press Menu Up or Menu
Down until you see:
Menus
Imaging Menu
2. Press Item Up or Item Down
until you see:
Imaging Menu
Fast Black
3. Press Value Up or Value Down
until you see:
Fast Black
New Value
4. Press Enter. You will see:
Imaging Menu
Fast Black
5. Press Online. You will see:
Ready
=
The available values are:
On
Off*
Image quality will be enhanced by not
allowing printing on seam.
=
Table 1.10 Page 2 of 3
1-48 ❖ DocuPrint NC60 System Administrator Guide
Imaging Menu
Table 1.12 Imaging Menu functions (continued)
Menu Item and Function
Process Black
Set to select process black operation.
The available values are:
On
Off*
Keystrokes
Display
1. Press Menu Up or Menu
Down until you see:
Menus
Imaging Menu
2. Press Item Up or Item Down
until you see:
Imaging Menu
Process Black
3. Press Value Up or Value Down
until you see:
Process Black
New Value
4. Press Enter. You will see:
Imaging Menu
Process Black
5. Press Online. You will see:
Ready
=
Table 1.10 Page 3 of 3
Chapter 1: Configuring the Printer
❖ 1-49
Parallel Menu
Parallel Menu
Use the Parallel Menu to set options for the parallel port
connection. The menu hierarchy is shown in Figure 1.9.
Figure 1.9 Parallel Menu hierarchy
Job Menu
Password Menu
Port Enable
Tray Menu
PCL Menu
Port Timeout
System Menu
Color Adjust Menu
Parallel PDL
Imaging Menu
On*
Off
5 ... 30* ... 300 Seconds
Auto*
PCL
PostScript
Parallel Menu
Serial Menu
Ethernet Menu
Binary PS
On
Off*
Token Ring Menu
Novell Menu
Bi-Directional
On*
Off
Print Menu
Media Server Menu
Service Menu
Reset Menu
Refer to Table 1.13 on page 1-51 for step-by-step
instructions.
1-50 ❖ DocuPrint NC60 System Administrator Guide
Parallel Menu
Table 1.13 Parallel Menu functions
Menu Item and Function
Port Enable
Enable or disable the parallel port.
The available values are:
On*
Off
Port Timeout
Set the time for determining when to
end an incomplete print job and poll
the next port in the polling sequence.
Keystrokes
Display
1. Press Menu Up or Menu
Down until you see:
Menus
Parallel Menu
2. Press Item Up or Item Down
until you see:
Parallel Menu
Port Enable
3. Press Value Up or Value Down
until you see:
Port Enable
New Value
4. Press Enter. You will see:
Parallel Menu
Port Enable
5. Press Online. You will see:
Ready
1. Press Menu Up or Menu
Down until you see:
Menus
Parallel Menu
2. Press Item Up or Item Down
until you see:
Parallel Menu
Port Timeout
3. Press Value Up or Value Down
until you see:
Port Timeout
New Value
4. Press Enter. You will see:
Parallel Menu
Port Timeout
5. Press Online. You will see:
Ready
=
The available values are:
5 - 300 seconds (30*)
This item also causes an implicit job
end such as Control D in PostScript or
<ESC> E in PCL, and invokes the
emulation functions associated with
this action (e.g., formfeed, reset, etc.).
=
The time changes incrementally by 1
second each time either Value Up or
Value Down is pressed. Holding
down Value Up or Value Down
causes continuous scrolling through
the values.
Table 1.13 Page 1 of 2
Chapter 1: Configuring the Printer
❖ 1-51
Parallel Menu
Table 1.13 Parallel Menu functions (continued)
Menu Item and Function
Parallel PDL
Set the default emulation for the
parallel port.
The available values are:
Auto*
PCL
PostScript
Binary PS
Enable or disable the binary mode of
PostScript.
The available values are:
On
Off*
Bidirectional
Enable or disable bidirectional
communications through the parallel
port.
Keystrokes
Display
1. Press Menu Up or Menu
Down until you see:
Menus
Parallel Menu
2. Press Item Up or Item Down
until you see:
Parallel Menu
Parallel PDL
3. Press Value Up or Value Down
until you see:
Parallel PDL
New Value
4. Press Enter. You will see:
Parallel Menu
Parallel PDL
5. Press Online. You will see:
Ready
1. Press Menu Up or Menu
Down until you see:
Menus
Parallel Menu
2. Press Item Up or Item Down
until you see:
Parallel Menu
Binary PS
3. Press Value Up or Value Down
until you see:
Binary PS
New Value
4. Press Enter. You will see:
Parallel Menu
Binary PS
5. Press Online. You will see:
Ready
1. Press Menu Up or Menu
Down until you see:
Menus
Parallel Menu
2. Press Item Up or Item Down
until you see:
Parallel Menu
Bidirectional
3. Press Value Up or Value Down
until you see:
Bidirectional
New Value
4. Press Enter. You will see:
Parallel Menu
Bidirectional
5. Press Online. You will see:
Ready
=
=
The available values are:
On*
Off
=
Table 1.13 Page 2 of 2
1-52 ❖ DocuPrint NC60 System Administrator Guide
Serial Menu
Serial Menu
Use the Serial Menu to set options for the serial port
connection. The menu hierarchy is shown in Figure 1.10.
Figure 1.10
Serial Menu hierarchy
Job Menu
Port Enable
Password Menu
Tray Menu
PCL Menu
System Menu
Color Adjust Menu
Imaging Menu
Port Timeout
Serial PDL
On*
Off
5 ... 30* ... 300 Seconds
Auto*
PCL
PostScript
Parallel Menu
Serial Menu
Ethernet Menu
Token Ring Menu
Flow Control
Novell Menu
Print Menu
Binary PS
Media Server Menu
Service Menu
Reset Menu
Baud Rate
XON/XOFF
Robust XON/XOFF
Hardware*
On
Off*
38400
28800
19200
9600*
4800
2400
1200
600
Refer to Table 1.14 on page 1-54 for step-by-step
instructions.
Chapter 1: Configuring the Printer
❖ 1-53
Serial Menu
Table 1.14 Serial Menu functions
Menu Item and Function
Port Enable
Enable or disable the serial port.
The available values are:
On*
Off
Port Timeout
Set the time for determining when to
end an incomplete print job and poll
the next port in the polling sequence.
Keystrokes
Display
1. Press Menu Up or Menu
Down until you see:
Menus
Serial Menu
2. Press Item Up or Item Down
until you see:
Serial Menu
Port Enable
3. Press Value Up or Value Down
until you see:
Port Enable
New Value
4. Press Enter. You will see:
Serial Menu
Port Enable
5. Press Online. You will see:
Ready
1. Press Menu Up or Menu
Down until you see:
Menus
Serial Menu
2. Press Item Up or Item Down
until you see:
Serial Menu
Port Timeout
3. Press Value Up or Value Down
until you see:
Port Timeout
New Value
4. Press Enter. You will see:
Serial Menu
Port Timeout
5. Press Online. You will see:
Ready
=
The available values are:
5 - 300 seconds (30*)
This item also causes an implicit job
end such as Control D in PostScript or
<ESC> E in PCL, and invokes the
emulation functions associated with
this action (e.g., formfeed, reset, etc.).
=
The time changes incrementally by 1
second each time either Value Up or
Value Down is pressed. Holding
down Value Up or Value Down
causes continuous scrolling through
the values.
Table 1.14 Page 1 of 3
1-54 ❖ DocuPrint NC60 System Administrator Guide
Serial Menu
Table 1.14 Serial Menu functions (continued)
Menu Item and Function
Serial PDL
Set the default emulation for the serial
port.
The available values are:
Auto*
PCL
Postscript
Flow Control
Set the handshaking parameters for
the serial port.
The available values are:
XON/XOFF
Robust XON/XOFF
Hardware*
Binary PS
Enable or disable the binary mode of
PostScript.
The available values are:
On
Off*
Keystrokes
Display
1. Press Menu Up or Menu
Down until you see:
Menus
Serial Menu
2. Press Item Up or Item Down
until you see:
Serial Menu
Serial PDL
3. Press Value Up or Value Down
until you see:
Serial PDL
New Value
4. Press Enter. You will see:
Serial Menu
Serial PDL
5. Press Online. You will see:
Ready
1. Press Menu Up or Menu
Down until you see:
Menus
Serial Menu
2. Press Item Up or Item Down
until you see:
Serial Menu
Flow Control
3. Press Value Up or Value Down
until you see:
Flow Control
New Value
4. Press Enter. You will see:
Serial Menu
Flow Control
5. Press Online. You will see:
Ready
1. Press Menu Up or Menu
Down until you see:
Menus
Parallel Menu
2. Press Item Up or Item Down
until you see:
Parallel Menu
Binary PS
3. Press Value Up or Value Down
until you see:
Binary PS
New Value
4. Press Enter. You will see:
Parallel Menu
Binary PS
5. Press Online. You will see:
Ready
=
=
=
Table 1.14 Page 2 of 3
Chapter 1: Configuring the Printer
❖ 1-55
Serial Menu
Table 1.14 Serial Menu functions (continued)
Menu Item and Function
Baud Rate
Set the baud rate for the serial port.
The available values are:
38400
28800
19200
9600*
4800
2400
1200
600
Keystrokes
Display
1. Press Menu Up or Menu
Down until you see:
Menus
Serial Menu
2. Press Item Up or Item Down
until you see:
Serial Menu
Baud Rate
3. Press Value Up or Value Down
until you see:
Baud Rate
New Value
4. Press Enter. You will see:
Serial Menu
Baud Rate
5. Press Online. You will see:
Ready
=
Table 1.14 Page 3 of 3
1-56 ❖ DocuPrint NC60 System Administrator Guide
Ethernet Menu
Ethernet Menu
Use the Ethernet Menu to set options for the Ethernet
port. The menu hierarchy is shown in Figure 1.11 on
page 1-58.
Refer to Table 1.15 on page 1-59 for step-by-step
instructions.
Chapter 1: Configuring the Printer
❖ 1-57
Ethernet Menu
Figure 1.11
Ethernet Menu hierarchy
Job Menu
LPR Enable
Password Menu
Tray Menu
LPR Banner
PCL Menu
System Menu
LPR PDL
LPR Binary PS
Color Adjust Menu
Imaging Menu
DLC/LLC Enable
Parallel Menu
Serial Menu
DLC/LLC PDL
DLC/LLC Bin PS
Ethernet Menu
Token Ring Menu
NetBEUI Enable
Novell Menu
Print Menu
NetBEUI PDL
NetBEUI Bin PS
Media Server Menu
Service Menu
AppSocket Enable
AppSocket PDL
AppSocket Bin PS
Reset Menu
Auto*
PCL
PostScript
On
Off*
On*
Off
Auto*
PCL
PostScript
On
Off*
On*
Off
Auto*
PCL
PostScript
On
Off*
On*
Off
Auto*
PCL
PostScript
On
Off*
On*
Off
HTTP Enable
On*
Off
IP Address1
Sub Net Mask1
Default Gateway1
Port Timeout
Speed2
2
On*
Off
EtherTalk Enable
IP Address Res
1
On*
Off
Static
BOOTP/RARP
DHCP*
xxx.xxx.xxx.xxx
5 ... 60* ... 300 Seconds
Auto*
10/HALF
10/FULL
100/HALF
100/FULL
Appears only if IP Address Res = Static.
Appears only if 10/100 Ethernet option is installed.
1-58 ❖ DocuPrint NC60 System Administrator Guide
Ethernet Menu
Table 1.15 Ethernet Menu functions
Menu Item and Function
LPR Enable
Enable or disable the Ethernet LPR
protocol.
The available values are:
On*
Off
LPR Banner
Enable or disable the LPR banner
sheet.
The available values are:
On
Off*
LPR PDL
Set the default emulation for the
Ethernet LPR protocol.
The available values are:
Auto*
PCL
PostScript
Keystrokes
Display
1. Press Menu Up or Menu
Down until you see:
Menus
Ethernet Menu
2. Press Item Up or Item Down
until you see:
Ethernet Menu
LPR Enable
3. Press Value Up or Value Down
until you see:
LPR Enable
New Value
4. Press Enter. You will see:
Ethernet Menu
LPR Enable
5. Press Online. You will see:
Ready
1. Press Menu Up or Menu
Down until you see:
Menus
Ethernet Menu
2. Press Item Up or Item Down
until you see:
Ethernet Menu
LPR Banner
3. Press Value Up or Value Down
until you see:
LPR Banner
New Value
4. Press Enter. You will see:
Ethernet Menu
LPR Banner
5. Press Online. You will see:
Ready
1. Press Menu Up or Menu
Down until you see:
Menus
Ethernet Menu
2. Press Item Up or Item Down
until you see:
Ethernet Menu
LPR PDL
3. Press Value Up or Value Down
until you see:
LPR PDL
New Value
4. Press Enter. You will see:
Ethernet Menu
LPR PDL
5. Press Online. You will see:
Ready
=
=
=
Table 1.15 Page 1 of 10
Chapter 1: Configuring the Printer
❖ 1-59
Ethernet Menu
Table 1.15 Ethernet Menu functions (continued)
Menu Item and Function
LPR Binary PS
Enable or disable the LPR binary mode
of PostScript.
The available values are:
On
Off*
DLC/LLC Enable
Enable or disable the DLC/LLC
protocol.
The available values are:
On*
Off
DLC/LLC PDL
Set the default emulation for the DLC/
LLC protocol.
The available values are:
Auto*
PCL
PostScript
Keystrokes
Display
1. Press Menu Up or Menu
Down until you see:
Menus
Ethernet Menu
2. Press Item Up or Item Down
until you see:
Ethernet Menu
LPR Binary PS
3. Press Value Up or Value Down
until you see:
LPR Binary PS
New Value
4. Press Enter. You will see:
Ethernet Menu
LPR Binary PS
5. Press Online. You will see:
Ready
1. Press Menu Up or Menu
Down until you see:
Menus
Ethernet Menu
2. Press Item Up or Item Down
until you see:
Ethernet Menu
DLC/LLC Enable
3. Press Value Up or Value Down
until you see:
DLC/LLC Enable =
New Value
4. Press Enter. You will see:
Ethernet Menu
DLC/LLC Enable
5. Press Online. You will see:
Ready
1. Press Menu Up or Menu
Down until you see:
Menus
Ethernet Menu
2. Press Item Up or Item Down
until you see:
Ethernet Menu
DLC/LLC PDL
3. Press Value Up or Value Down
until you see:
DLC/LLC PDL
New Value
4. Press Enter. You will see:
Ethernet Menu
DLC/LLC PDL
5. Press Online. You will see:
Ready
=
=
Table 1.15 Page 2 of 10
1-60 ❖ DocuPrint NC60 System Administrator Guide
Ethernet Menu
Table 1.15 Ethernet Menu functions (continued)
Menu Item and Function
DLC/LLC Bin PS
Enable or disable the DLC/LLC binary
mode of PostScript.
The available values are:
On
Off*
NetBEUI Enable
Enable or disable the NetBEUI
protocol.
The available values are:
On*
Off
NetBEUI PDL
Set the default emulation for the
NetBEUI protocol.
The available values are:
Auto*
PCL
PostScript
Keystrokes
Display
1. Press Menu Up or Menu
Down until you see:
Menus
Ethernet Menu
2. Press Item Up or Item Down
until you see:
Ethernet Menu
DLC/LLC Bin PS
3. Press Value Up or Value Down
until you see:
DLC/LLC Bin PS =
New Value
4. Press Enter. You will see:
Ethernet Menu
DLC/LLC Bin PS
5. Press Online. You will see:
Ready
1. Press Menu Up or Menu
Down until you see:
Menus
Ethernet Menu
2. Press Item Up or Item Down
until you see:
Ethernet Menu
NetBEUI Enable
3. Press Value Up or Value Down
until you see:
NetBEUI Enable =
New Value
4. Press Enter. You will see:
Ethernet Menu
NetBEUI Enable
5. Press Online. You will see:
Ready
1. Press Menu Up or Menu
Down until you see:
Menus
Ethernet Menu
2. Press Item Up or Item Down
until you see:
Ethernet Menu
NetBEUI PDL
3. Press Value Up or Value Down
until you see:
NetBEUI PDL
New Value
4. Press Enter. You will see:
Ethernet Menu
NetBEUI PDL
5. Press Online. You will see:
Ready
=
Table 1.15 Page 3 of 10
Chapter 1: Configuring the Printer
❖ 1-61
Ethernet Menu
Table 1.15 Ethernet Menu functions (continued)
Menu Item and Function
NetBEUI Bin PS
Enable or disable the NetBEUI binary
mode of PostScript.
The available values are:
On
Off*
AppSocket Enable
Enable or disable the Ethernet
AppSocket protocol. The AppSocket
in the printer supports Ports 2000,
9100, and 2501.
The available values are:
On*
Off
AppSocket PDL
Set the default emulation for the
Ethernet AppSocket protocol.
The available values are:
Auto*
PCL
PostScript
Keystrokes
Display
1. Press Menu Up or Menu
Down until you see:
Menus
Ethernet Menu
2. Press Item Up or Item Down
until you see:
Ethernet Menu
NetBEUI Bin PS
3. Press Value Up or Value Down
until you see:
NetBEUI Bin PS =
New Value
4. Press Enter. You will see:
Ethernet Menu
NetBEUI Bin PS
5. Press Online. You will see:
Ready
1. Press Menu Up or Menu
Down until you see:
Menus
Ethernet Menu
2. Press Item Up or Item Down
until you see:
Ethernet Menu
AppSocket Enabl
3. Press Value Up or Value Down
until you see:
AppSocket Enabl=
New Value
4. Press Enter. You will see:
Ethernet Menu
AppSocket Enabl
5. Press Online. You will see:
Ready
1. Press Menu Up or Menu
Down until you see:
Menus
Ethernet Menu
2. Press Item Up or Item Down
until you see:
Ethernet Menu
AppSocket PDL
3. Press Value Up or Value Down
until you see:
AppSocket PDL
New Value
4. Press Enter. You will see:
Ethernet Menu
AppSocket PDL
5. Press Online. You will see:
Ready
=
Table 1.15 Page 4 of 10
1-62 ❖ DocuPrint NC60 System Administrator Guide
Ethernet Menu
Table 1.15 Ethernet Menu functions (continued)
Menu Item and Function
AppSocket Bin PS
Enable or disable the AppSocket
binary mode of PostScript.
The available values are:
On
Off*
EtherTalk Enable
Enable or disable the Ethernet
EtherTalk protocol.
The available values are:
On*
Off
HTTP Enable
Enable or disable the Ethernet HTTP
Server protocol.
The available values are:
On*
Off
Keystrokes
Display
1. Press Menu Up or Menu
Down until you see:
Menus
Ethernet Menu
2. Press Item Up or Item Down
until you see:
Ethernet Menu
AppSocket Bin PS
3. Press Value Up or Value Down
until you see:
AppSocket Bin PS=
New Value
4. Press Enter. You will see:
Ethernet Menu
AppSocket Bin PS
5. Press Online. You will see:
Ready
1. Press Menu Up or Menu
Down until you see:
Menus
Ethernet Menu
2. Press Item Up or Item Down
until you see:
Ethernet Menu
EtherTalk Enable
3. Press Value Up or Value Down
until you see:
EtherTalk Enable=
New Value
4. Press Enter. You will see:
Ethernet Menu
EtherTalk Enable
5. Press Online. You will see:
Ready
1. Press Menu Up or Menu
Down until you see:
Menus
Ethernet Menu
2. Press Item Up or Item Down
until you see:
Ethernet Menu
HTTP Enable
3. Press Value Up or Value Down
until you see:
HTTP Enable
New Value
4. Press Enter. You will see:
Ethernet Menu
HTTP Enable
5. Press Online. You will see:
Ready
=
Table 1.15 Page 5 of 10
Chapter 1: Configuring the Printer
❖ 1-63
Ethernet Menu
Table 1.15 Ethernet Menu functions (continued)
Menu Item and Function
IP Address Res.
Set the method used to assign the IP
address, including subnet mask and
default gateway.
Keystrokes
Display
1. Press Menu Up or Menu
Down until you see:
Menus
Ethernet Menu
2. Press Item Up or Item Down
until you see:
Ethernet Menu
IP Address Res.
3. Press Value Up or Value Down
until you see:
IP Address Res.=
New Value
4. Press Enter. You will see:
Ethernet Menu
IP Address Res.
5. Press Online. You will see:
Ready
The available values are:
Static
BOOTP/RARP
DHCP*
Table 1.15 Page 6 of 10
1-64 ❖ DocuPrint NC60 System Administrator Guide
Ethernet Menu
Table 1.15 Ethernet Menu functions (continued)
Menu Item and Function
IP Address
Set the four byte IP address.
The available values are:
xxx.xxx.xxx.xxx
(where xxx = 000 to 255)
For this item (after Step 3), Item Up
moves the cursor to the right through
the displayed IP address and Item
Down moves the cursor to the left.
This allows you to change characters
within the string rather than having to
reenter the entire string.
This item appears only if
IP Address Res is set to Static.
Keystrokes
Display
1. Press Menu Up or Menu
Down until you see:
Menus
Ethernet Menu
2. Press Item Up or Item Down
until you see:
Ethernet Menu
IP Address
3. Press Value Up or Value Down.
You will see:
IP Address
=
xxx.xxx.xxx.xxx
4. Press Value Up or Value Down
to change the value of the
character above the cursor. The
value is incremented or
decremented by 1 each time
the key is pressed. Holding
down Value Up or Value
Down causes continuous
scrolling through the values.
IP Address
=
xxx.xxx.xxx.xxx
5. To change other characters in
the IP address, press Item Up
or Item Down to scroll right or
left respectively through the
character string, then press
Value Up or Value Down to
change the value of the
character above the cursor (as
in Step 4).
IP Address
=
xxx.xxx.xxx.xxx
6. When you have completed
setting the IP address, press
Enter. You will see:
Ethernet Menu
IP Address
7. Press Online. You will see:
Ready
8. Restart printer or power off/on.
Table 1.15 Page 7 of 10
Chapter 1: Configuring the Printer
❖ 1-65
Ethernet Menu
Table 1.15 Ethernet Menu functions (continued)
Menu Item and Function
Subnet Mask
Set the four byte Subnet Mask
address.
The available values are:
xxx.xxx.xxx.xxx
(where xxx = 000 to 255)
For this item (after Step 3), Item Up
moves the cursor to the right through
the displayed Subnet Mask address
and Item Down moves the cursor to
the left. This allows you to change
characters within the string rather
than having to reenter the entire
string.
This item appears only if
IP Address Res is set to Static.
Keystrokes
Display
1. Press Menu Up or Menu
Down until you see:
Menus
Ethernet Menu
2. Press Item Up or Item Down
until you see:
Ethernet Menu
Subnet Mask
3. Press Value Up or Value Down.
You will see:
Subnet Mask
=
xxx.xxx.xxx.xxx
4. Press Value Up or Value Down
to change the value of the
character above the cursor. The
value is incremented or
decremented by 1 each time
the key is pressed. Holding
down Value Up or Value
Down causes continuous
scrolling through the values.
Subnet Mask
=
xxx.xxx.xxx.xxx
5. To change other characters in
the Subnet Mask address, press
Item Up or Item Down to
scroll right or left respectively
through the character string,
then press Value Up or Value
Down to change the value of
the character above the cursor
(as in Step 4).
Subnet Mask
=
xxx.xxx.xxx.xxx
6. When you have completed
setting the Subnet Mask
address, press Enter. You will
see:
Ethernet Menu
Subnet Mask
7. Press Online. You will see:
Ready
8. Restart printer or power off/on.
Table 1.15 Page 8 of 10
1-66 ❖ DocuPrint NC60 System Administrator Guide
Ethernet Menu
Table 1.15 Ethernet Menu functions (continued)
Menu Item and Function
Default Gateway
Set the four byte Default Gateway
address.
The available values are:
xxx.xxx.xxx.xxx
(where xxx = 000 to 255)
For this item (after Step 3), Item Up
moves the cursor to the right through
the displayed Default Gateway
address and Item Down moves the
cursor to the left. This allows you to
change characters within the string
rather than having to reenter the
entire string.
With the cursor displayed under a
character, Value Up increments the
value of that character and Value
Down decrements the value.
This item appears only if
IP Address Res is set to Static.
Keystrokes
Display
1. Press Menu Up or Menu
Down until you see:
Menus
Ethernet Menu
2. Press Item Up or Item Down
until you see:
Ethernet Menu
Default Gateway
3. Press Value Up or Value Down.
You will see:
Default Gateway=
xxx.xxx.xxx.xxx
4. Press Value Up or Value Down
to change the value of the
character above the cursor. The
value is incremented or
decremented by 1 each time
the key is pressed. Holding
down Value Up or Value
Down causes continuous
scrolling through the values.
Default Gateway=
xxx.xxx.xxx.xxx
5. To change other characters in
the Default Gateway address,
press Item Up or Item Down
to scroll right or left
respectively through the
character string, then press
Value Up or Value Down to
change the value of the
character above the cursor (as
in Step 4).
Default Gateway=
xxx.xxx.xxx.xxx
6. When you have completed
setting the Default Gateway
address, press Enter. You will
see:
Ethernet Menu
Default Gateway
7. Press Online. You will see:
Ready
8. Restart printer or power off/on.
Table 1.15 Page 9 of 10
Chapter 1: Configuring the Printer
❖ 1-67
Ethernet Menu
Table 1.15 Ethernet Menu functions (continued)
Menu Item and Function
Port Timeout
Set the time for determining when to
end an incomplete print job and poll
the next port in the polling sequence.
Keystrokes
Display
1. Press Menu Up or Menu
Down until you see:
Menus
Ethernet Menu
2. Press Item Up or Item Down
until you see:
Ethernet Menu
Port Timeout
3. Press Value Up or Value Down
until you see:
Port Timeout
New Value
4. Press Enter. You will see:
Ethernet Menu
Port Timeout
5. Press Online. You will see:
Ready
1. Press Menu Up or Menu
Down until you see:
Menus
Ethernet Menu
2. Press Item Up or Item Down
until you see:
Ethernet Menu
Speed
3. Press Value Up or Value Down
until you see:
Speed
New Value
4. Press Enter. You will see:
Ethernet Menu
Speed
5. Press Online. You will see:
Ready
The available values are:
5 - 300 seconds (30*)
This item also causes an implicit job
end such as Control D in PostScript or
<ESC> E in PCL, and invokes the
emulation functions associated with
this action (e.g., formfeed, reset, etc.).
=
The time changes incrementally by 1
second each time either Value Up or
Value Down is pressed. Holding
down Value Up or Value Down
causes continuous scrolling through
the values.
Speed
Set the speed of the 10/100 Ethernet
interface card (appears only if the
option is installed).
The available values are:
Auto*
10/HALF
10/FULL
100/HALF
100/FULL
HALF = half duplex
FULL = full duplex
=
Table 1.15 Page 10 of 10
1-68 ❖ DocuPrint NC60 System Administrator Guide
Token Ring Menu
Token Ring Menu
Use the Token Ring Menu to set options for the Token
Ring port. The menu hierarchy is shown in Figure 1.12 on
page 1-70.
Refer to Table 1.16 on page 1-71 for step-by-step
instructions.
Chapter 1: Configuring the Printer
❖ 1-69
Token Ring Menu
Figure 1.12
Token Ring Menu hierarchy
Job Menu
LPR Enable
Password Menu
Tray Menu
LPR Banner
PCL Menu
System Menu
LPR PDL
LPR Binary PS
Color Adjust Menu
Imaging Menu
DLC/LLC Enable
Parallel Menu
Serial Menu
DLC/LLC PDL
DLC/LLC Bin PS
Ethernet Menu
On*
Off
On*
Off
Auto*
PCL
PostScript
On
Off*
On*
Off
Auto*
PCL
PostScript
On
Off*
On*
Off
Auto*
PCL
PostScript
On
Off*
On*
Off
Auto*
PCL
PostScript
NetBEUI Enable
Token Ring Menu
Novell Menu
Print Menu
NetBEUI PDL
NetBEUI Bin PS
Media Server Menu
Service Menu
AppSocket Enable
AppSocket PDL
AppSocket Bin PS
Reset Menu
TokenTalk Enable
On
Off*
On*
Off
On*
Off
HTTP Enable
IP Address Res
Static
BOOTP/RARP
DHCP*
IP Address1
Sub Net Mask1
Default Gateway1
Port Timeout
LAA
Source Routing
xxx.xxx.xxx.xxx
5 ... 60* ... 300 Seconds
xxx.xxx.xxx.xxx
On*
Off
Speed
1
Appears only if IP Address Res = Static.
1-70 ❖ DocuPrint NC60 System Administrator Guide
Auto*
16
4
Token Ring Menu
Table 1.16 Token Ring Menu functions
Menu Item and Function
LPR Enable
Enable or disable the Token Ring LPR
protocol.
The available values are:
On*
Off
LPR Banner
Enable or disable the LPR banner
sheet.
The available values are:
On*
Off
LPR PDL
Set the default emulation for the
Token Ring LPR protocol.
The available values are:
Auto*
PCL
PostScript
Keystrokes
Display
1. Press Menu Up or Menu
Down until you see:
Menus
Token Ring Menu
2. Press Item Up or Item Down
until you see:
Token Ring Menu
LPR Enable
3. Press Value Up or Value Down
until you see:
LPR Enable
New Value
4. Press Enter. You will see:
Token Ring Menu
LPR Enable
5. Press Online. You will see:
Ready
1. Press Menu Up or Menu
Down until you see:
Menus
Token Ring Menu
2. Press Item Up or Item Down
until you see:
Token Ring Menu
LPR Banner
3. Press Value Up or Value Down
until you see:
LPR Banner
New Value
4. Press Enter. You will see:
Token Ring Menu
LPR Banner
5. Press Online. You will see:
Ready
1. Press Menu Up or Menu
Down until you see:
Menus
Token Ring Menu
2. Press Item Up or Item Down
until you see:
Token Ring Menu
LPR PDL
3. Press Value Up or Value Down
until you see:
LPR PDL
New Value
4. Press Enter. You will see:
Token Ring Menu
LPR PDL
5. Press Online. You will see:
Ready
=
=
=
Table 1.16 Page 1 of 12
Chapter 1: Configuring the Printer
❖ 1-71
Token Ring Menu
Table 1.16 Token Ring Menu functions (continued)
Menu Item and Function
LPR Binary PS
Enable or disable the LPR binary mode
of PostScript.
The available values are:
On
Off*
DLC/LLC Enable
Enable or disable the DLC/LLC
protocol.
The available values are:
On*
Off
DLC/LLC PDL
Set the default emulation for the DLC/
LLC protocol.
The available values are:
Auto*
PCL
PostScript
Keystrokes
Display
1. Press Menu Up or Menu
Down until you see:
Menus
Token Ring Menu
2. Press Item Up or Item Down
until you see:
Token Ring Menu
LPR Binary PS
3. Press Value Up or Value Down
until you see:
LPR Binary PS
New Value
4. Press Enter. You will see:
Token Ring Menu
LPR Binary PS
5. Press Online. You will see:
Ready
1. Press Menu Up or Menu
Down until you see:
Menus
Token Ring Menu
2. Press Item Up or Item Down
until you see:
Token Ring Menu
DLC/LLC Enable
3. Press Value Up or Value Down
until you see:
DLC/LLC Enable =
New Value
4. Press Enter. You will see:
Token Ring Menu
DLC/LLC Enable
5. Press Online. You will see:
Ready
1. Press Menu Up or Menu
Down until you see:
Menus
Token Ring Menu
2. Press Item Up or Item Down
until you see:
Token Ring Menu
DLC/LLC PDL
3. Press Value Up or Value Down
until you see:
DLC/LLC PDL
New Value
4. Press Enter. You will see:
Token Ring Menu
DLC/LLC PDL
5. Press Online. You will see:
Ready
=
=
Table 1.16 Page 2 of 12
1-72 ❖ DocuPrint NC60 System Administrator Guide
Token Ring Menu
Table 1.16 Token Ring Menu functions (continued)
Menu Item and Function
DLC/LLC Bin PS
Enable or disable the DLC/LLC binary
mode of PostScript.
The available values are:
On
Off*
NetBEUI Enable
Enable or disable the NetBEUI
protocol.
The available values are:
On*
Off
NetBEUI PDL
Set the default emulation for the
NetBEUI protocol. The available values
are:
Auto*
PCL
PostScript
Keystrokes
Display
1. Press Menu Up or Menu
Down until you see:
Menus
Token Ring Menu
2. Press Item Up or Item Down
until you see:
Token Ring Menu
DLC/LLC Bin PS
3. Press Value Up or Value Down
until you see:
DLC/LLC Bin PS =
New Value
4. Press Enter. You will see:
Token Ring Menu
DLC/LLC Bin PS
5. Press Online. You will see:
Ready
1. Press Menu Up or Menu
Down until you see:
Menus
Token Ring Menu
2. Press Item Up or Item Down
until you see:
Token Ring Menu
NetBEUI Enable
3. Press Value Up or Value Down
until you see:
NetBEUI Enable =
New Value
4. Press Enter. You will see:
Token Ring Menu
NetBEUI Enable
5. Press Online. You will see:
Ready
1. Press Menu Up or Menu
Down until you see:
Menus
Token Ring Menu
2. Press Item Up or Item Down
until you see:
Token Ring Menu
NetBEUI PDL
3. Press Value Up or Value Down
until you see:
NetBEUI PDL
New Value
4. Press Enter. You will see:
Token Ring Menu
NetBEUI PDL
5. Press Online. You will see:
Ready
=
Table 1.16 Page 3 of 12
Chapter 1: Configuring the Printer
❖ 1-73
Token Ring Menu
Table 1.16 Token Ring Menu functions (continued)
Menu Item and Function
NetBEUI Bin PS
Enable or disable the NetBEUI binary
mode of PostScript.
The available values are:
On
Off*
AppSocket Enable
Enable or disable the Token Ring
AppSocket protocol. The AppSocket
in the printer supports Ports 200,
9100, and 2105.
The available values are:
On*
Off
AppSocket PDL
Set the default emulation for the
Token Ring AppSocket protocol.
The available values are:
Auto*
PCL
PostScript
Keystrokes
Display
1. Press Menu Up or Menu
Down until you see:
Menus
Token Ring Menu
2. Press Item Up or Item Down
until you see:
Token Ring Menu
NetBEUI Bin PS
3. Press Value Up or Value Down
until you see:
NetBEUI Bin PS =
New Value
4. Press Enter. You will see:
Token Ring Menu
NetBEUI Bin PS
5. Press Online. You will see:
Ready
1. Press Menu Up or Menu
Down until you see:
Menus
Token Ring Menu
2. Press Item Up or Item Down
until you see:
Token Ring Menu
AppSocket Enabl
3. Press Value Up or Value Down
until you see:
AppSocket Enabl=
New Value
4. Press Enter. You will see:
Token Ring Menu
AppSocket Enabl
5. Press Online. You will see:
Ready
1. Press Menu Up or Menu
Down until you see:
Menus
Token Ring Menu
2. Press Item Up or Item Down
until you see:
Token Ring Menu
AppSocket PDL
3. Press Value Up or Value Down
until you see:
AppSocket PDL
New Value
4. Press Enter. You will see:
Token Ring Menu
AppSocket PDL
5. Press Online. You will see:
Ready
=
Table 1.16 Page 4 of 12
1-74 ❖ DocuPrint NC60 System Administrator Guide
Token Ring Menu
Table 1.16 Token Ring Menu functions (continued)
Menu Item and Function
AppSocket Bin PS
Enable or disable the AppSocket
binary mode of PostScript.
The available values are:
On
Off*
TokenTalk Enable
Enable or disable the Token Ring
TokenTalk protocol.
The available values are:
On*
Off
HTTP Enable
Enable or disable the Token Ring HTTP
Server protocol.
The available values are:
On*
Off
Keystrokes
Display
1. Press Menu Up or Menu
Down until you see:
Menus
Token Ring Menu
2. Press Item Up or Item Down
until you see:
Token Ring Menu
AppSocket Bin PS
3. Press Value Up or Value Down
until you see:
AppSocket Bin PS=
New Value
4. Press Enter. You will see:
Token Ring Menu
AppSocket Bin PS
5. Press Online. You will see:
Ready
1. Press Menu Up or Menu
Down until you see:
Menus
Token Ring Menu
2. Press Item Up or Item Down
until you see:
Token Ring Menu
TokenTalk Enable
3. Press Value Up or Value Down
until you see:
TokenTalk Enable=
New Value
4. Press Enter. You will see:
Token Ring Menu
TokenTalk Enable
5. Press Online. You will see:
Ready
1. Press Menu Up or Menu
Down until you see:
Menus
Token Ring Menu
2. Press Item Up or Item Down
until you see:
Token Ring Menu
HTTP Enable
3. Press Value Up or Value Down
until you see:
HTTP Enable
New Value
4. Press Enter. You will see:
Token Ring Menu
HTTP Enable
5. Press Online. You will see:
Ready
=
Table 1.16 Page 5 of 12
Chapter 1: Configuring the Printer
❖ 1-75
Token Ring Menu
Table 1.16 Token Ring Menu functions (continued)
Menu Item and Function
IP Address Res.
Set the method used to assign the IP
address, including subnet mask and
default gateway. The available values
are:
Static
BOOTP/RARP
DHCP*
Keystrokes
Display
1. Press Menu Up or Menu
Down until you see:
Menus
Token Ring Menu
2. Press Item Up or Item Down
until you see:
Token Ring Menu
IP Address Res.
3. Press Value Up or Value Down
until you see:
IP Address Res.=
New Value
4. Press Enter. You will see:
Token Ring Menu
IP Address Res.
5. Press Online. You will see:
Ready
Table 1.16 Page 6 of 12
1-76 ❖ DocuPrint NC60 System Administrator Guide
Token Ring Menu
Table 1.16 Token Ring Menu functions (continued)
Menu Item and Function
IP Address
Set the four byte IP address.
The available values are:
xxx.xxx.xxx.xxx
(where xxx = 000 to 255)
For this item (after Step 3), Item Up
moves the cursor to the right through
the displayed IP address and Item
Down moves the cursor to the left.
This allows you to change characters
within the string rather than having to
reenter the entire string.
With the cursor displayed under a
character, Value Up increments the
value of that character and Value
Down decrements the value.
This item appears only if
IP Address Res is set to Static.
Keystrokes
Display
1. Press Menu Up or Menu
Down until you see:
Menus
Token Ring Menu
2. Press Item Up or Item Down
until you see:
Token Ring Menu
IP Address
3. Press Value Up or Value Down.
You will see:
IP Address
=
xxx.xxx.xxx.xxx
4. Press Value Up or Value Down
to change the value of the
character above the cursor. The
value is incremented or
decremented by 1 each time
the key is pressed. Holding
down Value Up or Value
Down causes continuous
scrolling through the values.
IP Address
=
xxx.xxx.xxx.xxx
5. To change other characters in
the IP address, press Item Up
or Item Down to scroll right or
left respectively through the
character string, then press
Value Up or Value Down to
change the value of the
character above the cursor (as
in Step 4).
IP Address
=
xxx.xxx.xxx.xxx
6. When you have completed
setting the IP address, press
Enter. You will see:
Token Ring Menu
IP Address
7. Press Online. You will see:
Ready
8. Restart printer or power off/on.
Table 1.16 Page 7 of 12
Chapter 1: Configuring the Printer
❖ 1-77
Token Ring Menu
Table 1.16 Token Ring Menu functions (continued)
Menu Item and Function
Subnet Mask
Set the four byte Subnet Mask
address.
The available values are:
xxx.xxx.xxx.xxx
(where xxx = 000 to 255)
For this item (after Step 3), Item Up
moves the cursor to the right through
the displayed Subnet Mask address
and Item Down moves the cursor to
the left. This allows you to change
characters within the string rather
than having to reenter the entire
string.
With the cursor displayed under a
character, Value Up increments the
value of that character and Value
Down decrements the value.
This item appears only if
IP Address Res is set to Static.
Keystrokes
Display
1. Press Menu Up or Menu
Down until you see:
Menus
Token Ring Menu
2. Press Item Up or Item Down
until you see:
Token Ring Menu
Subnet Mask
3. Press Value Up or Value Down.
You will see:
Subnet Mask
=
xxx.xxx.xxx.xxx
4. Press Value Up or Value Down
to change the value of the
character above the cursor. The
value is incremented or
decremented by 1 each time
the key is pressed. Holding
down Value Up or Value
Down causes continuous
scrolling through the values.
Subnet Mask
=
xxx.xxx.xxx.xxx
5. To change other characters in
the Subnet Mask address, press
Item Up or Item Down to
scroll right or left respectively
through the character string,
then press Value Up or Value
Down to change the value of
the character above the cursor
(as in Step 4).
Subnet Mask
=
xxx.xxx.xxx.xxx
6. When you have completed
setting the Subnet Mask
address, press Enter. You will
see:
Token Ring Menu
Subnet Mask
7. Press Online. You will see:
Ready
8. Restart printer or power off/on.
Table 1.16 Page 8 of 12
1-78 ❖ DocuPrint NC60 System Administrator Guide
Token Ring Menu
Table 1.16 Token Ring Menu functions (continued)
Menu Item and Function
Default Gateway
Set the four byte Default Gateway
address.
The available values are:
xxx.xxx.xxx.xxx
(where xxx = 000 to 255)
For this item (after Step 3), Item Up
moves the cursor to the right through
the displayed Default Gateway
address and Item Down moves the
cursor to the left. This allows you to
change characters within the string
rather than having to reenter the
entire string.
With the cursor displayed under a
character, Value Up increments the
value of that character and Value
Down decrements the value.
This item appears only if
IP Address Res is set to Static.
Keystrokes
Display
1. Press Menu Up or Menu
Down until you see:
Menus
Token Ring Menu
2. Press Item Up or Item Down
until you see:
Token Ring Menu
Default Gateway
3. Press Value Up or Value Down.
You will see:
Default Gateway=
xxx.xxx.xxx.xxx
4. Press Value Up or Value Down
to change the value of the
character above the cursor. The
value is incremented or
decremented by 1 each time
the key is pressed. Holding
down Value Up or Value
Down causes continuous
scrolling through the values.
Default Gateway=
xxx.xxx.xxx.xxx
5. To change other characters in
the Default Gateway address,
press Item Up or Item Down
to scroll right or left
respectively through the
character string, then press
Value Up or Value Down to
change the value of the
character above the cursor (as
in Step 4).
Default Gateway=
xxx.xxx.xxx.xxx
6. When you have completed
setting the Default Gateway
address, press Enter. You will
see:
Token Ring Menu
Default Gateway
7. Press Online. You will see:
Ready
8. Restart printer or power off/on.
Table 1.16 Page 9 of 12
Chapter 1: Configuring the Printer
❖ 1-79
Token Ring Menu
Table 1.16 Token Ring Menu functions (continued)
Menu Item and Function
Port Timeout
Set the time for determining when to
end an incomplete print job and poll
the next port in the polling sequence.
Keystrokes
Display
1. Press Menu Up or Menu
Down until you see:
Menus
Token Ring Menu
2. Press Item Up or Item Down
until you see:
Token Ring Menu
Port Timeout
3. Press Value Up or Value Down
until you see:
Port Timeout
New Value
4. Press Enter. You will see:
Token Ring Menu
Port Timeout
5. Press Online. You will see:
Ready
The available values are:
5 - 300 seconds (60*)
This item also causes an implicit job
end such as Control D in PostScript or
<ESC> E in PCL, and invokes the
emulation functions associated with
this action (e.g., formfeed, reset, etc.).
=
The time changes incrementally by 1
second each time either Value Up or
Value Down is pressed. Holding
down Value Up or Value Down
causes continuous scrolling through
the values.
Table 1.16 Page 10 of 12
1-80 ❖ DocuPrint NC60 System Administrator Guide
Token Ring Menu
Table 1.16 Token Ring Menu functions (continued)
Menu Item and Function
Keystrokes
Display
1. Press Menu Up or Menu
Down until you see:
Menus
Token Ring Menu
2. Press Item Up or Item Down
until you see:
Token Ring Menu
LAA
xxxx xxxx xxxx
(where xxxx xxxx xxxx can equal any
value within the valid range of 4000 0000
0000 and 7FFF FFFF FFFF)
3. Press Value Up or Value Down.
You will see:
LAA
=
xxxx xxxx xxxx
For this item (after Step 3), Item Up
moves the cursor to the right through
the displayed LAA and Item Down
moves the cursor to the left. This
allows you to change characters
within the string rather than having to
reenter the entire string.
4. Press Value Up or Value Down
to change the value of the
character above the cursor. The
value is incremented or
decremented by 1 each time
the key is pressed. Holding
down Value Up or Value
Down causes continuous
scrolling through the values.
LAA
=
xxxx xxxx xxxx
5. To change other characters in
the LAA, press Item Up or Item
Down to scroll right or left
respectively through the
character string, then press
Value Up or Value Down to
change the value of the
character above the cursor (as
in Step 4).
LAA
=
xxxx xxxx xxxx
6. When you have completed
setting the LAA, press Enter.
You will see:
Token Ring Menu
LAA
7. Press Online. You will see:
Ready
LAA
Set the six byte Locally Administered
Address.
The valid values are:
With the cursor displayed under a
character, Value Up increments the
value of that character and Value
Down decrements the value.
Table 1.16 Page 11 of 12
Chapter 1: Configuring the Printer
❖ 1-81
Token Ring Menu
Table 1.16 Token Ring Menu functions (continued)
Menu Item and Function
Source Routing
Select the Source Routing option.
The available values are:
On*
Off
Speed
Select the Token Ring speed option.
The available values are:
Auto*
16
4
Keystrokes
Display
1. Press Menu Up or Menu
Down until you see:
Menus
Token Ring Menu
2. Press Item Up or Item Down
until you see:
Token Ring Menu
Source Routing
3. Press Value Up or Value Down
until you see:
Source Routing =
New Value
4. Press Enter. You will see:
Token Ring Menu
Source Routing
5. Press Online. You will see:
Ready
1. Press Menu Up or Menu
Down until you see:
Menus
Token Ring Menu
2. Press Item Up or Item Down
until you see:
Token Ring Menu
Speed
3. Press Value Up or Value Down
until you see:
Speed
New Value
4. Press Enter. You will see:
Token Ring Menu
Speed
5. Press Online. You will see:
Ready
=
Table 1.16 Page 12 of 12
1-82 ❖ DocuPrint NC60 System Administrator Guide
Novell Menu
Novell Menu
Use the Novell Menu to modify Novell parameters. The
menu hierarchy is shown in Figure 1.13. Items in italics
appear only if Novell Enable is set to On.
Figure 1.13
Novell Menu hierarchy with factory settings
Job Menu
Novell Enable
Password Menu
Tray Menu
PCL Menu
System Menu
Color Adjust Menu
Imaging Menu
Parallel Menu
Serial Menu
Novell PDL
Media Server Menu
Service Menu
On
Off*
Auto*
PCL
PostScript
Novell Binary PS
Novell Mode
Frame Type
Ethernet Menu
Token Ring Menu
Novell Menu
Print Menu
On*
Off
Polling Interval
Auto*
802.2
802.3
SNAP
Ethernet II
NDS
BEM
NDS/BEM*
1 .. 2* .. 29
PServer Name
xxxxxxxxxxxxxxxxxxxx
Primary Server
xxxxxxxxxxxxxxxxxxxx
NDS Tree
xxxxxxxxxxxxxxxxxxxx
NDS Context
xxxxxxxxxxxxxxxxxxxx
Reset Menu
Refer to Table 1.17 on page 1-84 for step-by-step
instructions.
Chapter 1: Configuring the Printer
❖ 1-83
Novell Menu
Table 1.17 Novell Menu functions
Menu Item and Function
Novell Enable
Enable or disable the Novell protocol.
The available values are:
On*
Off
Novell PDL
Set the default emulation for the
Novell protocol.
The available values are:
Auto*
PCL
PostScript
Keystrokes
Display
1. Press Menu Up or Menu
Down until you see:
Menus
Novell Menu
2. Press Item Up or Item Down
until you see:
Novell Menu
Novell Enable
3. Press Value Up or Value Down
until you see:
Novell Enable
New Value
4. Press Enter. You will see:
Novell Menu
Novell Enable
5. Press Online. You will see:
Ready
1. Press Menu Up or Menu
Down until you see:
Menus
Novell Menu
2. Press Item Up or Item Down
until you see:
Novell Menu
Novell PDL
3. Press Value Up or Value Down
until you see:
Novell PDL
New Value
4. Press Enter. You will see:
Novell Menu
Novell PDL
5. Press Online. You will see:
Ready
=
=
Table 1.17 Page 1 of 7
1-84 ❖ DocuPrint NC60 System Administrator Guide
Novell Menu
Table 1.17 Novell Menu functions (continued)
Menu Item and Function
Novell Binary PS
Enable or disable the Novell binary
mode of PostScript.
The available values are:
On
Off*
Novell Mode
Set the PServer mode for the Novell
protocol.
The available values are:
NDS
BEM
NDS/BEM*
Keystrokes
Display
1. Press Menu Up or Menu
Down until you see:
Menus
Novell Menu
2. Press Item Up or Item Down
until you see:
Novell Menu
Novell Binary PS
3. Press Value Up or Value Down
until you see:
Novell Binary PS=
New Value
4. Press Enter. You will see:
Novell Menu
Novell Binary PS
5. Press Online. You will see:
Ready
1. Press Menu Up or Menu
Down until you see:
Menus
Novell Menu
2. Press Item Up or Item Down
until you see:
Novell Menu
Novell Mode
3. Press Value Up or Value Down
until you see:
Novell Mode
New Value
4. Press Enter. You will see:
Novell Menu
Novell Mode
5. Press Online. You will see:
Ready
=
Table 1.17 Page 2 of 7
Chapter 1: Configuring the Printer
❖ 1-85
Novell Menu
Table 1.17 Novell Menu functions (continued)
Menu Item and Function
Frame Type
Sets the frame type used for the
Novell protocol.
The available values are:
Auto*
802.2
802.3
SNAP
Ethernet II
Polling Interval
Set the rate (in seconds) at which the
PServer issues polling requests for
assigned queues.
Keystrokes
Display
1. Press Menu Up or Menu
Down until you see:
Menus
Novell Menu
2. Press Item Up or Item Down
until you see:
Novell Menu
Frame Type
3. Press Value Up or Value Down
until you see:
Frame Type
New Value
4. Press Enter. You will see:
Novell Menu
Frame Type
5. Press Online. You will see:
Ready
1. Press Menu Up or Menu
Down until you see:
Menus
Novell Menu
2. Press Item Up or Item Down
until you see:
Novell Menu
Polling Interval
3. Press Value Up or Value Down
until you see:
Polling Interval=
New Value
4. Press Enter. You will see:
Novell Menu
Polling Interval
5. Press Online. You will see:
Ready
=
The available values are:
1 - 29 (2*)
The Polling Interval changes
incrementally by 1 each time either
Value Up or Value Down is pressed.
Holding down Value Up or Value
Down causes continuous scrolling
through the values.
Table 1.17 Page 3 of 7
1-86 ❖ DocuPrint NC60 System Administrator Guide
Novell Menu
Table 1.17 Novell Menu functions (continued)
Menu Item and Function
PServer Name
Set the name of the PServer in this
printer (a name of 1 to 47 characters
in length).
Keystrokes
Display
1. Press Menu Up or Menu
Down until you see:
Menus
Novell Menu
2. Press Item Up or Item Down
until you see:
Novell Menu
PServer Name
3. Press Value Up or Value Down.
You will see:
PServer Name
xxx...xxx
=
4. Press Value Up or Value Down
to change the value of the
character above the cursor. The
value is incremented or
decremented by 1 each time
the key is pressed. Holding
down Value Up or Value
Down causes continuous
scrolling through the values.
PServer Name
xxx...xxx
=
5. To change other characters in
the PServer name, press Item
Up or Item Down to scroll
right or left respectively
through the character string,
then press Value Up or Value
Down to change the value of
the character above the cursor
(as in Step 4).
PServer Name
xxx...xxx
=
6. When you have completed
setting the PServer Name,
press Enter. You will see:
Novell Menu
PServer Name
7. Press Online. You will see:
Ready
The available values are:
A - Z, 0 - 9, hyphen (-),underscore (_)
XRX_<macaddress>*
For this item (after Step 3), Item Up
moves the cursor to the right through
the displayed PServer name and Item
Down moves the cursor to the left.
This allows you to change characters
within the string rather than having to
reenter the entire string.
With the cursor displayed under a
character, Value Up increments the
value of that character and Value
Down decrements the value.
Table 1.17 Page 4 of 7
Chapter 1: Configuring the Printer
❖ 1-87
Novell Menu
Table 1.17 Novell Menu functions (continued)
Menu Item and Function
Primary Server
Set the name of the Primary file server
(a name of 1 to 47 characters in
length).
Keystrokes
Display
1. Press Menu Up or Menu
Down until you see:
Menus
Novell Menu
2. Press Item Up or Item Down
until you see:
Novell Menu
Primary Server
3. Press Value Up or Value Down.
You will see:
Primary Server =
xxx...xxx
4. Press Value Up or Value Down
to change the value of the
character above the cursor. The
value is incremented or
decremented by 1 each time
the key is pressed. Holding
down Value Up or Value
Down causes continuous
scrolling through the values.
Primary Server =
xxx...xxx
5. To change other characters in
the Primary Server name, press
Item Up or Item Down to
scroll right or left respectively
through the character string,
then press Value Up or Value
Down to change the value of
the character above the cursor
(as in Step 4).
Primary Server =
xxx...xxx
6. When you have completed
setting the Primary Server
name, press Enter. You will see:
Novell Menu
Primary Server
7. Press Online. You will see:
Ready
The available values are:
A - Z, 0 - 9, hyphen (-) and underscore (_)
Null*
For this item (after Step 3), Item Up
moves the cursor to the right through
the displayed Primary Server name
and Item Down moves the cursor to
the left. This allows you to change
characters within the string rather
than having to reenter the entire
string.
With the cursor displayed under a
character, Value Up increments the
value of that character and Value
Down decrements the value.
Table 1.17 Page 5 of 7
1-88 ❖ DocuPrint NC60 System Administrator Guide
Novell Menu
Table 1.17 Novell Menu functions (continued)
Menu Item and Function
NDS Tree
Set the NDS Tree character string
(from 1 to 64 characters in length).
The available values are:
A - Z, 0 - 9, hyphen (-) and underscore (_)
Null*
For this item (after Step 3), Item Up
moves the cursor to the right through
the displayed NDS Tree character
string and Item Down moves the
cursor to the left. This allows you to
change characters within the string
rather than having to reenter the
entire string.
With the cursor displayed under a
character, Value Up increments the
value of that character and Value
Down decrements the value.
Keystrokes
Display
1. Press Menu Up or Menu
Down until you see:
Menus
Novell Menu
2. Press Item Up or Item Down
until you see:
Novell Menu
NDS Tree
3. Press Value Up or Value Down.
You will see:
NDS Tree
xxx...xxx
=
4. Press Value Up or Value Down
to change the value of the
character above the cursor. The
value is incremented or
decremented by 1 each time
the key is pressed. Holding
down Value Up or Value
Down causes continuous
scrolling through the values.
NDS Tree
xxx...xxx
=
5. To change other characters in
the NDS Tree character string,
press Item Up or Item Down
to scroll right or left
respectively through the
character string, then press
Value Up or Value Down to
change the value of the
character above the cursor (as
in Step 4).
NDS Tree
xxx...xxx
=
6. When you have completed
setting the NDS Tree, press
Enter. You will see:
Novell Menu
NDS Tree
7. Press Online. You will see:
Ready
Table 1.17 Page 6 of 7
Chapter 1: Configuring the Printer
❖ 1-89
Novell Menu
Table 1.17 Novell Menu functions (continued)
Menu Item and Function
NDS Context
Set the NDS context string (from 1 to
255 characters in length).
The available values are:
A - Z, 0 - 9, hyphen (-), period (.),
underscore (_), equal (=)
Null*
For this item (after Step 3), Item Up
moves the cursor to the right through
the displayed NDS Context string and
Item Down moves the cursor to the
left. This allows you to change
characters within the string rather
than having to reenter the entire
string.
With the cursor displayed under a
character, Value Up increments the
value of that character and Value
Down decrements the value.
Keystrokes
Display
1. Press Menu Up or Menu
Down until you see:
Menus
Novell Menu
2. Press Item Up or Item Down
until you see:
Novell Menu
NDS Context
3. Press Value Up or Value Down.
You will see:
NDS Context
xxx...xxx
=
4. Press Value Up or Value Down
to change the value of the
character above the cursor. The
value is incremented or
decremented by 1 each time
the key is pressed. Holding
down Value Up or Value
Down causes continuous
scrolling through the values.
NDS Context
xxx...xxx
=
5. To change other characters in
the NDS Context string, press
Item Up or Item Down to
scroll right or left respectively
through the character string,
then press Value Up or Value
Down to change the value of
the character above the cursor
(as in Step 4).
NDS Context
xxx...xxx
=
6. When you have completed
setting the NDS Context, press
Enter. You will see:
Novell Menu
NDS Context
7. Press Online. You will see:
Ready
Table 1.17 Page 7 of 7
1-90 ❖ DocuPrint NC60 System Administrator Guide
Print Menu
Print Menu
Use the Print Menu to print internal files or files
downloaded to the printer’s hard disk drive. The menu
hierarchy is shown in Figure 1.14.
Figure 1.14
Print Menu hierarchy with factory settings
Job Menu
Startup Page
Password Menu
Tray Menu
Config Sheet
PCL Menu
System Menu
Color Adjust Menu
Imaging Menu
Parallel Menu
Serial Menu
Ethernet Menu
Token Ring Menu
Novell Menu
PCL Font List
PS Font List
PS Demo
Menu Map
Fault History
Tip & Tricks
Disk Files
Print Menu
Disk Directory
Media Server Menu
Service Menu
Print Quantity
Job 9
.
.
.
Job 0*
1* .. 999
Reset Menu
Select Tray
Tray 1*
Tray 2
Manual Feeder
Refer to Table 1.18 on page 1-92 for step-by-step
instructions.
Chapter 1: Configuring the Printer
❖ 1-91
Print Menu
Table 1.18 Print Menu functions
Menu Item and Function
Startup Page
Print a Startup Page.
The Startup Page is formatted for
either Letter or A4 paper size,
regardless of the default paper size or
the actual paper size loaded.
Config Sheet
Print a Configuration Sheet showing
the printer's current information and
menu settings.
The Configuration Sheet is formatted
for either Letter or A4 paper size,
regardless of the default paper size or
the actual paper size loaded.
PCL Font List
Print a list of PCL fonts currently
loaded.
The PCL Font List is formatted for
either Letter or A4 paper size,
regardless of the default paper size or
the actual paper size loaded. There are
no multiple copies. The Print Menu
setting for Print Quantity is ignored.
Source tray is determined by the
Select Tray item.
Keystrokes
Display
1. Press Menu Up or Menu
Down until you see:
Menus
Print Menu
2. Press Item Up or Item Down
until you see:
Print Menu
Startup Page
3. Press Enter. You will see:
Printing
Startup Page
4. When completed, you will see:
Ready
1. Press Menu Up or Menu
Down until you see:
Menus
Print Menu
2. Press Item Up or Item Down
until you see:
Print Menu
Config Sheet
3. Press Enter. You will see:
Printing
Config Sheet
4. When completed, you will see:
Ready
1. Press Menu Up or Menu
Down until you see:
Menus
Print Menu
2. Press Item Up or Item Down
until you see:
Print Menu
PCL Font List
3. Press Enter. You will see:
Printing
PCL Font List
4. When completed, you will see:
Ready
Table 1.18 Page 1 of 4
1-92 ❖ DocuPrint NC60 System Administrator Guide
Print Menu
Table 1.18 Print Menu functions (continued)
Menu Item and Function
PS Font List
Print the list of the fonts available in
PostScript, including resident fonts
and fonts stored on the hard disk.
The PS Font List is formatted for either
Letter or A4 paper size, regardless of
the default paper size or the actual
paper size loaded
PS Demo
Print a PostScript demonstration page
that shows the printer features.
The PS Demo page is formatted for
either Letter or A4 paper size,
regardless of the default paper size or
the actual paper size loaded
Menu Map
Print the menu map/Control Panel
menu tree.
Menu Maps are formatted for either
Letter or A4 paper size, regardless of
the default paper size or the actual
paper size loaded. There are no
multiple copies. The Print Menu
setting for Print Quantity is ignored.
Source tray is determined by the
Select Tray item.
Keystrokes
Display
1. Press Menu Up or Menu
Down until you see:
Menus
Print Menu
2. Press Item Up or Item Down
until you see:
Print Menu
PS Font List
3. Press Enter. You will see:
Printing
PS Font List
4. When completed, you will see:
Ready
1. Press Menu Up or Menu
Down until you see:
Menus
Print Menu
2. Press Item Up or Item Down
until you see:
Print Menu
PS Demo Page
3. Press Enter. You will see:
Printing
PS Demo Page
4. When completed, you will see:
Ready
1. Press Menu Up or Menu
Down until you see:
Menus
Print Menu
2. Press Item Up or Item Down
until you see:
Print Menu
Menu Map
3. Press Enter. You will see:
Printing
Menu Map
4. When completed, you will see:
Ready
Table 1.18 Page 2 of 4
Chapter 1: Configuring the Printer
❖ 1-93
Print Menu
Table 1.18 Print Menu functions (continued)
Menu Item and Function
Fault History
Print a log of the printer’s last fifty
faults.
Tips & Tricks
Print information on how to get the
most from your DocuPrint NC60.
Disk Files
Print files downloaded to the optional
hard disk (not Secure Jobs or Proof
Jobs).
Files can be downloaded to the hard
disk using CentreWare DP. Job
number (i.e. “Job 3”) only appears if a
file is loaded in that position.
Keystrokes
Display
1. Press Menu Up or Menu
Down until you see:
Menus
Print Menu
2. Press Item Up or Item Down
until you see:
Print Menu
Fault History
3. Press Enter. You will see:
Printing
Fault History
4. When completed, you will see:
Ready
1. Press Menu Up or Menu
Down until you see:
Menus
Print Menu
2. Press Item Up or Item Down
until you see:
Print Menu
Tips & Tricks
3. Press Enter. You will see:
Printing
Tips & Tricks
4. When completed, you will see:
Ready
1. Press Menu Up or Menu
Down until you see:
Menus
Print Menu
2. Press Item Up or Item Down
until you see:
Print Menu
Disk Files
3. Press Value Up or Value Down
until you see:
Disk Files
Job Number
4. Press Enter. You will see:
Printing
Job Number
5. When completed, you will see:
Ready
=
Table 1.18 Page 3 of 4
1-94 ❖ DocuPrint NC60 System Administrator Guide
Print Menu
Table 1.18 Print Menu functions (continued)
Menu Item and Function
Disk Directory
Print a list of fonts and macros
downloaded to the hard disk.
This procedure does not list any
secure or proof jobs.
Print Quantity
Set the number of times each page is
printed.
The available values are:
1* - 999
The quantity changes incrementally
by 1 each time either Value Up or
Value Down is pressed. Holding
down Value Up or Value Down
causes continuous scrolling through
the values.
Select Tray
Select the source tray from which the
job is to be printed.
The available values are:
Tray 1*
Tray 2
Manual Feeder
Appears and is a choice only when the
optional Tray 2 is installed. The Tray
Sequence setting is ignored. Media
size or type mismatches will be
handled via the current Page Policy
settings.
Keystrokes
Display
1. Press Menu Up or Menu
Down until you see:
Menus
Print Menu
2. Press Item Up or Item Down
until you see:
Print Menu
Disk Directory
3. Press Enter. You will see:
Printing
Disk Directory
4. When completed, you will see:
Ready
1. Press Menu Up or Menu
Down until you see:
Menus
Print Menu
2. Press Item Up or Item Down
until you see:
Print Menu
Print Quantity
3. Press Value Up or Value Down
until you see:
Print Quantity =
New Value
4. Press Enter. You will see:
Print Menu
Print Quantity
5. Press Online. You will see:
Ready
1. Press Menu Up or Menu
Down until you see:
Menus
Print Menu
2. Press Item Up or Item Down
until you see:
Print Menu
Select Tray
3. Press Value Up or Value Down
until you see:
Select Tray
New Value
4. Press Enter. You will see:
Print Menu
Select Tray
5. Press Online. You will see:
Ready
=
Table 1.18 Page 4 of 4
Chapter 1: Configuring the Printer
❖ 1-95
Media Server Menu
Media Server Menu
Use the Media Server Menu to print from the Media
Server. The menu hierarchy is shown in Figure 1.15.
Figure 1.15
Media Server Menu hierarchy with factory settings
Job Menu
Select File
Password Menu
Tray Menu
PCL Menu
System Menu
Print Quantity
Color Adjust Menu
Imaging Menu
Select Tray
Parallel Menu
Serial Menu
Filename n
.
.
Filename 1*
1* - 999
Tray 1*
Tray 2
Manual Feeder
Ethernet Menu
Token Ring Menu
Novell Menu
Print Menu
Media Server Menu
Service Menu
Reset Menu
Refer to Table 1.19 on page 1-97 for step-by-step
instructions.
1-96 ❖ DocuPrint NC60 System Administrator Guide
Media Server Menu
Table 1.19 Media Server Menu functions
Menu Item and Function
Select File
Select a file from the Media Server’s
floppy disk.
The available values are:
Filename 1 through Filename n
Value keys scroll through floppy
filenames to find selection.
Print Quantity
Set the number of times each page is
printed.
The available values are:
1* - 999
The quantity changes incrementally
by 1 each time either Value Up or
Value Down is pressed. Holding
down Value Up or Value Down
causes continuous scrolling through
the values.
Keystrokes
Display
1. Press Menu Up or Menu
Down until you see:
Menus
Media Server Menu
2. Press Item Up or Item Down
until you see:
Media Server Menu
Select File
3. Press Value Up or Value Down
until you see:
Select File
Filename
4. Press Enter. You will see:
Printing
Filename
5. When completed, you will see:
Ready
1. Press Menu Up or Menu
Down until you see:
Menus
Media Server Menu
2. Press Item Up or Item Down
until you see:
Media Server Menu
Print Quantity
3. Press Value Up or Value Down
until you see:
Print Quantity =
New Value
4. Press Enter. You will see:
Media Server Menu
Print Quantity
5. Press Online. You will see:
Ready
=
This value is used rather than the
value in the print file.
Table 1.19 Page 1 of 2
Chapter 1: Configuring the Printer
❖ 1-97
Media Server Menu
Table 1.19 Media Server Menu functions (continued)
Menu Item and Function
Select Tray
Select the source tray from which the
job is to be printed.
The available values are:
Tray 1*
Tray 2
Manual Feeder
Appears and is a choice only when the
optional Tray 2 is installed. The Tray
Sequence setting is ignored. Media
size or type mismatches will be
handled via the current Page Policy
settings.
Keystrokes
Display
1. Press Menu Up or Menu
Down until you see:
Menus
Media Server Menu
2. Press Item Up or Item Down
until you see:
Media Server Menu
Select Tray
3. Press Value Up or Value Down
until you see:
Select Tray
New Value
4. Press Enter. You will see:
Media Server Menu
Select Tray
5. Press Online. You will see:
Ready
=
This tray selection is used rather
than the selection in the print
file.
Table 1.19 Page 2 of 2
1-98 ❖ DocuPrint NC60 System Administrator Guide
Service Menu
Service Menu
Use the Service Menu to generate printer reports and set
service options. The menu hierarchy is shown in
Figure 1.16 on page 1-100.
Refer to Table 1.20 on page 1-101 for step-by-step
instructions.
Chapter 1: Configuring the Printer
❖ 1-99
Service Menu
Figure 1.16
Service Menu hierarchy
Job Menu
Config Sheet
Password Menu
Tray Menu
Diag. Summary
PCL Menu
System Menu
Print PQ Set
Test Patterns
Color Adjust Menu
Imaging Menu
Print Quantity
1* - 999
Parallel Menu
Serial Menu
OHP Mode
None
1,2,3,4
Default*
Ethernet Menu
Token Ring Menu
Novell Menu
Print Menu
Media Server Menu
Service Menu
Select Tray
Auto*
Tray 1
Tray 2
Margin Left
-5 .. 0* .. 10.0 mm
Margin Top
-3 .. 0* .. 10.0 mm
Reset Menu
Cleaning Cycle
Patch Control
Show Page Counts
Show Setpoints
On
Off*
Black TC
Cyan TC
Magenta TC
Yellow TC
CRU Usage
Lossy Counter
Binary
1200 Quality
Faults Active
“Highest Fault”
.
.
“Lowest Fault”
Fault History
“50th Fault”
.
.
“Last Fault”
S/W Levels
1-100 ❖ DocuPrint NC60 System Administrator Guide
100% Stripe
Black Step
Blank
Color Balance
Cyan Step
Gray Halftone
Mag Step
Pattern A
Yellow Step
PCL Pattern
IOT Pattern
100 Images
90 Images
80 Images
70 Images
60 Images
50 Images
40 Images
30 Images
20 Images*
10 Images
Never
Total Count
Black Count
Cyan Count
Magenta Count
Yellow Count
Black Dev. Cart
Color Dev. Cart
Fuser Module %
Print Drum %
Adobe PostScrip
Boot
Controller
IOT
Service Menu
Table 1.20 Service Menu functions
Menu Item and Function
Config Sheet
Print a Configuration Sheet showing
the printer's current information and
menu settings.
The Configuration Sheet is formatted
for either Letter or A4 paper size,
regardless of the default paper size or
the actual paper size loaded.
Diag. Summary
Print the current diagnostic summary
data.
Source tray is determined by the
Select Tray item. The Diagnostic
Summary Sheet(s) are formatted for
either Letter or A4 paper size,
regardless of the default paper size or
the actual paper size loaded. There are
no multiple copies.
Print PQ Set
Print the PQ set: one “Test Pattern A,”
one “Color Balance” pattern and one
“Diagnostic Page” in PS.
The PQ set is formatted for either
Letter or A4 paper size, regardless of
the default paper size or the actual
paper size loaded. There are no
multiple copies. The Print Quantity
value is ignored. Source tray is
determined by the Select Tray value.
Keystrokes
Display
1. Press Menu Up or Menu
Down until you see:
Menus
Service Menu
2. Press Item Up or Item Down
until you see:
Service Menu
Config Sheet
3. Press Enter. You will see:
Printing
Config Sheet
4. When completed, you will see:
Ready
1. Press Menu Up or Menu
Down until you see:
Menus
Service Menu
2. Press Item Up or Item Down
until you see:
Service Menu
Diag. Summary
3. Press Enter. You will see:
Service Menu
Diag. Summary
4. When completed, you will see:
Ready
1. Press Menu Up or Menu
Down until you see:
Menus
Service Menu
2. Press Item Up or Item Down
until you see:
Service Menu
Print PQ Set
3. Press Enter. You will see:
Service Menu
Print PQ Set
4. When completed, you will see:
Ready
Table 1.20 Page 1 of 8
Chapter 1: Configuring the Printer
❖ 1-101
Service Menu
Table 1.20 Service Menu functions (continued)
Menu Item and Function
Test Patterns
Enable printing of printer resident,
PostScript test patterns.
The available values are:
100% Stripe
Black Step
Blank
Color Balance
Cyan Step
Gray Halftone
Mag Step
Pattern A
Yellow Step
PCL Pattern
IOT Pattern
Patterns are formatted for either Letter
or A4 paper size, regardless of the
default paper size or the actual paper
size loaded.
Print Quantity
Set the number of times each page is
printed (uncollated).
The available values are:
1* .. 999
The number of copies changes
incrementally by 1 each time either
Value Up or Value Down is pressed.
Holding down Value Up or Value
Down causes continuous scrolling
through the number of copies.
Keystrokes
Display
1. Press Menu Up or Menu
Down until you see:
Menus
Service Menu
2. Press Item Up or Item Down
until you see:
Service Menu
Test Patterns
3. Press Value Up or Value Down
until you see:
Test Patterns
New Value
4. Press Enter. You will see:
Service Menu
Test Patterns
5. Press Online. You will see:
Ready
1. Press Menu Up or Menu
Down until you see:
Menus
Service Menu
2. Press Item Up or Item Down
until you see:
Service Menu
Print Quantity
3. Press Value Up or Value Down
until you see:
Print Quantity =
New Value
4. Press Enter. You will see:
Service Menu
Print Quantity
5. Press Online. You will see:
Ready
=
Table 1.20 Page 2 of 8
1-102 ❖ DocuPrint NC60 System Administrator Guide
Service Menu
Table 1.20 Service Menu functions (continued)
Menu Item and Function
OHP Mode
Set Overhead Projection mode to
allow discrete selection of settings for
fuser temperature and transfer bias
voltages to enhance the performance
for transparencies.
The available values are:
None
1,2,3,4
Default*
Select Tray
Select the source tray from which the
job is to be printed.
The available values are:
Tray 1*
Tray 2
Manual Feeder
Appears and is a choice only when the
optional Tray 2 is installed. The Tray
Sequence setting is ignored. Job to
media size or type mismatch will be
handled via the current Page Policy
settings.
Keystrokes
Display
1. Press Menu Up or Menu
Down until you see:
Menus
Service Menu
2. Press Item Up or Item Down
until you see:
Service Menu
OHP Mode
3. Press Value Up or Value Down
until you see:
OHP Mode
New Value
4. Press Enter. You will see:
Service Menu
OHP Mode
5. Press Online. You will see:
Ready
1. Press Menu Up or Menu
Down until you see:
Menus
Service Menu
2. Press Item Up or Item Down
until you see:
Service Menu
Select Tray
3. Press Value Up or Value Down
until you see:
Select Tray
New Value
4. Press Enter. You will see:
Service Menu
Select Tray
5. Press Online. You will see:
Ready
=
=
Table 1.20 Page 3 of 8
Chapter 1: Configuring the Printer
❖ 1-103
Service Menu
Table 1.20 Service Menu functions (continued)
Menu Item and Function
Margin Left
Set the left margin or horizontal
displacement of the logical printed
page versus the physical page.
Keystrokes
Display
1. Press Menu Up or Menu
Down until you see:
Menus
Service Menu
2. Press Item Up or Item Down
until you see:
Service Menu
Margin Left
3. Press Value Up or Value Down
until you see:
Margin Left
New Value
4. Press Enter. You will see:
Service Menu
Margin Left
5. Press Online. You will see:
Ready
1. Press Menu Up or Menu
Down until you see:
Menus
Service Menu
2. Press Item Up or Item Down
until you see:
Service Menu
Margin Top
3. Press Value Up or Value Down
until you see:
Margin Top
New Value
4. Press Enter. You will see:
Service Menu
Margin Top
5. Press Online. You will see:
Ready
The available values are:
-5 .. 0* .. 10.0 mm
A negative value moves the logical
printed page (area) “left” on the
physical page.
Margin Top
Set the top margin or vertical
displacement of the logical printed
page versus the physical page.
=
The available values are:
-3 .. 0* .. 10.0 mm
A negative value moves the logical
printed page (area) “up” the physical
page.
=
Table 1.20 Page 4 of 8
1-104 ❖ DocuPrint NC60 System Administrator Guide
Service Menu
Table 1.20 Service Menu functions (continued)
Menu Item and Function
Cleaning Cycle
Select an automatic cleaning cycle
frequency, based upon the number of
prints.
Keystrokes
Display
1. Press Menu Up or Menu
Down until you see:
Menus
Service Menu
2. Press Item Up or Item Down
until you see:
Service Menu
Cleaning Cycle
3. Press Value Up or Value Down
until you see:
Cleaning Cycle =
New Value
4. Press Enter. You will see:
Service Menu
Cleaning Cycle
5. Press Online. You will see:
Ready
1. Press Menu Up or Menu
Down until you see:
Menus
Service Menu
2. Press Item Up or Item Down
until you see:
Service Menu
Patch Control
3. Press Value Up or Value Down
until you see:
Patch Control
New Value
4. Press Enter. You will see:
Service Menu
Patch Control
5. Press Online. You will see:
Ready
The available values are:
100 Images
90 Images
80 Images
70 Images
60 Images
50 Images
40 Images
30 Images
20 Images*
10 Images
Never
Patch Control
Control patch operation.
The available values are:
On
Off*
=
Table 1.20 Page 5 of 8
Chapter 1: Configuring the Printer
❖ 1-105
Service Menu
Table 1.20 Service Menu functions (continued)
Menu Item and Function
Keystrokes
Display
1. Press Menu Up or Menu
Down until you see:
Menus
Service Menu
2. Press Item Up or Item Down
until you see:
Service Menu
Show Page Counts
3. Press Value Up or Value Down
until you see:
Value
Count
Total Page count reflects total pages.
Color counts are the number of
images (full color page contains as
many as four color counts).
4. Press Item Up or Item Down.
You will see:
Service Menu
Show Page Counts
5. Press Online. You will see:
Ready
Show Setpoints
1. Press Menu Up or Menu
Down until you see:
Menus
Service Menu
2. Press Item Up or Item Down
until you see:
Service Menu
Show Setpoints
3. Press Value Up or Value Down
until you see:
Value
Setpoints
4. Press Item Up or Item Down.
You will see:
Service Menu
Show Setpoints
5. Press Online. You will see:
Ready
Show Page Counts
Display summary page count data.
The available values are:
Total Count
Black Count
Cyan Count
Magenta Count
Yellow Count
Display summary setpoint data.
The available values are:
Black TC
Cyan TC
Magenta TC
Yellow TC
Table 1.20 Page 6 of 8
1-106 ❖ DocuPrint NC60 System Administrator Guide
Service Menu
Table 1.20 Service Menu functions (continued)
Menu Item and Function
CRU Usage
Display CRU percentage of use data.
The available values are:
Black Dev. Cart
Color Dev. Cart
Fuser Module %
Print Drum %
Lossy Counter
Maintain a count of printed pages
that have printed using “Lossy”
compression (image data is dropped
during the compression process).
The available values are:
Binary
1200 Quality
Keystrokes
Display
1. Press Menu Up or Menu
Down until you see:
Menus
Service Menu
2. Press Item Up or Item Down
until you see:
Service Menu
CRU Usage
3. Press Value Up or Value Down
until you see:
Value
Percent Usage
4. Press Item Up or Item Down.
You will see:
Service Menu
CRU Usage
5. Press Online. You will see:
Ready
1. Press Menu Up or Menu
Down until you see:
Menus
Service Menu
2. Press Item Up or Item Down
until you see:
Service Menu
Lossy Counter
3. Press Value Up or Value Down
until you see:
Value
Count
4. Press Item Up or Item Down.
You will see:
Service Menu
Lossy Counter
5. Press Online. You will see:
Ready
Table 1.20 Page 7 of 8
Chapter 1: Configuring the Printer
❖ 1-107
Service Menu
Table 1.20 Service Menu functions (continued)
Menu Item and Function
Faults Active
Display all active faults on the Control
Panel display.
The available values are:
“Highest Fault”
.
.
“Lowest Fault”
Pressing Value Up or Value Down in
Step 3 scrolls through the messages.
Fault History
Print a list of the last fifty faults.
The available values are:
“50th Fault”
.
.
“Last Fault”
Pressing Value Up or Value Down in
Step 3 scrolls through the faults.
S/W Levels
Display the current software versions
(or levels).
The available values are:
Adobe PostScript
Boot
Controller
IOT
Pressing Value Up or Value Down in
Step 3 scrolls through the values.
Keystrokes
Display
1. Press Menu Up or Menu
Down until you see:
Menus
Service Menu
2. Press Item Up or Item Down
until you see:
Service Menu
Faults Active
3. Press Value Up or Value Down.
You will see:
Fault Message
Fault Message
4. Press Item Up or Item Down.
You will see:
Service Menu
Faults Active
5. Press Online. You will see:
Ready
1. Press Menu Up or Menu
Down until you see:
Menus
Service Menu
2. Press Item Up or Item Down
until you see:
Service Menu
Fault History
3. Press Value Up or Value Down.
You will see:
Log Entry # NN
Fault Description
4. Press Item Up or Item Down.
You will see:
Service Menu
Fault History
5. Press Online. You will see:
Ready
1. Press Menu Up or Menu
Down until you see:
Menus
Service Menu
2. Press Item Up or Item Down
until you see:
Service Menu
S/W Levels
3. Press Value Up or Value Down.
You will see:
Value
S/W Level
4. Press Item Up or Item Down.
You will see:
Service Menu
S/W Levels
5. Press Online. You will see:
Ready
Table 1.20 Page 8 of 8
1-108 ❖ DocuPrint NC60 System Administrator Guide
Reset Menu
Reset Menu
Use the Reset Menu to reset various printer functions. The
Reset Menu only appears in the Main Menu if the printer
is powered on while simultaneously holding down the
Online and Enter keys. It is removed after the printer is
powered off.
Figure 1.17 shows the menu hierarchy. Items in italics
appear only if the appropriate option is installed.
Figure 1.17
Reset Menu hierarchy with factory settings
Job Menu
Factory Defaults
Yes
No*
Network Defaults
Yes
No*
Password Menu
Tray Menu
PCL Menu
System Menu
Color Adjust Menu
Imaging Menu
CRU Resets
Parallel Menu
Serial Menu
Ethernet Menu
Token Ring Menu
Novell Menu
Print Menu
Restart Printer
Yes
No*
Delete All Jobs
Yes
No*
Disk Initialize
Yes
No*
Disk Format
Yes
No*
Media Server Menu
Service Menu
Reset Menu
COLOR DEV
FUSER MOD
BLACK DEV
PRINT DRUM
Refer to Table 1.21 on page 1-110 for step-by-step
instructions.
Chapter 1: Configuring the Printer
❖ 1-109
Reset Menu
Table 1.21 Reset Menu functions
Menu Item and Function
Factory Defaults
Reset the printer operating
parameters to factory default settings.
The available values are:
Yes
No*
All NVM values are set to factory
defaults, with the exception of:
“Language” in the System Menu and
“Defaults” in the System Menu which
are not affected. No NVM values
associated with the Ethernet or Token
Ring interfaces are reset. Ethernet and
Token Ring values may be reset to
factory defaults via the “Network
Defaults” item.
Network Defaults
Reset all NVM parameters associated
with the Ethernet and Token Ring
interfaces to factory defaults.
Keystrokes
Display
1. Press Menu Up or Menu
Down until you see:
Menus
Reset Menu
2. Press Item Up or Item Down
until you see:
Reset Menu
Factory Defaults
3. Press Value Up or Value Down
until you see:
Factory Defaults=
Yes
4. Press Enter. You will see:
Factory Defaults=
Please Wait
5. When the action is complete,
you will see:
Ready
1. Press Menu Up or Menu
Down until you see:
Menus
Reset Menu
2. Press Item Up or Item Down
until you see:
Reset Menu
Network Defaults
3. Press Value Up or Value Down
until you see:
Network Defaults
Yes
4. Press Enter. You will see:
Network Defaults
Please Wait
5. When the action is complete,
you will see:
Ready
The available values are:
Yes
No*
Table 1.21 Page 1 of 3
1-110 ❖ DocuPrint NC60 System Administrator Guide
Reset Menu
Table 1.21 Reset Menu functions (continued)
Menu Item and Function
Keystrokes
Display
1. Press Menu Up or Menu
Down until you see:
Menus
Reset Menu
2. Press Item Up or Item Down
until you see:
Reset Menu
CRU Resets
3. Press Value Up or Value Down
until you see:
CRU Resets
Yes
4. Press Enter. You will see:
CRU Resets
Please Wait
5. When the action is complete,
you will see:
Ready
1. Press Menu Up or Menu
Down until you see:
Menus
Job Menu
2. Press Item Up or Item Down
until you see:
Job Menu
Restart Printer
3. Press Value Up or Value Down
until you see:
Restart Printer
Yes
This action does not remove the Reset
Menu. To do so, power off/on the
printer.
4. Press Enter. You will see:
[Startup Messages]
5. When the action is complete,
you will see:
Ready
Delete All Jobs
1. Press Menu Up or Menu
Down until you see:
Menus
Reset Menu
2. Press Item Up or Item Down
until you see:
Reset Menu
Delete All Jobs
3. Press Value Up or Value Down
until you see:
Delete All Jobs
Yes
4. Press Enter. You will see:
Delete All Jobs
Please Wait
5. When the action is complete,
you will see:
Ready
CRU Resets
Reset the selected CRU.
The available values are:
COLOR DEV
FUSER MOD
BLACK DEV
PRINT DRUM
Restart Printer
Re-boot the printer as if the power
was cycled, but bypassing power on
diagnostics.
The available values are:
Yes
No*
Delete all secure or proof jobs from
the disk.
The available values are:
Yes
No*
This function is ignored if the disk is
locked (write protected) via a PJL or
SNMP command.
Table 1.21 Page 2 of 3
Chapter 1: Configuring the Printer
❖ 1-111
Reset Menu
Table 1.21 Reset Menu functions (continued)
Menu Item and Function
Disk Initialize
Initialize the Hard Disk Drive.
The available values are:
Yes
No*
This function is ignored if the disk is
locked (write protected) via a PJL or
SNMP command.
Disk Format
Request a complete format of the disk
directory.
The available values are:
Yes
No*
This item is used only if the disk has
not been formatted previously (e.g.
field disk replacement).
Keystrokes
Display
1. Press Menu Up or Menu
Down until you see:
Menus
Reset Menu
2. Press Item Up or Item Down
until you see:
Reset Menu
Disk Initialize
3. Press Value Up or Value Down
until you see:
Disk Initialize
Yes
4. Press Enter. You will see:
Disk Initialize
Please Wait
5. When the action is complete,
you will see:
Ready
1. Press Menu Up or Menu
Down until you see:
Menus
Reset Menu
2. Press Item Up or Item Down
until you see:
Reset Menu
Disk Format
3. Press Value Up or Value Down
until you see:
Disk Format
Yes
4. Press Enter. You will see:
Disk Format
Please Wait
5. When the action is complete,
you will see:
Ready
Table 1.21 Page 3 of 3
1-112 ❖ DocuPrint NC60 System Administrator Guide
Managing Printer Usage
2 r e tpahC
Network Printer Services .................................................... 2-2
CentreWare DP ................................................................. 2-3
CentreWare Internet Services ............................................. 2-4
Chapter 2: Managing Printer Usage
❖ 2-1
Network Printer Services
Network Printer Services
Two print service utilities are available for the installation
and management of your DocuPrint NC60-- CentreWare
DP and CentreWare Internet Services. Each of these
services provides you with the capability to easily and
quickly accomplish the following tasks with your
DocuPrint NC60 from your workstation:
• Check printer status.
• Remotely configure, monitor, and manage the printer.
• Set printer defaults.
• Perform printer maintenance diagnostics remotely.
• Upgrade the software on your DocuPrint NC60 and
optional Network Interface Card.
2-2
❖ DocuPrint NC60 System Administrator Guide
CentreWare DP
CentreWare DP
CentreWare DP is a new generation of network print
management software designed for the network
administrator. It provides a single point of administration
for all Xerox desktop and network printers, including
your DocuPrint NC60. Thanks to the ease of
point-and-click navigation, administrators will be able to
install, connect, and configure the DocuPrint NC60 on a
network immediately and quickly. Setup procedures have
been simplified and the management of network printers
is virtually effortless. CentreWare DP supports a number
of key network environments, including NetWare and
Windows NT.
See the Technical Information Guide and the
CentreWare DP User Guide for more information on the
operation and use of CentreWare DP.
Chapter 2: Managing Printer Usage
❖ 2-3
CentreWare Internet Services
CentreWare Internet Services
CentreWare Internet Services is an interactive service that
extends the capabilities of CentreWare DP using Internet
technology as the platform. It provides another option
for implementing advanced services for the installation,
configuration, and management of your DocuPrint NC60.
Each of the features in CentreWare Internet Services can
be accessed through familiar client-resident software
interfaces, such as Netscape Navigator or Microsoft
Explorer browsers. Through a web browser, users and
system administrators will be able to monitor the status of
the DocuPrint NC60, print HTML-based documents, and
access context sensitive on-line assistance.
For system administrators, CentreWare Internet Services
will provide a faster and more productive way to install
and upgrade software on your DocuPrint NC60 and a
wide range of supporting information on the Internet.
Setup
To set up your DocuPrint NC60 for Internet/Intranet
access, you will need to do the following:
• Configure an IP address for the printer on your
network. See “IP Address” (page 1-65 for Ethernet or
page 1-77 for Token Ring).
• Enable the embedded HTTP server at the Control
Panel. See “HTTP Enable” (page 1-63 for Ethernet or
page 1-75 for Token Ring).
To use the Mail Send/Receive capability, you will need to
establish a mail account for the printer and install and
configure the Xerox Mail Port Monitor.
See the Technical Information Guide, the CentreWare
Internet Services User Guide, and online help for more
information on the operation and use of CentreWare Internet
Services.
2-4
❖ DocuPrint NC60 System Administrator Guide
Using the Hard Drive
3 r e tpahC
Hard Drive Considerations ................................................. 3-2
Disk Initialization ........................................................... 3-2
Downloading Fonts and Macros ......................................... 3-3
FSDOWNLOAD Command ............................................. 3-4
FSDELETE Command ...................................................... 3-7
Using the Hard Disk Drive for Secure and Proof Jobs ........... 3-8
Creating Secure Jobs ....................................................... 3-8
Creating Proof Jobs ....................................................... 3-10
Printing or Deleting Secure or Proof Jobs ....................... 3-12
Chapter 3: Using the Hard Drive
❖ 3-1
Hard Drive Considerations
Hard Drive Considerations
If you install the optional Hard Disk Drive on the
DocuPrint NC60, it will significantly increase the amount
of memory available for processing jobs and storing
downloaded information (such as fonts, macros and jobs).
The hard disk is used for the following:
• Storage of print jobs for secure jobs and proof job.
• Temporary storage for collated print jobs.
• Long term storage for downloaded fonts and macros.
• Long term storage of up to ten jobs printable from the
Control Panel Print Menu.
Disk Initialization
3-2
The disk is preformatted and requires no initialization.
The disk may be returned to its initial state, with no
loaded fonts, macros or secure jobs, by selecting the Disk
Initialize item from the Reset Menu or from CentreWare.
❖ DocuPrint NC60 System Administrator Guide
Downloading Fonts and Macros
Downloading Fonts and Macros
The Xerox DocuPrint NC60 PCL printer driver provides
you with the ability to download fonts and PCL macros to
the printer.
• To download fonts you must first install the
appropriate DocuPrint NC60 PCL Windows 3.1 or
Windows 95/98 driver. To download macros, you must
install the DocuPrint NC60 Windows PCL driver.
• “Temporary” fonts/macros downloaded to printer
memory on a job per job basis are cleared from the
printer's memory after each job.
• “Permanent” fonts downloaded to printer memory are
cleared from memory whenever the printer is powered
off. When the printer switches PDLs, its automatic
State Saving feature saves all fonts and macros.
In addition to downloading to memory through drivers,
the DocuPrint NC60 will support downloading of fonts
and macros to its hard disk by the use of the PJL
command FSDOWNLOAD. These files may be deleted
from the DocuPrint NC60 disk by the PJL command
FSDELETE.
• Fonts downloaded to the hard disk are stored in the
PCL Fonts and PS Fonts directories. Macros
downloaded to the hard drive are stored in the PCL
Macros directory. Fonts and macros stored in these
directories remain there until you delete them. They
are not cleared from the hard disk when the printer is
powered off. You can only delete a macro from the
hard disk if you know the name of the macro. Since
you cannot print a list of macros as you can for fonts,
it is important to keep a record of all downloaded
macros. Then, use the PJL FSDELETE command to
delete fonts and macros.
Chapter 3: Using the Hard Drive
❖ 3-3
Downloading Fonts and Macros
FSDOWNLOAD
Command
Syntax
Parameters
The FSDOWNLOAD command is used to download fonts
or macros to the DocuPrint NC60 file system. If a file with
the same name exists, the downloaded file overwrites it.
@PJL FSDOWNLOAD FORMAT:BINARY [SIZE=int] [NAME = “pathname”] [<CR>] <LF>
<binary data><ESC>%-12345X
Parameter
Functional Range
Default
SIZE=integer
0 to 231 - 1
N/A
NAME=”pathname”
ASCII 01 thru 255
N/A
SIZE = integer — The size variable indicates the number of bytes in the file to be
downloaded. The size indicates the number of bytes immediately following the <LF> to
the next UEL command.
NAME = “pathname” — where “pathname” = 0:\PCL\FONTS\<fontname> to
download a font named “fontname” to the DocuPrint NC60 or =
0:\PCL\MACROS\<macroname> to download a macro named “macroname” to the
DocuPrint NC60. “Fontname/macroname” can be any combination of up to 512
alphanumeric characters.
<binary data> — This is the binary file data to be downloaded, such as font files and
macro data.
Use of 1 rather than 0 in the “pathname” will download the font or macro to RAM
rather than to the hard drive.
3-4
❖ DocuPrint NC60 System Administrator Guide
Downloading Fonts and Macros
Download Macro
The following is a sequence of commands that can be sent
to the DocuPrint NC60 to download a macro to the disk.
<ESC>%-12345X @PJL<CR><LF>
@PJL FSDOWNLOAD FORMAT:BINARY NAME =”0:\pcl\macros\a_macro” SIZE=29<CR><LF>
<ESC>*p900x1500YThis is the macro <ESC>%-12345X
In this example:
• <ESC>%-12345X is the PJL UEL command which starts
this sequence.
• @PJL<CR><LF> is the mandatory PJL command
following the UEL command.
• @PJL FSDOWNLOAD... downloads a macro of 29 bytes
named “a_macro.”
• The phrase “This is the macro” is positioned at x=900
and y=1500 by this macro.
• <ESC>%-12345X is the UEL command which ends this
sequence.
Executing this macro requires the following PCL
sequence:
<ESC>&n8W<HEX’04’>a_macro<CR,LF>
Sets the current macro ID to the
string ID “a_macro”
<ESC>&n8W<HEX’05’>a_macro<CR,LF>
Associates the current macro ID with
the supplied string ID
<ESC>&f<HEX’02’>x<CR,LF>
Executes this macro
Notes:
1. The macro ID must be the same case as in the original
download command.
2. The byte count (after the “n” and before the “w”)
must equal the ID byte count plus 1.
Chapter 3: Using the Hard Drive
❖ 3-5
Downloading Fonts and Macros
Download Fonts
The following is a sequence of commands that can be sent
to the DocuPrint NC60 to download a font to the disk.
<ESC>%-12345X @PJL<CR><LF>
@PJL FSDOWNLOAD FORMAT:BINARY NAME =”0:\pcl\fonts\font1” SIZE=XX<CR><LF>
<binary data><ESC>%-12345X
In this example:
• <ESC>%-12345X is the PJL UEL command which starts
this sequence.
• @PJL<CR><LF> is the mandatory PJL command
following the UEL command.
• @PJL FSDOWNLOAD... downloads a font named
“font1” that is “XX” bytes in size.
• <ESC>%-12345X is the UEL command which ends this
sequence.
Invoking this font requires the following PCL sequence:
<ESC>&n6W<HEX’00’>font1<CR,LF>
Sets the current font ID to the given
string ID “font1”
<ESC>&n6W<HEX’01’>font1<CR,LF>
Associates the current font ID with the
string ID “font1”
<ESC>&n6W<HEX’02’>font1<CR,LF>
Selects the font referred to as “font1”
for the primary font
Notes:
1. The case of the string ID must be the same as the case
of the fontname in the FSDOWNLOAD command.
2. The byte count (“6” in the above example) must equal
the string ID byte count plus 1.
3-6
❖ DocuPrint NC60 System Administrator Guide
Downloading Fonts and Macros
FSDELETE Command
Syntax
Parameters
The FSDELETE command is used to delete files from the
DocuPrint NC60 file system.
@PJL FSDELETE NAME = “pathname” [<CR>] <LF>
Parameter
NAME=”pathname”
Functional Range
ASCII 01 thru 255
Default
N/A
NAME = “pathname” — where “pathname” has the same parameters as the
FSDOWNLOAD command (see page 3-4).
Chapter 3: Using the Hard Drive
❖ 3-7
Using the Hard Disk Drive for Secure and Proof Jobs
Using the Hard Disk Drive for
Secure and Proof Jobs
Secure and proof jobs that have been submitted to the
printer are stored as processed, ready-to-print files on the
Hard Disk Drive. These jobs can be printed (or deleted)
through the Password Menu where you enter the 4-digit
password for the job or jobs to be printed. Procedures for
printing or deleting these jobs are listed in Table 1.7 on
page 1-23.
The secure or proof job is placed at the top of the print
queue, and will print following completion of the
currently printing job. If more than one job is released,
jobs are placed on the print queue in the order released.
Secure or proof jobs having the same priority are printed
on a first released basis.
Creating Secure Jobs
Secure printing delays printing of a job until a password
associated with the job is entered at the printer’s Control
Panel. Entering the password at the Control Panel will
provide access to only those jobs sent with that password.
Secure jobs are normally created in PCL and PostScript by
choosing the feature in a driver. When not using a driver
with this feature, secure jobs may also be created by
preceding the job with the following PJL commands:
@PJL XSECUREJOB
@PJL XJOBPASSWORD = "number"
These commands must be immediately followed by a
standard PJL “JOB” command that includes the
“jobname.”
3-8
❖ DocuPrint NC60 System Administrator Guide
Using the Hard Disk Drive for Secure and Proof Jobs
Job names can be up to 16 alphanumeric characters and
passwords must contain four numeric characters (0-7).
PCL does not support leading zeros in the password. The
printer assigns a default job name if no name or a name
with a syntax error is used. The job name is displayed on
the Control Panel Password Menu when the associated
password is entered. If a password is not assigned or the
password contains syntax errors, the job is not printed
and is discarded.
The following example creates a Secure Job named
“Bond” with a password of 7000:
<E SC >%- 12 34 5X @PJ L XS ECU RE JO B
@P JL XJ OB PA SS WOR D = 700 0
@P JL JO B NA ME = "B on d"
@P JL EN TE R LA NGU AG E = P CL
.. .P CL fi le .. .
<E SC >%- 01 23 45 X@P JL E OJ
<E SC >%- 01 23 45 X
The printer processes all data following the @PJL ENTER
LANGUAGE = PCL command as part of the Secure Job
named “Bond.” The job is stored on the hard disk under
the name “Bond” with a password of “7000” as defined in
the @PJL XJOBPASSWORD command. The @PJL EOJ
command signifies the end of the secure job. The EOJ
command should be followed by a UEL command.
Chapter 3: Using the Hard Drive
❖ 3-9
Using the Hard Disk Drive for Secure and Proof Jobs
Creating Proof Jobs
Proof printing lets you print a single copy of a multiple
copy job. You assign a password and copy count at your
workstation or computer before printing. The first set is
printed immediately. You can then go to the printer and
proofread (proof) the first set. Depending on the outcome
of the proofing, you can then decide either to continue
printing the remaining sets or to delete the job by
entering the password at the printer’s Control Panel.
Proof jobs, if not sent by a driver with the proof job
feature, may be invoked in both PCL and PostScript by
preceding the job with the following PJL commands:
@PJL XPROOFJOB
@PJL XJOBPASSWORD = "number"
These commands must be immediately followed by a
standard PJL “JOB” command that includes the
“jobname.”
The printer continues processing all subsequent data as
part of the proof job of name “job name.” The proof job is
stored with name “job name” and associated with the
password defined in the PJL XPASSWORD command. The
proof job ends when the PJL End of Job command is
received (i.e., @PJL EOJ). The “EOJ” command should be
followed by a UEL.
3-10
❖ DocuPrint NC60 System Administrator Guide
Using the Hard Disk Drive for Secure and Proof Jobs
The job name is limited to 16 alphanumeric characters in
the range ASCII 30 through ASCII 255, <SP> and <HT>.
The password must contain four numeric characters in
the range ASCII 48 through ASCII 55. The printer assigns
a default job name if no name or a name with a syntax
error is called out. The job name is the name displayed on
the Control Panel Password Menu when the associated
password is entered. If no password is assigned or there is
a password syntax error, the entire job is printed
immediately and is not stored as a proof job.
The following example generates a PCL proof job with
name “Sample” and associated with password “7777”
requesting five collated sets.
<E SC >%- 12 34 5X @PJ L XP ROO FJ OB
@P JL XJ OB PA SS WOR D = 777 7
@P JL JO B NA ME = "S am ple "
@P JL SE T QT Y = 5
@P JL EN TE R LA NGU AG E = P CL
.. .P CL fi le .. .
<E SC >%- 01 23 45 X@P JL E OJ
<E SC >%- 01 23 45 X
Chapter 3: Using the Hard Drive
❖ 3-11
Using the Hard Disk Drive for Secure and Proof Jobs
Printing or Deleting
Secure or Proof Jobs
3-12
Secure or proof jobs may be printed or deleted by using
the Password Menu, as described in the section “Password
Menu” (page 1-22). They may also be deleted by using the
Delete Jobs function in the Reset Menu, as described in
the section “Reset Menu” (page 1-109).
❖ DocuPrint NC60 System Administrator Guide
Maintaining the Printer
4 r e tpahC
Regular Printer Maintenance .............................................. 4-3
Cleaning the Printer ........................................................... 4-4
Cleaning the Grounding Roller and Feed Rollers .............. 4-5
Cleaning the Print Drum Charger .................................... 4-4
Adjusting Density and Color Balance .................................. 4-8
Printing a Test Page ....................................................... 4-9
Interpreting the Test Print ............................................. 4-10
What To Look For ......................................................... 4-11
Making Adjustments .................................................... 4-12
Adjustment Recovery .................................................... 4-15
Upgrading the Printer Software ........................................ 4-16
Upgrade Methods ........................................................ 4-18
Before You Upgrade ...................................................... 4-17
Printer Controller Upgrade Process ................................ 4-19
Determining a Successful Upgrade ................................ 4-20
After the Upgrade ......................................................... 4-20
Procedure A .................................................................. 4-21
Procedure B .................................................................. 4-22
Procedure C ................................................................. 4-24
Procedure D ................................................................. 4-26
Chapter 4: Maintaining the Printer
❖ 4-1
Maintaining the Printer
Procedure E .................................................................. 4-28
Procedure F .................................................................. 4-29
Procedure G ................................................................. 4-31
General Troubleshooting .............................................. 4-32
4-2
❖ DocuPrint NC60 System Administrator Guide
Regular Printer Maintenance
Regular Printer Maintenance
Your DocuPrint NC60 is designed to need very little
ongoing maintenance other than the replacement of
maintenance items as they reach their end of use.
To avoid untimely image quality problems, we
recommend that you replace maintenance items when
the end of use warnings appear on the Control Panel.
However, it is always good practice to periodically clean
any loose toner or foreign matter in your printer. See the
section “Cleaning the Printer” (page 4-4) for procedures and
cautions.
Chapter 4: Maintaining the Printer
❖ 4-3
Cleaning the Printer
Cleaning the Printer
The cleaning procedures described in this section will
help you maintain the optimum print quality and
minimize downtime of your DocuPrint NC60. Before you
begin, be sure that you have a basic understanding of the
parts of your printer. Also, pay strict attention to the
cautions given in each process.
Cleaning the Print
Drum Charger
4-4
The Print Drum Charger is a thin wire mesh used to place
a charge on the Print Drum. If this mesh becomes dirty
the Print Drum will not obtain a proper charge resulting
in image quality defects. To clean the Print Drum Charger,
follow these steps.
1
Open the front and top covers of the printer and locate
the Print Drum.
2
On the top left side of the Print Drum you will see a green
thumb tab. This is the Print Drum Charger cleaner slide.
3
Simply slide this Print Drum Charger cleaner slide back
and forth several times and return it to its original
location.
❖ DocuPrint NC60 System Administrator Guide
Cleaning the Printer
Cleaning the
Grounding Roller and
Feed Rollers
The interior rollers, located under the Front Cover, should
be cleaned only if roller marks appear on prints.
Figure 4.1 Location of Interior Rollers
1
2
➊ Grounding Roller
➋ Registration/Precurler Roller
➌ Paper Sensor Switch
➍ Paper Feed Rollers
➎ Developer Rollers (4)
(underneath the Print Drum)
3
4
5
0300242A-ACX
There is a small paper sensor switch in the bottom of the
printer that is easily broken. Use extreme caution in this
area to avoid damaging the printer. This switch can
only be repaired by a service technician.
When cleaning, do not use water or a cloth dampened
with water. Use a clean, dry, lint free cloth.
Chapter 4: Maintaining the Printer
❖ 4-5
Cleaning the Printer
Follow these steps to clean the rollers.
1
Raise the Front cover.
2
Locate the Print Drum.
When removing and inserting the Print Drum, do
not allow the green drum to touch any parts of the
printer. Contact may damage the delicate drum
degrading print quality.
3
Release the latches on both sides of the Print Drum.
4
Grasp the Print Drum by the handles and slide it up and
out of the printer, being careful to not allow the drum to
come into contact with the front cover of the printer.
The Print Drum is sensitive to prolonged exposure
to bright light. If the drum is exposed to excessive
light (the average fluorescent office lighting) for
more than 2 minutes, it may require up to 2 hours
of darkness to recover. Extended exposure will
cause permanent damage.
4-6
5
Set the Print Drum Module aside on several sheets of used
paper and cover the drum with several layers of paper to
avoid light contact.
6
Locate the paper sensor switch in the bottom of the
printer. See diagram above. Take care not to damage this
switch while cleaning.
❖ DocuPrint NC60 System Administrator Guide
Cleaning the Printer
7
While holding the paper switch down, wipe all the rollers
with a clean cloth.
8
Clean the areas between the developer rollers. It is not
necessary to completely remove the toner from the
developer rollers.
9
Hold the Print Drum with both hands by the side handles.
10
Replace the Print Drum by sliding it down and into the
printer.
11
Secure both latches of the Print Drum.
12
Close the Front Cover.
If you detect the presence of any oil on any of these rollers or
the Transfer Drum, immediately remove the Fuser from the
printer and call your service provider or Xerox representative.
Chapter 4: Maintaining the Printer
❖ 4-7
Adjusting Density and Color Balance
Adjusting Density and
Color Balance
You may notice, over the course of using the printer, that
colors may change. For example, reds may begin to take
on a purple cast, or blues may take on a green cast. This
happens during the normal use of a color printer and can
be easily remedied by using the Density/Color Balance
Adjustment procedure described in this section. This
procedure, which should be done monthly, will help
correct any color shifts.
This Control Panel procedure involves printing a test page
and adjusting the densities and colors based on the
appearance of the Test Page. You may need to repeat this
procedure and test your adjustments until you achieve
the desired effect.
If, during the adjustment process, you decide to return to your
starting point; you can do so by selecting Cancel Changes
from the Color Adjust Menu.
4-8
❖ DocuPrint NC60 System Administrator Guide
Adjusting Density and Color Balance
Printing a Test Page
1
Press Menu Up or Menu Down until you see:
Menus
Color Adjust
2
Press Item Up or Item Down.
You will see:
Processing
The printer prints the Color Balance test print.
Chapter 4: Maintaining the Printer
❖ 4-9
Adjusting Density and Color Balance
Interpreting the
Test Print
The Color Balance test print contains numbered images
that indicate possible adjustments that can be made, as
shown in Figure 4.2. You can choose to make an
adjustment to the Color Density, the Black Density, or the
Color Balance.
Figure 4.2 Color Balance Test Print
(While Figure 4.2 is in black and white, the actual Color
Balance test page is in full color.)
The Color Density Images, numbered -3CMY...0,...+3CMY
and the current setting show a lightness/darkness range of
three color gray 30% halftones.
The Black Density Images, numbered -3K...0,...+3K and
the current setting show a lightness/darkness range of
black only 30% halftones.
The Color Balance Images, numbered 0,10,11,...21 and
the current setting, show variations of three color gray.
Each of these circles contains gray with tints of other
colors.
4-10
❖ DocuPrint NC60 System Administrator Guide
Adjusting Density and Color Balance
What To Look For
There are basically three things to look for in examining
the test print.
1. The Color Density and the Black Density are a matter
of taste. The 30% halftones can be used to judge the
current level and decide on a preference.
2. The Color Density and Black Density should be at
approximately the same level. This is important in
order to make the Color Balance adjustment.
3. The correct Color Balance is determined by
comparing the circle in the center of the Color
Balance object marked “CURRENT” with the gray
background. The background is produced using black
only and the circles are produced using a combination
of cyan, magenta, and yellow. The adjustment
objective is for the “CURRENT” circle to be the closest
gray of any of the circles when compared to the
background.
Chapter 4: Maintaining the Printer
❖ 4-11
Adjusting Density and Color Balance
Making Adjustments
Use the following procedures to make adjustments to the
color density and balance:
Color Density Adjustment
1
Press Item Up or Item Down until you see:
Color Adjust
Color Density
2
Press Value Up or Value Down until you see:
Color Density
New Value
=
Values are -3CMY, -2CMY, -1CMY, 0, +1CMY, +2CMY,
+3CMY..
3
Press Enter. The test page will print and the Control Panel
will display:
Color Adjust Menu
Color Density
4
4-12
Enter “0” to set the current value or set another new value
by repeating Steps 2 and 3 above..
❖ DocuPrint NC60 System Administrator Guide
Adjusting Density and Color Balance
Black Density Adjustment
1
Press Item Up or Item Down until you see:
Color Adjust
Black Density
2
Press Value Up or Value Down until you see:
Black Density
New Value
=
Values are -3K, -2K, -1K, 0, +1K, +2K, +3K.
3
Press Enter. The test page will print and the Control Panel
will display:
Color Adjust Menu
Black Density
4
Enter “0” to set the current value or set another new value
by repeating Steps 2 and 3 above..
Chapter 4: Maintaining the Printer
❖ 4-13
Adjusting Density and Color Balance
Color Balance Adjustment
1
Press Menu Up or Menu Down until you see:
Menus
Color Adjust Menu
2
Press Item Up or Item Down until you see:
Color Adjust
Color Balance
3
Press Value Up or Value Down until you see:
Color Balance
New Value
=
Values are 0,10,11,12,13,14,15,16,17,18,19,20,21.
4
Press Enter. The test page will print and the Control Panel
will display:
Color Adjust Menu
Color Density
5
4-14
Enter “0” to set the current value or set another new value
by repeating Steps 3 and 4 above.
❖ DocuPrint NC60 System Administrator Guide
Adjusting Density and Color Balance
Adjustment Recovery
While in the color adjustment routine you have two
methods of recovering previous settings:
• You can choose to return to the values you had before
you began the adjustment routine by using the Color
Adjust menu’s Cancel Changes item.
The printer will be restored to the original settings you
had when you entered the color adjustment routine
• You can choose to return the values to the factory
default values by using the Color Adjust menu’s Color
Defaults item.
The printer will be restored to the initial nominal
default values.
Chapter 4: Maintaining the Printer
❖ 4-15
Upgrading the Printer Software
Upgrading the Printer Software
The Printer Controller is FLASH ROM equipped. This
means as software fixes and upgrades are available, you
are able to update printer software without a service call.
The current software at the time of manufacture is
provided on the CD-ROM. The path to the software is:
Table 4.1
Software on the CD-ROM
Software
Path to the Software
Printer Controller
D\INSTAL\UTILITY\FIRMWARE\PRINTER\(version #).xfc
(version # in the form #_#_#)
In addition the newest software will always be available
on the Internet on both the Xerox ftp and world wide
web sites.
Table 4.2
Software on the Internet
Software
Address
Printer Controller
ftp://ftp.xerox.com/pub/nc60/firmware
Printer Controller on WWW
http://www.xerox.com/drivers
All files are compressed using PKZIP or BinHex/ StuffIt
formats to avoid corruption during transfer.
Self-extracting versions of the files exist for many
platforms. For the other platforms you will need the
appropriate decoding software.
4-16
❖ DocuPrint NC60 System Administrator Guide
Upgrading the Printer Software
There are a variety of ways to upgrade the printer
software. Choose one of the following that is most
familiar to you.
Before You Upgrade
1
Be sure the printer is in communication with the
workstation directly or over the network.
2
Be sure you have the proper upgrade file for the kind of
upgrade you need to do. The printer controller file will
end in the extension .xfc.
3
Print a Configuration Sheet and a Diagnostics Page. Refer
to Table 1.20 on page 1-101 for instructions, if necessary.
Chapter 4: Maintaining the Printer
❖ 4-17
Upgrading the Printer Software
Upgrade Methods
Table 4.3
Select a method from Table 4.3 to do an upgrade for your
operating system. The bold letter indicates the upgrade
procedure to use, described later in this chapter.
Upgrade Methods
LPR
Parallel
Port
Novell
Print
Queue
Macintosh
Printer
Utility
A
***
C
D
*
F
G
Windows 95/98
A
***
C
D
*
F
G
Windows NT 3.51
& 4.0
A
B**
C
D
*
F
G
OS/2
*
B**
C
D
*
F
G
UNIX
*
B
*
*
*
F
G
Macintosh
*
*
*
*
E
F
G
Operating
System
CentreWare
DP
Windows 3.x
* Not Applicable
** Requires TCP/IP services to be installed from your operating system.
*** Requires LPR capable software to be installed independently from the operating system.
4-18
❖ DocuPrint NC60 System Administrator Guide
Internet
Services Mail Send
Upgrading the Printer Software
Printer Controller
Upgrade Process
During the upgrade process the printer’s Control Panel
will display several messages.
As the printer receives the file it will alternate between the
message “Waiting” and the message “Processing”. It is
normal in some cases for the printer to display the
message “Waiting” a majority of the time.
After the complete file has been received the Control
Panel will display “Upgrading, Please Wait…” and the
upgrade process will begin.
When the upgrade process is complete the printer will
automatically initialize and print a startup sheet.
The process can take as little as 5 minutes over a fast
network to as long as 20 minutes over the parallel port.
It is important to not interrupt any part of the process.
DO NOT TURN OFF THE PRINTER IN THE MIDDLE OF
AN UPGRADE.
If you experience any problems, call your Xerox Customer
Support Center.
Chapter 4: Maintaining the Printer
❖ 4-19
Upgrading the Printer Software
Determining a
Successful Upgrade
After the Upgrade
If your upgrade is successful, you will receive a new start
up page. The “Software Version” on the start up page
should reflect the software level of the upgrade.
After a successful upgrade, some printer features may be
set to the factory defaults. Some of these parameters may
include settings that allow you to print to the printer.
These parameters must be reset before you will be able to
print. To accomplish this, you will need the previously
printed Configuration Sheet and Diagnostics page.
Using the directions in the section “Before You Upgrade”
(page 4-17), print out a new Configuration Sheet and
Diagnostics page.
Compare the original Configuration Sheet with the new
one. Identify the items that are different between the two
pages. Use CentreWare DP or the Control Panel (in some
cases both) to restore settings. If you require assistance
please contact your Xerox Customer Support Center.
Now compare the Printer Diagnostics pages. Look at the
section labeled Adjustments. If the Top Margin and Left
Margin numbers have changed they will need to be reset.
To do this use the procedure on page 1-104.
Other settings on the Diagnostics Page may have changed
due to print quality adjustments. This is normal and not a
result of the upgrade.
Finally, it is advisable to perform a Color Balance
procedure at this time to ensure optimum color printing.
See the section “Adjusting Density and Color Balance”
(page 4-8).
4-20
❖ DocuPrint NC60 System Administrator Guide
Upgrading the Printer Software
Procedure A
Upgrade from CentreWare DP
Once the upgrade process has begun do not power
off your printer!
1
Print a Configuration Sheet and a Diagnostics Page.
Keep these pages for future reference. For directions on
doing this, refer to Table 1.20 on page 1-101.
2
Start the CentreWare DP software from your workstation.
Select the printer from the Printers List.
3
At the CentreWare DP main screen select the Tools menu.
4
From the Tools menu select the Upgrade Printer item.
5
Select the Printer button.
6
Enter the path of the upgrade file and click OK.
7
CentreWare DP will send the upgrade file to the printer.
The upgrade should take less than 10 minutes to perform.
8
To see if your upgrade was successful see the section
“Determining a Successful Upgrade” (page 4-20). If
successful, follow the instructions in the section “After the
Upgrade” (page 4-20). For problems consult the section
“General Troubleshooting” (page 4-32).
Chapter 4: Maintaining the Printer
❖ 4-21
Upgrading the Printer Software
Procedure B
LPR Upgrade Procedure
Once the upgrade process has begun do not power
off your printer!
1
Print a Configuration Sheet and a Diagnostics Page.
Keep these pages for future reference. For directions on
doing this, refer to Table 1.20 on page 1-101.
2
Send the upgrade file to the printer. Use the format based
on your client operating system:
Windows NT (3.51 & 4.)
lpr -P ps -S <ipaddress> <filename>[RETURN]
OS/2
lpr -p ps -s <ipaddress> <filename>[RETURN]
UNIX (use lp or lpr as appropriate)
lpr <switches><queue><filename> [RETURN]
lp <switches><queue><filename> [RETURN]
Where:
<ipaddress> = the TCP/IP address the printer has been
assigned
<filename> = the path and name of the upgrade file
<queue> = the native queue to which the printer is
assigned
<switches> = use switches as appropriate to your UNIX
environment
3
4-22
To see if your upgrade was successful see the section
“Determining a Successful Upgrade” (page 4-20). If
successful, follow the instructions in the section “After the
Upgrade” (page 4-20).
❖ DocuPrint NC60 System Administrator Guide
Upgrading the Printer Software
If you have problems:
• Try to ping the printer to make sure it has a valid ip
address.
• In addition consult the section “General
Troubleshooting” (page 4-32).
Chapter 4: Maintaining the Printer
❖ 4-23
Upgrading the Printer Software
Procedure C
The Parallel Port
Once the upgrade process has begun do not power
off your printer!
1
Print a Configuration Sheet and a Diagnostics Page.
Keep these pages for future reference. For directions on
doing this, refer to page 1-101.
2
The parallel port on the printer must be in Auto mode.
Check the Configuration Sheet previously printed. In the
Parallel Settings section the Mode should be set to Auto. If
it is not you will need to set this through the printer’s
Control Panel or CentreWare DP. For directions on doing
this through the Control Panel, refer to page 1-52.
3
Send the upgrade file to the printer.
An OS/2 user should open a command prompt.
A Windows(95/NT/3.1x) user should run from DOS or run
a DOS session. For speed, it is recommended to exit
Windows and run from DOS.
The format for the copy command is as follows:
copy /b <filename> <port>[RETURN]
Where:
<port> = the parallel port to which the printer is
connected (LPT1:,LPT2:, etc.)
<filename> = the path and name of the upgrade file
Ex: copy 3_3_4.xfc LPT1
4
4-24
To see if your upgrade was successful, see the section
“Determining a Successful Upgrade” (page 4-20). If
successful, follow the instructions in the section “After the
Upgrade” (page 4-20).
❖ DocuPrint NC60 System Administrator Guide
Upgrading the Printer Software
If you have problems:
• Make sure you are using an IEEE B1284 compliant
cable.
• Make sure the printer’s parallel port Mode is set to
Auto.
• If running a DOS window from Windows 95 make sure
that one of your printers through Settings/Printers is
mapped directly to LPT 1 (not redirected to a network
queue). Also check the port settings by selecting the
Port Settings... button on the Details tab dialog. Make
sure the selection Spool MS-DOS Print Jobs is
selected. If still having problems after making these
settings, try powering your PC off and on.
• (Windows Users) If experiencing time-outs on the host
PC (“Problem detected on parallel port, Abort, Retry,
Fail”) then you need to set the port to an infinite
time-out against busy on the printer. From the
command line or as an entry in autoexec.bat type the
following command:
mode lpt1:,,b (two commas following the colon)
The “b” option sets the port for infinite time-out. After
setting the port to an infinite time-out, try using the
copy command again. If the command prompt does
not appear within 20 minutes a ctrl-break can be used
to abort the copy command without rebooting your
computer.
• Windows 3.11 users should turn off Print Manager.
• In addition consult the section “General
Troubleshooting” (page 4-32).
Chapter 4: Maintaining the Printer
❖ 4-25
Upgrading the Printer Software
Procedure D
Insert into Novell Queue
Once the upgrade process has begun do not power
off your printer!
1
Print a Configuration Sheet and a Diagnostics Page.
Keep these pages for future reference. For directions on
doing this, refer to Table 1.20 on page 1-101.
2
Start PCONSOLE.
3
Select Print Queue Information then press [RETURN].
4
Select the print queue to send the job to, then press
[RETURN].
5
Select Current Print Job Entries then press [RETURN].
6
Press the [INSERT] key. Type in the path/filename and
press [RETURN].
7
Choose configuration and then press [RETURN].
8
Press the [ESC] key. Select Yes then press [RETURN].
9
The upgrade file will be sent to the printer. The upgrade
should take less than 10 minutes to perform.
10
4-26
To see if your upgrade was successful, see the section
“Determining a Successful Upgrade” (page 4-20). If
successful, follow the instructions in the section “After the
Upgrade” (page 4-20).
❖ DocuPrint NC60 System Administrator Guide
Upgrading the Printer Software
If you have problems:
If the printer never goes to “Processing” check the status
of the job in the queue. If the job is in the queue and
Active, but not being sent to the printer, power the printer
off and on. See if the job is then sent to the printer.
In addition consult the section “General Troubleshooting”
(page 4-32).
Chapter 4: Maintaining the Printer
❖ 4-27
Upgrading the Printer Software
Procedure E
MACINTOSH – XEROX PRINTER UTILITY
Once the upgrade process has begun do not power
off your printer!
4-28
1
Print a Configuration Sheet and a Diagnostics Page.
Keep these pages for future reference. For directions on
doing this, refer to Table 1.20 on page 1-101.
2
Launch the Xerox Printer Utility.
3
Select the NC60 printer to upgrade in PostScript Printers
list.
4
Select Send.
5
Locate the upgrade file.
6
Select Open to send the upgrade file to the printer.
7
The Xerox Printer Utility will send the upgrade file to the
printer. The upgrade should take less than 10 minutes.
8
To see if your upgrade was successful, see the section
“Determining a Successful Upgrade” (page 4-20). If
successful, follow the instructions in the section “After the
Upgrade” (page 4-20). For problems consult the section
“General Troubleshooting” (page 4-32).
❖ DocuPrint NC60 System Administrator Guide
Upgrading the Printer Software
Procedure F
Upgrade Procedure via Internet Services
Once the upgrade process has begun do not power
off your printer!
1
Print a Configuration Sheet and a Diagnostics Page.
Keep these pages for future reference. For directions on
doing this, refer to Table 1.20 on page 1-101.
2
Launch your web browser and connect to the printer URL
(typically http://ipaddress).
3
Select the Print page to get to the File Download dialog.
4
In the File: box enter the path and name of the upgrade
file, or select the Browse... button to select the upgrade
file.
5
Select the Start button.
6
The upgrade file will be sent to the printer. The upgrade
should take less than 10 minutes to perform.
7
To see if your upgrade was successful, see the section
“Determining a Successful Upgrade” (page 4-20). If
successful, follow the instructions in the section “After the
Upgrade” (page 4-20).
Chapter 4: Maintaining the Printer
❖ 4-29
Upgrading the Printer Software
If you have problems:
• If having problems with time-outs when sending the
file using a proxy server try turning off the proxy
server and sending the file again. Alternatively, the
printer IP address can be entered individually as an
address for which a proxy should not be used.
• Check your browser version to be sure your are using
the correct version. The upgrade procedure requires
Netscape 3.0 or later or Internet Explorer 4.0 or later
• Try to ping the printer to make sure it is a valid ip
address
• In addition consult the section “General
Troubleshooting” (page 4-32).
4-30
❖ DocuPrint NC60 System Administrator Guide
Upgrading the Printer Software
Procedure G
Mail Send
Once the upgrade process has begun do not power
off your printer!
If your printer is set up to receive mail (see “CentreWare
Internet Services” on page 2-4), send the upgrade file as an
attachemtnt to a mail note addressed to the printer’s mail
address. The upgrade should take less than ten minutes.
If your mail system limits the size of attached files, it is
possible that some of the file may get truncated. If this occurs,
the upgrade will not go through and no damage is done.
Chapter 4: Maintaining the Printer
❖ 4-31
Upgrading the Printer Software
General
Troubleshooting
Some of the individual printer upgrade methods will have
their own trouble shooting sections. This section is to
address general problems.
If the printer controller upgrade has failed, you will not
receive an error page. Check the following and try the
upgrade again:
4-32
1
Make sure you are using the correct upgrade file for your
printer controller. It should be a *.xfc file, not an *.xfn
file.
2
Check your method of connectivity to your printer. Can
you successfully send a job over your chosen method of
connectivity? For parallel port users- are you using a IEEE
1284 compliant parallel cable?
3
If the flash software was downloaded from an ftp site,
make sure it was downloaded in binary format, not ASCII.
To change to binary format, type binary at any ftp
prompt. If you are using an ftp software package such as
Chameleon ftp, you can select binary from within the
software.
4
Consult your upgrade procedure to see if there is a “If you
have problems” section in your chosen upgrade procedure
5
If the printer never goes to “Processing” and stays
“Online” check your method of printer connection. Try
powering off and on. If sending via a NetWare queue
check the status of the job in the queue. Powering off and
on the printer may cause the job to get to the printer.
❖ DocuPrint NC60 System Administrator Guide
Upgrading the Printer Software
6
Power off and on. Send the file again using the same
method.
7
Power off and on. Send the file using an alternative
method as indicated in the chart.
8
If the printer appears to be hung in “Processing” after
sending the upgrade file (with the “Processing” message
on the Control Panel for at least 15 minutes) either
contact your Xerox Customer Support Center for
assistance, or power off and on the printer. If the printer
powers up properly try sending the upgrade file again. If
the printer does not power up properly contact your
support center for assistance.
9
If the printer appears to be hung in “Upgrading, Please
Wait…”, (with the “Upgrading, Please Wait” message on
the Control Panel for at least 10 minutes) contact your
Xerox Customer Support Center for assistance.
10
If all attempts to upgrade the printer controller have
failed, note the Control Panel message of the printer
when the upgrade fails and contact your support center
for assistance.
11
If a printer upgrade was attempted and the printer will
not power up properly contact your support center for
assistance.
Chapter 4: Maintaining the Printer
❖ 4-33
4-34
❖ DocuPrint NC60 System Administrator Guide
Troubleshooting
5 r e tpahC
Control Panel Messages ..................................................... 5-2
Chapter 5: Troubleshooting
❖ 5-1
Control Panel Messages
Control Panel Messages
Listed in Table 5.1 are Control Panel messages that either:
• Cause the printer to stop printing.
• Require the user to call for service.
Also included in Table 5.1 are common, non-error
messages you are likely to see. The messages are listed in
alphabetical order.
Table 5.1
Control Panel Messages and Corrective Actions
Message
Explanation/Required Action
C1-CHECK TRAY 1
Tray 1 is misinstalled or not installed in the printer.
C2-CHECK TRAY 2
Tray 2 is misinstalled or not installed in the printer.
E1-TRAY 1 JAM
OPEN PRINTER
Tray 1 misfeed. Check tray and open printer to clear.
E2-TRAY 2 JAM
OPEN PRINTER
Tray 2 misfeed. Check tray and open printer to clear.
E3-BYPASS JAM
OPEN PRINTER
Manual bypass misfeed. Open printer to clear.
E4-INPUT JAM
OPEN PRINTER
Paper jam in the input roller area. Open printer to clear.
E5-FUSER JAM
OPEN PRINTER
Paper jam in the fuser area. Open printer, open the Fuser cover, release the
Fuser lever to clear.
E6-DRUM JAM
OPEN PRINTER
Paper jam in the transfer drum area. Open the printer to clear.
E7-PRINT DRUM
JAM-OPEN PRINTER
Paper jam in the print drum area. Open printer to clear.
5-2
❖ DocuPrint NC60 System Administrator Guide
Control Panel Messages
Table 5.1
Control Panel Messages and Corrective Actions
Message
Explanation/Required Action
E8-OUTPUT JAM
OPEN PRINTER
Paper jam in the output roller area. Open printer, open the Fuser cover, release
the Fuser lever to clear.
E9-PLEASE CLOSE
PRINTER
A printer cover is open. Close cover to resume printing.
EA-COLOR DEV.
MISINSTALLED
Color developer cartridge is not properly installed.
EB-BLACK DEV.
MISINSTALLED
Black developer cartridge is not properly installed.
EC-PRINT DRUM
MISINSTALLED
Print drum is not properly installed.
ED-TRAY 2
MISINSTALLED
Tray 2 is not properly installed.
ENTER PASSWORD
job filename
Enter 4-digit password to release Secure Job or Proof Job.
ENTER TO PRINT
ITEM TO SCROLL
F1-DISK READ
ERROR
Media Server error. Remove floppy and reinsert.
F2-DISK I/O
ERROR
Media Server error. Remove floppy and reinsert.
F3-DISK READ
FAILURE
Media Server error. Remove floppy and reinsert.
FEED #10ENVELOPE
IN MANUAL BYPASS
Load Comm. 10 envelope in manual bypass.
Chapter 5: Troubleshooting
❖ 5-3
Control Panel Messages
Table 5.1
Control Panel Messages and Corrective Actions
Message
Explanation/Required Action
FEED 8.5x13
IN MANUAL BYPASS
Load 81/2 x 13 in. paper in manual bypass.
FEED 8x10 PAPER
IN MANUAL BYPASS
Load 8 x 10 in. paper in manual bypass.
FEED A4 PAPER
IN MANUAL BYPASS
Load A4 (210 x 297 mm) paper in manual bypass.
FEED A5 PAPER
IN MANUAL BYPASS
Load A5 (148 x 210 mm) paper in manual bypass.
FEED B5 PAPER
IN MANUAL BYPASS
Load B5 (176 x 250 mm) paper in manual bypass.
FEED C5 ENVELOPE
IN MANUAL BYPASS
Load C5 envelope in manual bypass.
FEED DL ENVELOPE
IN MANUAL BYPASS
Load DL envelope in manual bypass.
FEED EXECUTIVE
IN MANUAL BYPASS
Load Executive (71/4 x 101/2 in.) paper in manual bypass.
FEED INVOICE
IN MANUAL BYPASS
Load Invoice (51/4 x 81/2 in.) paper in manual bypass.
FEED LEGAL
IN MANUAL BYPASS
Load Legal (81/2 x 14 in.) paper in manual bypass.
FEED LETTER
IN MANUAL BYPASS
Load Letter (81/2 x 11 in.) paper in manual bypass.
FEED MONARCH ENV
IN MANUAL BYPASS
Load Monarch envelope in manual bypass.
5-4
❖ DocuPrint NC60 System Administrator Guide
Control Panel Messages
Table 5.1
Control Panel Messages and Corrective Actions
Message
Explanation/Required Action
FEED SP. FOLIO
IN MANUAL BYPASS
Load Sp. Folio (216 x 315 mm) paper in manual bypass.
FLUSHING
job filename
Printer is removing current job from memory. No action required.
H1-HARD DISK
ERROR
H1 - Hard disk error. Power printer off/on; check hard disk connections;
reformat disk.
H2-HARD DISK
CONTROLLER ERROR
H2 - Hard disk controller error. Power printer off/on; check hard disk
connections.
H3-HARD DISK
IS FULL
H3 - Hard disk is full. Print or delete any Secure Jobs or Proof Jobs.
H4-PLEASE FORMAT
HARD DISK
H4 - Please format the hard disk.
INITIALIZING
No action required.
J1-ADD YELLOW
TONER
Add yellow toner.
J2-ADD MAGENTA
TONER
Add magenta toner.
J3-ADD CYAN
TONER
Add cyan toner.
J4-ADD BLACK
TONER
J4 - Add black toner.
J5-REPLACE COLOR
DEV. CARTRIDGE
J5 - Replace the color developer cartridge.
J6-REPLACE BLACK
DEV. CARTRIDGE
J6 - Replace the black developer cartridge.
J7-REPLACE
TONER COLLECTOR
Replace the full toner collector.
Chapter 5: Troubleshooting
❖ 5-5
Control Panel Messages
Table 5.1
Control Panel Messages and Corrective Actions
Message
Explanation/Required Action
J8-REPLACE
PRINT DRUM
J8 - Replace the print drum.
J9-REPLACE
FUSER MODULE
J9 - Replace the fuser module.
JA-REPLACE
FUSER OIL/PAD
Replace the fuser oil and pad.
JOB HELD
job filename
A print job is being held. Press Enter to resume printing.
LOAD 8.5x13
IN TRAY 1
Load 81/2 x 13 in. paper in tray 1.
LOAD 8.5x13
IN TRAY 2
Load 81/2 x 13 in. paper in tray 2.
LOAD 8x10 PAPER
IN TRAY 1
Load 8 x 10 in. paper in tray 1.
LOAD 8x10 PAPER
IN TRAY 2
Load 8 x 10 in. paper in tray 2.
LOAD A4 PAPER
IN TRAY 1
Load A4 (210 x 297 mm) paper in tray 1.
LOAD A4 PAPER
IN TRAY 2
Load A4 (210 x 297 mm) paper in tray 2.
LOAD A5 PAPER
IN TRAY 1
Load A5 (148 x 210 mm) paper in tray 1.
5-6
❖ DocuPrint NC60 System Administrator Guide
Control Panel Messages
Table 5.1
Control Panel Messages and Corrective Actions
Message
Explanation/Required Action
LOAD A5 PAPER
IN TRAY 2
Load A5 (148 x 210 mm) paper in tray 2.
LOAD B5 PAPER
IN TRAY 1
Load B5 (176 x 250 mm) paper in tray 1.
LOAD B5 PAPER
IN TRAY 2
Load B5 (176 x 250 mm) paper in tray 2.
LOAD EXECUTIVE
PAPER IN TRAY 1
Load Executive (71/4 x 101/2 in.) paper in tray 1.
LOAD EXECUTIVE
PAPER IN TRAY 2
Load Executive (71/4 x 101/2 in.) paper in tray 2.
LOAD INVOICE
8.5x5.5 IN TRAY1
Load Invoice (51/4 x 81/2 in.) paper in tray 1.
LOAD INVOICE
8.5x5.5 IN TRAY2
Load Invoice (51/4 x 81/2 in.) paper in tray 2.
LOAD LEGAL
8.5x14 IN TRAY 1
Load Legal (81/2 x 14 in.) paper in tray 1.
LOAD LEGAL
8.5x14 IN TRAY 2
Load Legal (81/2 x 14 in.) paper in tray 2.
LOAD LETTER
8.5x11 IN TRAY 1
Load Letter (81/2 x 11 in.) paper in tray 1.
LOAD LETTER
8.5x11 IN TRAY 2
Load Letter (81/2 x 11 in.) paper in tray 2.
LOAD SP. FOLIO
216x315 IN TRAY1
Load Sp. Folio (216 x 315 mm) paper in tray 1.
LOAD SP. FOLIO
216x315 IN TRAY2
Load Sp. Folio (216 x 315 mm) paper in tray 2.
Chapter 5: Troubleshooting
❖ 5-7
Control Panel Messages
Table 5.1
Control Panel Messages and Corrective Actions
Message
Explanation/Required Action
OFF LINE
Press On Line button to return to “Ready.”
PLEASE WAIT
WARMING UP
Please wait - Warming up
POWER SAVER
MODE
Power Saver Mode
PRINTING
job filename
PROCESSING
job filename
READY
SECURE JOB
job filename
T0-RESEAT FUSER
POWER OFF/ON
Fuser thermistor fault. Reseat the fuser, then power the printer off and on. If the
fault persists, call for service.
T1-RESEAT FUSER
POWER OFF/ON
Fuser under temperature fault. Reseat the fuser, then power the printer off and
on. If the fault persists, call for service.
T2-POWER OFF
REPLACE FUSER
Fuser over termperature fault. Replace the fuser module.
TRAY 1 EMPTY
Tray 1 is empty.
TRAY 2 EMPTY
Tray 2 is empty.
U0-ROM ERROR
POWER OFF/ON
There is a print engine ROM fault. Power the printer off and on. If the fault
persists, call for service.
5-8
❖ DocuPrint NC60 System Administrator Guide
Control Panel Messages
Table 5.1
Control Panel Messages and Corrective Actions
Message
Explanation/Required Action
U1-RAM ERROR
POWER OFF/ON
There is a print engine RAM fault. Power the printer off and on. If the fault
persists, call for service.
U2-NVRAM ERROR
POWER OFF/ON
There is a print engine NVRAM fault. Power the printer off and on. If the fault
persists, call for service.
U3-COMM.FAULT
POWER OFF/ON
There is a controller/engine communication fault. Power the printer off and on.
If the fault persists, call for service.
U4-OPTICS FAULT
POWER OFF/ON
There is a laser system fault. Power the printer off and on. If the fault persists,
call for service.
U5-POLYGON FAULT
POWER OFF/ON
There is a polygon motor fault. Power the printer off and on. If the fault
persists, call for service.
U6-MOTOR FAULT
POWER OFF/ON
There is a developer motor fault. Power the printer off and on. If the fault
persists, call for service.
U7-MOTOR FAULT
POWER OFF/ON
There is a main motor fault. Power the printer off and on. If the fault persists,
call for service.
W1-COLOR DEV MOD
NEAR END OF USE
W1 - Color developer cartridge near end of use. Order a new color developer
cartridge.
W2-BLACK DEV MOD
NEAR END OF USE
W2 - Black developer cartridge near end of use. Order a new black developer
cartridge.
W3-PRINT DRUM
NEAR END OF USE
W3 - Print drum near end of use. Order a new print drum.
W4-FUSER MODULE
NEAR END OF USE
W4 - Fuser module near end of use. Order a new fuser module.
W5-FUSER OIL/PAD
NEAR END OF USE
W5 - Fuser oil and pad near end of use. Replace oil bottle.
WAIT:ADJUSTING
PRINT QUALITY
Please wait - Adjusting print quality
WAITING
job filename
Printer waiting for data.
Chapter 5: Troubleshooting
❖ 5-9
5-10
❖ DocuPrint NC60 System Administrator Guide
Index
XI
A
AppSocket Binary PS
Setting
In Ethernet
Menu • 1-63
In Token Ring
Menu • 1-75
Binary PS
Setting • 1-52, 1-55
Black Density
Setting • 1-43
Black Overprint
Setting • 1-47
AppSocket Enable
Setting
In Ethernet
Menu • 1-62
In Token Ring
Menu • 1-74
C
AppSocket PDL
Setting
In Ethernet
Menu • 1-62
In Token Ring
Menu • 1-74
CentreWare DP • 2-3
B
Cleaning
procedures • 4-4 ➝ 4-7
Feed Rollers • 4-5 ➝ 4-7
Grounding
Roller • 4-5 ➝ 4-7
Print Drum Charger • 4-4
Baud Rate
Setting • 1-56
Bidirectional
Setting • 1-52
Cancel Changes
Setting • 1-44
Cancel Job
Performing • 1-20
CentreWare Internet
Services • 2-4
Cleaning Cycle
Setting • 1-105
DocuPrint NC60 System Administrator Guide
D
Color Adjust Menu
Hierarchy • 1-42
Items
Black Density • 1-43
Cancel Changes • 1-44
Color Balance • 1-44
Color Defaults • 1-45
Color Density • 1-43
Color Balance
Adjusting • 4-8 ➝ 4-15
Adjustment Recovery • 4-15
Setting • 1-44
Test print • 4-10
Color Defaults
Setting • 1-45
Color Density
Setting • 1-43
Color Mode
Setting • 1-47
Disk Directory
Printing • 1-95
Disk Drive
See Hard Disk Drive
Disk Files
Printing • 1-94
DLC/LLC Binary PS
Setting
In Ethernet Menu • 1-61
In Token Ring Menu • 1-73
DLC/LLC Enable
Setting
In Ethernet Menu • 1-60
In Token Ring Menu • 1-72
DLC/LLC PDL
Setting
In Ethernet Menu • 1-60
In Token Ring Menu • 1-72
Configuration Sheet
Printing • 1-92, 1-101
E
Control Panel • 1-2 ➝ 1-9
Display • 1-3
Indicator lights • 1-4
Keys • 1-5 ➝ 1-9
Messages • 5-2 ➝ 5-9
Enh. Alignment
Setting • 1-48
CRU
Resetting • 1-111
CRU Usage
Displaying • 1-107
D
Default Gateway
Setting
In Ethernet Menu • 1-67
In Token Ring Menu • 1-79
Defaults
Setting • 1-41
Delete jobs • 1-111
Density
Adjusting • 4-8 ➝ 4-15
Adjustment Recovery • 4-15
Diagnostic Summary
Printing • 1-101
DocuPrint NC60 System Administrator Guide
Edge Smoothing
Setting • 1-47
Ethernet Menu
Hierarchy • 1-58
Items
AppSocket Bin PS • 1-63
AppSocket Enable • 1-62
AppSocket PDL • 1-62
Default Gateway • 1-67
DLC/LLC Bin PS • 1-61
DLC/LLC Enable • 1-60
DLC/LLC PDL • 1-60
EtherTalk Enable • 1-63
HTTP Enable • 1-63
IP Address • 1-65
IP Address Reset • 1-64
LPR Banner • 1-59
LPR Binary PS • 1-60
LPR Enable • 1-59
LPR PDL • 1-59
NetBEUI Bin PS • 1-62
NetBEUI Enable • 1-61
NetBEUI PDL • 1-61
Port Timeout • 1-68
Speed • 1-68
Subnet Mask • 1-66
F
EtherTalk Enable
Setting • 1-63
F
Factory Defaults
Resetting to • 1-110
Fast Black
Setting • 1-48
Fault History
Displaying • 1-108
Printing • 1-94
Faults Active
Displaying • 1-108
Files
Printing from Media Server • 1-97
Flow Control
Setting • 1-55
Font Number
Setting • 1-30
Fonts
Downloading • 3-3 ➝ 3-7
Form Feed
Forcing • 1-20
Form Length
Setting • 1-32
Frame Type
Setting • 1-86
H
Halftone Type
Setting • 1-48
Hard Disk Drive
Control Panel settings • 1-112
Formatting • 1-112
Initializing • 1-112, 3-2
Using • 3-2 ➝ 3-12
For downloading fonts • 3-3 ➝ 3-7
For downloading macros • 3-3 ➝ 3-7
For proof jobs • 3-8 ➝ 3-12
For secure jobs • 3-8 ➝ 3-12
Hold Timeout
Setting • 1-38
HTTP Enable
Setting
In Ethernet Menu • 1-63
In Token Ring Menu • 1-75
I
Imaging Menu
Hierarchy • 1-46
Items
Blk. Overprint • 1-47
Color Mode • 1-47
Edge Smoothing • 1-47
Enh. Alignment • 1-48
Fast Black • 1-48
Halftone Type • 1-48
Process Black • 1-49
Internet
Also see CentreWare Internet Services
Software upgrades • 4-16, 4-29
IP Address
Setting
In Ethernet Menu • 1-65
In Token Ring Menu • 1-77
IP Address Reset
Setting
In Ethernet Menu • 1-64
In Token Ring Menu • 1-76
J
Job Menu
Hierarchy • 1-19
Items
Cancel Job • 1-20
Form Feed • 1-20
Restart Printer • 1-21
L
LAA
Setting • 1-81
Language
Setting • 1-35
Line Termination
Setting • 1-33
Lossy compression • 1-107
DocuPrint NC60 System Administrator Guide
M
LPR Banner
Setting
In Ethernet Menu • 1-59
In Token Ring Menu • 1-71
NetBEUI Enable
Setting
In Ethernet Menu • 1-61
In Token Ring Menu • 1-73
LPR Binary PS
Setting
In Ethernet Menu • 1-60
In Token Ring Menu • 1-72
NetBEUI PDL
Setting
In Ethernet Menu • 1-61
In Token Ring Menu • 1-73
LPR Enable
Setting
In Ethernet Menu • 1-59
In Token Ring Menu • 1-71
Network Defaults
Resetting to • 1-110
LPR PDL
Setting
In Ethernet Menu • 1-59
In Token Ring Menu • 1-71
M
Macros
Downloading • 3-3 ➝ 3-7
Mail Send/Receive • 2-4
Manual Timeout
Setting • 1-39
Margin Left
Setting • 1-104
Margin Top
Setting • 1-104
Media Server Menu
Hierarchy • 1-96
Items
Print Quantity • 1-97
Select File • 1-97
Select Tray • 1-98
Menu Map
Printing • 1-93
N
NDS Context
Setting • 1-90
NDS Tree
Setting • 1-89
NetBEUI Binary PS
Setting
In Ethernet Menu • 1-62
In Token Ring Menu • 1-74
DocuPrint NC60 System Administrator Guide
Network Printer Services • 2-2
Novell Binary PS
Setting
In Novell Menu • 1-85
Novell Enable
Setting • 1-84
Novell Menu
Hierarchy • 1-83
Items
Frame Type • 1-86
NDS Context • 1-90
NDS Tree • 1-89
Novell Binary PS • 1-85
Novell Enable • 1-84
Novell Mode • 1-85
Novell PDL • 1-84
Polling Interval • 1-86
Primary Server • 1-88
PServer Name • 1-87
Novell Mode
Setting • 1-85
Novell PDL
Setting • 1-84
O
OHP Mode
Setting • 1-103
Orientation
Setting • 1-32
Overhead Projection mode • 1-103
P
Page counts
Displaying • 1-106
P
Page Policy
Setting • 1-37
Paper
Specifying size of • 1-36
Specifying type of • 1-36
Paper Size
Setting • 1-36
Paper Type
Setting • 1-36
Parallel Menu
Hierarchy • 1-50
Items
Bidirectional • 1-52
Binary PS • 1-52
Parallel PDL • 1-52
Port Enable • 1-51
Port Timeout • 1-51
Parallel PDL
Setting • 1-52
Password Menu
Hierarchy • 1-22
Usage • 1-23 ➝ 1-24
Patch Control
Setting • 1-105
PCL Font List
Printing • 1-92
PCL Menu
Hierarchy • 1-29
Items
Font Number • 1-30
Form Length • 1-32
Line Termination • 1-33
Orientation • 1-32
Pitch • 1-30
Point Size • 1-31
Symbol Set • 1-31
Pitch
Setting • 1-30
Point Size
Setting • 1-31
Polling Interval
Setting • 1-86
Port Enable
Setting
In Parallel Menu • 1-51
In Serial Menu • 1-54
Port Timeout
Setting
In Ethernet Menu • 1-68
In Parallel Menu • 1-51
In Serial Menu • 1-54
In Token Ring Menu • 1-80
PostScript
Demo Page • 1-93
Enabling binary mode • 1-52
Font List • 1-93
Printing errors • 1-40
Printing test patterns • 1-102
Setting AppSocket binary mode • 1-63, 1-75
Setting binary mode • 1-55
Setting DLC/LLC binary mode • 1-61, 1-73
Setting LPR binary mode • 1-60, 1-72
Setting NetBEUI binary mode • 1-62, 1-74
Setting Novell binary mode • 1-85
Power Saver
Setting • 1-41
PQ Set
Printing • 1-101
Primary Server
Setting • 1-88
Print Menu
Hierarchy • 1-91
Items
Configuration Sheet • 1-92
Disk Directory • 1-95
Disk Files • 1-94
Fault History • 1-94
Menu Map • 1-93
PCL Font List • 1-92
Print Quantity • 1-95
PS Demo Page • 1-93
PS Font List • 1-93
Select Tray • 1-95
Startup Page • 1-92
Tips & Tricks • 1-94
Print PS Errors
Setting • 1-40
DocuPrint NC60 System Administrator Guide
R
Print Quantity
Setting • 1-39
Setting for internal page printing • 1-95
Setting for Media Server printing • 1-97
Setting for Service Menu printing • 1-102
Printer software
See Software
Process Black
Setting • 1-49
Proof printing • 3-8 ➝ 3-12
PS Demo Page
Printing • 1-93
PS Font List
Printing • 1-93
PServer Name
Setting • 1-87
R
Reset Menu
Hierarchy • 1-109
Items
CRU Resets • 1-111
Delete All Jobs • 1-111
Disk Format • 1-112
Disk Initialize • 1-112
Factory Defaults • 1-110
Network Defaults • 1-110
Restart Printer • 1-111
Restart Printer
Initiating • 1-21, 1-111
S
Secure printing • 3-8 ➝ 3-12
Serial PDL
Setting • 1-55
Service Menu
Hierarchy • 1-100
Items
Cleaning Cycle • 1-105
Configuration Sheet • 1-101
CRU Usage • 1-107
Diag. Summary • 1-101
Fault History • 1-108
Faults Active • 1-108
Lossy Counter • 1-107
Margin Left • 1-104
Margin Top • 1-104
OHP Mode • 1-103
Patch Control • 1-105
Print PQ Set • 1-101
Print Quantity • 1-102
Select Tray • 1-103
Show Page Counts • 1-106
Show Setpoints • 1-106
S/W Levels • 1-108
Test Patterns • 1-102
Setpoints
Displaying • 1-106
Software
Upgrading • 4-16 ➝ 4-33
Software levels
Displaying • 1-108
Source Routing
Setting • 1-82
Speed
Setting
In Ethernet Menu • 1-68
In Token Ring Menu • 1-82
Select Tray
Setting for internal page printing • 1-95
Setting for Media Server printing • 1-98
Setting for Service Menu printing • 1-103
Startup Page
Printing • 1-92
Setting • 1-40
Serial Menu
Hierarchy • 1-53
Items
Baud Rate • 1-56
Binary PS • 1-55
Flow Control • 1-55
Port Enable • 1-54
Port Timeout • 1-54
Serial PDL • 1-55
Symbol Set
Setting • 1-31
DocuPrint NC60 System Administrator Guide
Subnet Mask
Setting
In Ethernet Menu • 1-66
In Token Ring Menu • 1-78
T
System Menu
Hierarchy • 1-34
Items
Defaults • 1-41
Hold Timeout • 1-38
Language • 1-35
Manual Timeout • 1-39
Page Policy • 1-37
Paper Size • 1-36
Paper Type • 1-36
Power Saver • 1-41
Print PS Errors • 1-40
Print Quantity • 1-39
Startup Page • 1-40
T
Test Patterns
Printing • 1-102
Test Print
Interpreting • 4-10
Tips & Tricks
Printing • 1-94
Token Ring Menu
Hierarchy • 1-70
Items
AppSocket Binary PS • 1-75
AppSocket Enable • 1-74
AppSocket PDL • 1-74
Default Gateway • 1-79
DLC/LLC Binary PS • 1-73
DLC/LLC Enable • 1-72
DLC/LLC PDL • 1-72
HTTP Enable • 1-75
IP Address • 1-77
IP Address Reset • 1-76
LAA • 1-81
LPR Banner • 1-71
LPR Binary PS • 1-72
LPR Enable • 1-71
LPR PDL • 1-71
NetBEUI Binary PS • 1-74
NetBEUI Enable • 1-73
NetBEUI PDL • 1-73
Port Timeout • 1-80
Source Routing • 1-82
Speed • 1-82
Subnet Mask • 1-78
TokenTalk Enable • 1-75
TokenTalk Enable
Setting • 1-75
Tray Menu
Hierarchy • 1-25
Items
Tray Sequence • 1-28
Tray 1 Cust. Size • 1-26
Tray 1 Type • 1-27
Tray 2 Cust. Size • 1-26
Tray 2 Type • 1-27
Tray Sequence
Setting • 1-28
Tray 1 Cust. Size
Setting • 1-26
Tray 1 Type
Setting • 1-27
Tray 2 Cust. Size
Setting • 1-26
Tray 2 Type
Setting • 1-27
U
Upgrading software
See Software, Upgrading
DocuPrint NC60 System Administrator Guide
DocuPrint NC60 System Administrator Guide