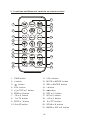
Download Pyle PLCD51BT
Transcript
Content Installation steps........................................................................... 2 General information about remote control...................................... 6 1. Removing insulating sheet......................................................... 6 2. Replacing the lithium cell........................................................... 6 3. Note about using the remote control........................................... 6 4. Warning about lithium cells of remote control............................. 6 Locations and Names of controls................................................... 7 1. Locations and Names of controls on main unit............................ 7 2. Locations and Names of controls on remote control................... 8 General operation........................................................................... 9 Radio operation.............................................................................10 BT operation..................................................................................12 Disc/USB/card operation............ ...................................................14 1. Loading or unloading a disc, USB or card.................................. 14 1.1 Loading a disc, USB or card.....................................................14 1.2 Unloading a disc, USB or card..................................................14 2. Function of controls on main unit or remote control.................. 15 AUX IN operation........................................................................... 17 Troubleshooting............................................................................18 Specifications............................................................................... 19 -1- INSTALLATION STEPS 1. Remove 2 screws for protecting deck; 1) Remove chassis from the Slide Bracket Housing as follows: KEY PLATE PLASTIC TRIM OUT KEY PLATE If you want to remove the chassis from the Slide Bracket Housing , first remove the Plastic trim from both sides, then insert 2 Key Plates into the left and the right side of the chassis as illustrated. 2) Remove 2 screws protecting the deck as illustrated on the right; 2. Connecting all wires 1) Re-insert the chassis into the Slide Bracket Housing; 2) Remove the control panel from the chassis as follows: A. Press REL button to detach the control panel . REL button B. Hold the right end of the control panel to pull rightward a little and then remove it -2- 3) Connecting all wires as bellows: REAR AUDIO OUT RCA JACK R (red) FRONT AUDIO OUT RCA JACK R (red) RADIO ANTENNA JACK REAR AUDIO OUT RCA JACK L (white) FUSE FUSE FRONT AUDIO OUT RCA JACK L (white) ISO CONNECTOR BLUE YELLOW BLACK RED FRONT Lch SPK. REAR WHITE GREY WHITE/BLACK GREY/BLACK GREEN VIOLET GREEN/BLACK VIOLET/BLACK Lch SPK. AUTO ANTENNA CONSTANT 12 VOLTS GROUND(B-) IGNITION SWITCH FRONT Rch SPK. REAR Rch SPK. NOTE: 1. Must use 4 ohms impedance of speakers. 2. Before finishing wiring, do not attach control panel onto chassis. 3. Maximum current of auto antenna is 200mA. -3- 4) Attaching the control panel onto the chassis. A. Align and thrush the bulge of the control panel into the hollow of the chassis. Hollow Bulge B. Push the right end of the control panel to the chassis till a click sound is heard. Panel Connector * How to clean panel connector Frequent detachment will cause the panel connectors to deteriorate. To minimize deterioration, periodically wipe the panel connector with a clean/soft/dry cloth . 5) Test to make sure that it works properly. 3. Instal the main unit according to the installation diagram on the next page: 1) Mount the main unit in A/V position in vehicle. 2) Bend tabs of the sliding metal housing where necessary to ensure that the front part of main unit is fixed; 3) Use a metal strap to fix the rear part of the chassis. * Uninstalling the main unit: 1) Remove the metal strap from the main unit; 2) Remove the plastic trim frame from the main unit; 3) Insert a key plate into the left and the right side of the main unit and draw the main unit out of the sliding metal housing. -4- Installation diagram DASH BOARD HEX NUT METAL MOUNTING STRAP SPRING WASHER PLAIN WASHER TAPPING SCREW CONSOLE SLIDE BRACKET HOUSING HEX BOLT -5- General information about the remote control 1. Removing insulating sheet The remote control comes with an insulating sheet attached to the underside of the remote control as illustrated on the right . The remote control is disabled and will not work until the insulating sheet is removed. 2. Replacing the lithium cell If the electric energy of the lithium cell is weak, replace it as illustrated on the right . 1. Press and hold the movable block in the direction indicated by arrow 1 , at the same time pull the cell holder out of the remote control in the direction indicated by arrow 2 . 2. Replace the old cell with a new one with (+) polarity side upward . 3. Insert the cell holder into the remote control again. 3. Note about using the remote control 1. Face the emitting window of the remote control towards the sensor window of the unit. 2. Operation angle for front panel: About 30 degrees 3. The distance between the emitting window of the remote control and the sensor window of the unit : < 5M . 4. Warning for lithium cells of remote control 1.Cell leakage may cause damage to remote control. 2.Do not throw cells into fire, it may cause an explosion. 3.To avoid accidents, keep cells out of reach of children. -6- Locations and Names of controls 1. Locations and Names of controls on main unit 6 2 16 14 24 4 7 5 3 15 25 22 8 9 17 19 10 11 12 13 21 20 1 Control Panel 23 18 Front side of chassis after removing control panel 1. REL button 14. |<< button 2. PWR or MODE button 15. >>| button 3. SEL button and VOL knob 16. PAIR or 4. BAND or ID3 or 17. EJECT button button button 5. TA or AF button 18. RESET button 6. APS button 19. IR sensor window 7. MUTE or PTY button 20. AUX IN jack 8. >|| or 1 button 21. USB port 9. INT or 2 button 22. LCD screen 10.RPT or 3 button 23. Card slot 11.RDM or 4 button 24. CLK button 12.-10 or 5 button 25. Disc slot 13.+10 or 6 button -7- 2. Locations and Names of controls on remote control 11 1 12 13 2 14 3 15 4 5 16 6 17 18 7 8 TA AF PTY 19 9 20 10 21 NCA A -608 1. PWR button 11. VOL+ button 2. < button 12. MUTE or MODE button 3. button 4. VOL- button 13. SEL or ENTER button 14. > button 5. >|| or TOP or 1 button 15. 6. RDM or 4 button 16. RPT or 3 button button 7. -10 or 5 button 17. INT or 2 button 8. 7 or TA button 18. +10 or 6 button 9. DISP or * button 19. 9 or PTY button 10. 8 or AF button 20. SCAN or # button 21. BAND or ID3 or 0 button -8- General Operation 1. PWR button To power main unit on , short press the PWR button on the control panel or on the remote control . To power main unit off, long press the PWR button on the control panel or short press the PWR button on the remote control . 2. VOL knob or VOL+ & VOL- button To increase or decrease volume level. 3. MUTE button To cancel or resume sound, long press the MUTE button on the control panel or long press the MUTE button on the remote control . 4. SEL button To switch between VOL(volume), BAS(bass), TRE(treble), BAL(balance), FAD (fader), EQ, BEEP, LOUD, MONO/STEREO(in radio mode) , LOC/DX(in radio mode) and BT, press the SEL button repeatedly. After selecting a desired mode, rotate the VOL knob or press the VOL+ or VOL- button to set it. To switch between TA SEEK/ALAR, MASK AL/DP, RETUNE S/L and TA VOL 25, long press the SEL button to switch on TA SEEK/ALAR, then short and repeatedly press the SEL button. After selecting a desired mode, rotate the VOL knob or press the VOL+ or VOL- button to set it. 5. DISP or CLK button To display clock time, briefly press the CLK button on control panel or short press the DISP button on remote control . To set clock time, first long press the CLK button to flash hour, and rotate the VOL knob or press the VOL+ or VOL- button to adjust the hour; then briefly press the SEL button to flash minute, and rotate the VOL knob or press the VOL+ or VOLbutton to adjust the minutes; finally press the CLK button to confirm it. 6. MODE button To switch on a work source between RADIO, DISC, USB, CARD, AUX IN and BT AUDIO(after pairing and connecting). repeatedly press the MODE button on the c ontrol panel or on the remote control. 7. REL button To detach the control panel from chassis. 8. RESET button To reset all parameters to factory default values. * When LCD does not display normally or sound is distorted or some controls are disabled, press the REL button to detach the control panel from chassis and remove the control panel from the chassis, then use a subject with a sharp point end to thrush the RESET hole. -9- Radio Operation 1. BAND button To switch between F1(FM1),F2(FM2),F3(FM3),A1(AM1) and A2(AM2). 2. |<< & >>| or < & > buttons In standby mode or after no manually searching operation for a while, briefly press one of them to automatically search down or up for an available station and listen to it. To manually search down or up for a desired station and listen to it, long press one of them to enter MANUAL mode, then briefly press one of them step by step. 3. SCAN button To scan for all available stations and select one of its to listen. 4. APS button To scan for every preset station of FM or AM, briefly press the APS button; To preset stations for every memory bank of FM or AM, long press the APS button. 5. 1~6 buttons To listen to a preset station, first switch on a desired band, then press one of the 1~6 buttons to find it and listen to it. To preset current station on a memory bank, long press one of the 1~6 buttons. 6. PTY b utton Pressing the PTY button on remote control or pressing the PTY button on control panel can switch between PTY music group, PTY speech group and OFF. When PTY group is on, pressing one of 6 number(1~6) buttons can select one of typed programs. After selecting one of typed programs, it will automatically search for a station broadcasting the selected typed program. If no any stations broadcasting the typed program exist, it will return back to normal station. 7. TA button when you press the TA button on the remote control or long press the TA button on the control panel, TA function is activated, and TA symbol appears in the display . ( press or long press it again to turn off . ) -10- During radio operation in one FM frequency band the search for a traffic announcement station is started automatically (TA SEEK) . If an FM station is being received which transmits the latest traffic announcements from time to time, the TP display lights up. If an FM station is being received which transmits the latest traffic announcements automatically interrupt CD operation(the word TRAFFIC appears in the display). The volume level is increased to the minimum value for the transmission of traffic announcements. After the traffic announcements has finished, the program that was previously running is resumed. 8. AF button When you press the AF button on remote control or press the AF button on control panel, it is activated as AF mode ON or OFF . Segment off: AF switching mode off. Segment on: AF switching mode on, the radio continuously tests the signal strength of the AF frequency. Whenever the new AF frequency is stronger than the station that is currently tuned in, the radio switches to this frequency for a short time and the message NEW FREQUENCY is displayed for one to two seconds. Segment flashing: AF switching mode is selected, but RDS information is not received yet. -11- BT Operation 1. Pairing and Connecting Prior to using the BT device named BT CAR STEREO as a handfree system for a BT-enabled mobile phone for the first time, you must pair and connect them as follows: * In any mode, prior to pairing and connecting, the BT logo flashes in the LCD. 1) Press the PAIR button on the control panel to display “PAIRING”(press the BAND button to cancel pairing); 2).Switch on the BT mode of your mobile phone; then s elect the item to find a BT device and enter it; When it finds the BT device of the car audio system, the name BT CAR STEREO will be displayed , select it and enter it; then it will show an interface that asks you to input a password, input 0000 and enter it; then i t will pair and connect with the BT device BT CAR STEREO of the car audio system, Confirm it, then the BT logo will not flash and light all the time. * When finishing pairing and connect ing , the audio of the mobile phone transfers to the car audio system whenever a call is made or received or the mobile phone plays music . 2. BT PHONE 1) Make a call (1) Dial with mobile phone directly; (2) Dial with the controls on remote control or on control panel a. Press the button on control panel or the display PHONE in the LCD; button on remote control to b. Use the number buttons to input your desired phone number; * When inputting a wrong digit, use the BAND button on control panel or the button on remote control to delete it. c. After finishing inputting, press the remote control to dial out. button on control panel or the 2) Redial last dialed phone number Press the button on control panel or the to dial out the last dialed phone number. -12- button on button on remote control twice 3) Answer a call During ringing, the incoming telephone number displays in the LCD. If you want to receive it, press the button on control panel or press the button on remote control; if you want to reject it, press the button on control panel or press the button on remote control. 4) End phone talking When you want to end phone talking, press the or button. 5) Switch audio between car A/V system and mobile phone During phone talking using the BT handfree system of the car audio system, if you want to change the phone audio to your mobile phone, press the button on the control panel or press the button on remote control. 6) Adjust volume level during phone talking During phone talking, use VOL knob or VOL+ and VOL- buttons to adjust volume level ; use MUTE button to mute sound . * * / # buttons they perform as * / # buttons on mobile phone. 3 . BT MUSIC 1 ) Pressing MODE button enter BT AUDIO mode and display BT AUDI in the LCD; 2 ) When using your mobile phone with BT function to play audio/video , if it is paired and connected with the BT device of the car audio system, the audio of the mobile phone will change into the car a udio system . The BT device of the car audio system support A2DP, if your mobile phone with BT function support A2DP, the car audio system can output stereo audio from your mobile phone. 3 ) T he BT device of the car audio system supports AVRCP, so these media buttons of the >||, > and < on remote control and >||, |<< and >>| on control panel are available for audio/video playback of your mobile phone during playback. But n o fast forward/backward functions for the |<< and >>| buttons . * If you don’t want to use the BT function of the car a udio system , r epeatedly press SEL button to display BT, then use VOL knob or VOL+ and VOL- buttons to switch BT off . -13- Disc/USB/card operation 1. Loading or unloading a disc, USB or card 1.1 Loading a disc, USB or card To play files on a disc, insert a disc with label surface up into the disc slot, then it will play automatically. Label surface up * DISCS PRECAUTIONS 1) Handle a disc by its edges, do not touch the surface of play side. 2) Before inserting a disc, wipe the disc outwards from the disc centre with a clean, soft, dry, lint-free cloth. Do not use solvents/thinners such as petrol/benzine or cleaners. 3) After taking a disc out of the disc slot, put the disc inside the disc case to keep it clean. 4) Do not stick paper or tape on the disc surface . If there is glue (or adhesive ) on the disc surface, wipe it off before using. To play files in a USB, open the USB port cover, then insert the USB storage into the USB port, it will play files in the USB automatically. To play files in a card, press the REL button to detach the control panel and remove it, then insert the card into the card slot as illustrated , finally it will play files in the card automatically . Label surface up 1.2 Unloading a disc, USB or card To unload the disc in the disc slot, use STOP button to stop playback, and then press EJECT button to eject disc and then remove it. -14- 
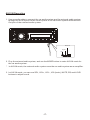
To unload the USB storage, use STOP button to stop playback, then remove the USB storage. To unload the card in the card slot, use STOP button to stop playback. Press REL button to detach the control panel, push the card to release it and then pull it out of the card slot. 2. Function of buttons on main unit or remote control 1. >|| button During playback, use it to pause playback; in pause mode, use it to resume playback. 2. |<< & >>| or < & > buttons To play next track, briefly press >>| or > button; To play previous track, briefly press |<< or < button; To fast backwards or forwards, press and hold |<< & < or >>| &> button. 3. APS button To quickly select a desired track to play. For CD(TRACK SEARCH): 1) Press the APS button to enter track search mode and display TRK SCH on LCD. 2) Press the SEL button to display TRK 000 1 and flash the 1 . The 1 is the digit of the track SN. in units order. Rotate the VOL knob or press the VOL+ or VOL- button to select the digit in units order. After selecting the desired digit in units order, press the SEL button to confirm. 3) To select all digits of the desired track SN. as above. 4) After selecting all digits of the desired track SN., long press the SEL button to play it. For MP3/WMA: 1) TRACK SEARCH: same as CD. -15- 2) DIR SEARCH: a. Press APS button twice to enter dir search mode and display NAVIGAT on LCD. b. Press the SEL button to display FOLD 00 1 , The 1 is the digit of the folder SN. in units order. after a while, it will display the name of the No. 1 folder. Then rotate the VOL knob or press the VOL+ or VOL- button to select the digit in units order of the folder SN. After selecting the desired digit in units order, press the SEL button to confirm. c. To select all digits of the desired folder SN.as above d. After selecting all digits of the desired folder SN., It will display the name of the folder, then press the SEL button to display FILE XX X . The XXx is the minimum SN.of files in the selected folder. Rotate the VOL knob or press the VOL+ or VOLbutton to select the desired file SN., Then it will display the selected file name, press the SEL button to play the selected file. 3) CHARACTER SEARCH: a. Press the APS button three times to enter character search mode and display CHAR SC on LCD. b. Press the SEL button to display and flash A, then rotate the VOL knob or press the VOL+ or VOL- button to select the first character of the desired file name. Then press the SEL button to display and flash the second A. Select some or all characters of the desired file name as above. c. After selecting some or all characters of the desired file name, long press the SEL button to display SEARCH and then FND XX X . The XX x is the maximum SN.of the files those include the selected characters. Rotate the VOL knob or press the VOL+ or VOL- button to display these files step by step. D.After selecting the desired file, press the SEL button to play it. 4. TOP button During CD/MP3/WMA playback, long press the TOP button to play the first track of the media. 5. INT button To switch INT mode on or off. 6. RPT button During CD playback, it can switch repeat mode between RPT ONE, RPT ALL or RPT OFF. During MP3/WMA playback, pressing RPT button can switch repeat mode between RPT ONE, RPT DIR, RPT ALL or RPT OFF. 7. RDM button To switch RDM mode on or off. 8. -10 and +10 buttons To skip to previous or next 10th track. 9. ID3 and BAND buttons To display ID3 information and so on such as: FILE, FOLDER, TITLE, ARTIST, ALBUM, YEAR and COMMENT, press the ID3 or BAND button.(Depend on the used media) -16- AUX IN Operation 1. Use an audio cable to connect the car audio system and the external audio system through the AUX IN jack on the control panel of the car audio system and the Audio Out jack of the external audio system. Ground Right Left 2. Play the external audio system, and use the MODE button to enter AUX IN mode for the car audio system. * In AUX IN mode, the external audio system uses the car audio system as an amplifier. 3. In AUX IN mode, you can use SEL, VOL+, VOL-, VOL(knob), MUTE, EQ and LOUD buttons to adjust sound. -17- Troubleshooting During playback, if your player has a problem, use this guide to try and resolve the problem .If you are unable to solve the problem,consult an authorised dealer or service centre. Symptom Cause Solution Car ignition is not on. Switch ignition key to " ACC " No power Fuse is blown Replace fuse Disc cannot be loaded Another disc is already in the player Remove the disc in the player then insert a new one Disc cannot be read The disc had been inserted upside down Insert the compact disc with the label facing upward Compact disc is extremely dirty or defective Clean the disc or try to play a new one Temperature inside the car is too high Cool off until the ambient temperature returns to normal Volume is turned down Adjust volume to a desired level Wiring is not properly connected Check wiring connection No sound Operation keys do not work 1.Built-in microcomputer is not operating properly due to noise 2.Front panel is not properly fixed into its place 3.Car interior is extremely hot Sound skips Installation angle is more than 30 degrees Adjust installation angle to less than 30 degrees Disc is extremely dirty or defective Clean compact disc/try to play a new one Radio does not work Automatic radio station selection does not work 1. Press the RESET button 2. Reinstall the front panel 3. Do not use the player until car has been driven for a while to cool off Insert antenna cable firmly Antenna cable is not connected Select a station manually Signals are too weak -18- SPECIFICATIONS GENERAL Power Supply Requirement.............................................DC 12V Current consumption....................................................10A MAX. Maximum Power Output..............4 x 60W(measured at DC 14.4 V) RADIO FM Frequency range.........................................87.5MHz -107.9MHz Usable sensitivity.............................................................15dBu I.F Frequency...............................................................10.7MHz AM Frequency range...........................................530KHz - 1710KHz Usable Sensitivity............................................................40dBu I.F Frequency................................................................450KHz CD/USB/card Usable audio formats...........................................CD/MP3/WMA Audio Output....................................................2ch&4ch line out Frequency Response..............................................20Hz-20KHz S/N ratio...................................................................90dB [JIS] MADE IN CHINA 88-J0916-03 -19-