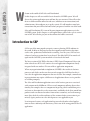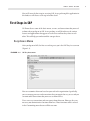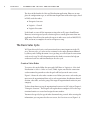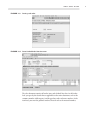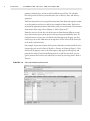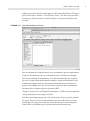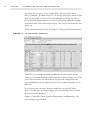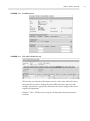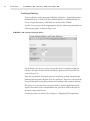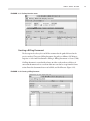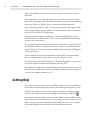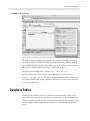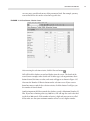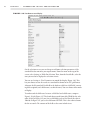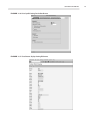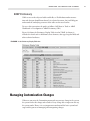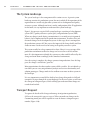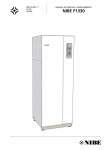
1
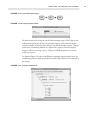
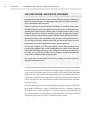
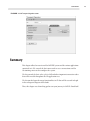
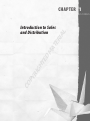
CO PY RI GH TE D MA TE RI Introduction to Sales and Distribution AL Chapter 1 Chapter 1 W elcome to the world of SAP Sales and Distribution! In this chapter, we will start with the basics about the SAP ERP system. We will discuss the various application areas and how they are structured. You will see that there are different menus offered to end users (who have to run transactions) and administrators (who configure or set up the system). We will introduce some basic transactions that you will need to know before you proceed with the rest of the book. Sales and Distribution (SD) is one of the most important application areas in the SAP ERP system. In this chapter, we will explain how a general sales cycle is carried out in SAP. We will also give you an idea of how this book is structured. Introduction to SAP SAP is one of the most popular enterprise resource planning (ERP) solutions in the world. It offers an integrated system that supports major business functions such as sales, production, and financial accounting. Over the years, SAP has been enhanced, and new versions have been released. The older SAP R/3 has now developed into the SAP ERP system on which we have based this book. The latest version of SAP ERP at this time is ERP Central Component, Release 6.0, often referred to as ECC 6.0. It consists of several application components closely integrated with one another. SD is one of these application components. When any organization looks to implement SAP ERP, it first studies its business processes and decides on the ones that are to be mapped in SAP. Based on this, it can select the application components that are relevant. For example, a manufacturing organization may require a different set of applications than a service provider or a trading company. The Sales and Distribution application caters to the business processes associated with customer order fulfillment. SD has several components offering diverse functionality. For example, there are components for pricing (which control how prices and costs are determined in a sales transaction), availability check (that control how product stocks are allocated to orders from various customers), and credit management (that check the credit worthiness of the customer before a transaction is permitted). Again, you have to select which processes are applicable to you. In an integrated system, each application has to mesh with other related applications to ensure continuity and consistency. This is one of the strong points of the SD application. First Steps in SAP Next we’ll cover the first steps in accessing SAP. As we go through the application in this book, we will discuss each step in further detail. First Steps in SAP We’ll now discuss some of the basic menus, screens, and transactions that you need to know when you log on to SAP. As we go along, we will also discuss the various features and applications that appear on each screen and how they relate to each other. This will help you understand the concepts better. Easy Access Menu After you log on to SAP, the first screen that greets you is the SAP Easy Access menu (Figure 1.1). F i g u r e 1.1 SAP Easy Access menu You can customize this menu based on your role in the organization. Specifically, you can arrange processes and transactions that you require for easy access and you can omit other transactions that you never use from the list. Users can access transactions and run reports from this menu. However, they cannot carry out administrative functions from here. Those functions will be covered in the Customizing menu that we will discuss soon. 3 4 C h a p t e r 1 • I n t r o d u c t i o n t o Sa l e s a n d D i s t r i b u t i o n SAP ERP offers several business applications. As you can see, the major application areas in this menu are Accounting, Human Resources, and Logistics: Accounting If you drill down this menu, you will find diverse applications listed. Some of them are for financial accounting/controlling (FI/CO), financial supply chain management, and Project Systems (PS). Human Resources All the applications related to human resources management are grouped here. For example, you will find applications for personnel management, time management, payroll, and travel management. Logistics All the applications related to logistics functions are contained in this menu. Materials Management (MM), Production (PP), and Plant Maintenance (PM) are some of the applications listed here. The focus of this book—Sales and Distribution—is an application that falls under the Logistics menu. Logistics Execution (LE) is another application that is relevant here, because it covers the product delivery processes. The Customizing Menu You can configure and customize the SAP system to meet the specific requirements of your organization. The Sales and Distribution module has been developed with several business processes and various industries in mind. Some of these processes may not be relevant to your business. On the other hand, there could be some specific requirements that you will need to map in SAP through configuration. During configuration, you can carry out various settings that control the process setup, such as the following: ff Activating or deactivating a certain process for your organization ff Configuring the look and feel of a transaction screen for a user ff Controlling which fields on the screen can be accessed, changed, or displayed ff Setting up a smooth flow of data from one document to another to ensure consistency and avoid the duplication of manual effort You can access the Customizing menu in SAP using the following path: SAP Easy Access Menu ➢ Tools ➢ Customizing ➢ IMG ➢ Execute Project (transaction code SPRO). First Steps in SAP N O T E A transaction code is a shortcut to a specific transaction in SAP. The menu path described would also lead you to the same destination. Whenever a transaction code is available, we will mention it alongside the path. You will also find a list of important transaction codes in the appendix. This transaction code leads you to the Display IMG screen, as shown in Figure 1.2. You will find a menu with the various applications listed. It is called SAP Customizing Implementation Guide (or IMG for short). All the customizationrelated steps will be launched from this menu. If you click any application, you will find another menu that leads you to various submodules. Based on the exact path listed in the book, you can reach the specific transaction in the menu where the customization setting is to be carried out. F i g u r e 1. 2 Customization menu In this book, we also refer to the Display IMG screen as the Customizing menu or just IMG while explaining menu paths. 5 6 C h a p t e r 1 • I n t r o d u c t i o n t o Sa l e s a n d D i s t r i b u t i o n The focus of this book is the Sales and Distribution application. However, to complete the configuration steps, we will also touch upon some of the other topics, listed in IMG, under the nodes: ff Enterprise Structure ff Logistics – General ff Logistics Execution In this book, we cover all the important settings that an SD expert should know. However, in an integrated system, a business process usually spans more than one application. You will need to work with experts in other areas (such as MM, FI/CO, WM, and so on) to complete the end-to-end process setup. The Basic Sales Cycle We’ll now discuss the basic set of transactions that are most important in the SD area. The term sales cycle refers to the creation of a sales order document followed by delivery and a billing document. As we go along, we will tell you the transaction codes at each step. We will also point out how this book is structured to help you understand each area and functionality in the sales cycle. Create a Sales Order To create a sales order, follow the menu path SAP Menu ➢ Logistics ➢ Sales And Distribution ➢ Sales ➢ Order ➢ Create (VA01). Again, note that the transaction code mentioned in parentheses after the path will lead you to the same screen. Figure 1.3 shows the sales order creation screen. Before you create a sales order, you must enter the organizational data such as sales organization, distribution channel, division, sales office, and sales group. This maps the organizational entities in your company. To learn about how to set up the organizational structure in SAP, refer to Chapter 2, “Enterprise Structure.” That chapter will explain how to configure SAP so the organizational entities are created and assigned to one another. You must also specify the type of order document being created. After entering this information, you can proceed to the next screen, the Overview screen (Figure 1.4). First Steps in SAP F i g u r e 1. 3 Creating a sales order F i g u r e 1. 4 Create Standard Order: Overview screen The sales document consists of header, item, and schedule line data. At the header level, you specify the details that are applicable to the entire document, such as the customer number (sold-to party) and the purchase order reference number. At the item level, you enter the products ordered. Details such as the material number, 7 8 C h a p t e r 1 • I n t r o d u c t i o n t o Sa l e s a n d D i s t r i b u t i o n quantity, and item price, and so on, will be different on each line. The schedule line data pertains to delivery-related details such as delivery dates and delivery quantities. You’ll use master data at every step of the transaction. Data about your regular customers or the products and services offered are examples of master data. You have to maintain the repository of master data before using it in transactions. To learn more about master data setup, refer to Chapter 3, “Master Data in SD.” From the overview screen of a sales order, you can branch out to different screens to get into various aspects of the process such as pricing and availability dates. To navigate between screens, you can click the tabs that appear on the page. An alternative way is to use the Goto menu at the top of the screen. It lists all the detail tabs at the header and item levels. For example, if you want to know all the partner functions associated with the sales transaction, you can select Goto ➢ Header ➢ Partner. As shown in Figure 1.5, this tab lists all the partners such as the sold-to party, ship-to party, bill-to party, and payer for this order. If you have different partners at each line item level, you can specify them on the Partners tab (which you can reach by selecting Goto ➢ Item ➢ Partner). F i g u r e 1. 5 Sales order: Header Data, Partners tab First Steps in SAP Another screen is the Texts tab, which appears at the header and item levels. The menu path is either Goto ➢ Header ➢ Text or Goto ➢ Item ➢ Text. Here you store all the text messages and instructions (as shown in Figure 1.6) that you want to flow with the order. F i g u r e 1. 6 Sales order: Header Data, Texts tab You can customize the setup for partners, texts, and outputs as per your requirements. In partner determination, you can control which partner functions are of importance to you and make them mandatory. Text determination helps you set up how the texts are copied from one document to another. Output determination lets you customize the outputs from sales documents and transmit them to the business partners. For example, you can use it to send out a copy of an order confirmation document to the customer in print or by email or EDI. Chapter 4, “Partner, Text, and Output Determination,” will discuss how to maintain settings related to partners, outputs, and texts. One of the most important parts of a sales transaction is the price that the customer has to pay. The price can be entered manually in the sales order. However, if your product prices are going to be stable for certain duration, you can maintain price records and set up automatic price determination to avoid manual entry. 9 10 C h a p t e r 1 • I n t r o d u c t i o n t o Sa l e s a n d D i s t r i b u t i o n To see how the exact price has been computed for a sales item, select Goto ➢ Item ➢ Conditions. As shown in Figure 1.7, the pricing schema gives you the details of the various pricing conditions in it. Pricing conditions are things such as base prices, discounts, freight conditions, or taxes. Certain pricing conditions can apply to the entire order (such as total freight charges). These are listed in the Header conditions tab. To learn how to customize pricing, visit Chapter 5, “Pricing and Tax Determination.” F i g u r e 1. 7 Sales order: Item Data, Conditions tab Availability check controls how product availability is checked and the date on which you can commit the delivery to the customer. As shown in Figure 1.8, as soon as you enter a material in the sales order, the system can be configured to carry out an availability check and display the earliest date on which this product can be delivered. In a sales order, you can always check the schedule lines by selecting Goto ➢ Item ➢ Schedule Lines. As shown in Figure 1.9, you can check the dates on which the quantity can be confirmed. Chapter 6, “Availability Check, Transfer of Requirements, and Backorders,” will cover this topic in greater detail. First Steps in SAP F i g u r e 1. 8 Availability Control F i g u r e 1. 9 Sales order: Schedule Lines tab We have now covered some of the major screens in a sales order. Other sales documents may also need to be configured to meet different business processes. For example, you may have separate sales documents for returns or for presales such as inquiries and quotations. Chapter 7, “Sales,” will discuss the setup of sales documents for various business scenarios. 11 12 C h a p t e r 1 • I n t r o d u c t i o n t o Sa l e s a n d D i s t r i b u t i o n Creating a Delivery To create a delivery, use the menu path SAP Menu ➢ Logistics ➢ Logistics Execution ➢ Outbound Process ➢ Goods Issue For Outbound Delivery ➢ Outbound Delivery ➢ Create ➢ Single Document ➢ With Reference to Sales Order (VL01N). On this screen, you specify the shipping point (which is another organizational unit related to your plant), as shown in Figure 1.10. F i g u r e 1.10 Creating an outbound delivery On the delivery overview screen, the relevant data has been copied over from the reference sales order. Product details and delivery quantity are the key fields here (refer to Figure 1.11). From this step onward, the logistics processes of picking, packing, transportation planning and execution, and goods issue are carried out. The process extends all the way up to the goods leaving your premises and traveling to the customer’s location. The process is so vast that it has been placed under a separate application named Logistics Execution. In the customization menu, you have to refer to this node to maintain settings for deliveries. To study the process in detail, refer to Chapter 8, “Shipping and Transportation.” First Steps in SAP F i g u r e 1.11 Delivery Overview screen Creating a Billing Document The last step in the sales cycle is to bill the customer for the goods delivered or the service rendered. To create a billing document, the path is as follows: SAP Menu ➢ Logistics ➢ Sales And Distribution ➢ Billing ➢ Billing Document ➢ Create (VF01). A billing document is created with reference to either a sales order or a delivery. A correction document such as a credit or debit note can also be set up from this transaction. Enter the documents that are to be billed, and click Execute (Figure 1.12). F i g u r e 1.12 Creating a Billing Document 13 14 C h a p t e r 1 • I n t r o d u c t i o n t o Sa l e s a n d D i s t r i b u t i o n Again, you will observe that all the critical data is copied over from the reference document. We mentioned the areas of pricing, outputs, and text in the context of sales documents. These also appear in the subsequent documents such as deliveries and billing documents. Chapter 9, “Billing,” focuses exclusively on billing documents. After a billing document is created, it is released to accounting. This updates all the relevant general ledger accounts with the transaction amounts. This is the interface between SAP’s SD and FI/CO applications. Some organizations require that billing the customer and updating the revenue books should occur at different times. The revenue recognition functionality helps you meet these requirements. The settings for account assignment and revenue recognition are carried out within the SD module. Hence, it is important to know how they are controlled and determined. Chapter 10, “Account Assignment and Revenue Recognition,” will help provide this perspective. Credit management, material determination, serial numbers, and batch management are some of the other topics that are covered in Chapters 11 to 13. The final chapter in this book is Chapter 14, “Advanced Techniques.” It covers some of the more sophisticated tools and techniques offered by SAP. This outline of a simple sales cycle should help you perceive the overall structure of the book. The actual processes can be very complex and diverse. In each chapter, we will cover the complex variations as well. Getting Help At this stage, we’ll discuss the resources available to you if you are in the middle of a transaction and need to know more about any of the fields appearing on the screen. From the transaction screen, you can get further details about a field by pressing the F1 key (the shortcut key for accessing Help) or by clicking the Help icon . For example, in the sales order create transaction (VA01), if you need further information about the Net Worth field, you can access Help. As shown in Figure 1.13, the Help screen gives you more information about the field. In some cases, it also provides further links to learn more about some related important terms. Da t a b a s e Ta b l e s F i g u r e 1.13 Using Help Clicking the Technical Information button at the bottom of the Help screen gives you more technical data about this field, such as the table name (VBAK) and field name (NETWR) where the data in this field is stored. We will discuss the technical topics such as database tables in the next section of this chapter. SAP Help is also available on the Web at http://help.sap.com. SAP also releases notes on its Online Service Marketplace website at https:// support.sap.com/support. You will need login information from SAP to access this website. In this book, we have provided reference to such notes (also called OSS notes) where applicable. Database Tables During the discussion on sales cycle, you saw several transaction screens. Users access and enter data in the system using transaction codes. In the background, all this data is stored in database tables. As you learn more about configuration, it will be very helpful to understand and know how to access records from the database tables. 15 16 C h a p t e r 1 • I n t r o d u c t i o n t o Sa l e s a n d D i s t r i b u t i o n The first step is to know the important table names—at least the names of the tables commonly used in the SD application. Table 1.1 lists some of the most important tables. Once again, for convenience of understanding, we have tried to arrange them according to the transactions in the basic sales cycle. The appendix contains a list of all the important tables related to SD. At this stage, do not try to remember the table names. It is more important to understand the concepts. As you progress further, however, you should make yourself familiar with these names. Ta b l e 1.1 Database Tables in SD Transaction Table Name Description Sales orders VBAK Order header VBAP Order item VBEP Order schedule lines LIKP Delivery header LIPS Delivery item VBRK Billing header VBRP Billing item VBFA Document flow VBUK Header status VBUP Item status Delivery Billing General process information We’ll now discuss how to access database records and explore the structure of a table. Data Browser The data browser allows you to search database tables and fetch stored records. To access the data browser, use the path SAP Menu ➢ Tools ➢ ABAP Workbench ➢ Overview ➢ Data Browser (SE16), and enter the name of the table that you want to study. The next screen contains selection parameters that can help you search for appropriate database records. Figure 1.14 shows the selection screen for order header table VBAK. If you know the sales order number, you can enter it in the Sales Document field on the selection screen. If, on the other hand, you do not know the order number, you Da t a b a s e Ta b l e s can carry out a search based on any of the parameters listed. For example, you may want to find all the sales orders created on a specific date. F i g u r e 1.14 Data Browser: Selection Screen After entering the selection criteria, click the Execute button . SAP will fetch the database record and display it on the screen. The details of the record (in our example, order details such as order type, sales organization, distribution channel, division, net value, and so on) will appear as shown in Figure 1.15. Also note the Number Of Entries button on the selection screen. If you want to know how many records fit the selection criteria, click this button. It will give you the number of records found. Another important field that controls the database search is Maximum Number Of Hits. If you enter a limiting value (say, 200) here, SAP will stop the search after finding the first 200 records. If the number of entries is high and you want to see all of them, make sure that your maximum number of hits is set to a higher number. 17 18 C h a p t e r 1 • I n t r o d u c t i o n t o Sa l e s a n d D i s t r i b u t i o n F i g u r e 1.15 Data Browser: record display On the selection screen, you can change or add more selection parameters if the standard list does not meet your requirements. From the menu on the top of the screen, select Settings ➢ Fields For Selection. Then, from the list of fields, select the ones you need to be displayed as selection criteria. You can use Settings ➢ User Parameters to control the display (Figure 1.16). This lets you choose to view the results in a standard list format or an ALV grid format. Also note the Keyword tab. Each field in the database table has a field label (a meaningful description) and a field name (a technical name). You can choose either mode of display. To understand the difference between a field label and a field name, compare Figure 1.15 with Figure 1.17. They both show records from table VBAK for the sales order 12369. In Figure 1.15, you can see field labels such as Net Worth (the value is 1708.10). In Figure 1.17, you see the field name NETWR. This is the technical name for the net worth. The contents of the field are the same in both views. Da t a b a s e Ta b l e s F i g u r e 1.16 User-Specific Settings for the Data Browser F i g u r e 1.17 Data Browser: display showing field names 19 20 C h a p t e r 1 • I n t r o d u c t i o n t o Sa l e s a n d D i s t r i b u t i o n You will need to be familiar with field names to communicate effectively with your technical team. Furthermore, as we will discuss in Chapter 14, if you ever need to create a custom enhancement in SAP, you will need all the technical information, such as table and field names. T I P Note that there is new version of the standard data browser (SE16), called SE16N. It offers the same functionality of displaying database records, but it has some extra userfriendly features. As shown here, SE16N lets you see the field names and the technical names of the selection parameters. You can also choose the fields that you need in the output display. M a n ag i n g C u s t o m i z at i o n C h a n g e s ABAP Dictionary While we are on the subject of tables and fields, we’ll talk about another transaction code that you should know about. It is technical in nature, but it will help you understand the underlying structure of the tables we discussed earlier. To access this transaction, the path is as follows: SAP Menu ➢ Tools ➢ ABAP Workbench ➢ Development ➢ ABAP Dictionary (SE11). Figure 1.18 shows the Dictionary: Display Table view for VBAK. As shown, it includes the details such as field names, data elements, data type, length of field, and other technical attributes. F i g u r e 1.18 Dictionary: Display Table view Managing Customization Changes Whenever you enter the Customizing menu and carry out any change in the system, the system tracks this change and records it. Every change has an impact on the way the system works. Hence, it is very important to understand the basic system landscape and the process of managing and transporting changes. 21 22 C h a p t e r 1 • I n t r o d u c t i o n t o Sa l e s a n d D i s t r i b u t i o n The System Landscape The system landscape is the arrangement of the various servers. A generic system landscape consists of a production system (the one in which all the operations of the organization are carried out) plus other systems such as development and quality assurance systems. Although our focus is on the configuration of the SD application in this book, it is very important to understand the system landscape. Figure 1.19 represents a typical SAP system landscape, consisting of a development system (DEV), quality assurance system (QAS), and production system (PRD). When any change is made during customization, it is essential to test it rigorously before it can be implemented in the production environment. To achieve this, you first make changes in the development system. At this stage, there is no impact on the production system at all. You can test the impact of the change locally and then choose to move it to the next level of testing in the quality assurance system. This system usually has a large amount of test data. Often, it is a recent copy of the production environment so that the change can be tested in a real-life environment. It is also important to identify the system users who would be affected by this change and train them accordingly in this simulated environment. Once the testing is complete, the change can move into production. Once this happens, the change is said to have “gone live.” Many organizations also have another system called a sandbox. It is an isolated system where you can carry out preliminary analysis and test new functionality and solution prototypes. Changes made in the sandbox never move to other systems in the landscape. It is very important to record all the details of any change being made in SAP and transport it in steps through the system landscape. In the next section, we will cover the concept of transport request, which will help you understand how changes are recorded and tracked. Transport Request To capture the details of the change and manage its migration to production, SAP uses the concept of a transport request. When you make any changes to the Customizing menu, you will be required to create or choose a transport request number (Figure 1.20). M a n ag i n g C u s t o m i z at i o n C h a n g e s F i g u r e 1.19 System landscape example DEV QAS PRD F i g u r e 1. 2 0 Transport request number The data related to the change is stored in the transport request. This helps in controlling and tracking the change. The transport request can be moved from one system to another so that the same change is carried out in other systems. Changes made in the customizing domain are captured in a separate class of transport requests called customizing requests. Changes to ABAP programs are stored in workbench requests. As shown in Figure 1.21, you can drill down a transport request number to see the customizing tasks that you have performed and the tables that have been affected by the change. F i g u r e 1. 21 Transport request details 23 24 C h a p t e r 1 • I n t r o d u c t i o n t o Sa l e s a n d D i s t r i b u t i o n Case Study Overview: Galaxy Musical Instruments Throughout this book, we will use a case study of a fictitious company, called Galaxy Musical Instruments, which is a trading company that deals in musical instruments as well as related media and accessories. Galaxy has operations in the United States and Mexico. Its main distribution center, located in California, caters to its wholesale and retail customers in the United States. Another plant in Baja California, Mexico, caters to all the customers there. In each chapter of this book, we will discuss how Galaxy uses SAP’s SD application to map its business processes, and we will use graphics to depict how the settings were made. We will consistently use the same product range, customers, and organizational units. This will help us present a cohesive picture and give you an idea of how an actual organization can use the SD application to map its business processes. For instance, in Chapter 3, we will present Galaxy’s master data requirements and how they were mapped in the system, including how the customer master data and hierarchical relationships were set up. Later, in Chapter 5, we will cover how the pricing procedure was set up for this customer. Later, in Chapter 8, we will cover how Galaxy set up routes to ship the products to the customer. This end-to-end case study will ensure continuity and help you understand how to apply the functionalities in SD. Once you have tested the change and are ready to move the changes to the quality assurance system, you have to release the transport request. Based on the process setup (which is not in our scope here), the change will be picked up for promotion to the next system. If you have transported the change to the quality assurance or production system and it is having an undesirable effect on the processes, you can reverse it at any time. This ensures that the production system remains safe from unwanted changes. A useful transaction for checking and updating transport requests is SE10. The menu path is SAP Menu ➢ Tools ➢ Customizing ➢ IMG ➢ Transport Organizer (Extended View). As shown in Figure 1.22, you can enter the user ID and check all the transport requests created by that user. This transaction is also used to release the transport requests that are ready to be moved to other systems. S u mma r y F i g u r e 1. 2 2 Transport Organizer screen Summary This chapter offered an overview of the SAP ERP system and the various applications contained in it. We covered the basic menu used to access transactions and the Customizing menu used to configure the system. We also covered the basic sales cycle in SAP and other important transaction codes that will be needed throughout the SD application area. We also touched upon the many functionalities in SD that will be covered in depth in the subsequent chapters of this book. Thus, this chapter was a launching pad to start your journey in SAP SD. Good luck! 25