1
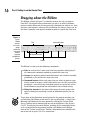
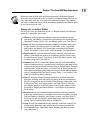
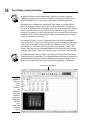
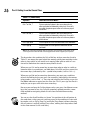
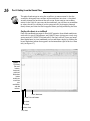
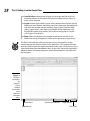
Chapter 1
In This Chapter
Selecting commands from the Ribbon
Customizing the Quick Access Toolbar
Methods for starting Excel 2007
Getting some help with using this program
MA
Surfing an Excel 2007 worksheet and workbook
TE
RI
Getting familiar with the new Excel 2007 program window
AL
The Excel 2007 User Experience
D
Quick start guide for users migrating to Excel 2007 from earlier versions
TE
T
PY
RI
GH
he designers and engineers at Microsoft have really gone and done it this
time — cooking up a brand new way to use everybody’s favorite electronic
spreadsheet program. This new Excel 2007 user interface scraps its previous
reliance on a series of pull-down menus, task panes, and multitudinous toolbars. Instead, it uses a single strip at the top of the worksheet called the
Ribbon designed to put the bulk of the Excel commands you use at your
fingertips at all times.
CO
Add a single remaining Office pull-down menu and sole Quick Access toolbar
along with a few remaining task panes (Clipboard, Clip Art, and Research) to
the Ribbon and you end up with the easiest to use Excel ever. This version
offers you the handiest way to crunch your numbers, produce and print polished financial reports, as well as organize and chart your data, in other
words, to do all the wonderful things for which you rely on Excel.
And best of all, this new and improved Excel user interface includes all sorts
of graphical improvements. First and foremost is Live Preview that shows
you how your actual worksheet data would appear in a particular font, table
formatting, and so on before you actually select it. In addition, Excel now
supports an honest to goodness Page Layout View that displays rulers and
margins along with headers and footers for every worksheet and has a zoom
slider at the bottom of the screen that enables you to zoom in and out on the
spreadsheet data instantly. Last but not least, Excel 2007 is full of pop-up galleries that make spreadsheet formatting and charting a real breeze, especially
in tandem with Live Preview.
12
Part I: Getting In on the Ground Floor
Excel’s Ribbon User Interface
When you first launch Excel 2007, the program opens up the first of three
new worksheets (named Sheet1) in a new workbook file (named Book1)
inside a program window like the one shown in Figure 1-1 and Color Plate 1.
The Excel program window containing this worksheet of the workbook is
made up of the following components:
Office Button that when clicked opens the Office pull-down menu containing all the file related commands including Save, Open, Print, and
Exit as well as the Excel Options button that enables you to change
Excel’s default settings
Quick Access toolbar that contains buttons you can click to perform
common tasks such as saving your work and undoing and redoing edits
and which you can customize by adding command buttons
Ribbon that contains the bulk of the Excel commands arranged into a
series of tabs ranging from Home through View
Formula bar that displays the address of the current cell along with the
contents of that cell
Worksheet area that contains all the cells of the current worksheet identified by column headings using letters along the top and row headings
using numbers along the left edge with tabs for selecting new worksheets
and a horizontal scroll bar to move left and right through the sheet on
the bottom and a vertical scroll bar to move up and down through the
sheet on the right edge
Status bar that keeps you informed of the program’s current mode, any
special keys you engage, and enables you to select a new worksheet
view and to zoom in and out on the worksheet
Manipulating the Office Button
At the very top of the Excel 2007 program window, you find the Office Button
(the round one with the Office four-color icon in the very upper-left corner of
the screen) followed immediately by the Quick Access toolbar.
When you click the Office Button, a pull-down menu similar to the one shown
in Figure 1-2 appears. This Office menu contains all the commands you need
for working with Excel workbook files such as saving, opening, and closing
files. In addition, this pull-down menu contains an Excel Options button that
you can select to change the program’s settings and an Exit Excel button
that you can select when you’re ready to shut down the program.
Chapter 1: The Excel 2007 User Experience
Formula bar
Office button
Quick Access toolbar
Ribbon
Figure 1-1:
The Excel
2007
program
window that
appears
immediately
after
launching
the
program.
Status bar
Figure 1-2:
Click the
Office
Button to
access the
commands
on its pulldown menu,
open a
recent
workbook,
or change
the Excel
Options.
Worksheet area
13
14
Part I: Getting In on the Ground Floor
Bragging about the Ribbon
The Ribbon (shown in Figure 1-3) radically changes the way you work in
Excel 2007. Instead of having to memorize (or guess) on which pull-down
menu or toolbar Microsoft put the particular command you want to use, their
designers and engineers came up with the Ribbon that always shows you all
the most commonly used options needed to perform a particular Excel task.
Figure 1-3:
Excel’s
Ribbon
consists
of a series
of tabs
containing
command
buttons
arranged
into different
groups.
Tabs
Command buttons
Dialog box launcher
Groups
The Ribbon is made up of the following components:
Tabs for each of Excel’s main tasks that bring together and display all
the commands commonly needed to perform that core task
Groups that organize related command buttons into subtasks normally
performed as part of the tab’s larger core task
Command buttons within each group that you select to perform a particular action or to open a gallery from which you can click a particular
thumbnail — note that many command buttons on certain tabs of the
Excel Ribbon are organized into mini-toolbars with related settings
Dialog Box launcher in the lower-right corner of certain groups that
opens a dialog box containing a bunch of additional options you can
select
To get more of the Worksheet area displayed in the program window, you
can minimize the Ribbon so that only its tabs are displayed — simply click
Minimize the Ribbon on the menu opened by clicking the Custom Quick
Access Toolbar button, double-click any one of the Ribbon’s tabs or press
Ctrl+F1. To redisplay the entire Ribbon, and keep all the command buttons
on its tab displayed in the program window, click Minimize the Ribbon
item on the Custom Quick Access Toolbar’s drop-down menu, double-click
one of the tabs or press Ctrl+F1 a second time.
Chapter 1: The Excel 2007 User Experience
When you work in Excel with the Ribbon minimized, the Ribbon expands
each time you click one of its tabs to show its command buttons but that tab
stays open only until you select one of the command buttons. The moment
you select a command button, Excel immediately minimizes the Ribbon again
to just the display of its tabs.
Keeping tabs on the Excel Ribbon
The very first time you launch Excel 2007, its Ribbon contains the following
seven tabs, going from left to right:
Home tab with the command buttons normally used when creating,
formatting, and editing a spreadsheet arranged into the Clipboard, Font,
Alignment, Number, Styles, Cells, and Editing groups (see Color Plate 1)
Insert tab with the command buttons normally used when adding particular elements (including graphics, PivotTables, charts, hyperlinks,
and headers and footers) to a spreadsheet arranged into the Shapes,
Tables, Illustrations, Charts, Links, and Text groups (see Color Plate 2)
Page Layout tab with the command buttons normally used when preparing a spreadsheet for printing or re-ordering graphics on the sheet
arranged into the Themes, Page Setup, Scale to Fit, Sheet Options, and
Arrange groups (see Color Plate 3)
Formulas tab with the command buttons normally used when adding
formulas and functions to a spreadsheet or checking a worksheet for formula errors arranged into the Function Library, Defined Names, Formula
Auditing, and Calculation groups (see Color Plate 4). Note that this tab
also contains a Solutions group when you activate certain add-in programs
such as Conditional Sum and Euro Currency Tools — see Chapter 12 for
more on using Excel add-in programs.
Data tab with the command buttons normally used when importing,
querying, outlining, and subtotaling the data placed into a worksheet’s
data list arranged into the Get External Data, Manage Connections, Sort
& Filter, Data Tools, and Outline groups (see Color Plate 5). Note that
this tab also contains an Analysis group if you activate add-ins such as
the Analysis Toolpak and Solver Add-In — see Chapter 12 for more on
Excel add-ins.
Review tab with the command buttons normally used when proofing,
protecting, and marking up a spreadsheet for review by others arranged
into the Proofing, Comments, and Changes, groups (see Color Plate 6).
Note that this tab also contains an Ink group with a sole Start Inking
button if you’re running Office 2007 on a Tablet PC.
View tab with the command buttons normally used when changing the
display of the Worksheet area and the data it contains arranged into
the Workbook Views, Show/Hide, Zoom, Window, and Macros groups
(see Color Plate 7).
15
16
Part I: Getting In on the Ground Floor
In addition to these seven standard tabs, Excel has an eighth, optional
Developer tab that you can add to the Ribbon if you do a lot of work with
macros and XML files — see Chapter 12 for more on the Developer tab.
Although these standard tabs are the ones you always see on the Ribbon
when it’s displayed in Excel, they aren’t the only things that can appear in
this area. In addition, Excel can display contextual tools when you’re working
with a particular object that you select in the worksheet such as a graphic
image you’ve added or a chart or PivotTable you’ve created. The name of the
contextual tools for the selected object appears immediately above the tab
or tabs associated with the tools.
For example, Figure 1-4 shows a worksheet after you click the embedded
chart to select it. As you can see, doing this causes the contextual tool called
Chart Tools to be added to the very end of the Ribbon. Chart Tools contextual tool has its own three tabs: Design (selected by default), Layout, and
Format. Note too that the command buttons on the Design tab are arranged
into their own groups: Type, Data, Chart Layouts, Chart Styles, and Location.
The moment you deselect the object (usually by clicking somewhere on the
sheet outside of its boundaries), the contextual tool for that object and all of its
tabs immediately disappears from the Ribbon, leaving only the regular tabs —
Home, Insert, Page Layout, Formulas, Data, Review, and View — displayed.
Chart Tools Contextual tab
Figure 1-4:
When you
select
certain
objects in
the
worksheet,
Excel adds
contextual
tools to the
Ribbon with
their own
tabs,
groups, and
command
buttons.
Chapter 1: The Excel 2007 User Experience
Selecting commands from the Ribbon
The most direct method for selecting commands on the Ribbon is to click the
tab that contains the command button you want and then click that button in
its group. For example, to insert a piece of Clip Art into your spreadsheet, you
click the Insert tab and then click the Clip Art button to open the Clip Art task
pane in the Worksheet area.
The easiest method for selecting commands on the Ribbon — if you know your
keyboard at all well — is to press the Alt key and then type the sequence of
letters designated as the hot keys for the desired tab and associated command
buttons.
When you first press and release the Alt key, Excel displays the hot keys for
all the tabs on the Ribbon. When you type one of the Ribbon tab hot keys to
select it, all the command button hot keys appear next to their buttons along
with the hot keys for the Dialog Box launchers in any group on that tab (see
Figure 1-5). To select a command button or Dialog Box launcher, simply type
its hot key letter.
Figure 1-5:
When you
press Alt
plus a tab
hot key,
Excel
displays the
hot keys for
selecting all
of its
command
buttons and
Dialog Box
launchers.
If you know the old Excel shortcut keys from versions Excel 97 through 2003,
you can still use them. For example, instead of going through the rigmarole of
pressing Alt+HC to copy a cell selection to the Windows Clipboard and then
Alt+HV to paste it elsewhere in the sheet, you can still press Ctrl+C to copy
the selection and then press Ctrl+V when you’re ready to paste it. Note, however, that when using a hot key combination with the Alt key, you don’t need
to keep the Alt key depressed while typing the remaining letter(s) as you do
when using a hot key combo with the Ctrl key.
17
18
Part I: Getting In on the Ground Floor
Adapting the Quick Access toolbar
When you first start using Excel 2007, the Quick Access toolbar contains only
the following few buttons:
Save to save any changes made to the current workbook using the same
filename, file format, and location
Undo to undo the last editing, formatting, or layout change you made
Redo to reapply the previous editing, formatting, or layout change that
you just removed with the Undo button
The Quick Access toolbar is very customizable as Excel makes it really easy
to add any Ribbon command to it. Moreover, you’re not restricted to adding
buttons for just the commands on the Ribbon: you can add any Excel command you want to the toolbar, even the obscure ones that don’t rate an
appearance on any of its tabs.
By default, the Quick Access toolbar appears above the Ribbon tabs immediately to the right of the Office Button. To display the toolbar beneath the
Ribbon immediately above the Formula bar, click the Customize Quick
Access Toolbar button (the drop-down button to the right of the toolbar
with a horizontal bar above a down-pointing triangle) and then click Show
Below the Ribbon on its drop-down menu. You will definitely want to make
this change if you start adding more buttons to the toolbar so that the growing Quick Access toolbar doesn’t start crowding out the name of the current
workbook that appears to the toolbar’s right.
Adding command buttons on the Customize
Quick Access Toolbar’s drop-down menu
When you click the Customize Quick Access Toolbar button, a drop-down
menu appears containing the following commands:
New to open a new workbook
Open to display the Open dialog box for opening an existing workbook
Save to save changes to your current workbook
E-mail to open your mail
Quick Print to send the current worksheet to your default printer
Print Preview to open the current worksheet in the Print Preview window
Spelling to check the current worksheet for spelling errors
Undo to undo your latest worksheet edit
Chapter 1: The Excel 2007 User Experience
Redo to reapply the last edit that you removed with Undo
Sort Ascending to sort the current cell selection or column in A to Z
alphabetical, lowest to highest numerical, or oldest to newest date order
Sort Descending to sort the current cell selection or column Z to A
alphabetical, highest to lowest numerical, or newest to oldest date order
When you first open this menu, only the Save, Undo, and Redo options are
selected (indicated by the check marks in front of their names) and therefore
theirs are the only buttons to appear on the Quick Access toolbar. To add any
of the other commands on this menu to the toolbar, you simply click the
option on the drop-down menu. Excel then adds a button for that command
to the end of the Quick Access toolbar (and a check mark to its option on the
drop-down menu).
To remove a command button that you add to the Quick Access toolbar in this
manner, click the option a second time on the Customize Quick Access
Toolbar button’s drop-down menu. Excel removes its command button from
the toolbar and the check mark from its option on the drop-down menu.
Adding command buttons on the Ribbon
To add any Ribbon command to the Quick Access toolbar, simply right-click
its command button on the Ribbon and then click Add to Quick Access
Toolbar on its shortcut menu. Excel then immediately adds the command
button to the very end of the Quick Access toolbar, immediately in front of
the Customize Quick Access Toolbar button.
If you want to move the command button to a new location on the Quick
Access toolbar or group with other buttons on the toolbar, you need to click
the Customize Quick Access Toolbar button and then click the More
Commands option near the bottom of its drop-down menu.
Excel then opens the Excel Options dialog box with the Customize tab
selected (similar to the one shown in Figure 1-6). Here, Excel shows all the
buttons currently added to the Quick Access toolbar with the order in which
they appear from left to right on the toolbar corresponding to their top-down
order in the list box on the right-hand side of the dialog box.
To reposition a particular button on the bar, click it in the list box on the right
and then click either the Move Up button (the one with the black triangle
pointing upward) or the Move Down button (the one with the black triangle pointing downward) until the button is promoted or demoted to the
desired position on the toolbar.
19
20
Part I: Getting In on the Ground Floor
Figure 1-6:
Use the
buttons
on the
Customize
tab of the
Excel
Options
dialog box
to customize the
appearance
of the Quick
Access
toolbar.
You can add separators to the toolbar to group related buttons. To do this,
click the <Separator> selection in the list box on the left and then click the
Add button twice to add two. Then, click the Move Up or Move Down buttons
to position one of the two separators at the beginning of the group and the
other at the end.
To remove a button added from the Ribbon, right-click it on the Quick Access
toolbar and then click the Remove from Quick Access Toolbar option on its
shortcut menu.
Adding non-Ribbon commands to the Quick Access toolbar
You can also use the options on the Customize tab of the Excel Options
dialog box (see Figure 1-6) to add a button for any Excel command even if it’s
is not one of those displayed on the tabs of the Ribbon:
1. Click the type of command you want to add to the Quick Access toolbar in the Choose Commands From drop-down list box.
The types of commands include the File pull-down menu (the default) as
well as each of the tabs that appear on the Ribbon. To display only the
commands that are not displayed on the Ribbon, click Commands Not in
the Ribbon near the bottom of the drop-down list. To display a complete
list of all the Excel commands, click All Commands at the very bottom of
the drop-down list.
2. Click the command whose button you want to add to the Quick Access
toolbar in the list box on the left.
Chapter 1: The Excel 2007 User Experience
3. Click the Add button to add the command button to the bottom of the
list box on the right.
4. (Optional) To reposition the newly added command button so that it’s
not the last one on the toolbar, click the Move Up button until it’s in
the desired position.
5. Click the OK button to close Excel Options dialog box.
If you’ve created favorite macros (see Chapter 12) that you routinely use and
want to be able to run directly from the Quick Access toolbar, click Macros in
the Choose Commands From drop-down list box in the Excel Options dialog
box and then click the name of the macro to add followed by the Add button.
Having fun with the Formula bar
The Formula bar displays the cell address and the contents of the current
cell. The address of this cell is determined by its column letter(s) followed
immediately by the row number as in cell A1, the very first cell of each worksheet at the intersection of column A and row 1 or cell XFD1048576, the very
last of each Excel 2007 worksheet, at the intersection of column XFD and row
1048576. The contents of the current cell are determined by the type of entry
you make there: text or numbers if you just enter a heading or particular
value and the nuts and bolts of a formula if you enter a calculation there.
The Formula bar is divided into three sections:
Name box: The left-most section that displays the address of the current
cell address
Formula bar buttons: The second, middle section that appears as a
rather nondescript button displaying only an indented circle on the left
(used to narrow or widen the Name box) with the Function Wizard
button (labeled fx) on the right until you start making or editing a cell
entry at which time, its Cancel (an X) and its Enter (a check mark) buttons appear in between them
Cell contents: The third, right-most white area to the immediate right of
the Function Wizard button that takes up the rest of the bar and expands
as necessary to display really, really long cell entries that won’t fit the
normal area
The Cell contents section of the Formula bar is really important because it
always shows you the contents of the cell even when the worksheet does not
(when you’re dealing with a formula, Excel displays only the calculated result
in the cell in the worksheet and not the formula by which that result is derived)
and you can edit the contents of the cell in this area at anytime. By the same
token, when the Contents area is blank, you know that the cell is empty as well.
21
22
Part I: Getting In on the Ground Floor
How you assign 26 letters to 16,384 columns
When it comes to labeling the 16,384 columns of
an Excel 2007 worksheet, our alphabet with its
measly 26 letters is simply not up to the task. To
make up the difference, Excel first doubles the
letters in the cell’s column reference so that
column AA follows column Z (after which you
find column AB, AC, and so on) and then triples
them so that column AAA follows column ZZ
(after which you get column AAB, AAC, and the
like). At the end of this letter tripling, the 16,384th
and last column of the worksheet ends up being
XFD so that the last cell in the 1,048,576th row
has the cell address XFD1048576.
What to do in the Worksheet area
The Worksheet area is where most of the Excel spreadsheet action takes
place because it’s the place that displays the cells in different sections of the
current worksheet and it’s right inside the cells that you do all your spreadsheet data entry and formatting, not to mention a great deal of your editing.
Keep in mind that in order for you to be able to enter or edit data in a cell,
that cell must be current. Excel indicates that a cell is current in three ways:
The cell cursor — the dark black border surrounding the cell’s entire
perimeter — appears in the cell
The address of the cell appears in the Name box of the Formula bar
The cell’s column letter(s) and row number are shaded (in a kind of a
beige color on most monitors) in the column headings and row headings
that appear at the top and left of the Worksheet area, respectively
Moving around the worksheet
An Excel worksheet contains far too many columns and rows for all of a
worksheet’s cells to be displayed at one time regardless of how large your
personal computer monitor screen is or how high the screen resolution.
(After all, we’re talking 17,179,869,184 cells total!) Excel therefore offers many
methods for moving the cell cursor around the worksheet to the cell where
you want to enter new data or edit existing data:
Click the desired cell — assuming that the cell is displayed within the
section of the sheet currently visible in the Worksheet area
Click the Name box, type the address of the desired cell directly into this
box and then press the Enter key
Chapter 1: The Excel 2007 User Experience
Press F5 to open the Go To dialog box, type the address of the desired
cell into its Reference text box and then click OK
Use the cursor keys as shown in Table 1-1 to move the cell cursor to the
desired cell
Use the horizontal and vertical scroll bars at the bottom and right edge
of the Worksheet area to move the part of the worksheet that contains
the desired cell and then click the cell to put the cell cursor in it
Keystroke shortcuts for moving the cell cursor
Excel offers a wide variety of keystrokes for moving the cell cursor to a new
cell. When you use one of these keystrokes, the program automatically
scrolls a new part of the worksheet into view, if this is required to move the
cell pointer. In Table 1-1, I summarize these keystrokes and how far each one
moves the cell pointer from its starting position.
Table 1-1
Keystrokes for Moving the Cell Cursor
Keystroke
Where the Cell Cursor Moves
→ or Tab
Cell to the immediate right.
← or Shift+Tab
Cell to the immediate left.
↑
Cell up one row.
↓
Cell down one row.
Home
Cell in Column A of the current row.
Ctrl+Home
First cell (A1) of the worksheet.
Ctrl+End or End, Home
Cell in the worksheet at the intersection of the last
column that has any data in it and the last row that has
any data in it (that is, the last cell of the so-called active
area of the worksheet).
PgUp
Cell one full screen up in the same column.
PgDn
Cell one full screen down in the same column.
Ctrl+→ or End, →
First occupied cell to the right in the same row that is
either preceded or followed by a blank cell. If no cell is
occupied, the pointer goes to the cell at the very end of
the row.
Ctrl+← or End, ←
First occupied cell to the left in the same row that is
either preceded or followed by a blank cell. If no cell is
occupied, the pointer goes to the cell at the very beginning of the row.
(continued)
23
24
Part I: Getting In on the Ground Floor
Table 1-1 (continued)
Keystroke
Where the Cell Cursor Moves
Ctrl+↑ or End, ↑
First occupied cell above in the same column that is
either preceded or followed by a blank cell. If no cell is
occupied, the pointer goes to the cell at the very top of
the column.
Ctrl+↓ or End, ↓
First occupied cell below in the same column that is
either preceded or followed by a blank cell. If no cell is
occupied, the pointer goes to the cell at the very bottom
of the column.
Ctrl+Page Down
Last occupied cell in the next worksheet of that workbook.
Ctrl+Page Up
Last occupied cell in the previous worksheet of that
workbook.
Note: In the case of those keystrokes that use arrow keys, you must either use the arrows on the
cursor keypad or else have the Num Lock disengaged on the numeric keypad of your keyboard.
The keystrokes that combine the Ctrl or End key with an arrow key listed in
Table 1-1 are among the most helpful for moving quickly from one edge to the
other in large tables of cell entries or in moving from table to table in a section of the worksheet that contains many blocks of cells.
When you use Ctrl and an arrow key to move from edge to edge in a table or
between tables in a worksheet, you hold down Ctrl while you press one of the
four arrow keys (indicated by the + symbol in keystrokes, such as Ctrl+→).
When you use End and an arrow-key alternative, you must press and then
release the End key before you press the arrow key (indicated by the comma
in keystrokes, such as End, →). Pressing and releasing the End key causes the
End Mode indicator to appear on the status bar. This is your sign that Excel is
ready for you to press one of the four arrow keys.
Because you can keep the Ctrl key depressed as you press the different arrow
keys that you need to use, the Ctrl-plus-arrow-key method provides a more
fluid method for navigating blocks of cells than the End-then-arrow-key
method.
You can use the Scroll Lock key to “freeze” the position of the cell pointer in
the worksheet so that you can scroll new areas of the worksheet in view with
keystrokes such as PgUp (Page Up) and PgDn (Page Down) without changing
the cell pointer’s original position (in essence, making these keystrokes work
in the same manner as the scroll bars).
Chapter 1: The Excel 2007 User Experience
After engaging Scroll Lock, when you scroll the worksheet with the keyboard,
Excel does not select a new cell while it brings a new section of the worksheet into view. To “unfreeze” the cell pointer when scrolling the worksheet
via the keyboard, you just press the Scroll Lock key again.
Tips on using the scroll bars
To understand how scrolling works in Excel, imagine its humongous worksheet as a papyrus scroll attached to rollers on the left and right. To bring
into view a new section of a papyrus worksheet that is hidden on the right,
you crank the left roller until the section with the cells that you want to see
appears. Likewise, to scroll into view a new section of the worksheet that is
hidden on the left, you would crank the right roller until that section of cells
appears.
You can use the horizontal scroll bar at the bottom of the Worksheet area to
scroll back and forth through the columns of a worksheet and the vertical
scroll bar to scroll up and down through its rows. To scroll a column or a
row at a time in a particular direction, click the appropriate scroll arrow
at the ends of the scroll bar. To jump immediately back to the originally
displayed area of the worksheet after scrolling through single columns or
rows in this fashion, simply click the black area in the scroll bar that now
appears in front of or after the scroll bar.
Keep in mind that you can resize the horizontal scroll bar making it wider or
narrower by dragging the button that appears to the immediate left of its left
scroll arrow. Just keep in mind when working in a workbook that contains a
whole bunch of worksheets that in widening the horizontal scroll bar you can
end up hiding the display of the workbook’s later sheet tabs.
To scroll very quickly through columns or rows of the worksheet, hold down
the Shift key and then drag the mouse pointer in the appropriate direction
within the scroll bar until the columns or rows that you want to see appear
on the screen in the Worksheet area. When you hold down the Shift key as
you scroll, the scroll button within the scroll bar becomes real skinny and
a ScreenTip appears next to the scroll bar, keeping you informed of the
letter(s) of the columns or the numbers of the rows that you’re currently
whizzing through.
If your mouse has a wheel, you can use it to scroll directly through the columns
and rows of the worksheet without using the horizontal or verticals scroll bars.
Simply position the white-cross mouse pointer in the center of the Worksheet
area and then hold down the wheel button of the mouse. When the mouse
pointer changes to a four-pointed arrow, drag the mouse pointer in the appropriate direction (left and right to scroll through columns or up and down to
scroll through rows) until the desired column or row comes into view in the
Worksheet area.
25
26
Part I: Getting In on the Ground Floor
The only disadvantage to using the scroll bars to move around is that the
scroll bars bring only new sections of the worksheet into view — they don’t
actually change the position of the cell cursor. If you want to start making
entries in the cells in a new area of the worksheet, you still have to remember
to select the cell (by clicking it) or the group of cells (by dragging through
them) where you want the data to appear before you begin entering the data.
Surfing the sheets in a workbook
Each new workbook you open in Excel 2007 contains three blank worksheets,
each with its own 16,384 columns and 1,048,576 rows (giving you a truly staggering total of 51,539,607,552 blank cells!). But that’s not all, if ever you need
more worksheets in your workbook; you can add them simply by clicking the
Insert Worksheet button that appears to the immediate right of the last sheet
tab (see Figure 1-7).
Figure 1-7:
The Sheet
Tab scroll
buttons,
sheet tabs,
and Insert
Worksheet
button
enable you
to activate
your
worksheets
and add
to them.
Insert Worksheet
Sheet Tab scroll buttons
Last sheet
Next sheet
Previous sheet
First sheet
Chapter 1: The Excel 2007 User Experience
One reason for adding extra sheets to a workbook
You may wonder why on earth anyone would
ever need more than three worksheets given just
how many cells each individual sheet contains.
The simple truth is that it’s all about how you
choose to structure a particular spreadsheet
rather than running out of places to put the data.
For example, suppose that you need to create a
workbook that contains budgets for all the various departments in your corporation, you may
decide to devote an individual worksheet to each
department (with the actual budget spreadsheet
tables laid out in the same manner on each
sheet) rather than placing all the tables in different sections of the same sheet. Using this kind of
one-sheet-per-budget layout makes it much
easier for you to find each budget, print each one
as a separate page of a report, and, if ever necessary, to consolidate their data in a separate
summary worksheet.
On the left side of the bottom of the Worksheet area, the Sheet Tab scroll buttons appear followed by the actual tabs for the worksheets in your workbook
and the Insert Worksheet button. To activate a worksheet for editing, you
select it by clicking its sheet tab. Excel lets you know what sheet is active by
displaying the sheet name in boldface type and making its tab appear on top
of the others.
Don’t forget the Ctrl+Page Down and Ctrl+Page Up shortcut keys for selecting
the next and previous sheet, respectively, in your workbook.
If your workbook contains too many sheets for all their tabs to be displayed
at the bottom of the Worksheet area, use the Sheet Tab scroll buttons to
bring new tabs into view (so that you can then click them to activate them).
You click the Next Sheet button to scroll the next hidden sheet tab into view
or the Last Sheet button to scroll the last group of completely or partially
hidden tabs into view.
Showing off the Status bar
The Status bar is the last component at the very bottom of the Excel program
window (see Figure 1-8). The Status bar contains the following areas:
Mode button that indicates the current state of the Excel program
(Ready, Edit, and so on) as well as any special keys that are engaged
(Caps Lock, Num Lock, and Scroll Lock)
Macro Recording button (the red dot) that opens the Record Macro
dialog box where you can set the parameters for a new macro and begin
recording it (see Chapter 12)
27
28
Part I: Getting In on the Ground Floor
AutoCalculate indicator that displays the Average and Sum of all the
numerical entries in the current cell selection along with the Count of
every cell in selection
Layout selector that enables you to select between three layouts for the
Worksheet area: Normal, the default view that shows only the worksheet
cells with the column and row headings; Page Layout View that adds
rulers, page margins, and shows page breaks for the worksheet; and
Page Break Preview that enables you to adjust the paging of a report
(see Chapter 5 for details)
Zoom slider that enables you to zoom in and out on the cells in the
Worksheet area by dragging the slider to the right or left, respectively
The Num Lock indicator tells you that you can use the numbers on the
numeric keypad for entering values in the worksheet. This keypad will most
often be separate from the regular keyboard on the right side if you’re using a
separate keyboard and embedded in keys on the right side of the regular keyboard on almost all laptop computers where the keyboard is built right into
the computer.
Figure 1-8:
The Status
bar displays
the
program’s
current
standing
and enables
you to
select new
worksheet
views.
Record Macro
Mode Indicator
Auto Calculate Indicator
Layout Selector
Zoom slider
Chapter 1: The Excel 2007 User Experience
Starting and Exiting Excel
Excel 2007 runs under both the older Windows XP operating system and the
brand new Windows Vista operating system. Because of changes made to
the Start menu in Windows Vista, the procedure for starting Excel from this
version of Windows is a bit different from Windows XP.
Starting Excel from the Windows
Vista Start menu
You can use the Start Search box at the bottom of the Windows Vista Start
menu to locate Excel on your computer and launch the program in no time
at all:
1. Click the Start button on the Windows taskbar to open the Windows
Start menu.
2. Click the Start Search text box and type the two letters ex to have
Vista locate Microsoft Office Excel 2007 on your computer.
3. Click the Microsoft Office Excel 2007 option that now appears in the
left Programs column on the Start menu.
If you have more time on your hands, you can also launch Excel from
the Vista Start menu by going through the rigmarole of clicking Start➪
All Programs➪Microsoft Office➪Microsoft Office Excel 2007.
Starting Excel from the Windows
XP Start menu
When starting Excel 2007 from the Windows XP Start menu, you follow these
simple steps:
1. Click the Start button on the Windows taskbar to open the Windows
Start menu.
2. With the mouse, highlight All Programs on the Start menu and then
Microsoft Office on the Start continuation menu before clicking the
Microsoft Office Excel 2007 option on the Microsoft Office continuation menu.
29
30
Part I: Getting In on the Ground Floor
Pinning Excel to the Start menu
If you use Excel all the time, you may want to make its program option a permanent part of the Windows Start menu. To do this, you pin the program
option to the Start menu (and the steps for doing this are the same in
Windows XP as they are in Windows Vista):
1. Start Excel from the Windows Start menu.
In launching Excel, use the appropriate method for your version of
Windows as outlined in the “Starting Excel from the Windows Vista Start
menu” or the “Starting Excel from the Windows XP Start menu” section
earlier in this chapter.
After launching Excel, Windows adds Microsoft Office 2007 to the
recently used portion on the left side of the Windows Start menu.
2. Click the Start menu and then right-click Microsoft Excel 2007 on the
Start menu to open its shortcut menu.
3. Click Pin to Start menu on the shortcut menu.
After pinning Excel in this manner, the Microsoft Office Excel 2007 option
always appears in the upper section of the left-hand column of the Start
menu and you can then launch Excel simply by clicking the Start button and
then click this option.
Creating an Excel desktop shortcut
for Windows Vista
Some people prefer having the Excel Program icon appear on the Windows
desktop so that they can launch the program from the desktop by doubleclicking this program icon. To create an Excel program shortcut for Windows
Vista, you follow these steps:
1. Click the Start button on the Windows taskbar.
The Start menu opens where you click the Start Search text box.
2. Click the Start Search text box and type excel.exe.
Excel.exe is the name of the executable program file that runs Excel.
After finding this file on your hard disk, you can create a desktop shortcut from it that launches the program.
Chapter 1: The Excel 2007 User Experience
3. Right-click the file icon for the excel.exe file at the top of the Start
menu and then highlight Send To on the pop-up menu and click
Desktop (Create Shortcut) on its continuation menu.
A shortcut named EXCEL -Shortcut appears to your desktop. You should
probably rename the shortcut to something a little more friendly, such
as Excel 2007.
4. Right-click the EXCEL - Shortcut icon on the Vista desktop and then
click Rename on the pop-up menu.
5. Replace the current name by typing a new shortcut name, such as
Excel 2007 and then click anywhere on the desktop.
Creating an Excel desktop
shortcut for Windows XP
If you’re running Excel 2007 on Windows XP, you use the following steps to
create a program shortcut for your Windows XP desktop:
1. Click the Start button on the Windows taskbar.
The Start menu opens the Search item.
2. Click Search in the lower-right corner of the Start menu.
The Search Results dialog box appears.
3. Click the All Files and Folders link in the panel on the left side of the
Search Results dialog box.
The Search Companion pane appears on the left side of the Search
Results dialog box.
4. Type excel.exe in the All or Part of the File Name text box.
Excel.exe is the name of the executable program file that runs Excel.
After finding this file on your hard disk, you can create a desktop shortcut from it that launches the program.
5. Click the Search button.
Windows now searches your hard disk for the Excel program file. After
locating this file, its name appears on the right side of the Search Results
dialog box. When this filename appears, you can click the Stop button in
the left panel to halt the search.
6. Right-click the file icon for the excel.exe file and then highlight
Send To on the pop-up menu and click Desktop (Create Shortcut) on
its continuation menu.
A shortcut named Shortcut to excel.exe appears on your desktop.
31
32
Part I: Getting In on the Ground Floor
7. Click the Close button in the upper-right corner of the Search Results
dialog box.
After closing the Search Results dialog box, you should see the icon
named Shortcut to excel.exe on the desktop. You should probably rename
the shortcut to something a little more friendly, such as Excel 2007.
8. Right-click the Shortcut to excel.exe icon and then click Rename on
the pop-up menu.
9. Replace the current name by typing a new shortcut name, such as
Excel 2007 and then click anywhere on the desktop.
After you create an Excel desktop shortcut on the Windows XP desktop you
can launch Excel by double-clicking the shortcut icon.
Adding the Excel desktop shortcut
to the Quick Launch toolbar
If you want to be able to launch Excel 2007 by clicking a single button, drag
the icon for your Excel Windows Vista or XP desktop shortcut to the Quick
Launch toolbar to the immediate right of the Start button at the beginning of
the Windows taskbar. When you position the icon on this toolbar, Windows
indicates where the new Excel button will appear by drawing a black, vertical
I-beam in front of or between the existing buttons on this bar. As soon as you
release the mouse button, Windows adds an Excel 2007 button to the Quick
Launch toolbar that enables you to launch the program by a single-click of
its icon.
Exiting Excel
When you’re ready to call it a day and quit Excel, you have several choices
for shutting down the program:
Click the Office Button followed by the Exit Excel button
Press Alt+FX or Alt+F4
Click the Close button in the upper-right corner of the Excel program
window (the X)
If you try to exit Excel after working on a workbook and you haven’t saved
your latest changes, the program beeps at you and displays an alert box
querying whether you want to save your changes. To save your changes
Chapter 1: The Excel 2007 User Experience
before exiting, click the Yes command button. (For detailed information on
saving documents, see Chapter 2.) If you’ve just been playing around in the
worksheet and don’t want to save your changes, you can abandon the document by clicking the No button.
Help Is on the Way
You can get online help with Excel 2007 anytime that you need it while using
the program. Simply click the Help button with the question mark icon on the
right side of the program window opposite the tabs on the Ribbon or press
F1 to open a separate Excel Help window (see Figure 1-9).
Figure 1-9:
The
Microsoft
Office Excel
Help window
automatically
connects
you to the
Internet
when you
open it.
When the Help window first opens, Excel attempts to use your Internet connection to update its topics. The opening Help window contains a bunch of
links that you can click to get information on what’s new in the program to
quizzes that test your knowledge of Excel.
To get help with a particular command or function, use the Search text box
at the top of the Excel Help window. Type keywords or a phrase describing
your topic (such as “print preview” or “printing worksheets”) in this text
box and then press Enter or click the Search button. The Excel Help window
then presents a list of links to related help topics that you can click to display
their information.
33
34
Part I: Getting In on the Ground Floor
To print the help topic currently displayed in the Excel Help window, click
the Print button (with the printer icon) on its toolbar. Excel then opens a
Print dialog box where you can select the printer and options to use in printing the information.
To display a table of contents with all the main categories and subtopics
arranged hierarchically, click the Show Table of Contents button (with the
book icon) on the toolbar.
Migrating to Excel 2007
from Earlier Versions
If you’re a brand new Excel user, you’re going to take to the program’s new
Ribbon User Interface like a duck to water. However, if you’re coming to Excel
2007 as a dedicated user of any of the earlier Excel versions (from Excel 97 all
the way through Excel 2003), the first time you launch Excel 2007 and take a
gander at the Ribbon, you’re probably going to feel more like someone just
threw you into the deep end of the pool without a life preserver.
Don’t panic! Simply use this section of the chapter as your Excel 2007 life preserver. It’s intended to get you oriented, keep your head above water, and
have you swimming with the new interface in no time at all. Just give me five
minutes of your precious time and I promise I’ll have you up and running with
Excel 2007 and, maybe even smiling again. Now, take a deep breath, and here
we go. . . .
First, the bad news: there is no Classic mode in Excel 2007 that will magically
turn that fat, screen-real estate stealing Ribbon back into those sleek and tried
and true pull-down menus (thanks Microsoft, I needed that)! After the wonderful designers and engineers at Microsoft got through dumping all the pull-down
menus and toolbars that you worked so diligently to master and on which you
relied every Excel workday of your life, there was just nothing left for them to
hang a Classic mode onto.
Now, for the good news: you really don’t need a Classic mode — you just
need to find out where those scoundrel engineers went and put all the stuff
you used to do so effortlessly in versions of Excel before the Ribbon User
Interface. After all, you already know what most of those pull-down menu
items and toolbar buttons do; all you have to do is locate them.
Chapter 1: The Excel 2007 User Experience
Cutting the Ribbon down to size
First thing to do is to get that busy Ribbon out of your face. At this point, it’s
just taking up valuable work space and probably making you crazy. So, please
double-click any one of the tabs or press Ctrl+F1 right now to cut the Ribbon
display down to only its tabs. Single-clicking a tab then temporarily redisplays
the Ribbon until you select one of its command buttons, whereas pressing
Ctrl+F1 a second time redisplays the Ribbon and keeps it open in all its glory.
When only the tabs — Home through View — are showing at the top of the
Excel program window, you should feel a whole lot more comfortable with the
screen. The Excel 2007 screen is then as clean and uncluttered, if not more, as
the earlier version of Excel that you were using with only the Quick Access
toolbar, Ribbon tabs, and Formula bar displayed above the Worksheet area.
Now, you’re probably wondering where those Microsoft engineers moved the
most important and commonly-used pull-down menu commands. Table 1-2
shows the Excel 2007 equivalents for the menu commands you probably used
most often in doing your work in the earlier version of Excel.
When a particular command is assigned to one of the tabs on the Ribbon,
Table 1-2 lists only the tab and command button name without naming the
group since the group name plays no part in selecting the command. So, for
example, the table lists the tab+command button equivalent of the
View➪Header and Footer command as Insert | Header & Footer without
regard to the fact that the Header & Footer button is part of the Text group
on the Insert tab.
Table 1-2:
Excel 2003
Command
Excel 2007 Equivalents for Common Pull-Down Menu
Commands in Excel 2003
Excel 2007
Equivalent
Common
Shortcut Keys
Excel 2007
Shortcut Keys
File➪New
Office Button | New
Ctrl+N
Alt+FN
File➪Open
Office Button | Open
Ctrl+O
Alt+FO
File➪Save
Office Button | Save or
Save button on the
Quick Access Toolbar
Ctrl+S
Alt+FS
File Menu
(continued)
35
36
Part I: Getting In on the Ground Floor
Table 1-2 (continued)
Excel 2003
Command
Excel 2007
Equivalent
Common
Shortcut Keys
Excel 2007
Shortcut Keys
File➪Save As
Office Button | Save As
F12
Alt+FA
File➪Print
Office Button | Print
Ctrl+P
Alt+FP
File➪Send To➪
Mail Recipient
Office Button|
Send|Email
Alt+FDE
File➪Send To➪
Recipient Using
Internet Fax
Service
Office Button|
Send | Internet Fax
Alt+FDX
File➪Close
Office Button | Close
Ctrl+W
Alt+FC
Edit Menu
Edit➪Office
Clipboard
Home | Dialog Box
launcher in the
Clipboard group
Alt+HFO
Edit➪Clear➪All
Home | Clear (eraser
icon) | Clear All
Alt+HEA
Edit➪Clear➪
Formats
Home | Clear (eraser
icon) | Clear Formats
Alt+HEF
Edit➪Clear➪
Contents
Home | Clear (eraser
icon) | Clear Contents
Edit➪Clear➪
Comments
Home | Clear (eraser
icon) | Clear Comments
Alt+HEM
Edit➪Delete
Home | Delete
Alt+HD
Edit➪Move or
Copy Sheet
Home | Format | Move
or Copy Sheet
Alt+HOM
Edit➪Find
Home | Find & Select |
Find
Ctrl+F
Alt+HFDF
Edit➪Replace
Home | Find & Select |
Replace
Ctrl+H
Alt+HFDR
View Menu
View➪Header
and Footer
Insert | Header
& Footer
View➪Full
Screen
View | Full Screen
Delete key
Alt+HEC
Chapter 1: The Excel 2007 User Experience
Excel 2003
Command
Excel 2007
Equivalent
Common
Shortcut Keys
Excel 2007
Shortcut Keys
Insert Menu
Insert➪Cells
Home | Insert |
Insert Cells
Alt+HII
Insert➪Rows
Home | Insert |
Insert Sheet Rows
Alt+HIR
Insert➪Columns
Home | Insert |
Insert Sheet Columns
Alt+HIC
Insert➪Worksheets
Home | Insert | Insert Sheet
Alt+HIS
Insert➪Symbol
Insert | Symbol
Alt+NU
Insert➪Page
Break
Page Layout | Page
Breaks | Insert Page Break
Alt+PBI
Insert➪Name➪
Define
Formulas | Define Name |
Define Name
Alt+MMD
Insert➪Name➪
Paste
Formulas | Use
in Formula
Alt+MS
Insert➪Name➪
Create
Formulas | Create
from Selection
Alt+MC
Insert➪Name➪
Label
Formulas | Name
Manager
Alt+MN
Insert➪Comment
Review | New
Comment
Alt+RC
Insert➪Picture
Insert | Picture
Alt+NP
Insert➪Hyperlink
Insert | Hyperlink
Ctrl+K
Alt+NI
Format➪Cells
Home | Format | Cells
Ctrl+1
Alt+HOE
Format➪Row➪
Height
Home | Format |
Height
Alt+HOH
Format➪Row➪
AutoFit
Home | Format |
AutoFit Row Height
Alt+HOA
Format➪Row➪
Hide/Unhide
Home | Format |
Hide & Unhide | Hide
Rows/Unhide Rows
Alt+HOUR/
Alt+HOUO
Format Menu
(continued)
37
38
Part I: Getting In on the Ground Floor
Table 1-2 (continued)
Excel 2003
Command
Excel 2007
Equivalent
Common
Excel 2007
Shortcut Keys Shortcut Keys
Format➪
Column➪Width
Home | Format |
Column Width
Alt+HOW
Format➪
Column➪
Hide/Unhide
Home | Format | Hide &
Unhide | Hide Columns/
Unhide Columns
Alt+HOUC/
Alt+HOUL
Format➪
Column➪
Standard Width
Home | Format |
Default Width
Alt+HOD
Format➪Sheet➪ Home | Format |
Rename
Rename Sheet
Alt+HOR
Format➪Sheet➪ Home | Format | Hide &
Hide/Unhide
Unhide | Hide Sheet/
Unhide Sheet
Alt+HOUS/
Alt+HOUH
Format➪Sheet➪ Page Layout |
Background
Background
Alt+PG
Format➪Sheet➪ Home | Format |
Tab Color
Tab Color
Alt+HOT
Format➪
AutoFormat
Home | Format
as Table
Alt+HT
Format➪
Conditional
Formatting
Home | Conditional
Formatting
Alt+HL
Format➪Style
Home | Cell Styles
Alt+HJ
Tools Menu
Tools➪Spelling
Review | Spelling
F7
Alt+RS
Tools➪Research Review | Research
Alt+RR
Tools➪Error
Checking
Alt+MK
Formulas | Error
Checking
Tools➪Speech➪ Available only as custom
Show Text to
Speak Cells, Speak Cells Speech Toolbar Stop Speak Cells, Speak Cells
by Columns, Speak Cells by
Rows and Speak Cells on
Enter buttons added to
Quick Access toolbar
Chapter 1: The Excel 2007 User Experience
Excel 2003
Command
Excel 2007
Equivalent
Common
Shortcut Keys
Tools➪Track
Changes
Review | Track
Changes
Alt+RG
Tools➪
Protection➪
Protect Sheet
Review | Protect
Sheet
Alt+RPS
Tools➪
Protection➪
Allow Users
to Edit Ranges
Review | Allow Users
to Edit Ranges
Alt+RU
Tools➪
Protection➪
Protect
Workbook
Review | Protect
Workbook
Alt+RPW
Tools➪
Review | Protect
Protection➪
Sharing
Protect and
Share Workbook
Excel 2007
Shortcut Keys
Alt+RO
Tools➪Macro
View | Macros
Alt+F8
Alt+WM
Tools➪Add-Ins
Office Button | Excel
Options | Add-Ins
Alt+FIAA and
Alt+G
Tools➪
AutoCorrect
Options
Office Button | Excel
Options | Proofing |
AutoCorrect Options
Alt+FIPP and
Alt+A
Tools➪Options
Office Button | Excel
Options
Alt+FI
Data➪Sort
Data | Sort or Home | Sort
& Filter | Custom Sort
Alt+AS or
Alt+HSU
Data➪Filter➪
AutoFilter
Data | Filter
Alt+AT
Data➪Filter➪
Advanced Filter
Data | Advanced
Alt+AQ
Data➪Form
Available only as a
custom Form button
added to Quick Access
toolbar
Data Menu
(continued)
39
40
Part I: Getting In on the Ground Floor
Table 1-2 (continued)
Excel 2003
Command
Excel 2007
Equivalent
Data➪Subtotals
Data | Subtotal
Common
Shortcut Keys
Excel 2007
Shortcut Keys
Alt+AB
Data➪Validation Data | Data Validation |
Data Validation
Alt+AVV
Data➪Table
Data | What-If Analysis |
Data Table
Alt+AWT
Data➪Text
to Columns
Data | Convert Text
to Table
Alt+AE
Data➪
Consolidate
Data | Consolidate
Alt+AN
Data➪Group
and Outline
Data | Group/Ungroup
Alt+AG/
Alt+AU
Data➪PivotTable Insert | PivotTable |
and PivotChart
PivotTable/PivotChart
Report
Alt+NVT/
Alt+NVC
Data➪Import
External Data
Data | From Other
Sources
Alt+AFO
Window➪
New Window
View | New Window
Alt+WN
Window➪
Arrange
View | Arrange
Alt+WA
Window➪
Compare Side
by Side
View | View Side by
Side (two-page icon
in Window group)
Alt+WB
Window➪
Hide, Unhide
View | Hide/Unhide
Window➪Split
View | Split
Alt+WS
Window➪
Freeze Panes
View | Freeze Panes
Alt+WF
Window Menu
Alt+WU
Alt+WH/
Chapter 1: The Excel 2007 User Experience
For the most part, the pull-down menu commands listed in Table 1-2 are logically located. The ones that take the most getting used to are the Header and
Footer and PivotTable/Chart commands that are located on the Insert tab
rather than the View tab and Data tab as might be expected given they inhabited, respectively, the View and Data pull-down menus in earlier Excel versions.
In addition, the worksheet background command ended up all by its lonesome
on the Page Layout tab rather than going to the Home tab with all its fellow
formatting commands.
Finding the Standard Toolbar
buttons equivalents
If you’re like me, you came to rely heavily on the buttons of the Standard toolbar in doing all sorts of everyday tasks in earlier versions of Excel. Table 1-3
shows you the Excel 2007 equivalents for the buttons on the Standard toolbar
in Excel 2003. As you can see from this table, most of these Standard toolbar
buttons are regulated to one of the places in Excel 2007:
Office pull-down menu activated by clicking the Office Button or pressing Alt+F (New, Open, Save, Print Preview)
Quick Access toolbar (Save, Undo, and Redo)
Home tab in the Clipboard group (Cut, Copy, Paste, and Format Painter)
and Editing group (AutoSum, Sort Ascending, and Sort Descending)
Table 1-3:
Excel 2007 Equivalents for the Standard Toolbar
Buttons in Excel 2003
Toolbar
button
Excel 2007
Equivalent
Common
Shortcut Keys
Excel 2007
Shortcut Keys
New
Office Button | New
Ctrl+N
Alt+FN
Open
Office Button | Open
Ctrl+O
Alt+FO
Save
Office Button | Save or
Save button on Quick
Access toolbar
Ctrl+S
Alt+FS
Permission
Available only as a
custom Permission
button added to
Quick Access toolbar
(continued)
41
42
Part I: Getting In on the Ground Floor
Table 1-3 (continued)
Toolbar
button
Excel 2007
Equivalent
Common
Shortcut Keys
Excel 2007
Shortcut Keys
E-mail
Office Button | Send |
Email
Print
Quick Print button on
Quick Access toolbar
Print Preview
Office Button | Print |
Print Preview
Spelling
Review | Spelling
Research
Review | Research
Cut
Home | Cut (scissors
icon in Clipboard group)
Ctrl+X
Alt+HX
Copy
Home | Copy (doublesheet icon in Clipboard
group)
Ctrl+C
Alt+HC
Paste
Home | Paste
Ctrl+V
Alt+HV
Format Painter
Home | Format Painter
(brush icon in Clipboard
group)
Undo
Undo button on Quick
Access toolbar
Ctrl+Z
Redo
Redo button on Quick
Access toolbar
Ctrl+Y
Toolbar
button
Excel 2007
Equivalent
Common
Shortcut Keys
Insert Ink
Annotations
Review | Start Inking
Insert Hyperlink
Insert | Hyperlink
AutoSum
Home | Sum
(( - Sigma icon)
Alt+HU
Sort Ascending
Home | Sort & Filter |
Sort A to Z
Alt+HSS
Alt+FDE
Alt+FWV
F7
Alt+RS
Alt+RR
Alt+HFP
Excel 2007
Shortcut Keys
Alt+RK
Ctrl+K
Alt+NI
Chapter 1: The Excel 2007 User Experience
Toolbar
button
Excel 2007
Equivalent
Common
Shortcut Keys
Sort Descending Home | Sort & Filter |
Sort Z to A
ChartWizard
Not available except
as specific chart type
command buttons in
the Charts group
on the Insert tab
Drawing
Not available except
as command buttons
in the Shapes,
Illustrations, and Text
groups on the Insert tab
and as custom buttons
added to Quick Access
toolbar
Zoom
View | Zoom
Microsoft Excel
Help
Microsoft Office Excel
Help button to the right
of the Ribbon tabs
Excel 2007
Shortcut Keys
Alt+HSO
Alt+WQ
F1
Because Excel 2007 supports only a single toolbar, the Quick Access toolbar,
the Drawing toolbar disappears completely from Excel 2007 and thus the
Drawing button on the Standard toolbar has no equivalent. Most of its main
features, including Clip Art, inserting graphics files, and creating diagrams
and WordArt are now found on the Insert tab. Also, keep in mind that Excel
2007 doesn’t have an equivalent to the ChartWizard button on the Standard
toolbar because you can create a chart in a split-second by clicking the
Column, Line, Pie, Bar, Area, XY (Scatter), or Other Charts command buttons
on the Insert tab (see Chapter 8).
Finding the Formatting Toolbar
buttons equivalents
Finding the Excel 2007 equivalents for the buttons on the Formatting toolbar
in earlier versions of Excel couldn’t be easier: Every one of the buttons on the
Formatting toolbar is prominently displayed on the Home tab of the Excel 2007
43
44
Part I: Getting In on the Ground Floor
Ribbon. They’re all easy to identify as they use the same icons as before and
are located in the Font, Alignment, or Number group on the Home tab (refer to
Figure 1-3).
In addition to the Font, Font Size, Bold, Italic, Underline, Borders, Fill Color,
and Font Color buttons from the Formatting toolbar, the Font group also contains the following two buttons:
Increase Font button that bumps up the current font size a point
Decrease Font button that reduces the current font size by a point
In addition to the Left Align, Center, Right Align, Decrease Indent, Increase
Indent, and Merge and Center buttons, the Alignment group also contains
the following buttons:
Top Align button that vertically aligns the data entered into the current
cell selection with the top edge of the cell
Middle Align button that vertically centers the data entered into the
current cell selection
Bottom Align button that aligns the data entered in the current cell
selection with the bottom edge of the cell
Orientation button that opens a pop-menu of orientation options that
enable you to change the direction of the text entered into the current
cell selection by angling it up or down, converting it to vertical text,
rotating it up or down as well as opening the Alignment tab of the
Format Cells dialog box
Wrap Text button that applies the wrap text function to the current cell
selection so that Excel expands the row heights as needed to fit all of its
text within the current column widths
In addition to the Percent Style, Comma, Increase Decimal, and Decrease
Decimal buttons from the Formatting toolbar, the Numbers group contains
the following buttons:
Accounting Number Format button that enables you to select among
several different currency formats from U.S. dollars to Swiss Francs as
well as to open the Number tab of the Format Cells dialog box with the
Accounting number format selected
Number Format button that opens a pop-up menu of different number
options from General through Text as well as opens the Number tab in
the Format Cells dialog box when you select its More Number Formats
option
Chapter 1: The Excel 2007 User Experience
Putting the Quick Access
toolbar to excellent use
Figure 1-10 shows you the Excel 2007 program window with the Ribbon minimized and a completely customized Quick Access toolbar that’s moved down
so that it appears under the tabs and immediately above the Formula bar.
This completely custom version of Quick Access toolbar should seem very
familiar to you: It contains every button from the Standard and Formatting
toolbar in Excel 2003 with the exception of the Permission, Zoom and Help
buttons in the original order in which they appear on their respective toolbars.
The Permission button is so esoteric and seldom used that I didn’t bother to
add it and neither the Zoom button nor the Help button is really needed as
the Zoom slider that enables you to quickly select a new screen magnification
percentage is always displayed in the lower-right corner of the Excel 2007
Status bar and the Help button is always displayed on the right side of the
bar containing the Ribbon tabs.
Figure 1-10:
Excel 2007
window
after
minimizing
the Ribbon
and adding
all but two
of the
buttons
from the
Standard
and
Formatting
toolbars to
the Quick
Access
toolbar.
45
46
Part I: Getting In on the Ground Floor
To customize your Quick Access toolbar so that it matches the one shown in
Figure 1-10 with every button from the Standard and Formatting toolbars
except the Permission, Zoom, and Help buttons, follow these steps:
1. Click the Customize Quick Access Toolbar button at the end of the
Quick Access toolbar and then click the Show Below the Ribbon option.
When filling the Quick Access toolbar with buttons, you need to place
the bar beneath the Ribbon so that it won’t crowd out name of the current workbook file.
2. Click the Customize Quick Access Toolbar button again and this time
click the More Commands option.
Excel opens the Excel Options dialog box with the Customize tab
selected. The Customize Quick Access Toolbar list box on the right side
of this dialog box shows all three of the default buttons in the order in
which they now appear on the toolbar.
3. Click the New option in the Popular Commands list followed by the
Add button.
Excel adds the New command button at the end of the toolbar indicated
by the appearance of the New button at the bottom of the list in the
Customize Quick Access Toolbar list box on the right.
4. Click the Move Up button (with the triangle pointing upward) three
times to move the New button to the top of the Customize Quick Access
Toolbar list box and the first position on the Quick Access toolbar.
Note that the New button is now in front of the Save button on the toolbar.
5. Click the Open option in the Popular Commands list box on the left
and then click the Add button.
Excel inserts the Open button in the Customize Quick Access Toolbar
list box in between the New and Save button, which is exactly where it
appears on the Standard toolbar.
6. Click the Save button in the Customize Quick Access Toolbar list box
on the right to select this button. Then, click the Quick Print option in
the Popular Commands list box on the left and click the Add button.
Excel inserts the Quick Print button after the Save button.
7. Click the Print Preview button near the bottom of the Popular
Commands list box and then click the Add button.
Excel inserts the Print Preview button after the Quick Print button in the
Customize Quick Access Toolbar list box.
Now, you need to add the Spelling and Research buttons. They are located
on the Review tab in Excel 2007. Before you can add their buttons to the
Quick Access toolbar, you need to replace Popular Commands with
Review Tab by selecting this option on the Choose Commands From
drop-down list.
Chapter 1: The Excel 2007 User Experience
8. Click the Choose Commands From drop-down button and then click
Review Tab in the drop-down list.
Excel now displays all the command buttons on the Review tab of the
Ribbon in the list box below.
9. Add the Spelling and Research buttons from the Review Tab list box
to the Customize Quick Access Toolbar list box and position them so
that they appear one after the other following the Print Preview
button.
Next you need to add the Cut, Copy, Paste, and Format Painter buttons to
the Quick Access toolbar. These command buttons are on the Home tab.
10. Click the Home Tab option in the Choose Commands From drop-down
list and then add the Cut, Copy, Paste, and Format Painter buttons to
the Customize Quick Access Toolbar in this order in front of the Undo
button.
Note when adding the Paste button that Choose Commands From displays two Paste buttons. The first is the regular Paste button that was on
the Standard toolbar. The second is a Paste button with a drop-down
button that, when clicked, opens a drop-down menu with all the special
Paste options. You can add either one, although the second Paste button
with the drop-down menu is much more versatile.
11. Click the Format Painter option in the Insert Tab list box and then
click the Add button.
Excel adds the Format Painter button after the Paste button in the
Customize Quick Access Toolbar list box on the right.
12. Click the Redo button in the Customize Quick Access Toolbar list box
to select its icon and then click the Insert Tab on the Choose
Commands From drop-down list and add the Insert Hyperlink button
from to the Quick Access toolbar.
13. Add the remaining Standard toolbar buttons, AutoSum, Sort Ascending,
Sort Descending, and Create Chart, to the Quick Access toolbar.
The AutoSum, Sort Ascending, and Sort Descending buttons are available in the Home Tab and the Create Chart button (the closest thing to
the Chart Wizard in Excel 2007) is on the Insert Tab list box.
14. Add the buttons on the Formatting toolbar to the Quick Access toolbar
in the order in which they appear.
The Formatting toolbar contains these tools all found on the Home tab:
• Font
• Font Size
• Bold
• Italic
47
48
Part I: Getting In on the Ground Floor
• Underline
• Align Text Left
• Center
• Align Text Right
• Merge and Center
• Accounting Number Format (corresponding to the Currency Style
button)
• Percent Style
• Comma Style
• Increase Decimal
• Decrease Decimal
• Decrease Indent
• Increase Indent
• Borders
• Fill Color
• Font Color.
15. Click the OK button to close the Excel Options dialog box and return
to the Excel program window.
Your Quick Access toolbar should now have the same buttons as the
one shown in Figure 1-10.
After adding all the buttons on the Standard and the Formatting toolbar (with
the exception of the Permission button that almost nobody uses, the Drawing
button that has no equivalent in Excel 2007, and the Zoom and Help buttons
that are always available in the Excel 2007 program window), the Quick
Access toolbar fills the entire width of the screen on many monitors. Keep in
mind that if you need to add extra buttons that can no longer be displayed on
the single row above the Formula bar, Excel automatically adds a More
Controls button to the end of the Quick Access toolbar. You then click this
More Controls button to display a pop-up menu containing all the buttons
that can no longer be displayed on the toolbar.
To add vertical bar separators to divide the buttons into groups as you see in
the original Standard and Formatting toolbars and shown in Figure 1-8, click
the <Separator> option located at the top of each Choose Commands From
list box followed by the Add button.
Chapter 1: The Excel 2007 User Experience
Getting good to go with Excel 2007
The version of the Excel 2007 program window shown in Figure 1-10 with the
Ribbon minimized to just tabs and the Quick Access toolbar displayed above
the Formula bar with all but a few of the buttons from the Standard and
Formatting toolbars is as close as I can get you to any sort of Excel 2003
Classic mode.
Combine this simplified screen layout with the common shortcut keys (see
Table 1-2) that you already know and you should be pretty much good to go
with Excel 2007. Of course, you need to keep in mind that in the course of
using the program, the Ribbon can’t always stay reduced to just its tabs. As
you find out as you explore the features covered in the remaining chapters of
this book, there’ll be times when you need the tools (especially in the form
of those fantastic galleries) that a particular tab has to offer.
The only other issues that should be of any concern to you right now are the
new Excel 2007 file formats and running all those Excel macros on which
you’ve come to rely.
Dealing with the new Excel file formats
Yes, it’s true that Excel 2007 introduces yet another new native file format in
which to save its workbook files (although Microsoft insists that this one is
a truly “open” XML file format and not at all proprietary like all the previous
ones).
Fortunately, Excel 2007 has no trouble opening any workbook files saved in
the good old .XLS file format used by versions 97 through 2003. More importantly, the program automatically saves all editing changes you make to these
files in this original file format.
This means you don’t have a worry in the world when it comes to making
simple edits to existing spreadsheets with Excel 2007. Simply, open the workbook file and then make all the necessary changes. When you finish, click the
Save button on the Quick Access toolbar to save your changes in the good
old .XLS file format that everybody in the office who is still using a previous
version of Excel can still open, edit, and print. Excel also warns you should you
ever add a new 2007 element to the existing workbook that’s not supported by
its earlier versions.
The challenge comes when you need to use Excel 2007 to create a brand new
spreadsheet. The program automatically wants to save all new workbooks in
its fancy new .XLSX file format (see Chapter 2 for a complete rundown on this
new workbook file format and the pros and cons of using it). If you don’t want
to save your workbook in this format, you need to remember to click the Save
as Type drop-down button and then click the Excel 97-2003 Workbook (*.xls)
option on its drop-down menu before you click Save.
49
50
Part I: Getting In on the Ground Floor
If you’re working an office environment where all the workbooks you produce
with Excel 2007 must be saved in the old 97-2003 file format for compatibility
sake, you can change the program’s default Save setting so that the program
always saves all new workbooks in the old file format. To do this, open the
Save tab of the Excel Options dialog box (Office Button | Excel Options or
Alt+FIS) and then click Excel 97-2003 Workbook in the Save Files in This
Format drop-down list box before you click OK.
Using your macros
The good news is that Excel 2007 supports the creating and running of macros,
using the same Microsoft Visual Basic for Applications of earlier versions. It
even enables you to edit these macros in a version of VBA Editor, if you’re
sufficiently skilled to do so.
The biggest problem with macros comes about if you have a tendency, like
I do, to map your global macros (the ones you save in the PERSONAL.XLSB
workbook so that they’re available when working in any Excel workbook)
onto custom pull-down menus and toolbars. Because Excel 2007 retains only
the single pull-down File menu and Quick Access toolbar, none of the custom
menus and toolbars to which you’ve assigned macros comes over to Excel
2007. This means, that although the macros are still a part of their respective
workbooks and continue to run, you must now run all macros either using
keyboard shortcuts you assigned to them or via the Macro dialog box (click
View | Macros | View Macros or press Alt+WMV or Alt+F8).
You can assign macros to buttons on the Quick Access toolbar and then
run them by clicking their buttons. The only problem is that all macros you
assign to this toolbar use the same generic macro button icon so that the
only way to differentiate the macros is through the ToolTip that appears
when you position the mouse over the macro button.
To assign a macro to a generic macro on the Quick Access toolbar, open the
Customize tab of the Excel Options dialog box (Office Button | Excel Options
or Alt+FIC) and then select Macros in the Choose Commands From drop-down
list box. Excel then displays the names of all the macros in the current workbook (including all global macros saved in the PERSONAL.XLSB workbook) in
the Choose Commands From list box. To assign a macro to a macro button,
click its name in this list box and then click the Add button. You can then
move the macro button to the desired position on the Quick Access toolbar
with the Move Up and Move Down buttons and, if you so desire, make it part
of a separate section on the toolbar by adding a <Separator> before and after
its button.