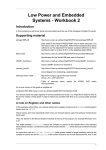
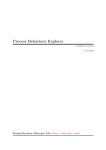
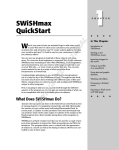
1
Chapter 1
Getting Started with Access
AL
In This Chapter
What is a database?
RI
Opening Access
Checking out the Access interface
TE
Exploring Office Online
MA
Finding help on Access topics
M
GH
TE
D
icrosoft Office Access 2007 — which I refer to as Access throughout this book —
is the database component of the 2007 Microsoft Office System. If you’re familiar
with other programs in the 2007 Microsoft Office System — such as Word, Excel,
PowerPoint, and Outlook — you might already be familiar with the interface in Access.
However, Access contains many components not found anywhere else within the
Microsoft Office System.
RI
In this chapter, you learn the very basics of databases, how to start and navigate Access,
and how to find help both online and offline.
PY
Understanding What a Database Is
CO
A database is just a collection of related information. The library’s card catalog, your
grandmother’s recipe cards, and the phone book are all examples of databases. Even if
they aren’t on the computer, they contain information you can retrieve relatively easily.
Putting these manual databases on the computer speeds up the retrieval of information.
You may have begun keeping lists in Excel (Microsoft’s spreadsheet application). Or
perhaps you maintain your contacts in Outlook (Microsoft’s e-mail application). And
you’ve no doubt used an Internet search engine to look up information online. These are
all computerized databases that harness the power of the microprocessor to organize
and retrieve the information you need.
Defining two types of databases
A database management system (DBMS) is a computer software package designed for
managing databases. A DBMS controls the organization, storage, and retrieval of data
from a database. A DBMS contains data structures optimized to deal with large amounts
of data — some DBMS’s handle this data better than others.
10
Part I: Learning Database Fundamentals
A relational database management system (RDBMS) is a type of database management
system that stores data in related tables.
For example, a table containing contact information (name, address, phone number)
may be related to a table containing items each contact purchases (product, quantity,
price). The RDBMS lets you retrieve answers to questions such as “What is the cost of
the products each contact ordered?” from the related tables.
Exploring the basic parts of Access databases
Access is an RDBMS that stores data in a relational database. Each Access database is
an automated version of the filing system where you define what type of information is
being stored. An Access database is the container for this information which is stored in
tables, plus other components such as queries, forms, reports, macros, and modules. You
learn more about these components (also known as database objects) throughout this
book.
Here’s a brief overview of each of these database components.
Tables
A table serves as the primary container for the data in a database and has the following
characteristics (shown in Figure 1-1):
Figure 1-1:
Viewing
the table
structure.
Each table contains records (rows) that represent a set of information.
For example, a record in a database of contact information for your clients contains the client’s name, address, e-mail address, cell phone number, work phone
number, and so on depending on what fields the database contains.
Each record contains fields (columns) that represent attributes of the record.
For example, a table of contact information contains such fields as Name, Address,
and City.
Each field contains a value.
The value is the actual information you’re storing.
Queries
A query retrieves or manipulates information in a database.
To retrieve information, you ask the database a question such as “What are all the
CDs that I purchased in 2007?” using a specialized language called Structured Query
Language (SQL).
Chapter 1: Getting Started with Access
Forms
A form presents data from a table or query in a structured view instead of the row and
column format that a table shows. You create forms to
Make data entry easier and more intuitive.
Limit fields the user sees and changes.
Reports
A report presents information from your database in a printed format. You can format
reports to display lists sorted by one or more columns. They can display totals and subtotals and pull data from one or more tables. You can apply a common theme to your
reports to ensure that the printed output from your database has a consistent look
and feel.
Macros
A macro is an action or set of actions that performs database operations. Macros let you
automate your database by automatically performing tasks or performing tasks at the
touch of a button. Macros perform such database functions as opening forms, printing
reports, and manipulating data.
Modules
A module is a set of functions and procedures written in the Visual Basic for Application
(VBA) programming language. Like macros, modules are also used for performing operations on your database, but go far beyond the limitations of macros.
VBA isn’t covered in this book. If (after you’re done with this workbook) you’re interested
in learning how to use VBA to perform operations in your databases, pick up a copy of
Access 2007 VBA Programming For Dummies, coauthored by yours truly and Alan Simpson
(Wiley).
Launching Access
In order to be proficient in its use, you need to be familiar with all the various ways of
launching Access.
Exercise 1-1: Launching Access
You can use any of the following techniques to start Access:
Click Start on the Windows taskbar and then choose All Programs➪Microsoft
Office➪Microsoft Office Access 2007.
Double-click an Access database file in any folder on any drive to which your computer has access.
Double-click the Microsoft Access program icon on your computer’s desktop.
Click the Microsoft Access icon on the taskbar’s Start menu.
Click the Access icon on the Quick Launch toolbar.
11
12
Part I: Learning Database Fundamentals
Exercise 1-2: Creating Additional Icons to Launch Access
The icons for launching Access are available only if you’ve added the Access program to
the desktop, the Start menu, and the Quick Launch toolbar, respectively. In this exercise,
add the Access program icon to your computer.
Add a Microsoft Office Access shortcut to the Windows desktop by right-clicking
the Microsoft Office Access item as it appears on the Start➪All Programs➪
Microsoft Office submenu and then clicking Send To➪Desktop from the pop-up
menu.
Add Access to the Start menu by right-clicking the Microsoft Office Access desktop
shortcut and then clicking Pin to Start Menu on its shortcut menu.
Add Access to the Quick Launch toolbar on the Windows taskbar by holding down
Ctrl as you drag and drop the Microsoft Office Access desktop shortcut on to the
toolbar.
Creating and Opening Databases
When you launch Access by clicking the Start button or a desktop shortcut (but not
when you double-click an Access database file), the Getting Started with Microsoft Office
Access page appears. (See Figure 1-2.) This page is the starting point for working with
Access.
Microsoft Office Button
Figure 1-2:
The Getting
Started with
Microsoft
Office
Access
page is
where you
begin your
Access
journey.
Chapter 1: Getting Started with Access
The Getting Started with Microsoft Office Access page contains various sections and
panes that allow you to create blank databases, open existing databases, and create
databases from templates (formatted examples), either online or local.
Creating a new database
Creating a new database is a simple task. The major decision you need to make is
whether you want to
Create a new blank database (as shown in Exercise 1-3 and Exercise 1-4).
Create a new database that already contains a structure you’d like to use (as shown
in Exercise 1-5).
Blank databases
You typically use a new blank database when you want to start from scratch in creating
an Access application.
Exercise 1-3: Creating a New Blank Database from Access
In this exercise, you create a new blank database, which is a blank container that doesn’t
contain tables, queries, forms, reports, macros, or modules.
To create a new blank database, follow these steps:
1. Launch Microsoft Office Access by clicking the Start button or a desktop shortcut.
The Getting Started with Microsoft Office Access page appears.
2. Under the New Blank Database section near the top of the Access window centered
on the page, click the Blank Database icon.
The right pane in the Access window switches to the Blank Database pane.
3. Type Exercise1-3.accdb in the File Name text box.
If you don’t want to change the database’s location, skip to Step 5.
4. (Optional) If you need to change the location of the database, follow these steps:
a. Click the Folder icon to the right of the File Name text box.
The File New Database dialog box opens.
b. Navigate to a folder on your computer or network where you’d like to save
the new blank database.
c. Click OK.
The File New Database dialog box closes, and you return to the Getting
Started with Microsoft Office Access page.
5. Click the Create button underneath the File Name text box in the Blank Database
pane.
Access creates the Exercise1-3.accdb database in the specified folder and
opens the database showing Table1.
13
14
Part I: Learning Database Fundamentals
6. Click the Microsoft Office Button and click Close Database to close the new blank
database and return to the Getting Started with Microsoft Office Access page.
To show the Blank Database pane on the right side of the Getting Started with Microsoft
Office Access page, you can click the Microsoft Office Button and click New.
Exercise 1-4: Creating a New Blank Database from Explorer
In this exercise, you create a new blank database without using Access. Windows lets
you create databases right from Explorer. Follow these steps:
1. Close Microsoft Office Access and open Windows Explorer.
2. Navigate to a folder on your computer or network where you’d like to save the
new blank database.
3. Right-click a blank area in the right pane of Windows Explorer and select
New➪Microsoft Office Access 2007 Database from the pop-up menu.
A new database named New Microsoft Office Access 2007
Database.accdb appears in Windows Explorer with the database name
highlighted.
4. Rename the database Exercise1-4.accdb.
Templates
A database template provides the structure of the database (tables, queries, forms,
reports, and macros) necessary to perform common tasks. Access automatically installs
a number of templates on your computer, and you can use templates from Microsoft
Office Online.
Exercise 1-5: Creating a Database from a Local Template
In this exercise, you create a new database based on a local template, which is a template
that’s installed when you install Access. Follow these steps:
1. Launch Microsoft Office Access by clicking the Start button or a desktop shortcut.
The Getting Started with Microsoft Office Access page appears.
2. Under the Template Categories section near the top left of the Access window,
click Local Templates.
The center section of the Access window switches to the Local Templates pane
and displays a list of available templates (such as Assets, Contacts, and Events)
installed on your computer.
3. Click Tasks in the Local Templates pane.
The right section of the Access window switches to a description of the Tasks template database.
For this example, I chose the Tasks template which is used to track work items that
need to be completed, but you can choose any of the other templates (such as
Assets, Contacts, or Projects) and create a database that’s useful to you.
Chapter 1: Getting Started with Access
4. Type Exercise1-5.accdb in the File Name text box.
If you don’t want to change the database’s location, skip to Step 6.
5. (Optional) Click the Folder icon to the right of the File Name text box to change the
location of the database.
The File New Database dialog box opens. Navigate to the desired folder and click
OK to change the location of the database.
6. Make sure the Create and Link Your Database to a Windows SharePoint Services
Site check box isn’t selected.
Windows SharePoint Services lets you share your database across an intranet,
which isn’t covered in this book.
7. Click the Create button underneath the File Name text box.
Access creates the Exercise1-5.accdb database in the specified folder and
opens the database, showing the Task List form.
8. Click the Microsoft Office Button and click Close Database to close the new template database and return to the Getting Started with Microsoft Office Access page.
Exercise 1-6: Creating a Database from an Online Template
In this exercise, you create a new database based on a template from Microsoft Office
Online. (You need an active Internet connection.) Follow these steps:
1. Launch Microsoft Office Access by clicking the Start button or a desktop shortcut.
The Getting Started with Microsoft Office Access page appears.
2. Under the From Microsoft Office Online section in the left pane of the Access
window, click Personal.
The center section of the Access window switches to the Personal pane and displays a list of available templates (such as Contacts, Home Inventory, Lending
Library, and so forth) from Microsoft Office Online. It may take a few moments for
the list of templates to appear.
3. Click Nutrition in the Personal pane.
The right section of the Access window switches to a description of the Personal
template database, showing you an approximate download time and a user rating.
4. Type Exercise1-6.accdb in the File Name text box.
If you don’t want to change the database’s location, skip to Step 6.
5. (Optional) Click the Folder icon to the right of the File Name text box to change the
location of the database.
The File New Database dialog box opens. Navigate to the desired folder and click
OK to change the location of the database.
6. Make sure the Create and Link Your Database to a Windows SharePoint Services
Site check box isn’t selected.
Windows SharePoint Services lets you share your database across an intranet,
which isn’t covered in this book.
15
16
Part I: Learning Database Fundamentals
7. Click the Download button underneath the File Name text box.
Access displays a message to verify you’re running a genuine copy of Microsoft
Office.
8. Click Continue to validate your version of Microsoft Office.
Access validates your version of Office; if it’s valid, Access downloads the template
from Microsoft Office Online and creates the Exercise1-6.accdb database in the
specified folder and opens the database showing the Nutrition Tracker Startup
Screen form.
9. Click the Microsoft Office Button and click Close Database to close the new template database and return to the Getting Started with Microsoft Office Access page.
Check the From Microsoft Office Online section out regularly, as Microsoft routinely
updates this with new and revised templates.
Opening an existing database
After you create a new database — blank or from a template — and close it, you must
open it again to use it. You also need to open an existing database if someone else creates it and sends it to you.
The My Practice Databases folder on the CD-ROM (which you copied to your My
Documents folder on your hard disk) contains the database files used throughout this
book. If you haven’t copied the files to your computer yet, see Appendix A.
Exercise 1-7: Opening an Existing Database
In this exercise, you open an existing database (Exercise1-7.accdb) that you copied
from the CD-ROM.
1. Launch Microsoft Office Access by clicking the Start button or a desktop shortcut.
The Getting Started with Microsoft Office Access page appears.
2. Click the Microsoft Office Button and click Open.
The Open dialog box appears.
3. Navigate to the Documents\My Practice Databases\Chapter01 folder (or the folder
where you saved the practice files from the CD-ROM).
4. Click Exercise1-7.accdb.
5. Click Open.
Access opens the Exercise1-7.accdb database, which displays contact
information.
Chapter 1: Getting Started with Access
In addition to clicking Open under the Microsoft Office button, you should be familiar
with the following methods of opening an existing Access database:
Click a name in the Open Recent Database list on the right side of the Getting
Started with Microsoft Office Access page.
Click the More link in the Open Recent Database list on the right side of the Getting
Started with Microsoft Office Access page to show the Open dialog box.
Double-click an Access database file in any folder on any drive to which your computer has access.
Exploring the Access Interface
Microsoft Access 2007 has a newly designed user interface (UI), which is the result of
extensive research and usability testing. This user interface consists of different elements, shown in Figure 1-3.
Groups
Quick Access Toolbar
Tabs
Ribbon
Figure 1-3:
The Access
2007 user
interface.
Navigation pane
Status bar
Message bar
Help button
17
18
Part I: Learning Database Fundamentals
The Ribbon contains commands necessary to perform operations in Access. The Ribbon
is broken down into tabs that contain different groups of commands:
The Ribbon contains four standard tabs: Home, Create, External Data, and
Database Tools.
Each tab contains groups, which categorize related commands.
The Ribbon can also contain one or more contextual tabs, which appear when additional commands become available.
The Microsoft Office Button appears in the top left side of the Access window. Use the
Microsoft Office Button to create, open, close, and manage databases.
The Quick Access Toolbar appears to the right of the Microsoft Office Button by default.
You can change the location of this toolbar and customize the commands that appear.
The Navigation pane is where you access the database objects in your database. From
here, you have access to all the tables, queries, forms, reports, macros, and modules in
your application.
The Message bar appears underneath the Ribbon when special attention is needed, such
as enabling security.
The Status bar appears at the bottom of the window and displays relevant information
about the active screen element.
Using the Ribbon
The Ribbon is where you find the commands to perform most of the database operations
while working with Access. In order to successfully use the Ribbon, you need to be aware
of the different tabs and what types of commands appear on each tab.
Exercise 1-8: Using the Ribbon
In this exercise, you view the different tabs and commands on the Access Ribbon. Open
the Exercise1-8.accdb file in the Chapter01 folder and do the following:
Click the Home tab to use commands that change the view of the current object,
access the clipboard, change fonts, navigate and create records, sort and filter
data, and find specific information.
Click the Create tab to use commands that create new tables, forms, reports,
queries, macros, and modules.
Click the External Data tab to use commands that import and export data to and
from a variety of formats (Excel, Access, XML), collect data using Outlook 2007,
and move data to and from SharePoint Lists.
Click the Database Tools tab to run macros, create relationships, analyze the database, move data to SQL Server or another Access database, and other database
functions.
Chapter 1: Getting Started with Access
Using the Navigation pane
The Navigation pane is where you access the objects in your database. You can collapse
the Navigation pane so you have more room to work with the database objects. You can
also change how the objects are listed in the Navigation pane. Figure 1-4 shows a few different views in the Navigation pane.
Figure 1-4:
Different
views of the
Navigation
pane.
Exercise 1-9: Manipulating the Navigation Pane
In this exercise, you change the look of the Navigation pane. Open the Exercise1-9.
accdb file in the Chapter01 folder and do the following:
Click the Shutter Bar Open/Close button to alternate between collapsed and open
views.
Press F11 to alternate between collapsed and open views.
With the Navigation pane open, click the drop-down list icon to the left of the
Shutter Bar Open/Close button and click Object Type to list the objects by type
(tables, queries, forms, reports, macros, modules). In this view, you can
expand/collapse each section using the arrows.
Click the drop-down list icon and select Tables and Related Views to see the
objects listed by what table each object is based on.
Click the drop-down list icon and select Created Date to see the objects listed by
when they were created.
Click the drop-down list icon and select Modified Date to see the objects listed by
when they were last modified.
In each open view, click the drop-down list icon and select a different option under
Filter by Group to narrow the list of objects. This is particularly useful when your
database contains many objects.
Experiment with the different views and use whichever one works best for you. What
works in one database may not work in another.
19
20
Part I: Learning Database Fundamentals
Finding help on Access topics
Access provides help in a number of ways. You can always access the help files on your
local machine. If you have an active Internet connection, you have access to the
resources of Microsoft Office Online. The Help window (Figure 1-5) is where you browse
and search for help on different topics.
Links
Search box
Figure 1-5:
Using the
Help
window.
Online/Offline button
Exercise 1-10: Getting Help
In this exercise, you explore the different methods of getting help in Access. Open the
Exercise1-10.accdb file in the Chapter01 folder and do the following:
Click the Help button in the top right corner of the Access window (refer to
Figure 1-3) to launch the Help window.
Press F1 to launch the Help window.
In the bottom-right of the Help window, click the Online/Offline button to switch
between using local help files and online help files.
Use the Search box to find help on a specific keyword. For example, to find help
on tables, type tables in the Search box and click Search.
Browse the help by clicking the links in the main area of the Help window.