1
Safety Precaution
Read all documentations carefully before operating the equipment. Retain this manual for future
reference. Follow all instructions printed on unit for proper operation.
Do not open cover (or back cover) to reduce the risk of electric shock or fire.
RISK OF ELECTRIC SHOCK
DO NOT OPEN
There are no user serviceable parts inside. Refer servicing to qualified service
Personnel.
This symbol is used to alert the operator to the presence of important operating
instructions and precautions detailed in the documentation manual.
This symbol is used to warn operators that uninsulated dangerous voltages are
present within the products enclosure that may pose a risk of electric shock.
Warning: To avoid fire or risk of electric shock, do not expose this unit to rain or moisture.
Notes:
•
Make sure power outlets conform to the power requirements listed on the back of the unit.
•
Main voltage must be correct and the same as that printed on the rear of the unit.
•
•
•
•
Do not use the unit if the electrical cord is frayed or broken.
The unit shall not be exposed to dripping or splashing and that no objects filled with liquids,
such as vases, shall be placed on unit.
The unit shall be connected to a mains socket outlet with a protective earthing connection.
Power plug as a equipment that separate from power supply system, it must be easy to
operating.
Warning:
•
Using, adjusting or changing program control beyond this specification may cause dangerous
radiation.
•
The unit should be serviced by qualified service personnel.
•
When repairing, use only same specification parts.
Notes:
•
•
Select the voltage requirement through the voltage selector switch at the real panel.
Make sure that the power of the equipment is off and disconnected from the main voltage
before switching the voltage selector to the required setting. We will not be responsible
for damages arising from the improper installation, wiring or operation due to the fault or
negligence of the user.
Record your model and serial number here:
Model:
Serial Number:
-1-
For Your Attention
Importance:
1) Read manual----Please read through safety and operating instruction carefully before using this unit.
2) Keep manual----Please keep this manual for future reference.
3) Attach importance to warning and note----Please operate it according warning and note of manual.
4) Do it according what the manual indicates----Do it according to instruction of manual.
5) Water and moisture----Position of the unit don't close to water. e.g. close to bath, wash by tub, washtub,
water basin in kitchen, moist floor or natatorium and so on.
6) Carriage and rack----The unit ought to match carriage and rack that manufacturer recommended.
Please be careful while carriage with the unit is moving.
Sudden stop, great power and rough surface may cause combination turns over.
7) Fix on wall or ceiling----Manufacturer suggest product only be fixed on wall or ceiling .
8) Heat---- Device do not leave heat source such as radiator, stove and amplifier etc.
9) Power supply----The unit only operate with rated power supply. Please ask dealer or local power
supply company while not ensure type of power supply. If operating with batteries or other power supply,
please refer to this booklet.
10) Connecting ground or polarization----Perhaps this unit has a polarization AC plug. This plug only has a
method to be inserted. Its characteristic is safety.
11) Power cord protect----Power cord do not be trampled or be pressed.
12) Clean----Clean this unit with a soft cloth. Prevent water to enter into inner.
13) For device with AC power cord, check AC plug sheet and all of exposed metal parts with ohmmeter
before using, and resistance ought to be more than 100K ohm.
14) Stop period ---- Unplug the power cord if the unit is not used for a long time.
15) Prevent solid and liquid to enter into unit----8e carefully, do not fall solid or spatter liquid at hole of unit.
16) Mangle for repair----If cause following case, refer to qualified service personnel:
A) Power cord or plug mangle; or
8) Inside of unit have falling solid or liquid; or
C) The unit be rained; or
D) Device do not work; or
E) The unit be fallen, or cover be mangle.
17) Repair----User do not repair unit except operating to depend on manual instruction. All of above
symptoms should refer to qualified service personnel.
18) Ventilation----Function of cover's interval and hole is ventilation. It ensure operating reliability and
prevent to overheat. Do not cover this hole absolutely. Do not place unit on bed, blanket, sofa or
similar object's surface. Do not place unit in object's inner, such as bookcase's inner, Shelfs inner etc.
19) Accessories----Not use parts that manufactory do not recommend in order to avoid damage.
20) Auxiliary equipment----Do not place this unit on unstable vehicle, shelf, tripod or table. It will cause
serious harm to child or adult if the unit be fallen. Please use the vehicle, shelf, tripod or table that
manufactory recommend.
21) Preventing thunderbolt----Add preventing thunderbolt equipment, or if the unit is not used for a long
time, unplug the power cord.
22) Replace parts----If the unit require replacing part, you must replace with manufactory recommend,
or same characteristic part.
23) Safety check----After repairing, repairer must test the unit for security.
-2-
Note On Use
Allow for sufficient heat dispersion when installed on a rack.
1) H andle the power cord carefully.
H old the plug when unplugging the cord.
2) Keep the set free from moisture, water and dust.
3) Unplug the power cord when not using the set for long periods of time.
4) Do not obstruct the ventilation holes.(For sets with ventilation holes.)
5) Do not let foreign objects in the set.
6) Do not let insecticides, benzene, and thinner come in contact with the set.
-3-
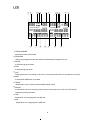
Front Panel
o
o
o
o
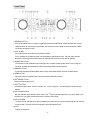
1) SEARCH BUTTON
After press search button, turning the jog wheel forwards and backwards, several forward and reverse
speed positions for searching through tracks. The more you turn the wheel in either direction the faster
you search through the music.
2) JOG WH EEL
Use it perform pitch bend, search and scratch function.
Turn it clockwise to increase the pitch or anticlockwise to decrease the pitch. The pitch bend function
allows the positioning of the bass beats to be matched after the pitch of each disc is matched.
3) SCRATCH BUTTON
The scratch function resembles the scratching with a turntable. Press scratch button, then turning the
jog wheel forwards and backwards, different scratching effects can be produced.-
4) BRAKE BUTTON
This button simulates turntable platter stops quickly. Press brake button To active the brake effect.
5) BPM BUTTON
Press this button to set BPM mode, press it and hold 3 seconds to cancel.
6) REV ERSE BUTTON
Press it to reverse play music.
7) PITCH BUTTON
Activates the pitch slider. Press it to select 6% , 12 % or 18% pitch. The indicator will indicate the pitch
setting.
8) PITCH INDICATORS
6% pitch indicator lights while 6% pitch mode is set. 12 %pitch indicator lights while 12% pitch mode is set.
Both 6% and 12 % pitch indicators light while 18% pitch mode is set.
9) PITCH SLIDER
The pitch can be changed up to 18% by pressing the pitch button so the pitch indicator lights, then moving
the pitch slider. The pitch will not be changed if the pitch indicator is off.
10) LCD
Display all functions.
-4-
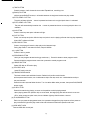
11) TIME BUTTON
Press this button, it will choose the time mode: Elapsed time, remaining time.
12) SINGLE BUTTON
While execute SINGLE function, it will switch between the single and continuous play modes.
13) PITCH BEND - BUTTON
The pitch will drop while the - button is pressed and return to the original pitch when it is released.
14) PITCH BEND + BUTTON
The pitch will automatically rise when the
+
button is pressed and return to the original pitch when it is
released.
15) IN BUTTON
Press it to set loop start point. Indicator will light.
16) OUT BUTTON
Press it to set loop end point. After the loop end point is set, the playing will enter the loop play repeatedly.
IN and OUT indicator will flash.
17) RELOOP BUTTON
Press it, the playing will enter the loop play on the lastsave loop.
During loop mode, if use search function, loop will disable.
18) + 10 BUTTON
Press it to add 10 tracks.
19) PROGRAM BUTTON
Use it you can program several tracks (20 tracks max.) . Press this button to enter program mode.
Press and hold the program button more than 5 second to cancel program mode.
20) USB/SO BUTTON
Select USB disk or SO card to play.
21) SO CARD JACK
Insert SO card in this slot.
22) TRACK/FOLDER KNOB
This knob include track and folder function. Default it will perform track function.
While execute track function, turn it clockwise to skip to the next track, turn it anticlockwise to skip to
the previous track.
Press this knob to execute folder function. Turn it to select folder what you want, then press PLAY/PAUSE
button to play.
23) CUE BUTTON
Press this button during playing to return to the position at which playing started.
When playing starts from pause or skip to a new track, the begin play point will be set to the new cue
point. When a new cue point is set, the cue indicator lights by flash for about 1 second.
24) PLAY/PAUSE BUTTON
Each time you press the play/pause button, the operation changes from play to pause or from pause to
play. Indicator will light while play mode is set and indicator will flash while pause mode is set.
25) USB INPUT JACK
Connect USB disk via this jack.
-5-
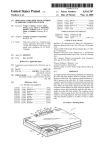
2
6
PROGRAM
�I!
!18.8
88.8
TRACK SINGLE USB SD
O
��:�� 88:88:88F
,I, ",!!!!!tl \\\
12
PITCH BPM
PROGRAM
PiTCH BPM
8 8.8
TRACK SINGLE USB SO
11
7
+'
1-8
. 8J_
��:��O 88:88:88F
GD """,n!!!!\\\\\
::::: ::::: ::::: ::::: :::: ::::: ::: : ::::: ::::: ::::: ::::: ::::: ::::: ::::: ::::: :::::
E:::: a:::: a:::: HE:: HE: HE:: ::: : a:::: :E::: :E::: a:::: EaSE: EE::: EE::: EE::: EE:::
::::: ::::: ::::: ::::: :::: ::::: ::: : ::::: ::::: ::::: ::::: ::::: ::::: ::::: ::::: :::::
13
14
15
16
17
18
19
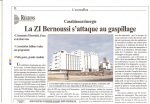
1) TRACK NUMBER
Shows the current track number.
2) PROGRAM
Used for pre-programming the track order to automatically be played by the unit.
3) PAUSE
It shows during pause mode.
4) PLAY
It shows during play mode.
5) CUE
Flashing when the unit is setting a cue point. Lit continuously when the unit is paused at a cue point.
6) BPM
It shows when BPM button is pressed.
7) TRACK
Shows when unit is in track list mode instead of folder mode.
8) SINGLE
It shows when the unit is set to play just on track at a time. When this is not lit, the CO will play
continuously through ali tracks.
9) USB
Shows when unit is playing track via USB disk.
10) SO
Shows when unit is playing track via SD card.
-6-
11) PITCH VALUE
Shows the percentage change in pitch.
12) LOOP
Indicates when loop is actively playing.
13) MP3
Shows when unit is playing a MP3 file.
14) MINUTES
Shows the minutes elapsed or remaining depending on mode setting.
15) SECONDS
Shows the seconds elapsed or remaining depending on mode setting.
16) FRAMES
Shows the frames elapsed or remaining depending on mode setting.
17) TIME MODE
(Elapsed) is for showing time as it is taking place. (Remain) shows how much time is left on a particular
track.
18) MATRIX DISPLAY
Displays track tag information.
19) TIME BAR
It provides a visual display of the approximate position of the pickup within the current track.
-
7
-
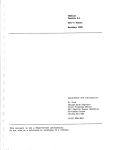
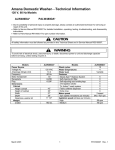
Rear Panel
{)'
{)'
°
00
RIGHT
AU
=
0
LE�
U 2
GON fUll
'"
START
1
NIT
{)'
°
00
CONTROL
AUDID
START UNIT 1
RIGHT
MADE IN CHINA
LE�
2
o
��
_
A
3
!�
C
ill
-
'='
4
1) AUDIO CONNECTORS
Connect your CD player to your mixer from this line level output.
2) AUTO START CONNECTORS
Use this connector to plug into your fader start-compatible mixer. You can remotely control CD player via
a fader start function mixer. Please note that these jacks must never be connected with any voltage.
3) DC INPUT
Input connection for the included DC adaptor.
NOTE: Use specified attached DC adaptor only.
4) POWER SWITCH
Turn on or off this unit.
D/ A converter------------------------------------------------------------------------------------------------------------------ 2 4 bits
Fre quency response------------------------------------------------------------------------------------------------20 H z-2 0 KH z
H arm0nic distorti0n-------------------------------------------------------------------------------------------------------------0. 10/0
Signa1/n0ise rati0----------------------------------------------------------------------------------------------------------- (-85 dB)
Cross ta I k ------------- ----------------------- ------------------------------------------------------------------------------- (-8 5 dB)
-
-
-
Output level-------------------------------------------------------------------------------------------------------------------------2 V
Load impedance-------------------------------------------------------------------------------------------more than 47 Kohms
Speed edge(pitch)---------------------------------------- --------------------------------------------------------------
-
-
(+/- 18 %)
Power supply------------------------------------------------------------------------------------------------ 100-240V AC 15W
Dimensions(WxHxD) ---------------------------------------------------------------- 482 x 89 x 105 mm 2 U Rack mount
Weight ---------------------------------------------------------------------------------------------------------------- 3.51 bs/ 1 .6 kgs
Specifications and design are subject to change without notice for purpose of improvement.
-8-
IMPORTANT: PACK CAREFULLY
IN ORIGINAL CARTON IF POSSIBLE. WE ARE NOT
RESPONSIBLE FOR DAMAGE INCURRED IN RETURNING ITEMS FOR REPAIR.
A
LETTER
STATING YOUR EXACT STREET ADORES, DAYTIME PHONE NUMBER, AND THE PROBLEM
YOU ARE EXPERIENCING SHOULD BE INCLUDED.
You MUST
ALSO ENCLOSE A COPY
OF THE ORIGINAL RECEIPT A 5PROOF OF DATE OF PURCHASE
I
•
•
,
r
•
PYLE SERVICE CENTER
1600 63RD STREET
BROOKLYN, NY 11204
1-80()..444-5671