1
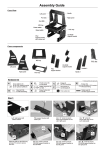
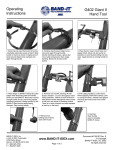
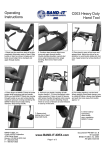
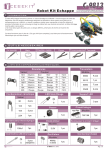
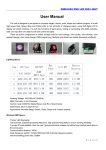
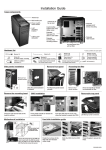
Assembly Guide
Case View
Handle
Right panel
Left panel
PCI slots
M/B tray
Power switch
Reset switch
5.25”device
support bracket
3.5” HDD cage
Removable
3.5” HDD bracket
Foot cushion
PSU
support bracket
with rubber pad
PSU tray
Case components
Handle
Handle bracket
5.25”device
support bracket
M/B tray
3.5” HDD cage
Left panel
Right panel
2.5” HDD bracket
Removable
3.5” HDD bracket
PSU
support bracket
with rubber pad
Bottom panel
PSU tray
PCI slots
Hardware list
A
Screw 3x6mm (6)
(4) for PSU support bracket
(2) for optional (USB3.0)
G
Stand off (20)
for M/B assembling
K
Screw (12)
for HDD
Bottom panel with
rubber cushion
Use “ A “ screw to secure
PSU support bracket on the
right panel
Place the “ I / J “ screw/spring on
the bottom panel fix points
C
Screw (4)
for PSU mounting
E
Rubber ring (12)
for HDD
F
Hex wrench (1)
for M/B stand-off
H
Screw 3x4mm (17)
for handle
I
Screw (2)
for bottom panel
B
Thumb screw (14)
Foot cushion (4)
PSU support bracket with
rubber pad
Use “ A “ screw to secure
PSU support bracket on the
bottom panel
D
J
Screw (43)
for CD-ROM / PCI bracket /
M/B assembling
Spring (2)
for bottom panel
Rubber pad (2)
for PSU support bracket
Use “ H “ screw to secure
bottom panel on the right panel
Use “ H “ screw to secure
bottom panel on the left panel
Use “ B “ screw to secure
PSU tray on the L/R panel, and “H”
screw to secure bottom panel
Place the PSU on the PSU tray, and
use “C” screw to secure the PSU.
Place the “ E “ rubber ring on the
Place the HDD into the HDD cage,
HDD cage fix points, and use” H “screw and use “ K “ screw to secure
to secure removable 3.5” HDD bracket
on the 3.5” HDD cage
Slide the HDD cage into the bottom
panel, and use “ B ” screw to secure
C50.T6000.00-1
Use “ D “ screw to secure
CD-ROM support bracket on
the CD-ROM
Place the CD-ROM below the M/B
tray, and use “ D ” screw to secure
Place the 2.5” HDD bracket on the
M/B tray, and use “ D ” screw to
secure
Place the HDD on the 2.5” HDD
bracket, and use “ D ” screw to secure
Place the “ G ”(stand-off 20pcs)
on the M/B tray fix points.
Tool: “ F “(Hex wrench)
Secure the PCI slots bracket on the M/B tray with “ D ” screw 6pcs
Use “ B “ screw to secure
M/B tray on the left/right panel
Place the M/B on the stand-off and
fastened by the ”D” screws
ATTENTION
You can adjust the height of M/B
by using “ G ”(stand-off 9pcs)
Assemble handle1 and handle 2
altogether
Fasten “ H ” screw
Combine L/R panel with “B” screw.
OPTION KITS:
Optional
Optional
Multi-Media I/O Ports
Upgrade Kit (USB3.0)
120mm /140mm fan Cooler
C50.T6000.00-2