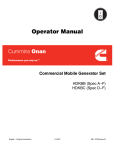
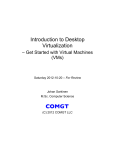
1
AL RI Part 1 MA TE Starting Out with Ubuntu Chapter 1: W hat Is Ubuntu? D Chapter 2: Playing with the LiveCD TE Chapter 3: Installing Ubuntu CO PY RI GH Chapter 4: Exploring the Desktop What is Ubuntu? Secrets in This Chapter The Linux Kernel The GNU Utilities The Linux Desktop Environments Linux Distributions Ubuntu Linux Chapter 1 4 Part 1: Starting Out with Ubuntu O ne of the most confusing features of Linux is the concept of a distribution. Many novice Linux users get confused about what a distribution is and why there are so many of them. Before diving into the world of Ubuntu, it often helps to have an understanding of what Linux is and how it relates to Ubuntu. This will help you understand where Ubuntu came from, and you’ll have a better idea of which flavor of Ubuntu is right for you. With that in mind, this chapter explains what Linux and Linux distributions are, then it explains the pieces that specifically make up the Ubuntu Linux distribution. It finishes by walking through different Ubuntu distributions and discussing what each provides. What Is Linux? If Ubuntu is your first experience with Linux, you may be confused about why there are so many different versions of it. I’m sure you have heard various terms such as “distribution,” “LiveCD,” and “GNU” when looking at Linux packages—and have been confused. Trying to wade through the world of Linux for the first time can be a tricky experience. Even for experienced Linux users, trying to figure out the features that distinguish different distributions can be tricky. This section walks through exactly what Linux is and describes each of its components. For starters, there are four main parts of a Linux system: ♦♦ The Linux kernel ♦♦ The GNU utilities ♦♦ Windows management software ♦♦ Application software Each of these four parts has a specific job in the Linux system. However, each of the parts by itself isn’t very useful. You need all of them in one package to have a Linux system. Figure 1-1 shows a basic diagram of how the parts fit together to create the overall Linux system. This section describes these four main parts in detail and gives you an overview of how they work together to create a complete Linux system. The Linux Kernel The core of the Linux system is the kernel. The kernel controls all of the hardware and software on the computer system, allocating hardware when necessary, and executing software when required. If you’ve been following the Linux world at all, no doubt you’ve heard the name Linus Torvalds. Linus is the person responsible for creating the first Linux kernel software, when he was a student at the University of Helsinki. He intended it to be a copy of the UNIX system, at the time a popular operating system used at many universities. After developing the Linux kernel, Linus released it to the Internet community and solicited suggestions for improving it. This simple process started a revolution in the world of computer operating systems. Soon Linus was receiving suggestions from students as well as professional programmers from around the world. Chapter 1: What is Ubuntu? 5 Application Software Windows Management Software GNU System Utilities Linux kernel computer hardware Figure 1-1: The Linux system. Allowing anyone to change programming code in the kernel would result in complete chaos. Therefore, to simplify things, Linus acted as a central point for all improvement suggestions. It was ultimately Linus’s decision whether or not to incorporate suggested code in the kernel. This same concept is still in place with the Linux kernel code, except instead of Linus controlling the kernel code alone, a team of developers has taken on the task. The kernel is primarily responsible for four main functions: ♦♦ System memory management ♦♦ Software program management ♦♦ Hardware management ♦♦ Filesystem management The following sections explore each of these functions in more detail. System Memory Management One of the primary functions of the operating system kernel is memory management. Not only does the kernel manage the physical memory available on the server, it can also create and manage virtual memory, or memory that does not actually exist. It does this by using space on the hard disk, called the swap space. The kernel swaps the contents of virtual memory locations back and forth from the swap space to the actual physical memory. This process allows the system to think there is more memory available than what physically exists (as shown in Figure 1-2). 6 Part 1: Starting Out with Ubuntu Virtual Memory PhysicalMemory Swap Space The Kernel Figure 1-2: The Linux system memory usage. The memory locations are grouped into blocks called pages. The kernel locates each page of memory in either the physical memory or the swap space. It then maintains a table of the memory pages that indicates which pages are in physical memory and which pages are swapped out to disk. The kernel keeps track of which memory pages are in use and automatically copies memory pages that have not been accessed for a period of time to the swap space area (called swapping out). When a program wants to access a memory page that has been swapped out, the kernel must make room for it in physical memory by swapping out a different memory page and swap in the required page from the swap space. Obviously, this process takes time, and it can slow down a running process. The process of swapping out memory pages for running applications continues for as long as the Linux system is running. You can see the current status of the memory on a Ubuntu system by using the System Monitor utility, as shown in Figure 1-3. The Memory graph shows that this Linux system has 380.5 MB of physical memory. It also shows that about 148.3 MB is currently being used. The next line shows that there is about 235.3 MB of swap space memory available on this system, with none in use at the time. By default, each process running on the Linux system has its own private memory pages. One process cannot access memory pages being used by another process. The kernel maintains its own memory areas. For security purposes, no processes can access memory used by the kernel processes. Each individual user on the system also has a private memory area used for handling any applications the user starts. Often, however, related applications run that must communicate with each other. One way to do this is through data sharing. To facilitate data sharing, you can create shared memory pages. Chapter 1: What is Ubuntu? 7 Figure 1-3: The Ubuntu System Monitor utility, showing the current memory usage. A shared memory page allows multiple processes to read and write to the same shared memory area. The kernel maintains and administers the shared memory areas, controlling which processes are allowed access to the shared area. The special ipcs command allows us to view the current shared memory pages on the system. Here’s the output from a sample ipcs command: test@testbox:~$ ipcs -m ------ Shared Memory Segments -------key shmid owner perms bytes nattch status 0x00000000 557056 test 600 393216 2 dest 0x00000000 589825 test 600 393216 2 dest 0x00000000 622594 test 600 393216 2 dest 0x00000000 655363 test 600 393216 2 dest 0x00000000 688132 test 600 393216 2 dest 0x00000000 720901 test 600 196608 2 dest 0x00000000 753670 test 600 393216 2 dest 0x00000000 1212423 test 600 393216 2 dest 0x00000000 819208 test 600 196608 2 dest 0x00000000 851977 test 600 393216 2 dest 0x00000000 1179658 test 600 393216 2 dest 0x00000000 1245195 test 600 196608 2 dest 0x00000000 1277964 test 600 16384 2 dest 0x00000000 1441805 test 600 393216 2 dest test@testbox:~$ 8 Part 1: Starting Out with Ubuntu Each shared memory segment has an owner that created the segment. Each segment also has a standard Linux permissions setting that sets the availability of the segment for other users. The key value is used to allow other users to gain access to the shared memory segment. Software Program Management The Linux operating system calls a running program a process. A process can run in the foreground, displaying output on a display, or it can run in the background, behind the scenes. The kernel controls how the Linux system manages all the processes running on the system. The kernel creates the first process, called the init process, to start all other processes on the system. When the kernel starts, it loads the init process into virtual memory. As the kernel starts each additional process, it allocates to it a unique area in virtual memory to store the data and code that the process uses. Most Linux implementations contain a table (or tables) of processes that start automatically on boot-up. This table is often located in the special file /etc/inittabs. However, the Ubuntu Linux system uses a slightly different format, storing multiple table files in the /etc/event.d folder by default. The Linux operating system uses an init system that utilizes run levels. A run level can be used to direct the init process to run only certain types of processes, as defined in the /etc/inittabs file or the files in the /etc/event.d folder. There are seven init run levels in the Linux operating system. Level 0 is for when the system is halted, and level 6 is for when the system is rebooting. Levels 1 through 5 manage the Linux system while it’s operating. At run level 1, only the basic system processes are started, along with one console terminal process. This is called Single User mode. Single User mode is most often used for emergency filesystem maintenance when something is broken. Obviously, in this mode only one person (usually the administrator) can log into the system to manipulate data. The standard init run level is 3. At this run level most application software, such as network support software, is started. Another popular run level in Linux is 5. This is the run level where the system starts the graphical X Window software and allows you to log in using a graphical desktop window. The Linux system can control the overall system functionality by controlling the init run level. By changing the run level from 3 to 5, the system can change from a console-based system to an advanced, graphical X Window system. Later on, in Chapter 19, “The Command Line,” you’ll see how to use the ps command to view the processes currently running on the Ubuntu system. Here are a few lines extracted from the output of the ps command: test@testbox~$ ps ax PID TTY STAT TIME COMMAND 1 ? Ss 0:01 /sbin/init 2 ? S< 0:00 [kthreadd] 3 ? S< 0:00 [migration/0] 4 ? S< 0:00 [ksoftirqd/0] 5 ? S< 0:00 [watchdog/0] 4708 ? S< 0:00 [krfcommd] Chapter 1: What is Ubuntu? 4759 4761 4814 4832 4920 5417 5425 5426 5437 5451 5632 5638 5642 6319 6321 6322 6343 6385 $ 9 ? Ss 0:00 /usr/sbin/gdm ? S 0:00 /usr/sbin/gdm ? Ss 0:00 /usr/sbin/atd ? Ss 0:00 /usr/sbin/cron tty1 Ss+ 0:00 /sbin/getty 38400 tty1 ? Sl 0:01 gnome-settings-daemon ? S 0:00 /usr/bin/pulseaudio --log-target=syslog ? S 0:00 /usr/lib/pulseaudio/pulse/gconf-helper ? S 0:00 /usr/lib/gvfs/gvfsd ? S 0:05 gnome-panel --sm-client-id default1 ? Sl 0:34 gnome-system-monitor ? S 0:00 /usr/lib/gnome-vfs-2.0/gnome-vfs-daemon ? S 0:09 gimp-2.4 ? Sl 0:01 gnome-terminal ? S 0:00 gnome-pty-helper pts/0 Rs 0:00 bash ? S 0:01 gedit pts/0 R+ 0:00 ps ax The first column in the output shows the process ID (or PID) of the process. Notice that the first process is our friend, the init process, which is assigned PID 1 by the Ubuntu system. All other processes that start after the init process are assigned PIDs in numerical order. No two processes can have the same PID. The third column shows the current status of the process. The first letter represents the state the process is in (S for sleeping, R for running). The process name is shown in the last column. Processes that are in brackets have been swapped out of memory to the disk swap space due to inactivity. You can see that some of the processes have been swapped out, but the running processes have not. Hardware Management Still another responsibility for the kernel is hardware management. Any device that the Linux system must communicate with needs driver code inside the kernel code. The driver code allows the kernel to pass data back and forth to the device, acting as a intermediary between applications and the hardware. Two methods are used for inserting device driver code in the Linux kernel: ♦♦ Drivers compiled in the kernel ♦♦ Driver modules added to the kernel Previously, the only way to insert a device driver code was to recompile the kernel. Each time you added a new device to the system, you had to recompile the kernel code. This process became even more inefficient as Linux kernels supported more hardware. Fortunately, Linux developers devised a better method to insert driver code into the running kernel. Programmers developed the concept of kernel modules to allow you to insert driver code into a running kernel without having to recompile the kernel. Also, a kernel module can be removed from the kernel when the device is finished being used. This improvement greatly simplified and expanded the use of hardware with Linux. 10 Part 1: Starting Out with Ubuntu The Linux system identifies hardware devices as special files, called device files. There are three classifications of device files: ♦♦ Character ♦♦ Block ♦♦ Network Character device files are for devices that can handle data only one character at a time. Most types of modems and terminals are created as character files. Block files are for devices that can handle data in large blocks at a time, such as disk drives. The network file types are used for devices that use packets to send and receive data. These devices include network cards and a special loopback mechanism that allows the Linux system to communicate with itself using common network programming protocols. Linux creates special files, called nodes, for each device on the system. All communication with the device is performed through the device node. Each node has a unique number pair that identifies it to the Linux kernel. The number pair includes a major and a minor device number. Similar devices are grouped into the same major device number. The minor device number is used to identify a specific device within the major device group. This is an example of device files on a Linux server: test@testbox~$ ls brw-rw---- 1 root brw-rw---- 1 root brw-rw---- 1 root brw-rw---- 1 root test@testbox~$ ls crw-rw---- 1 root crw-rw---- 1 root crw-rw---- 1 root crw-rw---- 1 root test@testbox~$ -al sda* disk 8, 0 2008-05-07 11:42 /dev/sda disk 8, 1 2008-05-07 11:42 /dev/sda1 disk 8, 2 2008-05-07 11:42 /dev/sda2 disk 8, 5 2008-05-07 11:42 /dev/sda5 -al ttyS* dialout 4, 64 2008-05-07 11:42 /dev/ttyS0 dialout 4, 65 2008-05-07 11:42 /dev/ttyS1 dialout 4, 66 2008-05-07 11:42 /dev/ttyS2 dialout 4, 67 2008-05-07 11:42 /dev/ttyS3 The sda device is the first SCSI hard drive, and the ttyS devices are the standard IBM-PC COM ports. The list shows all of the sda devices that were created on the sample Ubuntu system. Similarly, the list shows all of the ttyS devices created. The fifth column is the major device node number. Notice that all of the sda devices have the same major device node, 8, while all of the ttyS devices use 4. The sixth column is the minor device node number. Each device within a major number has a unique minor device node number. The first column indicates the permissions for the device file. The first character of the permissions indicates the type of file. Notice that the SCSI hard drive files are all marked as block (b) device, while the COM port device files are marked as character (c) devices. Filesystem Management Unlike some other operating systems, the Linux kernel can support different types of filesystems to read and write data to hard drives. Besides having over a dozen filesystems of its own, Linux can read and write to filesystems used by other operating systems, such as Microsoft Windows. The kernel must be compiled with support for all types of filesystems that the system will use. Table 1-1 lists the standard filesystems that a Linux system can use to read and write data. Chapter 1: What is Ubuntu? 11 Table 1-1: Linux Filesystems Filesystem Description ext Linux Extended filesystem—the original Linux filesystem ext2 Second extended filesystem; provided advanced features over ext ext3 Third extended filesystem; supports journaling hpfs OS/2 high-performance filesystem jfs IBM’s journaling file system iso9660 ISO 9660 filesystem (CD-ROMs) minix MINIX filesystem msdos Microsoft FAT16 ncp Netware filesystem nfs Network filesystem ntfs Support for Microsoft NT filesystem proc Access to system information reiserFS Advanced Linux filesystem for better performance and disk recovery smb Samba SMB filesystem for network access sysv Older UNIX filesystem ufs BSD filesystem umsdos UNIX-like filesystem that resides on top of MS-DOS vfat Windows 95 filesystem (FAT32) xfs High-performance 64-bit journaling filesystem Any hard drive that a UNIX server accesses must be formatted using one of the filesystem types listed in Table 1-1. The Linux kernel interfaces with each filesystem using the virtual file system (VFS), which provides a standard interface for the kernel to communicate with any type of filesystem. VFS caches information in memory as each filesystem is mounted and used. The GNU Utilities Besides having a kernel to control hardware devices, a computer operating system needs utilities to perform standard functions, such as controlling files and programs. Although Linus Torvalds created the Linux system kernel, he had no system utilities to run on it. Fortunately for him, at the same time he was working, a group of people were working together on the Internet trying to develop a standard set of computer system utilities that mimicked the popular UNIX operating system. 12 Part 1: Starting Out with Ubuntu The GNU organization (GNU stands for GNUs Not UNIX) developed a complete set of UNIX utilities but had no kernel system to run them on. These utilities were developed under a software philosophy called open-source software (OSS). The concept of OSS allows programmers to develop software and release it to the world with no licensing fees attached. Anyone can use the software, modify it, or incorporate it into his or her own system without having to pay a license fee. Uniting Linus’s Linux kernel with the GNU operating system utilities created a complete, functional, free operating system. Although the bundling of the Linux kernel and GNU utilities is often just called Linux, you will see some Linux purists on the Internet refer to it as the GNU/ Linux system to give credit to the GNU organization for its contributions to the cause. The Core GNU Utilities The GNU project was mainly designed for UNIX system administrators to have a UNIXlike environment available. This focus resulted in the project porting many common UNIX system command line utilities. The core bundle of utilities supplied for Linux systems is called the coreutils package. The GNU coreutils package consists of three parts: ♦♦ Utilities for handling files ♦♦ Utilities for manipulating text ♦♦ Utilities for managing processes These three groups of utilities each contain several utility programs that are invaluable to the Linux system administrator and programmer. The Shell The GNU/Linux shell is a special interactive utility. It provides a way for users to start programs, manage files on the filesystem, and manage processes running on the Linux system. The core of the shell is the command prompt. The command prompt is the interactive part of the shell. It allows you to enter text commands, then it interprets the commands and executes them in the kernel. The shell contains a set of internal commands that you use to control things such as copying files, moving files, renaming files, displaying the programs currently running on the system, and stopping programs running on the system. Besides the internal commands, the shell also allows you to enter the name of a program at the command prompt. The shell passes the program name off to the kernel to start it. There are quite a few Linux shells available to use on a Linux system. Different shells have different characteristics; some are more useful for creating scripts, and some are more useful for managing processes. The default shell used in all Linux distributions is the bash shell. Chapter 1: What is Ubuntu? 13 The bash shell was developed by the GNU project as a replacement for the standard UNIX shell, called the Bourne shell (after its creator, Stephen Bourne). The bash shell name is a play on this wording, referred to as the Bourne-again shell. Besides the bash shell there are several other popular shells that Ubuntu supports. Table 1-2 lists the more popular shells available in Ubuntu. Table 1-2: Linux Shells Shell Description ash A simple, lightweight shell that runs in low-memory environments but has full compatibility with the bash shell korn A programming shell compatible with the Bourne shell, but supporting advanced programming features such as associative arrays and floating-point arithmetic tcsh A shell that incorporates elements from the C programming language into shell scripts zsh An advanced shell that incorporates features from bash, tcsh, and korn, providing advanced programming features, shared history files, and themed prompts Most Linux distributions include more than one shell, although usually they pick one of them as the default. Ubuntu installs only the bash shell by default, but the others are available to download and install (see Chapter 13, “Software Installs and Updates”). The Linux Desktop Environment In the early days of Linux (the early 1990s), all that was available was a simple text interface to the Linux operating system. This text interface allowed administrators to start programs, control program operations, and move files around on the system. With the popularity of Microsoft Windows, computer users expected more than the old text interface to work with. This expectation spurred more development in the OSS community, and the advent of Linux graphical desktops emerged. Linux is famous for being able to do things more than one way, and no place is this feature more relevant than graphical desktops. You can choose from a plethora of graphical desktops in Linux. The following sections describe a few of the more popular ones. The X Windows System There are two basic elements that control your video environment—the video card in your PC and your monitor. To display fancy graphics on your computer, the Linux software needs to know how to talk to both of them. The X Windows software is the core element in presenting graphics. The X Windows software is a low-level program that works directly with the video card and monitor in the PC. It controls how Linux applications can present fancy windows and graphics on your computer. Linux isn’t the only operating system that uses X Windows; there are versions written for many different operating systems. In the Linux world, only two software packages can implement X Windows. 14 Part 1: Starting Out with Ubuntu The XFree86 software package is the older of the two, and for a long time it was the only X Windows package available for Linux. As its name implies, it’s a free, open-source version of the X Windows software. Recently, a new package called X.org has come onto the Linux scene. It too provides an open-source software implementation of the X Windows system. It is becoming increasingly popular, and many Linux distributions are starting to use it instead of the older XFree86 system. Ubuntu uses the X.org package to implement the X Windows system. Both packages work the same way in controlling how Linux uses your video card to display content on your monitor. To do that, they have to be configured for your specific system. That is supposed to happen automatically when you install Linux. When you first install Ubuntu, it attempts to detect your video card and monitor, then creates an X Windows configuration file that contains the required information. During installation you may notice a time when the installation program scans your monitor for supported video modes. Sometimes this causes your monitor to go blank for a few seconds. Because many different types of video cards and monitors are out there, this process can take a little while to complete. Unfortunately, sometimes the installation can’t autodetect what video settings to use, especially with some of the newer, more complicated video cards, and some Linux distributions will fail to install if they can’t find your specific video card settings. Others will ask a few questions during installation to help manually gather the necessary information. Still others default to the lowest common denominator and produce a screen image that is not customized for your video environment. To complicate matters more, many PC users have fancy video cards, such as 3-D accelerator cards, so that they can play high-resolution games. In the past, these video cards caused a lot of problems if you tried to install Linux. But lately, video card companies are helping to solve this problem by providing Linux drivers, and many customized Linux distributions now include drivers for specialty video cards. The core X Windows software produces a graphical display environment but nothing else. While this is fine for running individual applications, it is not too useful for day-to-day computer use. There is no desktop environment to allow users to manipulate files or launch programs. To do that, you need a desktop environment on top of the X Windows system software. The GNOME Desktop The GNU Network Object Model Environment (GNOME) is the default desktop environment used in Ubuntu. First released in 1999, GNOME has become the default desktop environment for many other Linux distributions (including the popular Red Hat commercial Linux distribution). Although GNOME chose to depart from the standard Microsoft Windows look and feel, it incorporates many features that most Windows users are comfortable with: ♦♦ A desktop area for icons ♦♦ Two panel areas ♦♦ Drag and drop capabilities Chapter 1: What is Ubuntu? 15 Figure 1-4 shows the standard GNOME desktop used in Ubuntu. Figure 1-4: The default GNOME desktop in Ubuntu 8.10. GNOME developers have produced a host of graphical applications that integrate with the GNOME desktop. These applications are shown in Table 1-3. Table 1-3: GNOME Applications Application Description epiphany Web browser evince Document viewer gcalc-tool Calculator gedit GNOME text editor gnome-panel Desktop panel for launching applications gnome-nettool Network diagnostics tool gnome-terminal Terminal emulator nautilus Graphical file manager nautilus-cd-burner CD-burning tool sound juicer Audio CD-ripping tool tomboy Note-taking software totem Multimedia player 16 Part 1: Starting Out with Ubuntu As you can see, quite a few applications are available for the GNOME desktop. Some of these applications are included in Ubuntu by default, while others you have to install from the Ubuntu repository. Besides all of these applications, other Linux applications use the GNOME library to create Windows-based applications that run on the GNOME desktop. The KDE Desktop The K Desktop Environment (KDE) was first released in 1996 as an open-source project to produce a graphical desktop similar to the Microsoft Windows environment. The KDE desktop incorporates all of the features you are probably familiar with if you are a Microsoft Windows user. Figure 1-5 shows a sample KDE desktop running on Kubuntu Linux. Figure 1-5: The default KDE desktop in Kubuntu 8.10. Just like in Microsoft Windows, the KDE desktop allows you to place application and file icons on the desktop area. Unlike Windows, if you single-click an application icon, the KDE system starts the application. If you single-click on a file icon, the KDE desktop attempts to determine what application to start to handle the file. The bar at the bottom of the desktop is called the panel. The panel consists of four parts: ♦♦ The K menu: similar to the Windows Start menu; contains links to start installed applications ♦♦ Program shortcuts: quick links to start applications directly from the panel ♦♦ The taskbar: shows icons for applications currently running on the desktop ♦♦ Applets: small applications that have an icon in the panel that often can change depending on information from the application Chapter 1: What is Ubuntu? 17 All of the panel features are similar to what you would find in Microsoft Windows. Besides the desktop features, the KDE project has produced a wide assortment of applications that run in the KDE environment. These applications are shown in Table 1-4. Table 1-4: KDE Applications Application Description amaroK Audio file player digiKam Digital camera software K3b CD-burning software Kaffeine Video player Kmail Email client Koffice Office applications suite Konqueror File and web browser Kontact Personal information manager Kopete Instant messaging client You may notice the trend of using a capital K in KDE application names. This is only a partial list of applications produced by the KDE project. Many more applications are part of the KDE project. Similar to the GNOME environment, Kubuntu doesn’t include all of the KDE project software by default, but you can easily install anything using the software repository. Other Desktops The downside to a fancy graphical desktop environment is that it requires a fair amount of system resources to operate properly. In the early days of Linux, a hallmark and selling feature of Linux was its ability to operate on older, less powerful PCs that the newer Microsoft desktop products couldn’t run on. However, with the popularity of KDE and GNOME desktops, this hallmark has changed, and it can take almost as much memory to run a KDE or GNOME desktop as the latest Microsoft desktop environment (the minimum requirements for Ubuntu is 384 MB of memory). If you have an older PC, don’t be discouraged. The Linux developers have banded together to take Linux back to its roots. They’ve created several low-memory-oriented graphical desktop applications that provide basic features that run perfectly fine on older PCs. Although those graphical desktops don’t have a plethora of applications designed around them, they still run many basic graphical applications that support features such as word processing, spreadsheets, databases, drawing, and, of course, multimedia applications. Table 1-5 shows some of the smaller Linux graphical desktop environments that can be used on lower-powered PCs and laptops. 18 Part 1: Starting Out with Ubuntu Table 1-5: Other Linux Graphical Desktops Desktop Description xfce A lightweight desktop that packages components separately so you can pick and choose which features you want to implement fluxbox A bare-bones desktop that doesn’t include a panel—only a pop-up menu to launch applications fvwm Supports some advanced desktop features such as virtual desktops and panels, but runs in low-memory environments fvwm95 Derived from fvwm, but made to look like a Windows 95 desktop These graphical desktop environments are not as fancy as the KDE and GNOME desktops, but they provide basic graphical functionality. Figure 1.6 shows what the xfce desktop used in the Xubuntu distribution looks like. Figure 1-6: The default xfce desktop as seen in the Xubuntu 8.10 distribution. If you are using an older PC, try a Linux distribution that uses one of these desktops and see what happens. You may be pleasantly surprised. Chapter 1: What is Ubuntu? 19 Linux Distributions Now that you have seen the four main components required for a complete Linux system, you may be wondering how you are going to put them all together to make a Linux system. Fortunately, there are people who have already done that for us. A complete Linux system package is called a distribution. Many different Linux distributions are available to meet almost any computing requirement you have. Most distributions are customized for a specific user group, such as business users, multimedia enthusiasts, software developers, or normal home users. Each customized distribution includes the software packages required to support specialized functions, such as audio and video editing software for multimedia enthusiasts, or compilers and Integrated Development Environments (IDEs) for software developers. The Linux distributions are often divided into three categories: ♦♦ Full-core Linux distributions ♦♦ Specialized distributions ♦♦ LiveCD test distributions The following sections describe these different Linux distributions and show some examples of Linux distributions in each category. Core Linux Distributions A core Linux distribution contains a kernel, one or more graphical desktop environments, and just about every Linux application that is available, precompiled for the kernel. It provides one-stop shopping for a complete Linux installation. Table 1-6 shows some of the more popular core Linux distributions. Table 1-6: Core Linux Distributions Distribution Description Slackware One of the original Linux distribution sets, popular with Linux geeks Red Hat A commercial business distribution used mainly for Internet servers Fedora A spin-off of Red Hat, but designed for home use Gentoo A distribution designed for advanced Linux users, containing only Linux source code Mandriva Designed mainly for home use (previously called Mandrake) openSuSe Different distributions for business and home use (now owned by Novell) Debian Popular with Linux experts and commercial Linux products In the early days of Linux, a distribution was released as a set of floppy disks. You had to download groups of files and then copy them onto disks. It would usually take 20 or more disks to make an entire distribution! Needless to say, it was a painful experience. 20 Part 1: Starting Out with Ubuntu These days, with home computers commonly having CD and DVD players built in, Linux distributions are released as either a CD set or a single DVD. This makes installing Linux much easier. However, beginners still often run into problems when they install one of the core Linux distributions. To cover just about any situation in which someone might want to use Linux, a single distribution has to include lots of application software. Distributions include everything from high-end Internet database servers to common games. Because of the quantity of applications available for Linux, a complete distribution often takes four or more CDs. Although having many options available in a distribution is great for Linux geeks, it can become a nightmare for beginning Linux users. Most distributions ask a series of questions during the installation process to determine which applications to load by default, what hardware is connected to the PC, and how to configure the hardware. Beginners often find these questions confusing. As a result, they often either load too many programs on their computer or don’t load enough and later discover that their computer won’t do what they want it to. Fortunately for beginners, there’s a much simpler way to install Linux. Specialized Linux Distributions Over the past few years a new subgroup of Linux distributions has started to appear. These are typically based on one of the main distributions but contain only a subset of applications that would make sense for a specific area of use. Besides providing specialized software (such as only office products for business users), customized Linux distributions also attempt to help beginning Linux users by autodetecting and autoconfiguring common hardware devices, which makes installing Linux a much more enjoyable process. Table 1-7 shows some of the specialized Linux distributions available and what they specialize in. Table 1-7: Specialized Linux Distributions Distribution Description Linspire A commercial Linux package configured to look like Windows Xandros A commercial Linux package configured for beginners SimplyMEPIS A free desktop distribution for home use Ubuntu A free desktop and server distribution for school and home use PCLinuxOS A free distribution for home and office use dyne:bolic A free distribution designed for audio and MIDI applications Puppy Linux A free, small distribution that runs well on older PCs Table 1-7 contains just a small sampling of specialized Linux distributions. There are hundreds of specialized Linux distributions, and more are popping up all the time on the Internet. No matter what your specialty, you’ll probably find a Linux distribution made for you. Chapter 1: What is Ubuntu? 21 Many of the specialized Linux distributions (including Ubuntu) are based on the Debian Linux distribution. They use the same installation files as Debian but package only a small fraction of a full-blown Debian system. The Linux LiveCD A relatively new phenomenon in the Linux world is the bootable Linux CD distribution, which lets you see what a Linux system is like without actually installing it. Most modern PCs can boot from a CD instead of the standard hard drive. To take advantage of this capability, some Linux distributions create a bootable CD that contains a sample Linux system (called a Linux LiveCD). Due to the size limitations of a single CD, the sample can’t contain a complete Linux system, but you’d be surprised at all the software they can cram in there. The result is, you can boot your PC from the CD and run a Linux distribution without having to install anything on your hard drive. It’s is an excellent way to test various Linux distributions without having to make changes to your PC. Just pop in a CD and boot! All of the Linux software will run directly off the CD. There are many Linux LiveCDs that you can download from the Internet and burn onto a CD to test-drive. Table 1-8 shows some popular Linux LiveCDs. Table 1-8: Linux LiveCD Distributions Distribution Description Knoppix A German Linux, the first Linux LiveCD developed SimplyMEPIS Designed for beginning home Linux users PCLinuxOS Full-blown Linux distribution on LiveCD Ubuntu A worldwide Linux project, designed for many languages Slax A live Linux CD based on Slackware Linux Puppy Linux A full-featured Linux designed for older PCs You may notice something familiar in Table 1-8. Many specialized Linux distributions also have a Linux LiveCD version. Some Linux LiveCD distributions, such as Ubuntu, allow you to install the Linux distribution directly from the LiveCD. You can boot with the CD, test drive the Linux distribution, and, if you like it, install it onto your hard drive. This feature is extremely handy and user friendly. As with all good things, Linux LiveCDs have a few drawbacks. Because you access everything from the CD, applications run more slowly, especially if you’re using older, slower computers and CD drives. Also, because you can’t write to the CD, any changes you make to the Linux system will be gone the next time you reboot. But there are advances being made in the Linux LiveCD world that help to solve some of these problems. These advances include the ability to ♦♦ Copy Linux system files from the CD to memory ♦♦ Copy system files to a file on the hard drive ♦♦ Store system settings on a USB Memory Stick ♦♦ Store user settings on a USB Memory Stick 22 Part 1: Starting Out with Ubuntu Some Linux LiveCDs, such as Puppy Linux, are designed with a minimum number of Linux system files and copy them directly into memory when the CD boots, which allows you to remove the CD from the computer as soon as Linux boots. Not only does it make your applications run much faster (because applications run faster from memory), but it frees up your CD tray for ripping audio CDs or playing video DVDs from the software included in Puppy Linux. Other Linux LiveCDs use an alternative method that allows you to remove the CD from the tray after booting. It involves copying the core Linux files onto the Windows hard drive as a single file. After the CD boots, it looks for that file and reads the system files from it. The Ubuntu Wubi project uses this technique to move the LiveCD contents to a single file stored in the Windows drive on the PC. From there you can boot directly into Ubuntu (more on this in Chapter 2, “Playing with the LiveCD”). A popular technique for storing data from a live Linux CD session is to use a USB Memory Stick (also called a flash drive and a thumb drive). Just about every Linux LiveCD can recognize a plugged-in USB Memory Stick (even if the stick is formatted for Windows) and read and write files from it. This capability allows you to boot a Linux LiveCD, use the Linux applications to create files, store them on your Memory Stick, then access them from your Windows applications later (or from a different computer). What Is Ubuntu? Now that you’ve seen what’s behind a Linux distribution, it’s time to turn our attention to the Ubuntu Linux distribution. Even within Ubuntu, there are several features that you have to choose from before running your system. This section walks through the different versions and choices available. Ubuntu Versions The Ubuntu Linux distribution is based on Debian Linux. As was discussed in the Core Linux Distributions section, the Debian distribution contains a variety of software and features. The Ubuntu developers created two subsets of the main Debian Linux system for specialized use: ♦♦ Ubuntu workstation ♦♦ Ubuntu server The Ubuntu workstation distribution includes only the software that’s most commonly used in a desktop environment: ♦♦ The OpenOffice.org office productivity suite ♦♦ The Firefox web browser software ♦♦ The Evolution email and calendar software ♦♦ Tomboy note-taking software ♦♦ F-spot digital image editing ♦♦ Totem video player ♦♦ Rhythmbox music player Chapter 1: What is Ubuntu? 23 The Ubuntu workstation distribution provides a complete home, school, and even office desktop environment, all in one package and all for free. The Ubuntu server distribution includes only software that’s most commonly used in a computer data center environment: ♦♦ The Postfix email server ♦♦ The Samba file and print-sharing server for Windows ♦♦ The Apache web server ♦♦ The MySQL database server The Ubuntu server distribution can support any size of server environment, from the small home network to the larger corporate data center. Ubuntu Release Schedule The Linux world is constantly evolving, and, for any Linux distribution to keep up with new advances, new versions of the software must be released on a regular schedule. The Ubuntu distribution does an excellent job of scheduling releases and sticking to the schedule. Ubuntu releases new versions every six months. Some releases are tagged as long-term support (LTS). For these releases, Ubuntu provides security and patch updates for up to 3 years. The current list of Ubuntu releases is shown in Table 1-9. Table 1-9: Ubuntu Releases Release Date Name 4.10 10/20/2004 Warty Warthog 5.04 04/08/2005 Hoary Hedgehog 5.10 10/13/2005 Breezy Badger 6.06 06/01/2006 Dapper Drake (LTS) 6.10 10/26/2006 Edgy Eft 7.04 04/19/2007 Feisty Fawn 7.10 10/18/2007 Gutsy Gibbon 8.04 04/24/2008 Hardy Heron (LTS) 8.10 10/30/2008 Intrepid Ibex Each Ubuntu release is assigned a code name. You’ll often see the Ubuntu releases referred to by their code names instead of their release numbers. The 6.06 and 8.04 releases are LTS releases and are slightly different from the others. LTS support distributions are intended for users who don’t want to constantly upgrade to new versions of software but who want to maintain the existing software packages as new bug and security patches are released. LTS distributions are often handy in places such as schools or offices that don’t want to constantly upgrade the workstation operating system but want to keep current on security and bug patches. 24 Part 1: Starting Out with Ubuntu Ubuntu Cousins The Ubuntu workstation distribution uses only the GNOME desktop environment. Consequently, other Ubuntu distributions have been developed to offer customers a choice (because that’s what Linux is all about). In addition to the main Ubuntu distribution, Ubuntu also supports specialized distributions that are based on the Ubuntu code base but that use alternative desktops: ♦♦ Kubuntu: uses the KDE desktop environment ♦♦ Xubuntu: uses the xfce desktop environment ♦♦ Edubuntu: uses the GNOME desktop to provide specialized educational software All of the Ubuntu distributions and features are based on the same basic ideas and principles of open-source software. The Kubuntu distribution contains the same core group of workstation software packages as Ubuntu, such as OpenOffice.org and Firefox, but it also provides the common KDE desktop utilities, including Dolphin for filesystem browsing, KMail as an email client, and the KDE desktop utilities for managing your graphical environment. The Xubuntu distribution is designed for less-powerful workstations. Besides using the xfce desktop, it uses the AbiWord word processor, as well as the Firefox web browser. It can run on systems with as little as 128 MB of memory. The Edubuntu distribution is something of a mix-and-match distribution. It uses the GNOME desktop but includes the KDE education software suite. That suite includes educational games for school-aged children and activities for pre-school aged children to get them used to the Linux environment. Summary This chapter discussed the origins of Linux system came and how it works. The Linux kernel is the core of the system, controlling how memory, programs, and hardware interact. The GNU utilities are also an important piece in the Linux system. The Linux shell is part of the GNU core utilities. The chapter also discussed the final piece of a Linux system, the Linux desktop environment. Things have changed over the years, and Linux now supports several graphical desktop environments. Next, the chapter talked about the various Linux distributions. A Linux distribution bundles the various parts of a Linux system into a simple package that you can easily install on your PC. The Linux distribution world consists of full-blown Linux distributions that include nearly every application imaginable, as well as specialized Linux distributions that include applications focused on a special function. The Linux LiveCD craze has created another group of Linux distributions that allow you to easily test drive Linux without installing it on your hard drive. Finally, the chapter discussed the Ubuntu Linux distribution and showed how the different versions and releases of Ubuntu fit together. In the next chapter we’ll look at the Ubuntu LiveCD. We’ll walk through how to test-drive Ubuntu on your PC without having to load anything, and we’ll see how to install it directly on your current Windows PC without having to make changes to your hard drive.