1
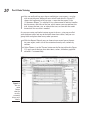
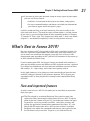
Chapter 1
AL
Getting to Know Access 2010
▶ Discovering what’s new in Access 2010
▶ Unlocking the basics of working with Access
MA
▶ Figuring out how to get started
TE
▶ Deciding when to use Access
RI
In This Chapter
A
GH
TE
D
ccess 2010, the most recent version of the Microsoft Office database
application, is a very robust and powerful program. You probably
already know that, and perhaps that power — or your perceptions of all that
Access can do — is what made you reach for this book. We applaud your
wise choice!
CO
PY
RI
For all of its power, Access is also very — pardon the expression — accessible. It’s pretty easy to use at the edges, where a new user will be; you don’t
have to venture all the way in to its core to get quite a lot out of the software.
In fact, with just the basic functionality that you’ll discover in this book,
you’ll be able to put Access through many of its most important paces, yet
you’ll be working with wizards and other on-screen tools that keep you at a
comfortable arm’s distance from the software’s inner workings, the things
that programmers and serious developers play with. Feel better now?
You don’t have to use every feature and tool and push the edges of the Access
envelope. In fact, you can use very little of everything Access has to offer and
still have quite a significant solution to your needs for storing and accessing
data — all because Access can really “do it all” — enabling you to set up a
database quickly, build records into that database, and then use that data in
several useful ways. Later on, who knows? You may become an Access guru.
In this chapter, you’ll discover what Access does best (and when you might
want to use another tool instead), and get a look at what’s new and improved
in Access 2010 (compared to Access 2007). You’ll see how it does what it
does, and hopefully you’ll begin to understand and absorb some basic terminology. Now, don’t panic — nobody’s expecting you to memorize long lists
12
Part I: Basic Training
of high-tech vocabulary or anything scary like that. The goal here (and in the
next two chapters) with regard to terms is to introduce you to some basic
words and concepts to help you make better use of Access in general — as
well as better understand later chapters in this book, if you choose to follow
us all the way to its stunning conclusion.
What Is Access Good For, Anyway?
What is Access good for? That’s a good question. Well, the list of what you
can do with it is a lot longer than the list of what you can’t do with it — of
course, only if you leave things like “paint your car” and “do the dishes” off
the “can’t do” list. When it comes to data organization, storage, and retrieval,
Access is at the head of the class.
Building big databases
Okay, what do I mean by big database? Any database with a lot of records —
and by a lot, I mean hundreds. At least. And certainly if you have thousands
of records, you need a tool like Access to manage them. Although you can
use Microsoft Excel to store lists of records, it limits how many you can store
(no more than the number of rows in a single worksheet). In addition, you
can’t use Excel to set up anything beyond a simple list that can be sorted and
filtered. So anything with a lot of records and complex data is best done in
Access.
Some reasons why Access handles big databases well:
✓ Typically a big database has big data-entry needs. Access offers not
only forms, but also features that can create a quick form through which
someone can enter all those records. This can make data entry easier
and faster, and can reduce the margin of error significantly. (Check out
Chapter 7 for more about building forms.)
✓ When you have lots and lots of records, you also have lots of opportunities for errors to creep — duplicate records, records with misspellings,
records with missing information — and that’s just for openers. So you
need an application such as Access to ferret out those errors and fix
them. (Chapter 9 lays out how you can use Access to find and replace
errors and search for duplicate entries.)
✓ Big databases mean big needs for accurate, insightful reporting. Access
has powerful reporting tools you can use to create printed and onscreen reports — and those can include as few or as many pieces of
your data as you need, drawn from more than one table if need be. You
can tailor your reports to your audience, from what’s shown on the
reports pages to the colors and fonts used.
Chapter 1: Getting to Know Access 2010
✓ Big databases are hard to wade through when you want to find something. Access provides several tools for sorting, searching, and creating
your own specialized tools (known as queries) for finding the elusive
single record or group of records you need.
✓ Access saves time by giving you new uses for existing tools you may
have used to import data from other sources — such as Excel worksheets (if you started in Excel and maxed out its usefulness as a datastorage device) and Word tables. This saves you from re-entering all
your data and allows you to keep multiple data sources consistent.
Creating databases with multiple tables
Whether your database holds 100 records or 1,000 records (or more), if you
need to keep separate tables and relate them for maximum use of the information, you need a relational database — and that’s Access. How do you
know whether your data needs to be in separate tables? Think about your
data — is it very compartmentalized? Does it go off on tangents? Consider the
following example and apply the concepts to your data and see if you need
multiple tables for your database.
The Big Organization database
A non-profit organization — one that rescues homeless pets — has a database of volunteers and contacts — past, present, and potential — and wants
to keep track of a lot of information on them. For current and past volunteers,
the people running the organization want to store information about the volunteering that was done, how much time they spent, what they did, and for
whom. For potential volunteers, they want to keep track of when and how
they’ve contacted them, whether with mailings and phone calls or at meetings. Imagine keeping all of that in a single table — with everything from the
volunteer’s name to what causes they support to where they live and how
much time they can donate.
For a complex database like this one, you’d need multiple tables, as follows:
✓ One table would house the volunteer contact information — names,
addresses, phone numbers, and e-mail addresses. It might make sense
to add a Volunteer Number field, which would make each record unique,
and it would be equally sensible to come up with a number format
where one or more of the characters could be used to differentiate
among different volunteer/contact types — past, current, or potential.
✓ A second table would contain the volunteer number again (as a way to
link or connect the two tables) and also the volunteers’ status information — how much time they have available to volunteer, when they’re
available, and which areas they can work in, geographically.
13
14
Part I: Basic Training
✓ A third table, again containing the volunteer number, would include the
volunteer’s preferences for activities — things they’re good at, enjoy
doing, and special skills or resources they can offer, such as training
homeless dogs or providing space in a barn for rescued horses.
Because you don’t have to fill in every field for each volunteer’s record (in
any table in the database) if you don’t have a phone number or don’t know
how many hours someone can work, it’s okay to leave those fields blank until
you’ve obtained that information.
With these three tables in place, any type of volunteer or useful contact
(past, current, or potential) can be entered into the database, and only the
table(s) that apply to that person need be populated with data. When a
potential volunteer becomes a current one, relevant data can be entered into
the appropriate table(s). If a potential volunteer never becomes available to
help out, you can delete that person’s name when a prescribed length of time
has elapsed — or perhaps you can set up a fourth table to hold archived volunteer records. The options are limited only by your needs and intended use
of the data.
Failure to plan? Plan to fail
If you think carefully about your database, how you use your data, and what
you need to know about your employees, customers, volunteers, donors,
products, or projects — whatever you’re storing information about — you
can plan
✓ How many tables you’ll need
✓ Which data will go into which table
✓ How you’ll use the tables together to get the reports you need
Feel free to sketch your planned database on paper, drawing a kind of flow
chart with boxes for each table and lists of fields that you’ll have in each one.
Draw arrows to show how they might be related — it’s sort of like drawing
a simple family tree — and you’re well on your way to a well-planned, useful
database.
Here’s a handy procedure to follow if you’re new to the process of planning a
database:
1. On paper or in a word processing document, whichever is more comfortable, type the following:
• A tentative name for your database
• A list of the pieces of information you plan on getting from that
database on a daily or regular basis
Chapter 1: Getting to Know Access 2010
2. Now, based on that information, create a new list of the actual details
you could store:
List every piece of information you can possibly think of about your customers, products, ideas, cases, books, works of art, students — whatever your database pertains to. Don’t be afraid to go overboard — you
can always skip some of the items in the list if they don’t turn out to be
things you really need to know (or can possibly find out) about each
item in your database.
3. Take the list of fields — that’s what all those pieces of information
are — and start breaking them up into logical groups.
How? Think about the fields and how they work together:
• If the database keeps track of a library of books, for example,
perhaps the title, publication date, publisher, ISBN (International
Standard Book Number, which is unique for each book), price,
and page count can be stored in one group, and author information, reviews, and lists of other titles by the same author or books
on the same topic can be stored in another group. These groups
become individual tables, creating your relational database of
books.
• Figure out what’s unique about each record. As stated in the previous point, you need a field that’s unique for each record. Although
Access can create this for you if no unique data exists for each
record in your database, it’s often best to have such a field already
in place, or create it yourself. Customer numbers, student numbers, book ISBNs, catalog numbers, serial numbers — anything
that won’t be the same for any two records will do.
With a big list of fields and some tentative groupings of those fields at
the ready, and with an idea of which field is unique for each record, you
can begin figuring out how to use the data.
4. Make a list of ways you might use the data, including
• Reports you’d like to create, including a list of which fields should
be included for each report.
• Other ways you can use the data — labels for mailings, product
labels, catalogue data, price lists, contact lists, and so on.
5. List all the places your data currently resides — on slips of paper in
your pocket, on cards in a box, in another program (such as Excel), or
maybe through a company that sells data for marketing purposes.
With this planning done, you’re ready to start building your database. The
particulars of that process come later in this chapter and in subsequent
chapters, so don’t jump in yet. Do pat yourself on the back, though, because
if you read this procedure and applied even some of it to your potential database, you’re way ahead of the game, and I’m confident you’ll make good use
of all that Access has to offer.
15
16
Part I: Basic Training
Databases with user forms
When you’re planning your database, consider how the data will be entered:
✓ If you’ll be doing the data entry yourself, perhaps you’re comfortable
working in a spreadsheet-like environment (known in Access as Table
view), where the table is a big grid, you fill it in row by row, and each
row is a record.
Figure 1-1 shows a table in progress in Table view. You decide — is it
easy to use, or can you picture yourself forgetting to move down a row
and entering the wrong stuff in the wrong columns as you enter each
record?
✓ You may want to use a form (shown in Figure 1-2) — a specialized interface for data entry, editing, and for viewing your database one record at
a time — if
• Someone else will be handling data entry.
• Typing row after row of data into a big grid seems mind-numbing.
Figure 1-1:
Table view
can be an
easy environment for
data entry.
Or not.
Chapter 1: Getting to Know Access 2010
The mind-numbing effect (and inherent increased margin for error) is especially likely when you have lots of fields in a database, and the user, if working in Table view, has to move horizontally through the fields. A form like the
one in Figure 1-2 puts the fields in a more digestible, vertical format, making
it easier to enter data into the fields and to see all the fields at once (or only
those you want data entered into). You can put those fields on the form in
the order that’ll be easiest for the data-entry person — and that order would
not necessarily have to be the order they appear in the table.
Figure 1-2:
Here’s a
simple form
for entering
new records
or reviewing existing
ones.
You can find out all about forms in Chapter 7. If your database is large
enough that you require help doing the data entry — or if it’s going to
grow over time, making an ongoing data-entry process likely — Access is
the tool for you. The fact that it offers simple forms of data entry/editing
is reason enough to make it your database application of choice.
17
18
Part I: Basic Training
Databases that require special reporting
Yet another reason to use Access is its ability to create customized reports
quickly and easily. Some database programs, especially those designed for
single-table databases (known as flat-file databases), have some canned
reports built in, and that’s all you can do — just select a report from the list
and run the same report that every other user of that software runs.
If you’re an Excel user, your reporting capabilities are far from easy or
simple, and they’re not designed for use with large databases — they’re
meant for spreadsheets and small, one-table lists. Further, you have to
dig much deeper into Excel’s tools to get at these reports. Access, on the
other hand, is a database application, so reporting is a major, up-front
feature.
An example? In Excel, to get a report that groups your data by one or more
of the fields in your list, you have to sort the database first, using the field(s)
to sort the data, and then you can create what’s known as a subtotal report.
To create it, you use a dialog box that asks you about calculations you want
to perform, where to place the results, and whether you’re basing a sort and/
or a subtotal on more than one field. The resulting report is not designed for
printing, and you have to tinker with your spreadsheet pagination (through a
specialized view of the spreadsheet) to control how the report prints out.
In Access? Just fire up the Report Wizard, and you can sort your data, choose
how to group it, decide which pieces of data to include in the report, and
pick a visual layout and color scheme — all in one simple, stream-lined process. Without your doing anything, the report is ready for printing. Access is
built for reporting — after all, it’s a database application — and reports are
one of the most (if not the most) important ways you’ll use and share your
data.
Because reports are such an important part of Access, you can not only
create them with minimum fuss, but also customize them to create powerful
documentation of your most important data:
✓ Build a quick, simple report that just spits out whatever’s in your table
in a tidy, easy-to-read format. (See Figure 1-3 for a sample.)
✓ Create a customized report that you design step-by-step with the help of
the Report Wizard. (See Figure 1-4.) The report shown in the figure has
the volunteers grouped by the State field (note DE comes before PA),
and the records for each state are in ascending order by the City field.
These options were easily put to work with just a few clicks.
Chapter 1: Getting to Know Access 2010
Figure 1-3:
Ah, simplicity. A quick
report is just
one click
away.
Figure 1-4:
The Report
Wizard creates more
elaborate
(but simple)
reports, like
this one.
19
20
Part I: Basic Training
✓ You can really roll up your sleeves and design a new report — or play
with an existing one, adding all sorts of bells and whistles. Figure 1-5
shows this happening in Design view — note that the report’s title
(“Volunteers Report”) is selected: It has a box around it and tiny handles
on the corners and sides of the box, which means you can reformat the
title, change the font, size, or color of the text, or even edit the words
themselves if a new title is needed.
So, you can create any kind of custom report in Access, using any or all of
your database tables and any of the fields from those tables, and you can
group fields and place them in any order you want:
✓ With the Report Wizard, you can choose from several preset layouts
for your report, and it can all be customized row by row, column by
column.
✓ Office Themes (see the Themes button on the Design tab back in Figure
1-5) apply preset designs that affect fonts, colors, and other graphical
elements — automatically.
Figure 1-5:
You can
avoid
Design
view, but
to really
customize
things, you’ll
need it.
Chapter 1: Getting to Know Access 2010
✓ If you want to place your personal stamp on every aspect of your report,
you can use Design view to
• Add titles, instructional or descriptive text boxes, and graphics.
• Set up customized headers and footers to include any information
you want to appear on all the report’s pages.
If all this sounds exciting, or at least interesting, then you’re really on the
right track with Access. The need to create custom reports is a major reason
to use Access; you can find out about all these reporting options in Chapters
17 through 19. That’s right: This chapter plus three more — that’s four whole
chapters — are devoted to reporting. It must be a big feature in Access!
What’s New in Access 2010?
For users of Access 2007, the upgrade to 2010 won’t seem like a big deal. Yes,
there are significant improvements and some really great new features, but
you’re won’t run smack into the learning curve that users of Access 2003
encountered upon upgrading to 2007 (and will still encounter if they move up
to 2010 without the interim step).
If you’re coming from 2003, the biggest changes are found in the interface —
gone are the familiar menus and toolbars of 2003 and prior versions, replaced
by a ribbon bar divided into tabs that take you to different versions of those
old standbys. It’s a big change, and it takes some getting used to.
In this book, however, we’re going to assume you already got your feet wet
with 2007 and aren’t thrown by the interface anymore. We’re figuring you
upgraded to 2007 or have played with it enough to feel comfortable diving
into 2010.
New and improved features
So what’s new in Access 2010? In the order you’re most likely to encounter
them, here goes:
✓ The File tab and its associated Backstage View panel are new; they
replace the Office button and resulting menu in Access 2007. Using the
panel on the left (shown in Figure 1-6), you make your choices for opening new files, accessing recently used files, saving files, printing, and
exiting the application (among other momentous decisions). It’s a lot
like ye olde File menu from Access 2003 in terms of what’s available;
Backstage view makes the commands and features that used to live on
the File menu easily accessible. To get to it, just click the File tab.
21
22
Part I: Basic Training
Figure 1-6:
Backstage
view —
new but
hauntingly
familiar to
those who
remember
the File
menu.
✓ Speaking of that ribbon bar that’s new to Access 2003 users, the Ribbon —
as Microsoft likes to refer to it — is now much more customizable. Using
the Options menu, available through Backstage view, you can create new
tabs, and customize existing ones by adding and reorganizing buttons on
the associated Ribbon groups. (More about this feature in this very chapter — Chapter 1.)
✓ Office Themes make it easy to create visual uniformity within your database, its reports and forms. Themes affect colors and fonts, and apply
consistent graphical elements, and are available throughout the Office
2010 suite, making it easy to give all your Office creations from Access,
Word, Excel, and PowerPoint the same look.
✓ Pre-built database templates, available through Backstage view, make it
easy to build a database with components that make sense for the kind
of data you’re dealing with. Use the Office online templates (see Figure
1-7 for the categories) and pick a template that suits your needs. The
secrets to this new feature are found right here in Chapter 1.
✓ Application Parts are, in essence, different aspects of your existing databases that you can recycle for use in new ones. Already developed a
great form or query? Reuse it. Learn how in Chapter 7.
Chapter 1: Getting to Know Access 2010
Figure 1-7:
Pick a
template
from any
category
offered with
Office online
templates
to speed
up your
databasebuilding
process.
✓ Publishing to the Web is even easier, including the reports you’ve created, your forms, and your data itself. The whole shooting match can be
opened in a browser window once you publish and upload it to the Web.
Look in Chapter 10 for more information on how this works.
✓ Navigation forms make it easier to organize your database components,
using a simple drag-and-drop method to display desired parts of your
database. (More about this feature in Chapter 21.)
✓ Table Events (also known as triggers) — which create new data based
on the data in your tables — are new in 2010. You’ll find out more about
those in Chapter 6; for now, suffice to say you’ll find data macros to be a
very handy way to add effective automation to your database.
✓ Between Data Bars and Conditional Formatting, reports have become
much more dynamic in Access 2010. Discussed in Chapter 17, you’ll find
out how to apply formatting based on the content of your data — based
on values found in the records themselves, in other words — making
your reports that much more intuitive.
So that’s a lot of new features and powerful tools you’ve now got at your disposal. Other than the Backstage view, which you get to see by default when
23
24
Part I: Basic Training
you start the application, however, you won’t encounter most of them until
and unless you want to. So for the new user, and for the early stages of your
database development, you’ve still got the same solid and dependable tools
Access always offered for building tables, setting up reports and forms, and
creating the relationships between your tables that make the database everything you need it to be.
Reach out with SharePoint
What the heck is SharePoint? You may be asking that, along with lots of other
people who’ve been seeing the product name and hearing how it provides
access to your Access data from anywhere — using desktop applications, a
Web browser, or even your phone. Well, it’s a Microsoft software product
that does all that and more, helping you manage your documents and collaborate with co-workers via the company network. Simply click the Save
and Publish command in Backstage view (see Figure 1-8), and you’re on your
way to publishing your database to SharePoint, which means you can access
it from pretty much everywhere, including that beach in Maui. (On second
thought, some places should probably be declared Data-Free Zones.)
Figure 1-8:
The Save
and Publish
command in
Backstage
view offers
choices
for… you
guessed
it… saving
and publishing your
database.
Chapter 1: Getting to Know Access 2010
As shown in Figure 1-8, the Save and Publish options include regular old
Save Database As (to save it in some other format other than as an Access
database), Save Object As (to save your database as a PDF or XPS file), and
there’s one more under the Publish heading: You can choose to Publish to
Access Services. Figure 1-9 reveals the mysteries of Access Services, showing that you can use this command to make your database accessible via the
Web or store it at a SharePoint location — which would then make it accessible to others who have the needed rights to view and snag files from that
same location.
Figure 1-9:
Get to
know your
SharePoint
options by
choosing
to Publish
to Access
Services.
You must have SharePoint installed on your network or server to make full
use of this feature — and of course, have other users with whom to share
your files — for this process to be useful. Given that we can’t delve too far
into Microsoft SharePoint here (hey, this is an Access book, right?), we recommend the following resources to expand your knowledge of SharePoint:
✓ http://sharepoint2010.microsoft.com
✓ www.wiley.com: Use the Search box to find books and other learning
tools that pertain to SharePoint 2010.
✓ http://sharepointsolutions.com: Check this site (and of
course, Google for others) to find online courses in making the most of
SharePoint 2010.
25
26
Part I: Basic Training
How Access Works and
How You Work with It
When you look at all the applications in Microsoft Office — Word, Excel,
PowerPoint, Outlook, and of course, Access — you’ll see some features that
are consistent throughout the suite. There are big differences, too — and
that’s where books like these come in handy, helping you deal with what’s
different and/or not terribly obvious to a new user.
Access has several features in common with the rest of the applications in
the Microsoft Office suite. You’ll find the same buttons on several of the tabs,
and the Quick Access toolbar (demonstrated in Chapter 2) appears in all the
applications, as do the default items on the menu itself.
If you already know how to open, save, and print in, say, Word, you’re probably ready to do the same things in Access without any difficulty.
To make sure you’re totally Access-ready, here’s a look at the basic procedures to make sure you have a solid foundation on which to build.
Opening Access
Access opens in any one of several ways. So, like a restaurant with a very
comprehensive menu, some people will love all the choices, and others will
say, “I can’t decide! There are just too many options to choose from!”
Now, you’ll run into situations in which one of the ways is the glaringly best
choice — hands down, that one will be the way to go. But what if you’ve
never heard of it? You’ll be trying to find my phone number (I’m unlisted —
ha!) so you can give me a piece of your mind. So — to acquaint you with all
your choices (so you’ll be ready for any situation) — here are all the ways
you can open Access:
✓ Click the Start menu button (in the lower-left corner of the screen) and
choose All Programs➪Microsoft Office➪Microsoft Access 2010.
Figure 1-10 shows my Start menu. You may notice items on my menu
that don’t match yours — say, programs you may not have — don’t
worry about that. Just focus on the Microsoft Office submenu and make
your choice from that.
If you’ve recently used Access, you’ll see it in the list on the left side of
the Start menu. Just choose Start➪Microsoft Access 2010, and Access
opens.
Chapter 1: Getting to Know Access 2010
✓ Double-click any existing Access database file on your Desktop or in a
folder (as shown in Figure 1-11). Access opens automatically.
Figure 1-10:
The
Windows
Start menu
offers all the
Microsoft
Office
applications
in one
submenu.
Figure 1-11:
Double-click
an Access
database
file, and
Access
opens
right up.
27
28
Part I: Basic Training
Good news: Access 2010 will open database files you created with previous versions of Access, and should support whatever features are
employed within those database files. All your tables should open properly, and reports, forms, and queries should all work fine, too.
✓ If some helpful person has added Access to the Quick Launch toolbar
(on the Windows Taskbar), you can click the Access 2010 icon (it looks
like a pink key) and there you go. Access opens for you right then and
there.
Does having an Access icon on the Quick Launch portion of the Taskbar sound
extremely convenient? It is! To add the icon, follow these steps:
1. Choose Start➪All Programs➪Microsoft Office.
2. When the list of Office applications appears, hold down the Ctrl key
and click and drag the Access menu command down to the Quick
Launch bar (that’s the portion of the Taskbar immediately to the right
of the Start button).
A black I-beam cursor, along with an icon for the application and a plus
sign (indicating that the shortcut will be a duplicate of the command on
the menu), appears where you point with your mouse on the bar, indicating where the new icon will go.
3. Release the mouse button and then release the Ctrl key.
You’ve got yourself single-click access to, well, Access.
Don’t have a Quick Launch bar on your Taskbar? Right-click the Taskbar and
choose Toolbars from the pop-up menu. From the resulting submenu, choose
Quick Launch. It won’t have a check next to it if it’s not currently part of your
Taskbar — if it’s already checked, you do have a Quick Launch bar displayed
and just didn’t realize it. If it’s not checked, choose it, and you’ll have a place
to put the icons you want to keep handy.
If you’re using Windows 7, you can also right-click on any icon in the Programs
menu and choose Pin to Taskbar from the pop-up menu. Quick and easy!
Selecting a starting point
So Access is open — and (assuming you opened it from the Start menu or
from the Quick Launch portion of the Taskbar) you’re staring at the Access
interface. You may see features whose purposes elude you or that you don’t
yet know how to use. Hey — don’t worry — that’s why you’re reading this
book!
You can find out more about all the tabs and buttons, panels and menus, and
all that fun stuff in Chapter 2 — for now, just look at the ways Access offers
Chapter 1: Getting to Know Access 2010
you to get started with your database, be it an existing one that needs work
or a new one you have all planned out and ready to go.
Opening an existing database
Well, this is the easy one. If a database already exists, you can open it by
clicking the Office button (at the upper left of the workspace) and choosing
Recent from the list of commands that appears. As shown in Figure 1-12, a
panel opens, displaying the databases you’ve most recently used. Just click
the database in the list and it opens — listing its current tables, queries,
reports, and forms on the far left side of the window.
Figure 1-12:
Pick your
recently
used database from
the Recent
list on the
right.
When the database is open, you can open its various parts just by doubleclicking them in that leftmost panel; whatever you open appears in the main,
central part of the window. Figure 1-13 shows an example: a table, ready for
editing.
After you open a table, you can begin entering or editing records — and you
can read more about how that’s done in Chapter 6, which demonstrates the
different ways to edit your data and tweak your tables’ setups. If you want
to tinker with any existing queries, these, too, open just by clicking them in
the list on the left side of the workspace. (For more information on queries,
check out Chapters 11 and 12. You can do simple sorting and look for particular records with the skills you pick up in Chapters 9 and 11.)
Starting a new database from scratch
So you don’t have a database to open, eh? Well, don’t let that stop you. To
start a new one, all you have to do is open Access — using any of the techniques listed earlier in this chapter (except the one that starts Access by
opening an existing database file, which you don’t have yet but will now).
29
30
Part I: Basic Training
Figure 1-13:
An existing
table, ready
for records.
A database file holds all your database components. Everything associated
with the data is part of the database, including
✓ All the tables that house your data
✓ Queries that help you search and use the data
✓ Reports that show what your data is and what it means
✓ Forms that allow people to view, enter, and edit data
After Access is open, you can click the Blank Database button (shown in
Figure 1-14) to get started. Actually, the assumption is that you’ll start this
way, so the Blank Database options already appear on the right side of the
panel, also shown in Figure 1-14. If you’ve already clicked one of the other
options (under Available Templates), you can click Blank Database to redisplay the panel shown in Figure 1-14.
At this point you can give your database a name (see the File Name box on
the right), and click the Create button. To take this slowly and step-by-step
(always a good idea for your first time), read on:
1. With Access open and the Available Templates panel displayed, click
the Blank Database button under the Available Templates heading.
Chapter 1: Getting to Know Access 2010
A panel appears on the right side of the Access window, asking you for a
name for your new database. (See Figure 1-14.)
Blank Database button
Figure 1-14:
The far-right
panel lets
you name
and choose
a home
for your
database.
Blank Database options
2. Replace the default DatabaseX with whatever name you want to use.
The X in the preceding file name represents a number — Access assigns
consecutive numbers to the default names, counting from any previously created databases.
If this is your absolute first database in a fresh installation of Access, the file
name offered in this panel will be Database1. Note that you don’t need to
type a file extension here — Access will add the correct one for you.
3. As needed, choose a new location for the database file by following
these steps:
a. Click the little file folder (with an arrow on it) found to the right of the
File Name box.
Doing so opens the File New Database dialog box (shown in Figure
1-15), which you can use to navigate to the drive or folder where
your database should live.
31
32
Part I: Basic Training
b. Use the panel on the left side of the File New Database dialog box to
navigate to a folder for your database. When you’re looking at a list
of folders, click once to select the one in which you want to store your
database.
c. As needed, click the New Folder button and name your new folder —
click OK to return to the File New Database dialog box.
d. Click OK — the name you gave the file back in Step 2 is applied, and
the file is saved to the location you chose.
Figure 1-15:
Name and
choose a
location to
store your
database
file.
4. Click the Create button.
A blank table opens. An ID column is automatically created, along with
the first field of your database, with the instructions “Click to Add”. The
cell beneath that instruction is active, awaiting data.
At this point, you can begin entering records into your first table or begin
naming your fields and setting them up. The field names go in the topmost
row (the ID field is already created, as previously stated), and the label Click
to Add is atop the column with the active cell. If you choose to save your
table now (right-click the Table1 tab and choose Save), you can name your
table something more useful than Table1.
Starting with a template
Access provides templates (prepared files that work sort of like database
cookie-cutters) for your new database needs. You’ll find a set of template
icons in the Available Templates panel, as soon as you open Access. As
Chapter 1: Getting to Know Access 2010
shown in Figure 1-16, you can choose a template category by clicking any
of the icons (which changes the displayed icons in the center of the
workspace).
Click a template icon, and you see its details displayed on the right — along
with the File Name box you saw when starting a new Blank Database. When
you’ve found a template that looks like a good fit for your needs — one that
starts with the tables, forms, reports, and so on that you think you’ll find
useful — give the new template-based database a name and choose a location
for it, just as we explained in the “Starting a new database from scratch” section earlier in this chapter.
Figure 1-16:
Pick a
template,
any
template —
and then
name your
new
templatebased
database.
Use the Back button at the top of the Available Templates panel to go back
to the original set of template categories — and to the original set of icons,
including those listed under the Office.com Templates Heading. Assuming you
have an Internet connection going, you’ll see the templates Microsoft has to
offer. Choose one by clicking it, and then follow the on-screen instructions to
utilize it for your new database. Note that you can also use the Search Office.
com for Templates box to look for a particular template (just click the arrow
button after you’ve entered your search terms). Again, you must be online to
use this feature.
33
34
Part I: Basic Training
After you’ve downloaded the template (or chosen a template that was available in your installed copy of Access), you can start building data into it.
There’s one major difference from the previous procedure that uses this
right side of the Available Templates panel to build a database from scratch
(naming it, choosing a place to store it): Instead of having a blank “Table1”
and nothing else, the template gives you pre-made tables, reports, queries,
and forms (in various combinations and numbers, all based on the template you chose) and they’re all set up — all you have to do is start entering
records. Figure 1-17 shows the populated list of database components that
comes with the Web Contacts database template.
Figure 1-17:
The basic
fields for
each table
are already
set up for
you, along
with reports
based on
the table’s
fields.
Just like a table you build from scratch, template-based tables need to be
populated with data. You can change field names (see Chapter 5 for directions) and add and remove fields, too. After you tweak them until they’re
appropriate for your database, you can begin entering records, one field at
a time.
Chapter 1: Getting to Know Access 2010
Now what?
So you’ve got a new database started. What do you do now? You leaf on over
to Chapter 2, where you can find out more about all the tools that Access
offers — which tools are on-screen almost all the time, and which ones are
specific to the way you chose to dig in and start that database.
In Chapter 3, you actually begin building a database, setting up tables and the
fields that give them structure. And you’ll figure out which tables you need to
set up, putting that great plan you built in this chapter to work!
35
36
Part I: Basic Training