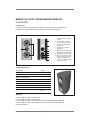
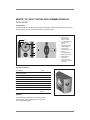
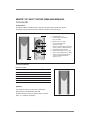
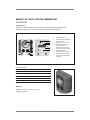
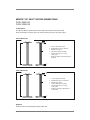
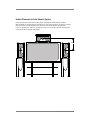
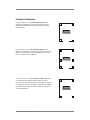
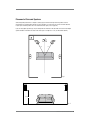
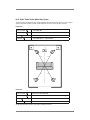
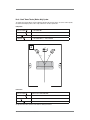
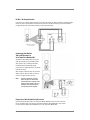
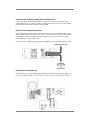
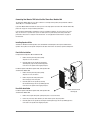
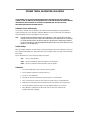
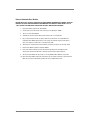
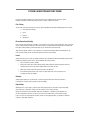
1
© 2005 Monster, LLC. “Monster”,“Monster THX Select”,“Monster Power”,“Monster Cable”,“Home Theater
Music”, the Monster logo and the Monster THX logo are trademarks or registered trademarks of Monster,
LLC. “THX”, “THX Select”, the THX logo and the THX Select logo are trademarks of THX Ltd. All other product
names, marks and logos are trademarks of their respective holders. Monster THX Select Certified speakers
are designed in the USA and manufactured to Monster quality specifications in China. Specifications subject
to change without notice. Images and illustrations in this guide may vary from actual products purchased.
rm 164264
TABLE OF CONTENTS
Section
Page
Important Safety Precautions ....
ii
General Operating Instructions .
iii
Introduction ................................
1
Monster Home Theater Secrets
2
Specifications for Monster ® THX ™ Select™ Certified Speakers .................................................................................5
Speaker Placement Guidelines ...............................................................................................................................12
Recommended Speaker Configuration and Placement for Home Theater Music
and Home Theater (Movies Only) Systems ..............................................................................................................20
Speaker Connections ...............
26
Speaker Tuning, Calibration, & Balancing ...............................................................................................................30
System Calibration and Fine Tuning ........................................................................................................................32
Speaker Specifications ............
33
Care and Maintenance .............
33
IMPORTANT SAFETY PRECAUTIONS FOR MONSTER® THX™
SELECT™ CERTIFIED POWERED SUBWOOFERS AND BASS MODULES
Please read and observe the following safety points at all times.
WARNING – Power Sources
Do not plug your Monster THX Select Certified Powered Subwoofer/Bass Module into a power outlet that differs
from what it was designed for. If you don’t know the type of electrical power that is supplied to your home,
please consult your local power company.
WARNING – Power Cord Safety
When routing the AC power cord, do not place it near heavy foot traffic areas (e.g., hallways, doorways,
and kitchen floors). Do not create a trip hazard with the power cord.
If your power cord’s protective jacket begins to rip or fray, exposing the internal wiring, shielding, etc.,
disconnect it from the power source and discontinue use immediately. See the warranty section of this
owner’s manual.
WARNING – Avoiding Electrical Shocks
Do not operate your Monster THX Select Certified Subwoofer/Bass Module if liquid of any kind is spilled onto
or inside the unit.
Do not operate your Monster THX Select Certified Subwoofer/Bass Module near rain or water that’s spilled
or openly exposed (patio, pool deck, etc.).
WARNING – Storm Precautions
In the event of a lightning storm, immediately disconnect your Monster THX Select Certified Powered
Subwoofer/Bass Module from its power source.
WARNING – Exposure To Heat
Do not expose your Monster THX Select Certified Subwoofer/Bass Module to direct sunlight or place it near
wall heaters, space heaters, or any enclosed space prone to temperature increase. Please see the section on
installation for more information.
WARNING – No User Serviceable Parts Inside
If, for any reason, your Monster THX Select Certified Subwoofer/Bass Module is not operating properly,
do not remove any part of the unit for repair. Unplug it and consult this owner’s manual for warranty
and service information.
WARNING – Appropriate Voltage Setting
Before operating your Monster THX Select Certified Speakers, ensure they are set to the appropriate voltage for
your geographic area (120 or 230) by adjusting the switch on the backside of each unit.
ii
IMPORTANT SAFETY PRECAUTIONS
GENERAL OPERATING PRECAUTIONS
CAUTION – DO NOT OPERATE YOUR AMPLIFIER OR AV RECEIVER AT POWER OUTPUT LEVELS
WHICH EXCEED THE RECOMMENDED POWER HANDLING CAPACITY.
Your amplifier or AV receiver is designed to operate within a very specific power output rating (consult your
equipment manufacturer’s owner’s manual for specifications). Regardless of what your amplifier/AV receiver
power output rating is (large or small), if you exceed this rating (i.e., push the amp/receiver to output more
power than it’s specified to handle), the resulting distortion can cause damage to your Monster THX Select
Certified speakers. Any damage to a Monster THX Select Certified speaker as a result of operating an
amplifier/AV receiver beyond its specified power output is not covered under any Monster warranty.
CAUTION – DO NOT UNDER-POWER YOUR MONSTER THX SELECT CERTIFIED SPEAKERS.
If your amplifier/AV receiver has less power handling capacity than your Monster THX Select Certified
speakers (e.g., your amp’s power output rating is 100 watts and your Monster THX Select Certified speakers
are rated at 200 watts) and you push the amp/receiver beyond its power output capacity, you may cause
damage to the Monster THX Select Certified speakers. Any damage to a Monster THX Select Certified speaker
as a result of operating an amplifier/AV receiver beyond its specified power output is not covered under
any Monster warranty.
CAUTION – DO NOT UNPACK SPEAKERS ON A HARD SURFACE.
Be sure to unpack your Monster THX Select Certified home theater speakers and complete any required
assembly on a padded surface such as carpeting, or use the enclosed packing materials to protect
both your floor and the speaker finish from scratches.
GENERAL OPERATING PRECAUTIONS
iii
INTRODUCTION
A Note from the Head Monster
Dear Enthusiast,
THANK YOU for purchasing my Monster® THX™ Select™ Certified speakers. With these speakers you will
enjoy many hours of unforgettable movie and music experiences.
Personally, I love the excitement of going to see a movie, and the passion and dynamics of virtuoso music
performances. Like many of you, I’m a critical listener and want my home theater to give me the same
thrilling experience I enjoy at the movies or at a concert.
At Monster, we take pride in our commitment to making home audio the best it can be. And of course
THX’s reputation as the leader in audio certification for movie theaters is known world-wide. When you
bring together two high-performance companies with a passion for audio you get incredible results.
Listen for yourself. I think you’ll agree that Monster THX Select Certified speakers sound amazing.
With a variety of Monster THX Select Certified speakers to choose from, you can mix and match to build
a system that meets your budget while giving you the superior performance you desire from both movies
and multi-channel audio formats like DVD-Audio and SACD.
This owner’s manual shows you how to properly position and hook up your new speakers for the best
possible Monster THX Select Certified home theater music experience. We’ve included high-performance
setup information plus some Monster “secrets” on how to get the most out of your home theater.
I hope you enjoy your Monster THX Select Certified Speakers and have many years of happy listening.
Monsterously,
Noel Lee,
The Head Monster
1
INTRODUCTION
TEN MONSTER HOME THEATER “SECRETS”
What You May Need to Know About Setting Up a Home Theater Music
System for Dramatic, Thrilling Audio
SECRET NO. 1: Understanding the Difference Between a Home Theater for Movies
and a Home Theater for Movies and Music
Movies – Traditionally, most home theaters featured surround channel speakers that produced sound
both ambient and enveloping. Surround speakers were designed to be non-localized dipoles, producing
an enveloping sound as required by the THX certification standard.
Music – For home theaters that can play multi-channel music (SACD & DVD-Audio titles), surround
speakers are traditionally identical to the front speakers for greater precision. Because of the way
producers and engineers mix multi-channel surround sound disks, musical instruments, voices
and percussion may be placed anywhere on the 360° soundstage.
If a surround sound system is set up in the traditional manner for movies only, the multi-channel
music suffers, because the correct speakers aren’t used. Even today, many movies are produced
with the capability of discrete point-specific audio in all channels.
SECRET NO. 2: Why Choosing Matched, Full-Range Speakers for All Channels
Ensures the Best Possible Performance
Movies – If you’ve ever watched a movie on VHS tape or even an older DVD title, you may have noticed
that some popular movie formats don’t require high performance sound reproduction from the surround
speakers. Audio that required full-frequency range was mixed to the front. Ambient, less demanding audio
was mixed to the rear.
Today, many movies feature full-frequency sound for all channels—both ambient and discrete audio
is distributed to the rear channels. DVD technology has allowed for advanced movie audio techniques
where full-range, discrete audio is mixed to the rear channels. This advancement makes it necessary
to have matched speakers, front and rear, for full-range high performance home theater.
Music – Traditionally, multi-channel music demanded very little from surround speakers. Most music was
mixed from the perspective of a listener seated in front of the stage at a music venue (e.g., a concert hall
or club), with only reflected ambient sound behind the listener. Producers and engineers now mix music
with discrete audio from all directions, placing the listener in the middle of a studio or concert stage.
Instruments are now placed all around you, with surround sound coming at you from all directions.
These fantastic audio possibilities require full-range speakers for all channels.
SECRET NO. 3: The Center Channel is Not Just for Dialogue Anymore
Movies – Traditionally, the center channel speaker was often used solely for dialogue with the
understanding that dialogue reproduction required a limited frequency range. However, when directors
started to use complex sound effects that panned from side to side, the pitch change going through center
channel that was not matched to the full-range left and right channels was distracting. Using a full-range
center channel speaker will deliver the reference quality audio now available across the front soundstage.
Music – Traditionally, music producers and engineers often did not use a center channel—music was
mixed so the listener would perceive a “phantom” center. Today, many producers mix to a discrete center
channel with dramatic results. Some Dolby® music modes will force a center channel with a mix of left
and right information. This is why the center channel for music also requires a matched, full-range speaker.
TEN MONSTER HOME THEATER “SECRETS”
2
SECRET NO. 4: Place Front Speakers on an Arc, Not a Line
A common mistake made in home theater setups is to place the three front speakers on the same vertical plane
with a large format television. The result: the center speaker is closer to the listener area than the left and right
speakers, which results in time-misalignment. Although this can be corrected with the distance control in many
AV receivers, the best solution is to physically place the speakers equidistant to the listener. For more information,
please read speaker placement guidelines.
SECRET NO. 5: The Right Speaker Cable Lengths Provide Optimum Performance
Ideally, the speaker cable you use to hook-up all your speakers should to be cut to the same equal length to ensure
correct time-alignment and optimum performance. To determine length, choose the speaker furthest from the
amplifier/AV receiver, run the cable from the amp/receiver to the speaker, measure and cut. Then, cut equal lengths
of cable for the remaining speakers.
If that is not practical for you, at the very least, make sure that the speaker cable length for the front three speakers
is the same. Cable length for the rear channels should also match each other.
SECRET NO. 6: Why “LFE” and “Subwoofer” are Not Synonymous
Movies – A true LFE (Low Frequency Effects) channel on a DVD does not perform the same function
as a traditional subwoofer. The LFE channel only outputs specific low frequency information from
the .1 channel as indicated by the movie director for maximum artistic effect—adding impact to
sound effects such as crashes and explosions.
Not every low frequency sound is directed to the LFE channel.
Because subwoofers output all low frequency audio information, having a subwoofer connected only
to the LFE channel shortchanges your audience. Some directors may require a lot of low frequency
information be sent to the LFE channel, but others do not.
Music – Subwoofers enhance the lowest octave of the music performed—the frequencies that cannot
be reproduced by a full-range speaker. In a music system, this is typically not a dedicated LFE channel.
Subwoofers are necessary to reproduce all low frequencies below the chosen crossover frequency.
The LFE channel is active only when the recording producer directs information to it. (Example: a kick drum
or bass guitar.) Many of the first multi-channel recordings commercially available were produced with no
LFE information. In fact, in the early days of SACD and DVD-Audio engineers rarely used the .1 channel.
However, music enthusiasts would assume their subwoofers were malfunctioning, when in fact the
subwoofer was connected only to the LFE. Today, engineers go out of their way to output information
to the LFE channel.
SECRET NO. 7: Why You Should Use Four Subwoofers for Maximum Performance
It’s often assumed that one subwoofer, tucked discretely in a corner, is sufficient for a typical home theater system.
Unfortunately, the bass sound is unbalanced, and the subwoofer has to work very hard to push sufficient amount
of air to create the desired effect.
Also, a single subwoofer system with the subwoofer tucked in the corner depends a lot on the power of sound
waves reflected off the walls. When a significant portion of bass sound waves are reflected, indistinct,
muddy bass is the result.
Many listeners may perceive some directionality in a single subwoofer system—no matter how powerful.
3
TEN MONSTER HOME THEATER “SECRETS”
SECRET NO. 8: How Using Pink Noise Can Fine Tune Your Home Theater
You can purchase a pink noise generator, or a pink noise disk, at your local consumer electronics retailer
or by shopping online. Some AV receivers also generate pink noise test tones. Pink noise is a type of white noise
with equal energy at all frequencies, which is optimal when fine tuning a home theater. Whatever pink noise device
you use, make sure to also use a dB (Sound Pressure Level or SPL) meter with it so you can balance your speaker
and subwoofers to get the best left-to-right, front-to-back balance possible from your system.
SECRET NO. 9: Why 7.1 is Really 6.1
Many consumers believe that 7.1 multi-channel audio comes from seven discrete channels, plus the LFE.
Actually assume 7.1 channel audio is output from only 6 discrete channels. The left and right side surround channels
are discrete, but the two rear speakers get their information from a single rear channel. Although the effect is
spectacular, the term “7.1 surround” may lead some to believe incorrectly that there are 7 discrete channels.
SECRET NO. 10: How to Get All the Performance You Paid For: Invest In
High Performance Cable and Power Management for Your Home Theater
The sound quality your home theater produces depends a lot on the quality of your speaker cables,
audio interconnects, and the use of proper power management.
Clean Power™: Your Components Depend On It
AC power is dirty, unstable, and polluted, and may be subject to lightning and other surges which may damage (or
destroy) your Home Theater electronics. Monster AVS 2000 Automatic Voltage Stabilizer controls voltage irregularities
so you’ll get stable power and enjoy maximum performance. Monster Home Theater HTPS 7000 PowerSourceTM cleans
AC power and protects connected components from surges and spikes. Together, these Monster Power products
provide clean, stable AC power.
You also need proper power amplification. If you underpower your speakers, you lessen the home theater
experience and risk damaging them. Monster Power Amplifiers provide sufficient power to drive full-range speakers
for all channels. The MPA 3250 3-channel and MPA 2250 2-channel amplifiers are both built with independent power
supplies for each channel, which output 250 watts continuous power per channel with all channels driven at 8 ohms
(400 watts at 4 ohms).
Cable: The Final Component
Of course, stable, clean, and ample power is wasted if there isn’t a clean audio signal. Choose the best possible
cables for your source components—whether they be digital fiber optic or coax audio cables used for Dolby Digital
surround sound, or six high-performance analog cables necessary for DVD-Audio and SACD multi-channel format
connections. For maximum performance, we recommend the Monster® THX™ Ultra Series complete family
of Home Theater audio, speaker and video connections.
Monster Cable® is the world’s leading manufacturer of high performance audio, video and speaker cable.
Monster made the first THX-certified cable for home theater audio, and is the only cable certified
by the Imaging Science Foundation (I.S.F.).
Monsterous Tip: Be sure your video connections are component video or HDMI to ensure you get
the best possible picture your equipment can deliver.
Build a Monsterous Home Theater
With Monster AC Power Conditioning and Stabilization, Monster Power Amplifiers, and all Monster AV
and speaker cables you’ll enjoy the cleanest possible sound with the clearest possible picture. With Monster Cable
and Monster Power, you’ll get all the performance you paid for.
TEN MONSTER HOME THEATER “SECRETS”
4
MONSTER® THX™ SELECT™ CERTIFIED SPEAKERS SPECIFICATIONS
MONSTER THX SELECT CERTIFIED TOWER SPEAKER 200
THX SL200-TWR
®
™
™
Product Features:
Every Monster THX Select Certified Speaker is made from the highest quality materials with advanced
technologies and unique features that ensure maximum performance and aesthetic appeal.
a
e
b
f
g
c
d
h
Technical Specifications:
CROSSOVER TYPE
3-Way
MAGNETICALLY SHIELDED
Yes
WOOFER 7" (18cm) KEVLAR®
2
®
MIDRANGE 7" (18cm) KEVLAR
1
TWEETER 1" (2.5cm) NEODYMIUM MAGNET
1
SENSITIVITY (dB/W/m)
92
MINIMUM IMPEDANCE (Ohm)
3.4
FREQUENCY RESPONSE (Hz-kHz)
40Hz-22kHz
ENCLOSURE TYPE: BASS REFLEX
Yes
24 GOLD CONTACT BI-WIRE CAPABLE BINDING POST
POWER HANDLING
Yes
150 Watts RMS, 300 Watts Max
@ 4 ohms
Application:
Left front or Right front speaker
Left rear or Right rear speaker
5
MONSTER ® THX ™ SELECT ™ CERTIFIED SPEAKERS SPECIFICATIONS
a.
Time-aligned, neodymium magnet
free-air tweeter
b.
3 rigid, responsive 7" Kevlar® mid-bass
drivers with die-cast frames
c.
24k gold contact bi-wire capable binding posts
d.
24k gold contact, custom fitted jumper straps
e.
Diffraction reducing narrow cabinet
f.
Curvilinear (non-rectangular) shape
g.
Beautiful hardwood veneer cabinet
h.
Positioning spikes
•
3-way crossover with low-resistance
components (not shown)
MONSTER THX SELECT CERTIFIED MONITOR SPEAKER 100
THX SL100-MTR
®
™
™
Product Features:
Every Monster THX Select Certified Speaker is made from the highest quality materials with advanced
technologies and unique features that ensure maximum performance and aesthetic appeal.
a
b
d
c
g
f
e
h
a.
Time-aligned, neodymium magnet
free-air tweeter
b.
Rigid, responsive 7" Kevlar® woofer
mid bass driver with die-cast frames
c.
24k gold contact bi-wire capable
binding posts
d.
24k gold contact, custom fitted
jumper straps
e.
Diffraction reducing narrow cabinet
f.
Curvilinear (non-rectangular) shape
g.
Beautiful hardwood veneer cabinet
h
24k gold contact conductive spikes,
which provide electrical connection
through Tower Bass Module 200
•
2-way crossover with low-resistance
components (not shown)
Technical Specifications:
CROSSOVER TYPE
2-WAY
MAGNETICALLY SHIELDED
Y
®
WOOFER 7" (18cm) KEVLAR
1
TWEETER 1" (2.5cm) NEODYMIUM MAGNET
1
SENSITIVITY (dB/W/m)
89
MINIMUM IMPEDANCE (Ohm)
3.4
FREQUENCY RESPONSE (Hz-kHz)
55Hz-20kHz
ENCLOSURE TYPE: BASS REFLEX
Y
24 GOLD CONTACT BI-WIRE CAPABLE BINDING POST
POWER HANDLING
Y
100 Watts RMS, 200 Watts Max
@ 4 ohms
Application:
Left front and Right front speaker on speaker stand
Left rear and Right rear speaker on speaker stand
Left front and Right front speaker, paired with Monster THX Select Certified Tower Bass Module 200
Left rear and Right rear speaker, paired with Monster THX Select Certified Tower Bass Module 200
(Not recommended as Center Channel speaker)
MONSTER ® THX ™ SELECT ™ CERTIFIED SPEAKERS SPECIFICATIONS
6
MONSTER THX SELECT CERTIFIED MONITOR SPEAKER 200
THX SL200-MTR
®
™
™
Product Features:
Every Monster THX Select Certified Speaker is made from the highest quality materials with advanced
technologies and unique features that ensure maximum performance and aesthetic appeal.
a.
1" Silk tweeter with low resonance
frequency
b.
2 rigid, responsive 7" Kevlar® midbass drivers with die-cast frames
c.
24k gold contact bi-wire capable
binding posts
d.
24k gold contact, custom fitted
jumper straps
e
e.
Diffraction-reducing narrow cabinet
f
f.
Curvilinear (non-rectangular) shape
g.
Beautiful hardwood veneer cabinet
h.
24k gold contact conductive spikes,
which provide electrical connection
through Tower Bass Module 200
•
2-way crossover with low-resistance
components (not shown)
e
g
b
a
d
c
h
Technical Specifications:
CROSSOVER TYPE
2-WAY
MAGNETICALLY SHIELDED
Y
®
WOOFER 7" (18cm) KEVLAR
2
TWEETER 1" (2.5cm) SILK DOME
1
SENSITIVITY (dB/W/m)
92
MINIMUM IMPEDANCE (Ohm)
3.4
FREQUENCY RESPONSE (Hz-kHz)
50Hz-22kHz
ENCLOSURE TYPE: BASS REFLEX
Y
24 GOLD CONTACT BI-WIRE CAPABLE BINDING POST
POWER HANDLING
Y
150 Watts RMS, 300 Watts Max
@ 4 ohms
Application:
Left front or Right front speaker on speaker stand
Left rear or Right rear speaker on speaker stand
Left front or Right front speaker, paired with Monster THX Select Certified Tower Bass Module 200
Left rear or Right rear speaker, paired with Monster THX Select Certified Tower Bass Module 200
Center Channel Speaker
7
MONSTER ® THX ™ SELECT ™ CERTIFIED SPEAKERS SPECIFICATIONS
MONSTER THX SELECT CERTIFIED DIPOLE SURROUND SPEAKER 100
THX SL100-DSR
®
™
™
Product Features:
Every Monster THX Select Certified Speaker is made from the highest quality materials with advanced technologies
and unique features that ensure maximum performance and aesthetic appeal.
a.
Rigid, responsive
7" Kevlar® mid-bass
with die-cast frame
b.
2 - 1" silk dome tweeters
with low resonance
frequency
c.
24k gold contact bi-wire
capable binding posts
d.
24k gold contact,
custom-fitted jumper straps
e.
Curvilinear
(non-rectangular) shape
f.
Angled driver positioning
g.
Beautiful hardwood
veneer cabinet
•
2-way crossover with
low-resistance components
(not shown)
b
f
a
b
c
d
e
g
Technical Specifications:
CROSSOVER TYPE
2-WAY
MAGNETICALLY SHIELDED
Y
WOOFER 7" (18cm) KEVLAR®
1
TWEETER 1" (2.5cm) SILK DOME
2
SENSITIVITY (dB/W/m)
88
MINIMUM IMPEDANCE (Ohm)
6.4
FREQUENCY RESPONSE (Hz-kHz)
55Hz - 20kHz
ENCLOSURE TYPE: BASS REFLEX
Y
24 GOLD CONTACT BI-WIRE CAPABLE BINDING POST
Y
POWER HANDLING
100 Watts RMS, 200 Watts Max
@ 8 ohms
Application:
Left and Right Surround Channels, for home theater systems
primarily used for movies (not multi-channel music formats
such as SACD and DVD-Audio)
MONSTER ® THX ™ SELECT ™ CERTIFIED SPEAKERS SPECIFICATIONS
8
MONSTER THX SELECT CERTIFIED TOWER BASS MODULE 200
THX SL200-PSM
®
™
™
Product Features:
Every Monster THX Select Certified Speaker is made from the highest quality materials with advanced
technologies and unique features that ensure maximum performance and aesthetic appeal.
j
a
g
c
b
e
f
d
h
i
Technical Specifications:
MAGNETICALLY SHIELDED
ACTIVE WOOFER 12" (30cm) WITH AMPLIFIER 200 Watt
AMPLIFIER POWER (Watt)
MINIMUM IMPEDANCE (Ohm)
Y
1
200
4
FREQUENCY RESPONSE (Hz-kHz)
20Hz-200kHz
ENCLOSURE TYPE: BASS REFLEX
Y
24 GOLD CONTACT BI-WIRE CAPABLE BINDING POST
Y
Application:
Front and/or Rear full-range speakers when combined with
Monster THX Select Certified Monitor 100 or 200
Standalone subwoofer connected to low-level outputs in systems
with 4, 2 or 1 subwoofer configurations
9
MONSTER ® THX ™ SELECT ™ CERTIFIED SPEAKERS SPECIFICATIONS
a.
Lightweight, rigid 12" cone
b.
Powerful 200 Watt internal amplifier
c.
Phase control switch
d.
Automatic “Power On” circuitry
e.
24k gold contact binding posts
for speaker level signal
f.
24k gold contact line-level input from LFE, plus
output for connection to additional subwoofers
g.
Large-diameter dual bass reflex tubes
h.
Beautiful curvilinear hardwood veneer cabinet
i.
24k gold contact positioning spikes for stability
j.
24k gold contact spike rests, which provide
electrical connectivity with the Monitor
Speaker 100 or 200
MONSTER THX SELECT CERTIFIED SUBWOOFER 200
THX SL200-SW
®
™
™
Product Features:
Every Monster THX Select Certified Speaker is made from the highest quality materials with advanced
technologies and unique features that ensure maximum performance and aesthetic appeal.
a.
e
a
c
f
h
b
g
d
i
Lightweight, rigid 12" cone
b.
Powerful 200 Watt internal amplifier
c.
Phase control switch
d.
Automatic “Power On” circuitry
e.
24k gold contact binding posts
for speaker level signal
f.
24k gold contact line-level input
from LFE, plus output for connection
to additional subwoofers
g.
Large-diameter bass reflex tube
h.
Beautiful hardwood veneer cabinet
i.
24k gold contact positioning spikes
for stability
Technical Specifications:
MAGNETICALLY SHIELDED
Y
ACTIVE WOOFER 12" (30cm) WITH AMPLIFIER 200 Watt
1
AMPLIFIER POWER (Watt)
MINIMUM IMPEDANCE (Ohm)
200
4
FREQUENCY RESPONSE (Hz-kHz)
20-350
ENCLOSURE TYPE: BASS REFLEX
Y
24 GOLD CONTACT BI-WIRE CAPABLE BINDING POST
Y
Application:
Standalone subwoofer in systems using 4, 2 or 1
subwoofer configurations
MONSTER ® THX ™ SELECT ™ CERTIFIED SPEAKERS SPECIFICATIONS
10
MONSTER THX SELECT CERTIFIED SPEAKER STANDS
THX SL-STAND 100
THX SL-STAND 200
®
™
™
Product Features:
Every Monster THX Select Certified Speaker Stand is made from the highest quality materials with
advanced technologies and unique features that ensure maximum performance and aesthetic appeal.
Stand for Monitor 100
e
b
a.
c
a
27" tall for optimal tweeter height
b.
Beautiful hardwood veneer top and bottom
c.
Aluminum center supports
d.
Copper positioning spikes for stability
e
24k gold contact spike rests to securely
receive speaker
•
Designed specifically for the Monitor Speaker 100
(not shown)
a.
23" tall for optimal tweeter height
b
d
Stand for Monitor 200
e
b
c
a
b
d
Application:
For Monster THX Select Certified Monitor Speakers 100 or 200
11
MONSTER ® THX ™ SELECT ™ CERTIFIED SPEAKERS SPECIFICATIONS
b.
Beautiful hardwood veneer top and bottom
c.
Aluminum center supports
d.
Copper positioning spikes for stability
e
24k gold contact spike rests to securely
receive speaker
•
Designed specifically for the Monitor Speaker
200 (not shown)
SPEAKER PLACEMENT GUIDELINES
WHETHER YOU USE YOUR HOME THEATER TO ENJOY MOVIES, MUSIC, OR BOTH, WE HAVE A MONSTER®
THX™ SELECT™ CERTIFIED SPEAKER CONFIGURATION TO MAXIMIZE YOUR LISTENING EXPERIENCE
Choosing the right speaker configuration and placement depends on how you use your home theater. Is your system
a one-stop entertainment hub where you watch your favorite movies and enjoy music in multi-channel SACD
or DVD-Audio? Or, is your AV system primarily for watching movies?
Put simply, movies and music place different demands on audio reproduction.
Film producers typically strive for an enveloping environment, knowing that the viewer’s attention is focused on the
screen in front of them. Although a few film formats use point-source specific audio for the rear surround channels,
many do not. For example, THX movie theater standards specifically encourage an enveloping sound best provided
by multiple speakers along the wall of the theater.
High-resolution audio formats such as DVD-Audio and SACD let you enjoy your favorite music in stunning multichannel surround sound. The sound quality is light years beyond the conventional CD. Each format uses all five
channels as discrete, point-source specific audio sources. Any instrument can be placed anywhere in a 360°
soundfield for maximum flexibility and creativity. Audio producers enjoy making dramatic use of the almost limitless
options provided by multi-channel music formats.
The following speaker configuration and placement guidelines will help you chose the configuration that works
best for you.
NOW THAT BREATHTAKING HOME THEATER SOUND IS WITHIN YOUR GRASP, IT’S NO WONDER YOU PROBABLY
WANT TO GET UP AND CONNECT YOUR MONSTER THX SELECT CERTIFIED SPEAKERS IMMEDIATELY AND GET
ON WITH THE SHOW. HOWEVER, THERE ARE SOME GUIDELINES TO CONSIDER BEFORE YOU BEGIN. CONSIDER
THE FOLLOWING TO GET THE MOST OUT OF YOUR HIGH PERFORMANCE HOME THEATER.
Before You Connect Your Speakers
•
Turn off all of your audio components.
•
Read the owner’s manual for all of your audio components, especially the A/V receiver, processor,
and/or power amplifiers.
•
Read this manual and have it available.
General Guidelines
Monster THX Select Certified Speakers are ported in the rear of each speaker and therefore should never be placed
in a bookshelf or other enclosed environment. Doing so will degrade the sonic performance.
When placing in your room, we recommend that each speaker be at least one foot from any room boundary
(with exception of the Dipole Surround Speaker 100 which is mounted to the wall). This will help ensure
proper sonic performance.
Installing Spikes
Monster THX Select Certified speakers come with spikes to separate the speakers and subwoofers from cabinets
and floors to help maintain proper sonic performance. The spikes should be installed in the bottom
of each speaker prior to placement.
To install, simply twist the spikes (clockwise) into the four threaded inserts on the bottom of each speaker.
The spikes are adjustable so you can raise or lower the height of the speaker. Make sure that all spikes
are at the same level when installing to avoid any rocking of the speaker.
SPEAKER PLACEMENT GUIDELINES
12
Installing Non-Conductive Spike Covers
Monster THX Select Certified speakers include non-conductive spike covers for certain installations.
You can connect your Monster THX Select Certified Monitor 100 or 200 to your Monster THX Select Certified Tower
Bass Module 200 to create a full-range speaker with optimum performance. You can make this connection without
additional speaker cable by inserting the conductive spikes on the Monitor 100 or 200 into the conductive spike rests
on the Tower Bass Module 200. For this configuration, do not use the non-conductive spike covers.
If your desired hookup of the Tower Bass Module 200 uses the line-level connection to the LFE output
on your receiver or processor, then you need to connect your Monitor 100 or 200 speaker to your amplifier/receiver
directly using a separate speaker cable. You also need to install the non-conductive spike covers on the Monitor 100
or 200 spikes to prevent signal from the speaker cable being transferred to the Tower Bass Module 200
via the conductive spikes and spike rests.
Non-Conductive Spike Cover
Carpet Spike
Caution: Prevent Damage to Furniture Surfaces
The non-conductive spike covers should be used on the spikes when placing speakers on shelves or hardwood
floors to prevent damage to the surface finish. Also, do not drag speakers across any floors or carpets.
It is possible to damage both the floor and the speakers by doing this.
Installing the THX Brand Epoxy Labels
Your THX Select Certified Monster home theater speakers come standard with magnetic THX brand epoxy labels
to complete the speaker look and communicate your enthusiasm for high-quality home theater audio. To affix,
simply remove the label from the plastic packaging and place on the front bottom center of your speaker grille.
Front Epoxy Placement
13
SPEAKER PLACEMENT GUIDELINES
Center Epoxy Placement
Placement of Front Channel Speakers
To maintain proper sonic performance during music and movie playback, proper positioning of the front speakers
is crucial. When placed properly, your speakers will form a “sweet spot” at the main listening position. Forming
the sweet spot correctly will allow for an accurate soundstage during music and movie playback.
Directions:
1. Place the center channel speaker (3) in position first (usually determined by mounting method;
i.e. furniture shelf, top of TV, etc.). Then measure from the front of the center channel speaker
to the nominal position of ears in center listening position (a to b).
2. Place the front (1) and back (2) pair of left and right speakers equidistant from the center channel
to the listening position (a to b = b to c, b to e = b to f, etc.)
3. Slightly toe-in each speaker so that they are pointing at the ears of the person seated in the center
of the listening position. The three front channel speakers should sit on an arc (dotted line)
where each speaker is the same distance to the listener.
Monsterous Tip: For best sonic performance and maximum accuracy placing your speakers, use masking
tape to mark off the measurements and centerline to each speaker.
4
c
1
d
3
1
a
b
e
2
f
2
SPEAKER PLACEMENT GUIDELINES
14
Physical Placement of Center Channel Speaker
All Monitor 200 Speakers come with four plugs and four rubber feet for horizontal mounting.
Rubber Foot
4 pc
Plug
4 pc
Insert the 4 plugs in the holes at the end of the speaker to cover the conductive spike screw holes.
Arrange the four rubber feet as shown in the diagram below.
Connect the speaker cable to the Monitor 200.
Set the speaker directly on the rubber feet horizontally with drivers facing the listening area. Make sure
the speaker is level left-to-right, and angle the speaker so that it points to the main listening area.
IMPORTANT:
Do not let the Monitor 200 wooden cabinet touch the furniture directly—unwanted audio resonance
will be the result.
Make sure that there is a minimum of 6" of clearance behind the center channel speaker to allow the rear port
to function properly. Also, avoid positioning the center channel speaker so that the speaker cable or other
interconnects would be pulled across the rear port.
15
SPEAKER PLACEMENT GUIDELINES
Vertical Placement of Center Channel Speaker
Proper vertical positioning of the center channel speaker is important for a wide and deep soundstage.
When positioning, we recommend that the centerline of the center channel speaker not be more than 24 inches
from the centerline of the left and right channel speakers to meet THX specifications (see illustration).
If this is not possible, place speakers so that they are as close to 24" as possible. The center channel speaker
may be placed above or below the video monitor.
������
SPEAKER PLACEMENT GUIDELINES
16
Placement of Subwoofers
If you have chosen to set up a four-subwoofer system, the best
locations for the subwoofers are the four corners of the room. This
configuration will provide the best possible bass response from both
movies and music.
If you have chosen to set up a two-subwoofer system, the best
locations for the subwoofers are the two corners at the front of the room
(Option A), on either side of the listening area (Option B) or in the two
corners at the back of the room (Option C).
If you have chosen to set up a one-subwoofer system (4), placement
of the subwoofer will be determined by the qualities of the room.
The corners of the room work best, left front corner (Option A), right front
corner (Option B), left back corner (Option C) or right back corner (Option
D). Experiment with locations until the bass response is clean and does
not sound overpowering.
17
SPEAKER PLACEMENT GUIDELINES
A
A
B
B
C
C
A
B
C
D
Placement of Surround Speakers
Surround speaker placement is as simple as setting up your front left and right channel speakers. Use the
measurement you recorded when placing your front speakers (a to b on page 14), and use that same distance
to place your surround speakers on an arc around the sweet spot (e to f on page 14).
If you are using dipole speakers (2), they are designed to be mounted on the side walls of the room. Each dipole
speaker should be mounted to the side of the sweet spot, at a height of 5' to 6'. (see illustrations below).
4
0
3
1
30
2
1
30
2
Fig. 1
��������
Fig. 2
SPEAKER PLACEMENT GUIDELINES
18
Wall-Mounting of Dipole Surround Speakers
WARNING: While mounting your Dipole Speaker is not a complicated process, it does require a certain level
of expertise. DO NOT attempt mounting without adequate tools and knowledge. If you do self-mount, you will need
a second person to assist. Monster ® and THX™ assume no responsibility for any damage to property or personal injury
while mounting a Dipole 100 Speaker.
Each Dipole 100 Speaker comes with the following included hardware:
Long Phillips Screws
2 pc
Paper Template
1 pc
��
���
�
Foam Spacers
4 pc
���������
���
�
�����������
����
��������
�����������
����
�����
����
Short Phillips Screws
2 pc
����
��
Drywall Anchors
2 pc
�����
�����
������
����������������������������������������������
������������������������������������
�������������������������������������
��������������������������������������������
���������������������������������������
�����
�����
����
���
������
�����
Directions:
����
��������
�������
����
���������
1. Locate a wall stud behind your drywall. We recommend using an electronic stud-finder (available
���������������������������������
at hardware stores and home centers) to help ensure accurate location of stud. If no stud is available,
the Dipole Speaker can still be mounted using the included drywall anchors.
2a. If a wall stud is available: tape the included paper template onto your wall with the illustrated screw
holes aligned with your wall stud. Be sure to use masking tape to protect wall paint. Drill a 1/8" pilot
hole through each of the 2 illustrated screw holes into the drywall and wall stud (this will also ease
installation of screws). Remove paper template.
Insert the 2 long Phillips screws into the pre-drilled holes and install with a Phillips screwdriver.
2b. If wall stud is unavailable: tape the included paper template onto your wall where desired. Be sure
to use masking tape to protect wall paint. Drill a 1/8" pilot hole through each of the 2 illustrated screw
holes into the drywall and wall stud and insert drywall anchor (may need to tap in with a hammer).
Remove paper template.
Insert the 2 short Phillips screws into the drywall anchors and install with a Phillips screwdriver.
3. Determine the number of spacers needed (single or stacked) by measuring the amount of space
between the wall and the top of the screw. Remove the protective paper and adhere the spacers
on the backside of the speaker, approximately 1 1/2" from the edge of the speaker side and centered
vertically. Adhere a second spacer on top of the first if the distance warrants it.
4. Connect your speaker wires to the back of the speaker (see the Speaker Connections section
in this manual).
5. With the help of a second person to assist, carefully lift the speaker to the wall and place the inset
mounting holes located on the backside onto the screws.
6. Enjoy your new speaker.
Congratulations—your new speaker is now mounted. The high-gloss finish offers protection, but avoid contact
with hard surfaces to avoid damage and scratches. To clean, dust often to remove abrasive particles and build-up
from surfaces. For deeper cleaning, slightly dampen a clean, lint-free cloth with water and wipe down, ensuring no
moisture remains on any wood surfaces. Don’t polish excessively—only two to three times a year to avoid
build-up should be needed.
19
SPEAKER PLACEMENT GUIDELINES
����� ���������
������������������
����������������������������
������������������������������������������
�����������
�������
������������������������������������������������������������
���������������������������������������������������������������
����������������������������������������������������������������
��������������������������������
����������������
���������������
���������������
��������������
�������������� �
������
����
����
���
��
�
����
��������
���������������������
����
�������
�
������
���
���
������������
������������������
�
�����������
�
RECOMMENDED SPEAKER CONFIGURATIONS AND PLACEMENT FOR HOME
THEATER MUSIC AND HOME THEATER (MOVIES ONLY) SYSTEMS.
No. 1: “Best” Home Theater Music System
The “Best” Home Theater Music system configuration will have four full-range towers for reproduction of point-source
specific audio in a 360° multi-channel music soundfield, one center channel speaker, and four subwoofers
for the best possible bass reproduction.
Components
Front and Rear Left / Right
Center
4 – THX SL200-MTR or 4 – THX SL200-PSM
1
1 – THX SL200-MTR Turned Sideways
2
Subwoofers
4 – THX SL200-PSM or 4 – THX SL200-SW
3
3
3
0
2
1
1
30
30
30
30
1
1
3
3
Connections
Front and Rear Left / Right 1
Speaker Level to THX SL200-PSM / Internal Pins to THX SL200-MTR
Center 2
Speaker Level to THX SL200-MTR
Subwoofers 3
Low Level to THX SL200-PSM or THX SL200-SW
See Speaker Connections section for more detail on making connections.
SPEAKER CONFIGURATIONS AND PLACEMENT
20
No. 2: “Better” Home Theater Music System
The “Better” Home Theater Music system configuration will have four full-range towers for reproduction
of point-source specific audio in a 360° multi-channel music soundfield, one center channel speaker,
and two subwoofers at the front corners for tight, clean bass.
Components
Front and Rear Left / Right 1
4 – THX SL200-MTR or 4 – THX SL200-PSM
Center 2
1 – THX SL200-MTR Turned Sideways
Subwoofers 3
2 – THX SL200-PSM or 2 – THX SL200-SW
3
3
0
2
1
1
30
30
30
30
1
1
Connections
Front and Rear Left / Right 1
Speaker Level to THX SL200-PSM / Internal Pins to THX SL200-MTR
Center 2
Speaker Level to THX SL200-MTR
Subwoofers 3
Low Level to THX SL200-PSM or THX SL200-SW
See Speaker Connections section for more detail on making connections.
21
SPEAKER CONFIGURATIONS AND PLACEMENT
No. 3: “Good” Home Theater Music System
The “Good” Home Theater Music system configuration will have four full-range towers for reproduction
of point-source specific audio in a 360° multi-channel music soundfield, one center channel speaker,
and a single subwoofer for low bass reproduction.
Components
Front and Rear Left / Right
4 – THX SL200-MTR or 4 – THX SL200-PSM
1
Center 2
1 – THX SL200-MTR Turned Sideways
Subwoofers 3
1 – THX SL200-PSM or 1 – THX SL200-SW
3
0
2
1
1
30
30
30
30
1
1
Connections
Front and Rear Left / Right 1
Speaker Level to THX SL200-PSM / Internal Pins to THX SL200-MTR
Center 2
Speaker Level to THX SL200-MTR
Subwoofers 3
Low Level to THX SL200-PSM or THX SL200-SW
See Speaker Connections section for more detail on making connections.
SPEAKER CONFIGURATIONS AND PLACEMENT
22
No. 4: “Best” Home Theater (Movies Only) System
A movie-specific system may be configured many different ways with multiple choices for bass and LFE output.
The ultimate performance system configuration will have four full-range towers, one center channel speaker
and four subwoofers at the front corners for tight, clean bass.
Components
Front and Rear Left / Right 1
4 – THX SL200-TWR
Center 2
1 – THX SL200-MTR Turned Sideways
Subwoofers 3
4 – THX SL200-PSM or 4 – THX SL200-SW
3
3
0
2
1
1
30
30
30
30
1
1
3
3
Connections
Front and Rear Left / Right
1
Speaker Level to THX SL200-TWR
Center 2
Speaker Level to THX SL200-MTR
Subwoofers 3
Low Level to THX SL200-PSM or THX SL200-SW
See Speaker Connections section for more detail on making connections.
23
SPEAKER CONFIGURATIONS AND PLACEMENT
No 5: “Better” Home Theater (Movies Only) System
The “Better” Home Theater (Movies only) system configuration will have two full-range towers, one center channel
speaker, two monitor speakers on stands, and two subwoofers at the front corners for tight, clean bass.
Components
Front Left / Right
1
2 – THX SL200-TWR
Rear Left / Right
2
2 – THX SL100-MTR on Stands
Center
1 – THX SL200-MTR Turned Sideways
3
Subwoofers
2 – THX SL200-PSM or 2 – THX SL200-SW
4
4
4
0
3
1
1
30
30
30
30
2
2
Connections
Front Left / Right
1
Speaker Level to THX SL200-TWR
Rear Left / Right
2
Speaker Level to THX SL100-MTR
Center
Speaker Level to THX SL200-MTR
3
Subwoofers
4
Low Level to THX SL200-PSM or THX SL200-SW
See Speaker Connections section for more detail on making connections.
SPEAKER CONFIGURATIONS AND PLACEMENT
24
No. 6: “Good” Home Theater (Movies Only) System
The “Good” Home Theater Music system configuration will have two full-range towers, one center channel speaker,
two wall-mounted dipole speakers, and a single subwoofer for low bass reproduction.
Components
Front Left / Right 1
2 – THX SL200-TWR
Rear Left / Right 2
2 – THX SL100-DSR Mounted on Side Walls
Center
1 – THX SL200-MTR Turned Sideways
3
Subwoofers
1 – THX SL200-PSM or 1 – THX SL200-SW
4
4
0
3
1
30
1
30
2
2
Connections
Front Left / Right 1
Speaker Level to THX SL200-TWR
Rear Left / Right 2
Speaker Level to THX SL100-DSR
Center 3
Speaker Level to THX SL200-MTR
Subwoofers 4
Low Level to THX SL200-PSM or THX SL200-SW
See Speaker Connections section for more detail on making connections.
25
SPEAKER CONFIGURATIONS AND PLACEMENT
SPEAKER CONNECTIONS
MONSTER® THX™ SELECT™ CERTIFIED SPEAKER SYSTEMS CAN BE CONNECTED IN A VARIETY OF WAYS. WHILE
MOST OF THE CONNECTIONS ARE STRAIGHTFORWARD, SEVERAL VARIATIONS ARE A BIT MORE CHALLENGING.
PLEASE READ THIS ENTIRE SECTION FIRST BEFORE CONNECTING YOUR SPEAKERS.
Before You Begin:
•
Turn off all of the audio components in your system.
•
Read through your audio components owner’s manuals to confirm their connection and setup procedures.
•
When making connections, follow all polarity markings to ensure proper operation of each speaker:
Positive (+) to Positive (usually Red), and Negative (–) to Negative (usually Black).
•
If you bi-wire your speakers, remove the jumper straps connecting the terminals. Failure to do so can result
in damaged speakers and components.
•
Have the cables available for the type of connections you have chosen.
Connecting Your Tower, Monitor and Dipole Surround Speakers
Your speakers can be connected in a variety of ways. You may chose the standard speaker connection, the bi-wire
speaker connection, or you may connect your Monitor 100 or 200 speakers to your Bass Module 200 using
the conductive spikes. The following instructions and illustrations will guide you through each connection type.
Single Cable Connection
Connect the positive and negative terminals to the correct terminal on the amplifier. Leave the jumper straps in place
between the terminals.
SPEAKER CONNECTIONS
26
Bi-Wire / Bi-Amp Connection
If you wish to use separate amplifier channels for the highs and mids of your Monster THX Select Certified Speakers,
remove the jumper straps between the terminals and connect the high-pass and low-pass connections between
the appropriate positive and negative terminals on both bi-amp and speaker.
Low
Pass
High
Pass
NOTE: Remove the jumper straps
between the terminals
Connecting Your Monitor
100 or 200 Speakers to
Your Tower Bass Module 200
Your Monitor 100 or 200 speakers can receive
audio signal through special conductive spikes
when placed on top of a Monster THX Select
Certified Tower Bass Module 200 already
connected to the amplifier/AV receiver via speaker
terminals (as shown).
When using the conductive spikes for connection,
double-check the spikes to make sure they are
secure for the best possible connection.
NOTE:
Connection through the conductive
spikes and spike rests will not work
if the Bass Module is connected via the
subwoofer low level input. In this case,
the Monitor 100 or 200 must then be
connected directly to the amplifier.
Proper Use of Non-Conductive Spike Covers
If placing the Monitor 100 or 200 on the Tower Bass Module 200 when using a line level connection,
the non-conductive spike covers must be placed over the Monitor 100 and 200 spikes. This prevents
the signal from the Monitor 100 and 200 being sent to the Tower Bass Module 200.
27
SPEAKER CONNECTIONS
Connecting Your Tower Bass Module 200 and Subwoofer 200
The Tower Bass Module 200 and Subwoofer 200 can be connected in several ways. If your AV receiver has
a THX-certified processor, the subwoofers should be connected using the line level connection to the subwoofer
output. This connection maintains the benefits of THX certification.
Using Line Level Subwoofer Connections
Using the subwoofer output from your AV receiver is the best way to connect your subwoofers and bass modules
used as subwoofers. With this connection you can choose to use the internal crossover control on the subwoofer
or the subwoofer crossover control in your AV receiver. If you choose to use the control in your AV receiver,
set the THX/Subwoofer selection switch to THX.
For your convenience, a subwoofer line level “output” is included to make connecting multiple subwoofers easier.
Using Speaker Level Connections
The Monster THX Select Tower Bass Module 200 and the Monster THX Select Certified Subwoofer 200 can also
be connected using speaker cable. Use this connection if your AV receiver does not have a subwoofer output.
SPEAKER CONNECTIONS
28
Connecting Your Monster THX Select Certified Tower Bass Modules 200
The Tower Bass Module 200 can act as either a woofer for a full-range tower speaker (when paired with a Monitor
100 or 200), or as a standalone subwoofer.
If your Bass Module 200 is intended to be used as part of a full-range speaker connection with a Monitor 100 or 200,
please refer to page 31 for output matching instructions.
If your Tower Bass Module 200 is intended to be used as a standalone subwoofer, you may connect it one of two
ways: via “line level” or “speaker-level” inputs. Line level input is the preferred way for the best possible bass
performance. Please refer to “Using Line Level Connections” or “Using Speaker Level Connections” on page 28
for instructions.
Installing Speaker Grilles
Your Monster THX Select Certified Speakers come standard with removable grilles that require installation before
operation. These grilles conceal speaker components and cables from view for an aesthetic, organized arrangement.
Front Grille Installation
For Dipole Surround Speaker 100 and Subwoofer 200
1. Remove the front grille from plastic packing
and place on a soft, flat surface.
2. Install the grille onto the speaker by inserting the
attached plastic pegs into the pre-drilled peg holes
on the front of the speaker and snapping into place.
For Monitor Speaker 100, Monitor Speaker 200, Tower Speaker 200
and Tower Bass Module 200
a
1. Remove the front grille from plastic packing
and place on a soft, flat surface.
2. Remove the protective foam packing from
the 6 metal pegs on the front grille.
3. Install the grille onto the speaker by inserting
the attached metal pegs into the pre-drilled peg holes
on the front of the speaker and snapping into place.
Rear Grille Installation
For Monitor Speaker 100, Monitor Speaker 200, Tower Speaker 200
and Tower Bass Module 200
b
c
d
Remove Protective Foam
Packing (a-d)
1. Remove the rear grille from plastic packing and place on a soft, flat surface.
2. Connect any necessary cables between your home theater system and your speaker.
3. Install the grille onto the speaker by inserting the attached plastic pegs into the pre-drilled peg holes
on the back of the speaker and snapping into place.
29
SPEAKER CONNECTIONS
SPEAKER TUNING, CALIBRATION & BALANCING
THE FOLLOWING STEPS ALLOW FOR PROPER CALIBRATION OF YOUR MONSTER THX SELECT CERTIFIED
SPEAKER SYSTEM. TO COMPLETE THE CALIBRATION OF THE SYSTEM YOU WILL NEED THE OWNER’S MANUAL
INCLUDED WITH YOUR AV RECEIVER. ALL RECEIVERS ARE DIFFERENT AND THE STEPS FOR SETUP
AND CALIBRATION SHOULD BE FOLLOWED CLOSELY.
Subwoofer Levels and Balancing
The first step in calibration is to set and balance the subwoofers and/or Bass Modules, especially important in
systems containing two or more subwoofers and/or Bass Modules. Be sure to set the output of your subwoofers
and/or Bass Modules first before calibrating the rest of the system.
NOTE:
Each Monster THX Select Certified subwoofer and Bass Module has a “THX” selection switch—this switch
will bypass the gain and crossover controls for the low level when set to the THX position. It is recommended
for systems that will play movies only have the switch set to the THX position to simplify system calibration.
Proceed to “Connecting Your Tower Bass Module 200 and Subwoofer 200” Section if your subwoofers or Bass
Modules are set to the THX position.
Switch Settings
When using multiple subwoofers the mode switch is used to maintain proper signal to all subwoofers if the internal
gain is bypassed (THX Setting). The “SUB” position does not have multiple settings as the gain control will maintain
proper signal.
Set the THX switch to the correct setting to get proper output levels.
“THX” - Use for a single subwoofer
“THX2” - Use for dual subwoofers with both subwoofers set to this position
“THX4” - Use for four subwoofers with all subwoofers set to this position
Subwoofers
1. Turn off the amplifiers/AV receiver or disconnect monitor speakers.
2. Set the subwoofer output level of your AV receiver to 0.
3. Turn on one of the subwoofers.
4. Start with the crossover control and bass gain control at the 12 o’clock position.
5. Play a 2-channel music cut and turn up the volume of your AV receiver to a comfortable level.
6. Slowly turn the crossover knob counter clockwise until vocals are muted or are no longer heard.
7. Turn off the subwoofer and repeat steps 2-6 for any additional subwoofer in your system.
8. After calibration is completed in your AV receiver, listen to some music and movies cuts
and adjust gain levels accordingly.
SPEAKER TUNING, CALIBRATION & BALANCING
30
Powered Subwoofer Bass Modules
FOLLOW THESE STEPS TO ADJUST THE OUTPUT OF YOUR POWERED SUBWOOFER BASS MODULES TO MATCH
MONSTER THX SELECT CERTIFIED MONITOR 100 OR MONITOR 200 SPEAKERS IF MODE SWITCH IS SET TO
“SUB”. THIS MUST BE DONE PRIOR TO ADJUSTING THE LEVELS WITHIN YOUR AV RECEIVER.
1. Disconnect Monitor speakers from Bass Modules.
2. Set the output in your AV receiver for the channel you are adjusting to “LARGE.”
3. Turn on one of the Bass Modules.
4. Start with the crossover control and bass gain control at the 12 o’clock position.
5. Play a 2-channel music cut and turn up the volume of your AV receiver to a comfortable level.
If adjusting a Bass Module being used on a rear channel, you will want to play a multi-channel
music cut or play the 2-channel cut in a surround music mode.
6. Slowly turn the crossover knob counter clockwise until vocals are muted or are no longer heard.
7. Reconnect the Monitor speaker for that Bass Module.
8. Listen to the balance between the bass and mid bass-high frequencies and adjust the gain
and crossover controls until tight bass is heard at a balanced level to high frequencies.
9. Turn off the Bass Module and repeat steps 2-7 for any additional Bass Module in your system.
10 After all the Bass Module output levels are balanced, you can adjust all channels in your AV receiver.
Make sure to reconnect the Monitor speakers and turn on amplifiers/AV receiver.
31
SPEAKER TUNING, CALIBRATION & BALANCING
SYSTEM CALIBRATION AND FINE TUNING
For the best possible performance, your AV receiver needs to be calibrated and the system fine tuned.
Follow the instructions included with your AV receiver on how to calibrate your system.
Fine Tuning
The four steps necessary to properly fine tune your system with Monster THX Select Certified Speakers are, in order:
1. Phase Correction (Polarity)
2. Levels
3. Distance
4. Equalization
Phase Correction (Polarity)
First, verify the correct polarity of all speakers. If one speaker is out of phase, it may be difficult to catch—but phase
effects on high performance audio are critical. Any speakers out of phase will affect directionality, soundstage and
bass impact, distort ambiance, and dull the impact of your favorite music and movie audio.
Triple-check all speaker cables for correct polarity. To accurately check polarity, Monster recommends the use
of an electronic polarity checker to verify that speakers all have the same polarity.
Levels
Setting output levels is crucial for the optimal performance from your Monster THX Select Certified speaker system.
Follow these guidelines and the owner’s manual included with your AV receiver.
•
Select a manual test tone if available.
•
Sitting in the sweet spot (central listening position), hold a dB meter (commonly found in electronics
specialty stores) in front of you facing upwards with the mic about ear level.
•
Adjust each channel output until 85 dB is reached on the dB meter.
•
If the dB meter jumps around or the sound is not quite right, listen to music and movie cuts
and adjust the levels accordingly.
Distance
Setting speaker distance to your AV receiver is crucial for proper performance. Measure the distance
to all speakers accurately and set your AV receiver accordingly.
Equalization
Although there is no such thing as a perfect room, with proper tuning you can make any room sound good.
Some rooms have “room nodes” which cancel the response of even the best speaker.
Monster recommends running a modified “Auto mode” equalization. If available on your equipment, run
the auto-equalization routine then fine tune it by ear (some auto-modes make a room sound too bright).
If you’re not sure how to perform this procedure and you are using good speakers, just equalize for mid-bass
or skip the “Auto Mode” altogether.
SYSTEM CALIBRATION AND FINE TUNING
32
SPEAKER SPECIFICATIONS
Frequency
Response
Sensitivity
Power Handling
(MAX)
Impedance
Amplifier Power
Monitor 100
55Hz - 20KHz
89 dB
200W
4
N/A
Monitor 200
50Hz - 20KHz
92 dB
300W
4
N/A
Dipole 100
55Hz - 22KHz
88 dB
200W
8
N/A
Tower 200
40Hz - 22KHz
92 dB
300W
4
N/A
Bass Module 200
20Hz - 350Hz
N/A
N/A
4
200W
Subwoofer 200
20Hz - 350Hz
N/A
N/A
4
200W
THX
Quantity
7" Driver
1" Silk
Monitor 100
1
1
Monitor 200
2
1
Dipole 100
1
2
Tower 200
3
1
10"
Driver
12"
Driver
15"
Driver
THX
Bass Module 200
1
Subwoofer 200
1
CARE AND MAINTENANCE
Your Monster THX Select Certified Speakers are made with a hardwood veneer and should be cared for like fine
furniture. Please observe the following:
•
Dust regularly with a soft, lint-free cotton cloth.
•
Never use solvents, harsh chemicals, or abrasive cleaners.
•
Keep speakers out of direct sunlight.
By caring for your Monster THX Select Certified Speakers, you will be able to enjoy them for many years to come.
33
SPEAKER SPECIFICATIONS • CARE AND MAINTENANCE
© 2005 Monster, LLC. “Monster”,“Monster THX Select”,“Monster Power”,“Monster Cable”,“Home Theater
Music”, the Monster logo and the Monster THX logo are trademarks or registered trademarks of Monster,
LLC. “THX”, “THX Select”, the THX logo and the THX Select logo are trademarks of THX Ltd. All other product
names, marks and logos are trademarks of their respective holders. Monster THX Select Certified speakers
are designed in the USA and manufactured to Monster quality specifications in China. Specifications subject
to change without notice. Images and illustrations in this guide may vary from actual products purchased.
rm 164264