1
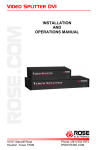
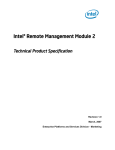
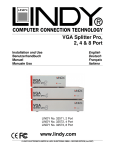
Quick Installation and Setup Guide
ARMC/3P
Ethernet
IPMB cable
VGA-USB System Cable
optional External
Power Supply
ARMC/3P Front Side Connectors
(a) IPMI over IPMB
I. Physical Installation
Congratulations on your purchase of ARMC/3P, the complete solution for secure remote platform management. This
very important installation procedure ensures a smooth installation.
Mount the ARMC/3P into a free PCI slot. You may use a PCI-X slot (33 or 66 MHz, 32 or 64 Bit). The ARMC/3P will not
fit in PCI express slots. Connect the cables like shown in the figure:
ATX Power Cable Adaptor
purple
Serial 1
Ethernet
Serial 1
Serial 2
PS/2
red
-
1
USB
1
KVM Port
black
cable color
IPMB
white
1
black
-
ADC
KIRA100
This connection is used to power on or off the
system, or to perform a hard reset. You must
have a motherboard that supports IPMI 1.5 or
higher and has a 3 or 4 pin IPMB connector as
shown in the Figure below.
1. Connect the 5 pin connector of the IPMB
cable with the 1x5 pin IPMB connector on the
ARMC/3P as shown in the schema with all connectors of the ARMC/3P. The red wire of the
IPMB cable has to be connected to pin 1 at the
ARMC/3P.
4. Make sure that the IPMI function is enabled
on the host system.
We recommend a 5V /1A power
supply. Contact your local sales
representative for a Acer approved
power supply.
Important: Any standard power
supply compliant with the requirements stated above may be used.
Nevertheless, any warranty from
Acer voids if non-Acer power supplies are used in conjunction with
the ARMC/3P. Check for the Acer
approval label on the external
power supply in order to preserve
your manufacturer's warranty.
Dimension: 2.1 mm diameter
(b) ATX Power Reset
If there are separate pins for the reset and power
switch connectors on the motherboard, refer to
the motherboard manual to find the right connectors for the front panel reset/power switch
buttons:
2. Connect the connector RST2 on the
ARMC/3P using the enclosed reset cable (two
wires, black/red) with the reset connector on the
motherboard.
Pinning: Plus on inner connector
IPMB Cable
2. Align the RJ45 plug with the notch on the
adapter´s connector and insert it into the adaptor´s connector.
(b) 100 Mpbs Connection
ARMC/3P
1. Use the video cable to connect the VGA output of the host with the VGA input on the
ARMC/3P. In case a local video display is
required, please use the videosplitter as shown
below. Make sure that the connector with
screws is mounted to the computer VGA out.
2. Connect the USB plug with one of the host's
own USB connectors.
3. Connect the Ethernet jack to a hub or switch
using an UTP 5 cable if required.
VGA-USB System Cable
3. Disconnect the power switch cable from the
motherboard and connect it to the connector
PWR1 on the ARMC/3P.
For 100BASE-TX ethernet networks the
ARMC/3P supports category 5 UTP cabling. To
establish a 100 Mbps connection, the cable has
to be connected to a 100BASE-TX hub.
1. Make sure that the cable is wired appropriately for a standard 100BASE-TX adapter.
2. Align the RJ45 plug with the notch on the
adapter´s connector and insert it into the adaptor´s connector.
Important: The UTP wire pairs and configuration for 100BASE-TX cable are identical to
those for 10BASE-T cable when used with category 5 UTP cable.
VGA
outoput
1. Disconnect the reset cable from the motherboard and connect it to the connector RST1 of
the ARMC/3P.
Current: >= 1A
For 10BASE-T ethernet networks the Fats
Ethernet adapter uses category 3, 4, or 5 UTP
cable. To establish a 10 Mbps connection, the
cable has to be connected to a 10BASE-T hub.
1. Make sure that the cable is wired appropriately for a standard 10BASE-T adapter.
USB
at host
IPMB
Type A
Connecting Power and Reset
Cables
The ARMC/3P offers the possibility
to remotely control both the power
and the reset functions of the host
system. In order to support it, there
is additional cabling necessary. The
preferred way for this cabling are the
interfaces offered by IPMI. However,
if your host does not support IPMI
you may use other possibilities.
The bracket of the ARMC/3P provides a RJ45
connector for Ethernet. The connector is used
either for a 100 Mbps 100BASE-TX connection
or for a 10 Mpbs 10BASE-T connection. The
adapter can sense the connection speed and
will adjust to the appropriate operation automatically.
VGA-USB System Cable
IPMB
type B
There are the following options to connect power and enable reset/power:
Voltage: 5V
VGA
output
PWR1
PWR2
S2D
Connecting Ethernet
(a) 10 Mpbs Connection
Connecting the VGA-USB System
Cable and the Videosplitter
3. Set the IPMI settings to IPMI over IPMB.
RST2
To allow the ARMC/3P to operate
independently from the server system it is possible to connect the
card to an external power supply.
From the technical point of view
any power supply can be used as
long as the following specifications
are met:
In case your motherboard does not have single
pins for reset and power switch, you may use
one of the front panel adapters which are
offered.
Reset/Power Wires
External Power
Adaptor
An external power supply could be
connected to the ARMC/3P in order
to use the remote power on/off features provided by the ARMC/3P.
4. Connect the connector PWR2 on the
ARMC/3P using the enclosed power switch
cable (two wires, black/red) with the power
switch on the motherboard.
2. Connect the ending of the cable with one of
the IPMB connectors (3 or 4 pin connector) on
the motherboard.
RST1
Connecting Power using
External Power Adaptor
ARMC/3P Rear Side Connectors
USB
at host
Videosplitter
ARMC/3P
To the local Monitor
F - female connector
M - male connector
For more detailed instructions, please consult the User Manual found on the enclosed CD-ROM. Rev. A March 2007
Quick Installation and Setup Guide
ARMC/3P
II. Initial Configuration
The ARMC/3P´s communication
interface is based on TCP/IP. Initially,
the ARMC/3P network interface is
configured with the parameters
shown here:
b) for the LINUX Psetup Tool:
IP auto configuration: DHCP
IP address: none
Net mask: 255.255.255.0
Gateway: none
IP access control: none
If this initial configuration does not
meet your local requirements, the
following describes the initial IP configuration that is necessary to access
the ARMC/3P for the first time.
II (a) Using the Psetup Tool via
Graphical User Interface
You can choose between a psetup
tool for Windows, that requires a MS
Windows 2000 and higher, and a
psetup tool for LINUX. Both can be
found on the CD delivered with this
package. You can follow the procedure described below. For other OS
you may either use the serial console.
1. Connect the ARMC/3P to your
computer via local network.
2. Start the psetup tool from the CD
on the computer that the ARMC/3P is
installed or any other computer which
is part of the same local network. A
window opens as shown in Figure a)
for the Windows or b) for the LINUX
Psetup Tool.
Note: If your network provides a
properly configured DHCP server the
ARMC/3P should be automatically
assigned an IP address. Please ask
your DHCP admin for the IP address
the ARMC/3P got from the DHCP
server.
Steps for configuration:
For detecting the right MAC address
of the ARMC/3P, press the Refresh
Devices button (a) Windows
Version) or Refresh button (b)
LINUX Version) and then choose the
right MAC address in the selection
box. The displayed MAC address is
the same MAC address printed on
the white sticker placed on the back
of the ARMC/3P.
Furthermore there are two buttons:
Query Device and Setup Device.
Press the Query Device button to
display the preconfigured values of
the network configuration. The values are displayed in the text fields
a) for the Windows Psetup Tool:
located below (Windows Version)
and above (LINUX Version). If necessary, adjust the network settings to
your needs. To save the changes
enter a super user name and an
according password. Then press the
Setup Device button.
To close the window and accept the
changes, press the OK button, otherwise Cancel at the Windows
Version. To accept the changes
press the OK button in the new
opening window. After successful
operation you can close the LINUX
Setup window.
III Web Interface
II (b) Running the LINUX Psetup Tool
via Command Line
for the configuration questions to appear.
To setup the ARMC/3P via Command Line
please open a command line terminal. The following list shows the command syntax and
their usage:
Bits/second: 115200
Data bits: 8
Stop bits: 1
The ARMC/3P may be accessed using a standard Java enabled web browser. You may use
the HTTP protocol or a secure encrypted connection via HTTPS. Just enter the configured
IP address of the ARMC/3P into your web
browser. The initial login settings are:
--mac <MAC address of the device>
Shows the current network
configuration.
--ip <neue IP address>
Set a new IP address.
--ipacp <dhcp|bootp|none>
Set the auto configuration.
--netmask <net mask>
Set a new netmask.
--gateway <gateway address>
Set a new gateway address.
--login <username>
Admin rights are required to
change the network configura
tion.
--pw <password>
Password of the specified
above user.
--pw-new <password>
The specified above user get a
new password.
Flow Control: Hardware
Login: admin
An example shows the described commands
and their effects:
Displaying the current network settings:
test@teststation:~# /home/test/psetup --mac
00:0D:5D:00:65:78
IP auto configuration: dhcp
IP address: 192.168.5.135
Subnet mask: 255.255.255.0
Gateway: 192.168.5.1
test@teststation:~#
Changing the network settings:
test@teststation:~# /home/test/psetup
--mac 00:0D:5D:00:65:78 --ipacp none
--ip 192.168.5.55 --gateway 192.168.5.1
--netmask 255.255.255.0 --login super
--pw pass
Device configured successfully.
test@teststation:~#
II (c) Initial Configuration via Serial
Console
To configure the ARMC/3P via serial interface
both a serial port replicator cable and a null
modem cable are required. Using a serial terminal, the ARMC/3P has a serial line interface
(rear bracket). This connector is compliant with
the RS 232 serial line standard. To establish a
serial connection use a standard null modem
cable. The serial line has to be configured with
the parameters belowe. When configuring with
a serial terminal, reset the ARMC/3P and immediately press the ESC key. You will see some
device information, and a "=>" prompt. Enter
config, press Enter and wait for a few seconds
Parity: no
Password: password
As you proceed, the following questions will
appear on the screen. To accept the default
values which are shown in square brackets
below, press Enter.
IP auto configuration
(none/dhcp/bootp) [dhcp]:
IP [none]:
Net mask [255.255.255.0]:
Gateway (0.0.0.0 for none) [0.0.0.0]:
a) IP autoconfiguration
With this option you can specify whether
the ARMC/3P should get its network
settings from a DHCP or BOOTP server.
For DHCP, enter dhcp, and for BOOTP
enter bootp. If you do not specify any of
these, the IP autoconfiguration is disabled
and subsequently you will be asked for
the following network settings.
Changing these settings to user specific values is strongly recommended and can be done
on the User Settings page.
IV Remote Console
The Remote Console is the redirected screen,
keyboard and mouse of the remote host system in which the ARMC/3P is installed. The
web browser which is used for accessing the
ARMC/3P has to supply a Java Runtime
Environment version 1.1 or higher. However,
we strongly recommend to install Sun JVM
1.5. The Remote Console will behave exactly
the same way as if you were sitting directly in
front of the screen of your remote system. That
means that both the keyboard and mouse can
be used in the usual way. Open the console
by clicking the preview picture on the main site
of the HTML frontend. The picture below
shows the top of the Remote Console.
b) IP address
The IP address the ARMC/3P uses.
This option is only available if IP autoconfiguration is disabled.
c) Net mask
The net mask of the connected IP subnet.
This option is only available if IP autoconfiguration is disabled.
d) Gateway address
The IP address of the default router for
the connected IP subnet. If you do not
have a default router, enter 0.0.0.0. This
option is only available if IP autoconfiguration is disabled.
Finally, you will be asked if the values are correct, and may adjust them if necessary. After
your confirmation the ARMC/3P performs a
reset using the new values.
There are some options to choose from the
menu, the important ones are the following:
Auto Adjust Button
If the video displayed is of bad quality or distorted in some way, press this button and wait
a few seconds while the ARMC/3P tries to
adjust itself for the best possible video quality.
Sync Mouse
Choose this option in order to synchronize the
local with the remote mouse cursor. This is
especially necessary when using accelerated
mouse settings on the host system. In general,
there is no need to change mouse settings on
the host. *)
*) Note: At first start, if the local mouse pointer
is not synchronized with the remote mouse
pointer, press the Auto Adjust Button once.