1
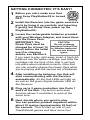
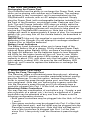
Saitek
WIRELESS
ADAPTER
USER MANUAL
GETTING CONNECTED: IT’S EASY!
1
Before you start, make sure that
your Sony PlayStation®2 is turned
OFF!
2
Install the Receiver into the game console’s
ports by lining it up carefully and inserting
it gently, but firmly. Now, power up the
PlayStation®2.
3
Locate the rechargeable batteries provided
with your Wireless Adapter, and insert them
into the Power Pack.
IMPORTANT: The
CAUTION:
Do not recharge
Power Pack must be
standard
Carbon Zinc
charged for at least 12
or Alkaline batteries!
hours before the initial Do not mix battery
use! For charging
types.
details, see Section 2.
If you want to play right away, insert 4 fresh AA
batteries into the spare cartridge, and slide the
cartridge into the front of the Hub. It will lock
into place when installed correctly. Note that
you can actually charge the Power Pack while
you’re playing with the second set of batteries.
4
After installing the batteries, the Hub will
start communicating with the Receiver
automatically. All the Hub LEDs will light up,
as well as the green Signal Indicator LED on
the Receiver.
5
Plug up to 2 game controllers into Ports 1
and 2 of the Hub. The built-in auto-scan
function allows 2 controllers to work at the
same time.
6
Next, decide where you want to play.
You can position yourself anywhere within
about 10 metres (approximately 30 feet) of
the console. Time to start up one of your
PlayStation® games and have some fun!
FEATURES AND CONTROLS
Pass-through Port
(with cover on)
Scan
Button
Signal
Indicator
LED
Charge
Indicator
LED
RECEIVER
Power Pack
(shown charging
in Receiver)
POWER PACK
Power Pack
(shown attached
to Hub)
Battery Level
Indicator LEDs
HUB
Rumble Button
Controller Ports 1 and 2
3
1. BATTERY INFORMATION
Recharging the Power Pack
Your Receiver has the ability to recharge the Power Pack, even
while you’re playing with another set of batteries. The recharging process is very convenient, as it’s accomplished via the
PlayStation®2 console, with no AC adapter required. Simply
plug the Power Pack (with rechargeable batteries installed) into
the front of the Receiver, as pictured under Features and Controls. The red Charge Indicator LED stays on solidly while the
Power Pack is being charged, and turns off once the charge is
complete. The charging process will continue to take place as
long as the PlayStation®2 remains on. Note that a 6-hour
charge will result in approximately 8 hours of play. For increased
battery life, you may turn off the rumble feature, as described in
Section 2.
IMPORTANT: Use only the supplied or equivalent rechargeable
batteries in the Charger. Do not attempt to recharge standard
Carbon Zinc or Alkaline batteries!
Battery Level Indicators
The Battery Level Indicators allow you to keep track of the
remaining battery life at a glance. A fully-charged Power Pack
lights all three green Battery LEDs, as does a cartridge containing fresh AA batteries. As the batteries begin to lose strength,
the LEDs for the higher levels will turn off, one by one. When
only the first and second green LEDs remain on, your battery
capacity is about 75%, and when only the first green LED is on,
your capacity is about 40%. As soon as the red Battery LED
lights up, you’ll need to replace the batteries or recharge the
Power Pack.
2. ADDITIONAL FEATURES
Using the Pass-Through Port
The Receiver offers a convenient pass-through port, allowing
you to use a DVD remote or another peripheral without unplugging the Receiver. To use this option, remove the protective
cover to reveal the pass-through game port, and then plug in
your peripheral. Note that you cannot plug a game controller
into the Receiver’s pass-through port if you already have a
controller plugged into Port 1 of the Hub, as described below.
Attaching Game Controllers
You may use any combination of controllers (e.g., 2 pads, a pad
plus a joystick or a wheel, etc.), but only a maximum of 2 game
controllers can be attached at any one time. Please note the
following configuration choices:
• Both game controllers may be plugged into the Hub, in Ports
1 and 2.
• One game controller may be plugged into Port 2 of the Hub
(the right-hand port), and the other may be plugged into the
Receiver’s pass-through port. Note that this will not work if
one of the controllers is plugged into Port 1 of the Hub,
since Port 1 has priority over the Receiver’s pass-through
port.
4
PLAY IT SAFE!
Try not to stay in the same position for too long, and
be sure to take breaks now and then. Be smart—
don’t take a chance on straining your wrists, hands,
or fingers! Plus, a word of caution: If you have strained
muscles, broken bones, or joint problems in your fingers, hands,
or arms, do not play games that support the vibration feature.
The Wireless Connection: An Important Note
If the Radio Frequency signal becomes blocked (due to interference or too great a distance between Hub and Receiver), the
Receiver LED will start flashing and your game will be paused
automatically. As soon as the signal has been reinstated, the
LEDs will turn back on solidly, and you can resume playing.
Rumble On/Off? It’s Your Call!
Press the Hub’s RUMBLE button to turn the vibration effects
OFF or ON. Since sustained use of this feature can affect battery life, this option allows you to save on batteries. Note that
the rumble option is on by default at power up.
The Battery-Saving Sleep Modes
• If no game controller buttons are pressed for approximately
90 seconds, the Hub enters Sleep Mode 1. To reactivate the
Hub, press any button on the game controller.
• If no game controller buttons are pressed for 10 minutes, the
Hub enters Sleep Mode 2 (indicated by all LEDs off). To
reactivate the Hub, press the RUMBLE button.
3. HAVE QUESTIONS? HERE’S SOME HELP
a. My controller doesn’t seem to be functioning.
• Confirm that your controllers are securely plugged in and
connected properly, as noted in Section 2.
• Position yourself within the recommended distance.
• Check the cable connections. Turn off the console and
unplug the Receiver. Then, plug the Receiver back into
the PlayStation®2 console, plug the Power Pack back
into the Hub, and press the Scan Button on the front of
the Receiver.
• Check that your console’s power cord is plugged in
snugly, both into the unit itself and into the wall. Consult
your PlayStation®2 manual for console troubleshooting.
b. Why isn’t the vibration feature working?
• Not all games support this feature. Check the documentation for your particular game.
• This Hub option may be turned off. Press RUMBLE to
select OFF or ON.
5
4. IF YOU NEED MORE SUPPORT…
Give our website a visit at www.saitek.com. Besides obtaining
help with your technical questions, you’ll find up-to-date news
and product information, as well as listings of related links that
are sure to interest you. And, while you’re there, why not explore
our website a little further and check out all the other products
Saitek has to offer, including a great variety of game controllers,
chess computers, and other electronic products—you might just
come across something you’ve never seen before! If you need
additional help with the setup or use of your Wireless Adapter,
you can also obtain comprehensive product support by contacting your nearest Technical Support Center. You’ll find a listing
of our worldwide affiliates on a separate sheet, included in the
box with your Wireless Adapter. We’ve provided everything you
might need, including e-mail addresses, mailing addresses, and
telephone numbers. In order to deal with your problems as
quickly as possible, we ask that you please follow these guidelines when contacting us:
• Have access to your Sony PlayStation®2 when you call! If
you are experiencing problems with one particular game, try
to have that game loaded.
• Provide us with other relevant information, such as the
game’s manufacturer, the version number, etc.
• Describe the problem you are having and the events that led
up to it, trying to be as precise as possible. Remember—the
better we can understand the problem, the faster we can
find the solution!
PlayStation®2 is a trademark of Sony Computer Entertainment Inc.
CONDITIONS OF WARRANTY
1. Warranty period is 2 years from date of purchase
with proof of purchase submitted.
2. Operating instructions must be followed.
3. Product must not have been damaged as a result of
defacement, misuse, abuse, neglect, accident,
destruction or alteration of the serial number, improper
electrical voltages or currents, repair, alteration or
maintenance by any person or party other than our own
service facility or an authorized service center, use or installation of
non-Saitek replacement parts in the product or the modification of this
product in any way, or the incorporation of this product into any other
products, or damage to the product caused by accident, fire, floods,
lightning, or acts of God, or any use violative of instructions furnished
by Saitek plc.
4. Obligations of Saitek shall be limited to repair or replacement with the
same or similar unit, at our option. To obtain repairs under this
warranty, present the product and proof of purchase (e.g., bill or
invoice) to the authorized Saitek Technical Support Center (listed on
the separate sheet packaged with this product), transportation charges
prepaid. Any requirements that conflict with any state or Federal laws,
rules and/or obligations shall not be enforceable in that particular
territory and Saitek will adhere to those laws, rules, and/or obligations.
5. When returning the product for repair, please pack it very carefully,
preferably using the original packaging materials. Please also include
an explanatory note.
6
6. IMPORTANT: To save yourself unnecessary cost and inconvenience,
please check carefully that you have read and followed the instructions
in this manual.
7. This warranty is in Lieu of all other expressed warranties, obligations or
liabilities. ANY IMPLIED WARRANTIES, OBLIGATIONS, OR
LIABILITIES, INCLUDING BUT NOT LIMITED TO THE IMPLIED
WARRANTIES OF MERCHANTABILITY AND FITNESS FOR A
PARTICULAR PURPOSE, SHALL BE LIMITED IN DURATION TO THE
DURATION OF THIS WRITTEN LIMITED WARRANTY. Some states do
not allow limitations on how long an implied warranty lasts, so the
above limitations may not apply to you. IN NO EVENT SHALL WE BE
LIABLE FOR ANY SPECIAL OR CONSEQUENTIAL DAMAGES FOR
BREACH OF THIS OR ANY OTHER WARRANTY, EXPRESS OR
IMPLIED, WHATSOEVER Some states do not allow the exclusion or
limitation of special, incidental or consequential damages, so the above
limitation may not apply to you. This warranty gives you specific legal
rights, and you may also have other rights which vary from state to
state.
Information for Customers in the United States:
FCC Compliance and Advisory Statement
Warning: Changes or modifications to this unit not expressly approved by
the party responsible for compliance could void the user’s authority to
operate the equipment.
This device complies with Part 15 of the FCC Rules. Operation is subject
to the following two conditions:
1. This device may not cause harmful interference, and
2. This device must accept any interference received, including
interference that may cause undesired operation.
NOTE: This equipment has been tested and found to comply with the
limits for a Class B digital device, pursuant to Part 15 of the FCC Rules.
These limits are designed to provide reasonable protection against
harmful interference in a residential installation. This equipment
generates, uses and can radiate radio frequency energy and, if not
installed and used in accordance with the instructions, may cause
harmful interference to radio communications. However, there is no
guarantee that interference will not occur in a particular installation. If this
equipment does cause harmful interference to radio or television
reception, which can be determined by turning the equipment off and on,
the user is encouraged to try to correct the interference by one or more of
the following measures:
• Reorient or relocate the receiving antenna.
• Increase the separation between the equipment and receiver.
• Connect the equipment into an outlet on a circuit different from that to
which the receiver is connected.
• Consult the dealer or an experienced radio/TV technician for help.
Saitek Industries, 2295 Jefferson Street, Torrance, CA 90501, USA
Canada 210
Operation is subject to the following two conditions:
1. This device may not cause harmful interference, and
2. This device must accept any interference, including interference that
may cause undesired operation of the device.
This Class B digital apparatus complies with Canadian ICES-003.
Cet appareil numérique de la classe B est conforme à la norme NMB-003
du Canada.
Product Specification:
Operating Distance: 10m (30ft approx.)
Operating Frequency: 2.402GHz - 2.480GHz
TX Power: <10mv erp
Voltage: 4.8 - 6VDC
7
www.saitek.com
©2003 Saitek Ltd. Made and printed in China
All trademarks are the property of their respective owners.
SZ02 1003 P/N