1
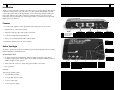
VIDEO CONVERTER
Game Console to PC Monitor Adapter
COMP2VGA
Instruction Guide
* Actual product may vary from photo
Revised: February 3, 2002
The Professionals’ Source For Hard-to-Find Computer Parts
5
FCC COMPLIANCE STATEMENT
Technical Support
This equipment has been tested and found to comply with the limits for a Class B
digital device, pursuant to part 15 of the FCC Rules. These limits are designed to
provide reasonable protection against harmful interference in a residential installation.
This equipment generates, uses and can radiate radio frequency energy and, if not
installed and used in accordance with the instructions, may cause harmful interference
to radio communications. However, there is no guarantee that interference will not
occur in a particular installation. If this equipment does cause harmful interference to
radio or television reception, which can be determined by turning the equipment off
and on, the user is encouraged to try to correct the interference by one or more of the
following measures:
The following technical resources are available for this StarTech.com product:
• Reorient or relocate the receiving antenna.
• Increase the separation between the equipment and receiver.
• Connect the equipment into an outlet on a circuit different from that to which the
receiver is connected.
• Consult the dealer or an experienced radio/TV technician for help.
On-line help:
We are constantly adding new information to the Tech Support section of our web site. To
access this page, click the Tech support link on our homepage, www.startech.com. In the
tech support section there are a number of options that can provide assistance with this
card.
Knowledge Base - This tool allows you to search for answers to common issues using
key words that describe the product and your issue.
FAQ - This tool provides quick answers to the top questions asked by our customers.
Downloads - This selection takes you to our driver download page where you can
find the latest drivers for this product.
Call StarTech.com tech support for help: 1-519-455-4931
Support hours: Monday to Friday 9:00AM to 5:00PM EST (except holidays)
Warranty Information
This product is backed by a one-year warranty. In addition StarTech.com warrants its
products against defects in materials and workmanship for the periods noted below,
following the initial date of purchase. During this period, the products may be
returned for repair, or replacement with equivalent products at our discretion. The
warranty covers parts and labor costs only. StarTech.com does not warrant its products
from defects or damages arising from misuse, abuse, alteration, or normal wear and
tear.
Limitation of Liability
In no event shall the liability to StarTech.com Ltd. (or its officers, directors, employees or
agents) for any damages (whether direct or indirect, special, punitive incidental,
consequential, or otherwise), loss of profits, loss of business, or any pecuniary loss,
arising out of related to the use of the product exceed the actual price paid for
the product.
Some states do not allow the exclusion or limitation of incidental or consequential
damages. If such laws apply, the limitations or exclusions contained in this statement
may not apply to you.
1
4
6. Depending on your system, use the appropriate video cable to connect either the S-In
(S-Video) port or the C-In (Composite video) port on the front of the adapter to your
video source.
7. Connect the audio cables from your video source to the Audio In ports on the front
of the adapter.
8. Plug the DC 9V power adapter from an available power source to the DC 9V port on
the back of your adapter.
Table of Contents
Introduction . . . . . . . . . . . . . . . . . . . . . . . . . . . . . . . . . . . . . . . . . . . . . . . . . . . . . . . . 2
Installation . . . . . . . . . . . . . . . . . . . . . . . . . . . . . . . . . . . . . . . . . . . . . . . . . . . . . . . . . 3
Using Your Adapter . . . . . . . . . . . . . . . . . . . . . . . . . . . . . . . . . . . . . . . . . . . . . . . . . 4
Troubleshooting . . . . . . . . . . . . . . . . . . . . . . . . . . . . . . . . . . . . . . . . . . . . . . . . . . . . 4
9. Make sure that the Mode button on the front of the adapter is set to IN for video
mode.
10. Make sure that the S/C button on top of the adapter is set appropriately: IN for SVideo systems, OUT for Composite video systems.
11. Turn on your video source, adapter, speakers, monitor, and PC. Your monitor should
show a full-screen display of your video source’s startup screen.
Using Your Adapter
• You can adjust the brightness of your screen by pressing the Brightness button on the
top of the adapter to scroll through the brightness options.
• You can adjust the screen position by pressing the Status button on the top of the
adapter to scroll through the adjustment options.
• Pressing the Mode button on the front of the adapter allows you to flip between your
video source and your PC. When the Mode button is pushed in, your monitor will
display information from your video source. When the button is out, your monitor
will display information from your PC.
Troubleshooting
If you are experiencing difficulty with your adapter, first make sure that all cables are
connected to their proper ports and are firmly seated.
There is no video displaying on the monitor.
• Check that the adapter is in Video mode.
• Check that the S/C switch is properly set.
The adapter’s LED is not lit while in PC mode.
• The adapter is in power-saving mode. There is nothing wrong with the adapter.
There is no sound from the video source.
• Check that the adapter is in Video mode.
• Check that the speakers are turned on and at an appropriate volume level.
Technical Support . . . . . . . . . . . . . . . . . . . . . . . . . . . . . . . . . . . . . . . . . . . . . . . . . . . 5
Warranty Information . . . . . . . . . . . . . . . . . . . . . . . . . . . . . . . . . . . . . . . . . . . . . . . 5
2
3
Introduction
Installation
Thank you for purchasing a StarTech.com game console to monitor adapter. This adapter
will take your television’s composite video or S-video signals and turn them into fullscreen video signals that can be displayed by your PC. Easy Plug and Play installation
means that with just a few cable connections, information from your game console,
camcorder, VCR, laser disk player or DVD player will be converted to VGA format and
displayed on your monitor.
This section will guide you through the installation of your device. Please read through
this section carefully and complete each step in the order listed. Also consult the
documentation that came with your PC and video source (i.e., game console, DVD
player, etc.) for specific details.
Features
• Converts video signals to VGA signals that can be displayed on your monitor
• Supports NTSC or PAL video systems
• Supports Composite video and S-Video connections
• Conforms to Plug and Play specifications
DC9V
VGA In
Connects power
supply to external
power source
Connects 15-pin
HD cable to PC’s
monitor port
Monitor
Line In
SPK Out
Connects to your
PC monitor
Connects audio
cable to PC’s
sound card
Connects to
external speakers
• Allows you to switch between Video and PC inputs
Reset
• Backed by StarTech.com’s one-year warranty
Resets the
adapter
Before You Begin
S/C
To ensure a quick and easy device installation, please read through this section carefully
before attempting to install the device.
IN: S-Video
OUT: Composite
System Requirements
• PC monitor with 15-pin high-density (HD) port with a horizontal signal (HS) of
31.5KHz or higher and a vertical signal (VS) of 60KHz or higher for NTSC systems or
50KHz or higher for PAL systems
• Video and audio source (i.e., DVD, VCR, game machine, camcorder)
• Pair of speakers
LED (Green)
Lit when adapter
is powered
Audio In
C-In/S-In
Bright
Status
Connects to audio
cables from video
source
Connects to Composite
or S-Video cables on
video source
Adjusts screen
brightness
Adjusts screen IN: Video mode
position
OUT: PC mode
Mode
Contents
This package should contain:
1. Make sure that your adapter, PC, monitor, and video device are turned off.
• 1 x COMP2VGA adapter
2. Connect the 15-pin HD cable from your computer’s monitor port to the VGA In port
on the back of the adapter.
• 1 x 15-pin HD extension cable
• 1 x stereo audio cable
• 1 x 9V DC power supply
3. Plug your monitor into the Monitor port on the back of the adapter.
4. Connect the provided audio cable from your computer’s sound card to the Line In
port on the back of the adapter.
5. Connect your speakers to the SPK Out port on the back of the adapter.