1
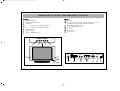
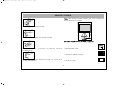
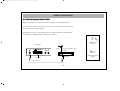
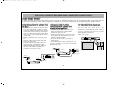
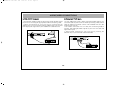
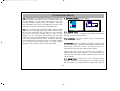
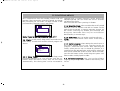
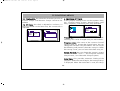
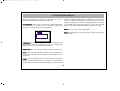
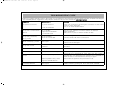
SALORA 20" LCD LOC1 ING
20/4/06
11:29
Page 1
LCD 2025TN
INSTRUCTION MANUAL
SALORA 20" LCD LOC1 ING
20/4/06
11:29
Page 2
CONTENTS
WHAT TO DO FOR SAFETY OF YOUR TV . . . . . . . . . . . . . . . . . . . . . . . . . . . . . . . . . . . . . . . . . . . . . . . . . . . . . . . . . . . . .3
WHICH PART OF YOUR TV PERFORMS WHAT FUNCTION . . . . . . . . . . . . . . . . . . . . . . . . . . . . . . . . . . . . . . . . . . . . . . .5
REMOTE CONTROL . . . . . . . . . . . . . . . . . . . . . . . . . . . . . . . . . . . . . . . . . . . . . . . . . . . . . . . . . . . . . . . . . . . . . . . . . . . . . .6
AERIAL CONNECTION . . . . . . . . . . . . . . . . . . . . . . . . . . . . . . . . . . . . . . . . . . . . . . . . . . . . . . . . . . . . . . . . . . . . . . . . . . . .8
VCR, DVD, COMPUTER AND DECODER CONNECTIONS . . . . . . . . . . . . . . . . . . . . . . . . . . . . . . . . . . . . . . . . . . . . . . . .9
AUDIO/VIDEO CONNECTIONS . . . . . . . . . . . . . . . . . . . . . . . . . . . . . . . . . . . . . . . . . . . . . . . . . . . . . . . . . . . . . . . . . . . .10
TV FUNCTIONS . . . . . . . . . . . . . . . . . . . . . . . . . . . . . . . . . . . . . . . . . . . . . . . . . . . . . . . . . . . . . . . . . . . . . . . . . . . . . . . . .11
SETUP . . . . . . . . . . . . . . . . . . . . . . . . . . . . . . . . . . . . . . . . . . . . . . . . . . . . . . . . . . . . . . . . . . . . . . . . . . . . . . . . . . . . . . . .13
TV FUNCTIONS (MENUS) . . . . . . . . . . . . . . . . . . . . . . . . . . . . . . . . . . . . . . . . . . . . . . . . . . . . . . . . . . . . . . . . . . . . . . . . .15
VOLUME ADJUSTMENT MENU, EQUALIZER, HEADPHONE . . . . . . . . . . . . . . . . . . . . . . . . . . . . . . . . . . . . . . . . . . . . .15
PICTURE SETTINGS MENU, PROGRAM TABLE . . . . . . . . . . . . . . . . . . . . . . . . . . . . . . . . . . . . . . . . . . . . . . . . . . . . . . . . .16
SETTINGGS MENU . . . . . . . . . . . . . . . . . . . . . . . . . . . . . . . . . . . . . . . . . . . . . . . . . . . . . . . . . . . . . . . . . . . . . . . . . . . . . .17
PROGRAM SETTINGS . . . . . . . . . . . . . . . . . . . . . . . . . . . . . . . . . . . . . . . . . . . . . . . . . . . . . . . . . . . . . . . . . . . . . . . . . . . .18
EXTERNAL DEVICE MODES . . . . . . . . . . . . . . . . . . . . . . . . . . . . . . . . . . . . . . . . . . . . . . . . . . . . . . . . . . . . . . . . . . . . . . . .20
TELETEXT . . . . . . . . . . . . . . . . . . . . . . . . . . . . . . . . . . . . . . . . . . . . . . . . . . . . . . . . . . . . . . . . . . . . . . . . . . . . . . . . . . . . . .22
TROUBLESHOOTING . . . . . . . . . . . . . . . . . . . . . . . . . . . . . . . . . . . . . . . . . . . . . . . . . . . . . . . . . . . . . . . . . . . . . . . . . . . .24
TECHNICAL SPECIFICATIONS . . . . . . . . . . . . . . . . . . . . . . . . . . . . . . . . . . . . . . . . . . . . . . . . . . . . . . . . . . . . . . . . . . . . . .25
2
SALORA 20" LCD LOC1 ING
20/4/06
11:29
Page 3
WHAT TO DO FOR SAFETY OF YOUR TV
CAUTION: TO REDUCE THE RISK OF ELECTRIC
SHOCK DO NOT REMOVE COVER (OR BACK). NO
USER-SERVICEABLE PARTS INSIDE. REFER
SERVICING TO QUALIFIED PERSONNEL.
BATTERY DISPOSAL
Your attention is drawn to the environmental aspects of infrared
remote control battery disposal.
Please dispose of depleted batteries responsibly and ensure you
follow the battery manufacturers disposal instructions.
POWER SOURCE
You should only plug this TV into a 230-240V AC 50Hz
mains supply.
MAINS AND OTHER LEADS
Position the mains supply lead and other leads so that they
are not likely to be walked on, pinched by things or placed
on or against them. Pay particular attention to leads where
they enter a power socket and at the point where they come
out of the TV.
VENTILATION
The slots and openings on the TV are for ventilation.
Please ensure that there is enough space to allow for adequate
ventilation around the TV (at least 10cm).
Do not block or cover these holes as overheating could occur.
MOISTURE AND WATER
Do not use the TV in a humid or damp area. The equipment
must not be exposed to dripping or splashing, as this may be
extremely dangerous. Objects filled with liquids, such as vases,
must not be placed on this equipment.
REPLACEMENT PARTS
The person carrying out the job must use parts that are specified
by the manufacturer or have the same specifications as the
original parts. The use of other parts may cause fire, electric
shock or other hazards.
NO NAKED FLAMES
Naked flame sources, such as lighted candles, must not be
placed near this equipment, or on top of it.
SERVICING
Ensure the person carrying out repairs to your TV is qualified to
do so. Please refer to separate service information supplied with
t h i s p r o d u c t . Never remove the cover yourself, there are
dangerous voltages inside and you could receive an electric
shock.
CLEANING
Always unplug the TV before cleaning it. Do not use liquid or
aerosol cleaners. Clean your TV with a soft damp cloth.
3
SALORA 20" LCD LOC1 ING
20/4/06
11:29
Page 4
SAFETY INFORMATION (continued)
LIGHTNING
In the event of a lightning storm, unplug your TV from the wall
socket.
Always unplug the TV if going away on holiday.
GENERAL
• This product is only designed for household or similar
general use. Any other use may invalidate the guarantee
and might be dangerous.
• We are proud to offer this high quality product. To keep
this equipment at this level of quality, this equipment
should only be serviced at your authorised service
centre.
• Do not connect or adjust cables while the TV is
plugged into the mains supply.
• Do not leave your TV in a hot, cold or humid area.
• Batteries in remote handsets can leak. Please check the
batteries regularly if they have not been replaced
recently.
• Never let anyone, especially children, push objects into
holes and ventilation slots.
• Don't continue to use your unit if you have spilt liquids
in it, if it is damaged in any way or if it does not work
normally. Immediately unplug the unit and get expert
advice.
4
SALORA 20" LCD LOC1 ING
20/4/06
11:29
Page 5
WHICH PART OF YOUR TV PERFORMS WHAT FUNCTION
FRONT :
BACK :
9 Aerial in
10 “Scart in” (Using this entry, you can connect to your TV
such devices as computer, decoder and VCR)
11 Component Audio in (L+R)
12 Component YPbPr input
13 PC input
14 PC Audio in
15 DC 12V in
1
Standby button
2
Remote control sensor
3
Speaker(s)
4 P+ / –
Program up and down buttons
5 e + / – Volume up and down buttons
6
Menu button
7
Source button
8
AV in / Headphone in
P–
SOURCE
7
4
P+
V–
V+
5
MENU
6
EURO AV
3
L
R
AUDIO IN
Y
Pb
IN
Pr
PC INPUT
PC
AUDIO IN DC 12V
3
8
9
1
2
5
10
11
12
13
14
15
SALORA 20" LCD LOC1 ING
20/4/06
11:29
Page 6
REMOTE CONTROL
1.
2.
3.
4.
5.
6.
7.
8.
9.
10.
11.
12.
13.
14.
15.
16.
17.
18.
19.
TM37 02
TM36 03
Switching off (stand-by button)
Direct program selection buttons
Swap button
Mute button
Main Menu Button
TV button (to shift to TV from AV)
Program ± in TV setting, Teletext page ± in teletext setting,
menu ± in menu setting
Volume ± and menu setting button
Menu leave button (EXIT or TV button leaves from the
menu)
User normalization button
Status button (i)
Volume setting button DUAL I, DUAL II, Stereo, Mono
(DUAL I, II, ST/MONO) (Memory Button in Mono Models)
To reach Setup Menu
AV Button
(Blue button) incred.stereo/mono-normal Audio select
(Yellow button)
(Green button) Picture preliminary values
(Red button) Volume preliminary values
Picture format selection (In some models)
Note: In order to use other functions on the remote controller,
please see the remote controller figure described in the
TELETEXT section.
6
SALORA 20" LCD LOC1 ING
20/4/06
11:29
Page 7
REMOTE CONTROL
Note: Your Remote Control controls your TV at 7 meters far
and 30 degrees of an angle
Never drop your Remote Control.
Do not attempt to open your Remote Control.
.
BATTERY INSERTION (1.5V AAA x 2 pieces)
• Remove battery cover
Do not press any 2 buttons on Remote Control.
simultaneously
• Place the batteries properly.
If you do not use your Remote Control. for a long time,
remove the batteries.
• Close the cover.
7
SALORA 20" LCD LOC1 ING
20/4/06
11:29
Page 8
AERIAL CONNECTION
OUTDOOR AERIAL CONNECTION
Optimum good picture and colour reception requires a good outdoor aerial.
Using a coaxial cable (75 ohm Fig A-2) for a aerial, connect the plug (refer to Fig.
A-1) into the aerial input of the set.
Alternatively you may connect the aerial via a video recorder by using the video
recorder Rf Input and Rf Output connections as shown.
AERIAL Socket
(Fig.A-1)
Back cover
AERIAL
EURO AV
L
R
AUDIO IN
Connection with video recorder
RF input
RF output
Scart socket
Aerial input
8
Coaxial cable(75 ohm)
Fig. A-2
SALORA 20" LCD LOC1 ING
20/4/06
11:29
Page 9
VCR, DVD, SATELLITE DECODER AND COMPUTER CONNECTIONS
EURO-SCART SOCKET
A Video Cassette Recorder, DVD Player, Games Console or Satellite Decoder may be connected to the scart socket with an
appropriate connecting cable. Select programme mode AV to access the signal being received through the SCART Socket.
VCR OPERATION BY USING THE
RF OUT
• Alternatively to connect a VCR to your
LCD TV using the RF sockets, connect
a coaxial cable from the RF Out socket
of the VCR to the aerial input socket of
your TV. Then connect the caxial cable
from your TV aerial to the RF In socket
of the VCR.
• Select programme no. 0 on your LCD
TV.
• Insert a video tape into the VCR and
press the “play” key.
• Use the instructions under “Manual
Programming” (found later in this
Instruction Book) to search and store
the VCR’s RF Output channel in
Channel 0 on your LCD TV.
VCR AND DVD PLAYER
OPERATION BY USING THE
EURO-SCART SOCKET
PC CONNECTION (Optional)
• Connect the SCART socket on your
VCR or DVD Player to the SCART
Socket on your LCD TV
• Select AV Channel on your LCD TV by
pressing the AV selection key on your
remote control handset.
• Press the PLAY key on your VCR or
DVD Player
• The advantage of this connection is a
superior quality of picture and sound
during play back.
EURO AV
To “RF IN”
You may use your LCD TV as a PC
monitor by connecting the VGA cable of
your PC into the LCD TV’s PC socket.
Supported PC resolutions:
VGA 640 x 480
TV
EURO AV
TV
L
R
AUDIO IN
AC230V~
50Hz/30W
EURO AV
Aerial
To “EURO SCART”(TV)
L
R
AUDIO IN
To “EURO SCART”(VCR)
To “RF IN”
Coaxial cable
From “RF OUT”
AC230V~
50Hz/30W
To aerial socket
9
L
R
AUDIO IN
Y
Pb
IN
Pr
PC INPUT
PC
AUDIO IN DC 12V
PC
SALORA 20" LCD LOC1 ING
20/4/06
11:29
Page 10
AUDIO/VIDEO CONNECTIONS
a) With SCART Connector
b) Component YPbPr input:
• Connect the SCART socket on the receiver to the SCART socket
on your LCD TV using the appropriate SCART connecting cable.
• Select AV Channel on your LCD TV by pressing the AV
selection key on your remote control handset. Your LCD TV will
now display the signal from your Satellite or Cable Receiver.
• If your Video Source has a YPbPr component video output, you
can connect this to your LCD TV’s YPbPr input using 3-Way chinch
cable by refering connector colours. This method will carry the
image to your LCD TV.
• For audio connection use a 2-Way AV connecting lead to
connect left and right audio outputs to your LCD TV’s left and
right audio inputs.
• Select YPbPr Channel on your LCD TV by pressing AV
selection key on your Remote Control handset.
EURO AV
L
R
AUDIO IN
Y
Pb
IN
Pr
PC INPUT
PC
AUDIO IN DC 12V
EURO AV
L
R
AUDIO IN
Y
Pb
Pr
PC INPUT
IN
PC
AUDIO IN DC 12V
RECEIVER
OUT
DISH
LNB
SVSH
V
DECODER SCART
L
R
TV SCART
TV
AERIAL
L
AUDIO OUT
OUT
DISH
LNB
SVSH
V
DECODER SCART
10
L
R
L
TV SCART
R
TV
AERIAL
SALORA 20" LCD LOC1 ING
20/4/06
11:29
Page 11
TV FUNCTIONS
1. OPERATION
a. Switching on the TV
Plug the power cable of the TV set into the wall outlet.
* Your set works on 12V DC power. For this purpose, use the
adapter provided within your TV set.
b.Stand-By Mode
While your TV is at stand-by mode, you can operate your TV
using one of the program selection buttons on the RC (0 to 9)
or the P± on the TV set
2. SWITCHING OFF
a. Switching OFF the TV
When you want to switch off the TV completely,
remove the power cable from the wall outlet.
b. Standby Mode
To turn your TV off for a short time press the standby
button on the remote control.
1. PROGRAM NUMBER SELECTION
* You can select the program you want by increasing
the program number pressing the P± button.
* Select the program no. 0 – 9 with the single number
keys (0-9) on the Remote control.
* To select a “double digit” number, simply press the
two required digits consecutively, within a short time.
Example: To shift to the program No. 14, first press 1
button. In this case, the "1-" message appears on the left
corner of the screen. If you keep the button pressed,
you shift to the program No.1. As long as this message
appears on the screen (3 seconds) without pressing 4,
the TV shifts to the program No. 1
Note: RC means Remote Controller
11
SALORA 20" LCD LOC1 ING
20/4/06
11:29
Page 12
TV FUNCTIONS
2. MUTE
In order to mute the sound immediately, press the mute
button on the RC. Pressing this button again will allow
you to hear the sound at the same volume as before.
3. STATUS Button: ( ) Shows the program number,
volume level and audio system info for 3 seconds on
the screen
4. PP Button (Normalization) : It brings the settings made
on the menu related to the picture and sound in the form
they have been saved by the user.
5. SWAP Button : Provides swapping to the previously
watched channel
6. SMD Button:
Mono: This button is not operative on TVs or mono
broadcastings
Stereo: This button is used to select mono or DUAL
volume outputs in TV sets
7. AV Button: In order to select the AV Mode, press the AV
button on the RC. To come back to the TV mode again,
enter the program number or press TV button. As long as
there is a menu on the screen, you cannot take your TV
set to AV mode. While on AV Mode, you cannot enter
into the Program Table menu. In the AV mode, you can
watch the external devices connected through the scart
(Video, DVD, VCD etc.). Each time you press the AV
button, the modes that you can connect to your device
are displayed.
8.AUTOMATIC SHUT OFF.
If the Tv receives no signal for 5 minutes it will
automatically switch to Stand - By. This feature is not
enabled in AV mode.
9. MENU Button : When you press this botton you can
reach the Main Menu.If you press again you will leave the
Main Menu. Besides for returning the preceeding menu
from the sub menus you have to use this button.
10. TV (EXIT) Button : Provides exit from the menus
11.16:9 Button : This is used to change the screen
format from 4 : 3 to 16 : 9
12. AUTO ZAP: Pressing P± button for 3 to 4 seconds and
releasing will cause automatic channel search. On the
upper right corner "Auto Zap" appears.
13. Red Button: You can select the preset "Sound" values
by using the Red button. The "Personal" value is the
adjustments which you were made on your apparatus.
14. Green Button: You can select the preset "Picture"
values by using the green button. The "Personal" value is
the adjustments which you were made on your apparatus.
12
SALORA 20" LCD LOC1 ING
20/4/06
11:29
Page 13
SETUP
If you assemble your apparatus according to the
explanations from the preview pages "Automatic Search"
(Welcome) will appear on the screen. At this menu;
Country
Language
Autostore
Source OSD
Language
Country
Child lock
Timers
Teletext lang
Off
English
GB
Pan European
GB
English
1- Use "P+/P-" button for "Country" option and choose the
country's abbreviation with "V+/V-" button.
2- Use "P+/P-" button for "Language" option and adjust
the menu language with "V+/V-" button.
3- Use "P+/P-" button for "Auto store" and initiate the
automatic search with the "V+" button. Please do not press
any button during automatic search. Your apparatus will
find the channels and record the memory automatically.
If "Welcome" menu does not appear you can search the
channels as below:
1- Press "Menu" button
2- Use "P+/P-" for "Settings" and enter the menu with "V+"
button.
3- Choose "Language" option with "P+/P-" button and
adjust you rdesired menu language with "V+/V-" button.
4- Use "P+/P-" button for "Country" option and choose the
country's abbreviation with "V+/V-" button.
5- Press "MENU" button and return to the main menu.
Program nr.
2
Program name
System standard Europe
Autostore
Frequency
182.25 MHz
Fine tune
6- Use "P+/P-" button for "Program Settings" and enter the
menu with "V+" button.
7- Use "P+/P-" button for "Auto store" and start the search
with the "V+" button. Do not press any button during the
automatic search. Your apparatus will find the channels
and record the memory automatically.
13
SALORA 20" LCD LOC1 ING
20/4/06
11:29
Page 14
SETUP
Use P+,P-,V+,V- for changing the menu language and the
manual adjustments processes at Program adjustments
Menu.
Use P+,P-,V+,V- for changing the order of the program,
naming the program, deleting the program and skipping
process at Program table Menu. These processes had been
mentioned at further pages.
Leave this menu pressing “TV” button.
14
SALORA 20" LCD LOC1 ING
20/4/06
11:29
Page 15
TV FUNCTIONS (MENUS)
Main Menu: To access this menu, press menu button.
You can come on the options in the main menu using
P± buttons and activate the options pressing V±
buttons.
1. VOLUME ADJUSTMENT MENU
Using the MENU button, you can access to volume
adjustment menu. In this menu, volume settings are
selected or memorized using P± buttons and can be
changed using V± buttons.
Treble: The user can adjust the treble at this option
Stereo models have AVL property. This is not shown on the
menus. This is for automatic volume limitation, i.e. it
keeps the volume level at the optimum level when shifting
from one channel to another. Because of this, the volume
comes after the display in case a channel is shifted.
Equalizer:
You can enter the Equalizer menu with the" V+" button
while you are in the Equalizer line. When you are in
this menu you can select (personal, voice, Music,
theatre) one of the equalizer adjustments with the "P+,
P-" buttons. For the personal equalizer settings P±, V±
buttons.
100 300 1k 3k 8k
Personal
Volume
Balance
Bass
Treble
Equalizer
Volume: The TV set's volume can be adjusted
Balance: The balance between left and right channel
outputs is shown
Bass: The user can adjust the bass level at this option
15
Headphone: (Optional)
When a headphone is inserted, no volume comes from
the speakers. The volume is only through the
headphones. Using the volume menu, headphone can
be set. You can change the volume as
Mono/Stereo/Dual using the S/M/D button.
SALORA 20" LCD LOC1 ING
20/4/06
11:29
Page 16
TV FUNCTIONS (MENUS)
2. PICTURE SETTINGS MENU
Using the MENU button, you can access to picture
settings menu. In the picture settings menu, you can
alter many parameters related to display. Brightness,
Contrast, Colour, Sharpness, Dyn. Skin tone and White
tone settings can be made according to your
requirements. Using the P± buttons on the RC, highlight
the option you want to set and change the setting value
or the option pressing the V± buttons.
Brightness
Contrast
Colour
Sharpness
Dyn. skin tone
White tone
Normal
Off
Normal
The changes are automatically memorized.
If you press MENU button, you can access to former menu,
while you can leave all menus if you press TV button.
16
3. PROGRAM TABLE : Using menu buttons, you can
access to program table.
1
2
3
4
5
6
7
8
9
10
11
12
Name
Move
Delete
Skip
The channel number and name in the program table
appear in different colors. You can access to other
channels using P± and V± buttons in the program table.
3.1. Blue button is for naming. When pressing the blue
button in the current channel, a small box appears.
The character can be changed pressing P± buttons. You
can access to the following or previous characters using
V± buttons. When the naming is over, press the blue
button again to memorize.
3.2. You can move by pressing the green button. Access
the channel you want to move pressing P± and V±
buttons and press the green button. Again, access to
the place where you want to move pressing P± and V±
buttons and press green button. Moving process has
been completed (The moved program is inserted
between the others, increasing the number of the
following programs by one)
SALORA 20" LCD LOC1 ING
20/4/06
11:29
Page 17
TV FUNCTIONS (MENUS)
3.3. Red button is for deletion. Access the channel you
want to delete pressing P± and V+ buttons and press
the red button. On the right side of the menu, the
channel number appears with a red button. Pressing
the red button once more will delete the channel. The
following channel will replace the deleted one.
3.4. You can skip using the yellow button. When on the
channel to be skipped, press the yellow button, there
by you can adjust the skip function on that channel.
After you leave the program table; if you use the
buttons "P+, P-" for passing the channels, the channels
which you skip with these buttons cannot be seen. You
can access to that channel using numbers, the name
and number of the channel appears in a different color.
To cancel the skip function, you can press yellow
button on the channel, again in the prog. table.
4. SETTINGS MENU: In this menu;
Source OSD
Language
Country
Child lock
Timers
Teletext lang
Off
English
GB
Pan European
4.1. Source OSD: The source OSD option can be
adjusted as Open / Closed. It provides continuous
display of the current channel.
4.2. Language: Using this option, you can change the
language in the menus.
4.3.Country: Your apparatus finds the channel and
choose the system according to the determined country
during the automatic search. For this reason it is
essential to enter the right code of the country.
Please do not forget to choose the country's
abbreviation with "V+/V-" button. ( if you do not have a
country name choose another country which has the
same system).
4.4. Child Lock: In this menu "Lock and Password"
appears. When the Lock function is on with by using
the V+ button, a password will be asked when the TV
17
SALORA 20" LCD LOC1 ING
20/4/06
11:29
Page 18
TV FUNCTIONS (MENUS)
set is switched on from the standby position and will
operate if the password is correctly entered. To change
the password, you can enter a 4 digit number in the
password line, between "0000" and "9999".
Lock
Lock code
4.5.2. Reminder Timer: You can adjust the recall period
between 5 to 120 minutes with the V+ button. At the
end of the set period, a warning message appears on
the screen. Pressing any button, this message will
disappear. Reminder time may be increased or
decreased by 5 minutes steps.
Off
1111
Note: If you forget the password, type 4711
4.5. Timers: In this menu, Sleep timer, Reminder timer,
OFFF timer, Switch timer and the Switch program are
shown.
Sleep timer
Reminder timer
Off timer
Switch timer
Switch program
reduced with 5 minutes intervals. At the end of the
adjusted period, you can watch the last 60 seconds
period on the screen.
You can leave this menu pressing TV button.
Off
Off
- -:- - -:- 5
4.5.1. Sleep Timer: You can adjust the Sleep timer
functions between 5 to 120 minutes with the V+
button. When the time is over, Your TV will close
automatically. The closing time can be increased or
4.5.3. OFF Timer: You can set the switching off time.
Note: Check from the RT clock menu if the time is
correct
4.5.4. Switch program: After setting the switch time in
the switch option, the TV sets switches to the set
program when the time comes. After adjusting the
switch, when your TV set is in Stand by position, it is
switched on the adjusted time and program when the
time comes. When the switch is to be set to AV mode,
press the AV button in the switch Program option. The
other modes are displayed in order.
4 . 6 . T e l e t e x t L a n g u a g e : You can set the teletext
language depending on the teletext received by your
TV set.
18
SALORA 20" LCD LOC1 ING
20/4/06
11:29
Page 19
TV FUNCTIONS (MENUS)
4.7. Teletext E/W: This selects the characters peculiar to
Eastern Europe and Western Europe countries for
teletext
4.8. RT Clock: The clock is adjusted as "24 hours, 12
hours or closed". In the lower line, the current time is
adjusted.
Country
Child Lock
Timers
Teletext lang.
Teletext E / W
RT Clock
5. PROGRAM SETTINGS
In the program settings menu are the options "Prog.
No., Channel Name, System, Sound System, Auto
Prog., Frequency, Fine Tuning, AFC, Skip and Lock".
Program nr.
2
Program name
System standard Europe
Autostore
Frequency
182.25 MHz
Fine tune
GB
Pan European
West
Clock
Time
Off
01:22
Program nr.: Shows the number of the current channel.
The Prog. No. can be changed using V± and numbers.
P r o g r a m n a m e : The name of the current channel
appears. Press V± to enter the channel name. You can
change the character using P± buttons. You can access
the following and previous characters using V±. When
the naming is over, you can leave from there using V±.
System Standard: You can choose the country’s system
standard with the "V+/V-". ( The European countries
except France ; can choose the "Europe" option)
A u t o S t o r e : This provides automatic finding of the
programs. When the search begins, the message "Busy"
is displayed. When the transaction is over, the "Busy"
19
SALORA 20" LCD LOC1 ING
20/4/06
11:29
Page 20
TV FUNCTIONS (MENUS)
message disappears. After the Auto store is over, it
displays until the found program numbers.
For example: If there are 50 programs in the Auto Store,
it hides after 50. When P+ is pressed in the 50th
program, it proceeds to PC instead of 51.
which is entered at the option of child lock), the channel
appears. After entering the password, the channel
appears. When the channel is changed and this channel
is revisited, the password appears as off. You should
adjust "Off" in the Program Settings in order to close.
Store: You can save the adjustments.
AFC
Lock
Store
Note: The Child Lock should be On in order to this lock
be functional.
On
Off
Frequency: In the frequency option, the frequency of
the current channel is displayed. You can change the
frequency using V± or numerical buttons.
Fine Tune: You can fine tune the channels pressing V±
AFC: This operates ON/OFF. When ON, Its follows or
corrects the possible small frequency distortions in the
channels.
Lock: This provides locking of the current channel.
When the locked channel is accessed, a password is
asked. If the password is entered correctly ( the password
20
SALORA 20" LCD LOC1 ING
20/4/06
11:29
Page 21
EXTERNAL DEVICE MODES
Not all menus appear in the external device modes, these
can be different from TV menus.
For example:
YPbPr mode
In this mode, some of the menus are closed. Volume,
Picture and Settings menus are operative
There is no change in the Volume Menu
In the Picture menu, the "dyn.skin tone" has been removed.
Info options have been added.
Info: The information on the display resolution appears
The options related to text have been removed in the
settings menu.
Position: Adjust horizontal and vertical position of the
picture.
Video Noise: In the video noise, there are "Phase and
Clock" options. Using these options, you can make the
display more clear.
Auto Adjust: Adjusts the picture clearness automatically
Info: The information on the display resolution appears
Factory: Provides restoration of the picture settings to
factory settings.
C o l o r t e m p : Sets the picture heat. When USER is
selected, the message "White tone RGB" appears at the
lower part. The user can do the adjustments.
The text related options have been removed in the settings
menu.
PC mode
Some of the menus have been closed in this menu. Sound,
Picture and Settings menus are preserved.
To the Sound Menu, the Audio option is added. When the
Audio is On, you can hear the sound of your computer
from the TV speakers. When it is off, you cannot hear
your computer's voice from your TVs speakers.
In the Picture Menu, "dyn.skin tone" option has been
removed. Position, Video noise, Auto adjust, Information,
Factory and Color temp options have been added.
21
SALORA 20" LCD LOC1 ING
20/4/06
11:29
Page 22
TELETEXT
TELETEXT MODE
If the channel you are watching has a teletext
broadcasting, you can perform various transactions by
shifting to teletext mode using the below described
buttons:
1. Teletext
: Provides shifting to teletext
broadcasting in the current channel
2. TV : Used for shifting to TV broadcasting while you
are in Teletext mode
3. Reveal / Conceal (Responding)
: Provides
displaying or re-saving of some information hidden in
the teletext broadcasting while in teletext mode
4. Teletext Timer (Calling the subpages)
: While in
TV mode, this mode displays the timer of your TV set
on the upper right corner of the screen. In the Teletext
mode, this is used for a direct access to the subpages of
the current page.
1.
2.
3.
4.
5.
6.
Teletext key
TV key
Reveal/Conceal
(answering) key
Teletext timer (calling
sub pages) key
Cancel (updating) key
Size (page expanding)
key
7. Mix (viewing TV and
Teletext information
together) key
8. Hold (holding sub
page) key
9. Index (main page) key
10. Colour (red, green,
yellow, blue) keys
For Example: You are in the teletext page No. 500. If the
message 1/2 appears, the number 1 shows the subpage
number and the number 2 shows the total number of
subpages. Pressing teletext timer button in this case, the
S - - - - marks will replace the teletext page number.
Using the number 0 to 9 on the RC, you can access the
subpage you would like to. For instance, if you want to
access the second subpage, press the numbers 0, 0, 0, 2.
.
22
SALORA 20" LCD LOC1 ING
20/4/06
11:29
Page 23
TELETEXT
5. Cancel (Updating)
: While in teletext mode,
pressing this button will bring TV broadcasting, but
teletext is still active and if a new page number is
entered, page search will continue. When the required
page comes, a message for page number is displayed.
Pressing this button once more, the teletext page
6. Size (Page expanding)
: This button is used for
displaying the current teletext page in 3 different
formats. This converts the display in normal size, upper
half doubled or lower half doubled format
7. Mix (Simultaneous TV and TELETEXT broadcasting)
: This provides simultaneous broadcasting of the
current channel and the related teletext data. Pressing
the mix button again will shift the TV to normal teletext
mode.
10) Colour Keys (RED/GREEN/YELLOW/BLUE)
You can scan the teletext information more easily using these
four colour text buttons.
EXAMPLE:
Press RED
button to
receive TV
information
TV GUIDE
Press GREEN
key to receive
Sports
Information
SPORTS
Press
YELLOW key
to receive the
news
NEWS
Press BLUE
key to receive
weather
forecast
WEATHER
The above given information are given for instance.
The color may change depending on the searched
page.
8. Hold (Holding sub page)
: If a teletext page has
subpages, such subpages are displayed from time to
time. In such a case, this button is pressed to hold that
page continuously on the screen. When the page is
held pressing "HOLD", the HOLD script appears on the
upper left corner of the screen. Pressing this button
again will release the page from the hold position.
9. Index (Home Page)
: This button provides
direct access to the teletext index page
23
Note: Some models do not have TELETEXT feature.
SALORA 20" LCD LOC1 ING
20/4/06
11:29
Page 24
TROUBLESHOOTING GUIDE
If there is a problem with the picture or the sound, you can fix them by first comparing with the “failure symptom” and then executing the
“check and adjustment” suggestions. If the problem cannot be fixed, you must contact the authorized service.
Symptom
Possible Fault
Remedy
No power. Led not lit
No power to the Tv
Tv not switched On
Check all connections ensuring the connector to the mains
socket is firmly engaged
Turn Tv on with On/Off button
No picture “screen black”
led lit.
Set in standby.
Brightness turned down.
Tv switched to AV
Press P+ or P- buttons or numeric button on the R/C
Adjust brightness
Select “TV” or press a numeric button on R/C.
No picture, screen lit,
noisy picture
Set not tuned in
Aerial not connected.
do fine tuning
Connect aerial and check connections
Weak “Ghosting” picture
Poor signal
If using an indoor aerial have an external aerial fitted.
External aerial damaged.
No picture on AV
AV source not connected or
turned on.
Check AV leads to Euro socket and ensure AV source is
turned on.
No Colour
Colour control not set
Adjust colour control using the RC
Poor, noisy colour.
Set may need fine tuning.
Do fine tuning for a more clear picture
Coloured patches on Tv
screen.
Screen may be magnetized
Ensure the Tv is switched off fully after use. The screen is
automatically “De Gaussed” each time the Tv is switched on.
Allow at least 15 minutes before turning on again.
External speakers may cause
magnetic field distortion
Move external speakers away from the Tv set
Poor Signal.
Teletext needs a good signal. Have the aerial checked.
Scrambled Teletext
24
SALORA 20" LCD LOC1 ING
20/4/06
11:29
Page 25
TECHNICAL SPECIFICATIONS
Screen Size
20”
Standard Size
51 cm
Power Consumption
70
Operating Voltage
AC 230V ~50Hz ( by adapter 12V DC)
TV System
MULTI SYSTEM / NTSC PLAYBACK
Band
VHF 1 Band 2 - 4
VHF III Band 5 - 12
UHF Band
21-69
S Band
S1-S41
Aerial Input
75 ohm Standard Antenna Socket
Program Capacity
100 + AV
Picture Tube
TFT LCD Panel 640 x 480 resolution
Sound Output rms
2x2W
25