1
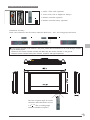
User's Manual
30” LCD display
Table of contents
Important Safety Instructions
01
Cautions
02
Accessories and descriptions
04
LCD display installation
English
The connectors and sockets
05
Remote controller
07
Display Menu
How to display modes
10
How to use the advanced menu
11
Other information
Trouble-shooting
19
VGA/DVI mode specification
20
Specifications
21
TV signal system
22
V4.1
Important Safety Instructions
1.
2.
3.
4.
5.
6.
7.
8.
Read these instructions.
Keep these instructions.
Heed all warnings.
Follow all instructions.
Do not use this apparatus near water.
Clean only with dry cloth.
Do not block any ventilation openings. Install in accordance with the manufacturer's instructions.
Do not install near any heat sources such as radiators, heat registers, stoves, or other apparatus
(including amplifiers) that produce heat.
9. Do not defeat the safety purpose of the polarized or grounding type plug. A polarized plug has two blades with
one wider than the other. A grounding type plug has two blades and a third grounding prong. The wide blade
or the third prong are provided for your safety. If the provided plug does not fit into your outlet, consult an
electrician for replacement of the obsolete outlet.
10. Protect the power cord from being walked on or pinched particularly at plugs, convenience receptacles, and the
point where they exit from the apparatus.
11. Only use attachments/accessories specified by the manufacturer.
12. Use only with the cart, stand, tripod, bracket, or table specified by the manufacturer,
or sold with the apparatus. When a cart is used, use caution when moving the cart/
apparatus combination to avoid injury from tip-over.
13. Unplug this apparatus during lightning storms or when unused for long periods of time.
14. Refer all servicing to qualified service personnel. Servicing is required when the apparatus has been damaged
in any way, such as power-supply cord or plug is damaged, liquid has been spilled or objects have fallen into the
apparatus, the apparatus has been exposed to rain or moisture, does not operate normally, or has been dropped.
15. Apparatus shall not be exposed to dripping or splashing and no objects fill with liquids, such as vases, shall be
placed on the apparatus.
16. To reduce the risk of electric shock, do not remove cover (or back). No user-serviceable parts inside. Refer
servicing to qualified service personnel.
17. The readily operable appliance coupler will serve as the disconnect device of this apparatus.
18. The apparatus must be connected to a mains socket outlet with a protected earthing connection.
19. Keep 10cm minimum distance around the apparatus for sufficient ventilation.
20. Spent or discharged batteries must be recycled or disposed of properly in compliance with all applicable laws.
For detailed information, contact your local county solid waste authority.
CAUTION
RISK OF ELECTRIC SHOCK
DO NOT OPEN
WARNING: TO REDUCE THE RISK OF FIRE OR
ELECTRIC SHOCK, DO NOT EXPOSE THIS
PRODUCT TO RAIN OR MOISTURE.
The lightning flash with arrow head symbol, within an equilateral triangle,
is intended to alert the user to the presence of uninsulated "dangerous voltage"
within the product's enclosure that may be of sufficient magnitude to constitute
a risk of electric shock to persons.
!
The exclamation point within an equilateral triangle is intended to alert the user to the
presence of important operating and maintenance (servicing) instructions in the
literature accompanying the appliance.
"CAUTION"
These servicing instructions are for use by qualified service personnel only. To reduce the risk of electric shock do
not perform any servicing other than that contained in the operating instructions unless you are qualified to do so.
!
CAUTION!
For use only with the following power supplies:Delta/ADP-150BB B;Delta/ADP-180CB B
01
Cautions
CAUTION
RISK OF ELECTRIC SHOCK
DO NOT OPEN
ATTENTION
RISQUE DE CHOC ELECTRIQUE
NE PAS OUVRIR
PRECAUCION
【Warning】
To protect the device from fire or electric shock, keep your LCD
display away from rain or moisture.
【Caution】
To protect your device from electric shock, be sure to plug
into socket securely.
RIESGO DE CHOQUE ELECTRICO
NO ABRIR
DO NOT REMOVE COVER(OR BACK).
NO USER-SERVICEABLE PARTS INSIDE.
REFER SERVICING TO QUALIFIED SERVICE PERSONNEL.
【Tips for cleaning LCD display】
【Caution】
If you use LCD display with video games, computers, or
any other similar products together, please keep brightness
and contrast at a low level. If an image appears on the screen
with a high level of brightness or contrast, the image might
be kept on the screen permanently.
1 Please wipe the LCD display with soft or dry cloth.
2 DO NOT use dissolvent or methylbenzene. Otherwise, you might damage your LCD display.
3 Be sure the LCD display is unplugged before you clean it.
【Cautions for CATV】
Be sure to acquire due authorization from broadcaster/CATV service provider/program owner before
using the TV receiver to watch programs through UHF, VHF, or CATV.
【Cautions for installation and use of LCD display】
1 Please check the LCD display power specification shown on the serial No./model tag. Be sure to use
the power according to the specification. If you are unsure about the power requirement, please contact
your distributor or local power company.
2 Be sure to plug into socket securely. If you have problems with plugging in, please contact your
distributor.
The plug is designed in such a manner that you can plug into a socket in a certain
direction. If you have problems with plug, please check with your distributor.
1 DO NOT allow overloading in the socket or extension cord. Otherwise, you might receive Electrical
shockor cause fire.
2 DO NOT leave any object pressing or winding on the power cord. Keep your LCD display away from
any place that might cause damage for your LCD display or mislead you to use a wrong Power cord.
3 Be sure to turn off your LCD display if it's not in use. If your LCD display is not in use for a long time,
please unplug it to prevent fire from happening.
4 The ventilation opening behind your LCD display is designed for ventilation and dissipation. Keep the
ventilation opening clear, so as not to obstruct dissipation.
5 DO NOT place your LCD display on the bed, sofa, or carpet, so as not to block the ventilation opening.
6 If you do not have proper ventilation setup, DO NOT keep your LCD display in the closed space, such
as bookshelf or TV cabinet.
7 Keep your LCD display away from high-temperature objects or any heat-generating object.
8 Keep your LCD display away from direct sunshine.
9 DO NOT place your LCD display on an unstable shelf or desk so as to prevent injuries caused by falling
LCD display.
10 DO NOT allow sharp objects to penetrate through your LCD display, so as not to cause any damage to
the high voltage device inside your LCD display.
02
Cautions
【Tips for your LCD display maintenance】
Maintenance
If any of following occurs, unplug your LCD display and contact your distributor or qualified
technician to repair your LCD display:
1 Power cord or plug is damaged.
2 Liquid dropped inside your LCD display.
3 LCD display is damp or wet.
4 LCD display is damaged.
5 LCD display functions abnormally.
DO NOT repair LCD display by yourself. Once the shell is opened, you are exposed to
high voltage device and face risks.
Changing parts
If you need to change the parts of your LCD display, please ask the technician for written proof so
as to make sure that the new parts are specified by the manufacturer and the functions are the same
as the original parts.
Safety inspection
After the LCD display is repaired, be sure to ask the technician (in accordance with the manufacturer's
requirements) for routine safety inspection so as to make sure that the LCD display is safe.
If your LCD display has been used longer than its life, please contact qualified technician for repair.
【User's record】
You can find the serial NO. and model on the back of the LCD display. Be sure to provide the model
and serial number when you contact your distributor.
Please read and comply with all warnings, cautions, and the manual thoroughly.
You might lose your warranty if you modify or revise your LCD display in such a manner
not approved by this manual.
【Compliance with Canadian rules】
This device has been tested and complies with the requirements of Class A/B digital device pursuant
to FCC Rules Part 15. These requirements were set up to provide reasonable protection with respect
to the harmful disturbances for the households where this device is installed. This device affects
radio communication during its production stage and when it is used. Without proper instructions
for installation and use, this device may disturb telecommunication to a certain extent. We cannot
guarantee that any installation method does not affect telecommunication. If you feel that this device
affects the reception of your radio or TV, you can turn on and off the power supply of this device to
determine if this device really affects telecommunication. If yes, you may use following methods
to eliminate the disturbances:
1 Change the position or direction of your antenna.
2 Keep your device farther from the receiver.
3 Plug your device and receiver in separate receptacles.
4 Contact your distributor or Service Center. (Remark on Warranty Card)
03
Accessories and descriptions
1
2
1. Audio / Video cable (optional)
3
2. Power cord (USA or England or Europe)
4
3. Remote controller (optional)
4. Remote controller battery (optional)
Installation of battery :
Insert 2 AAA batteries into the remote controller. Make sure + and - are facing proper directions.
1
2
3
If the remote controller is not used for a long time, please take the batteries out to avoid damages caused
by the leaking liquid.
Please use the remote controller carefully. DO NOT drop the remote controller on the ground.
Keep the remote controller away from moisture, sunshine, and high temperature.
The best reception angle for remote
controller and infrared line receiver
is 0 + 30 (The exceeding angle
results in unstable reception)
04
LCD display installation method The connectors and sockets
Connection ports
VGA input
VGA (Analog)
Scart
(Euro Region)
Y
Pb
Pr
Y
Pb
Pr
1
2
R
L
R
L
S-Video
R
L
DVI (Digital)
-(optional)
PC Audio Input
RS232 Input
Video
Audio Output (L/R)
R
L
Subwoofer Output
Power input
Turning on the LCD display
Power
Panel control
MENU
05
SOURCE
CH./ADJ.
VOL./ADJ.
CH./ADJ.
VOL./ADJ.
LCD display installation method The connectors and sockets
Connection ports' functions
Port
Functions
Power Input
Supply power for LCD display
VGA Input (analog) Inputs VGA analog signals; and can be used together with IBM or compatible computers.
* DVI Input (digital) Input digitals signals and can be used with IBM or compatible computers and also can take the
HDTV video signal that can support 720P, 1080i, 480P and 480i mode.
-(optional)
RS232
Connects to the signal cable of the control system for software upgrade on IBM PC or IBM-comparable PC.
PC & HDTV
Audio input:
When LCD display is in VGA/DVI mode, it can be input from the PC to get sound. When the
DVI port is used with HDTV source, it can be used for audio input by using a cable with RCA
plug convert to stereo mini jack plug.
Audio Output
Outputs sound signals.
Subwoofer Output
Outputs subwoofer signals.
* Tuner
Connects to TV source signals.
Video Input and
* R/L Input
Connects to the visual device equipped with AV Output port; and can be used together with
visual decoder, and sound signal (R/L connector) line.
S-Video and
* R/L Input
Connects to S-Video (Y/C) signal line and sound signal (R/L connector) line.
* Scart
A connector for Europe, using the same connector to transmit RGB, sound, and visual signals.
D4-Connector
* and R/L Input
A connector for Japan, using the same connector to transmit visual and sound signal (R/L
connector).
*
YPbPr1 and R/L Input When connecting to YPbPr(R/L), you can use YPbPr visual signal. For example, DVD
YPbPr2 and R/L Input (Progressive support) player and hi-scale HDTV decoder or satellite receiver obtains the picture
with maximum resolution and the sound signal (R/L connector).
* denotes optional item
Panel control's functions
Button
Functions
POWER
Turn on/off LCD display
Press the power button on the lower right corner of LCD display to turn on/off LCD display.
When power is on, LED indicator becomes green. When power is off, LCD display stands by
and LED indicator becomes red.
SOURCE
Select the source of signals.
Press the SOURCE button on the upper end of the LCD display and choose TV/CVBS(AV)/S-VIDEO
/SCART(for Europe only)/YPbPrl/YPbPr2 or D4(for Japan only)/VGA (PC)/DVI mode(optional).
VOL./ADJ.
MENU
CH./ADJ.
Adjust the volume.
Press
button to adjust LCD display volume. The adjustment procedure of this button is
the same as setup procedure shown on the menu (works in the same way as R/L button under
the menu mode)
Adjust the menu.
Press the MENU button on the upper end of the LCD display to revise the default. To display
the screen control menu of the LCD display, press the MENU button and press
to
adjust the content of quick menu.
Select CHANNEL
Press the
button on the upper end of the LCD display to select the channel (to be used
under the TV mode) (works in the same way as U/L button under menu mode)
06
LCD display installation method Remote controller
1
2
3
4
5
7
6
8
22
21
23
20
25
24
PAL
9
12
14
13
10
15
16
11
17
19
18
1. POWER
To turn on LCD display or enter into standby mode.
2. MUTE
3.
4.
5.
6.
7.
07
Press the button to shut down the voice of LCD display. Press again or press volume +/- to restore the original
volume.
PIP
Press the button to activate Picture In Picture mode (Please refer to P.9 for details)
SOURCE (select the small picture's signal source)
Press the button to select the small picture's signal source (Please refer to P.9 for details)
SWAP (switch between large picture and small picture)
Switch between large picture and small picture under PIP mode.
SIZE (size of small picture)
Change the size of small picture under PIP mode.
POSITION (small picture's position)
Select the small picture's position under PIP mode.
PAL
LCD display installation method Remote controller
9.
10.
11.
12.
13.
14.
15.
16.
17.
18.
19.
20.
21.
22.
23.
24.
25.
(menu adjustment)
Press MENU to activate the LCD display menu. Press again to quit the menu. You can press
to change direction and confirm your selection.
MTS
(Audio system group)
Press MTS button and
button to select STEREO, MONO, DUAL 1 and DUAL 2. If there's no second
language available for the signal received LCD display will not audio out, please back to mono mode.
SCALING (scale of screen)
Activate the screen-scaling mode. 4:3 Mode / Panoramic / Fill all / Wide
SOURCE (main picture's signal source)
Sequentially switch to the signal sources as follows: TV/CVBS(AV)/S-VIDEO/SCART (for Europe only)
/YPbPr1/YPbPr2 or D4 (for Japan only)/VGA/DVI(optional).
SLEEP
Press this button repeatedly to set the sleeping time at 0/30/60/90/120 minutes. LCD display cuts its
power as soon as the automatic sleeping time is up. To cancel your selection, simply press the button
continually until 0 appears.
FREEZE (frozen picture)
Press FREEZE to freeze picture.
VOL +/- (Volume +/-)
Adjust LCD display volume.
CH
(Channel)
Select channel.
TV
Press this button the display screen to be changed TV source.
0~9
Press 0~9 to select channels from 01 to 125. If the channel number you select is larger than 125,
picture will be halted in the previous channel without any switch.
RETURN
Return to previous channel.
CH. (displaying channel)
Press CH to display the current channel.
TEXT
Press this button to activate Teletext. Press again to turn off this function.
R/G/Y/C
Press this button to select the pictures with various colors of text. Different channels display different
corresponding functions.
PAGE
(page up & down)
Press this button to select the page you want together with the page number.
INDEX (indexing)
Press this button to return to page 100 or the indexing picture; and then press 0 to 9.
The teletext page will be numbered and added to the page you select or the secondary item.
HOLD
Press this button to stop the scrolling of text pages. The text decoder stops receiving data.
SIZE (font size)
Press this button to change the size of font: full screen, top half, and bottom half.
standard full-screen text
FULL (full screen)
top half of page appears on the full screen
TOP (top half)
bottom half of page appears on the full screen.
BOTTOM (bottom half)
PAL 08
PAL
8. MENU
Pop-out menu How to display modes
Main picture mode
1.You can change the signal source of the main picture through the SOURCE of your remote control.
The signal source you choose appears on the upper left corner of the screen (Diagram 1).
2.The main picture will be changed in the sequence as follows: TV/CVBS(AV)/S-VIDEO/SCART
(for Europe only)/YPbPr1/YPbPr2 or D4 (for Japan only)/VGA/DVI(optional).
3.Users are allowed to set the options specifically designed for a certain mode under the OSD MENU.
PIP mode
1.LCD display can display the main signal and auxiliary visual input signals simultaneously.
The auxiliary signal (or input source) appears in a frame on the main picture. This is known as PIP
picture (diagram 1). To activate PIP mode from the PIP button on the remote controller.
2.Please select the PIP input source from the PIP SOURCE button on the remote controller. There is no PIP
button on the LCD display control panel.
3.The sub-signal options change as the main signal source changes. (Diagram 2)
The signal source
Main signal
Sub signal
Channel & Audio mode
1. TV
2. OFF VGA DVI YPbPr1 YPbPr2
Sub signal
CHANNEL NO. : 25 SAP
Main signal
(Diagram 1)
Sub signal
(PIP)
Main signal
OFF
TV
AV
SV
SCART
(CVBS)
(S-VIDEO)
(For Europe
only)
YPbPr1 YPbPr2
D4
(For Japan
only)
TV
CVBS(AV(
S-VIDEO
SCART
YPbPr2
(For Europe only)
D4
YPbPr1
YPbPr2
D4 (For Japan only)
YPbPr2
D4
VGA (PC)
DVI (optional)
(Diagram 2)
09
VGA
DVI
(Optional)
( PC )
Pop-out menu How to use the advanced menu
1. Users can use either the SOURCE button on the remote control to select the proper mode. Once the signal
source is detected, the system mode selected by users appears on the upper left corner of the screen.
2. After the system mode is selected, users can press MENU buttons to execute the following functions:
AUTO (automatic adjustment) (can be used under PC mode)
Allows you to adjustment the setup of picture automatically.
DISPLAY (picture display)
Provides more picture modes and functions based upon your favorite programs and lets
you adjust the setup regarding colors and brightness.
TV (to be used under TV mode)
Allow you to set your favorite channels. If you use several systems and input signal
sources, this function executes the automatic programs.
GEOMETRIC (geometric adjustment) (to be used under PC mode)
Allows you to adjust the position and sharpness of picture.
AUDIO (audio setup)
Provides more audio selections. You can also set the audio environment for your LCD display.
MISCELLANEOUS (other setups)
Provides several options and allows you to set the automatic closing hour, language, and
restore the default.
10
Pop-out menu How to use the advanced menu
Items
DISPLAY
Range
0 ~ 50
TV/S-VIDEO/AV/YPbPr1/YPbPr2/SCART/D4/VGA/DVI
BRIGHTNESS
0 ~ 50
TV/S-VIDEO/AV/YPbPr1/YPbPr2/SCART/D4/VGA/DVI
COLOR-TEMP
High / Middle / Low / User
VGA
RED
0 ~ 255
VGA
GREEN
0 ~ 255
VGA
BLUE
0 ~ 255
VGA
COLOR
0 ~ 50
TV/S-VIDEO/AV/YPbPr1/YPbPr2/SCART/D4
HUE
0 ~ 50
TV/S-VIDEO/AV/YPbPr1/YPbPr2/SCART/D4
SHARPNESS
0 ~ 6
TV/S-VIDEO/AV/YPbPr1/YPbPr2/SCART/D4
FOCUS
0 ~ 31
YPbPr1/YPbPr2/SCART/D4
WHITE BALANCE
VGA
RESET< or >
TV
CCD
TV/S-VIDEO/AV/YPbPr1/YPbPr2/SCART/D4/VGA/DVI
CC1~CC4 / T1~T4 / OFF
V-CHIP
TV/S-VIDEO/AV ( For NTSC)
0000 ~ 9999
TV/S-VIDEO/AV ( For NTSC)
CH SCAN
0 ~ 125
TV
CATV / AIR
ANTENNA / CABLE
TV ( For NTSC)
CH ADD / DEL
+/-
TV ( For NTSC)
UPDATE CH SCAN
TV ( For PAL)
PR-EDIT
TV ( For PAL)
0 ~ 255
VGA
PHASE
0 ~ 31
VGA
H-POSITION
0 ~ 255
VGA
V-POSITION
0 ~ 255
VGA
RESET< or >
VGA
VOLUME
0 ~ 31
TV/S-VIDEO/AV/YPbPr1/YPbPr2/SCART/D4/VGA/DVI
BASS
0 ~ 24
TV/S-VIDEO/AV/YPbPr1/YPbPr2/SCART/D4/VGA/DVI
TREBLE
0 ~ 24
TV/S-VIDEO/AV/YPbPr1/YPbPr2/SCART/D4/VGA/DVI
SUBWOOFER
ON / OFF
TV/S-VIDEO/AV/YPbPr1/YPbPr2/SCART/D4/VGA/DVI
SURROUND
ON / OFF
TV/S-VIDEO/AV/YPbPr1/YPbPr2/SCART/D4/VGA/DVI
BALANCE
L ~ 0 ~ R
TV/S-VIDEO/AV/YPbPr1/YPbPr2/SCART/D4/VGA/DVI
RESET< or >
MISCELLANEOUS
TV/AV ( For NTSC)
CHANGE PASSWORD
GEOMETRIC CLOCK
AUDIO
Activation mode
CONTRAST
TV/S-VIDEO/AV/YPbPr1/YPbPr2/SCART/D4/VGA/DVI
OSD TIMER
5/10/15/20/25/30 SEC
TV/S-VIDEO/AV/YPbPr1/YPbPr2/SCART/D4/VGA/DVI
LANGUAGE
ENGLISH/DEUTESH/FRANCOIS/
ITALIA NO/ESPANOL/JAPAN
TV/S-VIDEO/AV/YPbPr1/YPbPr2/SCART/D4/VGA/DVI
PIP SIZE
1, 2, 3, 4, 5
TV/S-VIDEO/AV/YPbPr1/YPbPr2/SCART/D4/VGA/DVI
PIP POSITION
0 ~ 4
TV/S-VIDEO/AV/YPbPr1/YPbPr2/SCART/D4/VGA/DVI
RESET< or >
TV/S-VIDEO/AV/YPbPr1/YPbPr2/SCART/D4/VGA/DVI
Menu is changed as the picture mode and district are changed.
11
Pop-out menu How to use the advanced menu
DISPLAY
1. Press MENU button on the remote controller to display the main menu.
2. Press
button on the remote controller to select the Display to be adjusted.
3. Press
button on the remote controller to select the item to be adjusted.
4. Press
button on the remote controller to adjust the default of that item.
5. Press MENU again to quit the picture.
Menu
Descriptions
Contrast
Press
to increase or decrease the
picture contrast .
DIS PLAY
CONTRAST
42
BRIG HTNESS
28
COLOR
25
HUE
25
SHARPNESS
Press
to make picture brighter or darker.
Press
to select color temps.
Brightness
4
RESET < or >
(For TV/S-VIDEO/AV/SCART)
Color Temp
Red
DIS PLAY
CONTRAST
Press
to increase or decrease the red
of the picture.
43
BRIG HTNESS
COLOR-TEMP
49
USER
RED
128
GREEN
128
BLUE
128
WHIT E BALANCE
Green
Blue
Press
to increase or decrease the
green of the picture.
Press
to increase or decrease the blue
of the picture.
RESET < or >
In the PC Mode, select all white for the
White Balance center ofpicture; and then press
to
make the color balanced.
(For VGA)
Color
Press
to increase or decrease the
thickness of color.
Hue
Press
to change the colors to be redder
or greener.
DIS PLAY
CONTRAST
42
BRIG HTNESS
35
RESET < or >
(For DVI)
DIS PLAY
CONTRAST
42
BRIG HTNESS
35
COLOR
46
HUE
27
SHARPNESS
FOCUS
RESET < or >
Press
softer.
to make the picture sharper or
Sharpness
Press
softer.
to make the signal sharper or
Focus
4
15
Reset< or >
Press this button to restore all setups of the
Display to the default.
(For YPbPr1/YPbPr2/D4)
12
Pop-out menu How to use the advanced menu
GEOMETRIC
GEOMETRIC
CLOCK
127
PHASE
11
H-POSIT IO N
125
V-POSIT IO N
30
RESET < or >
1. Press MENU button on the remote controller to display the main menu.
2. Press
button on the remote controller to select the main item (Geometric) to be adjusted.
3. Press
button on the remote controller to select the item you'd like to adjust.
4. Press
button on the remote controller to adjust the default of that item.
5. Press MENU button again to quit the picture.
13
Menu
Descriptions
Clock
Press
button to adjust the alignment of VGA for steady display
of VGA.
Phase
Press
button to adjust the focus and sharpness of VGA.
H-Position
Press
button to adjust the horizontal position of VGA.
V-Position
Press
button to adjust the vertical position of VGA.
Reset< or >
Press this button to restore all Geometric setups to default.
Pop-out menu How to use the advanced menu
TV
(for Europe)
TV
CH SCAN
UPDATE CH SCAN
PR-EDIT
1. Press MENU button on the remote controller to display
the main menu.
2. Press
button on the remote controller to select the
main item (TV) to be adjusted.
3. Press
button on the remote controller to adjust the
setup of that item.
4. Press
button on the remote controller to adjust the
default of that item.
5. Press MENU button again to quit the picture.
Descriptions
PAL
CH Scan (automatic channel scanning)
At CH Scan, press
button to execute the automatic channel scanning.
You need to execute the automatic channel scanning if you install your LCD display for the first time.
UPDATE CH SCAN
Enter this option when TV already has channels. Press
(found by searching) after the current channels.
PR-Edit
Press
button to add the newly found channel
button on the remote controller, you"ll see the PR-EDIT picture (Page 15 Diagram 3).
PAL 14
Pop-out menu How to use the advanced menu
PR-Edit
1. After entering the PR-EDIT editing table, you may use R
PAL
change in yellow. Use
button to highlight the channel you wish to
button to select the channel to switch and press R
button again to switch the
two channels. (Figure 4)
2. Use the
button on the remote control to select the channel you want to edit and then press the
button on the remote control to enter the PR screen. (Figure 5)
3. How to adjust and use TV-SYS/ID/SKIP which needs to be edited.
3-1. TV-SYS:
Use the
button on the remote control to choose which TV system to represent the screen under
this PR frequency.
(If there is no other system can be used to represent the screen, then this RP frequency cannot
be used to confirm the screen quality.)
3-2. ID input:
Press 1 to rotate through "A", "B", "C" and "1". Press 2 for "D", "E", "F" and "2"......
Press 9 for "Y", "Z", and "9". Press 0 for "+", "-", "." and "0".
3-3. SKIP:
"0" means (skip on) and "X" means (skip off).
4. Press the "MENU" button to confirm and exit the PR setting OSD.
15
PAL
Pop-out menu How to use the advanced menu
AUDIO
1. Press the MENU button on the remote controller to display
the main menu.
2. Press
button on the remote controller to select the
main item (Audio) to be adjusted.
3. Press
button on the remote controller to select the
item to be adjusted.
4. Press
button on the remote controller to adjust the
default of that item.
5. Press MENU button again to quit the picture.
AUDIO
VOLUME
11
BASS
12
TREBLE
12
SUBWOOFER
ON
SURROUND
ON
BALANCE
L
0
R
RESET < or >
Menu
Descriptions
Volume
Press
button and adjust the volume to the level you want.
Bass
Press
button to increase or decrease the volume.
Treble
Press
button to increase or decrease the volume of pitch sound.
Subwoofer
Press ON or OFF to activate or inactivate the subwoofer.
Surround
Press ON or OFF to activate or inactivate the surround.
Balance
Press
Reset< or >
Return all Audio items to default.
button to adjust the balance between right and left speakers.
MISCELLANEOUS
1. Press the MENU button on the remote controller to display
main menu.
2. Press
button on the remote controller to display the
main item (Miscellaneous) to adjust.
3. Press
button on the remote controller to select the item
to be adjusted.
4. Press
button on the remote controller to adjust the
default of that item.
5. Press MENU again to quit the picture.
MIS CELLANEOUS
OSD TIM ER
30 SEC
LANGUAGE
Englis h
PIP SIZ E
1
PIP POSIT IO N
0
RESET < or >
Menu
Descriptions
OSD Timer
Press
5 sec
Language
Press
button to select language
English/French/Spanish/German/
Italian/Japanese/Chinese(Traditional)/Chinese(Simplified)
PIP Size
Press
button to select the size of small picture. (5 size)
(Please execute this function under PIP Mode)
PIP Position
Press
button to move the small to upper left, upper right, center,
lower left, or lower right.(Please execute this function under PIP Mode)
Reset< or >
Return all Miscellaneous items to default.
button to select the time to be shown on the menu
15 sec 20 sec 25 sec 30 sec
16
Other information Trouble-shooting
The following table contains the common problems and the solutions to these problems.
Please check this list before you contact technicians.
Problems
Reasons
Solutions
No picture
1.Did you connect the power cord?
2.Did you turn on power?
3.Is the signal line connected correctly?
4.Is the screen under the energy-saving
mode?
1.Connect power cord correctly.
2.Turn on power.
3.Connect signal line properly.
4.Press any button on the computer.
Abnormal colors
1.Is signal line connected correctly?
1.Connect signal line correctly.
Twisted picture
1.Is the signal line connected correctly?
2.Is input signal larger than the rated
frequency?
1.Are brightness and contrast set at the
lowest level?
1.Is input signal connected correctly?
2.Is TV signal too weak?
1.Connect signal line correctly.
2.Please use the rated signal.
Picture too dark
Voice only, no images
1.Adjust brightness and contrast.
1.Please check if input signal is correct.
2.Please check if signal is connected correctly.
3.TV-RF signal must not be lower than 70dB.
Picture only, no voice
1.Is signal line connected correctly?
2.Is volume at the minimum level?
3.Is audio signal line not connected?
4.Is TV signal too weak?
1.Connect signal line correctly.
2.Adjust volume to proper level.
3.Connect audio signal line correctly.
4.TV-RF signal must not be lower than 70dB.
Cannot use remote
controller
1.Please check if battery is still charged.
2.Is there any disturbance from static or
thunder?
1.Please change battery.
2.Turn off power for 10 seconds; and then
restart power.
The following table contains common problems and solutions to these problems.
Problems
Possible solutions
Cannot receive UHF
Change the signal line to other input-end
Cannot receive sufficient
channels through antenna
Please use the automatic scanning function to increase the channels not
included in memory (Please refer to page 14)
No colors
Please adjust the color setup at the menu
Blinking picture accompanied
by ghost image
Check the connection of antenna/signal line
Check if channel is in play mode
Press signal source and change input mode
Broken lines or segments
Adjust antenna
Keep TV away from noise source, such as automobile, neon lights, and hair dryer.
TV is blocked at certain channels Please use the automatic scanning method to add the channels not
(Hope to acquire some channels) included into memory (Please check page 14)
Overlapping images or ghost
Please use multi-directional outdoor antenna
image
(If your TV is subject to the influence imposed by the nearby mountains or buildings)
Cannot use the functions
If the item you choose turns gray, that item cannot be selected.
Cannot receive programs
through channels
Please use the automatic scanning method to add the channels not included into
memory (Please check page 14)
If you have further questions after reading the foregoing descriptions, please contact your distributor.
17
Other information VGA/DVI mode specification
Active
Refresh
Range
Rate
H
V
Dot
Clock
Horizontal
Pol.
H
V
Sync Back
Vertical
Front Total
Sync
Back Front
Total VGA DVI
(Optional)
MHz
Width Porch Porch
Width Porch Porch
640 × 350
70
31.5
25.175
N
N
96
48
16
800
2
60
37
449
640 × 480
60
31.469 59.940 25.175
N
N
96
48
16
800
2
33
10
525
VGA
72
37.861 72.809 31.5
N
N
40
128
24
832
3
28
9
520
75
37.5
N
N
64
120
16
840
3
16
1
500
85
43.269 85.008 36
N
N
56
80
56
832
3
25
1
509
720 × 400
70
31.46
N
P
108
54
18
900
2
35
12
449
800 × 600
56
35.156 56.250 36
P
P
72
128
24
1024
2
22
1
625
SVGA
60
37.879 60.317 40
P
P
128
88
40
1056
4
23
1
628
72
48.077 72.188 50
P
P
120
64
56
1040
6
23
37
666
75
46.875 75
P
P
80
160
16
1056
3
21
1
625
85
53.674 85.061 56.25
P
P
64
152
32
1048
3
27
1
631
1024 × 768
60
48.363 60.004 65
N
N
136
160
24
1344
6
29
3
806
XGA
70
56.476 70.069 75
N
N
136
144
24
1328
6
29
3
806
75
60.023 75.029 78.75
P
P
96
176
16
1312
3
28
1
800
1280 × 768
60
47.776 59.870 79.5
N
P
128
192
64
1664
7
20
3
798
1280 × 1024
60
63.981 60.020 108
P
P
112
248
48
1688
3
38
1
1066
70
75
70.08
31.5
28.32
49.5
18
Other information Specifications
Display panel
Signals Input/out
Screen Size
643.2(H) X 385.92(V)mm (diagonal 29.54 inches)
Aspect Ratio
16:9 WIDE
Pixel Pitch
0.1675(H) X 0.5025(V)mm
Number of Pixels
1280(H) X 768(V)
Brightness
550cd/m 2 (Typical)
Contrast
600:1(Typical)
Response Time
16ms
Viewing Angle
Typical 170 Degree(Horizontal/Vertical)
* Video in
RCA Jack X 1
* Scart
RGB + Audio/Composite + Audio(Europe region)
* S-Video in
Y/C X 1
* Component in
YPbPr(USA X 2,EuropeX2,JapanX1)
* Tuner in
NTSC/PAL/SECAM(OPTIONAL)
* NTSC-J(D4)
Mini-D 14 pin(Japan region)
Audio in
* RCA Jack(R+L)X 4
PC Audio In X 1
VGA in
* DVI-D in
Compatibility
D-sub 15 pin 3 row type, H:31~64KHz V:56~85Hz
DVI-D 24 pin (support HDCP), H:31~64KHz V:56~85Hz
RS232 in
D-sub 9 pin (for software update only)
Audio out
RCA Jack(R+L) X 1 / Subwoofer RCA Jack X 1
PIP
1 Mode (5 Size)
Display Mode
4:3 Mode, Panoramic, Fill All, Wide
Color system
NTSC/PAL/SECAM
Video system
NTSC/PAL/SECAM
PC/Mac
VGA/SVGA/XGA/SXGA
SDTV/HDTV scanning format
1080i, 720p, 480p, 480i (NTSC)
1080i, 576p, 576i (PAL)
Audio Output
Regulation
Built-in speaker
8w + 8w (Stereo)
Subwoofer
RCA Jack X 1
Safety / EMC
UL/CUL, VCCI, CB, CE, FCC Class B
Accessories
Power Cable
User's Manual / Warranty Card
* AV Cable/ Remote controller / Batteries
Other
Power Source
Input : 100-240V, 2.4A, 50-60Hz
Power consumption
Power on: 180W(Max) Standby: under 5W
Operative temperature
0~40 C
* denotes optional item
19
Other information TV signal system
Colour and Broadcasting System by Country
Countr y
TV
Colour
Albania
B/G
PAL
Argentina
N
PAL-N
Australia
B/G
Austria
Stereo
Subtitles
PAL
FM-FM
Teletext
B/G
PAL
FM-FM
Teletext
Azores(Portugal)
B
PAL
Bahamas
M
NTSC
Bahrain
B
PAL
Barbados
M
NTSC
Belgium
B/G
PAL
Nicam
Teletext
Bermuda
M
NTSC
Brazil
M
PAL-M
Bulgaria
D
SECAM
Canada
M
NTSC
Canary Is
B
PAL
China
D
PAL
Colombia
M
NTSC
Cyprus
B
PAL
Czechsolvakia
D/K
SECAM/PAL
Denmark
B
PAL
Egypt
B
SECAM
Faroe Islands (DK)
B
PAL
Finland
B/G
PAL
France
E/L
SECAM
Gambia
I
PAL
Germany
B/G
PAL
Germany(prev East)
B/G
SECAM/PAL
Gibraltar
B
PAL
B/G
PAL(was SECAM)
Greece
MTS
MTS
CC
Nicam
Teletext
Nicam
Teletext
Teletext
FM-FM
Hong Kong
I
PAL
Nicam
Hungary
B/G & D/K
PAL(was SECAM)
Nicam(Budapest
only)
Teletext
20
Other information TV signal system
Countr y
TV
Colour
Iceland
B
PAL
India
B
PAL
Indonesia
B
PAL
Iran
H
SECAM
Ireland
I
Israel
Stereo
Subtitles
PAL
Nicam
Teletext
B/G
PAL
Nicam
Teletext
Italy
B/G
PAL
FM-FM
Teletext
Jamaica
N
SECAM
Japan
M
NTSC
Jordan
B
PAL
Kenya
B
PAL
Korea
M
NTSC
Luxembourg
B/G
PAL
Madeira
B
PAL
Madagascar
B
SECAM
Malaysia
B
PAL
Malta
B/G
PAL
Mauritius
B
SECAM
Nicam
Teletext
MTS
CC
Mexico
M
NTSC
Monaco
L/G
SECAM/PAL
Morocco
B
SECAM
Netherlands
B/G
PAL
FM-FM
Teletext
New Zealand
B/G
PAL
Nicam
Teletext
North Korea
D/K
SECAM
Norway
B/G
PAL
Pakistan
B
PAL
Paraguay
N
PAL
M
NTSC
Philipines
M
NTSC
Poland
D/K
PA
Peru
21
Matrix
Nicam
Teletext
Other information TV signal system
Countr y
TV
Colour
Stereo
Subtitles
Portugal
B/G
PAL
Nicam
Teletext
Romania
G
PAL
Russia
D/K
SECAM
Saudi Arabia
B
SECAM
Seychelles
I
PAL
Singapore
B
PAL
South Africa
I
PAL
South Korea
M
NTSC
Spain
B/G
PAL
Nicam
Teletext
Sri Lanka
B/G
PAL
Sweden
B/G
PAL
Nicam
Teletext
Switzerland
B/G
PAL
FM-FM
Teletext
Tahiti
KI
SECAM
Taiwan
M
NTSC
Thailand
B
PAL
Trinidad
M
NTSC
Tunisia
B
SECAM
Turkey
B
PAL
-
Teletext
United Arab Emirates
B/G
PAL
United Kingdom
I
PAL
Nicam
Teletext
Uruguay
N
PAL
MTS
USA
M
NTSC
MTS
Venezuela
M
NTSC
Yugoslavia
B/H
PAL
Zimbabwe
B
PAL
CC
22