1
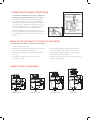
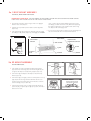
1. OVERFLOW/APPLIANCE CONNECTIONS
2B
* AIR GAP 1B
For overflow or dishwasher connections, complete the
following procedure. Alternatively go on to section 3.
KNOCK 2A
OUT PLUG
1
Using a blunt instrument (steel punch or wooden dowel),
knock out entire plug (see 1A). Do not use a screwdriver or
sharp instrument. (When knockout plug falls into Disposer,
you may remove it or grind it up when the disposer is used.
This will not damage the disposer in any way, but may take
some time to grind over the course of several uses).
RUBBER
HOSE
DISHWASHER
2B
GAP
HOSE
* AIR
WOOD OR
METAL DOWEL
DRAIN
2A
KNOCK 1A
OUT PLUG
2
Connect dishwasher hose (see 1B) using a hose clamp.
Make sure all plumbing connections are tight and in accordance
with all plumbing codes and ordinances. Run water and check
for leaks.
DISPOSER
RUBBER
HOSE
*Air gap may not be
required
DISHWASHER
for all installations.HOSE
Check local
plumbing codes.
WOOD OR
METAL DOWEL
DRAIN
DISPOSER
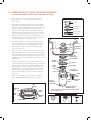
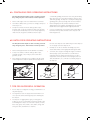
When you do NOT wish to utilise the Air Switch
*Air gap may not be required
for all installations. Check local
plumbing codes.
(e.g. if hard wiring the WDU to a standard electrical switch)
Follow the following procedure:
1
With the disposer mounted on the sink and the unit connected
to the mains, turn ON the wall mounted switch.
4
With the disposer ON pull air switch hose from disposer
connection and discard air switch actuator and hose.
2
Connect the air switch tube to the nipple on the underside
of the unit.
5
Turn the disposer OFF by turning off the switch, usually
controlled by a wall mounted switch.
3
If the disposer is OFF, depress air switch actuator to
turn the disposer ON.
6
Operation of disposer is now controlled in a typical manner
by the wall mounted switch.
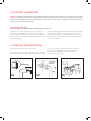
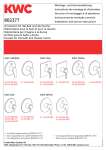
253
136
218
193
TP-75
Continuous Feed
TP-125
Continuous Feed
330
136
253
136
136
TP-50
Continuous Feed
330
295
270
356
381
416
491
FRanke turbo plus models
TP-125B
Batch Feed