1
2b. INSTALLATION OF EZ MOUNT ASSEMBLY
For TP-125B models. Read completely before starting
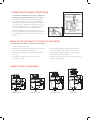
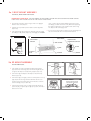
ARaise the mount ring towards the top of the sink flange.
Remove cushion mount. Remove mount ring. You may want to
practice installing the cushion mount at this point before you are
under the sink
See the ‘Important Notice: Cushion Mount Detail’ below.
BUnscrew support ring from the sink flange and remove fibre
gasket. You are now left with sink flange and rubber gasket.
CThe rubber gasket is used instead of plumbers putty with stainless
steel sinks. Others sinks will require silisone or plumbers putty.
DIf no caulking nis used, insert sink flange through rubber gasket into
sink opening. Do not rotate sink flange once it is seated.
A
EIf you use silicone instead of the gasket, form a ring around the
underside of the sink flange (see C). Insert flange into sink opening,
press down hard to squeeze out excess (see B). From under the sink,
clean up excess flush with bottom edge of the sink opening.
B
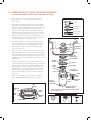
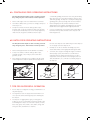
FFrom underneath sink, slip fibre gasket onto exposed sink flange.
With arrows pointing up, screw support ring onto the sink flange
and hand tighten until the sink flange will not move.
At this point you may want to insert stopper in sink and fill water
to check sink flange seal and ensure there are no leaks.
GPlace mount ring over sink flange and hold in place while installing
cushion mount (large side down) so the groove on the inside of the
cushion mount fits over the lip on sink flange (see D).
HThe disposer must be installed so that the reset button
in easily accessible.
IMPORTANT NOTICE: Cushion Mount Detail
When the cushion mount is installed correctly, the lip of the sink flange
fits into the groove of the inside of the cushion mount and the mount
ring can be pulled downwards over the cushion mount and will be free
to rotate. The bottom bead of the cushion mount acts as a gasket
between the bottom of the sink flange and the top of the disposer
(see F).
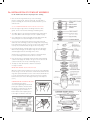
CONNECTION OF AIR SWITCH TO UNIT:
C
To install the button switch
unscrew the tightening nut and thread
plastic pipe and base of button switch
through hole in sink/work top. Attach
nut and tighten up nut on base of
button switch. Push in plastic pipe in
to the nipple on the base of the unit.
E
F
D