1
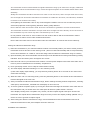
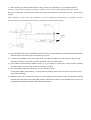
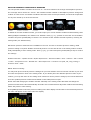
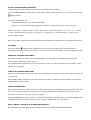
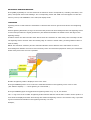
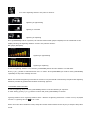
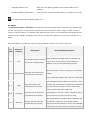
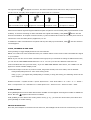
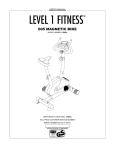
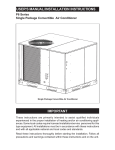
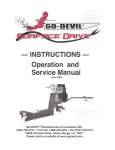
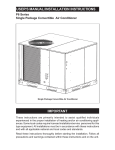
All-In-One Wireless Professional Weather Station (DCF) (975246)
User’s Manual
Functions
-
Weather forecast with sunny, partly cloudy, cloudy, rainy and stormy
-
Barometric pressure display
-
Wind direction display
-
Average & gust wind speed with storage of the minimum and maximum measured values
-
Daily, weekly, monthly and total rainfall display
-
Lightning detection with estimated number of lightning strike and distance display
-
Lightning alert indication (Approaching, Departing & Overhead) and alarm setting
-
Daily maximum and current UV Index with estimated exposure time display
-
Room temperature and interior humidity display with storage of the minimum and maximum
measurement values
-
Outside temperature and outside humidity display with storage of the minimum and maximum
measured values
-
Dew point, heat index & wind chill display
-
Ice/frost alert
-
Radio-controlled DCF-77 time signal reception with time display, time-zone setting
-
Date display
-
Alarm clock with snooze function
In this package you will find:
-
One monitor (main unit)
-
One Transmitter (Transmits Wind, Rain, UV, Lightning, Temperature/humidity data)
-
4 pieces of Nylon straps
-
One owner’s’ manual
-
Power adapter for the monitor
Additional tools needed for installation
-
Small Phillips screwdriver
-
Mast, 1 – 1.25 inch (2.54 – 3.18 cm) in diameter (to mount the transmitter)
Installation
Choose a suitable location for your transmitter
-
The transmitter must be set up outdoors
-
The transmitter must be located within the signal transmission range (100 meters line of sight). Walls and
obstructions reduce the transmission range. Check the signal reception on the weather station before final
assembly.
-
Ideally the transmitter should be mounted on a mast or roof of a house, and in an open area where wind,
rain & sunlight can access the transmitter from all sides to enable the wind force, wind direction, rainfall &
UV Index to be measured accurately
-
Avoid placing the transmitter close to any electromagnetic radiation sources such as electricity tower or
electrical equipments as the lightning detection will be greatly affected.
-
Ensure that the wind vane and the wind wheel are not blocked to guarantee accurate measurements.
-
The transmitter should be mounted in an open area where sunlight can shine directly on the UV sensor of
the transmitter any time of the day and is not blocked by tree or wall.
-
Do not position under trees or next to walls. The rain must be able to fall on the transmitter without
obstructions to achieve an accurate rainfall measurement.
-
Ensure that rain water does not accumulate under the transmitter. It must be able to flow off freely.
Testing the effective transmission range
1) Place the transmitter to your selected outdoor location in horizontal position (see above section) and the
transmitter must be at least 1 meter above ground. (This is not the final assembly and do not permanently
mount the transmitter on a mask or roof at this stage until the effective transmission range is verified)
2) Open the battery door of the transmitter and insert 4 pieces of AA batteries according to the battery polarity
indicated. Close the battery door and tighten the screws.
3) Place the main unit to your selected indoor location. Connect power adapter to the back of the main unit or
insert 3 pieces of AA batteries in the battery compartment.
4) Press [clock/set] button once to skip the initial weather setting
5) The main display will flash indicating it is in the searching mode
(If the main display stops flashing, you may hold the [Search] button for 3 seconds on the main unit to
enforce RF searching)
6) While the main unit is in searching mode, press the [Transmit] button on the bottom of the transmitter to
transmit RF signal to the main unit
7) If they are within the effective transmission range, all the readings including outdoor temperature, humidity,
wind speed, wind direction, rainfall & UVI will display on the main unit.
8) To ensure good RF reception signal, try turning the wind wheel & change the direction of the wind vane on
the transmitter and you should notice the wind speed & direction update within 2 minutes.
If the display reading does not update every minute, the RF reception signal is still poor. Shorten the
transmitter and repeat above transmission range test until you have the display reading updated every 1
minute to ensure good RF reception signal.
9) After testing the effective transmission range, remove all batteries from the transmitter. Remove all
batteries and disconnect the power adapter from the main unit.
Installation and Calibration
1) After verifying the effective transmission range, mount the transmitter on your selected location.
A mast is required with a diameter of approx. 25-3mm (not included) which stands stable and vertical.
Mount the transmitter as shown below with nylon strap provided and it should be at least 1 meter above
ground.
After assembly, ensure that the transmitter must be positioned horizontally to guarantee accurate
measurements for wind speed wind direction, rainfall & UV Index measurements.
2) Open the battery door of the transmitter and insert 4 pieces of AA batteries according to the battery polarity
indicated. Close the battery door and tighten the screws.
3) Connect power adapter to the back of the main unit. Open the battery door and Insert 3 pieces of AA
batteries according to the battery polarity indicated. Close the battery door.
4) The weather forecast display will flash. Press [+] or [-] buttons on to select the current weather condition
as initial weather forecast setup. Press [Clock/Set] to confirm.
5) The main display will flash indicating it is in the searching mode
(If the main display stops flashing, you may hold the [Search] button for 3 seconds on the main unit to
enforce RF searching)
6) While the main unit is in searching mode, Go to the transmitter and keep the wind vane pointing at North
direction and then single press [Transmit] button on the bottom casing to send RF data to the receiver for
registration & calibration purpose (LED will flash few times)
7) Once the RF reception is successful, the main display will show the outdoor temperature/ humidity, rainfall,
wind speed/ direction and UV Index readings
NOTE: After battery replacement or power reset on either of the transmitter or main unit, recalibration &
registration are needed. Repeat above step 2 to 6.
Top Key Operations
[Light / Snooze (Light on/off)]
-
When backlight is off, first press to turn on backlight
-
When alarm is beeping, press to activate snooze
-
Hold 2 sec to turn on/off the continuous backlight when adapter is connected
[TEMP/WIND CHILL/ HEAT/DEW]
-
When channel 1 is displayed, press to toggle between temperature, wind chill, heat index & dew point
-
When indoor is displayed, press to toggle between temperature, heat index & dew point
[BARO / RCC]
-
Press to display pressure reading in the clock section and show the pressure bar chart at the same time.
-
In clock display mode, hold to enforce searching for radio-controlled clock RCC signal. Hold again to disable
RCC search
Front key operation:
[WIND]
-
Toggle between average wind speed & gust wind speed
[RAIN]
-
Toggle between daily, weekly, monthly and total rainfall
-
Hold to clear the total rainfall reading to 0mm (or inch)
[UV / Exposure time Set]
-
Press to toggle between daily max. UV, current UV & Exposure time; It will also show the daily max UV I bar
chart
-
Hold [UV] to enter UV setting mode
Skin type > SPF > exit
(Press [up] or [down] to select and [UV/Set] to confirm)
[Lightning]
-
Press to display lightning reading and toggle the number of lightning strike per minute (10, 30, 60min)
-
Hold to enter lightning alarm setting:
km/miles > distance > number of lightning > per min > alarm On/Off > exit
(Press [+] or [-] button to select and [Lightning] to confirm setting)
-
Press any button to stop the lightning alarm sound
Back key operation:
[Clock / SET]
-
Toggle between time, calendar (Day/Month) and year
-
Hold to enter setting mode
Weather forecast, 12/24 hr format, D/M or M/D format, zone time offset, hour, minute, year, month, day,
temp unit, rainfall unit, wind speed unit, pressure unit and pressure value
[Alarm / Set]
-
Press to display alarm time. Press again to enable/disable daily alarm
-
In alarm display, hold to enter alarm setting mode for hour & minute setting
[Channel / Search / UP]
-
Toggle between indoor, outdoor channel and auto scroll
-
Hold to search for remote sensor
-
Increase setting value in setting mode
[Memory / Clear / Down]
-
Toggle between maximum, minimum & current temperature, humidity, wind chill, heat index, dew point,
average wind speed & gust wind speed
-
Decrease setting value in setting mode
-
When it is showing MAX or MIN reading, hold this button to clear the max/min memory
WEATHER FORECAST & BAROMETRIC PRESSURE
The unit predicts weather condition of the next 12 – 24 hours based on the change of atmospheric pressure.
The coverage area is around 30 – 50 km. The weather forecast is based on atmospheric pressure change and
is about 70-75% correct. As weather conditions cannot be 100% correctly forecasted, we cannot be responsible
for any loss caused by an incorrect forecast.
SUNNY
PARTLY CLOUDY
CLOUDY
RAINY
STORMY
To obtain an accurate weather forecast, you need to input your current weather condition as initial setting. After
battery/adapter installation, the weather icon will flash. Press [+] or [-] button to select the current weather
condition and press [CLOCK/SET] to confirm. You can also set the weather forecast anytime by entering the
setting mode (see details below).
Barometric pressure measurement is available on the unit. To have an accurate pressure reading, initial
pressure setting is required. Weather forecast & pressure unit can also be set in the setting mode if needed.
Hold [CLOCK/SET] to enter setting mode. Press [+] or [-] to select and press [CLOCK/SET] to skip or confirm
the settings.
Weather Forecast > 12/24hr format > D/M or M/D format > Time Zone Offset > Hour > Minute > Year > Month
> Date > Temperature unit > Rainfall unit > Wind Speed unit > Pressure unit (hPa, mb, inHg, mmHg) >
Pressure value > EXIT
NOTE: Pressure setting:
You may look up the sea level pressure reading from your local weather news or Internet web site of your area
and enter this pressure value in the setting mode. If you already know the absolute pressure value of your
location, you may also enter in the setting mode. Whenever the air pressure changes, the unit will offset and
show the updated pressure measurement based on this initial pressure input.
Please note that changing the weather forecast manually in the setting mode afterward will change the
pressure measurement value automatically. Therefore it is recommended to adjust the weather forecast setting
before the pressure value setting.
Press [BARO] button to show the pressure reading in the time display area and the 6 Hours historical pressure
bar chart will appear on the lower left of the display.
IN/OUT TEMPERATURE & HUMIDITY
Temperature & humidity readings are shown on the middle of lower display.
Press [CHANNEL/SEARCH] repeatedly to select indoor, outdoor (default channel 1) or auto-channel scrolling
display modes.
To change temperature unit,
-
Hold [CLOCK/SET] button to enter setting mode.
-
Uses [+] or [-] to adjust and [CLOCK/SET] to confirm (or skip) the setting in below sequence:
Weather Forecast > 12/24hr format > D/M or M/D format > Time Zone Offset > Hr > Min > Yr > > Month
> Date > Temperature unit (degree C or degree F) > Rainfall unit > Wind Speed unit > Pressure unit >
Pressure value > EXIT
Note: The outdoor temperature & humidity sensor is built inside the transmitter and is assigned to channel 1.
ICE ALERT
Ice alert indicator
appears on the display next to the wind chill reading when outdoor channel-1
temperature falls to or below 4C (or 39.2F). It provides an early alert for possible icy road condition to driver.
INDOOR & OUTDOOR HEAT INDEX
Heat Index combines the effects of heat and humidity. It is the apparent temperature of how hot the
heat-humidity combination makes it feels.
Press [TEMP] button repeatedly to show the respective indoor or outdoor heat index on the display. “HEAT
INDEX” icon will appear.
INDOOR & OUTDOOR DEW POINT
Dew point is the saturation point of the air, or the temperature to which the air has to be cooled in order to get
condensation.
Press [TEMP] button repeatedly to show the respective indoor or outdoor dew point reading on the display.
“DEW POINT” icon will appear.
OUTDOOR WIND CHILL
Wind chill is the apparent temperature felt on exposed skin due to the combination of air temperature and wind
speed. The wind chill reading on the monitor is calculated based on the temperature measured from the
transmitter (channel-1) and the average wind speed.
Press [CHANNEL] button to show channel 1 outdoor temperature/ humidity display. Then press [TEMP] button
repeatedly to show the outdoor wind chill on the display. “WIND CHILL” icon will appear.
DAILY, WEEKLY, MONTHLY & ACCUMLATED RAINFALL
The transmitter provides daily, weekly, monthly and total accumulated rainfall measurements.
Press [RAIN] repeatedly to switch between the different modes and the corresponding “DAILY”, “WEEKLY”,
“MONTHLY” or “TOTAL” icon will appear indicating your current display mode.
6 Hours historical bar graph is displayed in the middle left of the display showing the rainfall record of current
and the past 6 hours.
In total rainfall display, hold [RAIN] to clear total rainfall reading.
To change the rain unit,
-
Hold [CLOCK/SET] button to enter setting mode.
-
Uses [+] or [-] to adjust and [CLOCK/SET] to confirm (or skip) the setting in below sequence:
Weather Forecast > 12/24hr format > D/M or M/D format > Time Zone Offset > Hr > Min > Yr > > Month
> Date > Temperature unit > Rainfall unit (mm or inch) > Wind Speed unit > Pressure unit > Pressure value
> EXIT
WIND SPEED & DIRECTION
The transmitter uses the wind wheel to sample wind speed and wind vane to measure wind direction.
The monitor displays 16 wind directions (N for north, S for south, SW for south-west and so on).
Press [WIND] to select average & gust wind speed display.
Wind direction:
Average wind direction over a 2-minute period
Average wind speed:
Average wind speed over a 2-minute period
Gust wind speed:
Maximum wind speed over a 10-minute period
To change the wind speed unit:
-
Hold [CLOCK/SET] button to enter setting mode.
-
Uses [+] or [-] to adjust and [CLOCK/SET] to confirm (or skip) the setting in below sequence:
Weather Forecast > 12/24hr format > D/M or M/D format > Time Zone Offset > Hr > Min > Yr > > Month
Date > Temperature unit > Rainfall unit > Wind Speed unit (km/h, knots, m/s, mph, Beaufort) > Pressure unit
> Pressure value > EXIT
NOTE: To obtain the correct wind direction, the wind vane on the transmitter has to be calibrated during
installation. Please refer “INSTALLATION & CALIBRATION” section.
NOTE: After every battery replacement or power reset of the main unit or transmitter, recalibration of the wind
vane is needed
MAXIMUM & MINIMUM RECORDS
Press [MEM] repeatedly to view the maximum & minimum values of temperature, humidity, heat index, dew
point, wind speed & wind chill readings. The corresponding “MAX” and “MIN” icons will appear. To clear the
memory record, hold “MEMORY” in the max/min display mode
LIGHTNING
Lightning sensor is built inside the transmitter. It detects both cloud to ground and cloud to cloud lightning
strikes.
When a lightning bolt strikes, a huge current flows and produces an electromagnetic field. The lightning sensor
receives and processes the signal generated by this field and estimates the distance from the edge of the
lightning activity.
Human’s senses can detect thunder from strikes which are maximum of 10km away. This is already too late.
The lightning sensor can alert when the leading edge of a storm is within 30km, providing sufficient time to
head to safety.
NOTE: The detection sensitivity and the estimated distance will be affected if the transmitter is close to
electromagnetic radiation sources such as electricity tower and electrical equipments. Place your transmitter
farther away from these sources if possible.
Number of lightning strike is displayed next to the clock.
Press [LIGHTNING] button once to show the estimated distance of the lightning event in km or mile.
(The distance displays “----“when lightning is not detected.)
Press [LIGHTNING] again to toggle between lightning strike every 10, 30, 60 minutes
The “+” sign next to the number of lightning strike indicates that the actual strike number can be equal to or
more than the displayed number. Even though this measured lightning events is for reference only, it provides
a good overall trend indication of the lightning intensity over time.
Example,
16 or more lightning strikes in the past 10 minutes.
Lightning is approaching
Lighting is overhead
Lightning is departing
Once [LIGHTNING] button is pressed, 60 minutes historical bar graph is displayed in the middle left of the
display showing the lightning distance record in the past 60 minutes.
Bar graph (Examples)
Lightning is approaching
Lightning is departing
To set the lightning distance unit, hold the [LIGHTNING] button and the distance unit will flash.
Press [+] or [-] button to select between “km” or “miles”. Press [LIGHTNING] to confirm. Press [LIGHTNING]
repeatedly to skip other settings and exit.
NOTE: The measured lightning events are for reference only and should not be directly compared with lightning
statistics provided by professional weather monitoring agencies
LIGHTNING ALERT SETTING:
To set the lightning alert, hold the [LIGHTNING] button to set the following in sequence.
In each setting, press [+] or [-] button to select and press [LIGHTNING] to confirm.
Lightning distance unit> Lightning distance alert > Number of lightning strike alert > strike in every 10/30/60
minutes > Lightning alert on
or off > Exit
When one of the alert conditions is met, beep alert sound will be emitted. Press any key to stop the beep alert
sound.
-
Lightning distance alert:
Alert when the lightning distance has reached within the set
distance
-
Number of lightning strike alert:
Alert when the number of strike reaches or exceeds the set value
icon lights up indicate the lightning alert is on.
UV INDEX
The ultraviolet index or UV Index is a measurement of the strength of the ultraviolet (UV) radiation from
the sun. Its purpose is to help people to effectively protect themselves from UV light, of which excessive
exposure causes sunburns, eye damage, skin aging and skin cancer. It is recommended that people protect
themselves (for example, by applying sunscreen to the skin and wearing a hat) when the UV Index is 3 or
higher.
Recommendations for protection when the day's predicted UV Index is at various values are:
UV
Exposure
Index
Category
1-2
Low
Description
Low danger from the sun's UV
rays for the average person
Recommended protection
Wear sunglasses on bright days; use sunscreen if
there is snow on the ground, which reflects UV
radiation, or if you have particularly fair skin.
Take precautions, such as covering up, if you will be
3-5
Moderate (Mid)
Moderate risk of harm from
outside.
unprotected sun exposure
Stay in shade near midday when the sun is strongest.
Wear sunglasses and use SPF 30+ sunscreen, cover
6-7
High
High risk of harm from
the body with sun protective clothing and a wide-brim
unprotected sun exposure
hat, and reduce time in the sun from three hours
before to three hours after solar noon.
8-10
Very High
Very high risk of harm from
Wear SPF 30+ sunscreen, a shirt, sunglasses, and a
unprotected sun exposure
hat. Do not stay out in the sun for too long.
Take all precautions, including: wear sunglasses and
11+
Extreme
Extreme risk of harm from
use SPF 30+ sunscreen, cover the body with a
unprotected sun exposure
long-sleeve shirt and trousers, wear a very broad hat,
and avoid the sun from three hours before until three
hours after solar noon.
UVI reading is located on the lower right of the display.
Press [UV] button to toggle display between daily maximum UVI, current UVI and the recommended exposure
time under the sun.
The recommended exposure time is calculated based on
-
Skin type of the user
-
SPF (Sun Protection Factor) of the sunscreen
Hold [UV] button for 3 seconds to enter setting mode for skin type and SPF. Press [+] or [-] to select and press
[UV] to confirm.
Skin Type values range from 1 to 4.
Skin Type
Skin Categories
Skin Color in Unexposed Area
Tanning History
1
Never tans, always burns
Pale or milky, white alabaster
Develops red sunburns, painful
swelling, skin peels
2
Sometimes tans, usually
Very little browns, sometimes
Usually burns, pink or red
burns
freckles
coloring appears, can gradually
develop
3
4
Usually tans, sometimes
Light tan, brown or olive,
Rarely burns, moderately rapid
burns
distinctly pigmented
tanning response
Always tans, rarely burns
Brown, dark or black
Rarely burn, very rapid tanning
response
SPF refers to the amount of sun exposure time allowed before a person’s particular skin type begins to burn. An
SPF value is assigned by the manufacturers of sun protection cosmetics for items such as sunscreens, lipsticks,
makeup, etc. For example, using sunscreen with an SPF of 4 indicates a person can be exposed to the sun 4
times longer without burning than without using any sunscreen.
Once [UV] button is pressed, 6-days historical bar graph is displayed in the middle left of the display showing
the lightning distance record in the past 6 days.
RADIO-CONTROLLED CLOCK
The main unit will start synchronizing the radio-controlled clock after battery/adapter installation. The antenna
icon will flash during synchronization. If the reception of radio-controlled time is successful, antenna icon with
full signal strength
will appear on screen. The radio-controlled clock will have a daily synchronization at
02:03 & 03:03 everyday. Each reception cycle is around 2.5 to 10 minutes.
Antenna icon disappear
Searching for
Radio-Controlled Clock SignalReception is successful
Reception is fail
Reception is disabled
Antenna icon without signal strength indicates the past reception is not successful (Daily synchronization is still
enabled). To enforce searching of radio-controlled time signal immediately, Hold [BARO/ ] button and the
antenna icon flashes. If reception continues to fail, try other locations later. Place the unit away from source of
interference such as mobile phones, appliances, TV etc.
To disable the radio-controlled time reception and stop the daily synchronization, hold [ ] until the antenna
icon disappears.
CLOCK, CALENDAR & TIME ZONE
Press [CLOCK] to toggle display between time and calendar
NOTE: You need to set clock & calendar when your weather station cannot receive radio-controlled time signal
in your location.
NOTE: If your unit can receive radio-controlled clock signal, but you would like to change to different time zone,
you can set the TIME ZONE OFFSET between +12 to –12 hour (it is the time difference between the
radio-controlled time and your local time). If you set TIME ZONE OFFSET other than 0, the “ZONE” icon will
appear on clock & calendar display mode.
Follow below steps to set the 12/24 hour format, day/month format, time zone offset, time & calendar
-
Hold [CLOCK/SET] button to enter clock setting mode.
-
Using [+] or [-] to adjust and [CLOCK/SET] to confirm (or skip) the setting, the following values can be
set in sequence:
Weather Forecast > 12/24hr format > D/M or M/D format > Time Zone Offset > Hr > Min > Yr > > Month >
Date > Temperature unit > Rainfall unit > Wind Speed unit > Pressure unit > Pressure value > EXIT
ALARM SETTING
Press [ALARM] button to show alarm time and the “ALARM” icon will appear. Press again to enable or disable the
alarm. Bell icon “ ” appears when alarm is enabled.
Hold [ALARM] to enter alarm time setting mode. Press [+] or [-] to enter the desired Hour/ Min values and
press [ALARM] to confirm setting.
SNOOZE & BACKLIGHT
Once the power adapter is connected to the main unit, the backlight will be turned on continuously. To switch
off the continuous backlight, hold [SNOOZE / LIGHT]. Hold [SNOOZE/LIGHT] to activate continuous backlight
again.
When alarm is going off, press [SNOOZE/ LIGHT] to trigger snooze function. To stop alarm for one day, press
“ALARM” key.
In normal display, press SNOOZE/LIGHT for an extended backlight if adapter is not connected.
LOW BATTERY INDICATION
Low battery indication is available for the monitor itself and all of the remote sensors. Replace the batteries and
follow the setup procedure in this instruction manual.
Important: Wind direction calibration is required for the anemometer during battery replacement
(Details refer “Calibrating the anemometer & installing batteries” section)
BATTERY DISPOSAL
Replace only with the same or equivalent type recommended by the manufacturer.
Please disposal of old, defective batteries in an environmentally friendly manner in accordance with the
relevant legislation.
SPECIFICATIONS
Indoor Temperature
: 0 C to + 50 C (+32 F to +122 F)
Outdoor Temperature
: -20 C to +60 C (-4 F to +140 F)
Temperature Resolution
: 0.1 degree C
Indoor & Outdoor Humidity
: 20% - 99% RH
Humidity Resolution
: 1% RH
Heat Index
: 16C to 60C (60.8F to 140F)
Dew Point
: 0C to 60C (+32F to 140F)
Lightning detection range
: within 30km (detects both cloud to ground and cloud to cloud lightning
strikes)
UV Index
: 0 - 15
Wind speed range
: 0 – 30m/s
: 0 – 108 km/h
: 0 – 67 mph
: 0 – 58.3 knot
: 0 - 11 Beaufort
Rain Gauge reading
: 0 – 9999 mm
: 0 – 393.66 inch
Transmission Range
: up to 100M (228 feet) in open area, RF868 MHz
Clock
: DCF77 Radio-Controlled, Quartz back-up
Power
: AA x 3 pieces for the monitor (not included); 6.0V adapter included
: AA x 4 pieces for transmitter (not included)
DISPOSAL AT END OF WORKING LIFE:
Discarded appliances and electronic devices often still contain valuable materials, therefore do not
throw them away, instead hand them in to the store where you buy a new appliance or to your local
council recycling depot.
In accordance with the waste guidelines for electrical and electronic equipment, this product must
be disposed of separately. If you wish to dispose of this product in the future, do NOT discard it with
the household waste, but hand it in at your local refuse collection depot.
In compliance with the directives on Waste Electrical and Electronic Equipment, this product must
not be discarded with domestic waste but should be disposed of separately for recycling. If you wish
to dispose of this product in the future, do NOT throw it away with the household rubbish but hand
it in at a specially designated place, such as your municipal domestic chemical waste depot.
Never throw empty batteries away, but deposit them in special battery boxes or hand them in as
domestic chemical waste at your municipal depot.