1
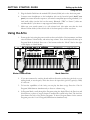
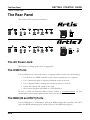
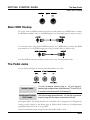
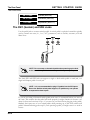
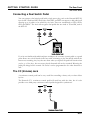
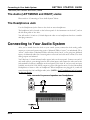
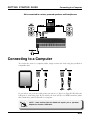
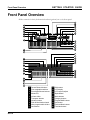
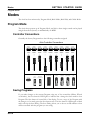
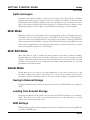
This guide will help you hook up the Artis/Artis7 to your sound system and MIDI system,
give you a quick overview, and show you how to start playing music with the Artis. A full
manual for the Artis can be obtained in electronic format from www.kurzweil.com.
Specifications
Artis (88 note weighted keys) and the Artis7 (76 note semi-weighted keys) are Kurzweil’s new
stage pianos. Some of the key specifications include:
• • • • • • • • New German Grand Piano
ROM sounds from Kurzweil’s acclaimed PC3 series and KORE64 expansion
4 Zone MIDI Controller
Full KB3 organ simulations with 9 sliders as drawbars
256 Factory/256 User Programs divided into 16 Categories
256 Factory/256 User Multis
MP3 player audio input jack
Full 128 voices of polyphony
®
It’s the sound.
®
©2014 Young Chang Co., Ltd. All rights reserved. Kurzweil® is a product line of Young Chang Co., Ltd. Kurzweil®, Young
Chang®, V. A. S. T.®, Artis® and Artis®7 are trademarks of Young Chang Co., Ltd. All other trademarks and copyrights are property of their respective companies. Product features and specifications are subject to change without notice.
You may legally print up to two (2) copies of this document for personal use. Commercial use of any copies of this document is
prohibited. Young Chang Co. retains ownership of all intellectual property represented by this document.
Part Number 910566 - 001
GS-1
Reading this guide with the Artis7

GETTING STARTED GUIDE
Reading this guide with the Artis7
This Getting Started Guide is designed to cover both the Artis and Artis7 Stage Pianos. Both
instruments share common features and the term “Artis” is used to cover a description of
both instruments. Where there are differences, we use the name “Artis7” to help instruct
owners of that instrument.
Before You Start…
Don’t connect anything until you make sure the Artis is properly and safely situated. If your
Artis keyboard has been out in the cold, give it time to warm up to room temperature before
starting it, since condensation may have formed inside.
Setting up the Artis
1. Set the keyboard on a hard, flat, level surface.
2. Four adhesive-backed rubber feet are provided with Artis. Carefully turn the keyboard
over onto a soft surface, remove the paper backing from the rubber feet and attach them.
NOTE : Unless the instrument will always be used with a keyboard stand,
attachment of the rubber feet is strongly advised. Otherwise protruding
screws will scratch the tabletop.
3. Connect the AC power cord to the Artis. Before plugging the cable into the power outlet,
check that the power is compatible with the Artis. The Artis runs on AC power and works
with voltages from 90-240 volts at 50–60 Hz (Artis7 is 100-240 volts at 50–60 Hz). The
voltage level is detected and set automatically by the Artis. If your power source does not
have the standard three hole outlet, you should take the time to install a proper grounding
system. This will reduce the risk of a shock. If your power outlet is not within these ranges
it is recommended you use an appropriate adaptor.
4. Plug the power cable into the wall.
GS-2
GETTING STARTED GUIDE
Setting up the Artis
Using the Artis
5. Plug the Switch Pedal into the marked SW1 (Sustain) Pedal jack on the Artis rear panel.
6. Connect stereo headphones to the headphone jack on the front left panel (Artis7 rear
panel) or connect the audio outputs to your mixer or amplifier inputs using standard (1/4inch) audio cables (use the Left out for mono). Balanced (“TRS” or “Stereo”) cables are
recommended if your mixer or amp supports balanced inputs.
7. Make sure your sound system is at a safe volume level. Also make sure that the Artis
Master Volume slider (on the far left side of the front panel) is all the way down.
Using the Artis
1. Power up the Artis using the power switch on the rear left side of the instrument, and then
raise the Master Volume slider, and mixer/amp volume. Your Artis keyboard starts up in
Program Mode by default. Press one of the buttons under the “Mode” label to the right
of the display to switch Modes.
Master Volume Slider
Mode Selection
2. If you are connected to a mixing board and hear distortion, reduce the gain level on your
mixing board, or use the pad (a switch that decreases the input audio signal level, typically by 20dB)
if it has one.
3. To hear the capabilities of the Artis, you can play the demo songs. Press the 13 & 14
Program/Multi buttons simultaneously to listen to a demo song.
4. In Program Mode, scroll through the Programs using the Alpha Wheel, the Previous and
Next buttons, or press a Category button to audition the sounds in the Artis. The Artis has
short demos for each of the factory Programs. To hear a Program Demo for the current
Program, press the 11 & 12 Program/Multi buttons simultaneously.
GS-3
The Rear Panel
The AC Power Jack
GETTING STARTED GUIDE
The Rear Panel
The Artis & Artis7 rear panel connections.
The AC Power Jack
Please refer to “Setting up the Artis” on page GS-2.
The USB Ports
Use the USB ports to connect the Artis to a computer/tablet in order to do the following:
• Use the Artis as a MIDI controller to play software instruments on a computer.
• Use a computer program to sequence multitrack songs on the Artis.
• Use a computer/tablet to manage the user data contents of the Artis.
• Update the software and sounds of the Artis.
• Store custom Programs and Multis on a USB flash drive.
Be sure to check the Kurzweil Music Systems website at www.kurzweil.com for new
documentation and software updates before using your new instrument.
The MIDI (IN and OUT) Ports
Use the MIDI ports to communicate with other MIDI modules and controllers. The OUT
port is the MIDI transmitting port, and the IN port is the MIDI receiving port.
GS-4
GETTING STARTED GUIDE
The Rear Panel
Basic MIDI Hookup
Basic MIDI Hookup
To use the Artis as a MIDI controller for another sound module, use a MIDI cable to connect
the MIDI port marked “Out” to the MIDI input port of the module that you want to control.
To control the Artis using another MIDI controller, use a MIDI cable to connect the MIDI
port marked “In” to the MIDI output port of the controller that you will be using.
For other MIDI connection scenarios, please refer to the Artis Musicians Guide.
The Pedal Jacks
Use the three pedal jacks to connect controller pedals to the Artis.
Switch Pedals
1/4 inch tip-sleeve (mono) plug or, 1/4 inch tip-ringsleeve plug configured as dual switches (TS and RS) or
2 terminal continuous pedal (half-damper).
Continuous Control
(CC) Pedals
10 kΩ linear-taper potentiometer, 1/4 inch tip-ring-sleeve
(stereo) plug with the wiper connected to the tip.
In Program Mode, the default function of each pedal can be changed for all Programs by
setting a pedal override on the Master page in Global Mode. Pedals are all independently
assignable within each Zone of every Multi.
Here are the default control settings for the three pedals used by Artis:
GS-5
GETTING STARTED GUIDE
The Rear Panel
The Pedal Jacks
SW 1 Pedal
Sustain (MIDI 64)
SW 2 Pedal
Sostenuto (MIDI 66)
CC Pedal
Expression (MIDI 11)
The SW1 (Sustain) and SW2 Jacks
Use the pedal jacks to connect switch pedals. A switch pedal is a physical controller typically
used to control two-state (i.e., “on / off ”) parameters, such as sustain, sostenuto, soft and
Mute Zone.
NOTE : Do not to step on the switch pedals when powering up the Artis,
as the state of the pedal is detected as part of the power up sequence.
The Artis SW1 and SW2 jacks can support a single or dual switch pedal on each jack, or a
single half-damper pedal on each jack.
NOTE : It is not recommended to plug CC pedals into the SW inputs.
Due to the flexible switch pedal support, CC pedals may not operate
as expected in these inputs.
If you are not using a Kurzweil switch pedal, make sure it’s connected before you turn on
the Artis. This ensures that the pedal will work properly (it might function in reverse—off
when it’s down and on when it’s up—if you turn on your Artis before plugging in the pedal).
Similarly, don’t press any of your switch pedals while powering up, as the Artis verifies each
pedal’s orientation during power-up. If you’re pressing a pedal, you might cause it to work in
reverse.
GS-6
GETTING STARTED GUIDE
The Rear Panel
The Pedal Jacks
Connecting a Dual Switch Pedal
You can connect a dual switch pedal with a single stereo plug, such as the Kurzweil KFP-2S,
into the SW1 Pedal and SW2 Pedal jacks. Both SW1 and SW2 can support a dual pedal each
allowing up to 4 pedals to be utilized by the Artis. These are enumerated as SW1a, SW1b,
SW2a and SW2b. The Artis will recognize dual pedals that are wired as TS and RS, such as
the KFP-2S.
If you’re not familiar with traditional piano technique, the sostenuto (center) pedal on a grand
piano allows one to hold chords in the bass while continuing to play the melody without the
latter notes sustaining. Any keys that are down when you depress the pedal will sustain when
you let go of the keys, but new notes played afterward will not be sustained. Releasing the
pedal puts things back to normal. Of course it can be programmed to do other functions as
well.
The CC (Volume) Jack
A continuous control pedal can be very useful for controlling volume, wah, or other effects
by foot.
The Kurzweil CC-1 continuous control pedal will work best with the Artis, but it is also
possible to use third-party continuous control pedals designed for synthesizers.
GS-7
Connecting to Your Audio System
The Audio (LEFT/MONO and RIGHT) Jacks
GETTING STARTED GUIDE
The Audio (LEFT/MONO and RIGHT) Jacks
Please refer to “Connecting to Your Audio System” below.
The Headphones Jack
Use the Headphones jack to listen to the Artis on stereo headphones.
The headphone jack is located on the left rear panel of the instrument on the Artis7, and on
the left front panel of the Artis.
You will need a 1/4-inch-to-1/8-inch adapter in order to use headphones that have a smaller
mini plug connector.
Connecting to Your Audio System
After you’ve turned down the level on your sound system, connect the Artis analog audio
outputs to your sound system using a pair of balanced (TRS or “stereo”) or unbalanced (TS or
“mono”) audio cables. Unbalanced cables will always work, but if you’re going into balanced
inputs, use balanced cables for a better signal-to-noise ratio and a bit more volume. The Artis
analog outputs are balanced.
You’ll find two 1/4-inch balanced audio output jacks on the rear panel. Connect one end of
each audio cable to your mixing board or PA system inputs, and connect the other end to the
jacks marked Left (Mono) and Right on the rear panel of the Artis. If you have only one input
available, use the Artis’ Left (Mono) output to get the full signal in mono. Use the jack marked
Headphones to listen to Artis on headphones. When headphones are plugged in, sound still
comes through the Left and Right audio jacks. (NOTE: Artis7 headphone jack is located
on the rear panel.)
Artis connected to powered speakers and headphones
GS-8
GETTING STARTED GUIDE
Connecting to a Computer
Artis connected to a mixer, powered speakers and headphones
Connecting to a Computer
To connect the Artis to a computer/tablet, simply connect the Artis using the provided or
compatible cable.
If you wish to use your own cable, make sure that it is a Type-A-to-Type-B USB cable (the
USB port of Artis being Type B). By default, the Artis will act as a MIDI controller (rather
than a hard drive) when connected to a computer.
NOTE : Some devices like the iPad® will require you to purchase
adaptors to connect a USB cable.
GS-9
GETTING STARTED GUIDE
Front Panel Overview
Front Panel Overview
All the controls for Artis, both musical and navigational, are on its front panel.
1
2
3
4
5
6
7
8
9
10
GS-10
Param/Channel buttons
Five assignable switches
Zone Mute/Volume buttons
Master EQ
Volume slider
Transpose buttons
Variation button
Pitch & Modulation wheels
Nine programmable sliders
Save button
11
12
13
14
15
16
17
18
19
20
Soft buttons
LCD display
LCD contrast adjust
Alpha Wheel
Mode buttons
Category buttons
Program/Multi buttons
User button
Previous/Next buttons
Favorites buttons
GETTING STARTED GUIDE
Front Panel Overview
EQ
EQ
The EQ button and knobs control the master effects that are applied to the audio outputs.
Display and Soft Buttons
The 240 x 64 monochrome LCD display provides the main user interface for the Artis.
The buttons immediately below the display are the soft buttons and their functions change
depending upon what screen is displayed. The functions of the soft buttons on each screen
are described in the bottom row of the display.
Sliders and Buttons
In Program Mode, the sliders and buttons are used to control various Program parameters (the
last four sliders and buttons are typically used for controlling effects). When KB3 Programs
are being played, the sliders and buttons control organ functions labeled in blue. In Multi
Mode, the first four sliders and buttons control Multi Zone volumes and Zone Mutes.
Sound Select
The Sound Select section allows you to quickly and easily get access to sounds in either
Program or Multi Modes. You select the Category of sound you want, then via the Program /
Multi select any of the 16 sounds in that Category.
Favorites Buttons
The Favorites buttons can be programmed to immediately take you to your Favorite programs
and Multis. To assign the currently selected Program or Multi to a Favorites button, press and
hold the desired Favorites button for a few seconds until the display indicates that the favorite
has been saved.
Transpose Buttons
The Transpose buttons can be used to change the tuning of notes played on the Artis keyboard
in semitones (ST), also known as half steps.
Variation Button
The Variation Button is a MIDI controller (default MIDI CC#29) that is programmed in most
Programs to modify the sound, such as adding a pad sound, changing the effects or some
other variation suited to changing with a switch.
For KB3 programs, the Variation Button controls the Rotary Speaker speed, switching between
fast and slow.
GS-11
Selecting Programs and Multis
Selecting Programs and Multis
GETTING STARTED GUIDE
Selecting Programs and Multis
The Artis supports two types of sounds. The first type is a Program, and these are normally a
single instrument, such as a piano, or an organ. A Program is similar to a “preset” or “patch”
on other synthesizers. The Artis has 256 factory Programs, and the space for a further 256
user Programs. Both factory and user Programs are arranged into 16 categories of 16 sounds
each.
The other type of sound is the more complex Multi. A Multi is a combination of Programs
arranged as layers and splits across the keyboard. They are similar to setups, from the Kurzweil
PC series, SP series and K2 series, and are similar to Combis or Multis from other synthesizers.
The Artis has a 256 factory Multis and space for a further 256 user Multis. Similar to Programs,
both factory and user Multis are arranged into 16 categories of 16 sounds each.
The Artis has been designed so that it is quick and easy to select Programs and Multis from
the front panel.
Use the following guide to audition the factory sounds on the Artis.
Selecting Programs and Multis
The Artis always powers up in Program Mode. If you wish to play a Multi, simply press the
Multi Button. The Multi Button will light up to show that Multi Mode is selected. To return to
Program Mode, from a different mode, simply press the Program button. If the User button
is illuminated, then you are in the User Bank. Press the User Button to return to the Factory
Bank, and the light will go out. In the Factory Bank, press one of the Category Buttons
to change Category, and that Category Button will light up. Once you are in your desired
Category, press one of the Program/Multi buttons to select the program you want.
To select another Program or Multi within the same Category, just press a Program/Multi
Button, or use the Alpha Wheel, or Next/Previous Buttons.
To select a Program or Multi in another Category but not in the other Bank (Factory/User),
press the desired Category Button, followed by the desired Program/Multi Button. The Alpha
Wheel and Next/Previous Buttons will select the next Category once you get to the end of
the current Category. Pressing the Category Button, will select the Default Program for that
Category. The Default Category Program can be set by the user for each Category. By default
the Artis has the Default Program for each Category set to the first Program of each Category.
To change the Default Category Program, please refer to the User Manual.
Controllers
The Sliders, Wheels, Pedals and Buttons can control each of the factory Programs and Multis,
to produce variations to the sound. Don’t forget to try these out as you explore the factory
sounds on the Artis.
GS-12
GETTING STARTED GUIDE
Selecting Programs and Multis
Favorites
Favorites
The Artis also features Favorites Buttons to quickly recall your favorite sounds. The Favorites
buttons store a set of 10 Programs and/or Multis. To assign the currently selected Program
or Multi to a Favorites button, press and hold the desired Favorites button for a few seconds
until the display indicates that the favorite has been saved. To recall a favorite Program or
Multi, simply press the one of the Favorites buttons. The Favorites buttons will work from
whichever mode you are currently in, changing to Program Mode or Multi Mode automatically
if required.
GS-13
GETTING STARTED GUIDE
Modes
Program Mode
Modes
The Artis has four main modes; Program Mode, Multi Mode, Multi Edit, and Global Mode.
Program Mode
The Artis always powers up in Program Mode, and this is where single sounds can be played
straight from the keyboard, or multitimbrally via MIDI.
Controller Conventions
Generally the factory Programs have the following controllers assigned.
Artis Controller Conventions
Sliders and Switches
Program
Dependent
Program
Dependent
Program
Dependent
Program
Dependent
Program
Dependent
Program
Dependent
Program
Dependent
Program
Dependent
Program
Dependent
Filter Freq
or EQ
Program
Dependent
Program
Dependent
Program
Dependent
Damper Noise
(Pianos)
Program
Dependent
Program
Dependent
Delay/Effects
Amount
Reverb
Amount
Wheels/Variation
Var
CC Pedal
Expression/Wah
Pitch
Up/Down
Pad Volume/
Tremolo Amount
SW Pedals (Refer to User Manual for SW Pedal Details)
Sustain
SW
Ped 1
Sostenuto
Sostenuto/Soft
SW
Ped 2
SW
Ped 3
Soft
Pad/Wah
Enable
Pitch
Mod
CCPed 1
SW1a
SW1b
SW2a
SW2b
Saving Programs
If you make changes to the current Program using any of the controllers (Sliders, Wheels
or Switches), the Save button’s LED lights to indicate that a change has been made to that
Program. The Save button is located left of the display. To save a copy of the Program with
the changes you’ve made, press the Save button once. The Save button’s LED begins to blink
and it calls up the Save Dialog. The Save Dialog allows you to choose an ID number to that
will be associated with the program you are saving.
GS-14
GETTING STARTED GUIDE
Modes
Multi Mode
Splits and Layers
Programs can be Split into Multis, so that keys in one region of the keyboard play a different
program than another region. Programs can also be Layered into Multis, so that more than
one Program can be played by striking one key. Press the Split or Layer soft button to create a
Split or Layer Multi containing the current Program. You will then be able to add up to three
additional programs to create a Split or Layered Multi containing up to four Programs.
Multi Mode
Multi mode allows you to play Multis, which are arrangements of up to 4 Programs split and/
or layered in Zones across selected ranges of the keyboard. The volume of the Program in
each Zone can be easily adjusted while you are playing by using sliders A through D, and each
Zone can be muted and enabled by using the Zone Mute buttons above these sliders. You can
create custom assignments for the remaining sliders, buttons and foot controllers to control
effects and synthesis parameters of each Program.
Multi Edit Mode
Multi Edit Mode is used to modify the many parameters that make up Multis, including
Program Selection, Volume, Pan, Controller assignments, effects and the layering and split
options. Multi Edit Mode allows for powerful customizations of the many built in sounds
available on Artis and allows you to make new and unique sound combinations for your own
performances and compositions.
Global Mode
Global Mode gives you access to the global parameters of the Artis. It allows you to edit
the master settings of the unit. It also allows you to restore factory defaults on the unit by
performing a Hard or Soft Reset. Some of the more common settings are summarized below
Saving to External Storage
Programs and Multis that you have created can be saved to a USB Flash Drive or a computer/
tablet.
Loading from External Storage
Programs and Multis can be loaded onto the Artis from USB Flash Drives or a computer/
tablet. This allows you to load new sounds from Kurzweil or other developers, or to load
sounds that you have previously saved.
MIDI Settings
MIDI channels, modes and other parameters related to transmitting and receiving MIDI are
set within the MIDI pages.
GS-15
GETTING STARTED GUIDE
Modes
Updating the Artis
Info
The Info page shows a number of key settings for your Artis, including the current operating
system and object versions. This is the place to check to see if you are running the current
operating system and object versions.
System Reset
In the unlikely event that something goes wrong with the settings or software of your Artis,
or if you just want to start fresh, you can return the Artis to the factory default state by doing
a System Reset.
NOTE : System Reset will erase ALL of the USER Programs and Multis,
so it is important to back up your sounds before attempting to reset
Artis. Factory Program/Multis are not affected.
Updating the Artis
Please check online at www.kurzweil.com for Artis updates. Detailed instructions on updating
the Artis are available with the update package. It is important that these instructions are
followed closely for trouble free updating of the Artis.
GS-16