1
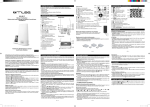
Remote Control
UNPACKING YOUR UNIT
When you unpack your new iPhone/iPod clock-radio, make sure that you
have removed all the accessories and information papers:
- Main unit
- AC adaptor
- Remote control
- 5 pieces iPhone/iPod interchangeable adaptors
- User manual
ML-60 IP
User Manual
Lighting Audio System with iPod-iPhone Docking
Please read the instruction carefully
before operating the unit.
LOCATION OF CONTROLS
Main Unit
1. Light diffuser
2. ON/OFF button
3.
(iPod-iPhone)
PLAY/PAUSE button
4. FM button
5.
Natural Sound switch
6.
Brightness control button
7.
Light control button
8. VOLUME +/- button
9.
/
button
10. ALARM 1 button
11. ALARM 2 button
12. M/SET button
13. SLEEP button
14. LCD display
15. Remote sensor
16. DSNOOZE SNOOZE/DIMMER
button
17. AUX IN jack
18. DC IN jack
19. iPhone-iPod drawer
20. Battery compartment
21. Speakers
1
5
6
4
3
7
2
16
8 9 14 15
Back View
17
R1
R2
VOL
R6
R7
R12
/
R5
FM
SLEEP
MENU
OK
M
SET
R10
R14
R11
ALM.
1
R15
2
SNOOZE
DIMMER
10 12
11 13
Replacing battery for the remote control
1. Press the stopper and pull out the battery holder.
2. Install 1pc “CR2025” lithium battery according to the polarity diagram on
the battery compartment.
3. Insert the battery holder into the remote control.
R9
R8
R13
R16
Remove the spacer tab before use
Remove the spacer tab when you
use the remote control for the first
time. To remove the tab, pull it in the
direction of the arrow in the illustration
as shown.
18
21
GB - 1
BASIC OPERATION
Using the AC adaptor
This AC adaptor operates on AC100-240V~50/60Hz.
• The supplied AC adaptor is suitable for use on AC mains supplies of
100-240V~50/60Hz and should only be connected to a mains supply within
these parameters.
• Use the supplied AC adaptor only. Using any other AC adaptor could
damage the unit.
Cautions:
- The included AC adaptor is for use with this unit only. Do not use it with
other equipments.
- When the unit is not going to be used for long time, disconnect the AC
adaptor from the AC outlet.
- Be sure to use it near the wall outlet. If a malfunction occurs, disconnect the
plug from the wall outlet at once.
- When the AC adaptor is plugged in, the apparatus is not completely discon
nected from the main power source, even when the unit is turned off.
- AC adaptor is used as the disconnect device. It shall remain readily
operable and should not be obstructed during intended use. To disconnect
the apparatus from sup ply mains,completely disconnect the AC adaptor of
the apparatus from the mains socket outlet.
Battery backup system
DC power: 2x1.5V, battery type AAA/R03/UM4(not provided) for clock and
alarm time backup system.
An alkaline type battery is recommended. For optimum performance, this
battery should be replaced every 6 months.
BACKUP SYSTEM: All clock settings will be kept in memory; however, the
clock time may require adjustment for exact accuracy. If the backup battery is
not installed, the display will show the clock flashing to indicate that you have
to reset the time and the alarm.
NOTE: When the battery backup is functioning, the display has no backlight.
1
R4
LCD DISPLAY
D1.
D8
- iPhone/iPod mode
D2 D3 D4 D5
playback
D1
NAT
D2.
- radio mode
D6
D3.
- AUX IN mode
D4. NAT - natural sound mode
D5.
- brightness level indicator D10
D6.
- alarm 1 wake to
radio/iPhone-iPod / buzzer / D11
natural sound
D12
AMMWMHzkHz
D7.
- alarm 2 wake to
radio / iPhone-iPod / buzzer /
natural sound
D8.
- memory indicator
D9.
- memory digit
D10.
- displays in 12hr time mode
D11. Time or radio frequency display
D12.
- sleep indicator
D13.
AMMWMHzkHz - radio mode & frequency unit
D9
D7
D13
19
POWER SUPPLY
GB - 4
R3
20
English
LA-2883 IB MUSE 001 REV0 -GB.ind1
Front View
R1.
button
R2.
Light control button
R3. VOLUME +/- button
R4.
button (mute)
R5.
Brightness control button
R6.
(iPod-iPhone) PLAY/PAUSE
button
R7. FM button
R8.
Natural Sound switch
R9. SLEEP button
R10.
/
button
R11.
/ button (navigate menu in
iPhone/iPod mode)
R12.OK button (confirm a selection in
iPhone/iPod mode)
R13.MENU button (return to previous
menu in iPhone/iPod mode)
R14.M.SET button
R15.Alarm 1/2 button
R16.SNOOZE/DIMMER button
Turn on the unit
The unit is in standby mode with clock display when it’s plugged in. Press
ON/OFF to switch on/off the audio function (radio, iPhone/iPod, natural sound
or auxiliary input).
Operating mode selection
- Press
to select playing iPod/iPhone and control play/pause when this
function is ON.
- Press FM to select radio mode.
- Press
to select natural sound mode, then press repeatedly to cycle
among 6 kinds of natural sound.
- Press
to control brightness of white light (20 levels for choose) or set
color light when it’s in color light mode after turn on the light by
.
- Press
to switch between 3 states in loop: Light Off – White Light – Color
Light-...
Sound Volume
Press VOLUME +/- button to adjust sound level. There are a total of 30
volume levels.
Press
button to cut off the sound temporarily, press this button again to
resume the sound.
Display Dimmer
D
When the unit is NOT in alarm mode, press SNOOZE button repeatedly to set
backlight brightness of display. 3 levels for choose: low, medium and high.
Sleep with digressive light
If white light or color light is ON during SLEEP function, the light will turn OFF
with digressive brightness when the SLEEP time is reach.
TIME SETTING
When used for the first time, or if the mains plug has been removed with no
backup battery inside, the clock display will blink for setting.
Setting sequence: Hour
Minute
24h/12h……
1. In standby mode, long press M/SET button to enter the current time setting
mode. “HH” digits flash for hour setting.
2. Press
/
to set the hour time.
3. Press M/SET button to validate the hour value, minute digits flash for
adjust.
4. Press
/
to set the minute time.
5. Press M/SET button to confirm time setting.
6. “24H” flashes for setting. Press
/
to set, and press M/SET to
complete the time setting.
NOTE:
- At first use of the set, the time setting sequence will start by 24h/12h
selection.
- Any following sequence, if the time has been entered already, will start by
Hour (HH) selection.
- With clock display blinking, if no button is pressed within 8 seconds, it will
return to previous clock display.
SLEEP (Automatic turn off)
ALARM SETTING
This unit can be set for two different wake up times which you can choose
to use independently or simultaneously ALARM1, ALARM2 or both ALARM1
and ALARM 2.
Alarm 1 or Alarm 2 setting
In standby mode,
1. Long press ALM.1 button, hour digit of alarm 1 flash. Press
/
to
adjust hour time, then press ALM.1 button again to confirm.
2. Minute digit of alarm 1 flash. Press
/
to adjust minute time. Press
ALM.1 button to confirm time setting.
3. “
- -“ flash for setting progressive light time before alarm time reach.
Press
button repeatedly to select among “00’ – 05’ – 10’ – 15’ -- 20’ -……”. (If “00” is selected, the white light will switch ON at wake-up time.)
4. Alarm 1 wake up source indicator flash. Press
/
to select wake up
source among
or
or or .
5. Press ALM.1 to confirm alarm 1 setting.
Note:
(1) If wake up by
is chose, kind of natural sound flashes for select by next
step. Press
/
to select.
(2) Progressive light is using WHITE light with progression to the maximum
brightness.
- If the COLOR light is ON at the time of progressive light start, color light will
switch OFF before progressive light start.
- If the WHITE light is ON at the time of progressive light to start, it keeps and
no progressive light.
Same operation for Alarm 2 setting.
To check the alarm setting
In standby mode, press ALM.1 or ALM.2 for 2 times to show the alarm time
and alarm source. Display will resume to current time after 2 seconds.
In sleep mode, the unit will turn off automatically after a specified time.
You can select duration in minutes before the unit turns off automatically.
Press SLEEP button repeatedly to select 120-110-100…0 minutes. 5
seconds after, display will resume to current time.
Note: Sleep time can be only set when the unit is turned ON.
- During SLEEP operation, press SLEEP button to display the remaining
sleep time.
- To turn off the unit before the SLEEP activates, press ON/OFF button, or
press SLEEP button repeatedly until value is adjusted to “00”. The sleep
function is cancelled and “SLEEP” icon will not displayed.
- If the playing time from your iPhone or other player is shorter than the se
lected sleep time, the music will stop at the end of the playing time.
GB - 5
GB - 3
GB - 2
To turning off alarm
The alarm is programmed to run for 59 minutes and triggers progressively.
Once the alarm 1 or alarm 2 is activated, corresponding alarm source
indicator
/ or
/
or / or
/
will flash on display.
D
1. In wake up mode, to temporarily stop alarm, press SNOOZE button, the alarm
will resume to the previous playing mode after 9 minutes. Alarm source in
dicators will keep flashing on display.
GB -6
GB -7
2011-3-10
16:33:31
2. To stop the alarm for 24 hours, press ON/OFF button, alarm source indica
tors remain displayed. The alarm will trigger at the preset time one day
later.
3. To turn off the alarm permanently, press ALM 1 or 2 button in standby
mode until alarm source indicators disappears.
NOTE:
- You can adjust the wake up sound level by VOL+/- button in wake up by
iPhone/iPod or radio modes.
- But since this is a progressive alarm, the sound will be louder and louder.
You could decrease the volume after the alarm reaches to its max volume
level.
LIGHTING
Your clock radio is equipped with a saving energy LED main light and
multicolor ambience light.
Main light
1. Press
button once to turn on the main light. The current level of
brightness will show on display for 5 seconds.
2. Press
button repeatedly to adjust the level of brightness (from 01 to
20).
Color light
1. Press
button twice to turn on the color light, then it will start to cycle in
different colors.
2. Press
button to stop at current color, press this button again to
resume the cycle.
3. Press
button again to turn off the light.
LISTENING TO THE RADIO
LISTEN TO YOUR iPhone/iPod
Manual operation
1. Press ON/OFF button to turn on the unit.
2. Press FM button to select RADIO mode, “
” shows on display.
3. Press
/
to tune to a desired station step by step.
Note: Press FM button directly in standby mode also can enter RADIO mode.
Automatic search operation
The automatic searching operation locates strong stations. Press and hold
/
button to start automatic searching in the chosen direction. Press
again to stop
searching. A station with a weak signal can be tuned manually.
NOTE: During the search operation the sound level will be muted
automatically.
Program preset stations
This unit is able to store 20 FM radio stations in memory.
1. Select a radio station either by manual or automatic search.
2. Press M/SET button once, “M” and preset number will flash on display.
3. Press ALM. 1 or ALM. 2 button to change preset number.
4. Press M/SET button again to save the radio station in the selected preset
channel.
5. Repeat steps 1-4 to store more stations.
When you memorize a station on a preset, the previous station is erased and
replaced by the new one.
Listening to the preset stations
Press ALM.1 or ALM.2 button directly to select a preset station.
NOTE: For a better reception in FM, extend the antenna. If a stereo
broadcast is received, “FM(ST)” is displayed.
NATURAL SOUNDS
1. In standby mode, press
button to trigger natural sound function.
“ NAT 01” will show on display.
2. Press
button repeatedly to select a kind of natural sound among six.
3. Press VOLUME +/- to adjust the volume level.
GB - 8
GB - 9
GB - 8
AUXILIARY
This unit includes the AUX IN jack to allow you to connect external devices,
such as MP3 player, and listen to the music of your external device through
the speakers of this unit.
1. Connect the external device to the AUX IN jack at the back of the unit.
2. Press ON/OFF button, AUX icon shows on the display, and function mode
switch to AUXILIARY.
3. Start to play your auxiliary source.
4. Adjust the volume to desired level.
5. To stop playback, press ON/OFF button, or disconnect your external
device from the AUX IN jack.
SPECIFICATIONS
GENERAL
Power source AC 100-240V ~ 50/60Hz
DC 3V, 2x1.5V “AAA/R03/UM4” size batteries (not included) or
equivalent for memory backup
Dimension
120 W * 312 H * 178 L mm
19
4
Made for iPod and iPhone
TUNER
Frequency range: FM: 87.5 - 108 MHz
AUDIO SECTION
Power Consumption 15W
Speaker Impedance 8 ohm
MORE INFORMATION
"Made for iPod," "Made for iPhone," and "Made for iPad" mean that an
electronic accessory has been designed to connect specifically to iPod,
iPhone, or iPad, respectively, and has been certified by the developer to meet
Apple performance standards. Apple is not responsible for the operation of
this device or its compliance with safety and regulatory standards. Please
note that the use of this accessory with iPod, iPhone or iPad may affect
wireless performance.
GB - 12
LA-2883 IB MUSE 001 REV0 -GB.ind2
2
ATTENTION : To reduce the risk of electric shock, do not
remove the cover. There are no user serviceable parts
inside the unit. Refer all servicing to qualified personnel.
The lightening flash with arrowhead symbol within the triangle is a
warning sign alerting the user of “dangerous voltage” inside the unit.
The exclamation point within the triangle is a warning sign alerting
the user of important instructions accompanying the product.
GB - 13
IMPORTANT
The docking station in this system follows the Apple “Universal Dock” design.
This system can be fitted to different iPhone or iPod model.
NOTE: No adapter is provided for the 3G (third generation) iPod.
Please use the adapters which were included with your iPod at the time of
purchase. They will fit properly into the docking station of this system.
Play your iPhone/iPod on the main unit
1. Connect your iPhone/iPod to the socket of the unit.
2. Press the ON/OFF button to turn on the unit.
3. Press
to select iPhone/iPod mode. The display indicates “
”.
4. Press
button to play or pause. Press and hold this button for 5
seconds to enter the iPod/iPhone sleep mode.
5. Select the previous or next track by pressing
/
button, press and
hold
/
on the unit to play review or fast forward.
6. Press VOL + / - buttons to adjust sound level.
Other iPhone/iPod functions MENU, OK (Select), ▲ (UP) and ▼ (DOWN)
are performed by the remote control.
MENU button: Press to return to previous page of menu.
▲or ▼ button: press to select a menu item.
OK button: press to confirm a selection (open a folder or start playing a
selected track).
iPhone call pick up
1. When phone call coming in, the music from the docking iPhone will pause
automatically.
2. Incoming call ring comes out from the unit speaker.
3. You can take iPhone from the unit and pick up phone call.
4. After finish your call, connect back the iPhone to the socket, it will resume
the playback of iPhone.
Charge your iPhone/iPod
While your iPhone/iPod is docked on the system, its battery recharges
automatically until fully charged.
Clock Time Synchronization
The first time when your unit connected with iPhone, the clock time of your
unit will be synchronous with the iPhone.
After the first time, you are required to press and hold M/SET button for 5
seconds to set your unit synchronous with iPhone.
iPhone/iPod interchangeable adapter
This system includes 5 different adapters designed to allow you to securely
connect any “dockable” iPhone/iPod model to the docking station. Refer to
the chart below to select the proper adapter for your particular iPhone/iPod
model and insert that adapter into the docking station before connecting your
iPhone/iPod.
GB - 10
WARNING - To reduce the risk of fire or electric shock, do not expose this
appliance to rain or moisture.
GB - 11
If at any time in the future you should need to dispose of this
product please note that Waste electrical products should not be
disposed of with household waste. Please recycle where facilities exist. Check with your Local Authority or retailer for recycling
advice.(Waste Electrical and Electronic Equipment Directive)
For indoor use only
Class 1 LED product.
IMPORTANT
- Do not throw batteries in fire!
- Do not place the product in closed bookcases or racks without proper
ventilation.
- If the external flexible cable or cord of this luminaire is damaged, it shall be
exclusively replaced by the manufacturer or his service agent or a similar
qualified person in order to avoid a hazard.
- Attention should be drawn to the environmental aspects of battery disposal.
- The marking information is located at the bottom of apparatus.
- Ensure a minimum distance of 5cm around the apparatus for sufficient
ventilation.
- Ensure that the ventilation is not impeded by covering the ventilation
openings with items, such as newspapers, table-clothes, curtains, etc.
- Do not place naked flame sources, such as lighted candles on the
apparatus.
- Use the apparatus only in moderate climates.
- Do not be exposed to dripping or splashing. And that no object filled with
liquids, such as vases, shall be placed on the apparatus.
- Do not use your set immediately after transport from a cold place to a warm
place, there may be condensation problems.
- Make sure that you keep your set away from water and high temperatures.
- Clean the player with a soft cloth, or damp chamois leather. Never use
solvent.
- To be completely disconnected the power input, the mains plug of the
apparatus shall be disconnected from the mains completely.
- The mains plug should not be obstructed or should be easily accessed
during intended use.
- Where the mains plug is used as the disconnect device, the disconnect
device shall remain readily operable.
- Under the influence of electrical fast transient or/and electrostatic
phenomenon, the product may malfunction and require user to power reset.
GB - 14
GB - 15
2011-3-10
16:33:34