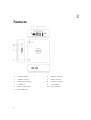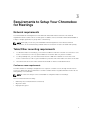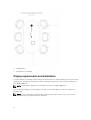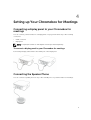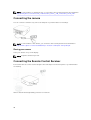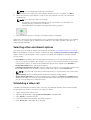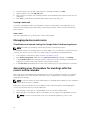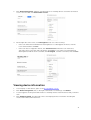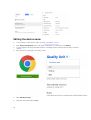
1
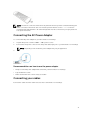
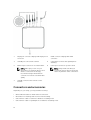
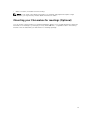
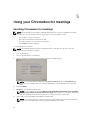
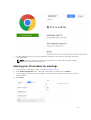
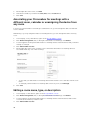
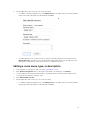
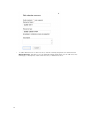
Dell Chromebox For Meetings 3010
User Guide
Regulatory Model: Z01V
Regulatory Type: Z01V001
Notes, Cautions, and Warnings
NOTE: A NOTE indicates important information that helps you make better use of your computer.
CAUTION: A CAUTION indicates either potential damage to hardware or loss of data and tells you
how to avoid the problem.
WARNING: A WARNING indicates a potential for property damage, personal injury, or death.
Copyright © 2014 Dell Inc. All rights reserved. This product is protected by U.S. and international copyright and
intellectual property laws. Dell™ and the Dell logo are trademarks of Dell Inc. in the United States and/or other
jurisdictions. All other marks and names mentioned herein may be trademarks of their respective companies.
2014 - 07
Rev. A00
Contents
1 Finding More Information and Resources........................................................5
2 Features.................................................................................................................. 6
3 Requirements to Setup Your Chromebox for Meetings................................ 7
Network requirements.......................................................................................................................... 7
Table/Other mounting requirements................................................................................................... 7
Conference room requirements..................................................................................................... 7
Display requirements and installation.................................................................................................. 8
4 Setting up Your Chromebox for Meetings.......................................................9
Connecting a display panel to your Chromebox for meetings...........................................................9
To connect a display panel to your Chromebox for meetings:.................................................... 9
Connecting the Speaker Phone............................................................................................................9
Connecting the camera...................................................................................................................... 10
Placing your camera......................................................................................................................10
Connecting the Remote Control Receiver........................................................................................ 10
Connecting the AC Power Adapter.....................................................................................................11
Recommendations on how to use the power adapter................................................................ 11
Connecting your cables.......................................................................................................................11
Connectors and accessories...............................................................................................................12
Mounting your Chromebox for meetings (Optional).........................................................................13
5 Using your Chromebox for meetings............................................................. 14
Enrolling Chromebox for meetings.................................................................................................... 14
Selecting other enrollment options....................................................................................................15
Scheduling a video call........................................................................................................................15
Leaving a video call........................................................................................................................16
Managing devices and rooms............................................................................................................. 16
Check Admin and console settings for Google Video Conferencing devices............................16
Associating your Chromebox for meetings with the room's online calendar..................................16
Viewing device information.................................................................................................................17
Editing the device name......................................................................................................................18
Naming your Chromebox for meetings............................................................................................. 19
Associating your Chromebox for meetings with a different room, calendar or unassigning
the device from any room.................................................................................................................. 20
Editing a room name, type, or description........................................................................................ 20
Editing a room name, type, or description......................................................................................... 21
6 Troubleshooting................................................................................................. 23
Fixing a problem..................................................................................................................................23
Help and support.................................................................................................................................23
7 Contacting Dell................................................................................................... 24
1
Finding More Information and Resources
See the safety and regulatory documents that shipped with your computer and the regulatory
compliance website at www.dell.com/regulatory_compliance for more information on:
•
Safety best practices
•
Regulatory certification
•
Ergonomics
See www.dell.com for additional information on:
•
Warranty
•
Terms and Conditions (U.S. only)
•
End User License Agreement
Additional information on your product is available at www.dell.com/support.
5
2
Features
1.
Power Connector
2.
Network connector
3.
USB 3.0 connector
4.
HDMI connector
5.
Display port connector
6.
Headset connector
7.
USB 3.0 Port
8.
Power Button
9.
Memory-card reader
10.
Recovery button
11.
Secure Cable slot
6
3
Requirements to Setup Your Chromebox
for Meetings
Network requirements
Your Chromebox for meeting device works with both wired and wireless networks. The network
requirements are the same as those for Hangouts. In addition, we recommend a minimum bandwidth of
1 mbps or 2mbps (up/down) for group video conferencing .
NOTE: Although you can use your Chromebox for meeting device over a wireless network
connection, we recommend using a wired network connection for best sound and video quality.
Table/Other mounting requirements
1.
For the Chromebox for meetings, you must have a 50 mm x 145 mm x 145 mm or 1.97 inches x 5.71
inches x 5.71 inches. (H x W x L) space available to mount the device or place it in a table.
2.
For the speakerphone, you must have at least 55 mm x 140 mm x 150 mm or 2.17 inches x 5.51
inches x 5.91 inches (H x W x L) space available to place the unit on the table or mount it on the wall.
3.
The universal hook mount on the camera fits the width on the most standard monitors.
Conference room requirements
Your Chromebox for meetings is designed for a 3-6 person conference room, though it works well in
rooms of 2-10 people. We recommend a room that contains either a long table with the monitor at one
end (optimal), or a round table.
NOTE: A classroom setup is not recommended for using Chromebox for meetings.
The room must have the following:
•
Network port (for wired network connections)
•
AC power outlet
•
Display/TV/Projector
7
1.
Speakerphone
2.
Chromebox for meetings
Display requirements and installation
Your Chromebox for meetings can be setup to work with LCD, LED, plasma and projector-type monitors
and televisions. The display must have an HDMI or DisplayPort input. The screen resolution must be at
least 1280 x 720 pixels.
NOTE: For best video quality, we recommend a resolution of 1920 x 1080 pixels.
You can place the display on a table against one wall, or mount the display on a wall or ceiling for a
projector unit.
NOTE: If you already have an existing video conferencing system in the room, you can use the
existing setup for your Chromebox for meetings.
8
4
Setting up Your Chromebox for Meetings
Connecting a display panel to your Chromebox for
meetings
You can connect your Chromebox to a display panel or a projector that has any of the following
connectors:
•
•
HDMI connector
DisplayPort
NOTE: If required, the HDMI-to-DVI adapter must be purchased separately.
To connect a display panel to your Chromebox for meetings:
Connecting a display cable either to the HDMI port or the DisplayPort.
Connecting the Speaker Phone
You can connect a speaker phone to any of the USB 3.0 ports on your Chromebox for meetings.
9
NOTE: For information on speaker phones, you can refer to the following technical documentation:
http://www.jabra.com/Products/PC_Headsets/Jabra_SPEAK__410_Series/Jabra_SPEAK_410
Connecting the camera
You can connect a camera to any of the USB 3.0 ports in your Chromebox for meetings.
NOTE: For information of the camera, you can refer to the following technical documentation:
http://www.logitech.com/assets/45920/hd-pro-webcam-c920-quick-start-guide.pdf
Placing your camera
Place your camera on top of the display.
NOTE: Keep the camera at eye level.
Connecting the Remote Control Receiver
Connect the remote control receiver dongle to the USB 3.0 port on the front panel of your Chromebox
for meeting.
Remove the anti-discharge battery protector from remote
10
NOTE: The remote controller and receiver are paired in the factory and should automatically pair
when connected. The remote does not include special characters such as ~ ^ < > nor does it
include the Ctrl and Alt buttons. An external keyboard must be connected if your login password
has special characters.
Connecting the AC Power Adapter
To connect the AC power adapter to your Chromebox for meetings:
1.
Plug the AC power cord into a 100 V ~ 240 V power source.
2.
Connect the DC power connector into the power (DC) input port of your Chromebox for meetings.
NOTE: Depending on the model the power adapter may vary in appearance.
3.
Recommendations on how to use the power adapter
•
Always use the AC power adapter that came with your Chromebox for meetings.
•
A grounded wall socket.
•
Make sure that the wall socket is easily accessible.
Connecting your cables
Connect the cables from the external accessories to Chromebox for meetings.
11
1.
DisplayPort connects a display with DisplayPort 2.
connector.
HDMI connects a display with HDMI
connector.
3.
USB 3.0 port connects the camera.
4.
USB 3.0 port connects the speakerphone
assembly.
5.
Network port connects to a router/modem.
6.
Power port connects to a power outlet.
NOTE: Although you can use your
Chromebox for meetings device over a
wireless connection we strongly
recommend using a wired network
connection for a best sound and video
quality.
7.
NOTE: Always make sure that you
connect the power cable to the power
outlet only after the other connections.
USB 3.0 connects to the remote control
receiver.
Connectors and accessories
Depending on your setup, you may need the following:
•
CAT5e Ethernet cable for wired network connection.
•
Chromebox for meetings wall mount for wall mounting.
•
USB extension cable for camera for distance exceeding 5 feet.
•
USB extension cable for speakerphone for distance exceeding 3 feet.
12
•
Cable concealers, if needed for wall mounting.
NOTE: If your setup of the display, Chromebox for meetings, and peripherals requires longer
distance, you may need to purchase additional extension cables.
Mounting your Chromebox for meetings (Optional)
You can mount your Chromebox for meetings behind the display. Use a mounting bracket to attach the
Chromebox for meetings to your display or to any VESA (100 mm) - compatible location. A mounting
bracket comes included with your Chromebox for meetings package.
13
Using your Chromebox for meetings
5
Enrolling Chromebox for meetings
NOTE: We recommend connecting a USB keyboard and mouse to easily complete the enrolling
your device. If you are using the remote here’s how to move around the screen:
•
Press right to move the next field.
•
Press left to move back to the pervious field.
•
Press up or down to scroll the list for each field.
•
Press Select to make a selection.
To complete basic enrollment:
NOTE: The instructions below are done using the remote controller. You can also use a USB
keyboard to perform the enrollment.
1.
Turn on the display.
2.
Turn on the Chromebox for meeting.
3.
Verify or change your language, keyboard layout, time zone and network.
NOTE: If your network doesn't appear in the Select a network list, select Join network and
enter the correct settings. Ask your network administrator for the settings if you don't know
them.
4.
Select Continue
5.
Accept the Google Chrome OS Terms.
NOTE: If you would like to uncheck Optional: Help make Chrome OS better by automatically
sending usage statistics and crash reports to Google with the remote, you need to uncheck it
with the spacebar on the back of the remote or connect a mouse to uncheck it.
6.
Sign in with your Google Apps email address and password.
NOTE: If you use the remote to enter your password, the entire password may be revealed on
screen. Use a USB keyboard to have your password hidden as you type.
14
NOTE: Use a USB keyboard to enter special characters.
7.
The enrollment process takes place automatically. After the process is complete, click Done.
8.
When the Hangouts screen appears, follow the onscreen instruction to test your camera and
speakerphone.
NOTE: If you cannot see video or hear audio;
9.
•
Ensure that your camera and speakerphone are connected to your Chromebox for
meetings before you turned on your device.
•
Unplug the cables and plug them in again, then restart your device.
Click through the screens to view tips on using Chromebox for meetings.
At the end of enrollment, the screen displays a URL for this devices page in the Chromebox for meetings
Admin console. Using this URL, an admin user must add the room’s online calendar to the device to
enable schedule meetings.
Selecting other enrollment options
Most users can go through the simple enrollment flow described in Enrolling Chromebox for meetings.
Options are available for users who want to customize the setup experience or learn more. These options
appear on the second enrollment screen, except for accessibility, which appear on both the first and
second screens:
•
Accessibility: Accessibility options include larger font and cursor, size voice prompts, and more. The
options you select here apply to the setup process only, you cannot use Chromebox for meetings by
selecting these options. To select the Accessibility link using remote, navigate to the Continue or
Accept and continue button and then press right–>.
•
Send usage and crash info to Google:, Allow your device to send info to Google helps us improve the
Chrome OS experience for all users. To learn more about this option, click the Learn more.
NOTE: If you click learn more link you will need a mouse to close the learn more screen option.
•
System security:: Read more about the Chromebox for meetings security settings.
•
Google Chrome OS Terms: If you are using the remote, navigate to the Accept and Continue button
and then press right–> to move the cursor inside the terms window. Once you are inside the window,
you can scroll up and down to review the terms.
Scheduling a video call
Scheduling a meeting that includes a video call is easy. Your Calender invitation will include everything
people need to join from a room and or from a personal device.
1.
Sign in using your Google account.
2.
Open Google Calender or type google.com/calender in the address bar.
3.
Click Create to schedule an event.
4.
Enter event details-the event title, date, time and guests.
5.
Click Rooms, etc. on the right side of the page.
15
6.
Enter the name of a room with a Chromebox for meetings, and then click Add.
7.
After booking a room, click Add video call.
8.
Give a name for the video call, but keep the name short and distinct (The name can have up to 15
characters)
9.
Click Save to send others an invitation that includes a link to the video call.
Leaving a video call
If you have scheduled the video call, leaving the call does not mean that you are ending the call for
everyone in the meeting. It just means that you are leaving. The video call will continue until the last
person leaves it.
From a room
Press the read handset icon on the remote control or the speaker.
Managing devices and rooms
Check Admin and console settings for Google Video Conferencing devices
NOTE: Chromebox for meetings uses the Google video conferencing solution.
To manage Chromebox for meetings devices from the Admin console, make sure your time zone is set
correctly. You can also choose to reboot your Chromebox for meetings at scheduled intervals.
1.
From a laptop or other device, sign in to the Google Admin console
2.
Click Device management, and then to the right of Chromebox for meetings, click Settings.
3.
In the Schedule reboot field, enter the number of days before a reboot takes place (optional). For
example, if you want to reboot your devices every five days, enter 5.
4.
In the Time Zone field at the bottom of the screen, make sure your correct time zone is selected.
Associating your Chromebox for meetings with the
room's online calendar
After a user enrolls a Chromebox for meeting device in a room, an admin user needs to associate the
device with that room’s online calendar. This allows users to schedule video conferences using the
Chromebox for meeting
NOTE: You do not need to associate a Chromebox for meetings device with the room’s calender to
use the device for ad hoc meetings.
At the end of device enrollment, the screen displays a URL for the Chromebox for meetings Admin
console. Follow these steps if you are an admin user:
1.
From a laptop or other device, copy the Admin console’s URL into a web browser.
2.
When the login screen appears, sign in to the Admin console using your Google Admin account.
NOTE: You will not see the login screen if you are already signed in to your account.
16
3.
Click Device Management, and then click Chromebox for meetings devices. Select the Conference
room or resource and click Add calendar resource.
4.
On the right side of the screen, click Unassigned and do one of the following:
•
If the room where the Chromebox for meeting device is located appears in the list, click the
room name and then click Save.
•
If the room does not appear in the list, click Create Resource. Enter the room name and,
optionally, the resource type and a description. Click Save. To associate your Chromebox for
meeting device with the room’s calendar, click Unassigned, click the room name, and click Save.
Viewing device information
1.
From a laptop or other device, sign in to the Google Admin console.
2.
Click Device management, then, to the right of Chromebox for meetings, click Devices.
3.
A screen appears showing active Chromebox for meetings devices. Click the device that you want to
view.
4.
Click Hardware and OS. The right side of the screen displays devices information including the
model, serial number, MEID and more.
17
Editing the device name
1.
From a laptop or other device, sign in to the Google Admin console.
2.
Click Device management, then, to the right of Chromebox for meetings, click Devices.
3.
A screen appears showing active Chromebox for meetings devices. Click the device that you want to
rename.
4.
Click the arrow to the right of the device name.
5.
Click Edit device name.
6.
Enter the new name and click Save.
18
7.
A screen appears asking if you want to update the calendar resource name to match the new device.
Select Yes or No.
NOTE: Having the device name match the calendar resource name makes it easy to identify
which resource goes with which device.
Naming your Chromebox for meetings
1.
From a laptop or other device, sign in to the Google Admin console.
2.
Click Device management, then, to the right of Chromebox for meetings, click Devices.
3.
A screen appears showing active Chromebox for meetings devices. Click the device that you want to
add information.
4.
Click Notes.
19
5.
On the right side of the screen, click Edit.
6.
Enter the information you want in the User, Note, and/or Location field.
7.
Click Save.
Associating your Chromebox for meetings with a
different room, calendar or unassigning the device from
any room
If you move your Chromebox for meetings to a different room, you must assign the device to that new
room’s calendar.
Alternatively, if you stop using Chromebox for meetings device, you can unassign the device from any
room.
1.
From a laptop, or any other device, sign in to the Google Admin console.
2.
Click Device management, then, to the right of Chromebox for meetings, click Devices.
3.
A screen appears showing active Chromebox for meetings devices. Click the device that you want to
reassign or unassign.
4.
Click Add calendar resource.
5.
On the right side of the screen, click the room to which the Chromebox for meetings device is
associated and do any one of the following:
6.
•
To associate your Chromebox for meetings device with another room’s calendar, click the room
name.
•
To unassign your Chromebox for meetings device from any room, click Unassign.
Click Save.
Editing a room name, type, or description
1.
From a laptop or other device, sign in to the Google Admin console.
2.
Click Device management, then, to the right of Chromebox for meetings, click Devices.
3.
A screen appears showing active Chromebox for meetings devices. Click the device that is in the
room whose information you want to edit.
4.
Click Add calendar resource.
20
5.
On the right side of the screen, do one of the following.
•
To edit the currently assigned room, click Edit Resource to the right of the room name. Edit the
name, type, and/or description as desired and click Save.
•
To edit a different room or other resource, click the currently assigned room name and click
Manage Resource. This takes you to the Calendar settings page where you can edit a resource
name, type, or description; create a new resource; or delete a resource.
Editing a room name, type, or description
1.
From a laptop or other device, sign in to the Google Admin console.
2.
Click Device management, then, to the right of Chromebox for meetings, click Devices.
3.
A screen appears showing active Chromebox for meetings devices. Click the device that is in the
room whose information you want to edit.
4.
Click Add calendar resource.
5.
On the right side of the screen, do one of the following.
•
To edit the currently assigned room, click Edit Resource to the right of the room name. Edit the
name, type, and/or description as desired and click Save.
21
•
22
To edit a different room or other resource, click the currently assigned room name and click
Manage Resource. This takes you to the Calendar settings page where you can edit a resource
name, type, or description; create a new resource; or delete a resource.
6
Troubleshooting
Fixing a problem
Setup-During enrollment, I cannot get past the
language screen
The link to the content is at https://
support.google.com/chromeboxformeetings/
answer/3344700?hl=en&ref_topic=3368353
How to wipe and re-enroll a device
The link to the content is athttps://
support.google.com/chromeboxformeetings/
answer/4580158?hl=en&ref_topic=3368353
Manage devices and rooms
I do not know how to identify the Chromebox for
meetings device I want on the device list screen.
If you are not sure which device to click, you can
identify the correct one by its serial number. You
can find your device serial number or service tag
on the bottom of the device itself.
Help and support
Visit support.google.com/chromeboxformeetings for more detailed set-up and provisioning instructions,
customizable table mats, or to print guides for your user.
23
Contacting Dell
7
NOTE: If you do not have an active Internet connection, you can find contact information on your
purchase invoice, packing slip, bill, or Dell product catalog.
Dell provides several online and telephone-based support and service options. Availability varies by
country and product, and some services may not be available in your area. To contact Dell for sales,
technical support, or customer service issues:
1.
Go to dell.com/support.
2.
Select your support category.
3.
Verify your country or region in the Choose a Country/Region drop-down list at the bottom of the
page.
4.
Select the appropriate service or support link based on your need.
24