1
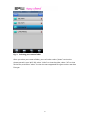
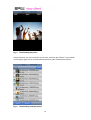
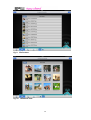
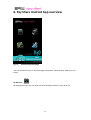
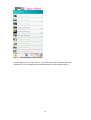
Wi-Fi SD
Sky Share S10 User Manual
Table of Contents
1. Introduction ............................................................................................................... 3
2. Spec and System Requirements ............................................................................... 4
3. Start Sky Share S10.................................................................................................... 5
4. iPhone App ................................................................................................................ 7
5. iPad App ................................................................................................................... 13
6. Android App ............................................................................................................ 15
7. Web UI ..................................................................................................................... 22
8. Wi-Fi Security........................................................................................................... 23
9. Setup Mode ............................................................................................................. 24
10. Restore................................................................................................................... 26
11. Enable/Disable Wi-Fi function .............................................................................. 27
12. Firmware Update………………………………………………………………………………………………29
13. Trouble shooting ................................................................................................... 30
2
1. Introduction
Sky Share S10, a Wi-Fi SD (microSDHC inside) provides instant transfer of your high
quality photos and videos from your digital camera to your smartphone or tablet
wirelessly.
It provides free iPhone App, iPad App, Andorid App, and Web UI (Web browser User
Interface) to support various Wi-Fi devices and allows up to 5 users to share the
photo simultaneously and wirelessly.
We recommend you to check the camera compatibility list on our website before
purchasing. http://www.silicon-power.com/support/su_dlc.php
The package is including:
- Wi-Fi SD adapter
- microSDHC Card
- Quick Guide including warranty card
3
2. Spec and System Requirements
Capacity: 16GB, 32GB
Speed: Class 10
Dimension: 32 x 24 x 2.1mm
Weight: 2g
Wi-Fi standard: IEEE 802.11b/g/n
Wi-Fi security: WPA2
Operation voltage: 2.8 ~ 3.3V
Operation Temp: 0 ~ 60 degree C
OS: iOS 4.0+, Mac OS X(10.5.X+), Android 4.0+, Win 7, Win XP, Win Vista, Win 8,
iPhone 3GS (iOS 4.2+), iPhone 4, iPhone 4S, iPhone 5, iPad, iPad2, the new iPad, iPad
mini
Allow up to 5 users to connect
Browsers: Safari 5 or later version, Webkit (Android), Internet Explorer 8 or later
version, Firefox, and Google Chrome
Supported file types:
Video: AVI, MOV, MP4, M2T, MTS, M2TS
Photo: BMP, JPG, PNG
Note: The file formats listed above will be displayed in the video and photo folder
respectively. Playability is subject to your device’s built-in player.
Note: For non-supported file types, you can still find them in “other” folder, but
these files will be supported with download function mainly.
Note: Please use the attached Silicon Power microSDHC for the product compatibility.
Other microSDHC is not guarantee for using Sky Share S10.
4
3. Start Sky Share S10
Step 1: Insert the microSD card into the Wi-Fi SD adapter and then insert them to
your camera.
Step 2: Power on your camera and disable the power saving mode function (or
prolong the power saving time period).
Step 3: Connect Sky Share S10 with your Smartphone or tablet via Wi-Fi
Default SSID: Sky Share S10
Default password: 88888888
Fig. 1
Connecting to Sky Share S10
For iPhone/ iPad:
1. Install the Sky Share S10 App (you can search for “Sky Share SD” in the App Store
and install it free of charge)
2. On the iPhone/ iPad, Select Settings > Wi-Fi and then select Sky Share S10 from
the wireless network list to connect
3. Tap the Sky Share S10 App (Sky Share SD) to open the application on your iPhone/
iPad home screen
For Android Smartphone/Tablet:
1. Install the Sky Share S10 app (you can search “Sky Share SD” on Google Play and
install it free of charge).
2. On the Android Smartphone/Tablet, Select settings and then enable Wi-Fi
3. Select and connect Sky Share S10 from the wireless network list
4. Tap the Sky Share S10 App (Sky Share SD) to open the application on your
Android smart phone/tablet home screen
5
For Other Tablets, Smart Phones and Computers:
1. Enable Wi-Fi
2. Select and connect Sky Share S10 from your device’s wireless network list
3. Launch your device’s Web browser and type 192.168.6.1
Step 4: Select SD Browse to view photos/video stored in your Wi-Fi memory card
Step 5: Select and download photos or videos to your smartphone or tablet
Note: When your Wi-Fi device is connected to Sky Share S10, Wi-Fi connection will
be devoted to the Sky Share S10. If you want to use Internet service, please
disconnect from Sky Share S10 to release your Wi-Fi connection for Internet service.
6
4. iPhone App
Fig. 2
iPhone App front page
You can find 4 functions on the front page: SD browse, Shoot & View, App local, and
setup.
SD Browse:
Tapping the icon will allow you to view the photos/videos stored in your Wi-Fi SD.
7
Fig. 3
Selecting your camera folder
After you select your camera folder, you can further select “photo” to view the
photos stored in your Wi-Fi SD, select “video” to view the video, select “all” to view
all the files, and select “other” to view the non-supported file types such as raw data
file type.
8
Fig. 4
Viewing Photos
Step 1: Tap SD Browse to view the files stored in your Wi-Fi SD
Step 2: Tap your camera folder and then tap the photo icon. The app will list the
photos stored in your Wi-Fi SD
Step 3: Tap your favorite photo to display.
Step 4: You can slide to next photo by your finger or go back to the upper layer by
touching the screen once and then tap the “Back” icon located on the upper left
corner.
9
Fig. 5
Downloading the photo
In Step 3 above, you can touch the screen once and then tap “Album” icon located
on the upper right corner to download the photo to your iPhone photo album.
Fig. 6
Downloading multiple photos
10
In step 2 above, you can tap “tool” to choose more than one photo, and tap
“Operation” to download the selected photos to your iPhone photo album or App
local folder.
Fig. 7
Download Selection
Note: Higher resolution photos may result in longer time to complete the
transferring process.
Playing Videos
Step 1: Tap SD Browse to view the files stored in your Wi-Fi SD
Step 2: Tap camera folder and then tap the “video” icon. The app will list the video
files stored in your Wi-Fi SD.
Step 3: Tap video to play
Note: For higher resolution video, the app will download the video file first before
playing.
Step 4: If you want to go back to the upper layer, simply touch the screen once and
then tap the “Back” icon located on the upper-left corner.
Downloading Videos
In step 2 above, you can tap “tool” to choose one or more video files and tap
“operation” to download the selected videos to your App local drive.
11
Note: Large video files may take longer time to complete the downloading process
Note: The video file will only be saved in “Sky Share S10” App local folder and will
not be saved in iPhone photo album (Not allowed by iPhone System)
Shoot & View:
By tapping this icon, the App will display the photo you are going to take on your
camera. Once you take a photo, it will be displayed on the screen of your
smartphone or tablet simultaneously and wirelessly.
If you like this photo, you can touch the screen and then tap “Album” in the upper
right corner of the App screen to save this photo into your iPhone photo album.
App local:
By tapping this icon, the photos/videos stored in Sky Share S10 App local folder will
be displayed.
Setup:
By tapping this icon, you will enter into the setup page. For the detail functions,
please refer to the chapter 9, Setup Mode.
12
5. Sky Share iPad App overview
Fig. 8
iPad App Front page
You can find 4 functions on the front page: SD browse, Shoot & View, App local, and
setup.
The operation is the same as iPhone App’s operation mentioned above.
However, iPad App can view the files in both of file list view and thumbnail view.
13
Fig. 9
File list view
Fig. 10 Thumbnail view
14
6. Sky Share Android App overview
Fig. 11
Android App front page
You can find 4 functions on the front page: SD browse, Shoot & View, App local, and
setup.
SD Browse:
By tapping this icon, you can view the photos/videos stored in your Wi-Fi SD.
15
Fig. 12
Selecting your camera folder
After you select your camera folder, you can further select “photo” to view the
photos stored in your Wi-Fi SD, select “video” to view the video, select “all” to view
all the files, and select “other” to view the non-supported file types such as raw data
file type.
All:
Tap this icon to view all file types
Photo:
Tap this icon to view the photos
Video:
Tap this icon to view the videos
16
Others:
Fig. 13
Tap this icon to view the non-supported file types
Viewing Photos
Step 1: Tap SD Browse to view the files stored in your Wi-Fi SD
Step 2: Tap your camera folder and then tap the photo icon. The app will list the
photos stored in your Wi-Fi SD
Step 3: Tap your favorite photo to display
Step 4: Sliding your finger across the screen to view the next photo or tapping the
“back” key to go back to the upper layer of your Android device
17
Fig. 14
Downloading the photo
In Step 3 above, by tapping and holding your finger on the photo, a pop-up message
will ask you to download this photo to your Android device.
18
Fig. 15
Downloading multiple photos
In step 2 above, you can tap “Select” to choose more than one photo, and tap
“download ” icon to download the selected photos to your Android device.
19
Fig. 16
Downloading screen
Note: Higher resolution photos may result in longer time to complete the
transferring process
Playing Videos
Step 1: Tap SD Browse
Step 2: Tap the camera folder and then tap the video icon. The app will list the video
files stored in your Wi-Fi SD
Step 3: Tap video to play
Note: For higher resolution video, the app will download the video file first before
playing.
Step 4: If you want to go back to the upper layer, please tap the “back” key of your
Android device.
Downloading Videos
In step 2 above, you can tap “select” to choose one or more video files and tap
“download” icon to download the selected videos to your Android device.
20
Note: Large video files may take longer time to complete the downloading process
Shoot & View:
By tapping this icon, the App will display the photo you are going to take on your
camera. Once you take a photo, this photo will be displayed on the screen of your
smartphone or tablet immediately and wirelessly.
You can tap and hold the photo then select “OK” from the pop-up message to save
this photo to your Android device.
App local:
By tapping this icon, the photos/videos stored in Sky Share S10 App local folder will
be displayed.
Setup:
By tapping this icon, you will enter into the setup page. For the detail functions,
please refer to the chapter 9, Setup Mode.
21
7. Web UI
Fig. 17 Web UI front page
After connecting to Sky Share S10, please type http://192.168.6.1 in your web
browser to open the Web UI main page.
Viewing and Downaloding Photos
Web UI for PC/NB/MAC:
Step 1: Tap “Photo” folder to view the photos stored in your Wi-Fi SD in the
thumbnail view
Step 2: Tap your favorite photo to display the photo or tap “download” button to
download this photo to your Wi-Fi device
Web UI for smart phone/tablet:
Please view the photo first and then tap and hold the photo until a selection menu
pops up on your smartphone or. You can then select “download” or “Copy” from the
menu to save the photo into your Wi-Fi device.
Downloading a video
For PC/NB/MAC only:
Step 1: Tap “video” folder to view the video files stored in your Wi-Fi SD
Step 2: Tap “download” to download the video to your computer.
Note: The video file is not allowed to be downloaded to the smart phone and
tablet.
Note: Larger video files may take longer time to complete the downloading process.
22
8. Sky Share S10 Wi-Fi Security
Sky Share S10 is a wireless broadcasting device within its range (up to 10 meters in
an open space)
Note: The signal range is subject to the camera models and the environment where
you use Sky Share S10.
When using Sky Share S10, you should be aware that the files are visible to all
devices connected to your Sky Share S10. Sky Share S10 has a default Wi-Fi security
which is enabled with the default password, 88888888. You can change the
password in the setup mode. (Referring to chapter 9, Setup Mode)
23
9. Setup Mode
Sky Share S10 is designed with default setting in production. You may want to adjust
its setting in use. For example, setting your password or changing the name of Sky
Share S10. The setting adjustment can be done through the setup page of Sky Share
S10 Web UI or App.
Fig. 18
Setup page of Web UI
Fig. 19 Setup page of iOS App
24
Fig. 20 Setup page of Android App
Change SSID (Network Name):
The default SSID is Sky Share S10. If you want to change SSID (Network Name), you
can tap the SSID column and key-in your favorite SSID (Network Name). After
tapping “OK”, please follow the pop-up message to restart your camera (Power off
and then on your camera) in order to make the new setting take effect.
Wireless Password enable/disable:
The default setting is enabled. You may select “OFF” to turn off the password if
necessary.
Change password:
The default password is 88888888.
Follow the steps below to change the password:
Step 1: Tap password column and key-in your favorite password
Step 2: After tapping “OK”, please follow the pop-up message to restart your camera
(Power off and then on your camera) in order to make the new password take effect.
About Sky Share S10:
It will show the card capacity, current free capacity, MAC address, App version, and
firmware version information here.
25
10. Restore
If you encounter a problem with Sky Share S10 or forget your password, you can
restore Sky Share S10 to the default setting to resolve the issues.
Please follow the steps below:
Step 1: Power on your camera.
Note: If your batter power is low, please charge your battery first before operation.
Step 2: Find a default “Restore” photo in pre-view mode of your camera.
Fig. 21
Default Restore Photo
Step 3: Delete this default restore photo by your camera, wait for 5 second, and then
restart your camera (power off and then on) to execute the restore command. The
system will take a while to reset Wi-Fi SD to the factory default setting. Please wait
for a while and then reconnect to your Wi-Fi SD.
Note: The system will automatically generate this default restore picture again
during next power on.
26
11. Enable/Disable Wi-Fi Function
Wi-Fi function of Sky Share S10 is enabled in the default setting whenever power-on.
This helps end-user to use Sky Share S10 immediately without any setup. If you don’t
use Wi-Fi function of Sky Share S10, you may power-off your camera to save battery
power consumption. Or, you may disable Wi-Fi of Sky Share S10 and enable Wi-Fi
again whenever you need.
Disable Wi-Fi function:
Step 1: Switch your camera to the pre-view mode
Step 2: Find the default “Wi-Fi OFF” photo in the pre-view mode.
Fig. 22 Default Wi-Fi OFF Photo
Step 3: Delete the default “Wi-Fi OFF” photo in the pre-view mode.
Wi-Fi function of Sky Share S10 will be disabled immediately.
Note: You have changed the Wi-Fi default setting to Wi-Fi OFF. Whenever you want
to use Wi-Fi function, you will need to enable Wi-Fi function first.
Enable Wi-Fi function:
Step 1: Switch your camera to the pre-view mode
Step 2: Find the default “Wi-Fi ON” photo in the pre-view mode
27
Fig. 23
Default Wi-Fi ON Photo
Step 3: Delete the default “Wi-Fi ON” photo in the pre-view mode.
Wi-Fi function of Sky Share S10 will be enabled immediately.
Note: You have changed the Wi-Fi default setting to Wi-Fi ON. Whenever you
power-on Sky Share S10, Wi-Fi function will be turn on automatically.
28
12. Firmware Update
The latest firmware will be available on our website.
http://www.silicon-power.com/support/su_dlc.php
Once you download the firmware system files, please store them in the root
directory of Sky Share S10. The firmware may crash if the power is suddenly off
during the firmware update process. In order to secure the power supply, we
recommend you to update the firmware by our Silicon Power card reader.
Step 1: Please insert Wi-Fi SD into the card reader and make sure the card reader has
been connected with the computer.
Step 2: Copy the following system files to the root directory of Sky Share S10.
image3, initramfs3.gz, mtd_jffs2.bin, program.bin
(Referring to the figure 24)
Fig. 24
System files in the root directory
Step 3: Remove your Wi-Fi SD and insert it to your card reader again
Step 4: Please wait for 5 minutes to complete the whole firmware upgrade process
and do not power off your card reader or remove your Wi-Fi SD during the process.
Step 5: After the upagrade is completed, please insert your Wi-Fi SD to your camera
and check the firmware version has been updated.
Note: It’s important to have a stable power for firmware upgrade. In case of sudden
power outage, the firmware may be damaged.
29
13. Troubleshooting
Can I change the default IP address (192.168.6.1)?
No, the default static IP address cannot be changed.
I cannot use the Internet after I connect to Sky Share S10. What
happened?
The Sky Share S10 is a wireless network on its own. When your WiFi device is
connected to Sky Share S10, Wi-Fi connection is dedicated for Sky Share S10 wireless.
If you want to use your WiFi device to surf on the Internet or check e-mail, please
disconnect with Sky Share S10 first to release Wi-Fi of your Wi-Fi device.
I cannot play part of my photos, videos, and files.
Please make sure the device you use to connect Sky Share S10 supports the file
formats. If not, please download the suitable player for your file format.
I cannot play the file bigger than 4GB.
Sky Share S10 only supports FAT32. FAT32 file system can only support the file size
up to 4GB.
30
Federal Communication Commission Interference Statement
This device complies with Part 15 of the FCC Rules. Operation is subject to the
following two conditions: (1) This device may not cause harmful interference,
and (2) this device must accept any interference received, including
interference that may cause undesired operation.
This equipment has been tested and found to comply with the limits for a
Class B digital device, pursuant to Part 15 of the FCC Rules. These limits are
designed to provide reasonable protection against harmful interference in a
residential installation. This equipment generates, uses and can radiate radio
frequency energy and, if not installed and used in accordance with the
instructions, may cause harmful interference to radio communications.
However, there is no guarantee that interference will not occur in a particular
installation. If this equipment does cause harmful interference to radio or
television reception, which can be determined by turning the equipment off
and on, the user is encouraged to try to correct the interference by one of the
following measures:
- Reorient or relocate the receiving antenna.
- Increase the separation between the equipment and receiver.
- Connect the equipment into an outlet on a circuit different from that
to which the receiver is connected.
- Consult the dealer or an experienced radio/TV technician for help.
FCC Caution: Any changes or modifications not expressly approved by the
party responsible for compliance could void the user's authority to operate
this equipment.
This transmitter must not be co-located or operating in conjunction with any
other antenna or transmitter.
31
警語:
根據NCC低功率電波輻射性電機管理辦法規定:
第十二條: 經型式認證合格之低功率射頻電機,非經許可,公司、商號或使
者均不得擅自變更頻率、加大功率或變更原設計之特性及功能。
第十四條: 低功率射頻電機之使用不得影響飛航安全及干擾合法通信;經
發現有干擾現象時,應立即停用,並改善至無干擾時方得繼續使
用。前項合法通信,指依電信法規定作業之無線電通信。低功率
射頻電機須忍受合法通信或工業、科學及醫療用電波輻射性電機
設備之干擾。
32


![TC55 Regulatory Guide [English] (P/N MN000016A03 Rev. A)](http://vs1.manualzilla.com/store/data/006084957_1-919751c600ce55e2e6481c06e14d0eb9-150x150.png)
![MC95XX Series Regulatory Guide [English] (P/N 72-118502](http://vs1.manualzilla.com/store/data/005760097_1-2f741b3a88b00c5f81d3f7718b174271-150x150.png)

![[PDF:4.7MB]](http://vs1.manualzilla.com/store/data/005740230_1-1ae4d56b6a4c67b9bd1782228090ff43-150x150.png)