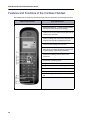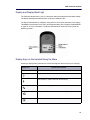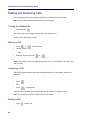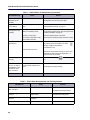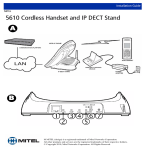
1
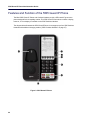
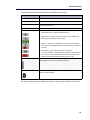
jfqbi
`çããìåáÅ~íáçåë=aáêÉÅíçê
RRMR=dìÉëí=fm=mÜçåÉ=
^Çãáåáëíê~íáçå=dìáÇÉ
NOTICE
The information contained in this document is believed to be accurate in all respects but is not warranted
by Mitel Networks™ Corporation (MITEL®). The information is subject to change without notice and should
not be construed in any way as a commitment by Mitel or any of its affiliates or subsidiaries. Mitel and its
affiliates and subsidiaries assume no responsibility for any errors or omissions in this document. Revisions
of this document or new editions of it may be issued to incorporate such changes.
No part of this document can be reproduced or transmitted in any form or by any means - electronic or
mechanical - for any purpose without written permission from Mitel Networks Corporation.
Trademarks
Mitel is a trademarks of Mitel Networks Corporation.
Adobe Acrobat Reader is a registered trademark of Adobe Systems Incorporated.
Other product names mentioned in this document may be trademarks of their respective companies and
are hereby acknowledged.
5505 Guest IP Phone Administration Guide
MCD Release 5.0
®,™ Trademark of Mitel Networks Corporation
© Copyright 2011, Mitel Networks Corporation
All rights reserved
ii
Table of Contents
Chapter 1: Introduction
Introduction . . . . . . . . . . . . . . . . . . . . . . . . . . . . . . . . . . . . . . . . . . . . . . . . . . . . . . . . . . . . . . . . . . . 3
About This Guide . . . . . . . . . . . . . . . . . . . . . . . . . . . . . . . . . . . . . . . . . . . . . . . . . . . . . . . . . . . . . . 3
Related Documentation . . . . . . . . . . . . . . . . . . . . . . . . . . . . . . . . . . . . . . . . . . . . . . . . . . . . . . . . . 4
Chapter 2: Registration and Configuration
Introduction . . . . . . . . . . . . . . . . . . . . . . . . . . . . . . . . . . . . . . . . . . . . . . . . . . . . . . . . . . . . . . . . . . . 7
Preparing the Cordless Handset and Installing the Batteries . . . . . . . . . . . . . . . . . . . . . . . . . . . . . 8
Battery Specification . . . . . . . . . . . . . . . . . . . . . . . . . . . . . . . . . . . . . . . . . . . . . . . . . . . . . . . . . . 9
Charging the Handset. . . . . . . . . . . . . . . . . . . . . . . . . . . . . . . . . . . . . . . . . . . . . . . . . . . . . . . . . . . 9
Care of the Handsets . . . . . . . . . . . . . . . . . . . . . . . . . . . . . . . . . . . . . . . . . . . . . . . . . . . . . . . . . . . 9
Registering the 5505 Guest IP Phone . . . . . . . . . . . . . . . . . . . . . . . . . . . . . . . . . . . . . . . . . . . . . 10
Connecting the Charging Cradle (Optional) . . . . . . . . . . . . . . . . . . . . . . . . . . . . . . . . . . . . . . . . . 11
Pairing the 5505 Cordless Handsets . . . . . . . . . . . . . . . . . . . . . . . . . . . . . . . . . . . . . . . . . . . . . . 12
Deleting/Replacing Paired Handsets . . . . . . . . . . . . . . . . . . . . . . . . . . . . . . . . . . . . . . . . . . . . . . 13
Reset to Factory (Default) Settings. . . . . . . . . . . . . . . . . . . . . . . . . . . . . . . . . . . . . . . . . . . . . . . . 14
Restoring the Base Station Default Settings . . . . . . . . . . . . . . . . . . . . . . . . . . . . . . . . . . . . . . . 14
Restoring the Handset Default Settings . . . . . . . . . . . . . . . . . . . . . . . . . . . . . . . . . . . . . . . . . . . 15
Re-Registering the 5505 Guest IP Phone . . . . . . . . . . . . . . . . . . . . . . . . . . . . . . . . . . . . . . . . . . 16
Firmware Upgrades . . . . . . . . . . . . . . . . . . . . . . . . . . . . . . . . . . . . . . . . . . . . . . . . . . . . . . . . . . 16
MCD Programming Required . . . . . . . . . . . . . . . . . . . . . . . . . . . . . . . . . . . . . . . . . . . . . . . . . . . . 17
DHCP Options Form . . . . . . . . . . . . . . . . . . . . . . . . . . . . . . . . . . . . . . . . . . . . . . . . . . . . . . . . . 17
User and Device Configuration Form . . . . . . . . . . . . . . . . . . . . . . . . . . . . . . . . . . . . . . . . . . . . 18
Other MCD ESM Forms . . . . . . . . . . . . . . . . . . . . . . . . . . . . . . . . . . . . . . . . . . . . . . . . . . . . . . . 18
Feature Access Code Support . . . . . . . . . . . . . . . . . . . . . . . . . . . . . . . . . . . . . . . . . . . . . . . . . . 18
Chapter 3: 5505 Phone Base
Introduction . . . . . . . . . . . . . . . . . . . . . . . . . . . . . . . . . . . . . . . . . . . . . . . . . . . . . . . . . . . . . . . . . . 21
Emergency Calls . . . . . . . . . . . . . . . . . . . . . . . . . . . . . . . . . . . . . . . . . . . . . . . . . . . . . . . . . . . . 21
Features and Function of the 5505 Guest IP Phone . . . . . . . . . . . . . . . . . . . . . . . . . . . . . . . . . . 22
Customizing the 5505 Guest IP Phone. . . . . . . . . . . . . . . . . . . . . . . . . . . . . . . . . . . . . . . . . . . . . 24
iii
5505 Guest IP Phone Administration Guide
Adjusting the Speaker Volume . . . . . . . . . . . . . . . . . . . . . . . . . . . . . . . . . . . . . . . . . . . . . . . . . . 24
Adjusting the Ringer Volume . . . . . . . . . . . . . . . . . . . . . . . . . . . . . . . . . . . . . . . . . . . . . . . . . . . 24
Making and Answering Calls. . . . . . . . . . . . . . . . . . . . . . . . . . . . . . . . . . . . . . . . . . . . . . . . . . . . . 25
Making a Call . . . . . . . . . . . . . . . . . . . . . . . . . . . . . . . . . . . . . . . . . . . . . . . . . . . . . . . . . . . . . . . 25
Answering a Call . . . . . . . . . . . . . . . . . . . . . . . . . . . . . . . . . . . . . . . . . . . . . . . . . . . . . . . . . . . . 25
Ending a Call . . . . . . . . . . . . . . . . . . . . . . . . . . . . . . . . . . . . . . . . . . . . . . . . . . . . . . . . . . . . . . . 25
Call Handling . . . . . . . . . . . . . . . . . . . . . . . . . . . . . . . . . . . . . . . . . . . . . . . . . . . . . . . . . . . . . . . . 25
Muting a Call . . . . . . . . . . . . . . . . . . . . . . . . . . . . . . . . . . . . . . . . . . . . . . . . . . . . . . . . . . . . . . . 25
Joining a Call/Conference on a Handset . . . . . . . . . . . . . . . . . . . . . . . . . . . . . . . . . . . . . . . . . . 25
Using Other Features . . . . . . . . . . . . . . . . . . . . . . . . . . . . . . . . . . . . . . . . . . . . . . . . . . . . . . . . . . 26
Using Speed Dial Keys . . . . . . . . . . . . . . . . . . . . . . . . . . . . . . . . . . . . . . . . . . . . . . . . . . . . . . . 26
Retrieving Messages . . . . . . . . . . . . . . . . . . . . . . . . . . . . . . . . . . . . . . . . . . . . . . . . . . . . . . . . . 26
Locating Handsets . . . . . . . . . . . . . . . . . . . . . . . . . . . . . . . . . . . . . . . . . . . . . . . . . . . . . . . . . . . 26
Chapter 4: 5505 Cordless Handset
Introduction . . . . . . . . . . . . . . . . . . . . . . . . . . . . . . . . . . . . . . . . . . . . . . . . . . . . . . . . . . . . . . . . . . 29
Out of Range Indication . . . . . . . . . . . . . . . . . . . . . . . . . . . . . . . . . . . . . . . . . . . . . . . . . . . . . . . 29
Charging the Battery . . . . . . . . . . . . . . . . . . . . . . . . . . . . . . . . . . . . . . . . . . . . . . . . . . . . . . . . . 29
Features and Functions of the Cordless Handset. . . . . . . . . . . . . . . . . . . . . . . . . . . . . . . . . . . . . 30
Display and Display Back Light . . . . . . . . . . . . . . . . . . . . . . . . . . . . . . . . . . . . . . . . . . . . . . . . . 31
Display Keys on the Handset/Using the Menu . . . . . . . . . . . . . . . . . . . . . . . . . . . . . . . . . . . . . . 31
Using the Handset MENU . . . . . . . . . . . . . . . . . . . . . . . . . . . . . . . . . . . . . . . . . . . . . . . . . . . . . 32
Menu Tree and Customizing the Handset . . . . . . . . . . . . . . . . . . . . . . . . . . . . . . . . . . . . . . . . . 33
Making and Answering Calls. . . . . . . . . . . . . . . . . . . . . . . . . . . . . . . . . . . . . . . . . . . . . . . . . . . . . 34
Turning the Handset On . . . . . . . . . . . . . . . . . . . . . . . . . . . . . . . . . . . . . . . . . . . . . . . . . . . . . . . 34
Making a Call . . . . . . . . . . . . . . . . . . . . . . . . . . . . . . . . . . . . . . . . . . . . . . . . . . . . . . . . . . . . . . . 34
Answering a Call . . . . . . . . . . . . . . . . . . . . . . . . . . . . . . . . . . . . . . . . . . . . . . . . . . . . . . . . . . . . 34
Ending a Call . . . . . . . . . . . . . . . . . . . . . . . . . . . . . . . . . . . . . . . . . . . . . . . . . . . . . . . . . . . . . . . 34
Turning the Ringer On/Off . . . . . . . . . . . . . . . . . . . . . . . . . . . . . . . . . . . . . . . . . . . . . . . . . . . . . 35
Adjusting the Handset Volume . . . . . . . . . . . . . . . . . . . . . . . . . . . . . . . . . . . . . . . . . . . . . . . . . . 35
Adjusting the Ringer Volume . . . . . . . . . . . . . . . . . . . . . . . . . . . . . . . . . . . . . . . . . . . . . . . . . . . 35
Call Handling . . . . . . . . . . . . . . . . . . . . . . . . . . . . . . . . . . . . . . . . . . . . . . . . . . . . . . . . . . . . . . . . 36
Muting a Call . . . . . . . . . . . . . . . . . . . . . . . . . . . . . . . . . . . . . . . . . . . . . . . . . . . . . . . . . . . . . . . 36
Joining a Call/Conference . . . . . . . . . . . . . . . . . . . . . . . . . . . . . . . . . . . . . . . . . . . . . . . . . . . . . 36
iv
Table of Contents
Using Other Features . . . . . . . . . . . . . . . . . . . . . . . . . . . . . . . . . . . . . . . . . . . . . . . . . . . . . . . . . . 37
Retrieving Messages . . . . . . . . . . . . . . . . . . . . . . . . . . . . . . . . . . . . . . . . . . . . . . . . . . . . . . . . . 37
Using Last Number Redial . . . . . . . . . . . . . . . . . . . . . . . . . . . . . . . . . . . . . . . . . . . . . . . . . . . . . 37
Using the Phonebook/Directory . . . . . . . . . . . . . . . . . . . . . . . . . . . . . . . . . . . . . . . . . . . . . . . . . 37
Using Speed Dials . . . . . . . . . . . . . . . . . . . . . . . . . . . . . . . . . . . . . . . . . . . . . . . . . . . . . . . . . . . 37
Chapter 5: Maintenance and Troubleshooting
Introduction . . . . . . . . . . . . . . . . . . . . . . . . . . . . . . . . . . . . . . . . . . . . . . . . . . . . . . . . . . . . . . . . . . 41
Checklist . . . . . . . . . . . . . . . . . . . . . . . . . . . . . . . . . . . . . . . . . . . . . . . . . . . . . . . . . . . . . . . . . . . . 41
Frequently Asked Questions/Troubleshooting . . . . . . . . . . . . . . . . . . . . . . . . . . . . . . . . . . . . . . . 41
v
5505 Guest IP Phone Administration Guide
vi
`Ü~éíÉê=N
fåíêçÇìÅíáçå
5505 Guest IP Phone Administration Guide
2
Introduction
Introduction
The Mitel 5505 Guest IP Phone and Cordless Handsets provide a SIP-based IP guest room
phone. The 5505 Guest IP Phone is a single-line phone that supports up to four cordless
handsets. You can order additional handsets and chargers.
The cordless handset has an indoor signal range of up to 100 meters (300 feet) from the 5505
Guest IP Phone.
Figure 1: 5505 Guest IP Phone and Cordless Handset
About This Guide
This guide contains the following information:
•
instructions on registering the 5505 Guest IP Phone, pairing the handsets, deleting and
replacing handsets, re-registration, and MCD programming required
•
detailed information on the features and functions of the 5505 Guest IP Phone and Cordless
Handset
•
troubleshooting chart and frequently-asked questions
3
5505 Guest IP Phone Administration Guide
Related Documentation
See the following documents for more information on the 5505 Guest IP Phone:
•
5505 Guest IP Phones Installation Guide - this guide provides instructions on how to
physically connect the 5505 Guest IP Phone, install the optional handset charger, install
the handset batteries, register the phone, and pair additional handsets.
•
5505 Guest IP Phone Quick Reference - this guide provides instructions on how to use
the features of the cordless handset and 5505 Guest IP Phone.
•
MCD System Administration Tool Online Help - Refer to this online help system for
instructions on how to program the Mitel 5505 Guest IP Phone on the MCD system.
To access phone- and system-specific documentation:
1. In your browser, go to http://www.edocs.mitel.com, and log in if necessary using your Mitel
Online account information.
2. Move your cursor over End User Documents and select PDF Guides to access any user
guides.
3. In Other Resources, click Installation Guides for end User Devices to access any
installation guides.
4
`Ü~éíÉê=O
oÉÖáëíê~íáçå=~åÇ=`çåÑáÖìê~íáçå
5505 Guest IP Phone Administration Guide
6
Registration and Configuration
Introduction
This section provides information on
•
preparing and charging the cordless handset
•
registering the 5505 Guest IP Phone
•
pairing handsets
•
deleting and replacing handsets
•
resetting the base station and handset to factory defaults
•
re-registration of the 5505 Guest IP Phone
•
required MCD programming for the 5505 Guest IP Phone
Refer to the 5505 Guest IP Phone Installation Guide for instructions on physically connecting
the 5505 Guest IP Phone.
7
5505 Guest IP Phone Administration Guide
Preparing the Cordless Handset and Installing the
Batteries
1. The display is protected by a plastic film. Remove the protective film.
2. Insert the batteries as designated on the back of the handset. The polarity is indicated on
the battery compartment.
3. Slide the battery cover back into the main casing until it clicks into place.
4. To open the battery cover, for example, to replace the batteries, place your fingertip in the
grooved area on the top of the cover and slide down.
8
Registration and Configuration
Battery Specification
Technology: Nickel-metal-hydride (NiMH)
Size:
AAA (Micro, HR03)
Voltage: 1.2 V
Capacity: 400–800 mAh
The following types of battery are recommended:
•
GP GP55AAAHCR 550mAh
•
SHP HFR-44AAAJ550 550mAh
•
SUPPO HSY-AAA0.55-C 550mAh
The handset is supplied with the recommended batteries.
Charging the Handset
It is recommended that you charge the handset battery fully before first use.
1. Charge the battery. It takes approximately 8 hours to fully charge the battery.
2. Then remove the handset for use.
Care of the Handsets
Wipe the charging cradle and the handset with a damp cloth (do not use solvent) or an antistatic
cloth. Never use a dry cloth. This can cause static.
If the handset should come into contact with liquid:
•
Switch the handset off and remove the batteries immediately.
•
Allow the liquid to drain from the handset.
•
Pat all parts dry, then place the handset with the battery compartment open and the keypad
facing down in a dry, warm place for at least 72 hours (not in a microwave, oven etc.).
•
Do not switch on the handset again until it is completely dry.
When it has fully dried out, it can be used again.
9
5505 Guest IP Phone Administration Guide
Registering the 5505 Guest IP Phone
The 5505 Guest IP Phone comes pre-paired with one 5505 Cordless Handset. Follow the
instructions below to register the 5505 Guest IP Phone.
Note: This procedure is valid only for first-time registration. See “Re-Registering the 5505 Guest
IP Phone” on page 16, if necessary.
1. Turn on the 5505 Cordless Handset using the power on button
2. Place the handset with the display facing up in the 5505 Guest IP Phone base.
If the phone has not been registered previously, the LEDs on the base start flashing in the
order below:
•
Speakerphone: LLDP & IP provisioning
•
Mute: Upgrade firmware
•
Messages: Upgrade CVM firmware
•
Line In Use: Successful boot up. The display on the handset displays “NO DN
PROGRMED”.
3. Enter the DN and the user PIN as DN#PIN#. In ESM, refer to User and Device Configuration
-> Access Authentication -> User PIN.
4. Press the Speaker key.
After successful registration, the screen displays the Room Name/Number.
See “Pairing the 5505 Cordless Handsets” on page 12 to continue pairing additional handsets.
10
Registration and Configuration
Connecting the Charging Cradle (Optional)
The 5505 Guest IP Phone can have up to three additional 5505 Cordless Handsets with
chargers. The additional handsets and cradle power adapter must be ordered separately.
1. Slide the flat plug from the power supply into the charging cradle until you hear a click.
2. Plug the power adapter into the plug socket.
If you need to disconnect the plug from the charging cradle, press the Release button and
disconnect the plug.
11
5505 Guest IP Phone Administration Guide
Pairing the 5505 Cordless Handsets
The 5505 Guest IP Phone supports up to four 5505 Cordless handsets. One handset comes
from the factory pre-paired with the base station. You can pair the remaining handsets by
following the instructions below.
It is recommended that the handsets be paired after the 5505 Guest Phone has been
registerered; however, if you wish to pair handsets on an unregistered 5505 Guest Phone,
press the End Call key to end registration.
Note: Only one handset can be paired at a time. The pairing must be completed before pairing
the next handset
1. On the 5505 Base Station, press down both the Volume Up/Down indicators on the
Volume key.
2. Then release the Volume Down (—) portion.
3. While the Volume Up key is pressed, type 7247 (PAIR) on the base station to start
the pairing process.
The Mute, Message and Line in Use keys start flashing to indicate an empty device slot is
available for pairing.
4. On the handset, press MENU -> Settings -> OK -> Handset -> OK -> Register HS?
5. Enter the Wireless PIN and press OK.
Registering ... appears on the handset.
Note: In ESM, refer to User and Device Configuration -> Access Authentication -> Wireless
PIN.
After successful pairing, Handset Registered is temporarily displayed on the handset, and
the indicators stop flashing on the base station. See “Maintenance and Troubleshooting”
on page 39 if the handset didn’t register successfuly.
6. To verify successful registration, press the handset locator button (in the handset
pocket on the base station). This will cause all paired handsets to start ringing.
7. Continue to pair the next handset, if necessary.
8. At any time, press the End Call key
12
on the base station to exit from pairing mode.
Registration and Configuration
Deleting/Replacing Paired Handsets
When all four handsets are paired and one/some/all of them are lost, new handsets will need
to be paired.
1. On the 5505 Base Station, press down both the Volume Up/Down indicators on the
Volume key.
2. Then release the Volume Down (—) portion.
3. While the Volume Up key is pressed, type 867247 (UNPAIR) on the 5505 base station
to start the unpairing process.
This procedure will un-pair all the paired handsets. After successful un-pairing,
Register HS will start flashing on the display of the handset(s).
All user data, including speed dials, room number, and the phone book entries will be deleted
on the handsets. You can now pair the new handsets following the procedure “Pairing the 5505
Cordless Handsets” on page 12.
13
5505 Guest IP Phone Administration Guide
Reset to Factory (Default) Settings
You can set the Base Station unit or the cordless handset to factory defaults
Restoring the Base Station Default Settings
1. On the Base Station, press down the Volume Up/Down key on the base station.
2. Then release the Volume Down ( -) portion.
3. While the Volume Up key is pressed, type 3228679 (FACTORY) to start the factory process.
The Line in Use key will flash for confirmation.
4. Release the Volume Up key and press * to confirm or any other key to cancel.
Settings are restored to factory settings, except for the pairing data. The base station is
rebooted. The message “NO DN PROGRMED is displayed on the handset.
14
Registration and Configuration
Restoring the Handset Default Settings
After a guest check outs, the handset settings are reset as detailed in the following table. As
well, you can restore the handset to factory defaults.To restore factory defaults on the handset,
enter MENU -> Settings -> OK -> Reset Handset -> OK.
The table below lists the factory settings and their defaults as well as the settings reset by guest
checkout.
Settings
Settings
Changed
by Reset
Handset?
Options
Factory Default
Settings
Changed by
Guest Checkout
Language
Handset Language
Yes
English
System default
Date and Time
Date and time
No
Date and Time are not
affected by reset
procedures (Clock stops
running if handset is
switched off)
00:00
Date mode
DD.MM.YY / MM.DD.YY DD.MM.YY
Time mode
24h / 12h
24h
Yes
on / off
off
Ringer volume
Yes
1...5 + Crescendo
3
Ringer melody
Yes
3 (monophonic) + 7
(polyphonic)
Carousel
Alarm clock
N/A
15.01.10
N/A
Audio
Alarm clock ringer
melody
Yes
3 (monophonic) + 7
(polyphonic)
Fountain
Earphone volume
Yes
1…3
1
Handsfree volume
Yes
1…5
5
All tones
Yes
on/off
on
Battery warnings
Yes
on/off during call
during call
Same as factory
defaults
Handset settings
Phonebook
(including speed dial
numbers and their
assignment)
No
Set to same speed
dials as the 5505
base
Redial list
No
Cleared of
previous redials
Automatic call
accept
Yes
on/off
on
Same as factory
default
15
5505 Guest IP Phone Administration Guide
Re-Registering the 5505 Guest IP Phone
The 5505 Guest IP Phone will require re-registration when the DN is changed for the phone
and/or when the User PIN is changed.
To re-register the phone:
1. On the 5505 base station, press down the Volume Up/Down key on the base station.
2. Then release the Volume Down ( -) portion.
3. While the Volume Up key is pressed, type 734 (REG) to start the re-registration
process.
The Line in Use keys start flashing slowly waiting for the DN number and Registration
PIN.
4. Enter the DN and registration PIN as DN#PIN#.
5. Press the Speaker key.
If an invalid DN or invalid PIN is entered, the cordless handset will display DN followed by
!REG or ! for DNs, indicating that the phone is not registered. Try the registration again.
See “Maintenance and Troubleshooting” on page 39 if the procedure is unsuccessful.
After successful registration, the screen displays the Room Name/Number.
6. At any time, to exit from the re-registration mode, press the End Call key
the 5505 base station.
on
Firmware Upgrades
The 5505 IP Phone checks its tftp server every day at 3 a.m. If there is new firmware, the phone
performs an upgrade.
If the phone is on a call at 3 am, it waits until it is idle before doing the firmware check.
16
Registration and Configuration
MCD Programming Required
Refer to the MCD System Administration Tool Online Help for detailed instructions on how
to program the Mitel 5505 Guest IP Phone on the MCD system.
Follow the steps below:
1. Program DHCP data in the DHCP Options form, see “DHCP Options Form” on page 17.
2. Program the 5505 Device data in the User and Device form, see “User and Device Configuration Form” on page 18
3. Program other 5505 data in other MCD ESM forms, see “Other MCD ESM Forms” on
page 18.
DHCP Options Form
The following data should be programmed:
•
SIP Proxy and Registrar Server: Option 125 -> call_srv
-
If resiliency is required, also configure DHCP Option 120 with the FQDN of your SIP
Proxy and Registrar Server.
-
To configure DHCP Option 120 on the MCD DHCP server:
- In the "format" drop down select "ASCII String"
- In the "value" text box enter the FQDN
•
TFTP Server: Option 125 -> sw_tftp
•
Voice Mail Server Address (MWI Subscribe): Option 125 call_srv
•
DSCP: Option 125 -> dscp
•
VLANID: Option 125 -> vlan
•
VLAN priority: Option 125 ->L2P
•
DNS Server: Option 6
17
5505 Guest IP Phone Administration Guide
User and Device Configuration Form
The following data should be programmed:
•
Number: Profile -> Number
•
Device Type: : Profile -> Device Type = 5505 SIP
•
CoS: Service Details -> Class of Service
•
Registration PIN: Access and Authentication -> User PIN
•
Wireless PIN: Access and Authentication -> Wireless PIN
•
Programmable Keys: Keys -> 2,3,4,5,6
Note: The five programmable keys on the 5505 Guest IP Phone are arranged horizontally: the
leftmost key is key 2, and the rightmost key is key 6. This numbering is used when programming
speed dial keys in ESM for the 5505 Guest IP Phone.
Other MCD ESM Forms
The following data should be programmed:
•
Dial Plan: SIP Device Capabilities -> Advanced -> Dial Plan
•
Voice Mail Retrieve Address : Call Rerouting First Alternative
•
Room number: Property Management -> Guest Rooms
•
Class of Service Options -> Basic -> Display -> Suppress Delivery of Caller Id Display
Between Sets
Feature Access Code Support
The following feature access codes are supported on the 5505 Guest IP Phone:
18
•
Hotel/Motel Room Personal Wake Up Call - Set
•
Hotel/Motel Room Personal Wake Up Call - Cancel
•
Hotel/Motel Room Wakeup Call From Guest Extension - Set
•
Hotel/Motel Room Wakeup Call From Guest Extension - Cancel
•
Hotel/Motel Room Remote Wake Up Call - Set
•
Hotel/Motel Room Remote Wake Up Call - Cancel
•
Hotel/Motel Room Status
•
Do Not Disturb
•
Do Not Disturb - Cancel
`Ü~éíÉê=P
RRMR=mÜçåÉ=_~ëÉ
5505 Guest IP Phone Administration Guide
20
5505 Phone Base
Introduction
This section provides detailed information on the 5505 Guest IP Phone. See the following topics
for more information:
•
“Features and Function of the 5505 Guest IP Phone” on page 22
•
“Customizing the 5505 Guest IP Phone” on page 24
•
“Making and Answering Calls” on page 25
•
“Call Handling” on page 25
•
“Using Other Features” on page 26
The 5505 Guest IP Phone Quick Reference Card is available for use in rooms by hotel guests
and contains brief instructions on how to make and receive calls, call handsets, join other calls,
and retrieve messages.
Emergency Calls
Warning for emergency number dialing: Consult your local authorities for Emergency Numbers
and 911 or equivalent service availability in your area.
To make an Emergency Call:
•
Dial your Local Emergency Number (911 or equivalent).
21
5505 Guest IP Phone Administration Guide
Features and Function of the 5505 Guest IP Phone
The Mitel 5505 Guest IP Phone and Cordless Handset provide a SIP-based IP guest room
phone designed for the hospitality market. The 5505 Guest IP Phone does not have a display;
however, a 1-line display is available on the 5505 Cordless Handset.
The diagram below illustrates the 5505 Guest IP Phone. It can support up to four 5505 Cordless
Handsets with additional charging cradles (“5505 Cordless Handset” on page 27).
Figure 2: 5505 Guest IP Phone
22
5505 Phone Base
The following table describes the features of the 5505 Guest IP Phone.
Feature
Function
1. PC Port
Provides a port for a PC.
2. Ringer Volume Slider
Provides a 3-position ringer volume control: low, medium, and high.
3. Speed Dial Keys
Use to dial common hotel sites, such as front desk, housekeeping,
restaurant, and so forth.
4. Dial Pad
Use to dial numbers.
5. Fixed Function Keys
Gives you access to the following phone functions:
• Speakerphone key - enables Handsfree mode.
• Message key - provides access to the room’s voice mailbox and
flashes (green) indicating new voicemail.
• Mute key - allows you to temporarily turn your phone's handsfree
microphone on/off during a call. When the key is lit (red), microphone
is muted.
• End Call key - ends a call or exits from a conference.
• Line in Use Indicator - shows the status of the phone. Lit (red) means
the line is in use, and off means the line is not being used. It also
flashes in sequence with the ringer when there is a call
6. Volume Up/Down Key
Provides volume control for the handsfree speakers. Also used for
administrative functions, such as pairing handsets.
7. Handset Locator
Used for locating paired handsets. Pressing this key when the phone is
idle will ring all handsets.
See the procedures below for detailed information on how to use the 5505 Guest IP Phone.
23
5505 Guest IP Phone Administration Guide
Customizing the 5505 Guest IP Phone
Follow the procedures below to customize the 5505 Guest IP Phone.
Adjusting the Speaker Volume
•
Press the volume button repeatedly to raise or lower the speaker phone volume.
Adjusting the Ringer Volume
•
24
Slide the switch on the side of the phone to low, medium or high.
5505 Phone Base
Making and Answering Calls
Making a Call
•
Press
and dial the number.
OR
•
Dial the number.
The speakerphone lights during your call
Answering a Call
During an incoming call, the base unit and all the registered handsets starts ringing. The "Line
in Use" indicator on base unit will start flashing in sync with the ringing cadence.
The Cordless Handsets show the calling Name/Number on the display, maximum 14 characters.
•
Press
Ending a Call
•
Press
to end the call.
Call Handling
Muting a Call
•
Press
The caller no longer can hear you. The mute key is lit while muted.
•
Press
to unmute the call.
Joining a Call/Conference on a Handset
When a handset is on a call, the Line In Use indicator is lit. You can join the call and create a
conference.
•
Press
.
•
Press
or
to end the conference.
25
5505 Guest IP Phone Administration Guide
Using Other Features
Using Speed Dial Keys
The 5505 Guest IP Phone has 5 programmable speed dial keys. The keys can be programmed
with speed dial numbers. Pressing the speed dial key will directly make the call to the
programmed number.
•
Press one of the five keys above the dial pad to reach the front desk, housekeeping, etc.
Retrieving Messages
The Message Key retrieves messages from the Voice Mail Server. This key is equipped with
a LED (green) that flashes when a new message is received.
•
Press
to access your messages.
Locating Handsets
You can locate all registered handsets while the base phone is idle.
•
Press
in the handset pocket.
All paired handsets will ring.
Press
on a handset to stop the ringing.
OR
•
26
Press
again to stop the ringing.
`Ü~éíÉê=Q
RRMR=`çêÇäÉëë=e~åÇëÉí
5505 Guest IP Phone Administration Guide
28
5505 Cordless Handset
Introduction
This section provides detailed information on using the 5505 Cordless Handset.
See the following topics for more information:
•
“Features and Functions of the Cordless Handset” on page 30
•
“Making and Answering Calls” on page 34
•
“Call Handling” on page 36
•
“Using Other Features” on page 37
The 5505 Guest IP Phone Quick Reference Card is available for use in rooms by hotel guests
and contains brief instructions on how to make and receive calls, call handsets, join other calls,
and retrieve messages.
Out of Range Indication
When a guest on a call is walking out of range of the base unit, the quality of the voice signal
will degrade.The range is up to 100 meters (300 feet). In addition, the Handset display will start
flashing the Room Name/Number. Going beyond the range will cause the call to drop.
Charging the Battery
•
Place the handset in the 5505 Guest IP Phone base or charger.
The Battery icon indicates charge level. The phone still works when in the charger.
29
5505 Guest IP Phone Administration Guide
Features and Functions of the Cordless Handset
The handset has 10 fixed keys and the dial pad. See the illustration and descriptions below.
5505 Cordless Handset
Keys and Functions
1. Battery Status - shows the battery status
2. Softkeys/Display Keys - provides context-sensitive
soft keys for phone functions and settings.
3. Message Key - provides access to the room’s voice
mailbox. It has an associated LED that starts flashing
indicating new voicemail.
4. Handsfree Key - enables and disables Handsfree
mode for making calls, accesses the redial lists, and
answers incoming calls in speakerphone mode.
5. Volume Control Key - scroll up or down to adjust the
volume or select settings from the menu.
6. Talk Key - used for making external calls, answering
calls, joining an existing call between the base and
an external party, and accessing redial lists,
7. Phonebook Key - accesses the handset’s
phonebook for dialing numbers stored in the
phonebook.
8. End Call On/Off Key- ends a call (short press), turns
the handset on/off (long press).
9. Ringer On/Off - silences the ringer.
10.Key Pad Lock On/Off - locks the keypad.
11.Not used.
12.Microphone - phone’s microphone.
13.Mute Key - toggles the microphone on/off during a
call.
30
5505 Cordless Handset
Display and Display Back Light
The Cordless Handset has a 1-line (14 characters wide) illuminated black and white display.
The display backlight automatically dims off while the handset is idle.
The Room Name/Number is displayed, along with the current time and status of the battery.
The MENU provides Alarm Clock, Audio, and Handset settings. See “Using the Handset MENU”
on page 32 for more information. The Room Name/Number remains in memory after the
batteries go dead.
Display Keys on the Handset/Using the Menu
Pressing a display/sofkey launches the function that appears above that key in the display.
Display Icon
MENU
Function when pressed
Opens the main/submenu (see the Menu tree)
Go back one menu level
Scroll up/down or adjust volume with the Control Key
Move cursor to left or right with
Backspace deletes one character at a time from right to left.
Confirm Menu function or save the entry.
31
5505 Guest IP Phone Administration Guide
Using the Handset MENU
The handset has many features offered in the MENU that allow you to customize the handset.
To open the main MENU:
1. Press the display key below MENU on the handset to open the main menu (see the illustration below).
2. Scroll down through the choices.
See “Menu Tree and Customizing the Handset” on page 33 for more details.
3. Press the display key below OK to confirm your selection.
32
5505 Cordless Handset
Menu Tree and Customizing the Handset
The table below contains the Handset Phone menu. Use this table as a guide in your menu
selections to customize the handset. Use the general guidelines for menu selection:
1. MENU -> use
Menu
1
Alarm Clock
to scroll to the selection, and press OK to confirm.
Sub Menu 1
Sub Menu 2
Activation
For activating/deactivating the alarm clock
Wakeup Time
Setting the wakeup time.
Input format: HHMM
Handset Volume
Earpiece
3 levels available
Speaker
5 levels available
Ringer Volume
Ringer Melody
5 levels + Crescendo available
Calls
10 ringer melodies available for calls
Alarm Clock
10 ringer melodies available for Alarm
Clock
Advisory Tones
2
Audio Settings
Battery Low
3
Description
Handset
Activate/deactivate the advisory tones
Off
Warning tone to indicate the battery is
almost flat:
Never
On
Always
During Call
Only during a call
Language
Changes the display language
33
5505 Guest IP Phone Administration Guide
Making and Answering Calls
See the procedures below for detailed information on how make and receive calls.
Note: Only one 5505 Cordless Handset can be used at a time.
Turning the Handset On
•
Press and hold
The button must be held (long press) in order to turn the phone on.
To end a call, a short press is used.
Making a Call
•
Press
or
•
Dial the number.
to get dial tone.
OR
•
Enter the number and press
or
Note: If the quality of the voice degrades during the call, you are walking out of range. The
call may drop.
Answering a Call
The 5505 Cordless Handset shows the calling Name/Number on the display, maximum 14
characters.
•
Press
OR
•
Press
for handsfree.
If Auto answer is enabled, just lift the handset from the charger to answer the call.
Note: Auto answer only works if the handset is on the charger.
Ending a Call
•
34
Press
to end a call.
5505 Cordless Handset
If auto answer is enabled on cordless handset, the call can also be disconnected by putting
the 5505 Cordless Handset on the charging cradle.
Turning the Ringer On/Off
You may want to turn the handset ringer off.
To turn the ringer off:
•
Press and hold
.
When the ringer is off, you will see a silenced bell in the display.
To turn the ringer on:
•
Press and hold
.
Adjusting the Handset Volume
While on a call:
•
Press the Volume Control key up
•
Then, press up or down to adjust the handset volume.
Adjusting the Ringer Volume
•
Press the Volume Control key up.
•
Then press up or down to adjust the ringer volume.
35
5505 Guest IP Phone Administration Guide
Call Handling
Muting a Call
You can mute your handset during a call so your caller no longer hears you.
•
Press the Mute key
•
Press the the Mute key
.
again to unmute the call.
Joining a Call/Conference
The 5505 Cordless Handset can join an existing call between the base unit and an external
party by pressing either the Talk or Speakerphone key. However, it cannot join a call between
another cordless handset and external party.
The 5505 Cordless Handset cannot join a call while the base unit is dialing.
36
•
Press
•
Press
to end the conference.
5505 Cordless Handset
Using Other Features
Retrieving Messages
The Message Key provides access to the room’s voice mailbox. It has an associated LED that
starts flashing indicating new voicemail.
•
Press
to access your messages.
Using Last Number Redial
The last 10 numbers dialed are stored in the redial list.
1. Press and hold
(long press)
2. Scroll down until you reach your selection.
3. Press
again to dial the number.
Using the Phonebook/Directory
The Phonebook stores approximately 40 entries, maximum 14 characters for the name and 32
characters for the number. The user is allowed to add, edit, and delete all phonebook entries.
If a user changes the pre-defined phonebook entries or inputs new entries and assigns them
to speed dial shortcuts (keys 1-5), the entries are defaulted to the base phone speed dials upon
check-in/checkout.
As well, the speed dial numbers to the front desk, housekeeping, restaurant and so forth are
stored in the phone directory. To dial numbers from the Phonebook:
1. Press the Phonebook Key
2. Use the up and down arrows to scroll through the names.
3. Press
to call the person/number.
Using Speed Dials
The 5505 Guest IP Phone base transfers its 5 speed dial numbers and names to the handset
each time a guest checks in and when the handset is registered. These entries are assigned
to the dial keys (1-5). The entries are overwritten if the handset is re-booted.
•
Press and hold one of the keys 1-5 on the dial pad.
The number is dialed automatically.
37
5505 Guest IP Phone Administration Guide
38
`Ü~éíÉê=R
j~áåíÉå~åÅÉ=~åÇ=qêçìÄäÉëÜççíáåÖ
5505 Guest IP Phone Administration Guide
40
Maintenance and Troubleshooting
Introduction
This section contains information on troubleshooting the 5505 Guest IP Phone.
Checklist
Please check:
•
Have you used the LAN cable supplied?
•
Have you fully inserted the LAN cable into the LAN port on the back of the phone?
•
Have you inserted the batteries correctly?
•
Have you charged the batteries for 8 hours?
Frequently Asked Questions/Troubleshooting
See the table below for error messages you may see on the 5505 Cordless Handset or problems
with the handset or base.
Table 1: 5505 IP Phone Troubleshooting
Problem/Message
Nothing appears in
the display.
Cause
The handset is not switched on.
Solution
Press the end call key for approximately 5
seconds or place the handset in the base.
Charge or replace the batteries.
The display is not
clear/seems to be
broken.
The display is protected by a
plastic film.
Remove the plastic film.
Base flashes on the
The handset is
not paired with the base.
Pair the handset. See “Pairing the 5505 Cordless
Handsets” on page 12.
The handset is outside the range
of the base.
Move the handset closer to the base.
The base station is not connected.
Check the main plug on the base station.
display. No
connection to base.
Room name/
number flashes on
the display.
!REG is displayed
on the handset.
The base is not registered with the
MCD. Possible causes are:
- network connectivity
- DHCP settings - call_srv
- MCD
- phone not programmed on
MCD
- Incorrect registration PIN
- Incorrect DN
Check network connectivity.
Check the call_srv setting in DHCP.
Check that MCD is operational.
Check programming on MCD and re-register.
Re-register with the correct PIN and DN.
Re-register with the correct PIN and DN.
Page 1 of 2
41
5505 Guest IP Phone Administration Guide
Table 1: 5505 IP Phone Troubleshooting (continued)
Problem/Message
Cause
Solution
PIN is not correct.
Re-enter the wireless PIN in the User Device
Configuration form and try to pair again.
on the display.
The handset is not paired with the
base.
Pair the handset with the base. See “Pairing the
5505 Cordless Handsets” on page 12.
Registration failed
Base is powered off.
Turn on the base.
is displayed on the
handset.
Base is not in pairing mode.
Put the base in pairing mode. See “Pairing the 5505
Cordless Handsets” on page 12.
Handset is out of range.
Place the handset closer to the base.
The handset variant (NA or UK)
doesn’t match the base.
Ensure that the handset variant matches the base.
The handset is not turned on.
Press the end call key for approximately 5
seconds or place the handset in the base.
Incorrect PIN is
displayed on the
handset.
Register handset is
Handset does not
get dial tone.
Charge or replace the batteries.
A handset is in use.
If the handset is turned on
The phone may be stuck booting up. See “Phone
State During Startup and First Registration” on
page 42 for its current state.
The handset does
not ring.
The ringer may be silenced.
Press and hold the * key
on.
DHCP failures -
Unable to obtain an IP address or
incorrect DHCP settings on the
server.
Check the network connectivity.
Waiting for DHCP
is displayed on the
handset for more
than 5 minutes.
to turn the ringer
Reconfigure the DHCP settings.
Page 2 of 2
Table 2: Phone State During Startup and First Registration
LED Behavior
Speakerphone flashing for more
than 5 minutes
Mode
LLDP & IP provisioning
Solution
Check the network connectivity.
Reconfigure the DHCP settings.
Mute flashing for more than 5
minutes
Upgrading firmware - l2 Boot, main
and recovery
Re-install the firmware on MCD
and reboot the 5505 phone.
Messages flashing for more than 5
minutes
Main startup and CVM firmware
upagrade
Reboot the phone.
No LED flashing
Successful boot up
42