1
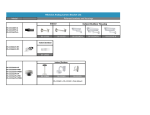
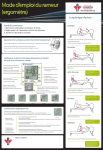
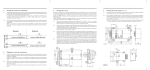
DS-1246ZJ Bracket
Installation Guide
DS-1246ZJ Bracket Installation Guide
1 Introduction
Thank you for purchasing our product. If there are any
questions, or requests, please do not hesitate to contact the
dealer.
This installation guide is applicable to DS-2CD71xx series
mini dome camera, such as DS-2CD7153-E, DS-2CD7164-E,
and DS-2CD7133-E.
This manual may contain several technical incorrect places or
printing errors, and the content is subject to change without
notice. The updates will be added to the new version of this
manual. We will readily improve or update the products or
procedures described in the manual.
The content in this installation guide is only for your
reference! If there is inconsistency between the image and the
actual product, the actual product shall govern.
The components, assemblies and accessories mentioned in
this guide is only for illustration, not standing for the actual
installation kit of the purchased model, the actual installation
kit please refer to the packing list.
Please refer to the camera user’s manual (in CD) to check
detail disclaimers.
Packing list:
Name
Number
Aluminum Pipe Bracket
1
Back Box
1
1
DS-1246ZJ Bracket Installation Guide
Name
Number
Securing Plate
1
PM4*8 Screw
4
φ8 Expansion Screw
5
M4*6 Lock Screw
2
Screws:
Φ8 Expansion Screw
PM4*8 Screw
2
M4*6 Lock Screw
DS-1246ZJ Bracket Installation Guide
2 Bracket Installation Steps
Note:
Please make sure that the wall is strong enough to withstand
three times the weight of the camera and the bracket.
1. Drill the holes on the wall
1). Drill four expansion screw holes and one cable hole
on the wall.
2). Feed the power cable and the video cable through the
cable hole.
3). Strike the four φ8 expansion screws into the screw
hole.
Expansion Screw Holes
The Wall
Figure 2-1 Drill the Holes on the Wall
Note: You may only see two expansion screw holes from the
above figure, because the visual line is horizontal, and
the other two expansion screw holes are exactly behind
the visible ones.
3
DS-1246ZJ Bracket Installation Guide
2. Install the bracket
1).
Remove the nuts and the washers from the expansion
screws.
2).
Align the mounting base with the expansion holes on
the wall.
3).
Feed the power/video cable through the bracket.
4).
Secure the mounting base to the wall with the
removed nuts and washers.
Bracket
Mounting Base
Figure 2-2 Install the Bracket
95
75±0.2
180
158±0.2
4-φ9
Figure 2-3 Mounting Base Overview
4
DS-1246ZJ Bracket Installation Guide
3. Install the back box and the securing plate:
1) Secure the back box to the threaded end of the
mounting bracket with the M4*6 lock screws.
2) Insert the securing plate, and secure it with four M4*8
set screws.
3) Feed the power cable and the video cable through the
back box and the securing plate.
Back Box
Securing Plate
Figure 2-4 Install the Housing
Note:
When you insert the securing plate to the back box, make
sure the plate side with the raised edges faces towards the
ground
4. Install the Camera:
1). Remove the hex screws on the dome camera with the
supplied screwdriver to separate the camera lid and
the camera.
2). Connect the corresponding power/video cables.
5
DS-1246ZJ Bracket Installation Guide
3).
Secure the camera to the back box with the two
supplied screws.
Camera
Figure 2-5 Install the Camera
5. Adjust the Lens:
1) Loosen the lock screw beside the lens.
2) View the camera image via the monitor.
3) Adjust the panning position and tilting position and
rotate the lens to get the desired surveillance angle.
4).Tighten the lock screws.
6
DS-1246ZJ Bracket Installation Guide
Lock Screw
Figure 2-6 Adjust the Lens
6. Install the Camera Lid:
1) Attach the camera lid to the camera
2) Secure the camera lid and the camera with the
removed hex screws.
Camera Lid
Figure 2-7 Install the Camera Lid
7
DS-1246ZJ Bracket Installation Guide
8