1
N30 Supervisory Controller User’s Manual
3-1
Chapter 3
Getting Started
Introduction
A VT100 can be used to add and edit objects and to browse an
N30 database. Project Builder software provides an easier way to
create, define, and edit N30 databases offline. This chapter explains
the VT100 interface to the N30 and describes tasks performed in using
an N30. Notes on using Project Builder to perform these tasks are
included where appropriate. This chapter describes how to:
•
log on to an N30
•
check the firmware version level of an N30
•
set the date and time
•
edit the attributes of an N30
•
browse an N30 database with a VT100
•
add objects with a VT100
•
edit objects with a VT100
•
command objects
•
display a summary
•
print a summary
•
change an Internet Protocol (IP) address
•
rebind a site
•
change device names
•
archive the current database
Note:
Tasks such as adding or commanding objects are described
generically. For details on specific objects, see the relevant chapter in
the N30 User’s Manual or in the Object Dictionary. For information
about using Project Builder software, see the Project Builder User’s
Guide.
© August 20, 2002 Johnson Controls, Inc.
Code No. LIT-6892030
www.johnsoncontrols.com
Software Release 5.1
3-2
Getting Started
Key Concepts
N30 Task Overview
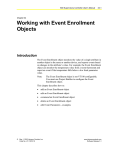
Figure 3-1 is a flowchart of tasks to get started with your N30 system
using the VT100, and in the case of setting up the N30 site, Project
Builder software. Other documents are referenced where required.
For information about generating N30 databases using Project Builder,
refer to the N30 Supervisory Controller Quick Start Technical Bulletin
(LIT-6891200).
Note:
We recommend generating databases using Project Builder
software. Project Builder supports copy, paste, and mass copy and can
save you a substantial amount of time. Project Builder also saves a
database file outside of the N30.
Install the N30.
See the N30 Supervisory
Controller Installation
Technical Bulletin
(LIT-6891100).
Set up the N30 site.
See the N30 Supervisory
Controller Quick Start
Technical Bulletin
(LIT-6891200).
Print controller
configurations.
See the N30 Supervisory
Controller Point Mapping
Technical Bulletin
(LIT-6891400).
Add controllers to your
database and map the
points to N30 point objects.
See the N30 Supervisory
Controller Point Mapping
Technical Bulletin
(LIT-6891400) and the
Object Dictionary.
Define alarms and
alarm messages.
See the N30 Supervisory
Controller User's Manual
chapters on Analog Alarm
objects, Multistate Alarm
objects, Notification Class
objects, Remote Destination
objects, E-mail objects, and
Pager objects.
Define Schedules.
See the N30 Supervisory
Controller User's Manual
chapters on Schedule objects
and Calendar objects.
Define Trend Logs.
See Working with Trend Log
Objects (LIT-6892280).
Build Energy Management
applications.
See Appendix A: Building an
Energy Management
Application (LIT-6892310).
Define Global Data
Sharing objects.
See Working with Global Data
Sharing Objects (LIT-6892130).
Build Signal Select
applications.
See Appendix E: Building a
Signal Select Application
(LIT-6892350).
Define Groups.
See Working with Group
Objects (LIT-6892060).
Edit and add additional
objects as required.
See the appropriate chapter in
the N30 Supervisory Controller
User's Manual or in the
Object Dictionary.
Build Optimal Start
applications.
See Appendix C: Building an
Optimal Start Application
(LIT-6892330).
N30 Overview.vsd
Figure 3-1: Getting Started with an N30
N30 Supervisory Controller User’s Manual
3-3
Objects
Configurable and reusable features of the N30 that contain both data
and a means to act on that data to achieve desired results. They add
flexibility to the programming of the N30 by allowing you to add only
the objects you need to your database. They are the building blocks of
the N30 database. The N30 literature describes the individual objects.
The Object Dictionary provides a reference to all the current N30
objects.
Object Identifier
A unique number internal to the object that identifies the object in the
system. The object identifier (object ID) consists of the object type and
instance number defined by BACnet™ codes. For example, the
Notification Class object’s Object Identifier defaults to 4194001. Use
Project Builder to configure the object ID of an object.
Object Type (Class)
Indicates membership in a particular object type class. This is a type of
object rather than an object. For example, Belgium could be an object
in the object class of Countries. All objects that come from an object
class inherit certain attributes of the object class in which they belong.
You can have multiple objects with the same object identifier within a
device as long as the objects are from different object classes. For
example, two Analog Value objects must have different object IDs, but
an Analog Value object and a Binary Value object can have the same
object ID because the objects are from different object classes.
Modifying two objects within the same object class to the same object
identifier causes the download to fail in Project Builder. Be sure each
object within an object class has a unique object identifier.
Object Name
Indicates unique names for an object. Providing an Object Name is
optional, but if it is defined, it must be unique throughout the site. If it
is not defined, the full reference becomes the identifier. For example,
Building1Floor2. The following characters are not allowed:
@ # $ * . , ? : ‘ ’ “ ” [ or ].
We also recommend that you do not use the following characters:
/ \ &.
3-4
Getting Started
Container
Holds objects to support the hierarchical organization of objects. The
N30 database is arranged through containers. All objects are added to
containers. The type of container selected determines the type of
objects that can be added to that part of the database. See Table 3-1 for
a list of which objects can be added to each container.
A container object can hold a maximum of 75 objects. However, since
there are hidden objects in N30s, N30s are limited to 50 child objects.
To put more than 50 objects in an N30, use Container objects to
organize your objects. Use a maximum of 50 Container objects in
one N30.
Group
Contains references to objects. Groups offer a way to personalize the
organization of an N30 database. This allows you access to the object
from both the designated group and from the container where it was
added. Groups are a powerful organizational tool when working with
large databases. For more information, see the Working with Group
Objects (LIT-6892060) chapter.
BACnet Group Object
Provides the user with the ability to customize the organization of
objects within the site. The BACnet Group object references any
object except another BACnet Group object as long as all members of
the group reside in the same device that maintains the BACnet Group
object. There is no limit to the number of members in a group and each
object member within the group includes one or more of its attributes.
Nesting is not allowed. For more information, see the Working with
BACnet Group Objects (LIT-1201217) chapter.
Flash Memory
Stores configuration data, startup code, boot code, main code, and the
archive database. Flash Memory is a type of nonvolatile memory
within the N30 device.
Warm Start
Cycling the N30 power off and then on again. In the N30, it is
considered a warm start when power is cycled with the battery still
installed. Use warm starts as resets for certain functions. For example,
after changing the IP address in an N30, you must warm start the
device to allow the updates to take effect.
N30 Supervisory Controller User’s Manual
3-5
Site Manager
Contains the master Site object. The master Site object is the N30
within a site responsible for the synchronization of global objects, time
synchronization, and device status monitoring within the site. There
can only be one Site Manager per site.
Rebind Site
Corrects situations where references to offbox objects become
unreliable. Rebind Site (formerly Rebind References) is a fail-safe
command. Offbox objects are objects that exist in other controllers on
the network (not in the local N30). Use the Rebind Site command
when you have made major changes to a database and are
re-downloading objects to N30s. If all N30s in the database are
connected during the download, some N30s can bind to objects that
have been moved to other N30s. The Rebind Site command is not
required when the IP address of an N30 changes because other N30s in
the site automatically relocate it within a few minutes. See Rebinding a
Site in the Detailed Procedures section.
The following describes a sample sequence of events requiring the
Rebind Site command:
1. Outdoor Air (an N2 Analog Input object on N30-B) is used in an
Interlock object in N30-A.
2. N30-A temporarily loses its network connection to N30-B.
3. User moves Outdoor Air from N30-B to N30-C.
4. User reestablishes the network connection to N30-A.
5. User must Rebind Site in order for the Interlock object in N30-A to
reestablish its reference to Outdoor Air.
3-6
Getting Started
Containers and Objects
You can add objects as they are needed for your facility. The objects
available to add depend on the container selected. Table 3-1 lists the
objects that can be added to each container.
Table 3-1: Containers/Objects
When This Container is Selected
These Objects Can Be Added:
Site Name - Top level name on the
VT100 screen
Note: All the N30s on this site are
listed in this container; it is usually
given a localized name during set up
of the N30 site.
Analog Alarm*
Multistate Alarm*
Event Enrollment*1
Analog Totalization*
Runtime Totalization*
Event Totalization*
Trend Log*
Container
Data Broadcast*
N30 - Name determined by user
All objects that can be added from the site name
Internals
Site
Report Server
All objects that can be added from the site name
Comm
All objects that can be added from the site name
Applications
All objects that can be added from the site name
Energy
Optimal Start*
Heavy Equip Contr
Pulse Meter*
Load*
Group
Group*
BACnet Group*
All objects that can be added from the site name
N2
Controller
All objects that can be added from the site name
A Controller object within an N2
container
N2 Analog Input (N2 AI)
N2 Binary Input (N2BI)
N2 Analog Output (N2 AO)
N2 Binary Output (N2 BO)
N2 Multistate Input (N2 MSI)
Notifications
Notification*
All objects that can be added from the site name
Demand Limit and Load Rolling
(DLLR*)
Utility Profile*
All objects that can be added from
the site name
N2 Multistate Output (N2 MSO)
N2 Pulse Counter (N2 PC)
All objects that can be added from
the site name
Continued on next page . . .
*
1.
Detailed procedures for working with these objects are in this manual. For all other objects, refer to the
Object Dictionary for further information.
The Event Enrollment object can be added to all objects using Project Builder.
N30 Supervisory Controller User’s Manual
When This Container is Selected
(Cont.)
These Objects Can Be Added:
Operator Devices
Display* (Project Builder is required to add this object.)
E-mail*
Modem Config*
LAN Remote Dest
Pager*
Printer*
Remote Destination*
VT100* (Project Builder is required to add this object.)
All objects that can be added from the site name
Operators
Operator*
All objects that can be added from the site name
Programming
Multiple Command
Interlock*
Global Data*
Signal Select*
Schedule
Schedule*
Calendar*
Temporary Occupancy*
All objects that can be added from the site name
Summaries
Summary
All objects that can be added from the site name
*
3-7
Multistate Value (MV)
Analog Value (AV)
Binary Value (BV)
All objects that can be added from
the site name
Detailed procedures for working with these objects are in this manual. For all other objects, refer to the
Object Dictionary for further information.
3-8
Getting Started
N30 Screen Layout on VT100 Terminal or VT100 Terminal Emulator
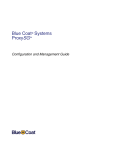
Figure 3-2 shows a typical N30 screen on a VT100 Terminal. The
screen shown is the main screen for the site called Brown Deer, after
someone has logged on to the N30 device named Dean, with a user
name of ADMIN. Table 3-2 describes areas 1 through 4 in Figure 3-2.
See Browsing an N30 Database with a VT100 in this chapter for basic
screens available in the N30. See the specific object chapter in this
document also.
Figure 3-2: N30 Screen Layout
N30 Supervisory Controller User’s Manual
3-9
Table 3-2: N30 Screen Layout Description
Number
1
Display Area Name
Purpose and Description
Alarm Information
Used to view Status Notification Reports (SNRs). Occupies Lines 1
and 2 at the top of the screen. Alarm information displayed in this
example includes (from left to right):
Note:
Refer to
Appendix B: Building
an Alarm Application
(LIT-6892320) for
more information about
SNRs.
2
Site/User Information
•
alarm priority (IMP). Possible values are SER (Serious), CRIT
(Critical), IMP (Important), STAT (Status).
•
event state being reported (LW). Possible values are HA (High
Alarm), LA (Low Alarm), HW (High Warning), LW (Low Warning),
and Nor (Normal).
•
object name in alarm (Principal Office)
•
value of attribute (65.0 deg F). Assumed attribute is Present
Value.
•
units of attribute (optional)
•
local date (28 Jan 2000)
•
local time in 24-hour format (09:16:39)
•
message text (line 2)
Used to view site/user information. Occupies Line 3 at the top of the
screen. Site/user information displayed in this example includes (from
left to right):
•
device object name (Dean)
•
name of logged-in user (ADMIN)
•
date and time (Fri 28 Jan 2000 9:18 CST)
3
User Workspace
Used to view site information and to complete most operations.
Occupies Lines 4 through 22 in the middle of the screen. In this space,
the operator displays and interacts with objects, calls up summaries,
and uses the available features to program the site.
In this example, Brown Deer is the name of the site, Overview Grp is
the name of the Site Group, and South Building and Dean are names
the operator gave to the two N30s on this site.
4
User Assistance
Used to view function key options, help messages, and error
messages. Occupies Lines 23 and 24 at the bottom of the screen.
Browsing
Browsing with a VT100 is moving within and through the N30
database to view, edit, and command objects. Browsing with Project
Builder software is performed offline and therefore commands are not
available. For information on browsing an N30 database using an
M-Series Workstation, see M-Explorer User’s Guide.
The User Assistance Line at the bottom of each screen (Number 4 in
Figure 3-2) displays the active keys and functions. The active keys and
the functions associated with each key change according to where you
are in the database. The User Assistance Line also provides
instructions for filling in attribute fields. Some basic navigational keys
are available but not described, such as the arrow keys for moving the
cursor.
3-10
Getting Started
Functions Available in the VT100
The same keys are used in an N30 with a VT100 Terminal or a
VT100 Terminal Emulator. The functions of some of the keys are
context-sensitive. For example, the F3 key can add, edit, or save
changes to an object, depending on when it is used. The available keys
and their functions at that time appear on the User Assistance Line at
the bottom of the screen. See Table 3-3 for descriptions of the keys.
Table 3-3: Functions Available in N30 from VT100
Function Key
Function
Context
Purpose
Page
There is more data than can
fit on one screen.
Displays all available screens.
Move cursor or
highlight fields
Available on any screen
where the cursor can move.
Moves the cursor or highlight box to an
object, attribute, or field.
Delete
An object is open or an
empty container is open.
Deletes the selected object.
F1
Ack
An alarm is displayed at the
top of the screen.
Acknowledges alarms that appear at the
top of the screen.
F2
Command
An object is selected.
Allows you to select and carry out an
action on the selected object.
Del (Delete)
Item
An attribute that can have
items deleted from it is open.
Deletes an item from an attribute, such
as an item from an Input List.
Add
A container or an object that
can have items added to it is
selected.
Opens the Add Object screen. However,
the function varies with the object or
container that is highlighted when this
key is pressed.
] or [
Arrow Keys
Delete
F3
F4
Q
Edit
An editable object is open.
Displays the objects attribute screen.
Save
An editable object is open
and changes have been
made to it.
Saves changes to the memory database
(RAM). The memory database is
archived in Flash memory once a day
after midnight.
Add Item
An attribute that can have
items added to it is open.
Adds a blank entry for an item to be
added to an attribute, such as an item for
an Input List.
Back
An attribute that can have
items added to or deleted
from it is open.
Displays the previous screen.
Cancel
An object, container, or
attribute screen is open.
Cancels the current action and/or
displays the previous screen.
Quit
N30 main screen displays
Logs the user off the N30.
Continued on next page . . .
N30 Supervisory Controller User’s Manual
3-11
Function Key
Function
Context
Purpose
Return (Enter)
Execute
An object has its command
line open and a command
selected.
Carries out (executes) the displayed
command.
Open
An object, container, or
device is selected.
Opens the selected (highlighted) object.
Select
An add object screen is
open with an object
highlighted.
Opens the attribute screen to create a
new object of the highlighted type.
Expand/
Collapse
An object with a plus (+) or
minus (-) next to it is
highlighted.
Expands a container, device, group, or
object that has a plus (+) sign beside it;
collapses a container that has a minus (-)
sign beside it.
Cycle
A field with multiple
predefined options is
selected, for example,
commanding an object.
When available, allows you to cycle
through the available options for the
selected attribute.
Confirm Delete
An object has been deleted.
Confirms the Delete operation.
Move to next
field
An object is being edited.
Moves the highlight box to highlight an
attribute.
Spacebar
Spacebar
(forward) and
Backspace key
(backward)
Tab
3-12
Getting Started
Detailed Procedures
The following procedures assume the N30 is already set up properly.
If using a direct serial port connection from the Personal Computer
(PC) to the N30, see the appropriate application note:
•
Direct Connect and Dial-Up on Windows 98 Application Note
(LIT-6893350)
•
Direct Connect and Dial-Up on Windows NT Application Note
(LIT-6893400)
•
Direct Connect and Dial-Up on Windows 2000 Application Note
(LIT-6893450)
If connecting to the N30 through an Ethernet Local Area Network
(LAN), also see the N30 Supervisory Controller Networking Technical
Bulletin (LIT-6891300).
Logging On to an N30
To log on to an N30:
1. Start your VT100 Emulator or turn on your VT100.
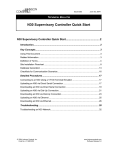
2. Press Enter when the N30 name appears at the top of the screen.
The Login screen appears (Figure 3-3).
Figure 3-3: N30 Login Screen in a VT100
3. Type your Login ID and press Enter.
N30 Supervisory Controller User’s Manual
3-13
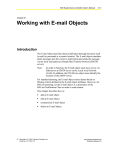
4. Type your password and press Enter. The Main N30 screen
appears (Figure 3-4).
Notes:
The default Login ID is ADMIN.
The default password is 2468.
The password is case sensitive.
We strongly recommend that the site administrator change the default
password immediately and create Operator objects for editing the site.
Figure 3-4: N30 Main Screen After Logging In
Checking the Firmware Version Level of an N30
To check the firmware version number of an N30:
Note:
These steps are performed using a VT100 Terminal or
VT100 Terminal Emulator on a PC.
1.
Browse to and highlight the N30 you want to check (for example,
B7F3N01 in Figure 3-5).
3-14
Getting Started
Figure 3-5: N30 Screen after Logging in Through VT100 Terminal
2.
Press Enter. The local attributes screen appears (Figure 3-6). The
Firmware Version level is on the right side under Engineering
Values.
Figure 3-6: N30 Local Attributes Screen
N30 Supervisory Controller User’s Manual
3-15
Setting the Date and Time
Note:
The date and time defined for a site can be changed from any
of the configured N30 devices. When date or time is changed at one
N30 device, the change is automatically sent to all other N30 devices
on the site. N30s automatically synchronize their time just after
midnight at 12:01 A.M. (00:01).
To set the date and time:
1. Browse to and highlight the desired N30 using the arrow keys
(for example, N30P497).
2. Press the F2 (Command) key. The Command field appears.
3. Use the Spacebar or the Backspace key to cycle through the list
until the Set Time or Set Date command appears.
4. Use the arrow keys or Tab key to highlight the Value field.
5. Edit the value as necessary, using the number keys to set the
numbers and the Spacebar to scroll through the months.
6. Press Enter.
3-16
Getting Started
Editing the Attributes of an N30
To edit the attributes of the N30:
1. Browse to and highlight the desired N30 using the arrow keys.
2. Press Enter to open the object (Figure 3-7).
Figure 3-7: Open N30 Device Object
Note:
When an object is opened, an object information line appears
beneath the alarm/site information display area. The information that
appears, from left to right, includes: object name (B7F3N01), present
value, and object status (Operational). Figure 3-7 only shows object
name and object status as an N30 Device object does not have a
present value.
3. Press the F3 (Edit) key. The first of two N30 Device object
attribute screens appears (Figure 3-8).
N30 Supervisory Controller User’s Manual
3-17
Figure 3-8: N30 Device Object Attribute Screen
4. Use the arrow keys to move the cursor to the field that you want to
edit. The ] and [ keys are used to see additional pages of attributes.
5. Edit the values. The acceptable values for each field are described
in the User Assistance line at the bottom of the screen. For more
information about the attributes of the N30 Device object, refer to
the N30 Device (LIT-694610) object chapter of the Object
Dictionary.
6. Press the F3 (Save) key to save changes or the F4 (Cancel) key to
cancel the changes.
3-18
Getting Started
Browsing an N30 Database with a VT100
This example illustrates how to browse an N30 database in a VT100
by describing how to view the attributes of an N2 Analog Output (AO)
object.
To browse an N30 database:
1. Browse to and highlight the desired N30 using the arrow keys.
2. Press the Spacebar to expand the list of containers (Figure 3-9).
Note:
The content of the list depends on the database. The
examples in this chapter use the containers of the default
N30 database. The default N30 database is downloaded using Project
Builder.
Figure 3-9: Expanded N30 Container List
3. Select the N2 container.
4. Press the Spacebar to expand the list of objects.
5. Use the arrow key to highlight the Controller object where the
N2 object is located. In this example, it is UNT {1}.
6. Press the Spacebar to expand the list of N2 objects in the UNT
Controller object (Figure 3-10).
N30 Supervisory Controller User’s Manual
3-19
Figure 3-10: Expanded List of Objects in the UNT
7. Use the arrow keys to highlight the N2 AO object. In this example,
we want to see the attributes of the Heating Setpoint
(ADMN - HEATING SP).
8. Press the Enter key to open the object (Figure 3-11).
3-20
Getting Started
Figure 3-11: Open N2 AO Object
Adding Objects with a VT100
Notes: This section describes how to add objects using a VT100.
Adding objects using Project Builder software is simply a matter of
dragging the desired objects from the N30 library to the appropriate
container in your database, defining their attributes, and downloading
to the N30. See the Project Builder User’s Guide for more details.
Most objects require that certain attributes be defined for them to be
valid. Refer to the Object Dictionary for details.
To add objects with a VT100:
1. Browse to and highlight an N30.
2. Press the Spacebar to expand the list of object containers
(Figure 3-9).
3. Browse to and highlight the container or object where you want to
add an object (for example, the UNT in Figure 3-10).
See Table 3-1 for a list of the objects that can be added to each
container type.
4. Press the F3 (Add) key. A list of objects that can be added at that
point appears (Figure 3-12).
Note:
The Add Objects list changes according to what is selected
when the F3 (Add) key is pressed (see Table 3-1).
N30 Supervisory Controller User’s Manual
3-21
Figure 3-12: Add Object Screen
5. Select the type of object to add.
6. Press Enter. The attribute screen for the selected object appears.
7. Fill in the fields using the information in the Object Dictionary or
the appropriate chapter in this manual. Point mapping information
is in the N30 Supervisory Controller Point Mapping Technical
Bulletin (LIT-6891400).
8. Press the F3 (Save) key.
Editing Objects with a VT100
Note:
Editing objects using the VT100 requires browsing to the
object, opening the object, and modifying the attributes as desired.
Editing objects using Project Builder software is similar in that the
object must be browsed to and opened to modify it. However, in
Project Builder, objects are edited in the M-View interface, allowing
standard windows features such as drop-down lists. Use Project
Builder to perform major editing of the database because Project
Builder saves the changes for future downloads. For more information,
see the Working with Objects and the M-View Screen (LIT-693230)
chapter in the Project Builder User’s Guide.
3-22
Getting Started
To edit objects:
1. Browse to and highlight an object.
2. Press Enter to open the object.
Note:
Additional attributes appear after an object is created. For
complete lists of attributes for each object, refer to the
Object Dictionary.
3. Press the F3 (Edit) key. The attribute screen for that object appears
(Figure 3-13).
4. Use the arrow keys to move the cursor to a field and edit as
desired. The User Assistance lines at the bottom of the screen
provide help on the range of values or types of information that can
be entered in the selected field. For example, in Figure 3-13, with
the Change-of-Value (COV) Increment field selected, the User
Assistance line shows that the number entered must be greater than
or equal to 0 to be valid for that field.
5. If an attribute shows a number of items rather than a value
(for example, [7] Items), move the cursor to the field, then
press the Enter key to open the list. The number in brackets
indicates the number of items that may be edited when that field is
opened.
Note:
After editing the items, press the F4 (Back) key to return to
the previous screen.
6. Press the F3 (Save) key.
Figure 3-13: N2 AO Object Attribute Screen
N30 Supervisory Controller User’s Manual
3-23
Commanding Objects
To command objects, the N30 device with the objects you are
commanding must be online. Therefore, you can command objects
using a VT100 or an M-Series Workstation, but not while using an
offline tool such as Project Builder.
To command objects:
1. Browse to and highlight an object.
2. Press the F2 (Command) key. The Command field appears
(Figure 3-14).
Figure 3-14: Command Field
3. Use the Spacebar and the Backspace key to cycle through the list
until the desired command appears. In this example, the Override
command is available for the Rooftop Unit N2 Binary Output
object.
4. If the desired command appears with additional parameters below
it, press the Tab key to highlight the field, and either type in the
necessary information or use the Spacebar and Backspace key to
cycle through the list of options.
5. Press Enter.
3-24
Getting Started
Displaying a Summary
To display a summary:
1. Browse to and highlight the Summary container.
2. Press the Spacebar to expand the list of Summaries.
3. Highlight a Summary.
4. Press the F2 (Command) key.
5. Use the Spacebar and Backspace keys to cycle through the list
until the Display command appears (Figure 3-15).
Figure 3-15: Summary Command Screen
6. Press Enter. The Summary Display screen appears (Figure 3-16).
N30 Supervisory Controller User’s Manual
3-25
Figure 3-16: Summary Display Screen
Printing a Summary
To print a summary:
1. Browse to and highlight the Summary container.
2. Press the Spacebar to expand the list of Summaries.
3. Highlight a Summary.
4. Press the F2 (Command) key.
5. Use the Spacebar and Backspace keys to cycle through the list
until Print appears (Figure 3-17).
6. Use the arrow keys or Tab key to highlight the Destination field.
7. Use the Spacebar and Backspace keys to cycle through the list
until the desired printer appears.
8. Press Enter.
3-26
Getting Started
Figure 3-17: Print Summary Command
N30 Supervisory Controller User’s Manual
3-27
Changing an IP Address
Notes: Before performing the following steps, have the necessary
IP Addresses available. If you do not know the IP Addresses, check
with your system administrator.
If the network uses Bootstrap Protocol (BOOTP), you can allow the
N30 to obtain its own IP address by setting its BOOTP Enabled
attribute to true and by configuring the BOOTP server to assign an
IP address. See the N30 Device (LIT-694610) chapter in the Object
Dictionary and the N30 Supervisory Controller Networking Technical
Bulletin (LIT-6891300) for more information.
To change an IP address using a VT100:
1. Browse to and highlight an N30.
2. Press Enter to open the N30 Device object. Figure 3-7 shows the
N30 Device object named South Building after it has been opened.
3. Press the F3 (Edit) key. The first of two N30 Device object
attribute screens appears (Figure 3-8).
4. Use the arrow keys to move the cursor to IP Address.
5. Press Enter. The IP Address list appears (Figure 3-18).
Figure 3-18: N30 IP Address List
3-28
Getting Started
6. Type in the address for your network in the four fields.
7. Press the F4 (Back) key.
8. Repeat steps 5 through 7 for the IP Mask and IP Router addresses.
9. Press the F3 (Save) key.
10. Press any key to continue.
11. Press the F4 (Cancel) key to return to the container hierarchy.
Note:
The status field for the device should now show
Reset Needed (Figure 3-19). The South Building N30 Device
object has just had its IP address changed.
Figure 3-19: N30 Requiring Reset
12. Press Q to quit the N30.
13. Warm start the N30 to reset.
N30 Supervisory Controller User’s Manual
3-29
Rebinding a Site
To rebind a site:
1. Browse to and highlight an N30.
2. Press Enter to open the N30 Device object.
3. Press the F2 (Command) key.
4. Use the Spacebar and Backspace key to cycle through the list until
Rebind Site appears.
5. Press Enter.
Changing Device Names
To change device names for the N30s:
1. Browse to and highlight an N30.
2. Press the Enter key to open the N30 Device Object.
3. Press the F3 (Edit) key.
4. Use the arrow keys or Tab key to highlight the Name field.
5. Type in the new device name.
6. Press the F3 (Save) key.
7. Press any key to continue.
Archiving the Current Database
Note:
The N30 automatically archives the memory database to
Flash memory just after midnight at 12:02 A.M. (00:02) and after a
download. The Archive command is provided for special
circumstances and should not be used regularly.
To archive the current database in an N30 to Flash memory:
1. After logging in, browse to and highlight an N30.
2. Press the F2 (Command) key. The Command field appears.
3. Use the Spacebar and Backspace key to cycle through the list until
Archive appears.
4. Press Enter.
Controls Group
507 E. Michigan Street
P.O. Box 423
Milwaukee, WI 53201
www.johnsoncontrols.com
Printed in U.S.A.