1
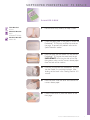
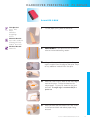
REBINDING MANUAL
2
T O O L S A N D M AT E R I A L S
3
T I P S B E F O R E YO U B E G I N
SOFTCOVER
4
SOFTCOVER PERFECTBACK™ PS REPAIR
For paperbacks where the cover is in good reusable condition
6
S O F TC O V E R TA P E R E PA I R
For highly damaged paperbacks where the cover is unusable
7
V E RY W I D E S O F TC O V E R R E PA I R
For softcover books wider than 11/2 inches
HAR D C O V E R
10
HARDCOVER PERFECTBACK™ PS REPAIR
For hardcover books where the cover is in good reusable condition
12
H A R D C O V E R TA P E R E PA I R
For hardcover books where the cover’s spine material is unusable
13
V E RY W I D E H A R D C O V E R R E PA I R
For hardcover books wider than 11/2 inches
16
TIPS ON PRINTING
17
S P E C I A L AT T E N T I O N
T O O L S A N D M AT E R I A L S
Tools Needed:
Marker/Pen
Straight Edge
Scissors
X-acto® Knife
Heavy Duty Stapler
Rasper
Materials Needed:
Fastback® Clear Liners
Super Strips™ (N,M,W) and/or Comp Strips™ (N,M,W)
Perfectback™ PS Strips (N,M,W)
Regular Paper and/or Small Pieces of Cardboard
Cover Material
Machines Needed:
Model 15xs
Optional Machines:
Powis Printer®
Foilfast® Printer
Cutter
P O W I S PA R K E R R E B I N D I N G M A N U A L
2
TIPS BEFORE YOU BEGIN
The Fastback® Rebinding system is an excellent method to use for
the functional rebinding of a wide variety of books. This method
offers a professional quality rebind, which is in many cases stronger
than the original binding. The Fastback® rebinding system is not
designed for the restoration of fine books. A bookbinding professional should be employed for fine book restoration.
Before you begin, here are tips for a successful rebind.
When placing a book into the Model 15xs, make sure the lowered number
pages are always facing toward you.
Always jog the pages until they are even.
When cutting a strip to the length of the book, always cut the right side of the
strip while lining the left edge of the strip with the left edge of the book.
If you cut a strip to size, the Powis Printer® will automatically center all three
zones on the new strip length.
Always insert the uncut end of the strip first.
When cutting a Perfectback™ PS strip, ensure the narrow release paper faces the
back of the machine.
When using Clear Liners, make sure the release paper faces outward and the
glossy side faces the book.
When cutting the Clear Liners to size, the clear edge should be positioned next
to the spine.
When inserting the book into the binder, the Clear Liner should be even with
the spine, and not and folded under as shown below.
For any of the following scenarios refer to the Special Attention section.
The spine fans out.
The spine is curved.
Book length is shorter than 81/4"
P O W I S PA R K E R R E B I N D I N G M A N U A L
3
S O F T C O V E R P E R F E C T B A C K ™ P S R E PA I R
DAMAGED BOOK
Tools Needed:
Scissors
1
Peel the cover away carefully to keep it intact
2
Check the book gutter. If the gutter is narrow, the
Perfectback™ PS Strip may overlap the words on
the page. To prevent this problem refer to the
Special Attention section.
3
Place the book into the Model 15xs and cut the
Perfectback™ PS Strip to the exact book length.
IMPORTANT: With the glue side of the strip
facing down, make sure the narrow release paper
faces the back of the machine
4
Insert the uncut end of the Perfectback™ PS Strip
into the Model 15xs and bind the book. After
binding, set the book in the Cooling Rack for 3–5
minutes.
5
Place the book inside the cover and remove the
narrow release paper.
6
Fold the front cover in place and adhere to the
front page.
Materials Needed:
Paper
Perfectback™ PS Strip
Machines Needed:
Model 15xs
P O W I S PA R K E R R E B I N D I N G M A N U A L
4
7
Flip the book over and remove the wide release
paper.
8
Adhere the cover to the spine and the back of
the book.
REBOUND BOOK
P O W I S PA R K E R R E B I N D I N G M A N U A L
5
S O F T C O V E R TA P E R E PA I R
DAMAGED BOOK
Tools Needed:
Marker/Pen
Straight Edge
Scissors
Materials Needed:
Cover Material
Super Strip™ or
Comp Strip™
1
Peel the cover away from the spine.
2
Optional Step: For creating cover designs, refer
to tips on printing.
3
Outline the book on the cover material. Cut 2
full sheets to size for the front and back. A straight
edge is recommended for a precise cut.
4
Place the book into the Model 15xs and cut the
strip to the exact book length.
If the book is shorter than 81/4" in length, refer to
the Special Attention section.
5
For creating spine titles, refer to tips on printing.
6
Bind the book using Super Strip™ or Comp Strip™.
After binding, set the book in the Cooling Rack
for 3–5 minutes.
Machines Needed:
Model 15xs
PowisPrinter®
Foilfast® Printer
REBOUND BOOK
P O W I S PA R K E R R E B I N D I N G M A N U A L
6
V E R Y W I D E S O F T C O V E R R E PA I R
DAMAGED BOOK
Tools Needed:
X-acto® Knife
Marker/Pen
Scissors
Straight Edge
Materials Needed:
Clear Liners
Perfectback PS™ Strip
1
Carefully peel the cover off the book block.
2
Split the book into narrow, medium, or wide size
blocks.
3
Place the Clear Liner on book so the clear edge is
next to the spine. Outline the book on the
release paper. Cut two full sheets for the front
and back. A straight edge is recommended for a
precise cut.
4
Front block: Insert the front block into the
binder with the lower numbered pages in front.
Place the Clear Liner in the front of the block
with the release paper faces outward.
NOTE: Cut the Perfectback™ PS Strip to the exact
book length for all the blocks.
5
Cut the Perfectback™ PS Strip to the exact length
of the book. IMPORTANT: With the glue side
of the strip facing down, make sure the narrow
release paper faces the back of the machine.
Machines Needed:
Model 15xs
clear edge
release paper
faces outward
P O W I S PA R K E R R E B I N D I N G M A N U A L
7
6
Insert the uncut end of the strip into the Model
15xs and bind the book. After binding, set the
block in the cooling rack for 3–5 minutes.
7
Middle blocks: Insert the middle blocks into
the binder with the lower numbered pages in
front. Bind without any Clear Liners. Set block in
Cooling Rack for 3-5 minutes.
8
Back block: Insert the back block into the
binder with the lower numbered pages in front.
Place a Clear Liner in the back of the block.
Ensure the release paper faces outward. After
binding, set block in Cooling Rack for 3–5 minutes.
9
Peel off the release paper from all the blocks.
10
Adhere the blocks together in sequential order.
11
Carefully place the blocks inside the cover.
Adhere the spine first then close the covers to
adhere the front and back.
release paper
faces outward
P O W I S PA R K E R R E B I N D I N G M A N U A L
8
12
Peel off the Clear Liner release paper and close
the front cover. Repeat these steps to adhere the
back inside cover.
REBOUND BOOK
P O W I S PA R K E R R E B I N D I N G M A N U A L
9
H A R D C O V E R P E R F E C T B A C K ™ P S R E PA I R
DAMAGED BOOK
Tools Needed:
X-acto® Knife
Rasper
Marker/Pen
Straight Edge
Scissors
1
Cut the paper joining book to the cover.
2
IMPORTANT: If the spine fans out (as shown),
refer to the troubleshooting section.
3
Using an X-acto® knife or scissors, cut off any
excess material from the edge of the spine. Rasp
off any additional material from the spine.
4
Place the Clear Liner on book so the clear edge is
next to the spine. Outline the book on the
release paper. Cut two full sheets for the front
and back. A straight edge is recommended for a
precise cut.
5
Place the block into the binder with Clear Liners
in the front and back and release paper facing
outward.
Materials Needed:
Paper and/or cardboard
Perfectback PS™ Strip
Fastback® Clear Liners
Machines Needed:
Model 15xs
clear edge
release paper
faces outward
P O W I S PA R K E R R E B I N D I N G M A N U A L
10
6
Cut the Perfectback™ PS Strip to the exact length
of the book. IMPORTANT: With the glue side
of the strip facing down, make sure the narrow
release paper faces the back of the machine.
7
Insert the uncut end of the strip into the Model
15xs and bind the book. After binding, set the
book in the cooling rack for a 3–5 minutes.
8
Place the book inside the cover and remove the
narrow release paper on the spine. Fold the front
cover in place and adhere to the front page.
9
Flip the book over and remove the wide release
paper. Adhere the spine and back cover to the
block.
10
Peel off the Clear Liner release paper and close
the front cover. Repeat these steps to adhere the
back inside cover.
REBOUND BOOK
P O W I S PA R K E R R E B I N D I N G M A N U A L
11
H A R D C O V E R TA P E B I N D I N G R E PA I R
DAMAGED BOOK
Tools Needed:
X-acto® Knife
Rasper
Scissors
1
Peel the spine off the book. Remove the front and
back cover. Using an X-acto® knife and a Rasper,
remove any excess material from the spine.
2
Place the book into the Model 15xs and cut the
strip to the exact book length.
3
Optional Step: For creating spine titles, refer to
the Tips on Printing Section.
4
Bind the hardcover book with the Fastback®
Model 15xs using either a Super Strip™ or Comp
Strip™. After binding, set the book in the cooling
rack for 3–5 minutes.
Materials Needed:
Super Strip™ or Comp
Strip™
Machines Needed:
Powis Printer®
Model 15xs
REBOUND BOOK
P O W I S PA R K E R R E B I N D I N G M A N U A L
12
V E R Y W I D E H A R D C O V E R R E PA I R
DAMAGED BOOK
Tools Needed:
X-acto® Knife
Rasper
Paper and/or Cardboard
Materials Needed:
Clear Liner
Paper and/or cardboard
Perfectback™ PS strip
1
Cut the paper joining the book to the hard cover.
2
Split the book into narrow, medium, or wide
range blocks.
3
IMPORTANT: If the spine fans out (as shown),
refer to the Special Attention section.
4
Using an X-acto® knife or scissors, cut off any
excess material from the edge of the spine. Rasp
off any additional material from the spine.
5
Place the Clear Liner on the book so that the
clear edge is next to the spine. Outline the book
on the release paper. Cut two full sheets for the
front and back. A straight edge is recommended for
a precise cut.
Machines Needed:
Model 15xs
clear edge
P O W I S PA R K E R R E B I N D I N G M A N U A L
13
6
Front block: Insert the front block into the
binder with the lower numbered pages in front.
Place the Clear Liner in the front of the block so
the release paper faces outward.
7
Cut the Perfectback™ PS Strip to the exact length
of the book. IMPORTANT: With the glue side
of the strip facing down, ensure the narrow release
paper points towards the back of the machine.
NOTE: Cut the Perfectback™ PS Strip to the exact
book length for all the blocks.
8
Insert the uncut end of the strip into the machine
and bind the book. After binding, set the block in
the cooling rack for 3–5 minutes.
9
Middle blocks: Insert the middle blocks into the
binder with the lower numbered pages in front.
Bind without any release paper. Set the block in
the cooling rack for 3–5 minutes.
10
Back block: Insert the back block into the
binder with the lower numbered pages in front.
Place a Clear Liner in the back of the block.
Ensure the release paper faces outward. Bind and
set in cooling rack for 3–5 minutes.
11
Peel off the release paper from all the blocks.
release paper
faces outward
release paper
faces outward
P O W I S PA R K E R R E B I N D I N G M A N U A L
14
12
Adhere the blocks together in sequential order.
13
Carefully place the blocks inside the cover.
Adhere the spine first, then close the covers to
adhere the front and back.
14
Peel off the Clear Liner release paper and close
the cover. Repeat these steps to adhere the back
inside cover.
REBOUND BOOK
P O W I S PA R K E R R E B I N D I N G M A N U A L
15
TIPS ON PRINTING
Using the Foilfast® Printer: If the covers on your
book are highly damaged, you can design a new cover
with the Foilfast® Printer.
After printing the cover, position it on the book and cut
to size. Consult the Powis Printer® User’s Manual for
detailed printing techniques.
Using the Powis Printer®: To print titles or logos
onto the spine, first cut the strip to the length of the
book.Then design the strip using the Powis Printer®.The
Powis Printer® is designed to reconfigure itself and
center all three zones onto the new strip length.
IMPORTANT: The minimum strip length the Powis
Printer® accepts is 81/4". For detailed instructions on the
various printing techniques, consult the Powis Printer®’s
User’s Manual.
P O W I S PA R K E R R E B I N D I N G M A N U A L
16
S P E C I A L AT T E N T I O N
CHOOSING THE CORRECT STRIP
Checking the book thickness: If you’re unsure
which strip width, insert book into binder and press
the BIND button. Book thickness will be displayed on
the LCD panel. Press the OPEN button to remove
the book.
BIND button
A note on checking book thickness: Insert the
book in the desired binding position.
If binding with Super Strip™ or Comp Strip™, insert the
front and back covers.This applies to both hardcover
and softcover.
OPEN button
If binding with Perfectback™ PS Strip, do not include the
original covers.
book thickness
Reusing the spine on hardcover or paperback
rebinding: If you want to reuse the entire cover, bind
with Perfectback™ PS Strip.
Rebinding hardcover or paperback with the
spine material missing: If binding a book with only
the front and back covers, bind with Superstrip™ or
Comp™ Strip.
Do not bind with Perfectback™ PS Strip.
P O W I S PA R K E R R E B I N D I N G M A N U A L
17
CLEANING THE MODEL 15XS
Expect a minimal amount of glue leakage on the heater
when binding books that already have glue on the spine.
Refer to the Model 15xs Operating Manual for the
binding cleaning procedures.
EVENING OUT THE SPINE
If the spine fans out, the strip will not properly adhere
to the front and back of the book.
To correct this problem, insert sheets of paper or a
piece of cardboard inside the first few pages in the
front and back until the book block is straight. Ensure
the paper or cardboard is pressed deeply into the book.
REBINDING A BOOK SHORTER
T H A N 8 1/ 4"
If the book is shorter than 81/4", do not cut the strip to
the length of the book. Instead, cut the strip to an 81/4"
length and bind the book. After the book has cooled,
cut off the excess binderstrip.
P O W I S PA R K E R R E B I N D I N G M A N U A L
18
PROTECTING THE BOOK GUTTER
The book gutter is the blank space between facing pages.
book gutter
For narrow, medium, and wide sized books
If the gutter is very narrow, the Perfectback™ PS Strip
may overlap the words on the page. To prevent this
problem place one sheet of paper in the front of the
book and one sheet of paper in the back.
After binding, cut off the sheets of paper using scissors
without cutting the strip.
For oversized books
Front blocks: Protect the gutter by placing a sheet of
paper in the back of the book. Place the Clear Liner in
front.
Middle blocks: Place a sheet of paper in the front and
in the back.
Back blocks: Place a sheet of paper in the front of
the book. Place the Clear Liner in back.
Cut the sheets of paper away after combining the
blocks without cutting the strip.
P O W I S PA R K E R R E B I N D I N G M A N U A L
19
USING A CUTTER ON A BOOK WITH
L O O S E PA G E S
If the book has loose pages, we recommend using a
cutter to remove a small sliver off the spine. This step is
helpful when binding a “signature” bound book or if
there is excess glue on the spine. In either case, the glue
on the binderstrip will not penetrate deeply enough to
hold the pages in place.
Prior to cutting off a small sliver, jog the loose pages
until they are even. Cut a small section off the spine
and continue the rebinding procedure.
signature binding
Signature binding: A type of binding where the text
is printed on large sheets of paper that are folded,
gathered together in “signatures”, and trimmed to the
size of the book.
REBINDING A CURVED SPINE
If the book has a curved spine you can do a variety of
things to ensure you get the strongest bind possible.
First, press down on the book to try to manually flatten
out the spine.
If you cannot manually flatten the spine, you can either
split the book into multiple sections or cut a small sliver
off the spine.
After you split the book into multiple sections, gather
the sections together in sequential order and jog the
pages until they are even. Continue with the rebinding
procedure.
P O W I S PA R K E R R E B I N D I N G M A N U A L
20
REBINDING A BOOK WITH GLOSSY
PA P E R
Certain types of glossy paper do not bind well with the
Super Strip™ or the Perfectback™ PS Strips. If you
rebind a book with glossy paper, we recommended you
do not cut the spine off.
Leave the original glue in tact and staple the book
together using a heavy duty industrial stapler.
If the book is very thick, you may have to staple the
book in multiple sections and bind as if it were an
oversized book.
P O W I S PA R K E R R E B I N D I N G M A N U A L
21