1
Screen Adjustment for 120V Screens
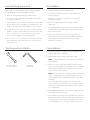
If your Tensioned Advantage Electrol was ordered as a complete unit, the up and down limits were pre-set by Da-Lite. If your screen and
roller assembly was ordered separately from the case, or if general adjustment is needed, please follow the steps below and refer to the
120V Wiring Diagram.
1. Locate the wall switch and remove the cover plate from the
wall switch and remove the switch from the junction box.
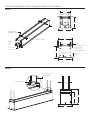
2. Locate the two tactile buttons on the back of the switch.
They are black round buttons on silver plates. See 120V
Wiring Diagram.
3. To adjust the down limit switch, press and hold the down
tactile button until the LED on the back of the switch turns
solid red. This will put the motor in limit set mode. Turn the
wall switch over and use the down button on the front of the
switch. Press and hold the down button until the desired
down position is reached. If you travel too far down, press the
up button to move the screen upward. If you press and let go
of either the up or down buttons, the motor will do a small
jog in that direction for fine adjustment of the screen. Once
the desired position is reached, turn the switch over; press
and hold the down tactile button until the LED on back of
switch blinks red twice. The down limit is now set.
changes will be saved. If this occurs, return to step 3 for down
limit adjustment or step 4 for up limit adjustment.
4. To adjust the up limit switch, press and hold the up tactile
button until the LED on the back of the switch turns solid
green. This will put the motor in limit set mode. Turn the wall
switch over and use the up button on the front of the switch.
Press and hold the up button until the desired up position is
reached. If you travel too far up, press the down button to
move the screen downward. If you press and let go of either
the up or down buttons, the motor will do a small jog in that
direction for fine adjustment of the screen. Once the desired
position is reached, turn the switch over; press and hold the
up tactile button until the LED on back of switch blinks green
twice. The up limit is now set.
CAUTION: Adjusting the down limit switch for less drop
by more than 6" can cause the screen surface to lose
proper tensioning.
CAUTION: Do not adjust for more drop than what was
ordered. At least 1–1/2 wraps of fabric must remain on
the roller. This screen comes standard with 12" black
at the top.
ATTENTION! N'effectuez pas de réglage pour obtenir un
déroulement supérieur à celui commandé. Au moins 1 à
1/2 tour de toile doit être maintenu sur le cylindre. Ce
écran est doté de série d'une bande noire supérieure de
30,5 cm (12 po).
ATTENTION! LE FAIT D'AJOUTER NE DÉROULEZ PAS
TROP L'ÉCRAN PLUS DE 15 CM (6PO) AUX
INTERRUPTEURS DE FIN DE COURSE PEUT FAIRE
PERDRE LA BONNE TENSION À LA SURFACE DE L'ÉCRAN.
5. To test the limit switch settings, press and release the up or
down buttons on the switch to operate the screen.
6. Replace the switch and cover plate on the wall.
NOTE: If the screen is in limit set mode and no buttons are
pushed for 20 seconds, the LED on the back of the wall
switch will turn off, the motor will return to run mode and no
IMPORTANT NOTE: The wall switch is REQUIRED to make
any limit switch adjustments, even if a third party control
system is used. Therefore, it is advised to wire the switch or
provide a 3-conductor connection that is accessible.
Screen Adjustment for 220V/240V Screens
C AUTION: Adjusting the down limit switch for less drop
by more than 6” can cause the screen surface to lose
proper tensioning.
1. Remove the cover plate from the 3-button wall switch and
remove the switch from the junction box.
2. Locate small 3-position switch on back of wall switch. See
Figure 5 for 120V screens or Figure 8 for 220/240V screens.
3. To adjust the down limit switch, slide the 3-position switch to
the down position. Press and hold the down button to run the
screen down to the desired stop position. Release the button
to stop the screen. DO NOT PUSH THE STOP BUTTON.
CAUTION: Do not adjust for more drop than what was
ordered. At least 1–1/2 wraps of fabric must remain on the
roller. This screen comes standard with 12" black at the
top. See the specification data sheet for details.
ATTENTION! N'effectuez pas de réglage pour obtenir un
déroulement supérieur à celui commandé. Au moins 1 à
1/2 tour de toile doit être maintenu sur le cylindre. Ce
écran est doté de série d'une bande noire supérieure de
30,5 cm (12 po).
4. When the screen is in the desired down position, slide the
3-position switch to the off (center) position. The down limit
switch is now set.
5. To adjust the up limit switch, slide the 3-position switch to the
up position. Press and hold the up button to run the screen
up to the desired stop position. Release the button to stop
the screen. DO NOT PUSH THE STOP BUTTON.
ATTENTION! Le fait d'ajouter ne déroulez pas trop l'écran
plus de 15 cm (6po) aux interrupteurs de fin de course
peut faire perdre la bonne tension à la surface de l'écran.
6. When the screen is in the desired up position, slide the
3-position switch to the off (center) position. The up limit
switch is now set.
7. To test limit switch setting, make sure the 3-position switch is
in the off (center) position. Press and release the up or down
button on the wall switch to operate the screen.
8. Replace switch and cover plate on the wall.
NOTE: If stop button is pressed, the wall switch will reverse
direction. To correct this, press the stop button again. This will
reset the switch. You will have to re-set both the up and the
down limit settings.
IMPORTANT NOTE: The wall switch is REQUIRED to make
any limit switch adjustments, EVEN if a third party control
system is used. Therefore, it is advised to wire the switch or
provide a 4-conductor connection that is accessible.
5